Using Statements for Evaluation and Calculation in a Rule
The section discusses how to:
Activate and move Statements within a Rule.
Apply Rule concepts and add Statements to a Rule.
|
Page Name |
Definition Name |
Navigation |
Usage |
|---|---|---|---|
|
Select a Statement |
SCC_RULE_STMT_SEC |
On the Define Rule page, click the Details icon on a blank row in the Evaluations and Calculations group box. |
Select a Statement to add to a Rule. |
|
Define If Statement |
SCC_RULE_IF_SEC |
On the Select a Statement page, select IF. |
Select an If Statement for a Rule. |
|
Define Else Statement |
SCC_RULE_ELSE_SEC |
On the Select a Statement page, select ELSE. |
Select an Else Statement for a Rule. |
|
Define For-Each Statement |
SCC_RULE_FOR_SEC |
On the Select a Statement page, select FOR EACH. |
Select a For-Each Statement for generic loop processing for a Rule. |
|
Exit For-Each Statement |
SCC_RULE_EXTF_SEC |
On the Select a Statement page, select EXIT FOR EACH. |
Select to exit a For-Each loop. |
|
Define Assignment Statement |
SCC_RULE_ASGN_SEC |
On the Select a Statement page, select ASSIGN. |
Select an Assignment Statement to assign data to an object. |
|
Define Call Statement |
SCC_RULE_CALL_SEC |
On the Select a Statement page, select CALL. |
Select a Call Statement to call a Rule. |
|
Exit Rule Statement |
SCC_RULE_EXTR_SEC |
On the Select a Statement page, select EXIT RULE. |
Insert to exit a Rule. |
|
Create Entity |
SCC_RULE_CREN_SEC |
On the Select a Statement page, select CREATE ENTITY. |
Create an Entity within a Rule. |
|
Call Dynamic Rule Group |
SCC_RULE_DYNR_SEC |
On the Select a Statement page, select CALL DYNAMIC RULE GROUP. |
Insert to call a dynamic Rule Group. |
|
Define Add To List Statement |
SCC_RULE_LADD_SEC |
On the Select a Statement page, select ADD TO LIST. |
Select an Add to List Statement to add a value to a list in a Rule. |
|
Define Length of List Statement |
SCC_RULE_LENL_SEC |
On the Select a Statement page, select LENGTH OF LIST. |
Select a Length of List Statement to return the length of a list in a Rule. |
|
Define Sort List Statement |
SCC_RULE_SRTL_SEC |
On the Select a Statement page, select SORT LIST. |
Define an Sort List Statement to sort a list for a Rule. |
|
Define Clear List Statement |
SCC_RULE_LCLR_SEC |
On the Select a Statement page, select CLEAR LIST. |
Select a Clear List Statement to reset a List variable to empty in a Rule. |
|
Write to Log Statement |
SCC_RULE_WLOG_SEC |
On the Select a Statement page, select WRITE TO LOG |
Select a WRITE TO LOG statement to log the contents of variables. |
You can use delivered Rules Engine Statements in the Rules Engine Manager Evaluations and Calculations grid to set up evaluative logic for your business Rules or Functions. Available Statements can be used to perform a specific task in the Rule you have created.
Access the Select a Statement page (click the Details icon on the left side of an empty row in the Evaluations and Calculations grid).
Image: Delivered Statements
This example illustrates the fields and controls on the Delivered Statements. You can find definitions for the fields and controls later on this page.
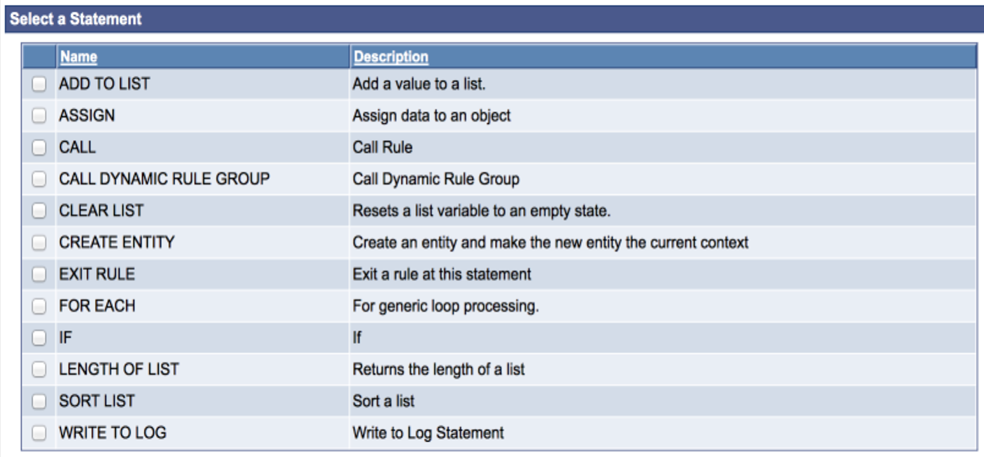
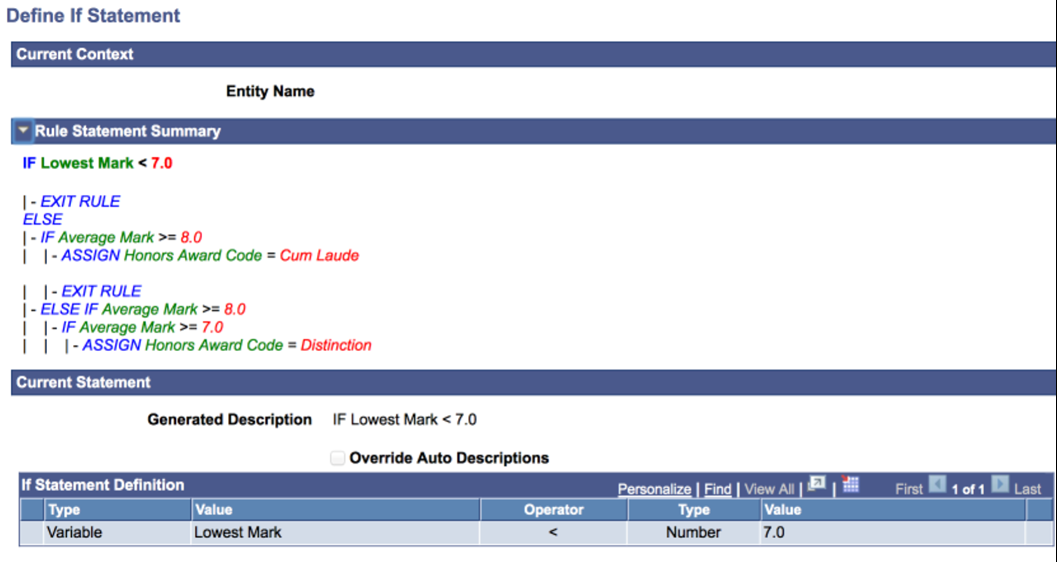
When you select a Statement, a Define Statement page opens. Each Statement has a Define Statement page created specifically for that Statement. Although each Define Statement page is different, there are common fields and elements shared by all Statements. Each Define Statement page for each delivered Statement is explained below, but, first, to illustrate the common attributes of the Statement, access the Define If Statement page (select the check box next to the IF Statement Name on the Select a Statement page).
Image: Example of Common Statement Attributes on a Statement Page
This example illustrates the fields and controls on the Example of Common Statement Attributes on a Statement page.. You can find definitions for the fields and controls later on this page.
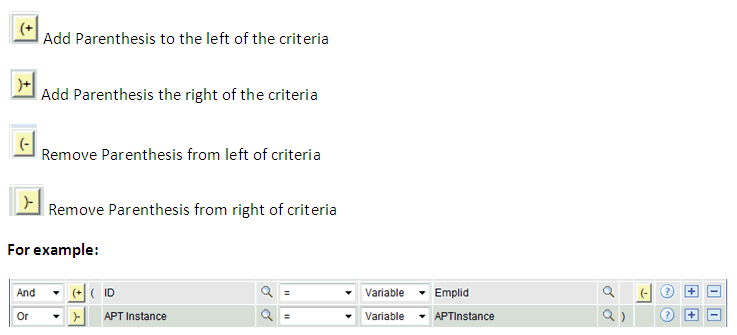
Connectors and Parentheses
Use the AND/OR connectors and parenthesis to create complex (nested) Statement definitions.
Image: Example of Connectors and Parentheses
This example illustrates the fields and controls on the Example of Connectors and Parentheses. You can find definitions for the fields and controls later on this page.
Current Context
Displays the Current Context of the Statement. The Current Context provides information about the current Entity you are working with when you have a Rule that accesses multiple layers in a Data Hierarchy represented by the Base Entity. You always have access to properties from the Current Context and the immediate Parent. For example, when working with the Academic Progress Tracker (APT) using System Data only, your Current Context could be one of the following:
Image: Example of Academic Progress Tracker Entity Hierarchy
This example illustrates the fields and controls on the Example of Academic Progress Tracker Entity Hierarchy. You can find definitions for the fields and controls later on this page.
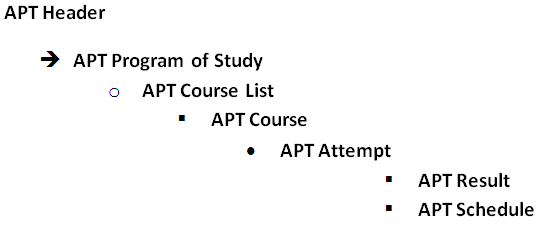
In our example, the context is set to APT Header which means that we are able to use as data, within our IF Statement, all properties from the APT Header. If our current context had been APT Program of Study we would have been able to use all properties from the APT Program of study as well as the APT Header.
Rule Statement Summary
Displays a summary of the entire evaluative statement. The view is shown in color. Bold type indicates which Statement you are currently working with.
If you have not yet added a Statement, this is shown as "Current New Row".
Current Statement
Displays the short description of the Current Statement you are working with as well as the options for this Statement.
Override Auto Description
Select the Override Auto Description check box to override the Generated Description and provide your own using a Rich Text Editor.
Each delivered Statement contains Statement-specific features; as described below with examples.
IF Statements
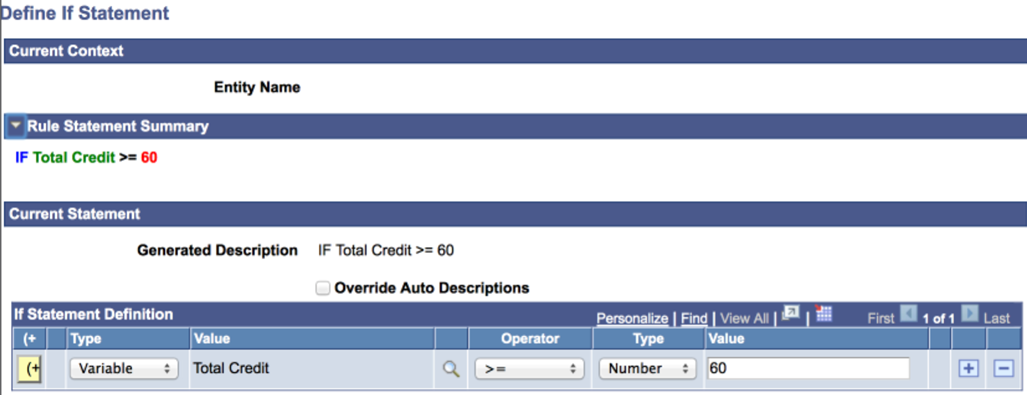
Use this statement to create evaluative Statements in your business rule. This is an encompassing statement; meaning that within the context of this statement, you can use other statements.
This example evaluates whether or not a student has achieved a sum of credits higher than 60 in Year 1 of his program. If the condition is met, the student may progress to Year 2.
Image: Example of IF Statement before Saving
This example illustrates the fields and controls on the Example of IF Statement before Saving. You can find definitions for the fields and controls later on this page.
The possible combinations of Objects and Types in IF Statements are:
|
Type |
Object |
Operator |
Type |
Value |
|---|---|---|---|---|
|
Property or Data Set Property (DS Prop) or Variable |
Prompts on Properties or Prompts on Variables |
> < >= <= = Like Not like |
Variable or Text (String Property) or Number (Number Property or Number Variable) or Date(time) or Data Set Property |
Prompt on Variable which matches a Data Set Property or Variable Type. or Text entry in an open field if Type is Text. or Numeric entry in open field if a Variable is numeric. or Date(time) in an open field if a Data Set Property or Variable is Date(time). or Prompt on Data Set Property which matches Property or Variable Type |
|
Property or Data Set Property (DS Prop) or Variable |
Prompts on Data Set Properties or Variables |
In Not in |
Variable |
List Variable |
|
Property or Data Set Property (DS Prop) or Variable |
Prompts on Data Set Properties or Variables |
Exists Not exists |
no value |
no value |
The saved IF Statement looks like this:
Image: Example of IF Statement After Saving
This example illustrates the fields and controls on the Example of IF Statement After Saving. You can find definitions for the fields and controls later on this page.

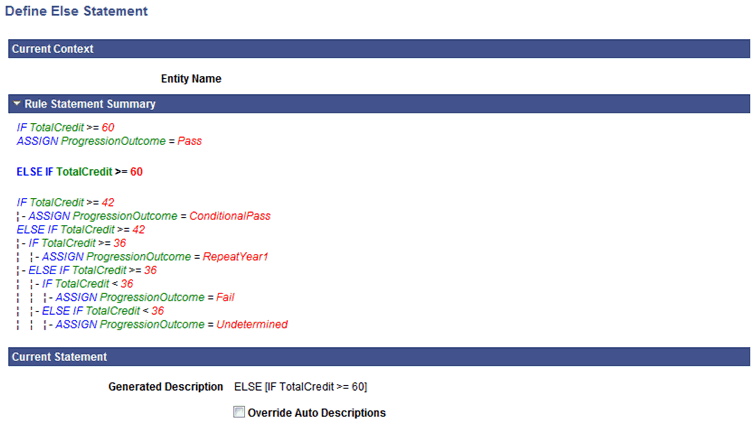
ELSE Statements
Combine ELSE statements with IF statements to create complex evaluative business Logic. This statement can only exist in the context of an IF statement. The ELSE statement page itself offers no features besides the possibility to override the auto-generated text.
Note: If you do not already have an IF statement in your Rule, the ELSE statement is not shown as an option on the Select a Statement page.
This example evaluates whether or not a student has achieved a sum of credits higher than 60 in Year 1 of his program. If the condition is met, the student may progress to Year 2. However, if the student has less than 60 credits but greater than 40 credits, this student may need to repeat courses from Year 1.
Image: Define ELSE Statement page
This example illustrates the fields and controls on the Define ELSE Statement page. You can find definitions for the fields and controls later on this page.
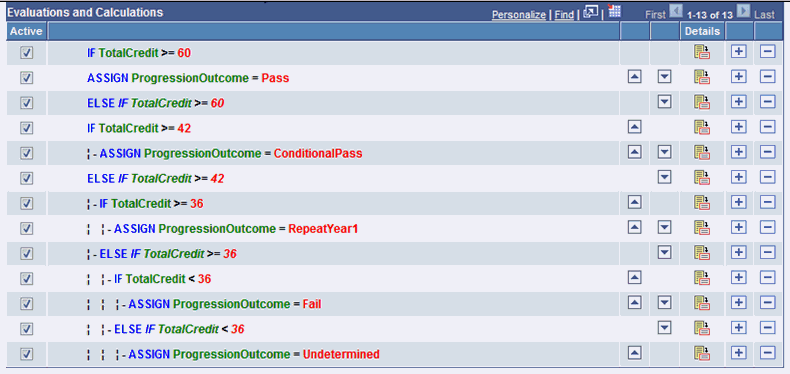
Here is an example of how an Evaluative Statement can be created combining IF and ELSE statements:
Image: Example of IF and ELSE Statements Used Together
This example illustrates the fields and controls on the Example of IF and ELSE Statements Used Together. You can find definitions for the fields and controls later on this page.
FOR EACH Statements
Use this statement to scroll through a set of elements which has been retrieved into the Rule. These elements can be Entities retrieved in the context of a Rule or Variables from a list of Variables. The FOR-EACH statement is an encompassing statement; meaning you can use other statements within the context of the FOR-EACH.
For example, to scroll through the Academic Progress Tracker entity to retrieve all courses in a program, select a FOR-EACH statement:
Image: Define FOR-EACH Statement page
This example illustrates the fields and controls on the Define FOR-EACH Statement page. You can find definitions for the fields and controls later on this page.
Statement-specific fields on this page are:
|
Field or Control |
Definition |
|---|---|
| Entity Processing |
Select this option to activate the Entity Name prompt and Process Immediate Children Only check box. |
| List Variable (list variable radio button) |
Select this option to activate the List Variable prompt. |
| Entity Name |
Select an Entity. |
| List Variable (list variable field) |
Select a List Variable. |
| Process Immediate Children Only |
Select this check box to process only immediate child records of the selected Entity. This means only a direct child record of the Entity is used in the process; not grand children of great-grand children in the same Entity structure. |
For example, you want to evaluate whether a student has achieved a sum of credits higher than 60 in Year 1 of his program of study in order to progress to Year 2. To calculate the overall credit total, you must first retrieve all courses for Year 1 and sum the credits of each course. First, you retrieve Year 1 for the student, and then you use a FOR EACH (course) statement to loop through all courses and retrieve the credits.
Since the Courses in Year 1 may be part of a Course List or a Requirement and not an immediate child of the Year, you do not want to select the "Process Immediate Children Only" option. However, if you wanted to make sure that you only process immediate children of the Year, you do want to select this option.
EXIT FOR EACH Statement
The EXIT FOR EACH statement is only available in the context of a FOR EACH statement. Use this statement to exit scrolling through a set of elements which has been retrieved into the Rule. These elements can be Entities retrieved in the context of a Rule or Variables from a list of Variables.
For example, you want to evaluate whether a student completed Course Math 101 in Year 1 of his program of study. If the condition is met, the student may progress to Year 2. When the condition has been met (Math 101 course has been found), there is no need to retrieve other Courses from the system. The EXIT FOR EACH can be used to exit the for each loop at this time.
ASSIGN Statements
Use this statement to assign values to Variables or Properties in your Rule
For example, to assign Credit = 2 to Variable Credit, select the ASSIGN statement from the Select a Statement page:
Image: Define Assignment Statement page
This example illustrates the fields and controls on the Define Assignment Statement page. You can find definitions for the fields and controls later on this page.
The possible combinations of Objects and Types in ASSIGN Statements are:
|
Type |
Object |
Operator |
Type |
Value |
|---|---|---|---|---|
|
Property or Data Set Property (DS Prop) or Variable |
Prompts on Properties or Prompts on Variables |
= |
Variable or Text (String Property or Number (Number Property or Number Variable) or Date(time) or Data Set Property |
Prompt on Variable which matches Data Set Property Type or Variable Type. or Text entry in open field if Type is Text. or Numeric entry in open field if Data Set Property or Variable is numeric. or Date(time) in open field if Data Set Property or variable type is Date(time). or Prompt on Data Set Property which matches Property or Variable Type. |
CALL Statements
Use this statement to call a Function or Rule from within the current Function or Rule. The current Rule is the Calling Rule. The Function or Rule called executes a piece of business logic in the context of the Calling Rule.
When you call a Rule, you need to pass all Criteria for that Rule as input to that Rule otherwise the correct data cannot be selected.
When you call a Function which uses Entity Data, you do not need to provide Criteria to find the correct data. That data is passed to the called Function automatically through Contextual Referencing.
In this example, a student is evaluated to see if he has achieved a sum of credits greater than 60 in Year 1 of his program of study 1. If that condition is met, the student may progress to Year 2. In order to obtain the student's credit total, you must first to retrieve all courses for Year 1 and sum the credit result by retrieving each course to obtain the overall sum of credit. This is done using a FOR EACH statement that retrieves Year 1 and loops through all Courses and retrieves credits. This uses an Add math Function to add Course Credits to a variable, SumCredit. At the end of the FOR EACH loop, the total number of credits for all courses in Year 1 is counted. Here is a similar example of the Add Function Add being called from a Rule:
Image: Define Call Statement page
This example illustrates the fields and controls on the Define Call Statement page. You can find definitions for the fields and controls later on this page.
These are the Call Statement-Specific fields:
|
Field or Control |
Definition |
|---|---|
| Rule Category |
Select a valid Rule Category from which to retrieve the Function you want to use. The Rule Category available must be one of the valid categories on the Rule Category Definition page. |
| Rule Name |
Click the Search icon to the right of the Rule Name to open the Rules Engine Search page and select a Rule. Click the Go To icon to the right of the Rule Name to open a new page that displays information on Rule Definition, Version History, and Cross Reference. |
| Inputs |
Select an Argument and Type for each Object. This is required so that all Input can be passed from the Calling Rule to the Called Function. The arguments are the Input Variables that have been defined in the Called Function. The Operator field is restricted to only show the Equals to operator. The Type is restricted to the Type that is assigned to the Argument. |
| Outputs |
Select a Type and Object for each Output. The Return represents the Variable(s) that has been defined as Output Variable in the called Function. The Type is restricted to the Type that is assigned to the Argument. |
EXIT RULE Statement
Use this statement to exit a Rule or Function in its entirety. The outcome for this Rule would be to process to success.
For example, to find out whether a student completed Course Math 101 in Year 1 of his program of study, you can create a Rule to retrieve only that information. If you have use a FOR EACH statement in the Called Rule to scroll through all of the courses in Year 1, you can use an EXIT RULE statement to exit the FOR EACH loop and the Rule entirely once the condition has been met.
CREATE ENTITY Statement
Use this statement to create an Entity. After the Entity is created, the user is transferred to the context of the created Entity and all Entity properties are available.
You can only create an Entity in the context of a parent Entity. For example, when in the context of APT Course, you can create Entity APT Attempt, and when working in the context of APT Attempt, you can create and APT Result Entity or APT Schedule Entity.
Image: Example of APT Header Hierarchy
This example illustrates the fields and controls on the Example of APT Header Hierarchy. You can find definitions for the fields and controls later on this page.
When the Entity is created, it does not yet exist in the database. The CREATE ENTITY statement can be used together with the delivered Function Save Entity to insert new rows into database tables.
Note: You can only create an Entity as a child within the Entity of the Current Context.
The following Functions can be used after having changed an entity or after having created an entity:
|
Function |
Function Description |
|---|---|
|
SaveEntity |
Saves the Current Entity in context and all of its children. Performs all validation and pre-save logic and deletes any entities marked for deletion. |
|
SaveAllEntities |
Saves all the Entities in context and all of their children. Performs all validation and pre-save logic and deletes any entities marked for deletion. |
|
DeleteEntity |
Marks the Current Entity and all of its children for deletion. SaveEntity Function must be called to actually delete the Entity. |
|
UndeleteEntity |
Marks the Current Entity and all of its children to be un-deleted. SaveEntity Function must be called to actually delete the Entity |
Warning! Using the CREATE ENTITY statement in combination with delivered Functions which can save an Entity, like the Save Entity Function, inserts data into referenced database tables. These Statements and Functions should only be used by experienced users with a Skill Level of Expert who have a good understanding of the Campus Solutions record structure. Rules Engine administrators should minimize risk by allowing Functional Experts to create Entities but not authorizing them to use one of the Save Entity Functions or by creating separate Functions in which CREATE ENTITY and SAVE ENTITY statements are combined.
For example, continuing the example of evaluating whether a student has achieved a sum of credit higher than 60 in his program of study year 1, you can use the CREATE ENTITY statement to create and Entity to store the result of that calculation in the APT result. Once the Entity is created, you populate the appropriate fields with values. In this case, Result value with the Sum of Credits retrieved by the Rule. To do this, use the Assign statement to assign the actual Sum of Credits to the Result value property for Result Type Sum Credit. Once assigned, you can save the Entity, which creates a row in the database using the system delivered Function Save Entity.
Note: The Rules Engine Manager has logic which validates nested Create Entity Statements that are present in the Evaluations and Calculations Grid upon saving the Rule.
A Create Entity Statement cannot be added to a Rule that is invalid, but it is possible to invalidate an existing Create Entity statement by removing a Statement from the Evaluations and Calculations grid or by deactivating a line on the Evaluations and Calculations grid. This would make the overall Rule invalid.
For example, if a Create Entity statement is used to create the APT Attempt followed by a Create Entity statement to create the APT Result row, and the Create Entity APT attempt row is removed from the Evaluations and Calculations grid or moved to a new position after having been added, the overall Rule becomes invalid.
The APT Result can only exist in the Rule as a child to APT Course and not as a child to APT Attempt. Deletion, moving, and deactivating statements while the Rule is being built is allowed because the action may have been done in the course of correcting the Rule. However, when the Rule is saved, the whole Rule is validated and appropriate warning messages are displayed.
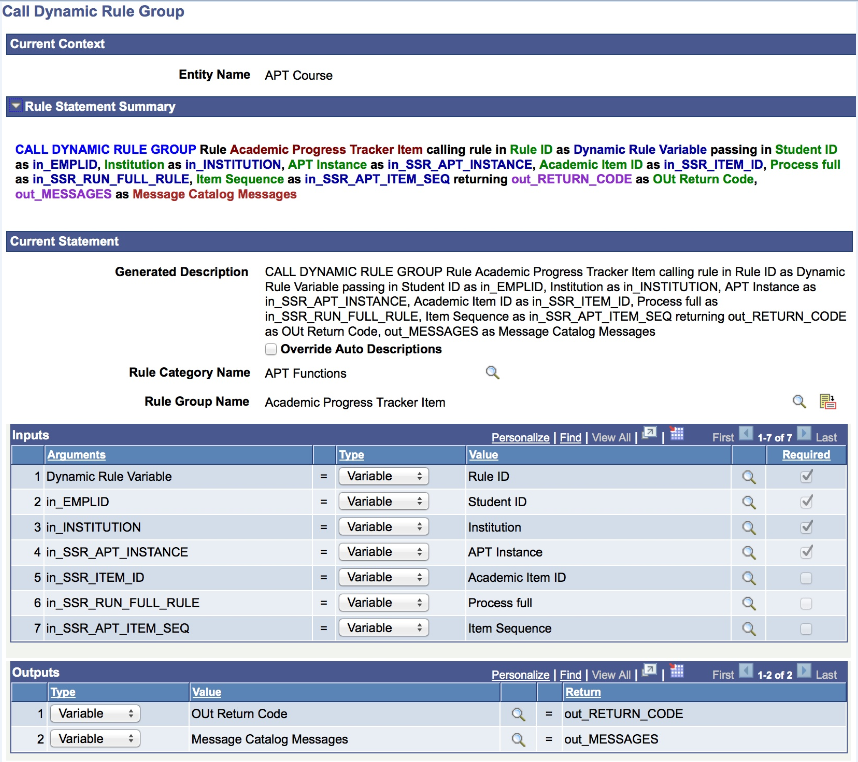
CALL DYNAMIC RULE GROUP Statements
Use this statement to call a Rule from a dynamic Rule Group. A Rule Group provides Rules with a standard template with predefined input and output parameters as well as a Base Entity. Rules which share the same template characteristics can be grouped in the same Rule Group. When calling Dynamic Rule Groups, all Rules belonging to this Rule Group are called and executed. The following example passes a retrieved Rule ID to the Rule Group PRECON-Minor Precondition. The Rule associated with the ID is then called.
For more information, see Understanding Rule Groups and Define Rule Groups.
Image: CALL DYNAMIC RULE GROUP Statement page
This example illustrates the fields and controls on the CALL DYNAMIC RULE GROUP Statement page. You can find definitions for the fields and controls later on this page.
These are the Call Statement-Specific fields:
|
Field or Control |
Definition |
|---|---|
| Rule Category |
Select a valid Rule Category from which to retrieve the Rule Group you want to use. The Rule Category available must be one of the valid categories on the Rule Group Category Definition page. |
| Rule Group Name |
Click the Search icon to the right of the Rule Name to open the Rule Group Search page and select a Rule Group. Click the Go To icon to the right of the Rule Group Name to open a new page that displays information on Rule Group Definition, Categories, and Cross Reference. |
| Inputs |
Select an Argument and Type for each Object. This is required so that all Input can be passed from the Calling Rule to the Called Function. The arguments are the Input Variables that have been defined in the Called Function. The Dynamic Rule Variable is always the first required Input parameter when calling Dynamic Rule Groups. The Operator field is restricted to only show the Equals to operator. The Type is restricted to the Type that is assigned to the Argument. |
| Outputs |
Select a Type and Object for each Output. The Return represents the Variable(s) that has been defined as Output Variable in the called Function. The Type is restricted to the Type that is assigned to the Argument. |
ADD TO LIST Statements
Use this statement add values to a List.
The List to which you want add Variables must have been created before using this statement. ADD TO LIST statements can also be used in the context of a FOR EACH loop; however, when using ADD TO LIST, you cannot add to the same List that you are scrolling through within the context of a FOR EACH loop.
Image: Define ADD TO LIST Statement page
This example illustrates the fields and controls on the Define ADD TO LIST Statement page. You can find definitions for the fields and controls later on this page.

Click the Search icon to the right of the List field to open the Add/Select a Variable page:
Image: Example of Add/Select a Variable page with only List Variables
This example illustrates the fields and controls on the Example of Add/Select a Variable page with only List Variables. You can find definitions for the fields and controls later on this page.

After having selected the List, you are returned to the ADD TO LIST statement page to add relevant Variables to the list:
Image: Example of ADD TO LIST statement page with Value to Add to the List Grid
This example illustrates the fields and controls on the Example of ADD TO LIST statement page with Value to Add to the List Grid. You can find definitions for the fields and controls later on this page.

If the selected List is a Data Set, you may only add Type Variable to the List, and the Variable must be a Data Set.
If the list is not a Data Set, you may add the following to the List:
A Variable which matches the Type of the List (for example, Text).
A Data Set Property which matches the Type of the List.
A Property which matches the Type of the List.
A user–defined value of Type Text .
For example, a curriculum requirement dictates that students may only fail three courses in subject area “Economics”. A Rule is needed to capture a List which contains both the Course as well as the failed Mark. For this, use a Data Set for the purpose of capturing the failed courses in subject area Economics. At the time of creation, the List is empty. Associate the List Variable with the created Data set. In the same Rule, also add a simple List containing all Courses. In a FOR EACH loop which scrolls through all the Courses in a program of study, evaluate the subject area for each course, determine whether the course is failed and, if meeting the criteria, add the Course ID as well as the Mark to the Data Set list. Use a ADD TO LIST to add Course ID’s and Marks as they are found.
LENGTH OF LIST Statement
Use this statement to determine the length of any List.
Image: Define Length of List Statement page
This example illustrates the fields and controls on the Define Length of List Statement page. You can find definitions for the fields and controls later on this page.

Click the Search icon to the right of the List field to open the Add/Select a Variable page.
Enter a Number Variable in the Length filed or create a Numeric Variable on the fly to designate the Length of the List.
SORT LIST Statements
Use the SORT LIST statement to sort a List by any List value. Depending of the type of List you select, you are presented different options upon returning to the Define statement page.
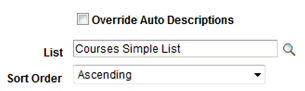
For Lists that are not Data Sets, select a Sort Order of Ascending or Descending.
Image: Example of a Sort Order Specification that is not a Data Set
This example illustrates the fields and controls on the Example of a Sort Order Specification that is not a Data Set. You can find definitions for the fields and controls later on this page.
For Lists that are Data Sets, select the Search icon to the right of the Object to open theData Set Property Search page and select a Data Set. Upon return to the Define SORT LIST statement page, select a Sort Order of Ascending or Descending for selected Data Set.
Image: Example of a Sort Order Specification that is a Data Set
This example illustrates the fields and controls on the Example of a Sort Order Specification that is a Data Set. You can find definitions for the fields and controls later on this page.

CLEAR LIST Statements
Use this statement to clear a list and remove all list data.
Click the Search icon to the right of the List field to open the Add/Select a Variable page and select a List.
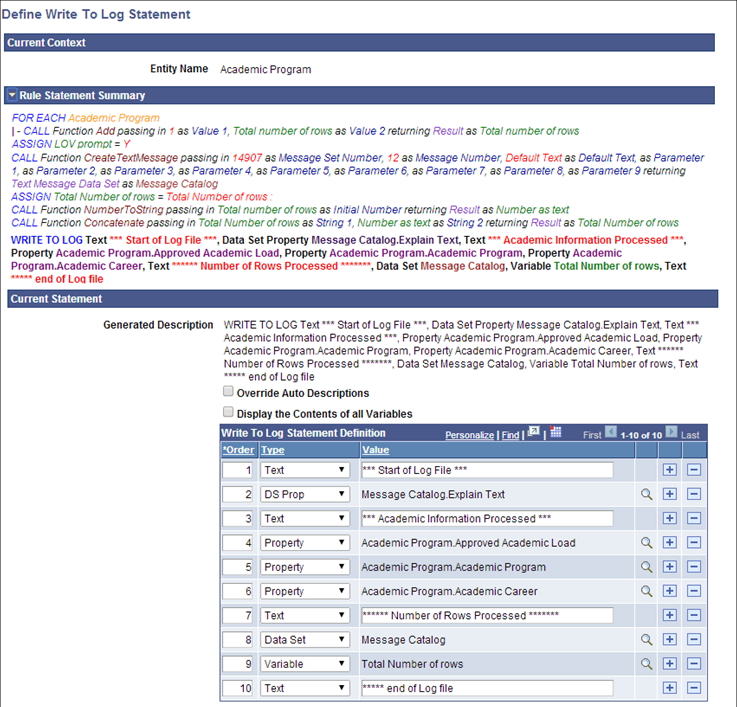
WRITE TO LOG Statements
Write to Log functionality can be used to provide Rule users with useful processing feedback when Rules are run in batch. For example, a log file can show information such as numbers of rows processed or retrieved.
The Logging Level Write to Log must be set for a log file to be created. Subsequently, the a Write to Log statement can be used to write text strings as well as the contents of Variables, Data Set Properties, and Entity Properties to a log file.
Image: Define Write to Log Statement page
This example illustrates the fields and controls on the Define Write To Log Statement page. You can find definitions for the fields and controls later on this page.
|
Field or Control |
Definition |
|---|---|
| Display the Contents of All Variables |
Select this option to write all Rule Variable and their contents to the log file. |
Use the Write to Log Statement Definition grid to add one or more values to be written to the log file. The Order number is automatically augmented when rows are added. Rows are written to the log file in the same order.
|
Field or Control |
Definition |
|---|---|
| Type |
Select a Value Type to include in the log:
|
Once Statements are added to a Rule, they can be activated or inactivated, and they can be moved within the Rule to alter the Rule logic.
Activating and Inactivating Statements
Select the Active check box to the right of each Statement to activate or inactivate the Statement.
An Inactive statement (check box is unchecked) is ignored by the Rules Engine compiler and skipped when executing a Rule build. Inactivated statement are displayed in non-bold italic text.
Moving Statements within a Rule
One way that Rule logic can be modified is by moving Statements within the Rule. There are two ways that a Statement can be moved within a Rule:
Up and Down
Image: Up and Down Toggle for Statements
This example illustrates the fields and controls on the Up and Down Toggle for Statements. You can find definitions for the fields and controls later on this page.

Use the Up and Down Toggle fields to move a Statement before or after other Statements, changing the order in which Statements are executed. The type of Statement and where it is located in relation to other Statements determines if it can be moved up and/or down.
By Indentation
Image: Indentation Toggle for Statements
This example illustrates the fields and controls on the Indentation Toggle for Statements. You can find definitions for the fields and controls later on this page.

Use the Indentation Toggle fields to move a Statement within or outside of other Statements, changing when a Statement is executed in relation to Statements above or below it.
Image: Example Showing Statements with Indentations and Up and Down Toggles
This example illustrates the fields and controls on the Example Showing Statements with Indentations and Up and Down Toggles. You can find definitions for the fields and controls later on this page.
For an example of incorrectly indented Statements, see Applying Rule Concepts and Adding Statements to a Rule, Add a CALL Statement to Determine Academic Progression.
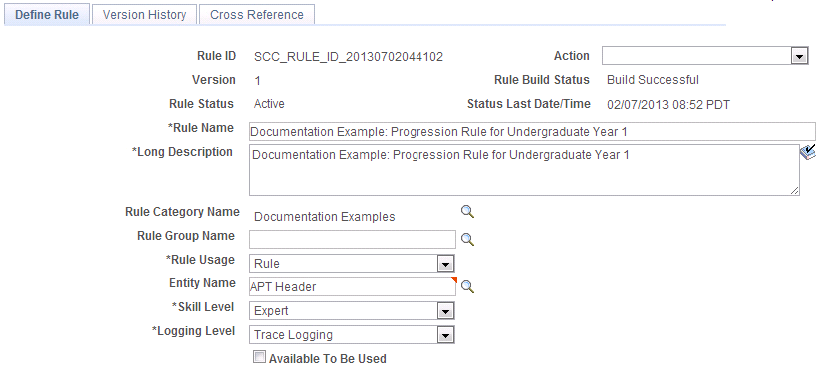
In this section, an example Rule illustrates how Rule Options, Variables, Criteria, and Statements are used together. Previous sections of the documentation describe creating Variables, using Criteria to define a data set, and the features of delivered Statements for Rule evaluation and calculation.
The objective of this example Rule is to evaluate whether a student has obtained enough credits to be able to progress to the next phase of an academic program after having completed Year 1. To start, the Rule accesses the courses for the program of study for Year 1 and sums the credits for the courses the student has passed. In order to insure an accurate TotalCredit value, the Rule sets the TotalCredit Variable to zero prior to passing the sum result into a Variable, TotalCredit.
Image: Example of Define Rule page for Progression Rule
This example illustrates the fields and controls on the Example of Define Rule page for Progression Rule. You can find definitions for the fields and controls later on this page.
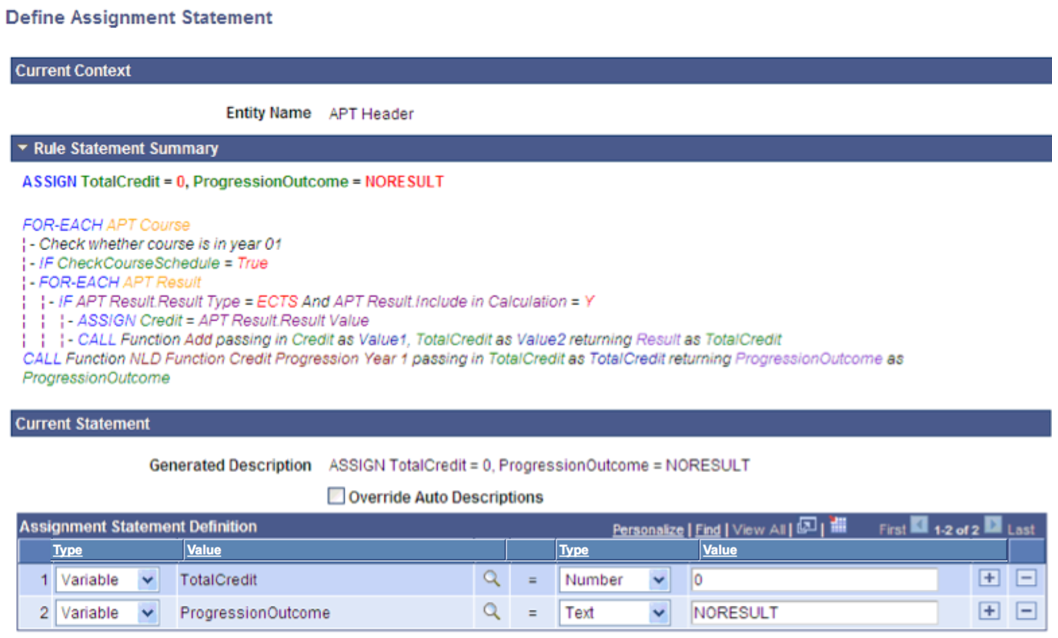
Add an ASSIGN Statement to Set the TotalCredit Field to Zero
With Rule Options, Variables, and Criteria defined, begin by adding an ASSIGN statement that selects the Variable TotalCredit and set it equal to the Number 0 (zero):
Image: Example of Assignment Statement Definition
This example illustrates the fields and controls on the Example of Assignment Statement Definition. You can find definitions for the fields and controls later on this page.

Upon saving, the ASSIGN statement is added to the Evaluations and Calculations grid of the Define Rule page with the Rule text automatically generated using the text color setup:
Image: Example of ASSIGN Rule Text
This example illustrates the fields and controls on the Example of ASSIGN Rule Text. You can find definitions for the fields and controls later on this page.

For more information about ASSIGN statements, see “Understanding Statement-Specific Attributes, ASSIGN Statements.”
Add a FOR EACH Statement to Select All Courses
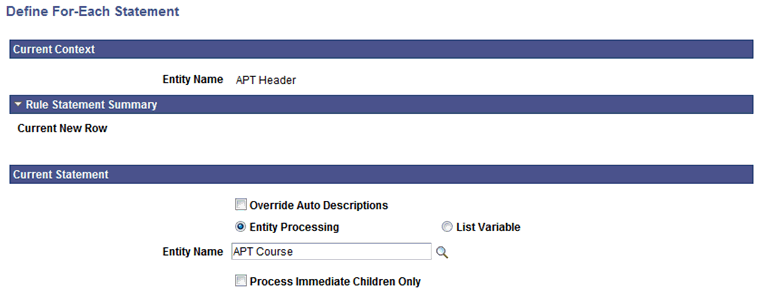
The next step is to retrieve all courses for the academic program of study which is associated with the Academic Progress tracker through the APT header. You need to retrieve the correct APT Program of Study before selecting all associated courses. Select the APT program of study using a FOR-Each statement.
Image: Example of FOR EACH Statement Definition
This example illustrates the fields and controls on the Example of FOR EACH Statement Definition. You can find definitions for the fields and controls later on this page.
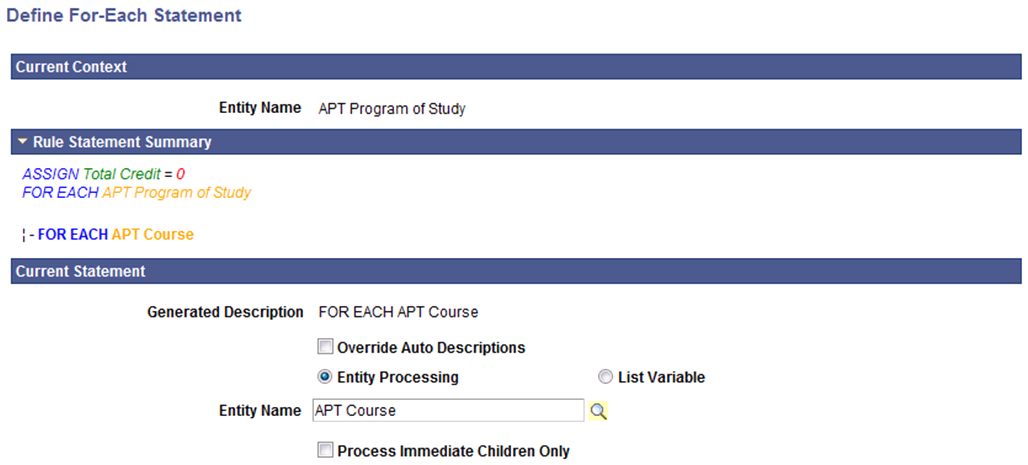
Select Entity Processing to activate the Entity Name field and prompt. Select the Search icon and choose the APT Course Entity. By selecting APT Course, you can retrieve all courses that are part of the APT instance selected as Base Entity. Do not select Process Immediate Children Only so the Rule selects Courses wherever they exist in the structure and not just the immediate children of the APT Program of Study.
Upon saving, the FOR EACH statement is added to the Evaluations and Calculations grid of the Define Rule page with the Rule text automatically generated using the text color setup:
Image: Example of FOR EACH Rule Text
This example illustrates the fields and controls on the Example of FOR EACH Rule Text. You can find definitions for the fields and controls later on this page.

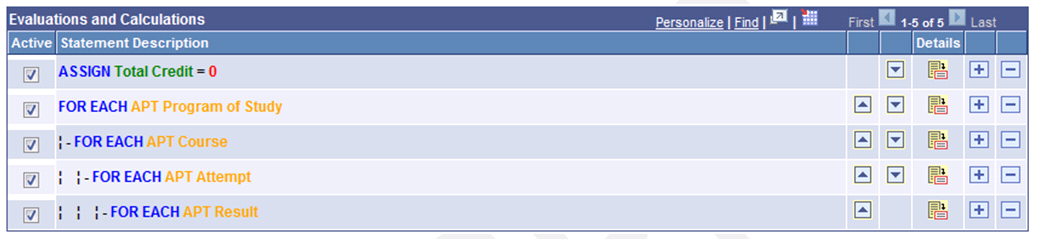
Add a FOR EACH Statement to Select a Result for Each Course
Next, you add another FOR EACH Statement to Select APT Results for each Course. This statement is indented under the FOR EACH APT Course Statement so that it is executed for each to retrieve the APT Result for each APT Course.
Image: Example of Indented FOR EACH APT Result Rule Text
This example illustrates the fields and controls on the Example of Indented FOR EACH APT Result Rule Text. You can find definitions for the fields and controls later on this page.
Note: The Rules Engine Manager has logic which validates FOR EACH statements upon saving the Rule. A FOR EACH statement cannot be added to a Rule that is invalid, but it is possible to invalidate an existing FOR EACH statement by removing a statement from the Evaluations and Calculations grid or by deactivating a line on the Evaluations and Calculations grid. This would make the overall Rule invalid.
For example, if an APT Attempt row is removed from the Evaluations and Calculations grid or moved to a new position after having been added, the overall Rule becomes invalid.
The APT Result can only exist in the rule as a child to APT Course and not as a child to APT attempt. This allowed while the Rule is being built because the action may have been done in the course of correcting the rule. However, when the rule is saved, the whole Rule is validated and appropriate warning messages are displayed. If a nested FOR EACH statement is used in combination with a CREATE ENTITY statement, the same logic applies.
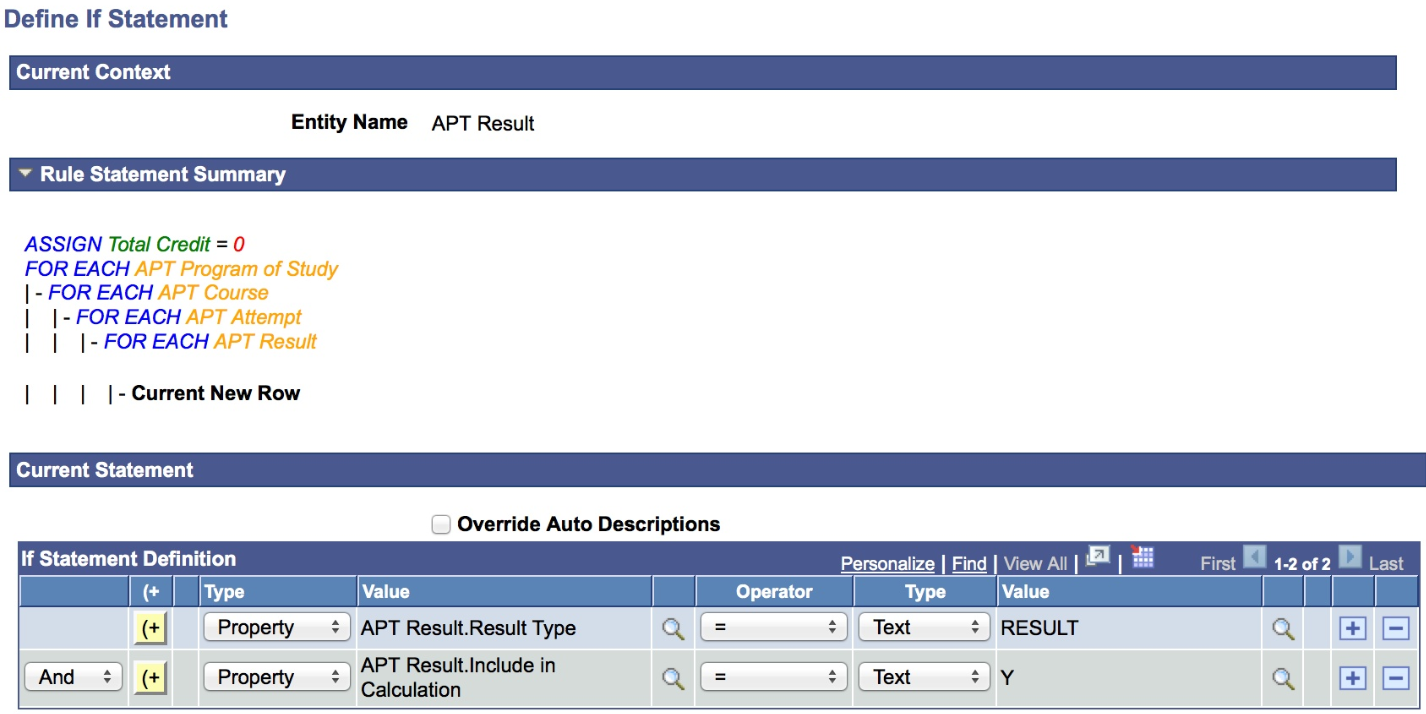
Add an IF Statement
Next add an IF statement to make sure that we select the correct result before we add it to our total credit count. Do this by restricting the APT Results by Result Type and whether the Result is included in the Calculation:
Image: Example of Define IF Statement Definition
This example illustrates the fields and controls on the Example of Define IF Statement Definition. You can find definitions for the fields and controls later on this page.
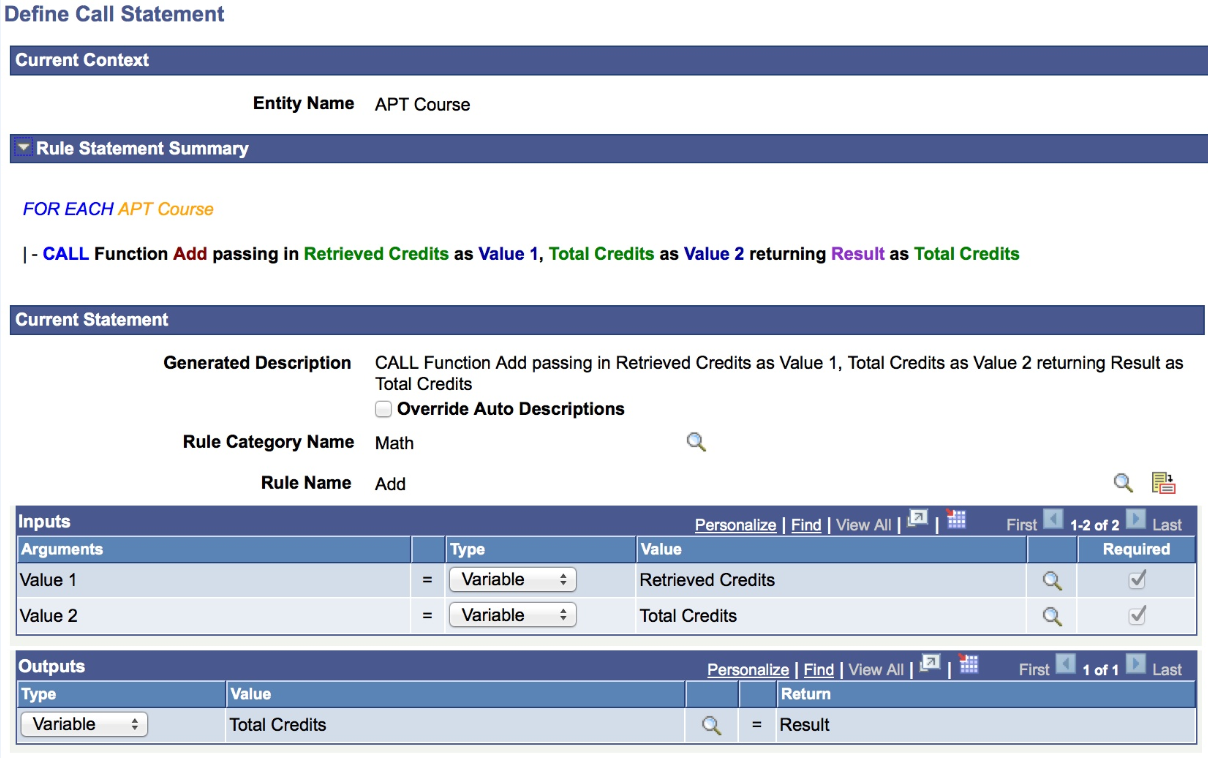
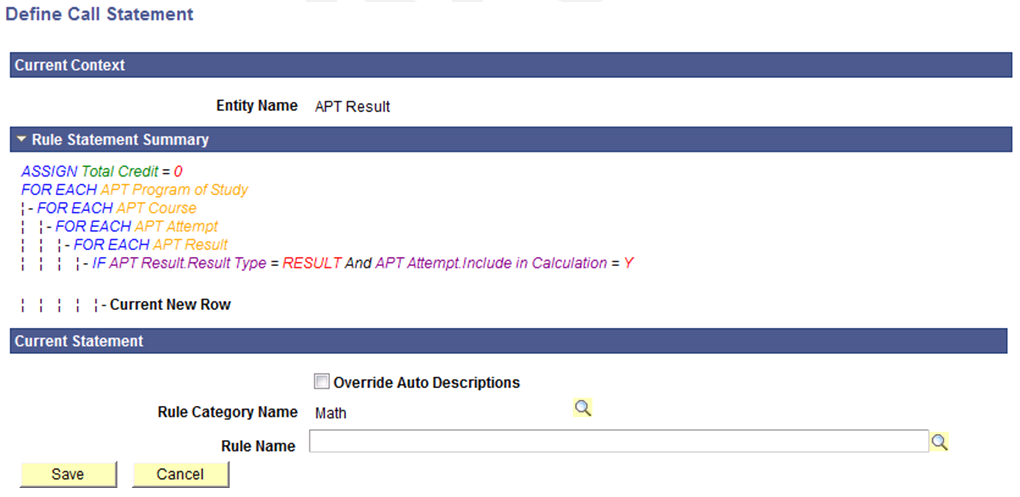
Add a CALL Statement to Sum Credits
After adding specified criteria for selecting results, use a CALL statement to call a Function to sum the retrieved credits. In the Define CALL Statement page, pre-delivered Functions are available that are restricted to those which are available in the Rule Categories, including common math functions.
When calling a Function, the required parameters are automatically displayed and the available parameter values are restricted to those that can retrieved for the Rule. For example, when selecting Rule Category Math and Rule Name Add, the Input and Output parameters are displayed. The selection of variables and properties and variables are restricted to show the correct property and variable types. In this case only numeric variables and properties can be selected:
Image: Example of Define CALL Statement
This example illustrates the fields and controls on the Example of Define CALL Statement. You can find definitions for the fields and controls later on this page.
When calling a Function, the Function itself indicates which Input and Output parameters are required. Only the valid Property and Variable Types are shown. In this case, only numeric Variables and Properties can be selected:
Image: Example of CALL Statement Inputs and Outputs
This example illustrates the fields and controls on the Example of CALL Statement Inputs and Outputs. You can find definitions for the fields and controls later on this page.

Upon saving, the CALL statement is added to the Evaluations and Calculations grid of the Define Rule page with the Rule text automatically generated using the text color setup:
Image: Example of CALL Statement Rule Text
This example illustrates the fields and controls on the Example of CALL Statement Rule Text. You can find definitions for the fields and controls later on this page.

Add a CALL Statement to Determine Academic Progression
After calculating a student's total credits, you can use that result to evaluate whether the student may progress to Year 2 of his program of study. Assuming that multiple programs of study use the same credit requirement for academic progression, you can create a Rule of type Function that can be used by multiple academic progression Rules:
Image: Example of Academic Progression Function (1 of 2)
This example illustrates the fields and controls on the Example of Academic Progression Function (1 of 2). You can find definitions for the fields and controls later on this page.
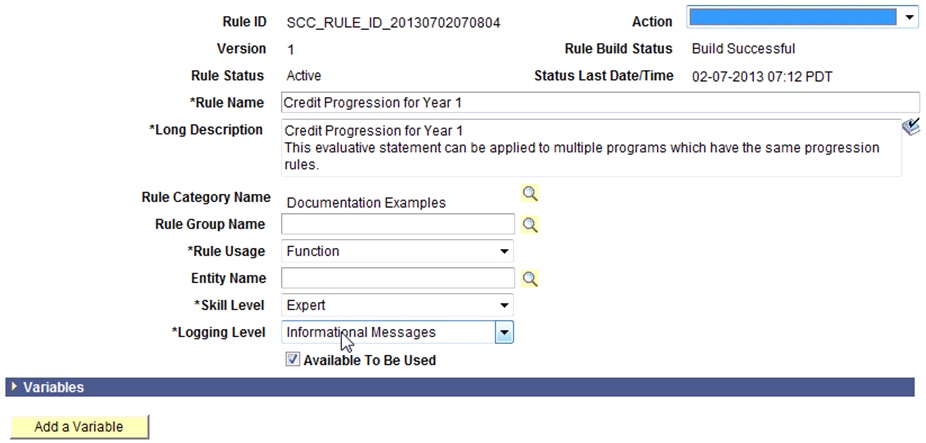
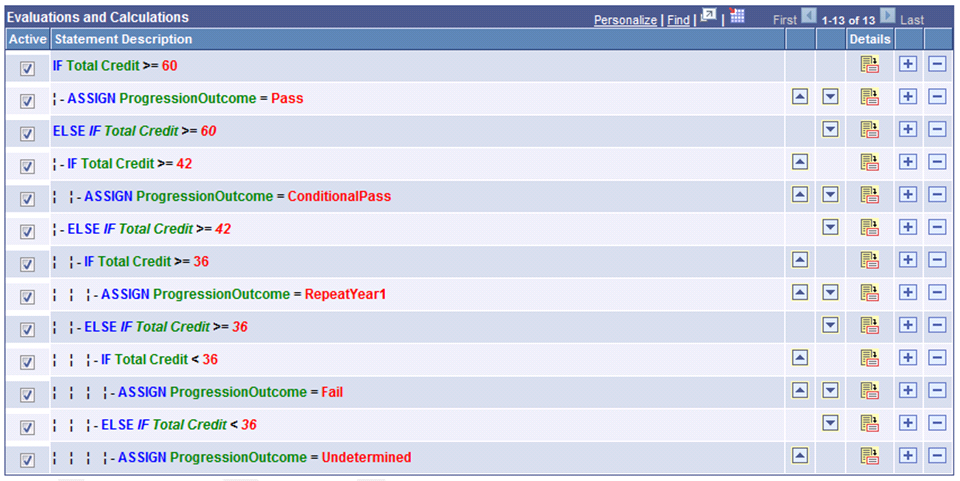
Image: Example of Academic Progression Function (2 of 2)
This example illustrates the fields and controls on the Example of Academic Progression Function (2 of 2). You can find definitions for the fields and controls later on this page.
This Function can be called from the main Rule by adding a row to the Evaluations and Calculations grid and using the CALL statement. The Parameters from the Rule are automatically offered as Input and Output parameters on the Define Call Statement page:
Image: Example of Academic Progression Function Input and Output
This example illustrates the fields and controls on the Example of Academic Progression Function Input and Output. You can find definitions for the fields and controls later on this page.

Upon saving, the academic progress CALL Function is added to the Evaluations and Calculations grid of the Define Rule page with the Rule text automatically generated using the text color setup. However, its placement would result in its being executed at the wrong time:
Image: Example of Academic Progression Rule Text with Progression Function Incorrectly Indented
This example illustrates the fields and controls on the Example of Academic Progression Rule Text with Progression Function Incorrectly Indented. You can find definitions for the fields and controls later on this page.

With the CALL Function in the current position, the evaluation takes place for each result selected as follows:
Fetch of Course A
Retrieval of Result for Course A
— Add retrieved result for Course A to TotalCredit
— Call Function Credit progression Year 1
Fetch of Course B
Retrieval of Result for Course A
— Add retrieved result for Course B to TotalCredit
— Call Function Credit progression Year 1
The evaluation of academic progression takes place each time a result is retrieved. This is not what you want the Rule to do. What you want is for the academic progression evaluation to take place after all the course credit have been added up:
Fetch of Course A
Retrieval of Result for Course A
— Add retrieved result for Course A to TotalCredit
Fetch of Course B
Retrieval of Result for Course A
— Add retrieved result for Course B to TotalCredit
Call Function Credit progression Year 1
Use the remove indentation field to place the statement in the correct place:
Image: Example of Academic Progression Rule Text with Progression Function Correctly Indented
This example illustrates the fields and controls on the Example of Academic Progression Rule Text with Progression Function Correctly Indented. You can find definitions for the fields and controls later on this page.

The Rules Engine includes a feature called Contextual Reference. This feature ensures that when Functions are called by other Rules (Calling Rules), the Entity of the Calling Rule is passed to the called Function.
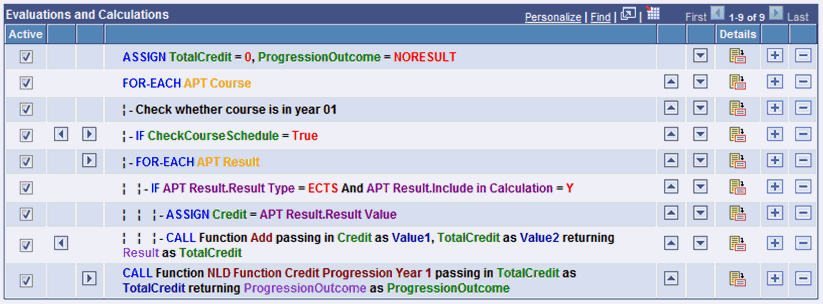
The following is an example of a Rule using Contextual Referencing which does the following:
Selects all relevant Courses.
For each Course, determines whether en enrollment record exists in Year 1 of the academic program according to the APT schedule record using user defined Function.
Selects the appropriate result which is stored in the result record as Result Type “ECTS”.
Uses the result value obtained in the previous step to calculate the sum of credit using delivered math Function “Add” in Category “Math”.
Evaluates whether total credit is enough to progress to year 2 of the academic program using user defined Function.
Image: Example of Progression Rule for Contextual Reference Example (1 of 2)
This example illustrates the fields and controls on the Example of Progression Rule for Contextual Reference Example (1 of 2). You can find definitions for the fields and controls later on this page.
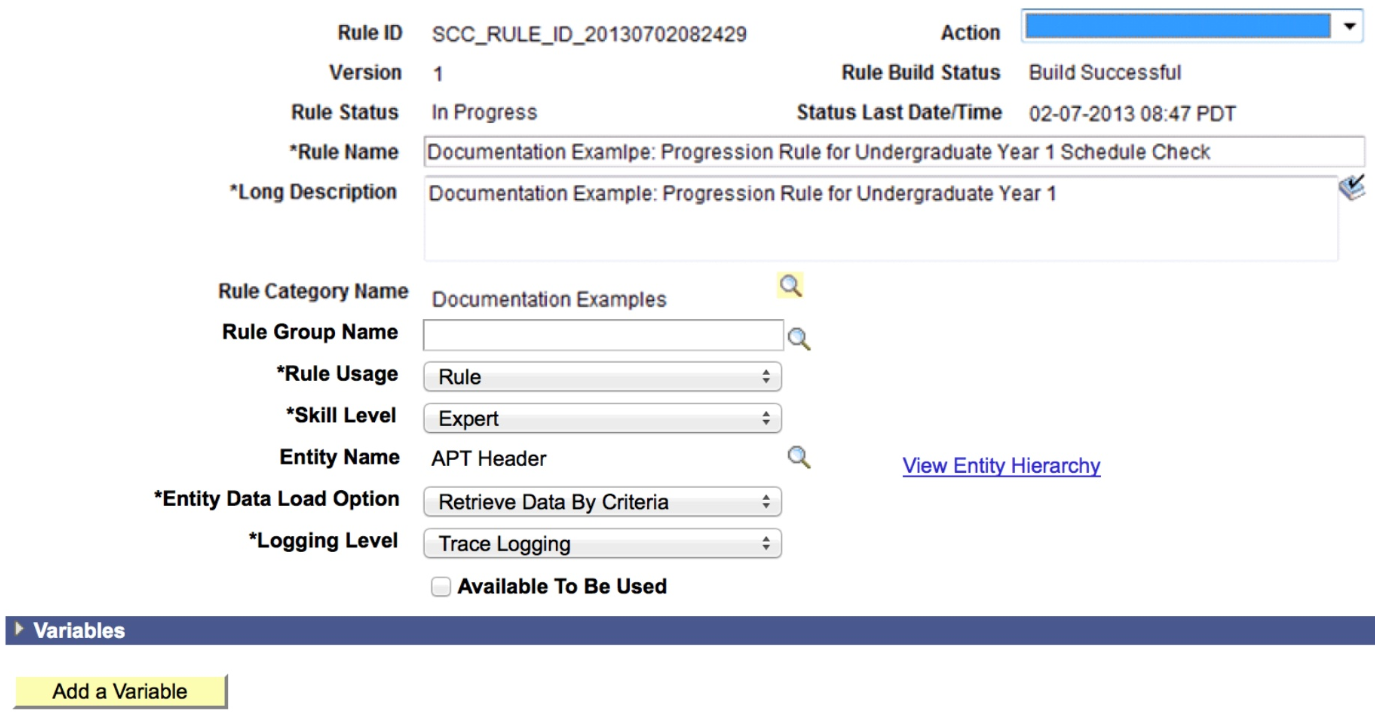
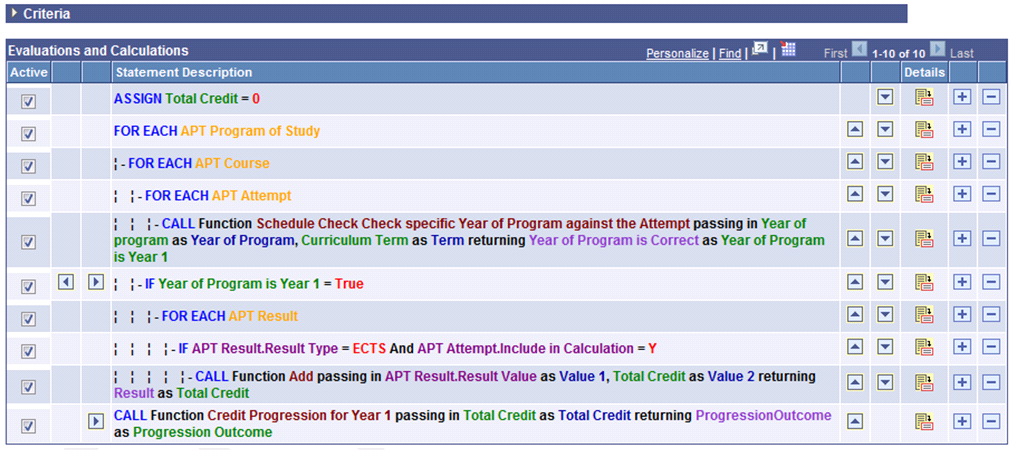
Image: Progression Rule for Contextual Reference Example (2 of 2)
This example illustrates the fields and controls on the Progression Rule for Contextual Reference Example (2 of 2). You can find definitions for the fields and controls later on this page.
The Functions used to perform summing of Total Credit (Steps 4 and 5) receive either an Input value of type Variable or Property directly from the Calling Rule. An input Variable is all that these Functions need to execute the required processing logic. The Function performs a series of evaluative Statements using the single input Variable TotalCredit and passes back the result into Variable Progressionoutcome. The Function has no Entity of its own and is without criteria.
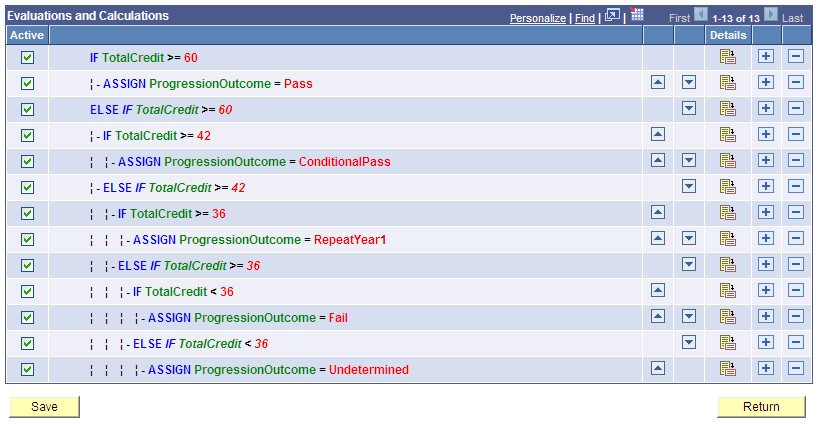
Shown below is an example of the custom Function “NLD Function Credit Progression Year 1”.
Image: Example of Progression Function for Contextual Reference (1 of 2)
This example illustrates the fields and controls on the Example of Progression Function for Contextual Reference (1 of 2). You can find definitions for the fields and controls later on this page.
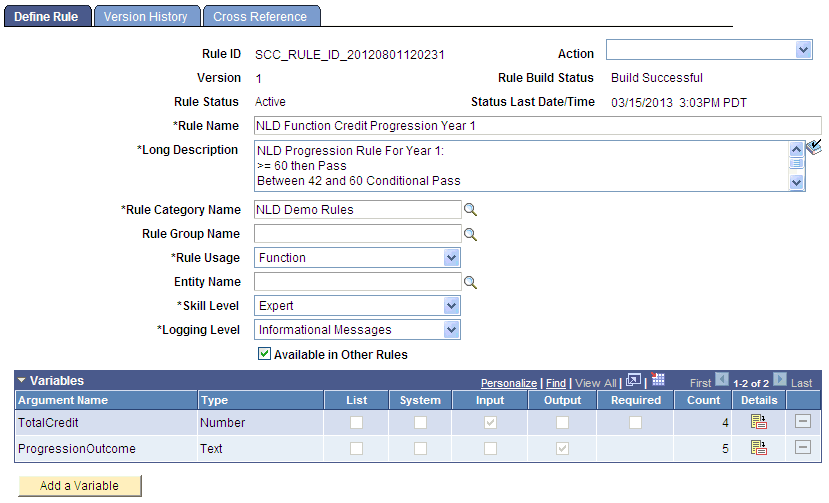
Image: Example of Progression Function for Contextual Reference (2 of 2)
This example illustrates the fields and controls on the Example of Progression Function for Contextual Reference (2 of 2). You can find definitions for the fields and controls later on this page.
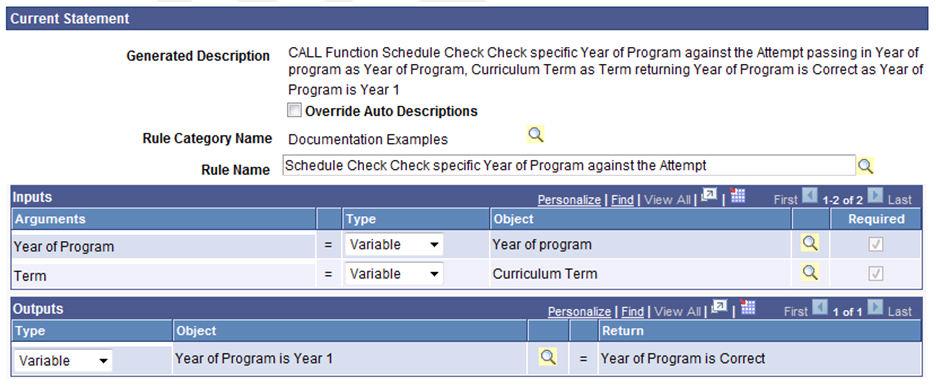
Next is an example of the Function “Schedule Check, Check specific Year of Program against the Attempt”. This Function does have its own Base Entity “APT Attempt”, but only Input and Output parameters are defined in the Call Statement shown after the Function example. The criteria identifying the exact APT Attempt are not explicitly passed from the Calling Rule to the Called Function.
However, when the Function is called, the exact Attempt information is passed from the calling Rule to the called Function by virtue of Contextual Reference. This is because the called Function's Base Entity is APT Attempt which is the same context that the Calling Rule is working from when retrieving Attempts using the FOR-EACH loop.
Image: Example of Program Course Function for Contextual Reference
This example illustrates the fields and controls on the Example of Program Course Function for Contextual Reference. You can find definitions for the fields and controls later on this page.
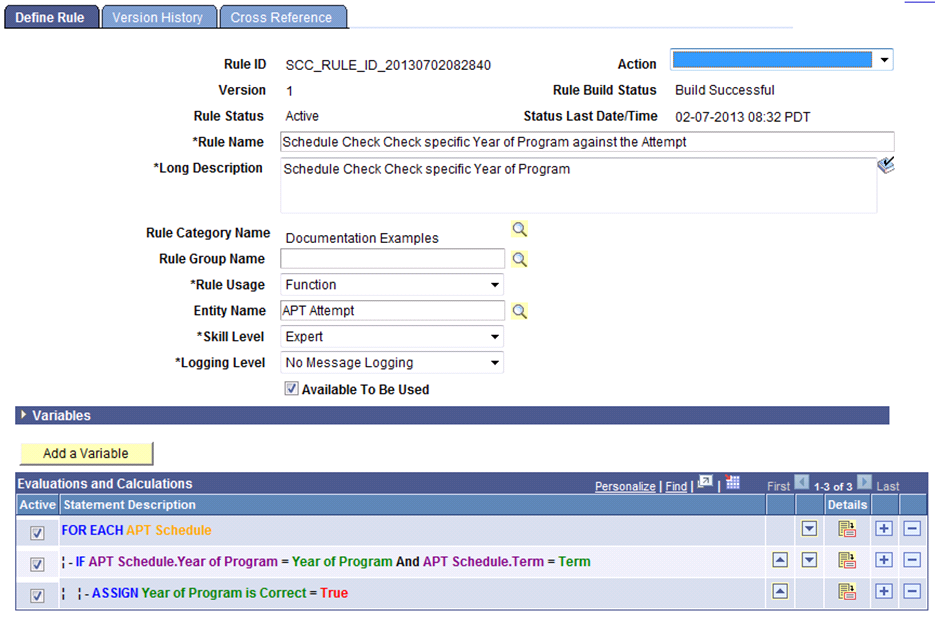
Image: Example of Call Statement for Contextual Reference
This example illustrates the fields and controls on the Example of Call Statement for Contextual Reference. You can find definitions for the fields and controls later on this page.