Using the Components of Forms Engine
The Forms Engine consists of several components. This section discusses how to:
Use the application designer.
Create and modify forms.
Use the form image text repository.
Using form image text.
Upload form image text.
Review form groups.
Use output destination formats.
Specify font names.
Using PostScript fonts.
Use the Inquire On Form Data page.
|
Page Name |
Definition Name |
Navigation |
Usage |
|---|---|---|---|
|
Form Editor |
FORM_EDITOR |
|
Create and modify forms. |
|
Form Image Text Viewer |
FE_IMAGE_TEXT |
|
Update Description and Cache From On Printer fields. |
|
Upload EPS Image File |
FE_UPIMG_RUNCTL |
|
Modify an image that you are rendered on a page by making a new or modified file in encapsulated Postscript (EPS) format. |
|
Form Groups |
FORM_GROUP_TABLE |
|
Use to tie a list of forms together. |
|
Output Destination Formats |
FE_OUTDESTFMT |
|
View parameters for various output formats usable by programs that use the Forms Engine. |
|
Font Names |
FONT_NAME_TABLE |
|
Lists all PostScript font names that you can specify within Form Editor. |
|
PostScript Fonts |
POSTSCRIPT_FONTS |
|
View a list of translations using font names as specified in the Application Designer and translate to a PostScript font name. |
The Application Designer is not part of the Forms Engine. However, page layouts defined within the Application Designer can be imported into the Form Editor. You can make all of your changes to a form using Application Designer. If you use Application Designer to make changes, you do not need to make changes in Form Editor.
You can create or modify forms using the Form Editor either by importing a page layout from the Application Designer or by manually adding objects to the page definition. If you import a page layout from the Application Designer, the entire contents of the form definition are replaced by the imported page definition.
Access the Form Editor page ().
Image: Form Editor page
This example illustrates the fields and controls on the Form Editor page. You can find definitions for the fields and controls later on this page.
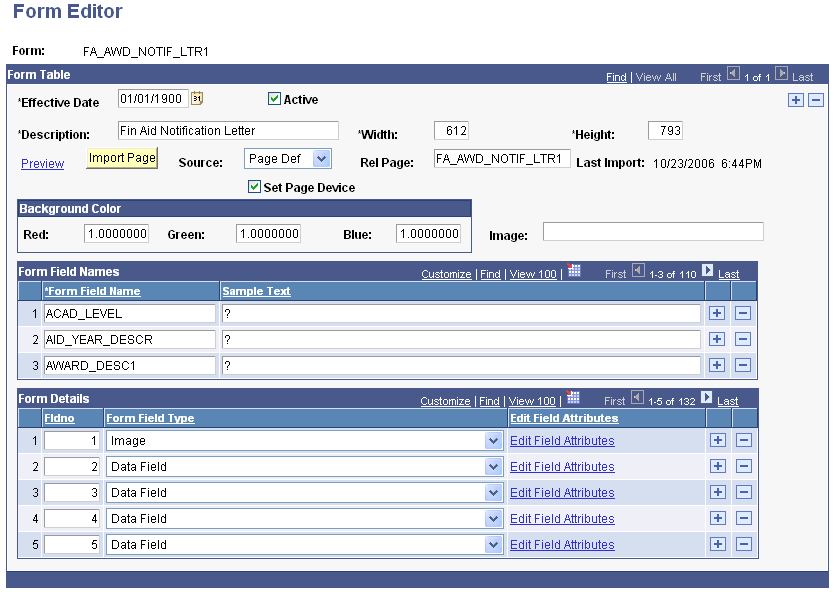
Select Set Page Device to force the form to start on a new piece of paper. This is important when you are duplex printing (printing on both sides of the paper). If you do not select Set Page Device, a new form might print on the backside of a piece of paper.
You can add types of objects to forms such as Box, Data Field, Image, Line, Long Text, and Text. You can set attributes for each of these objects such as color, font, position, length, style, scale, spacing, justification, line thickness, dashes, image ID, and literal text. Not all attributes apply to all form child objects. You can specify to have sample text values appear in data fields when you preview the form.
To preview the form that you are editing, click the Preview link. This saves any unsaved changes, generates the PostScript print data stream, and sends the data to your browser. If your browser is configured to display this type of data, it displays the image of the form. If your browser is not configured to display this type of data, you can save the data to a disk directory. If you save the data to a disk directory and give it a file name, give it a (.ps) extension indicating that it is a PostScript file. Copy this file to a postscript printer. The page image renders graphically to that printer.
If you want to view the PostScript preview page image on your browser, click the Get PostScript Viewer link on the Form Editor page. The system displays a website where you can obtain a PostScript View program.
Access the Form Image Text Viewer page ().
Image: Form Image Text page
This example illustrates the fields and controls on the Form Image Text page. You can find definitions for the fields and controls later on this page.
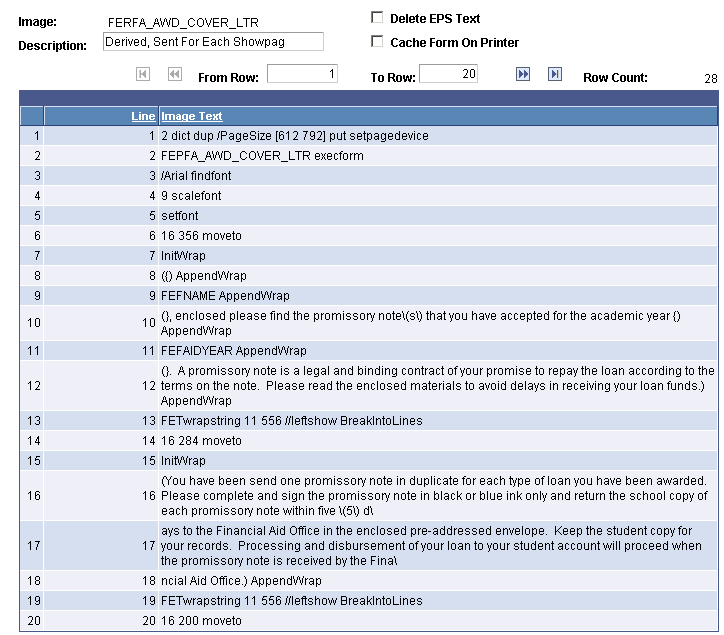
The form image text is the actual PostScript text that is sent to the PostScript printer. To access the Form Image Text page, select .
The only fields that you can update on the setup page are Description and Cache Form On Printer. Cache Form On Printer indicates whether the form is sent to the printer only once at the beginning of the print run or each time that the image is needed.
When you save a form layout in the Form Editor, it generates two corresponding entries in the Form Image Text table. The entry that starts with FEP followed by the form name is the static page layout. It is automatically set to cache on the printer. The other entry is the one that starts with FER followed by the form name. It is the runtime portion of the page and is sent each time that the page is printed. The runtime portion combines the page layout with images and wrapped text.
To modify an image that is being rendered on a page, you must create a new or modified form image text file in encapsulated PostScript (EPS) format and upload it to an FTP site that you choose. You can then run the process to upload this text into the Form Image Text repository.
Access the Upload EPS Image File page ().
Image: Upload EPS Image File page
This example illustrates the fields and controls on the Upload EPS Image File page. You can find definitions for the fields and controls later on this page.
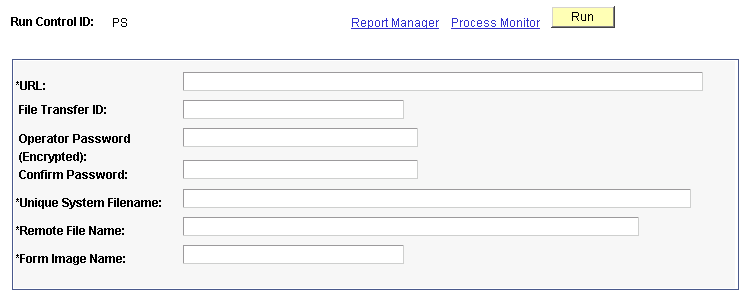
Follow these steps to upload form image text.
Create a run control record.
The URL is the name of the FTP domain to which you had previously uploaded the EPS file. If you uploaded it to the FTP server called MYFTPSITE, then you would enter MYFTPSITE into this field.
Enter the ID and password that you used to log on to the FTP site.
Retype the password in the Confirm Password field.
The unique system file name should be a file name in 8.3-format without any blank spaces.
Note: Do not enter path information. For example, MYLOGO.EPS is used for the MYLOGO form image text file. The remote file name is the path and name of the file that you specified when you uploaded it to your FTP site. The form image name is the name that Oracle uses as the key to the Form Image Text repository. Our example is MYLOGO.
Submit the process.
Access the Form Image Text page after the process finishes successfully. Enter a description for the image and select the Cache Form On Printer check box.
To create or modify form image text, you can create or modify the corresponding EPS file in the data directory of ps_home. For example, to create a graphic image called MYLOGO, copy the FAPSULGO.EPS file from the data directory to a file called MYLOGO.EPS. Use a simple text editor to edit it and change every occurrence of FAPSULGO with MYLOGO. You can modify the contents of the image text using a simple text editor and enter PostScript command text to construct an image.
An alternative technique for creating an EPS file for your image is to use some other program to generate the PostScript file. A possible future enhancement to this process is that the program that uploads the EPS Image File accepts files with the .JPG extension and converts them to EPS format while loading them into the Form Image Text repository. Some JPG files convert to EPS files that are too large to cache on the printer. You have to clear the Cache Form On Printer check box if your image is converted from a JPG file.
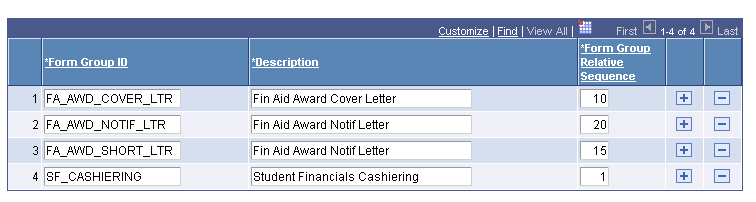
A form group ties a list of forms together. The Form Group Relative Sequence field indicates the relative order for form groups to be rendered when more than one form group is output into a single print stream. The forms are tied to the form groups within an application program. Because of this, you should not modify these settings unless you are customizing a program.
Access the Form Groups page ().
Image: Form Groups page
This example illustrates the fields and controls on the Form Groups page.
Access the Output Destination Formats page ().
Image: Output Destination Formats page
This example illustrates the fields and controls on the Output Destination Formats page.
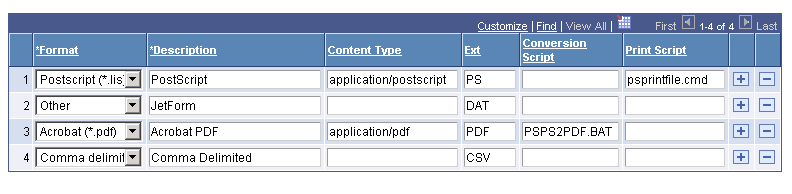
This table specifies parameters for various output formats usable by programs, which in turn use the Forms Engine. For example, a program looks at the Print Script field to determine the name of a command script for printing. In the case of the PostScript output destination format, the print script PSPRINTFILE.CMD requires two arguments: the printer name and the file name.
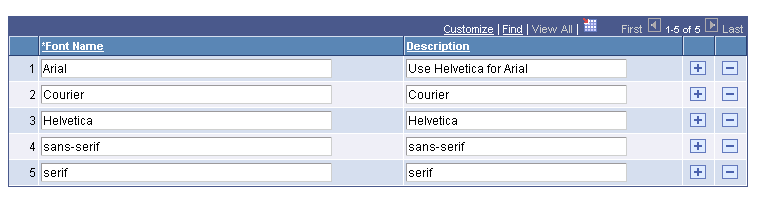
Access the Font Names page ().
This table contains the list of all PostScript font names that you can specify within the Form Editor.
Image: Font Names page
This example illustrates the fields and controls on the Font Names page.
Access the PostScript Fonts page ().
Image: PostScript Fonts page
This example illustrates the fields and controls on the PostScript Fonts page.
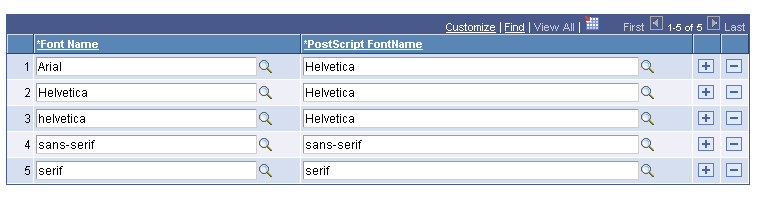
This table is a list of translations that uses a font name as specified in the Application Designer and translates it into a PostScript font name. You must install the font names specified on all of the PostScript printers at your installation.
This page is normally hidden. You should restrict access to this page. It enables you to view any page printed by the Forms Engine and retained in the Form Data tables. Functions that refer to this data have pages and views that restrict the content to data relating to just that function. Use this page to debug problems.