Monitoring Integrations Using the Integrity Utility
This section provides an overview of the Integration Integrity Utility and discusses how to:
Get started with the Utility.
Configure the Utility.
The Integration Integrity Utility (the Utility) provides configurable end-user tools to help monitor and maintain high-quality data in separate PeopleSoft CS and PeopleSoft HCM databases. As with most integration, unplanned scenarios can sometimes leave data out-of-sync. The Utility provides methods to detect, report, and resynchronize data where necessary.
Data Integration Assumptions and Practices
Using the Integration Integrity Utility to regularly monitor data will provide assurance that your data is being synchronized properly between separate PeopleSoft CS and PeopleSoft HCM databases.
A valuable feature of the Utility is the ability to re-sync data if discrepancies are found, however, it is important to remember some general assumptions and guidelines when using this Utility:
Oracle delivered integration design models for split CS and HCM databases (Owner/Subscriber, Subscriber Only) assume that shared data is replicated exactly between both databases.
The Utility is not designed to replace standard Application Messaging. Errors that may occur in Integration Broker Queue processing should be properly investigated and the message transaction resubmitted for proper handling.
If data discrepancies appear regularly on comparison reports, there may be a systemic problem that should be investigated, and corrected.
Data discrepancies may be the result of a variety of root causes. Investigation into the issue is critical.
Data comparisons should be run during periods of low activity, and when transaction changes are not expected to occur frequently.
|
Page Name |
Definition Name |
Navigation |
Usage |
|---|---|---|---|
|
Comparison Methods |
SCC_DISCREP_METHOD |
|
Maintain the list of available methods for comparing table data between two different databases. |
|
Resolution Methods |
SCC_DISCREP_APPMTH |
|
Maintain the list of methods used to apply winners to resolve data discrepancies. |
|
Data Sources |
SCC_DISCREPDSRC |
|
Provide connection information for an external data source. |
|
Database Link Maps |
SCC_DISCREP_LNK |
|
Define mappings from a record name to a database link record name. |
|
Record Maps |
SCC_DISCREP_MAP |
|
Define a view used to compare data for the same table on two different databases. Views may be used instead of the base table when only certain columns or rows are desired for comparison. |
|
Winner Rules |
SCC_DISCREP_RULE |
|
Maintain rule definitions for determining how to resolve data discrepancies between the same table on two different databases. |
|
CS Permission Maps |
SCC_PERMISN_MAP |
|
Set comparison and discrepancy resolution security by mapping record names to permission lists in CS. |
|
HCM Permission Maps |
HCI_PERMISN_MAP |
|
Set comparison and discrepancy resolution security by mapping record names to permission lists in HCM. |
|
Run Discrepancy Comparison |
SCC_DISCREPRCTL |
|
Run the comparison process to determine data discrepancies in the specified tables between two databases. |
|
Integration Discrepancies |
SCC_INTGR_DSCRPNCY |
|
Display data discrepancies found between the same table on two different databases and specify the winner for resolution. |
|
Discrepancy Details |
SCC_INTGR_DSCRFLDS |
Click the Show Fields link for any row on the Integration Discrepancies page. |
Show data discrepancy details for a selected row. |
|
Resolve Discrepancies |
SCC_DISCREP_RUNRUL |
|
Run the process to apply the winner rule to all discrepancy rows in the specified table or resolve discrepancies. |
|
Resolution Log |
SCC_RESOLVE_LOG |
|
View a log of transactions that have resolved data discrepancies. |
|
Purge Resolution Log |
SCC_RSLVLOGPRUNCTL |
|
Run the process to delete data discrepancy resolved transaction logs. |
Before setting up and running the Utility, you will want to analyze the data that is kept in sync between your PeopleSoft CS and PeopleSoft HCM databases. This information will be needed for configuring the Utility.
Here are some points to consider regarding this analysis:
Oracle-delivered integration design models (Owner/Subscriber, Subscriber Only) assume that shared data is replicated exactly between both databases.
Note: Some data fields, such as audit date/time fields, may have slightly different values in each database due to the nature of Application Messaging.
Is there any custom data filtering as part of your integration design? For tables where the data is not fully synchronized, use of a view will be needed to achieve accurate comparison results. A view allows the Utility to compare on a subset of fields between the databases, or supports the use of custom logic defined in the view SQL.
The list of tables that are synchronized will differ at every institution, and may include customizations. Your resulting list will become the scope of tables that will be compared between the databases.
There are several delivered methods for performing data comparison and resolution. Which you choose to use will depend on your data and database environments. You may also develop and add other comparison or resolution methods.
Related Language tables must be separately compared and resolved.
Audit tables and fields should not be compared.
The compare process reports data discrepancies by table, and it does not enforce the parent/child relationship. Please note the following guidance when using the Resolution process to resync data:
Add missing parent record rows before adding any children data rows.
Delete child data rows before deleting a parent data row.
Identify Synchronized Tables
Identify the list of tables where data is synchronized between your PeopleSoft CS and PeopleSoft HCM databases; be sure to include setup tables and all tables where manual data entry occurs in both databases.
The following list of synchronized tables is supported by delivered integrations. Not all tables may be populated in your CS database, or are data that your institution keeps in sync. These tables form part of the message structure definition and therefore are included in this list.
Delivered Base Tables
This list is also populated as setup data on the CS Permission Maps page.
|
Name |
Description |
|---|---|
|
ACCOM_DIAGNOSIS |
EE Accommodation Diagnosis |
|
ACCOM_JOB_TASK |
EE Accommodation Job Tasks |
|
ACCOM_OPTION |
EE Accommodation Options |
|
ACCOM_OP_LNG |
EE Accommodation Options |
|
ACCOM_REQUEST |
EE Accommodation Requests |
|
ADDRESSES |
Address Type |
|
ADDRESS_TYP_LNG |
Address Type Table (rel. lang) |
|
ADDRESS_TYP_TBL |
Address Type Table |
|
BEN_PROG_PARTIC |
EE Benefit Programs |
|
BUS_UNIT_HR_LNG |
Rellang HR Business Unit |
|
BUS_UNIT_TBL_HR |
HR Business Unit Table |
|
CAN_JOBCODE_CU |
Canadian WCB Jobcode to CU |
|
CITIZENSHIP |
EE/Dependent Citizenship |
|
CITIZEN_PSSPRT |
EE/Dependent Passport Data |
|
CITIZEN_STS_LNG |
Citizen Status Language Table |
|
CITIZEN_STS_TBL |
Citizen Status Table |
|
CIT_PSSPRT_LANG |
EE/Dependent Passport Data |
|
COMPANY_TBL |
Company Codes |
|
COMPANY_TBL_ITA |
Company Table - ITA |
|
COMPENSATION |
EE Compensation Data |
|
COMPNY_TBL_LANG |
Related Lang-Company Tbl |
|
COMP_PHONE_TBL |
Company Phone Table |
|
COUNTRYTBL_LANG |
Country Related Language |
|
COUNTRY_TBL |
Countries |
|
CURRCD_TBL_LANG |
Currency Related Language |
|
CURRENCY_CD_TBL |
Currency Codes |
|
DEPT_TBL |
Departments |
|
DEPT_TBL_LANG |
Related Lang-Department Tbl |
|
DISABILITY |
Disability |
|
DISABILITY_BRA |
Disability Brazil |
|
DISABILITY_CHE |
Disability Table - CHE |
|
DISABILITY_ESP |
Disability Table - ESP |
|
DISABILITY_FRA |
Disability |
|
DISABILITY_GER |
GER Disabled EE info |
|
DISABILITY_NLD |
Disability Netherlands |
|
DISABILITY_NZL |
NZL Employee Disability Data |
|
DIVERSITY |
Diversity Data |
|
DIVERS_ETHNIC |
Ethnic Diversity |
|
DIVERS_RELIGION |
Religion Diversity - Asia Pac |
|
EMAIL_ADDRESSES |
Email Addresses |
|
EMERGENCY_CNTCT |
EE Emergency Contacts |
|
EMERGENCY_PHONE |
EE Emergency Cntct-Phone Nbr |
|
EO_ADDRFMT_LANG |
Address fields |
|
EO_ADDR_FMT_TBL |
Address fields |
|
ETHNIC_GRP_LANG |
Ethnic Group -Lang |
|
ETHNIC_GRP_TBL |
Ethnic Group Table |
|
HOLIDAY_DATE |
Holiday Dates |
|
HOLIDAY_DTE_LNG |
Holiday Dates RelLang |
|
HOLIDAY_LANG |
Holiday Table ID RelLang |
|
HOLIDAY_TBL |
Holiday Table ID |
|
HP_EMPLT_TEACH |
|
|
HR_EE_SNR_DATES |
Job Labor Seniority Dates |
|
JOB |
EE Job History |
|
JOBCD_COMP_RATE |
Job Code Comp Rate Table |
|
JOBCD_TRN_PROG |
Job Codes |
|
JOBCODE_LANG |
Related Lang-Job Code Tbl |
|
JOBCODE_TBL |
Job Codes |
|
JOB_AUS |
Job Extension for AU |
|
JOB_EARNS_DIST |
EE Job Earnings Distribution |
|
JOB_IND |
Job table for India |
|
JOB_JR |
Job Junior |
|
JOB_MIL |
Military Related Job Fields |
|
JOB_USF |
Job Extension for USF |
|
LOCATION_LANG |
Related Lang-Location Tbl |
|
LOCATION_TBL |
Company Site Locations |
|
MAJOR_TBL |
College Major Subject Codes |
|
MAJOR_TBL_LANG |
Related Lang-Major Tbl |
|
NAMES |
Person Names |
|
NAME_PREFIX_LNG |
Related Lang - Name Prefix Tbl |
|
NAME_PREFIX_TBL |
Name Prefixes |
|
NAME_SUFFIX_LNG |
Related Lang - Name Suffix Tbl |
|
NAME_SUFFIX_TBL |
Name Suffix Table |
|
NAME_TYPE_VW |
Employee Name Types |
|
NATIONALITY_GER |
GER - Nationality record |
|
NID_TYPE_LANG |
Related Lng Tbl - NID_TYPE_TBL |
|
NID_TYPE_TBL |
National ID Type table |
|
NM_ROYPREF_LNG |
Related Lang for Roy Pref |
|
NM_ROYPREF_TBL |
Name Royal Pref Table |
|
NM_ROYSUFF_LNG |
Related Lang for Royal Suff |
|
NM_ROYSUFF_TBL |
Name Royal Suff Table |
|
OPR_DEF_TBL_HR |
Operator Defaults Table - HR |
|
PERSON |
PERSON record |
|
PERSONAL_PHONE |
Personal Data - Phone Numbers |
|
PERSON_BRA |
PERSON BRAZIL |
|
PERSON_FRA |
Person Subrecord - FRA |
|
PERSON_SA |
|
|
PERS_DATA_BRA |
Personal Data Effdt |
|
PERS_DATA_CAN |
Extension of PERSON for CAN |
|
PERS_DATA_CHE |
Extension of PERSON for CHE |
|
PERS_DATA_DEU |
Effdt Ext of PERSON for DEU |
|
PERS_DATA_EFFDT |
Effective Dated Personal Data |
|
PERS_DATA_ESP |
Extension of PERSON for ESP |
|
PERS_DATA_FPS |
Extension of PERSON for FPS |
|
PERS_DATA_FRA |
Extension of PERSON for FRA |
|
PERS_DATA_IND |
Personal Data - India |
|
PERS_DATA_ITA |
Extension of PERSON for ITA |
|
PERS_DATA_JPN |
Extension of PERSON for JPN |
|
PERS_DATA_MEX |
Personal Data Effdt Mexico |
|
PERS_DATA_USA |
Extension of PERSON for USA |
|
PERS_DATA_USF |
Ext of PERS_DATA_EFFDT for USF |
|
PERS_HUKOU_CHN |
PERSON CHINA |
|
PERS_NID |
PERS_NID Record |
|
PERS_REGIST_BEL |
Empl Registration Number - BEL |
|
PERS_SMOKER |
PERSON Smoker History |
|
PERS_WRKLIF_CHN |
PERSON WORK LIFE INFO CHINA |
|
PERS_WRKLV_CHN |
Working & Living Permit |
|
PER_ORG_ASGN |
Person Org Assignments |
|
PER_ORG_ASG_BEL |
PER_ORG_ASG - Exts for Belgium |
|
PER_ORG_ASG_BRA |
PER_ORG_ASG Ext for Brazil |
|
PER_ORG_ASG_FA |
PER_ORG_ASG_FA |
|
PER_ORG_ASG_HP |
Per Org Asgn for E&G |
|
PER_ORG_ASG_JPN |
PER_ORG_ASGN Ext for JPN |
|
PER_ORG_ASG_LNG |
Rel Lng for PER_ORG_ASGN |
|
PER_ORG_ASG_MIL |
Person Assignment - Military |
|
PER_ORG_ASG_NLD |
PER_ORG- Exts for Netherlands |
|
PER_ORG_INST |
Person Org Instance |
|
PER_POI_SCRTY |
Per Poi Security |
|
PER_POI_SCR_DT |
Per Poi Security |
|
PER_POI_TRANS |
Dflt Transaction Tbl for POIs |
|
PER_POI_TRN_LNG |
Lng Tbl for PER_POI_TRANS |
|
PER_POI_TYPE |
Person POI Types |
|
PLACE_ORIG_CHE |
Employee Place of Origin |
|
POI_TYPE_LNG |
POI Type Language |
|
POI_TYPE_TBL |
POI Type Table |
|
REG_REGION_LANG |
Regulatory Region |
|
REG_REGION_TBL |
Regulatory Region |
|
SETID_LANG |
TableSet IDs |
|
SETID_TBL |
TableSet IDs |
|
SET_CNTRL_GROUP |
TableSet Record Groups |
|
SET_CNTRL_REC |
TableSet Record Detail |
|
SET_CNTRL_TBL |
TableSet Controls |
|
STATE_TBL |
State Codes/Names w/in Country |
|
STATE_TBL_LANG |
State Names Related Language |
|
SUPPORT_DOC_TBL |
Visa Supporting Documents |
|
SUPPRT_DOC_LANG |
Related Lang-Visa Support Docs |
|
TITLE_TBL |
Title Table |
|
TITLE_TBL_LNG |
Rellang Title Table |
|
US_SOC_TBL |
US Standard Occupational Codes |
|
US_SOC_TBL_LNG |
US Standard Occupational Codes |
|
VISA_PERMIT_SUP |
Visa Supporting Docs Needed |
|
VISA_PERMIT_TBL |
Visa Requirements by Country |
|
VISA_PERMT_LANG |
Related Lang-Visa Requirements |
|
VISA_PMT_DATA |
EE/Dependent Visa Data |
|
VISA_PMT_DA_LNG |
EE/Dependent Visa Data |
|
VISA_PMT_SUPPRT |
EE/Depndnt Visa Support Docs |
Determine Views Needed for Record Maps
The Utility generally performs data comparison using base tables. In some cases, using views, instead of base tables, provides the ability to filter the data compare between the two databases. This is useful in cases where: the Last Updated Date/Time field values may differ and should be excluded from the compare; record definitions are different between the databases; record definitions include long varchar or image fields (as these are not supported by all comparison methods); or data rows may not be identical – by design – between the databases, such as for filtered populations.
The following views are delivered and can be used for setting Record Maps. These views have certain fields excluded to increase accurate data comparison – such as drop out hits on LASTUPDDTTM values.
Some of these views are existing HCR interface views, and are used elsewhere in Campus Solutions.
New views created for this purpose are named HCI_%.
The following list of base tables and views are referenced in delivered message definitions used with CS-to-HCM integrations.
|
Base Table Name |
View Name |
|---|---|
|
ADDRESSES |
HCR_PER_ADDR_I |
|
NAMES |
HCR_PER_NAME_I |
|
CURRENCY_CD_TBL |
HCI_CRNCY_CD_VW |
|
CURRCD_TBL_LANG |
HCI_CRNCY_CD_VL |
|
DEPT_TBL |
HCI_DEPT_VW |
|
DEPT_TBL_LANG |
HCI_DEPT_VWLANG |
|
JOB |
HCI_JOB_VW |
|
JOBCODE_TBL |
HCI_JOBCODE_VW |
|
JOBCODE_LANG |
HCI_JOBCODE_VWL |
|
JOB_JR |
HCI_JOB_JR_VW |
|
JOB_MIL |
HCI_JOB_MIL_VW |
|
PERSON |
HCR_PERSON_I |
|
PERS_DATA_BRA |
HCI_PDATA_BRAVW |
|
PERS_DATA_EFFDT |
HCR_PER_PDE_I |
|
PERS_NID |
HCR_PER_NID_I |
|
PER_ORG_ASGN |
HCI_PERORGASGNV |
|
PER_ORG_ASG_LNG |
HCI_PERORGASGNL |
|
PER_ORG_INST |
HCI_PERORGINSVW |
|
PER_POI_SCRTY |
HCI_PERPOISECVW |
|
PER_POI_TYPE |
HCI_PERPOITYPVW |
To configure the Utility for data comparison and resolution:
Configure the system.
Set the “Add to CLASSPATH” Variable (optional, only if using Java JDBC methods).
Create Database Link on database server (optional, only if using Database Link method).
Determine Comparison methods (required).
Determine Resolution methods (required).
Define Data Source (optional, only if using Java JDBC methods).
Define Database Link Map (optional, only if using Database Link methods).
Set Record Maps (optional, depends on tables).
Define Winner Rules (optional).
Determine Permission Maps (required).
Configure the HCI_RECORD service operations (optional, only if using Synchronous Message resolution method).
System Configuration: Set the “Add to CLASSPATH” Variable
This procedure is required only if using Java JDBC methods.
This procedure is performed only on the CS 9.0 environment; it does not need to be performed on the HCM environment.
This procedure should be done on both Application Server and Process Server domains.
The Add to CLASSPATH environment variable parameter enables the Java Virtual Machine (JVM) and other Java applications where to find the Java class libraries, including any user-defined class libraries. Because PeopleTools automatically generates CLASSPATH entries for core, delivered class libraries, setting this variable specifies additional class libraries that the PeopleSoft software needs to access.
To use this parameter, you need to uncomment it in the configuration files for Application Server and Process Server.
Use PSADMIN to access the configuration file in the Application Server and Process Server.
Uncomment the “Add to CLASSPATH” variable.
Add the appropriate database platform JAR files to the “Add to CLASSPATH” variable as follows
Database Platform
JAR Files
DB2
db2jcc_license_cisuz.jar
db2jcc4.jar
sqlj4.zip
Microsoft SQL Server
sqljdbc4.jar
Oracle
ojdbc6.jar or latest version
Note: For DB2 platforms it is also necessary to modify the 'Add to PATH' variable and append <db2sqllib>\bin;<db2sqllib>\function. Consult your database platform documentation for further details.
System Configuration: Create Database Link
This procedure is required only if using the Database Link comparison method.
Create the database link on the CS instance database server.
The database link does not need to be created on the HCM instance.
Database links are platform dependent and must be created on the database server. Consult your specific database platform documentation and database administrator for more information and the proper syntax for creating database links on your environments.
Oracle
The following is a sample command for creating a database link on the Oracle database:
CREATE DATABASE LINK HRDBLINK CONNECT TO <sqluid> IDENTIFIED
BY <sqlpass> USING '<dbname>';
Microsoft SQL Server
The following is a set of sample commands for creating a SYNONYM on the SQL Server database. Run the following commands first; substitute your specific values for those in the example:
Example:
sp_addlinkedserver myhost;
Example:
sp_addlinkedsrvlogin myhost, false, 'localaccessid’, ‘remoteaccessid’, ‘remoteaccesspw’;
The syntax is:
sp_addlinkedserver [ @server= ] ‘server’ [ , [ @srvproduct= ] ‘product_name’ ]
[ , [ @provider= ] ‘provider_name’ ]
[ , [ @datasrc= ] ‘data_source’ ]
[ , [ @location= ] ‘location’ ]
[ , [ @provstr= ] ‘provider_string’ ]
[ , [ @catalog= ] ‘catalog’ ]

sp_addlinkedsrvlogin [ @rmtsrvname = ] ‘rmtsrvname’
[ , [ @useself = ] ‘TRUE’ | ‘FALSE’ | NULL ]
[ , [ @locallogin = ] ‘locallogin’ ]
[ , [ @rmtuser = ] ‘rmtuser’ ]
[ , [ @rmtpassword = ] ‘rmtpassword’ ]
Then run the following command; substitute your specific values for those in the example:
Example:
CREATE SYNONYM HR_PS_VISA_PMT_DATA FOR myhost.mydb.dbo.PS_VISA_PMT_DATA;
The syntax is:
CREATE SYNONYM [ schema_name_1. ] synonym_name FOR <object><object> :: ={ [ server_name.[ database_name ] . [ schema_name_2 ].| database_name . [ schema_name_2 ].| schema_name_2. ] object_name}
Test by running the following command:
Example:
SELECT COUNT(*) FROM HR_PS_VISA_PMT_DATA;
See PeopleTools: System and Server Administration, “Setting Application Server Domain Parameters”
Configuring Comparison Methods
There are three delivered methods for performing data comparison:
|
Method |
Description |
|---|---|
|
SCCDBLINK |
Use Database Link |
|
SCCJDBC |
Use Java JDBC |
|
Full Sync Method |
Full Data Publish asynchronous message process Note: There is no Comparison Methods setup data for the Full Sync method as it leverages the Full Data Publish message subscription process. |
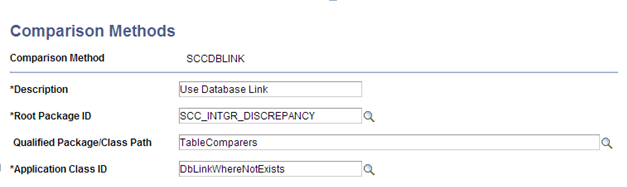
Access the Comparison Methods page ().
Image: Comparison Methods page
This example illustrates the fields and controls on the Comparison Methods page. You can find definitions for the fields and controls later on this page.
|
Field or Control |
Definition |
|---|---|
| Description |
The description for the comparison method. |
| Root Package ID |
The application package used for the comparison method. |
| Qualified Package\Class Path |
The class path being used. |
| Application Class ID |
The application class ID being used. |
The following table details the required configuration components for each comparison method.
|
Comparison Method |
Data Source |
Database Link on Server |
Database Link Map |
Record Maps |
Permission Maps |
Service Operation |
|---|---|---|---|---|---|---|
|
SCCDBLINK - Database Link |
X |
X |
X |
X |
||
|
SCCJDBC - Java JDBC |
X |
X |
X |
|||
|
Full Sync |
X |
X |
X |
Java JDBC
The Java JDBC method uses a Java class to read from the HCM database, and the data is then compared inside the SCC_DISCREP2 batch process with data discrepancies logged to the Integration Discrepancies table. The Java objects required for using this method were delivered with the CS 9.0 Bundle #29 package.
This method generally performs slower than the database link method, but does not require the maintenance that a database link may. Consider using this method if a database link is not suitable for your environment.
To use the delivered Java JDBC method, the following steps are required:
The “Add to CLASSPATH” system configuration detailed in the preceding step must be complete.
A Data Source definition for the foreign HCM database must be defined.
Record Maps and Permission Maps must be defined as appropriate for the tables that will be compared.
Database Link
The Database Link method uses a database link to join the HCM table to its sibling CS table, with the data comparison done on the database server. Results are returned to the SCC_DISCREP2 batch process with data discrepancies logged to the Integration Discrepancies table.
This method generally performs the fastest, but does not run on all platforms.
To use the delivered Database Link method, the following steps are required:
A database link to the HCM database must be created on the database server for the CS 9.0 instance.
A Database Link Map must be defined for every table that will be compared.
Record Maps and Permission Maps must be defined appropriately for the tables that will be compared.
Full Sync
The Full Sync method leverages the delivered Full Data Publish messages which are published from the HCM instance and a special subscription handler in the CS instance is used to read and perform the data compare.
The Full Sync method is better suited for smaller volume tables as it generally runs slower than the other methods, but it will run on any platform. Use this method if you cannot use the others.
Important! Do NOT activate the standard Full Sync subscription handlers when using this method, as this can impact data in the production tables. The SCC_INTGR_DISCREPENCY handler code delivered for performing this comparison does not update data in the base tables.
Configuring and Running the FULLSYNC Compare Method
This section discusses how to:
Configure the FULLSYNC service operations.
Define the Full Data Publish Rule.
Run the Full Data Publish process.
Review integration discrepancy results.
Configuring the FULLSYNC Service Operations
To set up service operation on the HCM instance:
Access .
Activate the selected FULLSYNC service operation on for the message that contains the tables you will compare.
Grant appropriate service operation security
No Handlers are required.
Configure the routing to the Campus Solutions 9.0 database, using proper transformations if required for the message being used.
To set up service operation on the CS instance:
Access .
Activate the selected FULLSYNC service operation on for the message that contains the tables you will compare.
Grant appropriate service operation security.
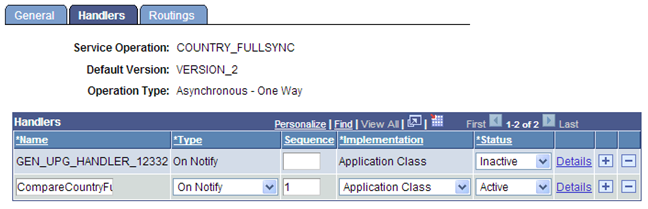
On the Handlers tab, configure the Full Sync Compare subscription handler as follows:
Important! Inactivate the FULLSYNC data handler for this procedure as this can impact production data. After the Full Sync data compare is completed, reset your handler settings as desired
On the Service Operation Handler tab, insert a row in the Handlers grid: 1) Define a Name for the handler, 2) Type = OnNotify, 3) Implementation = Application Class, and 4) Status = Active.
Image: Handlers page
This example illustrates potential Handlers page field values.
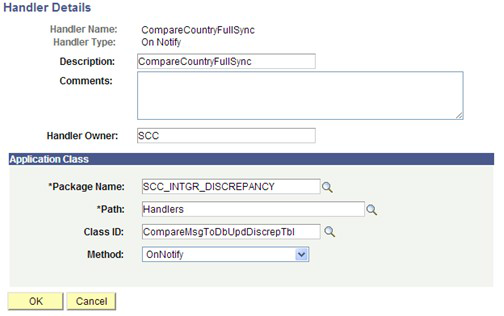
Click the Details link: 1) Enter Description, 2) Comments optional, 3) Define a Handler Owner, and 4) In the Application Class section, enter the field values shown below:
Image: Handler Details page
This example illustrates potential Handler Details page field values.
Configure the inbound routing in CS database, using transformations if required for the selected FULLSYNC service operation.
Save the Service Operation changes.
Defining the Full Data Publish Rule
To define the full data publish rule:
Access .
Configure the Full Data Publish Rule for the selected FULLSYNC service operation.
Running the Full Data Publish Process
To run on the HCM instance:
Access .
On the run control, set the process request parameters and select the desired Service Operation.
Run the process.
Reviewing Integration Discrepancy Results
To run on the CS instance:
Confirm successful FULLSYNC message transaction subscription in Integration Broker Monitor.
Review the results on the Integration Discrepancies pages.
Configuring Resolution Methods
The resolution method is the way the Utility can resync data between the databases. Either method is invoked by the Resolve Discrepancies process (Application Engine SCC_DISCREP3). There are two delivered resolution methods which can be used to re-sync data discrepancies:
|
Method |
Description |
|---|---|
|
SCCJAVA1 |
Apply winner via Java jdbc |
|
SCCSYNCMSG1 |
Apply winner via Synchronous Message |
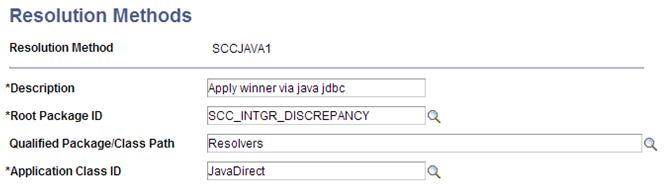
Access the Resolution Methods page ().
Image: Resolution Methods page
This example illustrates the fields and controls on the Resolution Methods page. You can find definitions for the fields and controls later on this page.
|
Field or Control |
Definition |
|---|---|
| Description |
The description for the resolution method. |
| Root Package ID |
The application package used for the resolution method. |
| Qualified Package\Class Path |
The class path being used. |
| Application Class ID |
The application class ID being used. |
Either resolution method may be used independent of what method was used for the data compare.
The following table details the required configurations for each delivered resolution method. The procedures for each are detailed in subsequent sections of this document.
|
Resolution Method |
Data Source |
Record Maps |
Permission Maps |
Winner Rules |
Service Operation |
|---|---|---|---|---|---|
|
SCCJAVA1 Java JDBC |
X |
X |
X |
X |
|
|
SCCSYNCMSG1 Synchronous Message |
X |
X |
X |
X |
Defining Data Sources
In order to use the Java JDBC methods, a data source for the HCM database must be defined.
It is not necessary to define a data source for the CS database instance.
Important! Define the data source name to match the Node name of the HCM database.
The sample connect string is platform-specific. Select the appropriate the Platform Type dropdown to see examples of the connect string relevant for the matching database platform.
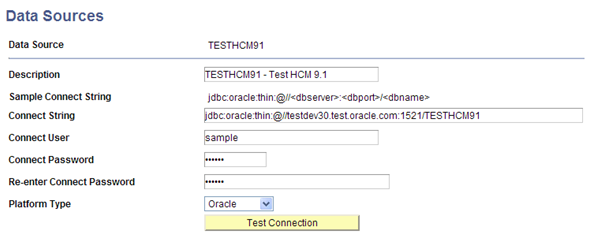
Access the Data Sources page ().
Image: Data Sources page
This example illustrates the fields and controls on the Data Sources page. You can find definitions for the fields and controls later on this page.
|
Field or Control |
Definition |
|---|---|
| Description |
Enter the description for the data source. |
| Sample Connect String |
The displayed text will change based on the Platform Type selected below. |
| Connect String |
Enter the connect string, following the correct platform parameters. |
| Connect User |
Enter the connect user ID. |
| Connect Password |
Enter the password for the connect user ID. |
| Re-enter Connect Password |
Re-enter the password for the connect user ID. |
| Platform Type |
Supported platform types. |
| Test Connection |
Click this button to test the connection. A successful connection will cause a “success” message to appear; an unsuccessful connection will cause a Java error message to appear. |
Defining Database Link Maps
To use the Database Link comparison method (SCCDBLINK), a database link for the HCM database must exist on the CS database server, and a database link map must be defined for every table that is being compared. For SQL Server database link maps, use the synonym name instead of the table name.
Access the Database Link Maps page ().
Image: Database Link Maps page for Oracle database
This example illustrates the fields and controls on the Database Link Maps page for Oracle database. You can find definitions for the fields and controls later on this page.
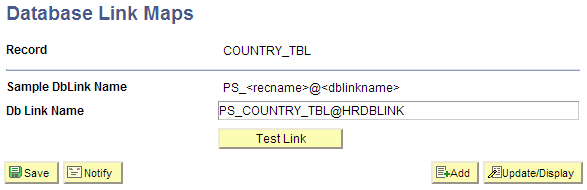
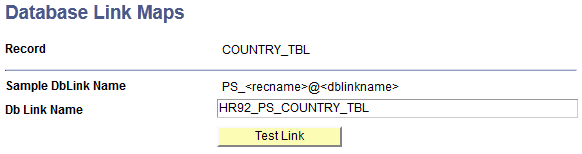
Image: Database Link Maps page for SQL Server
This example illustrates the fields and controls on the Database Link Maps page for SQL Server. You can find definitions for the fields and controls later on this page.
|
Field or Control |
Definition |
|---|---|
| Record |
The table name that is being defined. |
| Sample Db Link Name |
All database link maps should follow this example. |
| Db Link Name |
Enter the Db Link using the proper syntax. |
Defining Record Maps
When the Comparison process runs, the program will evaluate the Record Maps definitions and will select data using any defined Mapping View Name instead of selecting the columns from the base table definition.
Record Maps are not required. Data comparisons can be done directly between the tables; however Record Maps are necessary when you want to omit columns or rows, or reformat columns for comparison. This allows for configuration and extensibility in several ways:
Exclude audit fields such as LASTUPDDTTM.
Exclude other data fields.
Compare records between databases where record definitions are different.
Include custom logic, such as custom selection criteria in SQL View text.
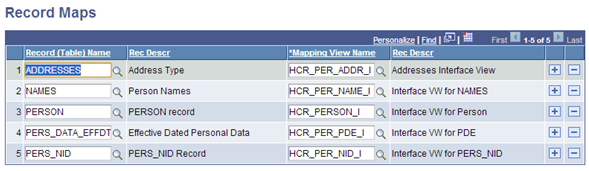
Access the Record Maps page ().
Image: Record Maps page
This example illustrates the fields and controls on the Record Maps page. You can find definitions for the fields and controls later on this page.
|
Field or Control |
Definition |
|---|---|
| Record (Table) Name |
Enter the base SQL Table name. |
| Rec Descr |
The Record Definition description for the base SQL Table. |
| Mapping View Name |
Enter the SQL View name to be used. This must be a valid SQL View in Application Designer. |
| Rec Descr |
The Record Definition description for the SQL View. |
Defining Winner Rules
Usually most data discrepancies will be due to specific reasons and should be investigated and resolved individually. For example, a broken integration transaction might be suspended in the Queue. To resolve, this transaction should be fixed and resubmitted through the Queue.
There may be circumstances when data discrepancies can be resolved in the same way. Using a winner rule can simplify the task of setting the winners on the Integration Discrepancies page (described later in this document). For example, you may set some data discrepancy winners manually, but then use a winner rule to update the rest.
For the delivered winner rules, only those rows on the Integration Discrepancies page that are marked Undecided will be updated according to the rule that is selected.
Winner Rules are used on the Resolve Discrepancies process run control page.
There are two delivered Winner Rule ID definitions:
|
Method |
Description |
|---|---|
|
SCCFRGNWINSALL |
Foreign Wins All (the designated foreign “target” database values will be used to update the local database). |
|
SCCLOCALWINSALL |
Local Wins All (the designated local “source” database values will be used to update the foreign database). |
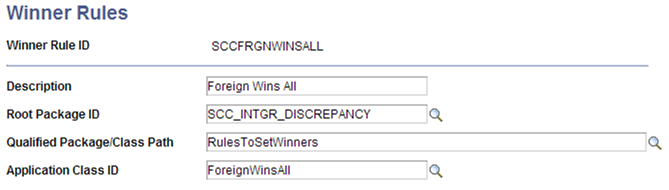
Access the Winner Rules page ().
Image: Winner Rules page
This example illustrates the fields and controls on the Winner Rules page. You can find definitions for the fields and controls later on this page.
|
Field or Control |
Definition |
|---|---|
| Description |
The description for the winner rule. |
| Root Package ID |
The application package used for the winner rule. |
| Qualified Package\Class Path |
The class path being used. |
| Application Class ID |
The application class ID being used. |
Defining Permission Maps
Permission Maps define security settings for read/write access to tables used by the Comparison and Resolution processes. Both CS and HCM environments must be configured with appropriate Permission Maps settings. Read/Write security authorization is assigned by Record name associated with a Permission List.
The SCC_DISCREP2 compare process uses the mapped view to do the comparison. The SCC_DISCREP3 resolution process uses the base table.
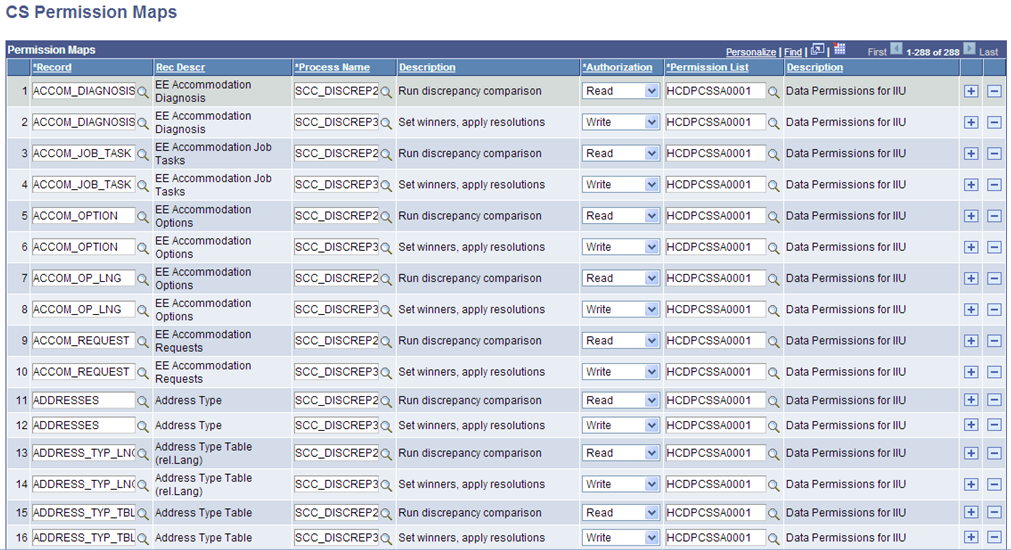
In the CS instance, access the CS Permission Maps page .
Image: CS Permission Maps page
This example illustrates the fields and controls on the CS Permission Maps page. You can find definitions for the fields and controls later on this page.
|
Field or Control |
Definition |
|---|---|
| Record |
Enter the base table name. |
| Rec Descr |
The Record Definition description of the base table. |
| Process Name and Description |
The delivered SCC_DISCREP2 or SCC_DISCREP3 App Engine processes. |
| Authorization |
Read or Write access to the specified record. |
| Permission List |
Data Permission List that must be attached to Role to the User. |
| Description |
The permission list description. |
Note: The Process Name provides an additional security attribute for the Synchronous Message method HCI_RECORD service operations to ensure the service request is being made from one of the authorized programs or components.
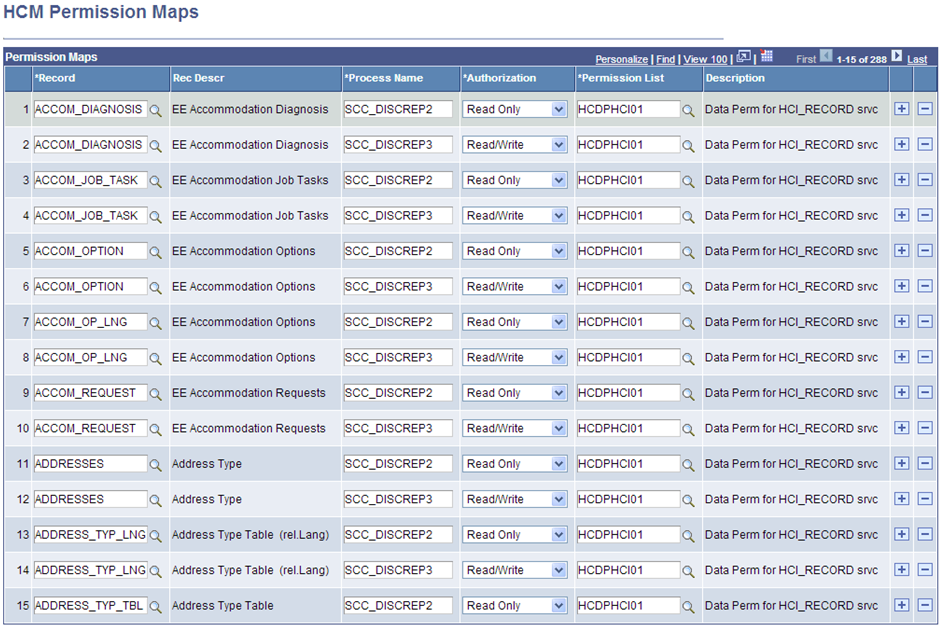
In the HCM instance, access the HCM Permission Maps page .
Image: HCM Permission Maps page
This example illustrates the fields and controls on the HCM Permission Maps page. You can find definitions for the fields and controls later on this page.
|
Field or Control |
Definition |
|---|---|
| Record |
Enter the base table name. |
| Rec Descr |
The Record Definition description of the base table. |
| Process Name |
The delivered SCC_DISCREP2 or SCC_DISCREP3 App Engine processes. |
| Authorization |
Read or Write access to the specified record. |
| Permission List |
Data Permission List that must be attached to Role to the User. |
| Description |
The permission list description. |
Configuring the HCI_RECORD Service Operations
The HCI_RECORD service is a synchronous request/response message which is invoked by the Synchronous Message resolution process to perform Add, Update, and Delete actions on data.
There are three service operations used by the Synchronous Message (SCCMSGSYNC1) resolution method:
HCI_RECORD_DELETE
HCI_RECORD_GET
HCI_RECORD_PUT
The HCI_RECORD service operations are used with the Synchronous Message resolution method. The following steps describe how to configure the HCI_RECORD service operations.
Note: These instructions show pages from the HCM 9.1 database, but are the same for all releases.
Configure HCI_RECORD Service Operations in HCM
Begin the procedure in the HCM database.
Image: Example of Service Operations search page (HCM)
This example illustrates the fields and controls on an example of the Service Operations search page (HCM).
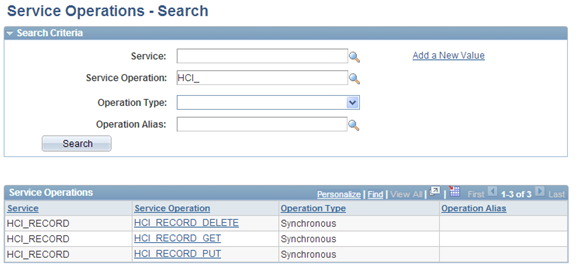
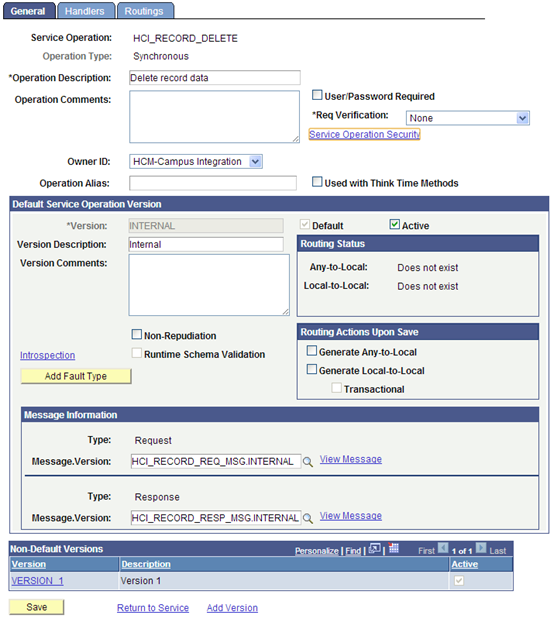
Open Service Operation HCI_RECORD_DELETE.
Image: Example of Service Operations – General page (HCM)
This example illustrates the fields and controls on an example of the Service Operations – General page (HCM).
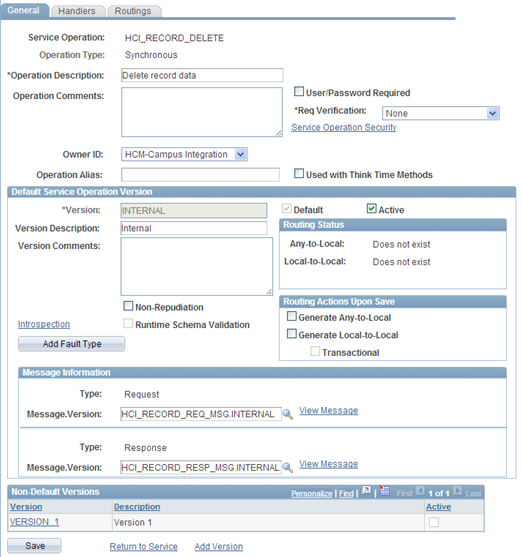
In the Default Service Operation Version group box, select the Active check box and click Save.
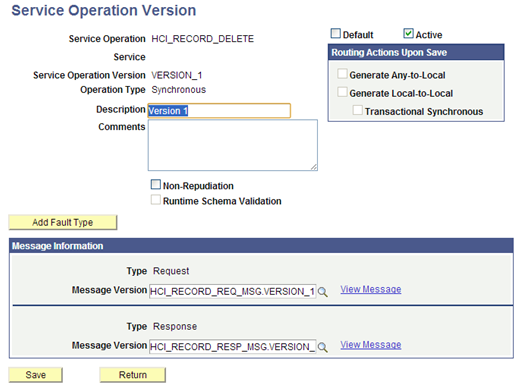
In the Non-Default Versions group box, click the VERSION_1 link.
Image: Example of Service Operation Version page (HCM)
This example illustrates the fields and controls on the Example of Service Operation Version page (HCM).
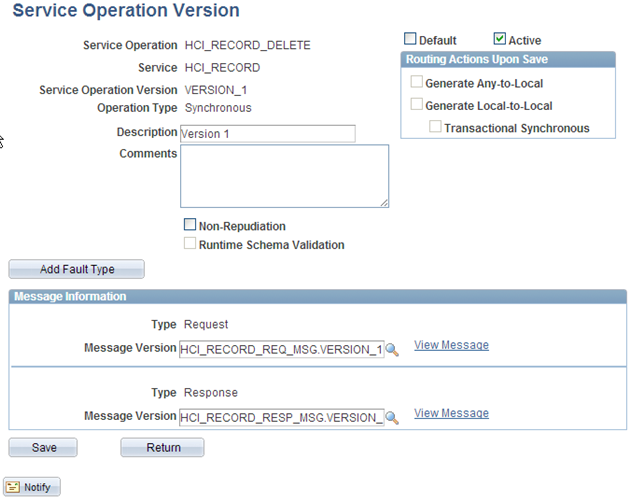
Select the Active check box and click Save.
Click Return.
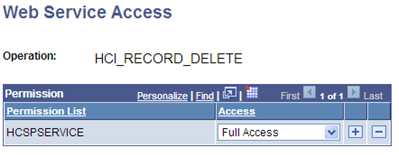
Back on the General page, click the Service Operation Security link and enter the appropriate permission list.
Image: Example of Web Service Access page (HCM)
This example illustrates the fields and controls on an example of the Web Service Access page (HCM).
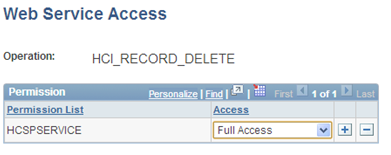
Click Save, then close the window.
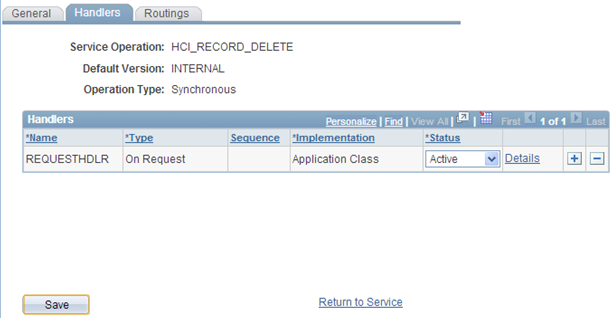
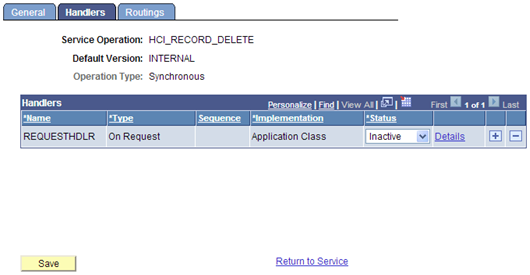
Select the Handlers tab to activate the On-Request Handler, as shown below.
Image: Example of Service Operations – Handlers page (HCM)
This example illustrates the fields and controls on an example of the Service Operations – Handlers page (HCM).
Select the Routings tab to add a routing to the sender database.
(In this example, the SPLTC90M database is the sender, so the routing is named HCI_REC_DEL_FROM_SPLTC90M.)
Image: Example of Routing Definitions page (HCM)
This example illustrates the fields and controls on an example of the Routing Definitions page (HCM).
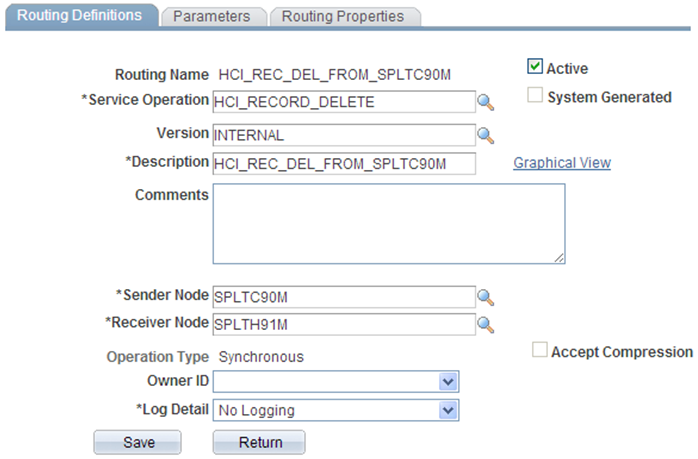
Enter a Description, Sender Node, and Receiver Node.
On the Parameters tab, enter information as shown in the screenshot below:
Image: Example of Parameters page (HCM)
This example illustrates the fields and controls on an example of the Parameters page (HCM).
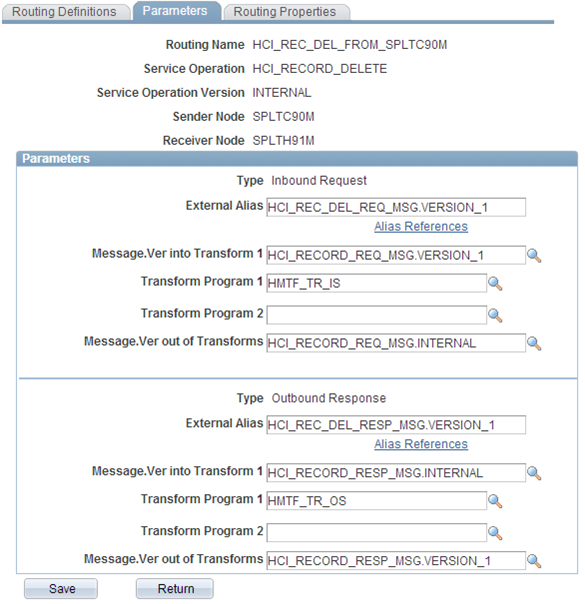
The Inbound Request transformation program is HMTF_TR_IS.
The Outbound Response transformation program is HMTF_TR_OS.
The External Alias is changed to VERSION_1 in both cases.
Click Save and then click Return.
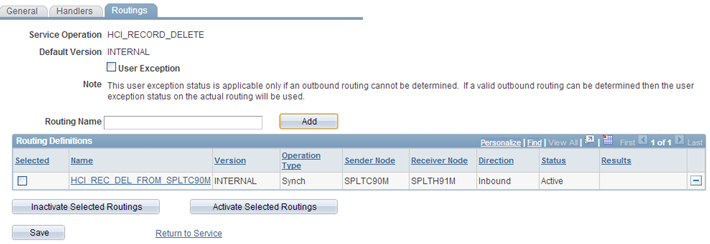
Click Save on the Routings tab.
Image: Example of Service Operations – Routings page (HCM)
This example illustrates the fields and controls on an example of the Service Operations – Routings page (HCM).
Important! Repeat the above steps in the HCM database for the following service operations: HCI_RECORD_GET and HCI_RECORD_PUT.
Configuring HCI_RECORD Service Operations in CS
Begin the procedure in the CS database.
The configuration steps are similar as in the HCM database, with the following exceptions:
Do not activate the subscription handlers.
The Routing transformations parameter settings are different.
Open Service Operation HCI_RECORD_DELETE.
Image: Example of General page (CS)
This example illustrates the fields and controls on an example of the General page (CS).
In the Default Service Operation Version group box, select the Active check box and click Save.
In the Non-Default Versions group box, click the VERSION_1 link.
Image: Example of Service Operation Version page (CS)
This example illustrates the fields and controls on an example of the Service Operation Version page (CS).
Select the Active check box and click Save.
Click Return.
Back on the General page, click the Service Operation Security link and enter the appropriate permission list.
Image: Example of Web Service Access page (CS)
This example illustrates the fields and controls on an example of the Web Service Access page (CS).
Click Save, then close the window.
Select the Handlers tab to confirm that the On-Request Handler is inactive, as shown below.
Image: Example of Service Operations – Handlers page (CS)
This example illustrates the fields and controls on an example of the Service Operations – Handlers page (CS).
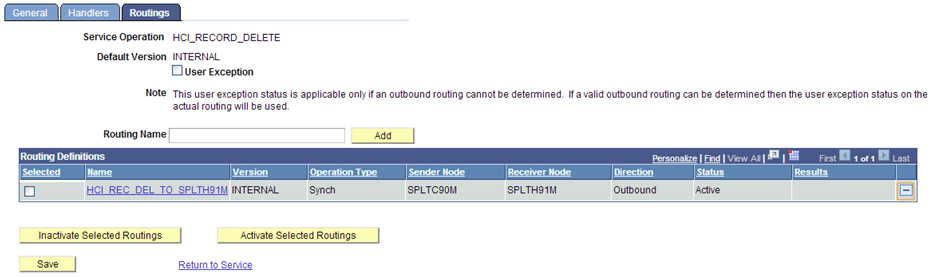
Select the Routings tab to add a routing to the sender database.
(In this example, the SPLTC90L database is the sender, so the routing is named HCI_REC_DEL_TO_SPLTH91M.)
Image: Example of Routing Definitions page (CS)
This example illustrates the fields and controls on an example of the Routing Definitions page (CS).
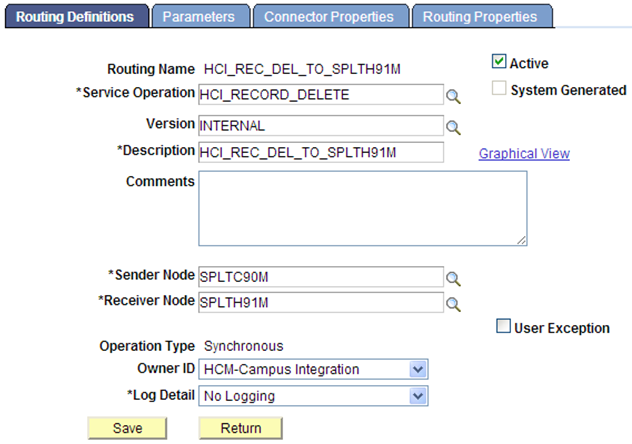
Enter a Description, Sender Node, and Receiver Node.
On the Parameters tab, enter information as shown in the screenshot below:
Image: Example of Parameters page (CS)
This example illustrates the fields and controls on an example of the Parameters page (CS).
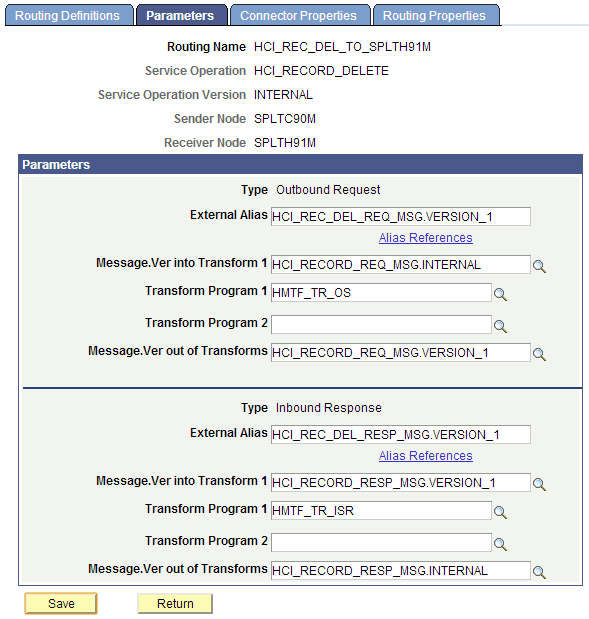
The Inbound Request transformation program is HMTF_TR_ISR.
The Outbound Response transformation program is HMTF_TR_OS.
The External Alias is changed to VERSION_1 in both cases.
Click Save and then click Return.
Click Save on the Routings tab.
Image: Example of Service Operations – Routings page (CS)
This example illustrates the fields and controls on an example of the Service Operations – Routings page (CS).
Important! Repeat the above steps in the CS database for the following service operations: HCI_RECORD_GET and HCI_RECORD_PUT.
Warning! The HCI_RECORD service is intended for use with the Synchronous Message resolution method of the Integration Integrity Utility only. The delivered service operations can – depending on security permission settings – perform data updates to any table in the system. As such, Security Administrators should carefully review which users will have access to the pages, record and permission mappings, and process settings related to this service. Improper use may result in data compromise or corruption. The HCI_RECORD_DELETE, HCI_RECORD_GET, and HCI_RECORD_PUT service operations should only be activated if the Synchronous Message Resolution method will be used.
Running Discrepancy Comparison
The Run Discrepancy Comparison page is the primary run control page where the list of tables to be compared and the methods for the data compare are set. The process initiates a compare of the data for the listed records between the databases, and logs discrepancy results in the Integration Discrepancies tables for review.
Individually add record names to the grid or populate a list of records from a message definition by using the Append Table Names from Message button.
Note: When populating the list of records from a message, choose the INTERNAL version of the message if it exists for the selected message name.
Run the compare process as many times as desired for any set of tables. When a process is launched, any previous data discrepancy results for the same tables are deleted and refreshed with the latest results of the compare.
If using the Database Link method, confirm that a Database Link Map is defined for all the records you specify. The process will abort if it does not find an entry in the Database Link Map table for the specified record.
Confirm that Permission Maps are defined for all records you specify for compare. Confirm that the user running the process has appropriate permission list defined. The process will abort if it does not find an entry in the Permission Maps table for the record name being compared.
Access the Run Discrepancy Comparison page ().
Image: Run Discrepancy Comparison page
This example illustrates the fields and controls on the Run Discrepancy Comparison page. You can find definitions for the fields and controls later on this page.
|
Field or Control |
Definition |
|---|---|
| Foreign Node Name |
Enter the data source name; this must be a valid Integration Broker Node name. |
| Comparison Method |
Select the comparison method to be used. The delivered choices include SCCDBLINK and SCCJDBC. |
| Append Table Names from Message |
Press this button after the Message Name and Message Version fields are entered. |
| Message Name |
Select the message name for which records are being compared. |
| Message Version |
Select the desired message version. |
| Record |
The base table being compared. |
| Mapping View Name |
A view defined on the Record Map for the base table. |
| Record Description |
The description of the base table, or mapping view if defined. |
Reviewing Integration Discrepancies
Once a compare is run, all data discrepancies found by the process appear on the Integration Discrepancies page. The data results displayed in the Integration Discrepancies page are specific to each table name. Use the results to analyze what data is out of sync, and then investigate why this may be the case.
Once data discrepancies are resolved and the data is re-synced, they will no longer appear on this page on subsequent compares of the table.
Data discrepancies due to errors in Integration Broker processing should be investigated and then resubmitted for proper Integration Broker handling.
Select the Winner value for all data rows that will be re-synced using the Resolve Discrepancies process (see next section).
Foreign: the row or values in the foreign node will be updated in the local node
Local: the row or values in the local node will update the foreign node
Undecided: nothing will change
Access the Integration Discrepancies page by selecting the appropriate record name on the search record ().
Image: Example of Integration Discrepancies page (1 of 2)
This example illustrates the fields and controls on an example of the Integration Discrepancies page, after the initial compare is done.
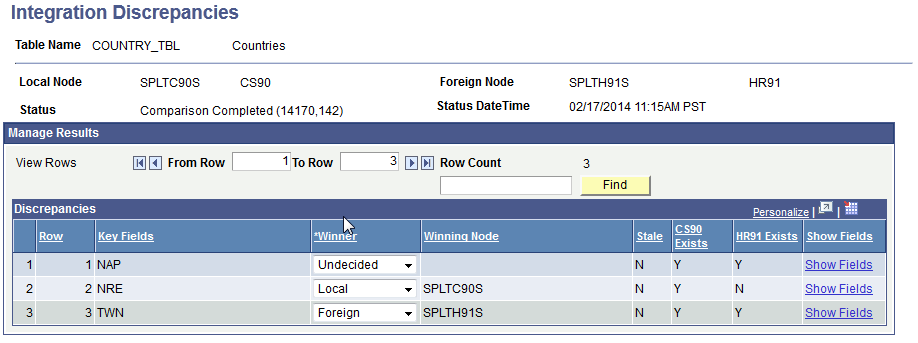
Image: Example of Integration Discrepancies page (2 of 2)
This example illustrates the fields and controls on an example of the Integration Discrepancies page, after the Stale data column = Y and the system has made the Winner field unavailable for entry.
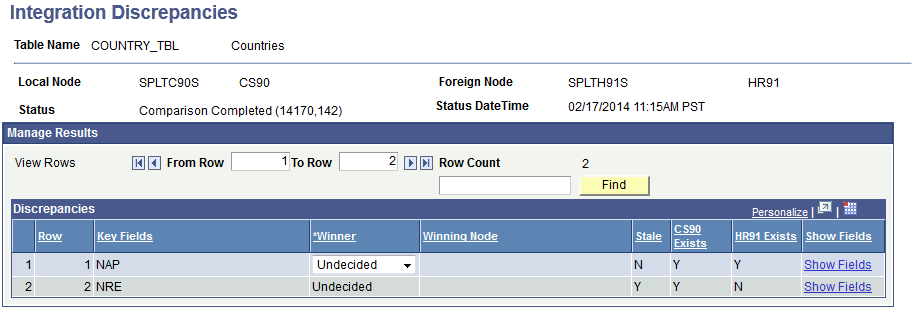
The page displays data rows that are missing in either of the database instances and where field values are different.
|
Field or Control |
Definition |
|---|---|
| View Rows |
The Row Count shows the total number of data rows identified by the compare. Enter numbers in the From Row and To Row fields and then click the Find button to navigate between many rows. |
| Find |
Enter a search value in the box and click this button to locate a value string within results. |
| Key Fields |
The key field values for the data rows on the table that was compared. |
| Winner |
Select the value for the resolution process to follow, if desired. Options are: Undecided, Foreign, or Local. |
| Winning Node |
The description of the node set by the value selected in the Winner field. |
| Stale |
Indicates that the data has changed in the foreign or local database after the Discrepancy Comparison process was run. Y = Stale data conditions are detected. N = Data is unchanged since the Discrepancy Comparison process was run. When Stale = Y, the Resolve Discrepancies process has detected data that has changed since the Discrepancy Comparison process was run. The Winner field becomes unavailable for such rows. Investigate why this data may have changed. The next run of the Discrepancy Comparison process may no longer show a discrepancy for such rows of data if the values are back in sync. |
| Exists columns |
The Local and Foreign node names appear in the column header and appear if the data row exists. Y = Yes exists in this node. N = No does not exist in this node. |
| Show Fields |
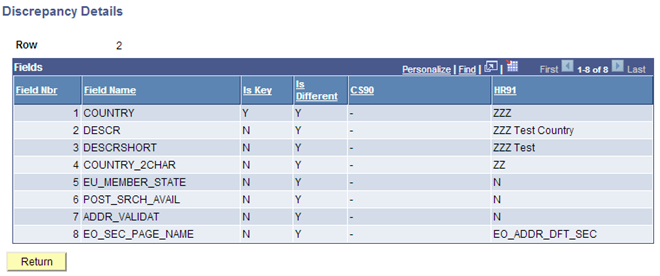
Click the link to access the Discrepancy Details page. This page shows field value differences for the selected row. |
Access the Discrepancy Details page (Click the Show Fields link for any row on the Integration Discrepancies page).
Image: Discrepancy Details page
This example illustrates the fields and controls on the Discrepancy Details page.
Resolving Integration Discrepancies
The Resolve Discrepancies page is used to run the process for each table that data discrepancies have been found, and that you determine should be updated through the resolution process. Winner dispositions are set on the Integration Discrepancies page. It is important to ensure that data rows selected to be updated by the resolution process have been thoroughly investigated and this method of re-sync is desired.
The resolution process is performed by table. Run the resolution process for all tables with data discrepancies. If there are multiple tables related to an entity, be sure all table data discrepancies are resolved.
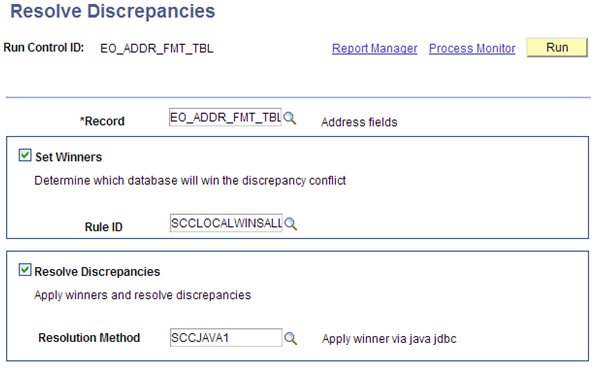
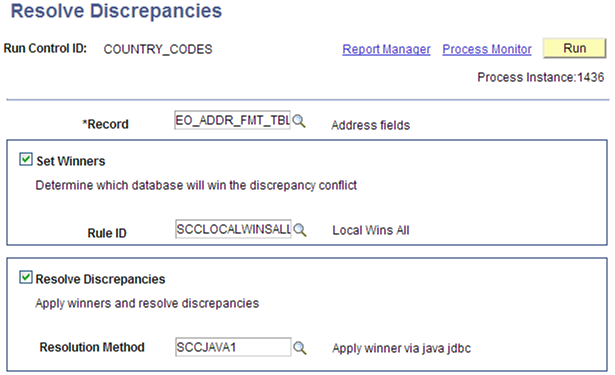
Access the Resolve Discrepancies page ().
Image: Resolve Discrepancies page
This example illustrates the fields and controls on the Resolve Discrepancies page. You can find definitions for the fields and controls later on this page.
|
Field or Control |
Definition |
|---|---|
| Record |
Select the table name where data discrepancies are being resolved. |
| Set Winners |
Select the check box if a Winner Rule will be used. If selected, the process will update all Undecided rows on the Integration Discrepancies page with the selected winner rule logic (such as local wins, foreign wins). |
| Rule ID |
Select the Rule ID to use. |
| Resolve Discrepancies |
Select the check box to apply winners and update data values in the databases accordingly. |
| Resolution Method |
Select the resolution method being used for the updates. |
Reviewing the Resolution Log
Access the Resolution Log page ().
Image: Resolution Log page
This example illustrates the fields and controls on the Resolution Log page. You can find definitions for the fields and controls later on this page.
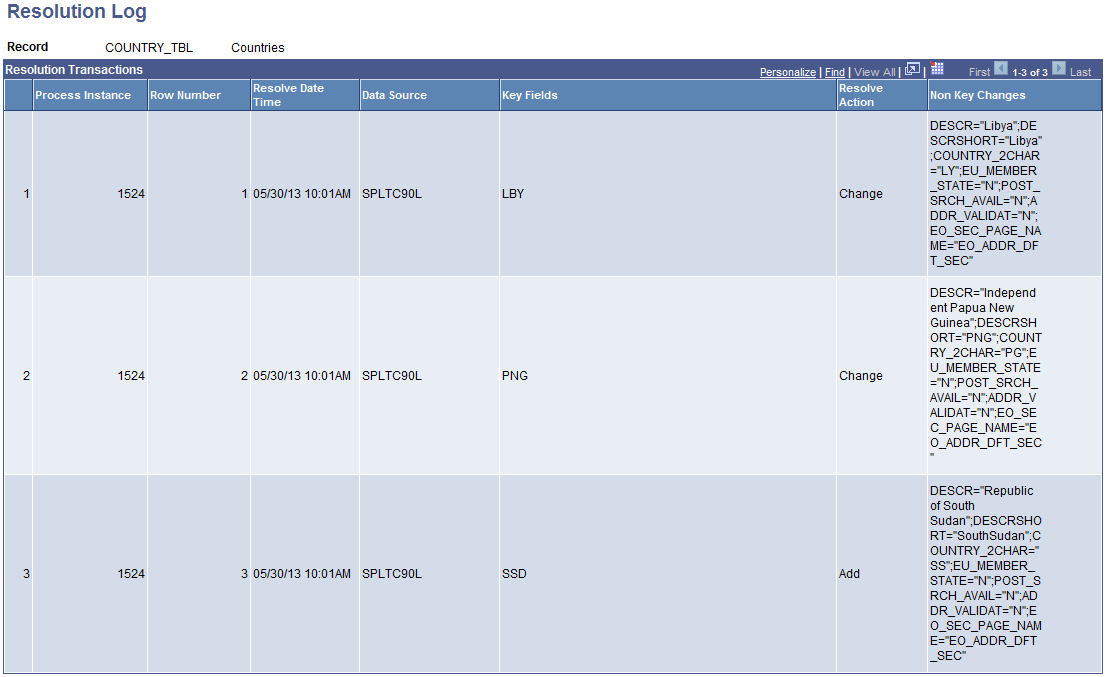
When you run the Resolve Discrepancies process, the system logs all data discrepancies that are updated and displays them on this page. The log entries provide an audit history of the data updated through this process.
|
Field or Control |
Definition |
|---|---|
| Process Instance |
The Resolve Discrepancies process instance used. |
| Row Number |
The row number from the Integration Discrepancies page that is updated. |
| Resolve Date/Time |
The date and time when the Resolve Discrepancies process updated the row of data. |
| Data Source |
The database that was used to provide the winner data values. |
| Key Fields |
The key value(s) for the data row that has been updated. |
| Resolve Action |
The action taken on the data row. Delivered values include: Add, Change, and Delete. |
| Non Key Changes |
The value(s) for the additional non-key fields in the data row that has been updated. |
Purging the Resolution Log
Access the Purge Resolution Log page ().
Image: Purge Resolution Log page
This example illustrates the fields and controls on the Purge Resolution Log page. You can find definitions for the fields and controls later on this page.
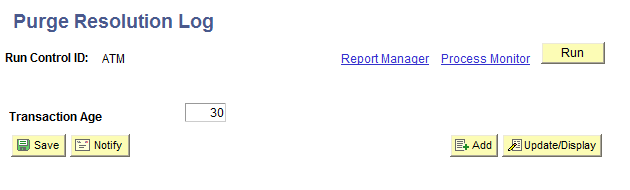
The Purge Resolution Log process removes unwanted history rows from the Transaction Log table. Run this process as frequently as desired. The system deletes data rows purged by this process from the database. Carefully consider what record retention policies you may have in place to determine with what frequency you run this process.
|
Field or Control |
Definition |
|---|---|
| Transaction Age |
Enter the number of days’ worth of history rows to delete. For example, 30 will cause the system to remove all rows dated 30 days prior to the current system date and earlier. The default value is 0 (zero) and when the process runs, all rows from the Resolution Log table are deleted. |
Examples of Integration Discrepancies
The following are examples of setting up, running, and viewing Integration Discrepancies.
Example: Country Codes COUNTRY_SYNC (Tables: COUNTRY_TBL, EO_ADDR_FMT_TBL)
No Record Maps required (tables do not include audit fields, and so on).
CS 9.0 – HCM 9.1.
Using SCCDBLINK Database Link compare method.
Data will be resolved using Local Wins All winner rule.
Database Link HRDBLINK created on the CS 9.0 database server. (not shown here).
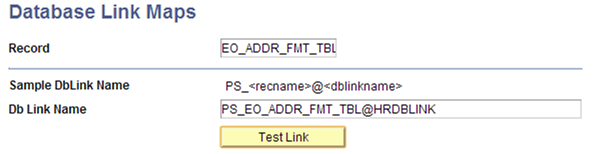
Database Link Maps for the tables included in COUNTRY_SYNC.
Image: Example of Database Link Maps for COUNTRY_TBL record
This example illustrates the fields and controls on an example of the Database Link Maps page for the COUNTRY_TBL record.
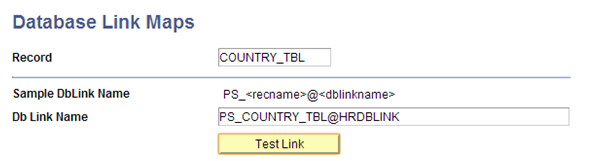
Image: Example of Database Link Maps for EO_ADDR_FMT_TBL record
This example illustrates the fields and controls on an example of the Database Link Maps page for the EO_ADDR_FMT_TBL record.
Confirm tables are listed in CS Permission Maps.
Image: Example of table list
This example illustrates the fields and controls on an example of the CS Permission Maps list.

Confirm User ID has an assigned Role of CS – IIU Administrator (this includes the data permission list for record permissions).
Image: Example of Roles page
This example illustrates the fields and controls on an example of the Roles page.

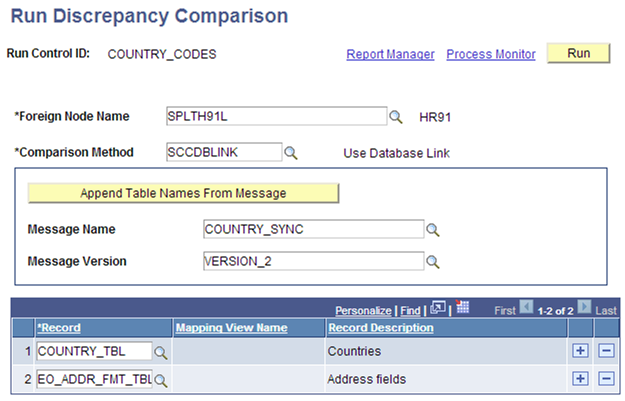
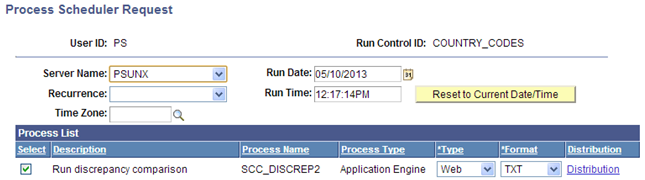
Run the Discrepancy Comparison process.
Image: Example of Run Discrepancy Comparison run control page
This example illustrates the fields and controls on an example of the Run Discrepancy Comparison page.
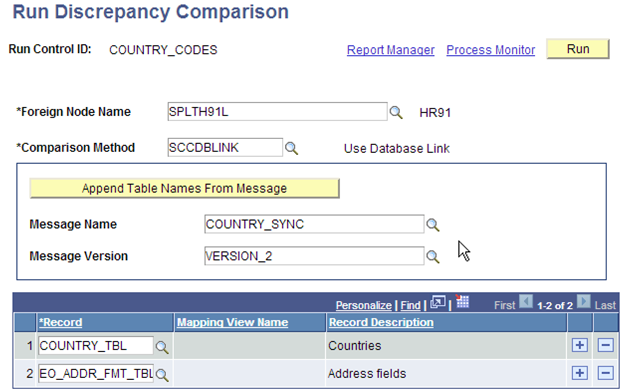
Image: Example of Process Scheduler Request page for Run Discrepancy Comparison process
This example illustrates the fields and controls on an example of the Process Scheduler Request page.
Review Integration Discrepancies for both tables.
Image: Example of Integration Discrepancies page (1 of 2)
This example illustrates the fields and controls on an example of the Integration Discrepancies page for COUNTRY_TBL.
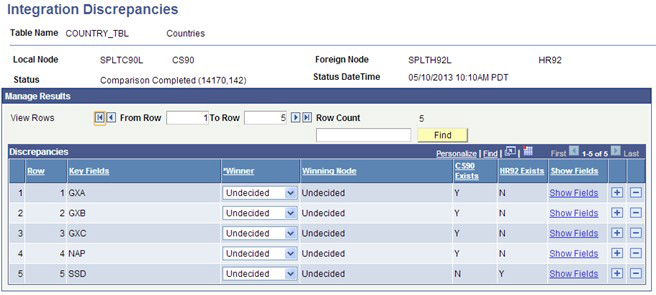
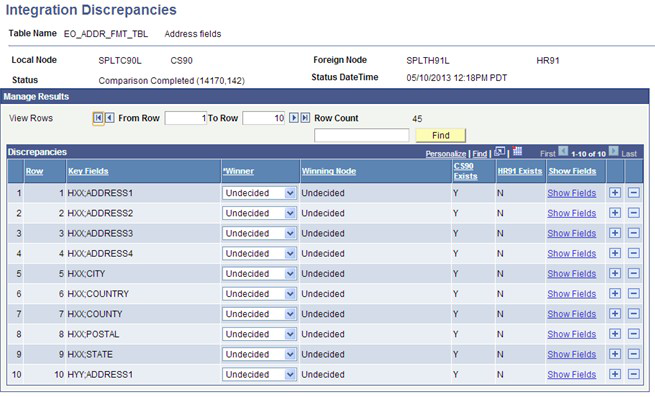
Image: Example of Integration Discrepancies page (2 of 2)
This example illustrates the fields and controls on an example of the Integration Discrepancies page for EO_ADDR_FMT_TBL.
Review data to determine that no discrepancies are due to blocked Integration Broker queue issues.
Use the Resolution Process with Java JDBC method to update all rows to use the Local Wins All winner rule.
All CS values will be updated to the HR91 database.
Resolve parent COUNTRY_TBL rows first, then run the Resolve Discrepancies process.
Image: Example of Resolve Discrepancies page (1 of 2)
This example illustrates the fields and controls on an example of the Resolve Discrepancies page for COUNTRY_TBL.
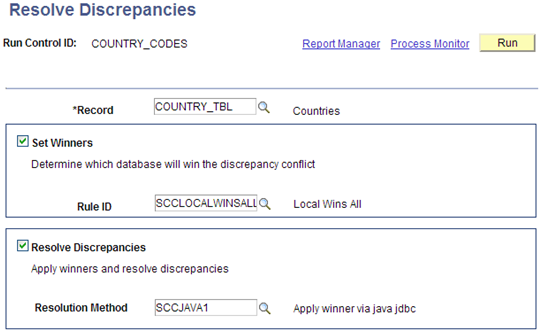
Image: Example of Resolve Discrepancies page (2 of 2)
This example illustrates the fields and controls on an example of the Resolve Discrepancies page for EO_ADDR_FMT_TBL.
Confirm that the data was updated by first reviewing Integration Discrepancies (search does not include the tables). Then review data in the HCM database to confirm that the updates were successful.