Running the User Profiles Management Processes
Important! Mass Change is a deprecated product. Support will be maintained for this product, but no new development will be produced for Mass Change. It is strongly recommended that you use Application Engine instead. For more information on PeopleSoft Application Engine, see PeopleTools: Application Engine.
To set up user profile management, use the User Profiles Management component (RUN_CC_USERPROFILE).
Before running the User Profiles Management process, regenerate the mass change that you plan to use.
The User Profiles Management process consists of a series of mass changes templates and definitions, as well as a series of application engine programs.
This section discusses how to run the processes that are part of User Profiles Management process.
|
Page Name |
Definition Name |
Navigation |
Usage |
|---|---|---|---|
|
User Profiles Management Processes |
RUNCNT_USERPROFILE |
|
Run any of the five user profile processes. You can create user profiles, delete or assign a role to user profiles, assign user preferences, and assign or update SAML definition values. |
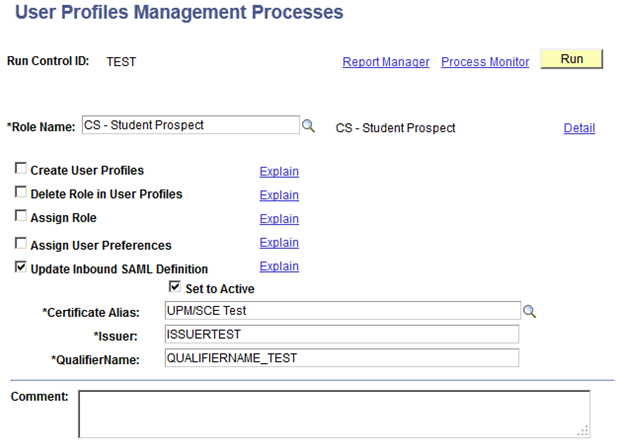
Access the User Profiles Management Processes page ().
Image: User Profiles Management Processes page
This example illustrates the fields and controls on the User Profiles Management Processes page. You can find definitions for the fields and controls later on this page.
|
Field or Control |
Definition |
|---|---|
| Role Name |
Enter the name of the role to create or maintain. The available options correspond to the roles for which you set up a mass change on the User Profile Mass Creation page. |
| Detail |
Click to access the User Profiles Mass Creation page, where you can review and modify the setup before running the processes. |
The five check boxes represent the five processes that you can run when you run the USERPROFILE Application Engine process. You can select one or more of these check boxes.
|
Field or Control |
Definition |
|---|---|
| Create User Profiles |
Select to create a user profile for the IDs that are selected by the mass change (if they do not already have user IDs). The role that you selected is also added to the new user IDs. The user IDs and the passwords are based on the algorithms that you select on the User Profiles Mass Creation setup page. When this check box is selected, the User Profiles Management process creates a temporary table to list all the user IDs that are created. This temporary table is called PS_USRPRF_NWID_TMP. If on the User Profiles Mass Creation setup page you select to create the result table, this process creates the temporary table. See Supplemental Installation Instructions for Campus Solutions Applications: Using the User Profiles Management Result Table on My Oracle Support. |
| Delete Role in User Profiles |
Select to delete the role from the user IDs that are not selected by the mass change. This option deletes the role name on the user profiles that no longer meet the criteria for the specified role name. For example, to provide self-service access to the applicants of the current term, this function deletes the Applicant role for all the user profiles that have the role but are not part of the current term. When this process runs, it creates a temporary table so you can review the IDs for which the specified role is removed. The temporary table is called PS_USRPRF_DEL_TMP. |
| Assign Role |
Select to assign the role to the existing user IDs that are selected by the mass change. This process creates a temporary table called PS_USRPRF_ASG_TMP. It lists the user IDs that have the role assigned to them. Note: This is the same process that you can run from the Dynamic Members page in the PeopleTools, Security, User Profiles, User Profiles, Roles component. If you assign roles using that component, be sure the query that you use has the same criteria as the mass change. |
| Assign User Preferences |
Select to assign the user preferences from the Assign User Preferences page. These user preferences are assigned to all user IDs selected by the mass change. If a user ID already has a value set for the preferences, it is overridden by this process (unless a value is added to the institution set override). If you are using online credit card processing, you should select this process to assign a business unit and an institution set to the user IDs. The process creates a temporary table called PS_ASSN_SETVAL_TMP. Use this table to review the IDs that have the user preferences assigned to them. |
| Update Inbound SAML Definition |
Select to assign or update the inbound SAML definition to the user IDs selected by the mass change. To review the SAML definition updates, review the changes on the SAML Inbound Setup page for the user IDs selected in the mass change. When selected, the Certificate Alias, Issuer, and QualifierName fields appear on the page. Note: The process does not create a temporary table to review which records received assigned or updated SAML values. Warning! To use this option, administrators must have access to a security role that contains a permission list that grants access to the SCC_PTSAML_CI component interface. |
| Certificate Alias |
Enter the sender's certificate alias name that you set up under the “Setting Up a Certificate Alias” section. See “Setting Up a Certificate Alias” |
| Issuer |
Enter the domain name of the issuing entity. |
| QualifierName |
Enter the domain name of the issuing entity. |
| Comment |
Enter any comments about the selections. The selected settings are associated with the user ID and the run control ID, so when you use the same settings, you can see the comments. This field is for informational purposes only. |
| Explain |
Click these links to view the explanation for the selected check box. |
| Run |
Click to run the User Profiles Management Application Engine process (USERPROFILE). When you run this process, do not select a type or a format on the Process Scheduler page. |
Error Log Information
An error log (PS_ERR_LOG_USRPRF) is created by the User Profiles Management process that lists any IDs for which a user profile is not created. Review the error log after running any of the processes. In the error log these error codes are used:
|
Field or Control |
Definition |
|---|---|
| 1 |
In the Assign Role Application Engine process, the save method was not completed for the existing user ID. The system also assigns this error code if it encounters an invalid user ID. A valid user ID must meet these conditions:
|
| 2 |
In the Create User Profile Application Engine process, the save method was not completed for the newly created user ID. |
| 3 |
In the Create User Profile process, the newly created user ID cannot be saved because the user ID already exists. |
| 4 |
In the Create User Profile process, no user ID can be created because Email was selected in the For User IDs field on the User Profiles Mass Creation page. |
| 5 |
In the Delete Role Application Engine process, the save method was not completed for the existing user ID. |
After you run the process, you can access the User Profiles Mass Creation page for the role you just ran and click the Populate Selection button to see which user IDs were created. You can also see which business unit and institution set were assigned, if any where defined. In addition, you can review the temporary tables that are created by the processes.
See PeopleTools: Applications User's Guide