Securing Access to Student Data
To set up student data security access, use the Security Views component (ES_SECURITY_TBL), the Security Views Update component (RUNCTL_SRSECVWU), and the Security View Change Audit component (SECURITY_AUDIT).
You can secure a user's access to pages that contain student information.
This section provides an overview of security for access to student data, lists prerequisites (including delivered security views), and discusses how to:
Set component security.
Run the Security Views Update SQR process (SRSECVWU) and report.
Specify search parameters for security view changes.
Review security table audit information.
Review security detail audit information.
Set advisement report security.
The Component Security feature provides the option to impose security on selected components, based on a student's institution, campus, career, program or plan. You set the specific security level on the Security Views page. The security level determines which search record (or security view) is used when the user attempts to access the component. Select No Security to retain the original search records that are delivered with the system. The security views delivered with this feature enable the system to verify that the user has access to the appropriate institution, campus, career, program, or plan to view, update, or add data relating to a student's record.
The security level becomes effective only after you run the Security Views Update process. This process exchanges the original search record with one of the delivered security views for a component (if you select the Global Security option) or a specific menu item. In the latter case, the component search record is overridden only on the specific menu item with one of the security views. Consequently, you can impose different levels of security for components that are accessed using different navigation paths.
After you have created security views for the institution and applied views for components that you want to secure, you can use the Security View Change Audit component to view the details of any changes to those settings. For example, you can view the user ID, date of action and action taken, and the security level settings for a particular component. You can see when the security view was created, updated, or deleted, and you can view the state of the record before and after a change. A check box on the Search Criteria page controls how the system returns values that match the selection criteria.
Note: This feature should not be used to update search record security for self-service features.
You complete these steps to secure access to student data:
Identify and define levels of security for a component on the Security Views page.
Update security definitions by running the Security Views Update process on the Security Views page.
(Optional) Perform an audit of changes to security in the Security View Change Audit component.
Before you implement component security, identify people at the institution who have both technical and functional expertise and who can review this feature. Although the Component Security feature is functional in application, it is quite technical in design and implementation. The individuals assigned to evaluate, incorporate, and support this feature must not only understand the way staff and faculty interact with student-centered components at the institution, they must also have a solid understanding of table structures, security views, and page caching. A working knowledge of managing version control and PeopleSoft lock records is also useful.
Begin the review process by thoroughly investigating delivered security views for all tables. To do this, run the Security Views report with the Report Only option selected. Notice in the report that the majority of delivered component security views are not set at the global level but at the menu item level. Also most of the delivered views are limited to PeopleSoft Academic Advisement, PeopleSoft Recruiting and Admissions, PeopleSoft Campus Community, and PeopleSoft Student Records. Every delivered security view is set to a value of None. This means that no security is implemented (other than standard preexisting people search filters) until you modify this setting for every component that you want to secure. Familiarize yourself with the different levels of security that are available, and decide which levels work for the components at the institution.
Upon review of the delivered security views, evaluate and set the security-level settings for all components. Again, all delivered component views have the security level None, so you must update this value and assign data in the Security Views fields accordingly. You can modify these settings at any time, but you must run the Security Views Update process to activate the changes.
Note: PeopleSoft delivers security views setup data for some Financial Aid components and most of the Campus Community components within the Campus Community student-only menus. These secure views restrict access to student data for specific user IDs by institution, campus, career, program, and plan. Note that applying component security is optional, and applies only to schools that set up security for Financial Aid, Campus Community, and Enrollment Services tasks.
See Applying Demographic Data Access Security.
The following table lists the default settings for the Financial Aid components that have security views. These are the default component settings delivered on the Security Views page. All components in the table display the following security settings:
Security Level = No Security
Global Security = Yes (selected)
Component names with an asterisk (*) also display the following security setting: Exclude Add Searchrecord = Yes (selected).
|
Component Name |
No Security View |
Institution Security View |
Campus Security View |
Career Security View |
Program Security View |
Plan Security View |
|---|---|---|---|---|---|---|
|
ANTICIPATED_AID |
STDNT_ANT_SRCH1 |
STUAN1_INS_SCTY |
SFA_SN1_CMP_STY |
STUAN1_CAR_SCTY |
STUAN1_PRG_SCTY |
STUAN1_PLN_SCTY |
|
ANTICIPTD_AID_EDIT |
STDNT_ANT_SRCH2 |
STUAN2_INS_SCTY |
SFA_SN2_CMP_STY |
STUAN2_CAR_SCTY |
STUAN2_PRG_SCTY |
STUAN2_PLN_SCTY |
|
ANTICIPTD_AID_SUMM |
STDNT_ANT_SRCH2 |
STUAN2_INS_SCTY |
SFA_SN2_CMP_STY |
STUAN2_CAR_SCTY |
STUAN2_PRG_SCTY |
STUAN2_PLN_SCTY |
|
AS_OF_STATUS |
STDNT_AID_SRCH |
STUAID_INS_SCTY |
SFA_STA_CMP_STY |
STUAID_CAR_SCTY |
STUAID_PRG_SCTY |
STUAID_PLN_SCTY |
|
AWARD_ACTIVITY |
STDNT_AID_SRCH |
STUAID_INS_SCTY |
SFA_STA_CMP_STY |
STUAID_CAR_SCTY |
STUAID_PRG_SCTY |
STUAID_PLN_SCTY |
|
AWARD_ENTRY_MC |
STDNT_AID_SRCH |
STUAID_INS_SCTY |
SFA_STA_CMP_STY |
STUAID_CAR_SCTY |
STUAID_PRG_SCTY |
STUAID_PLN_SCTY |
|
AWARD_MANUAL_MC |
STDNT_AID_SRCH |
STUAID_INS_SCTY |
SFA_STA_CMP_STY |
STUAID_CAR_SCTY |
STUAID_PRG_SCTY |
STUAID_PLN_SCTY |
|
AWARD_NOTIF_DETAIL |
STDNT_AID_SRCH |
STUAID_INS_SCTY |
SFA_STA_CMP_STY |
STUAID_CAR_SCTY |
STUAID_PRG_SCTY |
STUAID_PLN_SCTY |
|
AWARD_NOTIF_INQ |
STDNT_AID_SRCH |
STUAID_INS_SCTY |
SFA_STA_CMP_STY |
STUAID_CAR_SCTY |
STUAID_PRG_SCTY |
STUAID_PLN_SCTY |
|
AWARD_OVERRIDE_MC |
STDNT_AID_SRCH |
STUAID_INS_SCTY |
SFA_STA_CMP_STY |
STUAID_CAR_SCTY |
STUAID_PRG_SCTY |
STUAID_PLN_SCTY |
|
AWARD_SUMMARY |
STDNT_AID_SRCH |
STUAID_INS_SCTY |
SFA_STA_CMP_STY |
STUAID_CAR_SCTY |
STUAID_PRG_SCTY |
STUAID_PLN_SCTY |
|
DISBURSE_AID |
STDNT_DISB_SRCH |
STUDSB_INS_SCTY |
SFA_SDB_CMP_STY |
STUDSB_CAR_SCTY |
STUDSB_PRG_SCTY |
STUDSB_PLN_SCTY |
|
DISBURSE_AID_WO |
STDNT_DISB_SRCH |
STUDSB_INS_SCTY |
SFA_SDB_CMP_STY |
STUDSB_CAR_SCTY |
STUDSB_PRG_SCTY |
STUDSB_PLN_SCTY |
|
FA_EARNINGS |
STDNT_AID_SRCH |
STUAID_INS_SCTY |
SFA_STA_CMP_STY |
STUAID_CAR_SCTY |
STUAID_PRG_SCTY |
STUAID_PLN_SCTY |
|
INST_ADD |
STDNT_AID_SRCH |
STUAID_INS_SCTY |
SFA_STA_CMP_STY |
STUAID_CAR_SCTY |
STUAID_PRG_SCTY |
STUAID_PLN_SCTY |
|
ISIR_ADD_SCHOOL |
STDNT_AID_SRCH |
STUAID_INS_SCTY |
SFA_STA_CMP_STY |
STUAID_CAR_SCTY |
STUAID_PRG_SCTY |
STUAID_PLN_SCTY |
|
ISIR_AUDIT |
STDNT_AID_SRCH |
STUAID_INS_SCTY |
SFA_STA_CMP_STY |
STUAID_CAR_SCTY |
STUAID_PRG_SCTY |
STUAID_PLN_SCTY |
|
ISIR_DELETE_PG |
STDNT_AID_SRCH |
STUAID_INS_SCTY |
SFA_STA_CMP_STY |
STUAID_CAR_SCTY |
STUAID_PRG_SCTY |
STUAID_PLN_SCTY |
|
LOAN_FUND_MAINT |
LN_CL_FUND_SRCH |
LNCLFN_INS_SCTY |
SFA_LCN_CMP_STY |
LNCLFN_CAR_SCTY |
LNCLFN_PRG_SCTY |
LNCLFN_PLN_SCTY |
|
LOAN_ORIG* |
LOAN_UPD_SRCH |
LN_UPD_INS_SCTY |
SFA_LUD_CMP_STY |
LN_UPD_CAR_SCTY |
LN_UPD_PRG_SCTY |
LN_UPD_PLN_SCTY |
|
LOAN_ORIG_TRANS |
LN_CL_TRNS_SRCH |
LNCLTR_INS_SCTY |
SFA_LCT_CMP_STY |
LNCLTR_CAR_SCTY |
LNCLTR_PRG_SCTY |
LNCLTR_PLN_SCTY |
|
LOAN_STDNT_AWD |
STDNT_AID_SRCH |
STUAID_INS_SCTY |
SFA_STA_CMP_STY |
STUAID_CAR_SCTY |
STUAID_PRG_SCTY |
STUAID_PLN_SCTY |
|
LOAN_TRANS_INQ |
LOAN_UPD_SRCH |
LN_UPD_INS_SCTY |
SFA_LUD_CMP_STY |
LN_UPD_CAR_SCTY |
LN_UPD_PRG_SCTY |
LN_UPD_PLN_SCTY |
|
REVIEW_USER_EDITS* |
STDNT_AID_SRCH |
STUAID_INS_SCTY |
SFA_STA_CMP_STY |
STUAID_CAR_SCTY |
STUAID_PRG_SCTY |
STUAID_PLN_SCTY |
|
RUN_VERIFICATION |
STDNT_AID_SRCH |
STUAID_INS_SCTY |
SFA_STA_CMP_STY |
STUAID_CAR_SCTY |
STUAID_PRG_SCTY |
STUAID_PLN_SCTY |
|
SFA_CRC_PNOTE_ALT |
STDNT_AID_SRCH |
STUAID_INS_SCTY |
SFA_STA_CMP_STY |
STUAID_CAR_SCTY |
STUAID_PRG_SCTY |
STUAID_PLN_SCTY |
|
SFA_CRC_PNOTE_PLUS |
STDNT_AID_SRCH |
TUAID_INS_SCTY |
SFA_STA_CMP_STY |
STUAID_CAR_SCTY |
STUAID_PRG_SCTY |
STUAID_PLN_SCTY |
|
SFA_CRC_PNOTE_STAF |
STDNT_AID_SRCH |
STUAID_INS_SCTY |
SFA_STA_CMP_STY |
STUAID_CAR_SCTY |
STUAID_PRG_SCTY |
STUAID_PLN_SCTY |
|
SS_FA_AU_STATUS |
STDNT_AID_SRCH |
STUAID_INS_SCTY |
SFA_STA_CMP_STY |
STUAID_CAR_SCTY |
STUAID_PRG_SCTY |
STUAID_PLN_SCTY |
|
STDNT_AID_PACKAGE |
STDNT_AID_SRCH |
STUAID_INS_SCTY |
SFA_STA_CMP_STY |
STUAID_CAR_SCTY |
STUAID_PRG_SCTY |
STUAID_PLN_SCTY |
|
STDNT_AWD_PER_RSRC |
STDNT_AID_SRCH |
STUAID_INS_SCTY |
SFA_STA_CMP_STY |
STUAID_CAR_SCTY |
STUAID_PRG_SCTY |
STUAID_PLN_SCTY |
|
STDNT_AWRD_CATG |
STDNT_AID_SRCH |
STUAID_INS_SCTY |
SFA_STA_CMP_STY |
STUAID_CAR_SCTY |
STUAID_PRG_SCTY |
STUAID_PLN_SCTY |
|
STDNT_AWRD_INQUIRY |
STDNT_AID_SRCH |
STUAID_INS_SCTY |
SFA_STA_CMP_STY |
STUAID_CAR_SCTY |
STUAID_PRG_SCTY |
STUAID_PLN_SCTY |
|
STDNT_BDGT_ADJUST |
STDNT_AWDPER_VW |
SAWPER_INS_SCTY |
SFA_SWP_CMP_STY |
SAWPER_CAR_SCTY |
SAWPER_PRG_SCTY |
SAWPER_PLN_SCTY |
|
STDNT_BDGT_CALC |
STDNT_BDGT_SRCH |
STUBGT_INS_SCTY |
SFA_SBG_CMP_STY |
STUBGT_CAR_SCTY |
STUBGT_PRG_SCTY |
STUBGT_PLN_SCTY |
|
STDNT_BUDGET_SUMM |
STDNT_AID_SRCH |
STUAID_INS_SCTY |
SFA_STA_CMP_STY |
STUAID_CAR_SCTY |
STUAID_PRG_SCTY |
STUAID_PLN_SCTY |
|
STDNT_DISB |
STDNT_DISB_SCH2 |
STUDS2_INS_SCTY |
SFA_SD2_CMP_STY |
STUDS2_CAR_SCTY |
STUDS2_PRG_SCTY |
STUDS2_PLN_SCTY |
|
STDNT_FA_TERM |
STDNT_AID_SRCH |
STUAID_INS_SCTY |
SFA_STA_CMP_STY |
STUAID_CAR_SCTY |
STUAID_PRG_SCTY |
STUAID_PLN_SCTY |
|
STDNT_FAN_ATRBT |
STDNT_AID_SRCH |
STUAID_INS_SCTY |
SFA_STA_CMP_STY |
STUAID_CAR_SCTY |
STUAID_PRG_SCTY |
STUAID_PLN_SCTY |
|
STDNT_PKG_VARS |
STDNT_PKG_SRCH |
STUPKG_INS_SCTY |
SFA_SPG_CMP_STY |
STUPKG_CAR_SCTY |
STUPKG_PRG_SCTY |
STUPKG_PLN_SCTY |
|
STDNT_RESTRCTD_AID |
STDNT_AID_SRCH |
STUAID_INS_SCTY |
SFA_STA_CMP_STY |
STUAID_CAR_SCTY |
STUAID_PRG_SCTY |
STUAID_PLN_SCTY |
|
STDNT_TERM_BUDGET |
STDNT_BDMT_SRCH |
STUBMT_INS_SCTY |
SFA_SBT_CMP_STY |
STUBMT_CAR_SCTY |
STUBMT_PRG_SCTY |
STUBMT_PLN_SCTY |
The following table lists the default settings for the Campus Community components in the student-only menus that have security views. These are the default component settings delivered on the Security Views page. All components in the table display the following security settings:
Security Level = No Security
Global Security = No (cleared)
Exclude Add Searchrecord = No (cleared)
No Security View = STUDENT_SRCH
Institution Security View = CC_STU_INS_SCTY
Career Security View = CC_STU_CAR_SCTY
Program Security View = CC_STU_PRG_SCTY
Institution Security View = CC_STU_PLN_SCTY
|
Component Name |
Menu Name |
Application Designer Bar Name |
|---|---|---|
|
ADDRESS_MAINT |
CC_BIO_DEMO_DATA_STDNT |
USE |
|
CC_ADDR_SEASONAL |
CC_BIO_DEMO_DATA_STDNT |
USE |
|
CITIZEN_PASSPORT |
CC_IDENTIFICATION_DATA_STDNT |
USE |
|
DRIVER_LIC_SA_PERS |
CC_IDENTIFICATION_DATA_STDNT |
USE |
|
ETHNIC_DTL_PERS |
CC_BIO_DEMO_DATA_STDNT |
USE |
|
EXT_SYS_ID_PERS |
CC_SERVICES_DATA_STDNT |
USE |
|
E_MAIL_ADDR_PERS |
CC_BIO_DEMO_DATA_STDNT |
USE |
|
FERPA_ADMIN_QENTRY |
CC_SERVICES_DATA_STDNT |
USE |
|
FERPA_DISPL_PERS |
CC_SERVICES_DATA_STDNT |
INQUIRE |
|
FERPA_PERS |
CC_SERVICES_DATA_STDNT |
USE |
|
HNR_AWD_PERS |
CC_PARTICIPATION_DATA_STDNT |
USE |
|
IMMUNIZATN_HEALTH |
CC_HEALTH_DATA_STDNT |
USE |
|
INST_REL_PERS |
CC_SERVICES_DATA_STDNT |
USE |
|
LS_EXTRA_ACTIVITY |
CC_PARTICIPATION_DATA_STDNT |
USE |
|
LS_PUBLICATIONS |
CC_PARTICIPATION_DATA_STDNT |
USE |
|
NAMES_PERS |
CC_BIO_DEMO_DATA_STDNT |
USE |
|
PEOPLE_ATHL_PERS |
CC_PARTICIPATION_DATA_STDNT |
USE |
|
PEOPLE_PHTO_PERS |
CC_IDENTIFICATION_DATA_STDNT |
USE |
|
PHONE_PERS |
CC_BIO_DEMO_DATA_STDNT |
USE |
|
PIN_PERS |
CC_SERVICES_DATA_STDNT |
USE |
|
RELATIONSHIPS |
CC_BIO_DEMO_DATA_STDNT |
USE |
|
RELIG_PREF_PERS |
CC_BIO_DEMO_DATA_STDNT |
USE |
|
RESIDENCY_PERS |
CC_IDENTIFICATION_DATA_STDNT |
USE |
|
SA_DECEASED_DATA |
CC_SERVICES_DATA_STDNT |
USE |
|
SCC_ACCOM_REQUEST |
CC_HEALTH_DATA_STDNT |
USE |
|
SCC_BIO_DEMO |
CC_BIO_DEMO_DATA_STDNT |
USE |
|
SCC_EMERG_CNTCT |
CC_BIO_DEMO_DATA_STDNT |
USE |
|
SCC_HS_EXAM_AUDIO |
CC_HEALTH_DATA_STDNT |
USE |
|
SCC_HS_EXAM_EYE |
CC_HEALTH_DATA_STDNT |
USE |
|
SCC_HS_EXAM_PHYS |
CC_HEALTH_DATA_STDNT |
USE |
|
SCC_HS_EXAM_RESP |
CC_HEALTH_DATA_STDNT |
USE |
|
SCC_IMPAIR_DTL |
CC_HEALTH_DATA_STDNT |
USE |
|
SCC_LANGUAGES_PERS |
CC_BIO_DEMO_DATA_STDNT |
USE |
|
SCC_LICENSE_CERT |
CC_PARTICIPATION_DATA_STDNT |
USE |
|
SCC_MEMBERSHIPS |
CC_PARTICIPATION_DATA_STDNT |
USE |
|
SERVICE_IND_PERS |
MAINTAIN_SERVICE_IND_STDNT |
USE |
|
SSR_STDN_DATA_DEST |
CC_BIO_DEMO_DATA_STDNT |
USE |
|
VISA_PERMIT_PERS |
CC_IDENTIFICATION_DATA_STDNT |
USE |
|
WORK_EXPERIENCE |
CC_BIO_DEMO_DATA_STDNT |
USE |
Refer to the following book to learn more about how the system renders Application Designer menus through the portal.
See PeopleTools: Application Designer Developer's Guide
This table lists the default settings for the Enrollment Services components that have security views. If no menu or Application Designer Bar Name is listed, then the value for Global Security = Yes (selected).
|
Component Name |
Menu Name |
App. Designer Bar Name |
No Security View |
Institution Security View |
Campus Security View |
Career Security View |
Program Security View |
Plan Security View |
|---|---|---|---|---|---|---|---|---|
|
ACADEMIC_DEGREE |
STDNT_SRCH |
STDNT_INS_SCRTY |
SSR_STD_CMP_STY |
STDNT_CAR_SCRTY |
STDNT_PRG_SCRTY |
STDNT_PLN_SCRTY |
||
|
ACAD_HISTORY_PERS |
PROCESS_TRANSFER_CREDIT |
USE |
PEOPLE_SRCH |
STDNT_INS_SCRTY |
SSR_STD_CMP_STY |
STDNT_CAR_SCRTY |
STDNT_PRG_SCRTY |
STDNT_PLN_SCRTY |
|
ACAD_PLAN |
STDNT_CAR_SRCH |
STUCAR_INS_SEC |
SSR_SCR_CMP_SEC |
STUCAR_CAR_SEC |
STUCAR_PRG_SEC |
STUCAR_PLN_SEC |
||
|
ACAD_TST_RSLT_PERS |
PROCESS_TRANSFER_CREDIT |
USE |
PEOPLE_SRCH |
STDNT_INS_SCRTY |
SSR_STD_CMP_STY |
STDNT_CAR_SCRTY |
STDNT_PRG_SCRTY |
STDNT_PLN_SCRTY |
|
ACAD_TST_SUM_PERS |
PROCESS_TRANSFER_CREDIT |
INQUIRE |
PEOPLE_SRCH |
STDNT_INS_SCRTY |
SSR_STD_CMP_STY |
STDNT_CAR_SCRTY |
STDNT_PRG_SCRTY |
STDNT_PLN_SCRTY |
|
ADM_APPL_SUMM |
PEOPLE_SRCH |
STDNT_INS_SCRTY |
No Campus security view delivered |
STDNT_CAR_SCRTY |
STDNT_PRG_SCRTY |
STDNT_PLN_SCRTY |
||
|
APPOINT- MENTS |
STDNT_TERM_SRCH |
STUTRM_INS_SEC |
SSR_STM_CMP_SEC |
STUTRM_CAR_SEC |
STUTRM_PRG_SEC |
STUTRM_PLN_SEC |
||
|
CHKLST_SUMM_PERS |
TRACK_STUDENT_CAREERS |
INQUIRE |
STDNT_SRCH |
STDNT_INS_SCRTY |
SSR_STD_CMP_STY |
STDNT_CAR_SCRTY |
STDNT_PRG_SCRTY |
STDNT_PLN_SCRTY |
|
COMM_SUMMARY_PERS |
TRACK_STUDENT_CAREERS |
INQUIRE |
STDNT_SRCH |
STDNT_INS_SCRTY |
SSR_STD_CMP_STY |
STDNT_CAR_SCRTY |
STDNT_PRG_SCRTY |
STDNT_PLN_SCRTY |
|
ENRL_REQUEST |
ENRL_REQ_SRCH |
ENRLREQ_INS_SEC |
SSR_ERQ_CMP_SEC |
ENRLREQ_CAR_SEC |
ENRLREQ_PRG_SEC |
ENRLREQ_PLN_SEC |
||
|
HNR_AWD_EXT_PERS |
MANAGE_ACADEMIC_RECORDS |
USE |
STDNT_SRCH |
STDNT_INS_SCRTY |
SSR_STD_CMP_STY |
STDNT_CAR_SCRTY |
STDNT_PRG_SCRTY |
STDNT_PLN_SCRTY |
|
HNR_AWD_EXT_PERS |
TRACK_STUDENT_CAREERS |
USE |
STDNT_SRCH |
STDNT_INS_SCRTY |
SSR_STD_CMP_STY |
STDNT_CAR_SCRTY |
STDNT_PRG_SCRTY |
STDNT_PLN_SCRTY |
|
INSTR_ADVSR_PERS |
DEFINE_STUDENT_RECORDS |
SETUP |
PEOPLE_SRCH |
STDNT_INS_SCRTY |
SSR_STD_CMP_STY |
STDNT_CAR_SCRTY |
STDNT_PRG_SCRTY |
STDNT_PLN_SCRTY |
|
OPR_3C_SUM_PERS |
TRACK_STUDENT_CAREERS |
INQUIRE |
STDNT_SRCH |
STDNT_INS_SCRTY |
SSR_STD_CMP_STY |
STDNT_CAR_SCRTY |
STDNT_PRG_SCRTY |
STDNT_PLN_SCRTY |
|
SERVICE_IND_PERS |
TRACK_STUDENT_CAREERS |
USE |
STDNT_SRCH |
STDNT_INS_SCRTY |
SCC_STU_CMP_STY |
STDNT_CAR_SCRTY |
STDNT_PRG_SCRTY |
STDNT_PLN_SCRTY |
|
STDNT_ADVISOR |
STDNT_SRCH |
STDNT_INS_SCRTY |
SSR_STD_CMP_STY |
STDNT_CAR_SCRTY |
STDNT_PRG_SCRTY |
STDNT_PLN_SCRTY |
||
|
STDNT_CAREER |
STDNT_SRCH |
STDNT_INS_SCRTY |
SSR_STD_CMP_STY |
STDNT_CAR_SCRTY |
STDNT_PRG_SCRTY |
STDNT_PLN_SCRTY |
||
|
STDNT_CONS_STAT |
STDNT_SRCH |
STDNT_INS_SCRTY |
SSR_STD_CMP_STY |
STDNT_CAR_SCRTY |
STDNT_PRG_SCRTY |
STDNT_PLN_SCRTY |
||
|
STDNT_ENRL_INQ |
STDNT_TERM_SRCH |
STUTRM_INS_SEC |
SSR_STM_CMP_SEC |
STUTRM_CAR_SEC |
STUTRM_PRG_SEC |
STUTRM_PLN_SEC |
||
|
STDNT_GRADE_INQ |
STDNT_TERM_SRCH |
STUTRM_INS_SEC |
SSR_STM_CMP_SEC |
STUTRM_CAR_SEC |
STUTRM_PRG_SEC |
STUTRM_PLN_SEC |
||
|
STDNT_INCOMPLETE |
STDNT_INC_SRCH |
STDINC_INS_SEC |
SSR_SIN_CMP_SEC |
STDINC_CAR_SEC |
STDINC_PRG_SEC |
STDINC_PLN_SEC |
||
|
STDNT_TERM_SEARCH |
STDNT_SRCH |
STDNT_INS_SCRTY |
SSR_STD_CMP_STY |
STDNT_CAR_SCRTY |
STDNT_PRG_SCRTY |
STDNT_PLN_SCRTY |
||
|
STDNT_XTRACT_PERS |
STDNT_SRCH |
STDNT_INS_SCRTY |
SSR_STD_CMP_STY |
STDNT_CAR_SCRTY |
STDNT_PRG_SCRTY |
STDNT_PLN_SCRTY |
||
|
STUDENT_MILESTONE1 |
STDNT_MLST_SRCH |
STDMLST_INS_SEC |
SSR_SML_CMP_SEC |
STDMLST_CAR_SEC |
STDMLST_PRG_SEC |
STDMLST_PLN_SEC |
||
|
TERM_HISTORY |
STDNT_SRCH |
STDNT_INS_SCRTY |
SSR_STD_CMP_STY |
STDNT_CAR_SCRTY |
STDNT_PRG_SCRTY |
STDNT_PLN_SCRTY |
||
|
TSCRPT_TEXT |
STDNT_CAR_SRCA |
STUCAR_INS_SEC |
SSR_SCR_CMP_SEC |
STUCAR_CAR_SEC |
STUCAR_PRG_SEC |
STUCAR_PLN_SEC |
Once again, refer to the PeopleTools: PeopleSoft Appliation Designer Developer’s Guide to learn more about how the system renders Application Designer menus through the portal.
The components below display the following security settings: Exclude Add Searchrecord = Yes (selected):
ACAD_PLAN
ENRL_REQUEST
LOAN_ORIG
REVIEW_USER_EDITS
STUDENT_MILESTONE1
You can create additional security for components not included in the PeopleSoft-delivered set, using one of two methods:
If the component already uses one of the search records listed in the previous table, add the component using the Security Views page and enter all of the corresponding views in the Security Views group box.
Use the table as the template.
If the component uses a search record other than those listed in the previous table, you can create modified security views for institution, campus, career, program, and plan security.
Add the component using the Security Views page and enter all of its corresponding modified views in the Security Views group box.
|
Page Name |
Definition Name |
Navigation |
Usage |
|---|---|---|---|
|
Security Views |
ES_SECURITY_TBL |
|
Set component security and identify student-related components to which you want to assign security. In addition, specify the level of security (institution, campus, career, program, plan) that you want to use. |
|
Security Views Update |
RUNCTL_SRSECVWU |
|
Run the Security Views Update process after you set up or alter security views. Create the Security Views summary report for all security views at the institution. |
|
Search Criteria |
SECURITY_AUDIT |
|
Specify search parameters for component security view changes. |
|
Security Table |
AUD_SECURITY_TBL |
|
Review security table audit information about security view changes that match the selection criteria specified on the Search Criteria page. This page displays any changes made to the Add Search record setting for the table. |
|
Security Detail |
AUD_SECURITY_DTL |
|
Review security detail audit information about security view changes that match the selection criteria specified on the Search Criteria page. Security detail values correspond to the parent record on the Security Table page. |
|
Advisement Report Security |
SAA_SCRTY_AARPT |
|
Set advisement reports security. |
Access the Security Views page ().
When you search for existing values before accessing this page, you can search by Institution Security View.
Note: Adding components to the Security Views page does not automatically secure them. After you have specified all necessary components and views on the Security Views page, run the Security Views Update process to implement the settings.
Image: Security Views page
This example illustrates the fields and controls on the Security Views page. You can find definitions for the fields and controls later on this page.
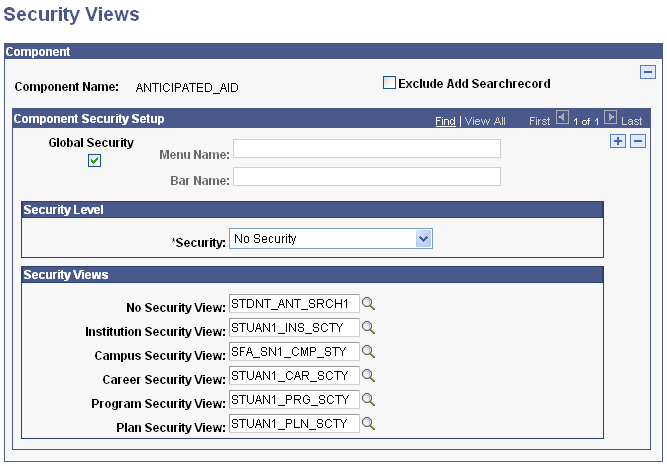
When a user attempts to access one of the components that you specify, the system checks the user's security for the institution, campus, career, program, or plan to verify that the user has permission to access the student data using the component. In some cases, the navigation is also verified.
Note: Adding components to the Security Views page does not automatically secure them. After you have specified all necessary components and views on the Security Views page, run the Security Views Update process to implement the settings.
Component
|
Field or Control |
Definition |
|---|---|
| Exclude Add Searchrecord |
Select to run the Security Views Update process without updating the Add Searchrecord settings. Note: If the check box is cleared, you may inadvertently overwrite predefined Add Searchrecord views. Before running the Security Views Update process with the check box cleared, review the Add Searchrecord settings by running a query or by reviewing the Add Searchrecord settings in PeopleSoft Application Designer on the component Properties page. All delivered security view settings initially have this check box cleared, with the exception of ENRL_REQUEST components. To change this setting, do so before running the Security Views Update process. |
Component Security Setup
|
Field or Control |
Definition |
|---|---|
| Global Security |
Select to secure the component name everywhere that the component is used, regardless of the menu name or bar name. Do not select this check box if want to have different security views set up for the component, depending on the navigation path. For example, if you access the component through the portal by selecting you may want to clear the Global Security check box and enter the underlying menu structure for this component . Then, insert a second row that specifies unique security level and security view data for the component name if you access it by selecting Campus Community through the portal. |
| Menu Name |
If you do not select the Global Security check box, this field is available for entry. Enter the particular menu name for which you want to apply this security view. Use this field to isolate a component name that is accessible using multiple navigation paths (for example, INSTR_ADVSR_PERS) when you want component security to vary depending on the navigation. |
| Bar Name |
If you do not select the Global Security check box, the Bar Name field is available for entry. Enter the bar name that coincides with the selected menu name for which you want to apply this security view. Use this field to isolate a component name that is accessed by multiple navigation paths when you want component security to vary depending on the navigation. |
Security Level
|
Field or Control |
Definition |
|---|---|
| Security |
Use this field to select the security that you want to apply at this level for the component name. The level specified here determines which user IDs can access the component. For example, if you select Program Level Security,in the Security field, a user who attempts to access the specified component must have security set up on the Academic Program Security page for the same academic program as the student data that is accessed. In addition, if the user has access to careers and plans but has no user ID security set up for access to programs (and, in particular, the program of the accessed student data), then the user is denied access. Security level options are: No Security: Impose no security on the component name specified. Never delete a delivered component security view entry, even if the institution does not need it. Instead of deleting the security view entry for a particular component, set the Security field to No Security. Institution Level Security: Secure the component name at the institution level. This requires that a user attempting to access student data must have access to the student's institution. This user ID access is set up on the Academic Institution Security page. Campus Level Security: Secure the component name at the campus level. This requires that a user attempting to access student data must have access to the student's campus. This user ID access is set up on the Institution/Campus Security page. Note: Campus level security is available for all components; however campus level security views are delivered for only the Financial Aid and Enrollment Services delivered components. Career Level Security: Secure the component name at the career level. This requires that a user attempting to access student data must have access to the student's career. This user ID access is set up on the Institution/Career Security page. Program Level Security: Secure the component name at the program level. This requires that a user attempting to access student data must have access to the student's program. This user ID access is set up on the Academic Program Security page. Plan Level Security: Secure the component name at the plan level. This requires that a user attempting to access student data must have access to the student's plan. This user ID access is set up on the Academic Plan Security page. Note: Security Values are delivered with the PeopleSoft system as translate values. These translate values should not be modified in any way. Modification to these values requires significant programming effort. |
Security Views
All of the security view settings delivered with the PeopleSoft system are provided as initial settings that you can alter to fit specific business needs before running the Security Views Update process.
The fields for delivered component name security views are populated with the appropriate security view (search record) based on the institution, campus, career, program, plan or no security setting in the Security field. Use of a particular view is determined by the selected security value. You can select any security value, based on your needs, and the corresponding security view is used. All of the security views fields prompt against all security records in the database, including records that you have modified.
You must enter a security view value for the corresponding level specified in the Security field. For example, if you specify Program Level Security in the Security field, then you must enter a value in the Program Security View field.
|
Field or Control |
Definition |
|---|---|
| No Security View |
If No Security has been entered in the Security field, then you must enter a value in this field. The view that you enter is used to filter (not necessarily secure) the student data that is accessible through the component. For security views provided by PeopleSoft, this field is set to match each specific component. For example, the ACADEMIC_DEGREE component is delivered with a No Security View field setting of PEOPLE_SRCH. This is because the delivered search record for ACADEMIC_DEGREE is set to PEOPLE_SRCH. You can modify this value. |
| Institution Security View |
If Institution Level Security has been entered in the Security field, then you must enter a value in this field. The system uses the security view entered in this field to determine which user IDs can access the component. For most security views provided by PeopleSoft, this field is set to STDNT_INS_SCRTY. This value references the user ID security that is set up on the Institution Security page. You can modify this value. |
| Campus Security View |
If Campus Level Security has been entered in the Security field, then you must enter a value in this field. The system uses the security view entered in this field to determine which user IDs can access the component. This value references the user ID security that is set up on the Institution/Campus Security page. You can modify this value. Note: Campus level security is available for all components; however campus level security views are delivered for only the Financial Aid and Enrollment Services delivered components. |
| Career Security View |
If Career Level Security has been entered in the Security field, then you must enter a value in this field. The system uses the security view entered in this field to determine which user IDs can access the component. For most security views provided by PeopleSoft, this field is set to STDNT_CAR_SCRTY. This value references the user ID security that is set up on the Institution/Career Security page. You can modify this value. |
| Program Security View |
If Program Level Security has been entered in the Security field, then you must enter a value in this field. The system uses the security view entered in this field to determine which user IDs can access the component. For most security views provided by PeopleSoft, this field is set to STDNT_PRG_SCRTY. This value references the user ID security that is set up on the Academic Program Security page. You can modify this value. |
| Plan Security View |
If Plan Level Security has been entered in the Security field, then you must enter a value in this field. The system uses the security view entered in this field to determine which user IDs can access the component. For most security views provided by PeopleSoft, this field is set to STDNT_PLN_SCRTY. This value references the user ID security that is set up on the Academic Plan Security page. You can modify this value. |
Note: Components based on search records other than PEOPLE_SRCH are delivered with settings different from those described here for Institution Security View, Campus Security View, Career Security View, Program Security View, and Plan Security View.
SQL Statements to Find Component Occurrences
You can use these Structured Query Language (SQL) select statements to find out the global and specific occurrences of a particular component:
To identify components that have multiple menu paths, use this SQL Select statement:
SELECT PNLGRPNAME, MENUNAME, BARNAME, ITEMLABEL FROM PSMENUITEM
WHERE PNLGRPNAME = 'COMM_SUMMARY_PERS'
To determine if a search record exists at the menu level, you can use either the PeopleSoft Application Designer Menu Item Properties page, or this SQL Select statement:
SELECT PNLGRPNAME, SEARCHRECNAME FROM PSMENUITEM
WHERE PNLGRPNAME = 'ACAD_PLAN'
If a search record exists, the search record at the component level has no effect here. Consequently, the page is secured at the menu level using this search record.
To identify the search record at the component level, you can use either the PeopleSoft Application Designer Component Properties page, or this SQL Select statement:
SELECT PNLGRPNAME, SEARCHRECNAME FROM PSPNLGRPDEFN
WHERE PNLGRPNAME = 'ACAD_PLAN'
If a search record does not exist at the menu level, the search record at the component level is used to access and secure the page.
Access the Security Views Update page ().
After you assign new security views to Financial Aid or Campus Community components, you must re-run the Security Views Update process to accommodate the new views.
Important! The first time all users log on to the system after you run the Security Views Update process, all PeopleTools data pertaining to pages is recached. Consequently, you should run this process at the same time that you run other major maintenance processes, rather than immediately before a heavy traffic period for the institution. Recaching pages slows initial page access for users. In addition, if you erroneously delete or modify security, it is better to discover the error during a system lull than during a peak admission, billing, or registration period.
|
Field or Control |
Definition |
|---|---|
| Report Only |
Select to create the SA Security Views Update (student administration security views update) report (SRSECVWU) without updating security view access for components at the institution. If this check box is cleared, the process updates security view access and creates the Security Views report. |
| Run |
Click to run the Security Views Update process (SRSECVWU) as needed. When you run this process, the system updates PS Lock (PeopleSoft lock) record. |
The Security Views Update process allows you to move from menu-specific security view settings to global settings without the risk of creating inaccurate search record data. Specifically, the process:
Removes the menu component search record override.
Enables the system to use the component search record that was updated by the SQR.
Important! Do not run the update process until you are satisfied with all of the security views data, including the security views data delivered by PeopleSoft. Before you run the process, review all of the security views data settings thoroughly—paying close attention to the Exclude Add Searchrecord and Global Security options.
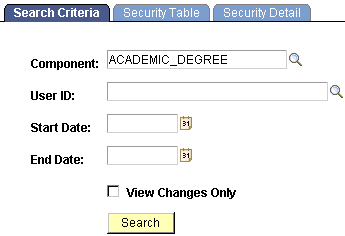
Access the Search Criteria page ().
Image: Search Criteria page
This example illustrates the fields and controls on the Search Criteria page. You can find definitions for the fields and controls later on this page.
|
Field or Control |
Definition |
|---|---|
| Component |
Enter the component object name to be audited for security. This field is required. |
| User ID |
Enter the user ID that you want to audit. Leave this field blank to have the system retrieve all values for this field. |
| Start Date |
Enter the earliest date to be audited. Leave this field blank to have the system retrieve all values for this field. |
| End Date |
Enter the latest date to be audited. Leave this field blank to have the system retrieve all values for this field. |
| View Changes Only |
Clear this check box to have the system return all records with the action Insert, Before, After, or Delete. Select this check box to prevent the system from returning records with the action Before. This option controls before-and-after results. If you want to see only the values after the change, then select this check box. If you want to see the both the before and after values, then clear this check box. |
| Search |
After you enter the selection criteria, click this button to return audit data to the Security Table page and the Security Detail page. To modify the data that the system returns, update the selection criteria and click this button again. Note: When you click this button, the retrieval process begins and the system displays the first page with data (either the Security Table page or the Security Detail page). If no changes were made to the table, the system displays the Security Detail page. |
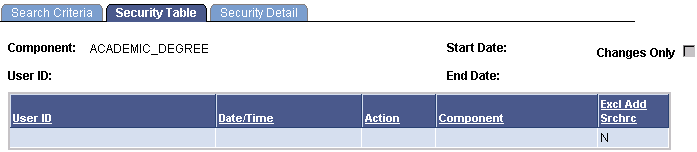
Access the Security Table page ().
Image: Security Table page
This example illustrates the fields and controls on the Security Table page. You can find definitions for the fields and controls later on this page.
|
Field or Control |
Definition |
|---|---|
| User ID |
Displays the user ID of the person who made changes to the Security View table. For rows where the action is Delete, no user ID appears because the system does not track the user ID of the person who deletes a record. When deletions occur, the character string ******** appears in the User ID field. |
| Date/Time |
Displays the date and time when the changes to the Security View table were made. |
| Action |
Values are:
|
| Component |
Displays the component that you selected as part of the search criteria. |
| Excl Add Srchrc (exclude add search record) |
Displays the status of the Exclude Add Searchrecord option on the Security Views page. The values Y for selected and N for cleared indicate the status of the check box. |
Access the Security Detail page ().
Image: Security Detail page: Component tab
This example illustrates the fields and controls on the Security Detail page: Component tab. You can find definitions for the fields and controls later on this page.

Important! To record the security changes that the Security View Audit functionality audits, the IT team must first install and execute delivered SQL trigger files.
The installation guides on My Oracle Support provide more information about this topic.
Note: Column order may vary by implementation. All columns may not be visible. Use the horizontal scroll bar on the page to view all available columns.
Component Tab
|
Field or Control |
Definition |
|---|---|
| User ID |
Displays the user ID of the person who made changes to the Security View table. For rows where the action is Delete, no user ID appears because the system does not track the user ID of the person who deletes a record. When deletions occur, the character string ******** appears in the User ID field. |
| Date/Time |
Displays the date and time when changes to the Security View table were made. |
| Action |
Values are:
|
| Component |
Displays the component that you entered as part of the search criteria. |
| Menu Name |
Displays the menu name entered on the Security Views page. |
| Bar Name |
Displays the bar name entered on the Security Views page. |
Security Tab
Select the Security tab.
Image: Security Detail page: Security tab
This example illustrates the fields and controls on the Security Detail page: Security tab. You can find definitions for the fields and controls later on this page.

|
Field or Control |
Definition |
|---|---|
| Gbl Scrty (global security) |
Displays the status of the Global Security check box on the Security Views page. The values Y for selected and N for cleared indicate the status of the check box. |
| Security |
Displays the option entered in the Security field on the Security Views page. Options are:
|
| No Security |
Displays the view entered for the component in the No Security View field on the Security Views page. |
| Inst Security (institutional security) |
Displays the view entered for the component in the Institution Security View field on the Security Views page. |
| Campus Security |
Displays the view entered for the component in the Campus Security View field on the Security Views page. |
| Career Security |
Displays the view entered for the component in the Career Security View field on the Security Views page. |
| Program Security View |
Displays the view entered for the component in the Program Security View field on the Security Views page. |
| Plan Security |
Displays the view entered for the component in the Plan Security View field on the Security Views page. |
When the administrator uses the Request Advisement Reports page, the Generate Report Requests page, the Print batch Reports page or the Purge Report Results page, the type of advisement reports that can be accessed is specified on this page.
Access the Advisement Report Security page ().
Image: Advisement Report Security
This example illustrates the fields and controls on the Advisement Report Security. You can find definitions for the fields and controls later on this page.
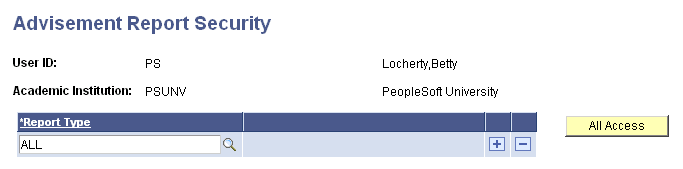
Enter a report type for which the combination of user ID and academic institution has access.