Using PeopleSoft Directory Interface with Campus Solutions
This section discusses how to:
Access sample mappings and delivered messages.
Use sample mappings.
Review delivered messages.
Use best practices when working with maps.
If you have licensed PeopleSoft Directory Interface, the system provides sample mappings and messages for both HRMS applications and Campus Solutions applications.
See PeopleSoft Components for PeopleSoft HRMS and Campus Solutions: PeopleSoft Directory Interface.
To use sample mappings that are delivered with the PeopleSoft system, establish directory IDs in the Directory Configurations component and add a directory ID to the mappings. The sample mappings use schema objects from a standard Novell eDirectory.
For Campus Solutions customers, PeopleSoft Directory Interface delivers two sets of sample maps for Applicant, Advisor/Instructor, Student and CS Person. One set is for the use of a hierarchical directory interface tree (that contains multiple nodes, such as organizational unit ou or location l), and one set for the use of a flat directory interface tree (for example that has no node in between the common name cn and the organization o). The sample map names delivered for a flat directory interface tree end with _FLAT.
The hierarchical sample maps are useful for customers that have licensed the HRMS application and are using maps similar to the ones provided for HRMS. Even if the student population (mostly persons of interest, POIs) will likely not be assigned a department and a location, you can set a default value inside the maps for these two nodes. Set up DN default values on the DN Defaults page When you set up DN default values, you allow the system to use the same DN for all of the person IDs, regardless of whether they have the necessary data to be placed underneath a node. If a POI is hired at a later time and assigned a department ID and a location, PeopleSoft Directory Interface moves the person into the newly specified department and location branches, In this way, PeopleSoft Directory Interface ensures that only one entry exists in the directory for a specific person.
Note: The system uses DN default values only if the values of the Record field where they're defined are blank; if the Force check box is selected, the system overwrites the Record. You can use DN default values to force all POIs without a department ID and location into a predefined directory branch by setting the appropriate values on the DN defaults page.
The PeopleSoft HRMS Integration Interfaces explains how to set up a DN.
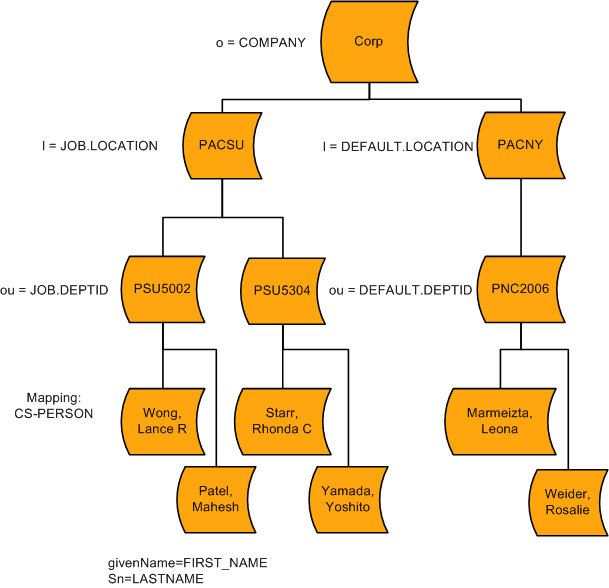
Hierarchical sample maps have the following structure:
Image: Campus Solutions Sample Directory Interface tree: hierarchical
Example of a hierarchical map of a directory interface.
The flat maps style can be used for Campus Solutions customers that have not licensed the HRMS application. It keeps the data in the directory placed under the same node and also prohibits duplicate entries. Note that flat maps do not require you to use DN default values.
Flat sample maps have the following structure:
Image: Campus Solutions Sample Directory Interface tree: flat
Example of a flat map of a directory interface.

Note: Even if PeopleSoft Directory Interface delivers hierarchical maps for HRMS, you could use a flat tree instead, where no nodes exist between the common name cn and the organization o.
See PeopleTools: Security Administration
The following sections describe the delivered sample messages and PeopleCode functions that are related to the directory mappings.
Directory Interface Messages
PeopleSoft Directory Interface delivers the following sample messages for mapping Campus Solutions data to the directory.
|
Message Name |
Directory Entry |
|---|---|
|
DSPERSON_BASIC_SYNC DSPERSON_BASIC_SYNC_EFF |
Person Entry |
|
DSADVSR_SYNC DSADVSR_SYNC_EFF DSMAPINPUT_ADVSR |
Advisor/Instructor Entry |
|
DSAPPLICANT_SYNC DSAPPLICANT_SYNC_EFF DSMAPINPUT_APPLICANT |
Applicant Entry |
|
DSSTUDENT_SYNC DSSTUDENT_SYNC_EFF DSMAPINPUT_STUDENT |
Student Entry |
|
DSPERSON_SYNC DSPERSON_SYNC_EFF DSMAPINPUT_PERSON_SA |
CS Person Entry |
See PeopleTools: Integration Broker Service Operations MonitorPeopleTools: Integration Broker Testing Utilities and ToolsPeopleTools: Supported Integration TechnologiesPeopleSoft HCM: Application Fundamentals, "Working with PeopleSoft Directory Interface for PeopleSoft HRMS"
Message Publish
The following example is Publish PeopleCode that is used in a component's SavePostChange PeopleCode:
Local Message &MSG;
Local Rowset &COMPONENTROWSET;
&COMPONENTROWSET = GetLevel0();
&MSG = CreateMessage(MESSAGE.WANDA_PERSPUB);
&MSG.CopyRowsetDeltaOriginal(&COMPONENTROWSET);
&MSG.Publish();
Note: When publishing mapping data, use CopyRowsetDeltaOriginal, not CopyRowsetDelta.
Message Subscription for Hierarchical Maps
The following example shows handler application class in a message when using hierarchical maps:
Declare Function ProcessMappingMessage PeopleCode FUNCLIB_EO_DS.DSMAPMESSAGE FieldFormula;
Local Message &msgIn;
/* Build the Mapping messages from the input message */
&msgIn = GetMessage();
ProcessMappingMessage(&msgIn, "DSMAPINPUT", True, "");
Message Subscription for Flat Maps
The following example shows handler application class in a message when using flat maps:
Declare Function BuildMappingMessage PeopleCode FUNCLIB_EO_DS.DSMAPMESSAGE FieldFormula;
Component string &DSMapname;
Local Message &DSMsg;
&DSMsg = GetMessage();
&MsgName = &DSMsg.Name;
/* Create a SQL statement to retrieve the Names of all the Mappings that reference this Message */
&MapSQL = CreateSQL("SELECT DSMAPNAME FROM PS_EO_DSMAP WHERE MSGNAME = :1 AND STATUS = 'A' ", &MsgName);
While &MapSQL.Fetch(&DSMapname)
BuildMappingMessage(&DSMsg, &MsgName, True, &DSMapname);
End-While;
BuildMapping Message Syntax
The BuildMappingMessage function populates a message with data that is stored in another message and with data from the local database. After populating the message from the two data sources, it calls the mapping function. When all the data required for directory mapping does not exist in the original published message, BuildMappingMessage uses this function instead of directly calling the mapping function:
BuildMappingMessage (input message, output message, on-line flag, [, map name])
The function performs the following tasks:
Copies data in the same record from the input message into the output message.
Searches for empty records in the output message.
Examines data in the message for key values for empty records.
If it finds key values for empty records, populates empty records in the output message by retrieving its current rows in the database.
If a map name is provided, calls the mapping function for the specified name.
Otherwise, it calls the mapping function for each map referencing the output message.
The BuildMappingMessage code is in the FUNCLIB_EO_DS derived record, DSMAPMESSAGE field, Field Formula event.
Parameters
|
Name |
Type |
Description |
|---|---|---|
|
input message |
Message |
Pass the message containing the originally published data. |
|
output message |
String |
Specify the name of the message to be created, populated, and passed to the mapping function. |
|
online flag |
Boolean |
Set to true if the function is called after an online message publication. This flag isn't used by the BuildMappingMessage function, but it is passed to the mapping function. Set to false if the function is called through a background process, such as Directory Audit. |
|
map name |
String |
Specify the name of the map to be used if the function does not call every map associated with the output message. |
Here is an example:
Local Message &MsgIn;
BuildMappingMessage(&MsgIn, "DSMAPINPUT", True, "PERSON_NDS");
To avoid problems with directory maps, confirm the following information:
Confirm that the PeopleSoft Directory Interface product is selected on the Installation page:
Confirm that the PeopleSoft database is properly connected to the directory:
Both the Running Bind Test and Running Search Test fields should display Success.
Confirm that the schema extensions were loaded from the delivered DMS scripts (for CS and for HRMS, if needed):
You should see rows in the Apply PeopleSoft Schema Extensions grid.
Confirm that you ran the Schema Cache process:
Confirm that the Campus Solutions delivered messages are listed in Integration Broker transactions and are active:
Make sure that these Campus Solutions messages are listed with their latest version activated:
DSADVSR_SYNC
DSADVSR_SYNC_EFF
DSAPPLICANT_SYNC
DSAPPLICANT_SYNC_EFF
DSDEPT_SYNC
DSDEPT_SYNC_EFF
DSPERSON_BASIC_SYNC
DSPERSON_BASIC_SYNC_EFF
DSSTUDENT_SYNC
DSSTUDENT_SYNC_EFF
The messages should appear twice: once for Transaction Type = Inbound Asynchronous and once for Transaction Type = Outbound Asynchronous.
Confirm that these messages are also activated in Application Designer:
Select the messages listed above, then right-click the version number. Select The Status should be set to Active.
Confirm that the message subscriptions PeopleCode is active for all of the messages listed above:
Select the messages listed above, then right-click the XxxxSyncEff message subscription. Select The Status should be set to Active.
Note: If you are using flat maps, the message subscriptions for messages that end with _EFF should have DSMappingSub activated and UsingDSMAPINPUTSub inactivated. If you are using hierarchical maps, the opposite should be true.
Confirm that the DIR_INTFC and DSCHNL channels are running:
Confirm that you can ping the node successfully:
Confirm that the domain is active:
Confirm that you do not see errors in the PS_EO_DSBILOAD_ERR table when triggering a map.
If a map does not trigger the data to the directory, confirm that the messages were triggered: : Overview and Message Instances tabs.
See PeopleTools: Integration Broker Administration