Entering Groups of Transactions
This section provides an overview of group data entry and discusses:
PeopleSoft Student Financials enables you to post transactions for a group of students or organizations, which enables you to quickly and easily post many receivables without having to post and approve each one individually. Student Financial Cashiering Office application has the option to create Group Data entries. In addition, charges and payments from external sources can be loaded through the SF External File Load process, and these transactions populate the Group Data Entry tables. You may also use the Mass Select Transactions process to create Group Post entries using Population Selection.
To enter groups of transactions for students and organizations, access the pages using the Group Data Entry and Group Corp Data Entry components, respectively. To approve groups of transactions, use the same two pages, but access them from the worklist.
|
Page Name |
Definition Name |
Navigation |
Usage |
|---|---|---|---|
|
Group Entry |
GROUP_ENT_ONE |
|
Define source information and control totals for group transactions. |
|
Group Line Entry |
GROUP_LINE_CNTRL |
|
Add transactions to a group entry. |
Access the Group Entry page ().
Image: Group Entry page
This example illustrates the fields and controls on the Group Entry page. You can find definitions for the fields and controls later on this page.
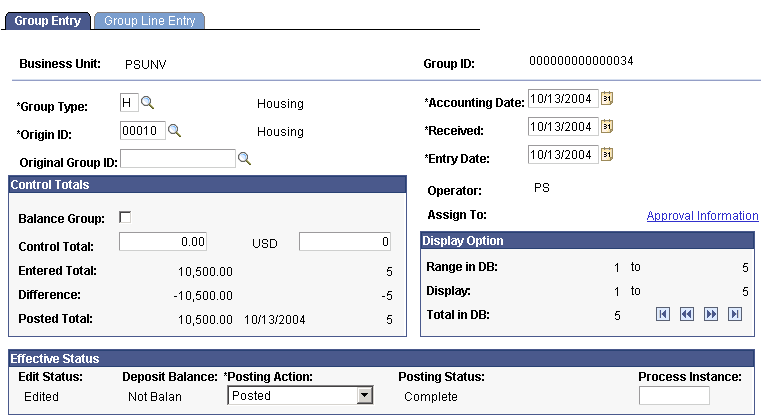
Note: The system uses all of the information on this page as group control information and does not post it to student or corporate accounts.
|
Field or Control |
Definition |
|---|---|
| Group Type |
Enter the group type that describes the transactions. |
| Accounting Date |
Enter the accounting date for the transactions. The default value is the current system date, but you can change it if necessary. |
| Origin ID |
Enter an origin ID to indicate the source of the transactions. Depending on the origin ID, approval for the transactions might be required. SF Security can be placed on this field to allow individual sources (origins) to access only their groups of transactions. |
| Received |
Enter the date on which your office received payment or charge transactions. |
| Original Group ID |
This field is populated after the Reverse Groups process runs. The Reverse Group process creates a new group ID representing the transactions that were reversed, and this field will reference the original group ID. |
| Entry Date |
Enter the date that you are entering the transactions. |
| Operator |
This field displays the ID of the user who is entering transactions. |
| Assign To |
Reserved for future use. Note: For groups requiring approval, the Approval Information link appears following the Assign To field. This link gives you the Original Approver ID, Approved At Date/Time Stamp, Last Approver ID, and Approved At Date/Time Stamp data. This link does not replace the Assign To field, it just provides further information about the content of the field. |
Control Totals
|
Field or Control |
Definition |
|---|---|
| Balance Group |
Select this option to require that the group be in balance before the system posts it. To determine whether a group is balanced, the system compares the number of transactions and amounts to information in the control totals fields. |
| Control Total |
Enter the monetary sum of the transactions in the group in the Control Total field and enter the total number of transactions in the group in the unlabeled field to the right. For example, if you are entering a group of checks that was received from students, enter the total monetary value of the checks in the Control Total field and the number of checks (count) in the unlabeled field. If the external file load process is used and the external file setup defines control totals, these fields are populated through the file load process. |
| Entered Total |
These fields display the monetary amount of all transactions that are entered in the batch and the count of the entries. |
| Difference |
These fields display the difference between the entered totals and the control totals. |
| Posted Total |
These fields display the monetary total, posting date, and count of the entries after the batch is posted. |
Display Option
The display option enables you to view multiple rows. The number of transaction rows that are chunked (viewable at one time) is controlled by the maximum row settings selection in the SF Installation setup.
|
Field or Control |
Definition |
|---|---|
| Range in DB |
This field displays the range of sequence numbers within the group ID. |
| Display |
This field displays the range of sequence numbers that is currently displayed. The display range is the viewable "chunk." |
| Total in DB |
This field displays the total number of transactions within the group ID. |
Effective Status
|
Field or Control |
Definition |
|---|---|
| Edit Status |
This field displays whether the batch has been edited. |
| Deposit Balance |
This field displays whether the batch is balanced. You must select the Balance Group check box and the batch must balance for this field to display Balanced. |
| Posting Action |
Select one of these values:
|
| Posting Status |
This field displays the posting status. Possible values for this field are Balance, Complete, Error, Incomplete, Not Posted, and Reversed. |
| Process Instance |
This field displays the process instance number assigned by the process scheduler. This field is only populated if the posting job is not successful. To post a corrected group, you must remove the process instance number using the Reset Process Instance button on the Group Post Run Control page. |
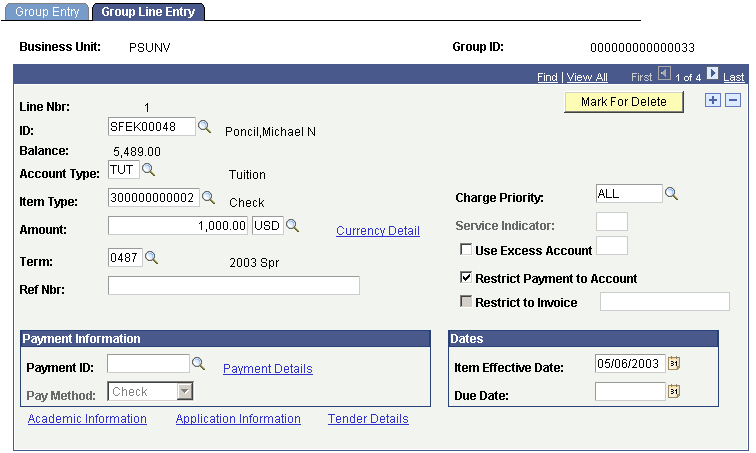
Access the Group Line Entry page ().
Image: Group Line Entry page
This example illustrates the fields and controls on the Group Line Entry page. You can find definitions for the fields and controls later on this page.
|
Field or Control |
Definition |
|---|---|
| Line Nbr (line number) |
This field displays the line number of the current entry. This field increments as each new entry line is added. |
| ID |
Enter the ID for the student that you are adding to the group. |
| Balance |
This field displays the current balance of the student's account. |
| Account Type |
Select the account type of the new entry. The description of the account type appears to the right of the field. Note: Specifying an account type for a payment transaction is optional. |
| Item Type |
Select the item type of the new entry. The description of the item type appears to the right of the field. Warning! We strongly advise that you do not enter refund item types through Group Post. If you enter a refund item type through Group Post, the Refund Table is not updated. If you try to reverse the refund item type through the Group Reversal process, the reversal process tries to reverse all items with the same refund number. Refund item types that are posted through Group Post have a refund number of zero because they are not true refunds. Posting reverses all items on the account with a refund number of zero, that is, all items on the account that are not refunds. We also strongly advise that you do not enter waiver item types through Group Post. Waivers should be applied through Tuition Calculation to ensure that adjustments to fees and waivers are processed correctly. Payment applier is not invoked for waivers. Waivers should never be posted to corporate accounts through the Group Corp Line Entry page. Payment reversals do not work for waivers posted as payments to a corporate account. The reversal process looks for an EmplID which does not exist on a corporate account. |
| Charge Priority |
The charge priority list that is attached to the selected item type (credit item types only) appears in this field. You may override this value. |
| Amount |
Enter the item (charge or payment) amount of the transaction. |
| Use Excess Account |
Select to direct payment amounts in excess of the charge to another account. Enter the target account in the field to the right. |
| Restrict Payment to Account |
Select to keep the entire amount of the payment in the account. Selecting this option prevents an excess payment from being transferred to an excess payment account. |
| Restrict to Invoice |
If your institution specifies that it will apply payments by invoice, you can restrict payments to an invoice. |
| Term |
Enter the term for which you want to post this transaction. |
| Ref Nbr (reference number) |
Enter an optional reference number to track the transaction. |
| Service Indicator |
If this transaction is a write-off, the system populates the write-off service indicator code. |
Payment Information
|
Field or Control |
Definition |
|---|---|
| Payment ID |
Enter a payment ID in this field to reverse a payment. When you exit the field, the system populates the remaining fields on the page with the original payment information. |
| Pay Method |
If the payment item type is set up to be tender-specific, the tender value appears in this field. If the field is not populated, you may select a payment method (tender). |
Dates
|
Field or Control |
Definition |
|---|---|
| Item Effective Date |
Enter the date on which the transaction becomes active. The default value is the current date. |
| Due Date |
Enter an optional due date for charge transactions. If you leave this field blank, the billing program populates the field in the student's account. |
| Mark For Delete |
Click to select a particular row on the group entry page of the non-posted group for deletion. Note: This button only appears for non-posted rows on the Create Transaction page and when the posting status value is Not Complete. When you click the button, the label changes to Unmark for Delete. You can post the group and this transaction will not be posted, but you will still have a record of it as part of the group for audit or reconciliation purposes. You can later correct the item, click Unmark for Delete, and repost the group. |
| Currency Detail |
Click to access the Currency Conversion page, where you can change the exchange rate type on payment item types if you changed the default currency code. |
| Payment Details |
Click to access the Payment Details page, where you can review details about the payment that was made. You can review the details about the payment for a payment item type, but typically, when you post a payment, you would use this page to enter data to which the payment should apply. For example, posting a payment toward payment plans, you could enter the specific contract number or post a payment for a specific career or class if you only want the payment to go towards one career or a particular class. On the Group Corp Line Entry page, you can use the Payment Details link to populate the Contract # (Contract Number) and/or Contract ID (EmplID) to restrict a corporate payment to a specific contract and/or a specific student assigned to a contract. |
| Academic Information |
Click to access the Academic Information page, where you can review the student's enrollment information. |
| Application Information |
Click to access the Application Information page, where you can review the student's application status. |
| Tender Details |
Click to access the Check Information page, where you can enter details about a payment by check. When entering a specific item type that is attached to a particular tender type (check or credit card), this page appears so that you can enter specific tender details. Otherwise, click the link to view the tender details. |