Setting Up Target Keys
To set up target keys, use the Target Keys component (TARGET_KEYS).
Target keys indicate which charges receive credit for a given transaction. A cashier must specify a target key for all transactions except department receipts, cash replenishments, and interim deposits. You can also enter ChartField information for target keys.
This section discusses:
|
Page Name |
Definition Name |
Navigation |
Usage |
|---|---|---|---|
|
Target Keys - Definition |
TARGET_KEY_TABLE |
|
Define a target key. |
|
Target Key ChartFields |
SSF_CF_WRKGRID_SEC |
|
Define a chart of accounts for a target key. Define the general ledger chart of accounts to which you record any cashiering transactions associated with the target key that you are defining. |
|
Target Keys - Tax Authority |
TARGET_KEY_TAX |
|
Link tax authorities to target keys. Attach tax authorities to your target key. This enables you to assess tax on certain cashiering transactions with this target key. |
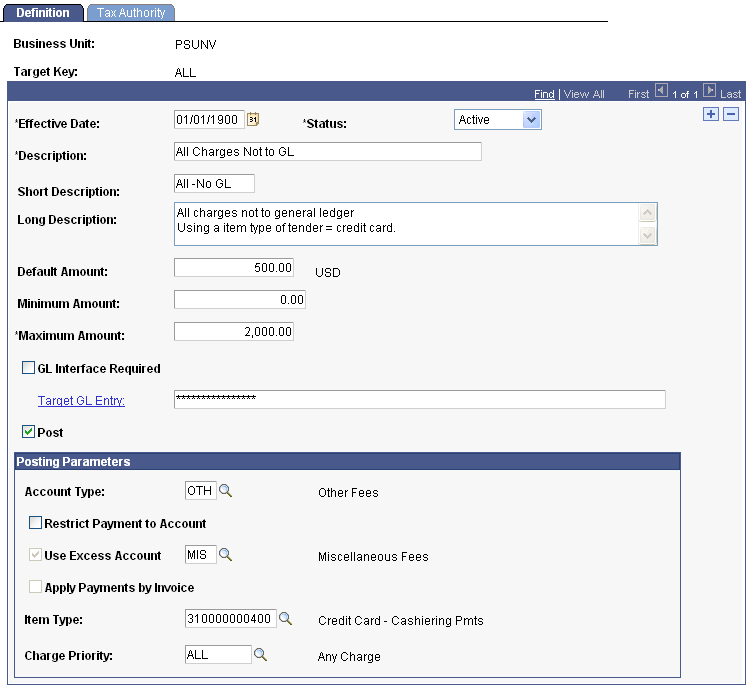
Access the Target Keys - Definition page ().
Image: Target Keys – Definition page
This example illustrates the fields and controls on the Target Keys – Definition page. You can find definitions for the fields and controls later on this page.
|
Field or Control |
Definition |
|---|---|
| Default Amount |
Enter an optional default amount for the target. For example, if tuition charges are typically 5,000 USD, then for the tuition target key, you can enter 5,000 USD as a default amount to reduce the amount of data entry required at the time of payment. |
| Minimum Amount |
Enter the minimum amount allowed for the target key per transaction. |
| Maximum Amount |
Enter the maximum amount allowed for the target key per transaction. |
| GL Interface Required, Target GL Entry and Copy and Paste buttons |
Select to include transactions for this target key when you run the cashiering GL interface process. Click the Target GL Entry link to specify ChartFields or enter ChartField values. Enter the ChartField values that correspond to the general ledger account into which you record transaction information associated with the target key. The chart of accounts that you define on this page provides the credit side of the GL entry. For a cashiering receipt to properly interface with your general ledger system, both the target key and the tender key associated with the receipt must have the GL Interface Required check box selected. You can also specify a SpeedType on this page. To specify the Speed Type, click the link and enter the SpeedType that you have already set up. For ease of use, after entering your ChartFields, click the Copy button to copy them to a clipboard. You can go to any other field and use the Paste button to paste. Be careful when selecting this check box because if the item type associated with the target key also has this check box selected, the regular GL interface process will pick up any transactions associated with the target key that you are defining. The cashiering GL interface process is intended to be used to send transactions to your general ledger that do not post to student or corporate accounts. Usually, you do not want these nonpostable transactions to be picked up by the regular GL interface process. Therefore, you normally do not want to select the GL Interface Required check box for the target key unless it is to be used for transactions that do not post to an account. |
| Post |
Select to post student payments or corporate payments associated with this target key. The system selects this check box by default. If you select this check box, you cannot attach a tax authority to the target key. This is because when you attach a tax authority to a target key, the system assesses a tax to any cashiering transactions associated with that target key. Postable targets post against charges on a student or corporate account. The system already assesses any necessary taxes to a charge when it posts to an account. Therefore, if a tax authority were attached to a postable target key, when you used the target key for a cashiering transaction, the system would assess tax to the target even though the charge it would post against had already been taxed. This would cause the payer of the charge to be taxed twice for the same charge. |
Posting Parameters
Determine how the system posts transactions associated with the target key.
|
Field or Control |
Definition |
|---|---|
| Account Type |
If you are defining target keys for student or corporate payments, enter the account type the target affects. The account type determines the account to which the payment posts. |
| Restrict Payment to Account |
Select to post each payment in its entirety to the account that you set in the Account Type field. The system credits any excess payments to the account that you selected, thereby creating a credit balance that can be applied to new charges or refunded later. If you select this check box, the Use Excess Account check box and its accompanying field become unavailable. |
| Use Excess Account |
If you do not select Restrict Payment to Account check box, you can select this check box. When you select this check box and do not specify a specific account in its accompanying field, the system credits excess payments to the default payment excess account that you defined during the setup of your Student Financials business unit. Use the edit box to the right of this check box to enter a specific excess account to which the system credits any excess payments to this target key. |
| Apply Payments by Invoice |
Select this check box to restrict payments to an invoice. The check box displays only if your institution indicated on the SF Installation 2 page that it will apply payments by invoice. |
| Item Type |
If you are defining a target key for payments that post to student or corporate accounts, enter the payment item type that appears on the account when you use this target key. |
| Charge Priority |
The system automatically populates this field with the charge priority of the item type that you entered. However, you can use this field to override the payment allocation rules for payments to this target. The charge priority determines how the system applies payments to charges. |
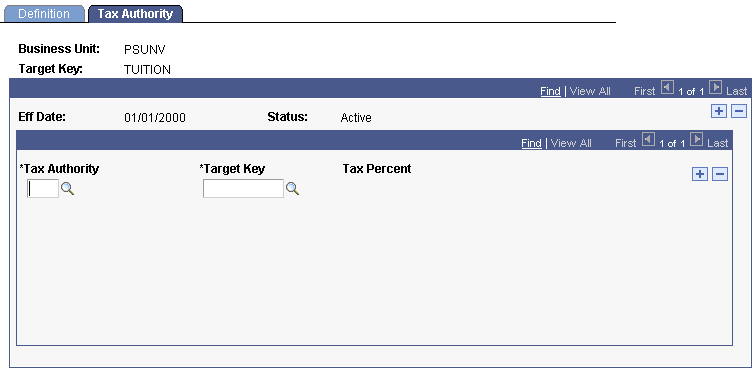
Access the Target Keys - Tax Authority page ().
Image: Target Keys - Tax Authority page
This example illustrates the fields and controls on the Target Keys - Tax Authority page. You can find definitions for the fields and controls later on this page.
|
Field or Control |
Definition |
|---|---|
| Tax Authority |
Enter tax authorities to attach to the target key. When you enter a tax authority, the system automatically populates the Tax Percent field with the appropriate percentage. |
| Target Key |
Enter the target key of the tax that the system adds to transactions conducted using the target key that you are defining. Whenever you process payments to the target key, the system adds the attached tax target key automatically, thereby charging the customer the appropriate tax. |
| Tax Percent |
The system populates this field with the appropriate percentage when you entered a value in the Tax Authority field. |
Note: If you attach a tax authority to the target key and you select the Post check box on the Definition page, the system does not allow you to save the target key.