Setting Up Tender Keys
To set up tender keys, use the Tender Keys component (TENDER_KEYS).
Tender keys represent the types of tender your office can accept. Examples of tender include cash, checks, and credit cards. You can also enter ChartField information for tender keys, overages, and shortages.
This section discusses:
|
Page Name |
Definition Name |
Navigation |
Usage |
|---|---|---|---|
|
Tender Key |
TENDER_KEY_TABLE |
|
Define tender keys. |
|
Tender Key GL |
SSF_CF_WRKGRID_SEC |
Click the GL Entry link on the Tender Key page. |
Define charts of accounts for tender keys. |
|
Tender Key Over GL |
SSF_CF_WRKGRID_SEC |
Click the Over GL Entry link on the Tender Key page. |
Define charts of accounts for overages. |
|
Tender Key Short GL |
SSF_CF_WRKGRID_SEC |
Click the Short GL Entry link on the Tender Key page. |
Define charts of accounts for shortages. |
|
Tender Key Valid Cashiers |
TENDER_CSHR_TABLE |
|
Specify cashiers for tender keys. |
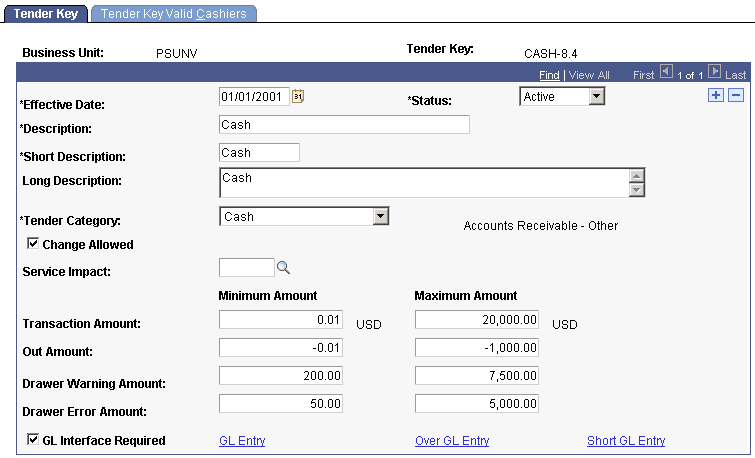
Access the Tender Key page ().
Image: Tender Key page
This example illustrates the fields and controls on the Tender Key page. You can find definitions for the fields and controls later on this page.
|
Field or Control |
Definition |
|---|---|
| Tender Category |
Select the appropriate category for the tender that you are defining. When a cashier enters a tender key during a cashiering transaction, this tender category tells the system which tender details must be entered before the cashier can successfully conduct the transaction. |
| Change Allowed |
Select this check box if you want the cashier to be able to give change for a transaction using this tender key. |
| Service Impact |
Enter a service impact code to affect how the system processes transactions using this tender. For example, if this field contains a negative service impact for checks, the system will not permit any students to tender checks as payment if the service indicators on their accounts are associated with the negative service impact. |
| Transaction Amount |
Enter the minimum and maximum amounts of this tender that your cashiers can accept per transaction. |
| Out Amount |
Enter the minimum and maximum amounts of this tender that your cashiers can dispense per transaction as change due. |
| Drawer Warning Amount |
Enter the minimum and maximum amounts of this tender that your drawers can contain before the system generates a warning message. When you create a receipt that causes the amount of this tender remaining in the cashier's drawer to be equal to or less than the minimum amount, the system generates a warning message signaling you to perform a cash replenishment. When you create a receipt that causes the amount of this tender in the cashier's drawer to exceed the maximum amount, the system generates a warning message signaling you to perform an interim deposit. |
| Drawer Error Amount |
Enter the minimum and maximum amounts of this tender that your drawers can contain before the system generates an error message. When you attempt to create a receipt that causes the amount of this tender in the cashier's drawer to be equal to or less than the minimum amount, the system generates an error message signaling you to perform a cash replenishment and does not process the receipt. When you attempt to create a receipt that causes the amount of this tender in the cashier's drawer to equal or exceed the maximum amount, the system generates an error message signaling you to perform an interim deposit and does not process the receipt. Note: You determine the maximum amount that the cashiering office can dispense when cashing a check in the Cashiering Offices page. |
| GL Interface Required (general ledger interface required) |
If you select the GL Interface Required check box, any transactions associated with this tender key must interface with the general ledger, and you must enter ChartField information on the GL Entry, Over GL Entry, and Short GL Entry pages of this component. For a cashiering receipt to properly interface with the general ledger system, both the target key and the tender key associated with the receipt must have the GL Interface Required check box selected. |
| GL Entry (general ledger entry) |
Click the GL Entry link to enter in the display field the ChartField values that correspond to the general ledger account into which you record any cashiering transactions associated with the tender key that you are defining. The chart of accounts that you define on this page provides the debit side of the GL entry. You can also specify a SpeedType on this page. To specify the Speed Type, click this link or one of the proceeding links and enter the SpeedType that you have already set up. For ease of use, after entering your ChartFields values, click the Copy button to copy them to a clipboard. You can go to any other field and use the Paste button to paste. |
| Over GL Entry (over general ledger entry) |
Click the Over GL Entry link to enter in the display field the ChartField values that correspond to the general ledger account into which you record any overages when a cashier or register does not balance for the tender that you are defining. The chart of accounts that you define on this page provides the debit side of the GL entry. |
| Short GL Entry (short general ledger entry) |
Click the Short GL Entry link to enter in the display field the ChartField values that correspond to the general ledger account into which you record any short amounts when a cashier or register does not balance for the tender that you are defining. The chart of accounts that you define on this page provides the credit side of the GL entry. |
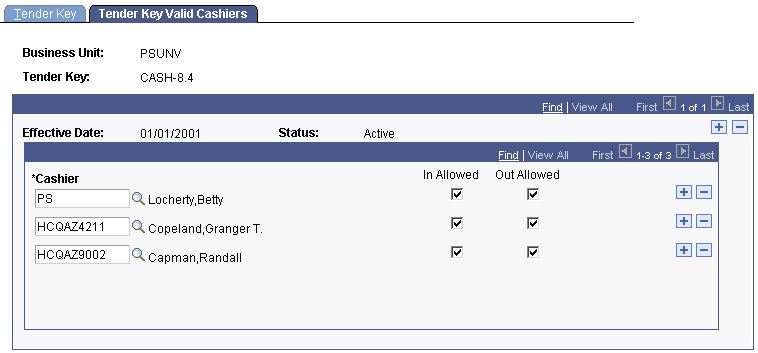
Access the Tender Key Valid Cashiers page ().
Image: Tender Key Valid Cashiers page
This example illustrates the fields and controls on the Tender Key Valid Cashiers page. You can find definitions for the fields and controls later on this page.
|
Field or Control |
Definition |
|---|---|
| Cashier |
Enter cashiers that can process transactions using the tender key. |
| In Allowed and Out Allowed |
Select to determine if a cashier can take the tender in or give the tender out. For example, if you select only the In Allowed check box for a cashier when you define the cash tender key, the cashier can only take in cash. The cashier cannot give cash to a customer in a check cashing transaction or as change. A cashier with neither check box selected can not perform any transactions with this tender. |