Copying Transfer Components Between Component Subject Areas
This section discusses how to copy transfer components between component subject areas.
|
Page Name |
Definition Name |
Navigation |
Usage |
|---|---|---|---|
|
Subject Area Copy Function |
RUNCNTL_TRNSFR_CPY |
|
As necessary and as time permits, copy transfer components from larger, more general component subject areas into new, smaller component subject areas. |
Access the Subject Area Copy Function page ().
Image: Subject Area Copy Function page
This example illustrates the fields and controls on the Subject Area Copy Function page. You can find definitions for the fields and controls later on this page.
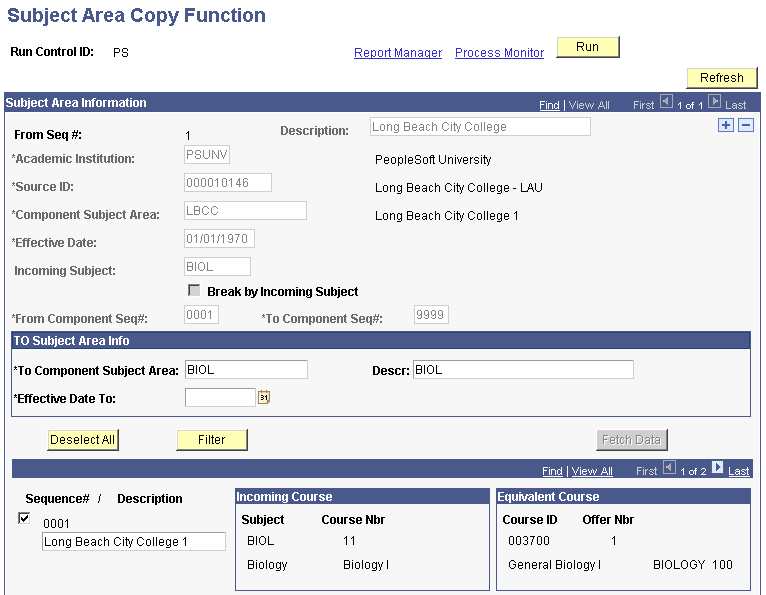
The copying functionality is intended primarily for academic institutions that receive a large number of transfer credit courses from a single source. On this page, you select the component subject area from which you want to retrieve transfer components, define the basics of the new component subject area to create, then retrieve the transfer components from the existing component subject area based on your parameters. Sort through the list of results to select the transfer components to include in the new transfer subject area, then run the Transfer Rule Subject Area Copy COBOL/SQL process (SRPCCARX) to create the new, smaller component subject area and to copy the selected components into it. After you run the process, you can edit the newly created component subject area in the Transfer Subject Area component. Attach this new component subject area to course transfer equivalency rules in the Course Transfer Rules (TRNSFR_RULE) component and resume course transfer credit processing as usual.
Important! If you are copying a large component subject area, you should either use the Incoming Subject field or the Break by Incoming Subject check box to separate the large component subject area into smaller ones based on incoming subject. Alternatively, use the From Component Seq# and To Component Seq# fields to copy blocks of 500 transfer components at a time into smaller component subject areas based on transfer component sequence numbers. You are not required to copy transfer components by subject area—it is just a logical breaking point for large component subject areas.
|
Field or Control |
Definition |
|---|---|
| Refresh |
Click to refresh the page. |
| From Seq # (from sequence number) |
The sequence number is the numeric counter that distinguishes each row of the process request apart from other rows. By default, the system sets the first sequence number to 1 and increases the number by one as you add rows. |
| Description |
Enter a description for this row of the process request. |
| Academic Institution |
Enter the academic institution to which the component subject area to copy belongs. |
| Source ID |
Enter the identification code of the source to which the component subject area to copy belongs. |
| Component Subject Area |
Enter the component subject area to copy. The system displays values based on the academic institution and source that you specified for this process request. |
| Effective Date |
Enter the effective date of the specified component subject area. The effective date indicates the row to copy within the specified component subject area. |
| Incoming Subject |
Enter an incoming subject to filter by subject through all transfer components of the specified transfer component subject area. When you click the Fetch button, the system retrieves only the transfer components with this incoming subject and automatically selects to copy them into the new, smaller component subject area during processing. This field prompts against the external subject table for the specified external organization. If you use this field, the Break by Incoming Subject check box becomes unavailable for entry. Note that you can assign the To Component Subject Area field and its related Description field the same name as the incoming subject because component subject areas are keyed by source ID. Alternatively, you can assign these fields unique values. |
| Break by Incoming Subject |
Select to break by incoming subject all the transfer components of the specified component subject area. If you select this check box, the Incoming Subject field, To Component Subject Area field, and its related Description field become unavailable for entry. When you click the Fetch button, the system retrieves all transfer components, separates them by incoming subject into unique rows on the run control page, assigns each row a sequence number, and automatically selects to copy all transfer components into new, smaller component subject areas during processing. For example, LBCC has eight different incoming subjects in their component subject area, so the system creates eight rows for eight new component subject areas. In addition, the system automatically populates the Incoming Subject field, the To Incoming Subject Area field, and its related Description field for each row. The Incoming Subject field remains unavailable for edit, but you can edit the other two fields. |
| From Component Seq# (from component sequence number) |
Indicate the first transfer component to retrieve from the specified component subject area. By default, the system sets the value of this field to 0001. You can override this default value. |
| To Component Seq# (to component sequence number) |
Indicate the last transfer component to retrieve from the specified component subject area. When you click the Fetch button to retrieve transfer components, the system displays all transfer components within the specified range. By default, the system sets the value of this field to 9999. You can override this default value. |
| To Component Subject Area |
Enter the identification code of the new component subject area to create based on the preexisting component subject area that you specified. |
| Description |
Enter a description of the new component subject area. |
| Effective Date To |
Enter the effective date of the new component subject area to create based on the preexisting component subject area that you specified to copy. |
| Fetch |
Click to retrieve the transfer components from the preexisting component subject area that you specified to copy. |
| Sequence # (sequence number) |
The system displays the sequence number of the transfer component from the preexisting component subject area that you specified to copy. |
| Description |
The system displays the description of the transfer component from the preexisting component subject area that you specified to copy. |
| Incoming Course |
The system displays the subject, course number, and description for the incoming course of the transfer component. |
| Equivalent Course |
The system displays the course ID, offering number, and description for the internal equivalent course of the transfer component. |
| Select All or Deselect All |
Click to select or clear all of the transfer components in the list at the bottom of the page. This functionality is useful when you are splitting a component subject area with a large amount of transfer components. For example, you have a math component subject area with 300 transfer components and you want to group 250 within a new, higher math component subject area and the remaining 50 within a new, lower math component subject area. To create the higher math component subject area, retrieve all of the transfer components from the math component subject area, click the Select All button, and then clear the check boxes for the 50 excluded components. When you create the lower math component subject area, select all of the 50 included transfer components. |
| Filter |
Click to filter the list of transfer components that appear at the bottom of this page. The system displays only the transfer components that you have checked. The checked transfer components are the only ones that the Subject Area Copy Function process uses when creating the new component subject area. |
| Unfilter |
The system displays this button whenever you have filtered the list of transfer components that appear at the bottom of the page. Click this button to reset the list back to its original number of transfer components. |