Creating Enrollment and Validation Appointments
This section provides an overview of enrollment and validation appointments and discusses how to:
Select an appointment control session.
Create enrollment appointment blocks.
Create validation appointments.
An appointment consists of an appointment number, a start and end date, and a start and end time. In Student Records, appointments are organized into appointment blocks. An appointment block is a group of appointments. Because you can define multiple appointment blocks you can set up a variety of appointment types. For example, you can create one block with many appointments in 15 minute increments, and another with appointments in hourly increments. And you can create another block that contains appointments with varying lengths of time. You can also create multiple appointment blocks to allow some or all of the same students to have more than one appointment.
To create an appointment block you can manually enter appointment numbers, dates, and times, or you can use a variety of criteria to generate appointments in batch. We provide functionality that enables you an immense amount of flexibility and control in defining when appointments will begin and end, and how long they will last. Additionally, you can easily define the maximum number of students in each appointment and you can see how many students are actually assigned to a particular appointment. The system updates the number of students actually assigned to an appointment when the Assign Students Appointment process assigns an appointment to a student, when you assign an appointment to an individual student on the Student Enrollment Appointment page, or when you delete a student appointment.
You create validation appointments the same way that you create enrollment appointments. Like enrollment appointments, validation appointments use appointment blocks, and you can create appointments in batch using the flexible start, end, and number of students per appointment criteria, or manually. The Validation Appointment page only appears if you have enabled the Validation feature on the Self Service Options page in the Academic Career Table component.
You create appointment blocks by session. You can reuse the appointment blocks that you created for one session for another session by selecting the first session as the appointment control session. When you select an appointment control session, the Enrollment Appointment and Validation Appointment pages become unavailable for that session.
|
Page Name |
Definition Name |
Navigation |
Usage |
|---|---|---|---|
|
Appointment Table |
SSR_APPT_TBL_HDR |
|
Set an appointment control session, if applicable, and indicate if you want to display enrollment and validation appointments in self service. |
|
Enrollment Appointments |
APPOINTMENT_TBL |
|
Define enrollment appointments, by appointment block, for the session. For each enrollment appointment, define the valid date and time ranges, length of appointments, and the number of students allowed per appointment. Regardless of whether you decide to assign appointments manually or through the Assign Students Appointment process, you must create the parameters of each appointment ID on this page. |
|
Validation Appointments |
SSR_VALIDAT_TBL |
|
Define validation appointments, by appointment block, for the session. For each validation appointment, define the valid date and time ranges, length of appointments, and the number of students allowed per appointment. This page is available if you selected the Enable Validation Feature check box on the Self Service Options page for this academic career. |
Access the Appointment Table page ().
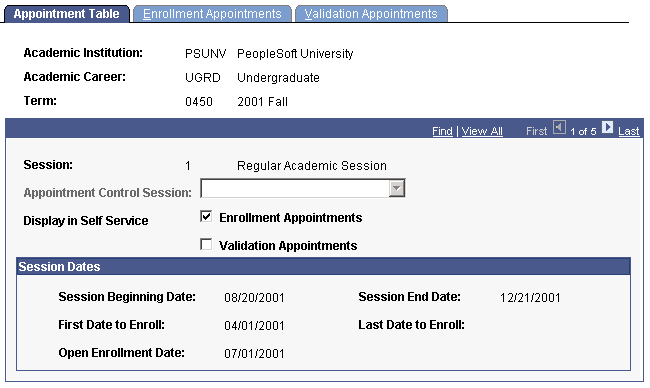
Image: Appointment Table page
This example illustrates the fields and controls on the Appointment Table page. You can find definitions for the fields and controls later on this page.
|
Field or Control |
Definition |
|---|---|
| Appointment Control Session |
Enter a session to which you want to point this session's appointment information. This enables a student to register in both sessions with a single appointment. For example, by pointing the appointment control session for a 12-week session and a 6-week session to a regular session, the appointment information defined for the regular session becomes valid for both the 12-week and 6-week sessions. When you select an appointment control session, the Enrollment Appointment and Validation Appointment pages for this session becomes unavailable for edit. Note: This field is only available for entry if this session has no students assigned to it. If no students are assigned to the session for which you are setting an appointment control session value, the appointments from the session are deleted. |
| Enrollment Appointments |
Select this check box if you want the system to display the enrollment appointments for this session in self-service pages. Clear this check box if you want to add and delete appointments and test the results of different enrollment appointment criteria before enrollment appointments are visible in self-service pages. |
| Validation Appointments |
Select this check box if you want the system to display the validation appointments for this session in self service. Clear this check box if you want to add and delete appointments and test the results of different validation appointment criteria before enrollment appointments are visible in self service. This field is available if you selected the Enable Validation Feature check box on the Self Service Options page for this academic career. |
Session Dates
These dates appear as defaults from the Session Table page. They appear here to assist you when assigning appointment date ranges on the Enrollment Appointments page.
Note: Appointment start and end dates must be within the first day and last day to enroll date range set up on the Session Table page.
Access the Enrollment Appointments page ().
Image: Enrollment Appointments page (1 of 2)
This example illustrates the fields and controls on the Enrollment Appointments page (1 of 2). You can find definitions for the fields and controls later on this page.
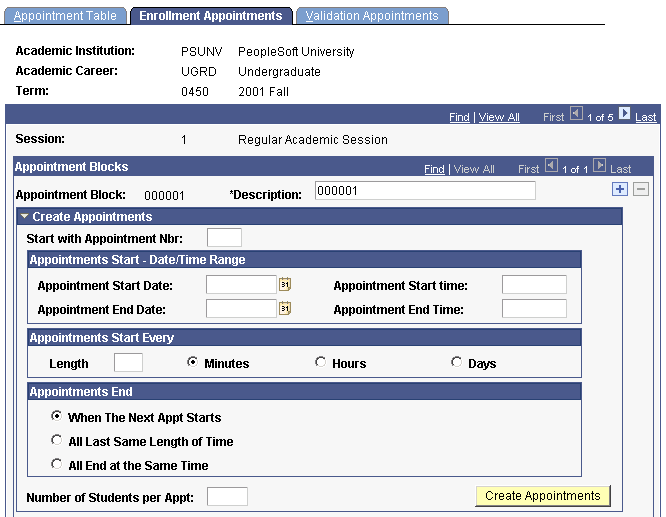
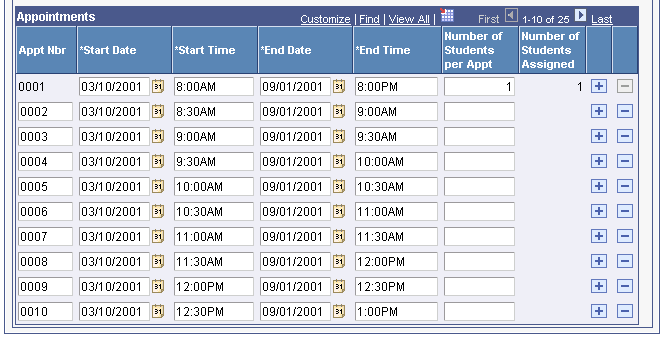
Image: Enrollment Appointments page (2 of 2)
This example illustrates the fields and controls on the Enrollment Appointments page (2 of 2). You can find definitions for the fields and controls later on this page.
Appointment Blocks
|
Field or Control |
Definition |
|---|---|
| Appointment Block |
Enter a name or code for this appointment block. An appointment block is a group of appointments. You can define one or several appointment blocks for a session. For example, you can define one appointment block for all student appointments in a session, or you can define one appointment block that contains appointments in 15 minute increments, while another might have appointments in hourly increments. Then, you can create one appointment block that has varying lengths of time. You can also set up multiple appointment blocks to allow the same block of students to have more than one appointment. Appointment block is now a key on the Appointment table. When you run the Assign Students Appointment process (SRAPPT.sqr), you merge a student appointment block with this appointment block. Also, when you assign individual students to appointments on the Student Enrollment Appointment page, you can select appointments by appointment block. |
Create Appointments
|
Field or Control |
Definition |
|---|---|
| Start with Appointment Nbr (start with appointment number) |
Indicate to the system where you want to start the appointment numbers in this appointment block. You can enter any numerical value. This enables you to segment appointment numbers if you want to leave gaps that can be filled later. If no value is entered, the system starts the appointment numbers with the next available number. |
Appointments Start - Date/Time Range
|
Field or Control |
Definition |
|---|---|
| Appointment Start Date and Appointment End Date |
Enter a range of dates in which your appointments can start. For example, if you enter 08/01/2005 in the Appointment Start Date field and 09/01/2005 in the Appointment End Date field, the first appointment in the block will start on 08/01/200, and the last appointment in the block will start on 09/01/2005. Appointments might end on a later date than 09/01/2005, but they will not start later than that date. The appointment start and end dates will be edited against the first date and last date to enroll for the session. If the date being added is not within the range, an error message will appear. |
| Appointment Start Time and Appointment End Time |
Enter a range of times at which you want your appointments to start. For example, if you enter a start of 8:00 a.m. and an end time 5:30 p.m., the first appointment of the day will start at 8:00 a.m., and the last appointment of the day will start no later than 5:30 p.m. Appointments might end later than 5:30 p.m., but they will not start later than that time. |
Appointments Start Every
|
Field or Control |
Definition |
|---|---|
| Length, Minutes, Hours, and Days |
Enter the length of time between the start time for each appointment. For example, if you enter 30 minutes, then appointments will start in 30 minute increments. |
Appointments End
|
Field or Control |
Definition |
|---|---|
| When The Next Appt Starts (when the next appointment starts) |
Select to have the system schedule appointments immediately following one another. For example, if one appointment ends at 9:25 a.m., the next appointment would start at 9:25 a.m. |
| All Last Same Length of Time |
Select to manually enter the length of time that you want each appointment to last. |
| Length, Minutes, Hours, and Days |
These fields become available when you select the All Last Same Length of Time option. Enter the length of time that you want appointments to last. |
| All End at the Same Time |
Select to indicate a specific date and time that you want all appointments in this appointment block to end. The End Date and End Time fields appear. |
| End Date |
This field becomes available when you select the All End at the Same Time option. Enter the date on which you want all appointments in this appointment block to end. |
| End Time |
This field becomes available when you select the All End at the Same Time option. Enter the time at which you want all appointments in this appointment block to end. |
Additional Elements
|
Field or Control |
Definition |
|---|---|
| Number of Students per Appt (number of students per appointment) |
Enter how many students you want assigned to each appointment. You can change this for individual appointments in the Number of Students per Appt field. |
| Create Appointments |
Click to create enrollment appointments in batch based on the criteria you defined. |
Appointments
The system populates this grid when you click the Create Appointments button. You can also manually add and delete appointments here.
Note: You cannot delete an appointment in which students are already assigned.
|
Field or Control |
Definition |
|---|---|
| Appt Nbr (appointment number) |
The system starts the appointment numbers with the value you entered in the Start with Appointment Nbr field. You can override this value. If no value is entered in the Start with Appointment Nbr field, the system will start the appointment numbers with the next available number. The system assumes appointments are assigned in numerical order. Therefore, appointment 0002 begins after appointment 0001. Through the Assign Appointments and Student Enrollment Appointment pages, you can assign appointment numbers to students. |
| Number of Students per Appt (number of students per appointment) |
When you create appointments in batch, The system populates this value based on the value you entered in the Number of Students per Appt field in the Create Appointments group box. You can change this value here. |
| Number of Student Assigned |
The number of students actually assigned to this appointment ID appears here. The system updates this number when a student appointment is deleted or when a student is assigned an appointment in batch on the Assign Appointments page or individually on the Student Enrollment Appointment page. |
Access the Validation Appointments page ().
Image: Validation Appointments page
This example illustrates the fields and controls on the Validation Appointments page. You can find definitions for the fields and controls later on this page.
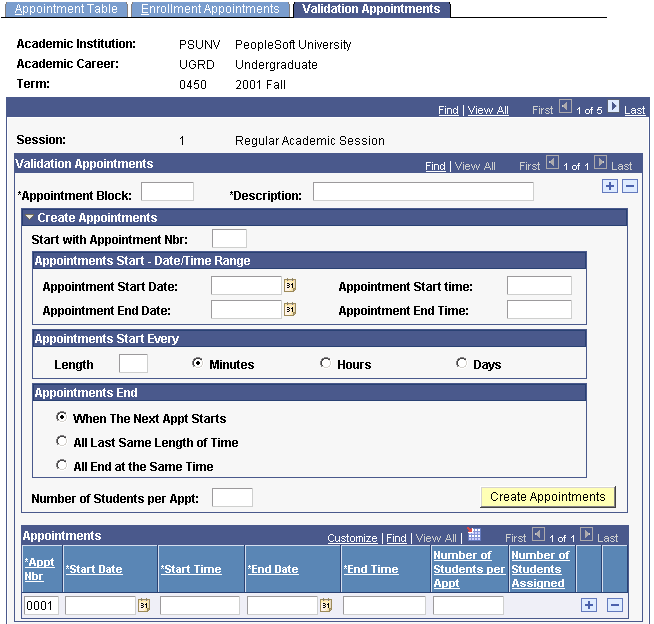
Create validation appointments the same way that you create enrollment appointments. This page is available if you selected the Enable Validation Feature check box on the Self Service Options page for this academic career.