Creating Transcript Text
Use the Transcript Text page to define transcript text for a specific student. Unlike transcript notes, which are predefined and attached to students on the enrollment request pages, transcript text is created for a specific student and is not necessarily associated with a specific enrollment record. After you create transcript text for a student, it always appears on transcripts with the transcript type you specify, or on a transcript that is at or above the transcript level you specify. No options at the transcript type setup level enable you to inactivate or hide transcript text. You can limit when and how the transcript text appears by using the filtering options on the Transcript Text page to specify valid transcript types, levels, and relative positions for the transcript text.
|
Page Name |
Definition Name |
Navigation |
Usage |
|---|---|---|---|
|
Transcript Text |
TRANSCRIPT_TEXT |
|
Define transcript text for a specific student. |
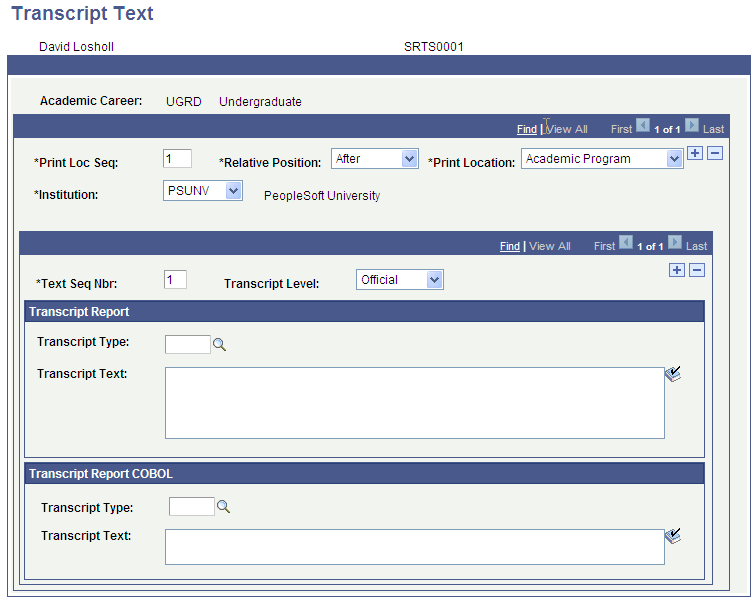
Access the Transcript Text page ().
Image: Transcript Text page
This example illustrates the fields and controls on the Transcript Text page. You can find definitions for the fields and controls later on this page.
|
Field or Control |
Definition |
|---|---|
| Print Loc Seq (print location sequence) |
Enter the print location sequence to identify the order in which notes appear within a print location. The default is 1, and each additional row increases by one. |
| Relative Position |
Select the relative position of the note within the chosen print location. You are prompted from the translate table. Values for this field are delivered with your system as translate values. Do not modify these values in any way. Any modifications to these values require a substantial programming effort. Values include: After: Select this value if you want the transcript text to appear immediately after the specified print location sequence. Before: Select this value if you want the transcript text to appear immediately before the specified print location sequence. |
| Print Location |
Enter the print location of the text. Print location values are delivered with your system and you can view them on the Print Area Table page. Modifying these values requires programming effort. The system uses this value in conjunction with the relative position value to determine where to print the transcript text. If the Transcript Type or Transcript Level that you specify is associated with a transcript type that has the Print Location set to Do Not Display, then the transcript text does not appear on the transcript. The transcript type setup is the overriding rule. Print Location values are: Academic Program, Academic Standing, Cumulative Stats, Degrees - External, Degrees - Local, Enrollment, Milestones, Student Personal Data, Term Honors, Term Statistics, Transcript Print Date, Transcript Recipient, Transcript Request Reason, Transcript Requester, Transfer Credit - Courses, Transfer Credit - Others, Transfer Credit - Tests, and Withdrawal Info. Note: Transcript text associated with a print location of Academic Program appears on the transcript only if the associated transcript type is configured such that the academic program prints in the Transcript Header. To review a particular transcript type's setup data, access the Transcript Type - Program page. Note: Transcript text associated with a print location of Institution Data appears differently on transcripts printed through Crystal than it does on transcripts you view online. Transcripts printed through Crystal always display institution data in a reserved area in the header of the transcript (upper left corner). This reserved area has a limited number of lines of text. For this reason, we have inactivated the Institution Data value. Any transcript text created with a print location of Institution Data prior to PeopleSoft Student Administration 8 remains in the database, and print as always. However, no new entries with a print location of Institution Data can be made. To review the setup data for a particular transcript type, access the Transcript Type - General page. Note: Transcript text associated with a print location of Student Personal Data does not appear as expected for transcript types for which student personal data is set to print in the page header. This is because the page header has a limited number of text lines available for printing. Therefore, transcript text associated with student personal data and a transcript type with student personal data printing in the page header, will instead print the transcript text in the first lines of text in the body of the transcript. To review the setup data for a particular transcript type, access the Transcript Type - General page. Note: Transcript text for all types of Transfer Credit must be associated with a transfer model. Because the model can be applied to multiple articulation terms, the effect on printing associated with transcript text is significant. Therefore, transcript text associated with a transfer credit model can be printed successfully only when the transfer credit is configured to print in the transcript header or transcript trailer. Transfer credit that is configured to print in the enrollment detail or enrollment trailer does not display any associated transcript text. To review the setup data for a particular transcript type, access the Transcript Type - Transfer/Test/Other Credits page. |
| Institution |
Enter the institution for which you want to create the transcript text. The institution value determines which transcript types are available in the Transcript Type field. |
| Model Nbr (model number) |
Based on the print location you select, the system prompts you for additional information. For instance, if you select a print location of Transfer Credit - Courses, the Model Number field appears. If you select a print location of Milestones, the Milestone Number field appears, and so on. |
| Text Seq Nbr (text sequence number) |
The system populates the text sequence number to 1 by default. You can insert text rows and increase the text sequence number. The sequence number determines the order of printing on the student's transcript before or after a print location. |
| Transcript Level |
Select either a transcript level or a transcript type, but not both. Select a transcript level to determine the types of transcripts on which the system will include this transcript text. Depending on the transcript level you select, the system prints the transcript text on transcript types set to the same level, and all other greater numbered transcript types on the translate table. For example, if you select Official for your transcript level (which has a level value of 20 in the translate table), the system prints the transcript text on all transcript types that have transcript levels of 20 to 80. However, if you select Stdnt Life for your transcript level (which has a level value of 60 in the translate table), the system prints the transcript text only on those transcript types where the transcript level is set to Stdnt Life or Degr Prog (degree progress), levels 60 - 80. The only exception to this rule is Not Print. If you select Not Print, the transcript text never prints. |
Transcript Type and Transcript Text
Use the Transcript Report group box for XML transcripts or the Transcript Report COBOL group box for COBOL transcripts.
|
Field or Control |
Definition |
|---|---|
| Transcript Type |
Select either a transcript level or a transcript type, not both. Enter a transcript type if you want the text to appear only on the type you specify. |
| Transcript Text |
Enter your free-form text in the Transcript Text field. This text appears on the student's transcript. For XML transcripts, this field is 1000 characters. |
Note: If you use the Historical Course Enrollment page for conversion purposes, and want to display term statistics for those enrollments, use transcript text for those statistics. Otherwise, display summary statistics that you converted using the transfer credit process.