Managing Prospect Actions
This section discusses how to:
Select a prospect name prior to managing prospect actions.
Edit or add a prospect action.
Edit or add prospect action details.
(Optional) Edit or add ask information.
(Optional) Edit or add prospect action descriptions.
Assign resources to prospect actions.
Link prospect actions to initiatives.
View a prospect action summary.
Select a prospect name prior to completing an action.
Select an action to complete.
Complete a prospect action.
Select a prospect name prior to completing a contact report.
Enter contact report details.
View a contact report summary.
Send a contact report.
Send updated biographical information.
|
Page Name |
Definition Name |
Navigation |
Usage |
|---|---|---|---|
|
Prospect Action - Select a Prospect |
AV_OUTR_SRCH |
|
Search for and select a prospect action record from the My Prospects workset. |
|
Prospect Action - Edit Action |
AV_OUTR_ACTN_LIST |
Click a name in the Search Results area of the Prospect Action - Select a Prospect page. |
Select a prospect action to edit. |
|
Prospect Action - Action Detail |
AV_OUTR_ACTN_DTL |
Click a link under the Action Description heading or click the Add an Action button on the Prospect Action - Edit Action page. |
Enter or update an action step for a prospect that will be carried out by a staff member or volunteer. |
|
Prospect Action - Ask Information |
AV_OUTR_ACTN_ASK |
Click the Next button on the Prospect Action - Action Detail page. |
Enter details about an action that includes a donation request (ask). If the action type on the Prospect Action - Action Detail page is not Ask, you should skip this page. |
|
Prospect Action - Action Description |
AV_OUTR_ACTN_DSCR |
Click the Next button on the Prospect Action - Ask Information page. |
Enter detailed information related to the action. If the action does not require further description, you can skip this page. |
|
Prospect Action - Assigned Resources |
AV_OUTR_ACTN_ASGN |
Click the Next button on the Prospect Action - Action Description page. |
Assign other resources to the action. If appropriate, you can skip this page. |
|
Prospect Action - Linked Initiatives |
AV_OUTR_ACTN_INIT |
Click the Next button on the Prospect Action - Assigned Resources page. |
Link campaign, event, membership, volunteer, or other initiatives to the action. If appropriate, you can skip this page. |
|
Prospect Action - Summary |
AV_OUTR_ACTN_SMRY |
Click the Next button on the Prospect Action - Linked Initiatives page. |
View and print a prospect action summary. |
|
Prospect Action Results - Select a Prospect |
AV_OUTR_SRCH |
|
Search for and select a prospect record from the My Prospects workset that has an action to complete. |
|
Prospect Action - Results - Edit Action |
AV_OUTR_RSLT_LIST |
Click a name in the Search Results area of the Prospect Action Results - Select a Prospect page. |
Select a specific action to complete. |
|
Prospect Action - Results |
AV_OUTR_ACTN_RSLT |
Click a link under the Action Description heading on the Prospect Action - Results - Edit Action page. |
Enter the specific results of a completed action. |
|
Prospect Contact Report - Select a Prospect |
AV_OUTR_SRCH |
|
Search for and select a prospect record from the My Prospects workset to complete and send a contact report. |
|
Prospect Contact Report - Detail |
AV_OUTR_ACTN_CNCT |
Click a name in the Search Results area of the Prospect Contact Report - Select a Prospect page. |
Enter constituent contact report details. |
|
Prospect Contact Report - Summary |
AV_OUTR_ACTN_CSMRY |
Click the Printer Friendly Version link on the Prospect Contact Report - Detail page. |
View a printable summary of all information on the contact report. |
|
Send Contact Report |
AV_OUTR_CNCT_SEND |
Click the Send Report button on the Prospect Contact Report - Detail page. |
Send a completed contact report to a list of users. |
|
Send BioDemo Update |
AV_OUTR_BIO_SEND |
Click the Send BioDemo Update button on the Prospect Contact Report - Detail page. |
Send updated biographical and demographic data, learned during a prospect contact, to the department responsible for updates to biodemo data. |
Outreach officers can manage prospect actions by using the three links on the Outreach Home page. Their options are to add or update an action, complete an action, or complete a prospect contact report.
To add or update prospect actions, outreach officers must first access the Prospect Action page, search their prospect worksets, and select prospect names. When a user selects a name, that user can then add new actions or edit existing ones on that prospect record.
Access the Prospect Action - Edit Action page (click a name in the Search Results area of the Prospect Action - Select a Prospect page).
This page lists each action associated with the prospect, its status, and its planned completion date.
Select an action description, to edit an existing action.
Click the Add an Action button, if no existing actions are available, for the prospect and you want to add a new action.
Note: Both the link and the button access the Prospect Action - Action Detail page.
Enter the action detail information, If you are adding a new action.
The system populates the Prospect Action - Action Detail page with the existing data.
Access the Prospect Action - Action Detail page (click a link under the Action Description heading or click the Add an Action button on the Prospect Action - Edit Action page).
Users enter or change an action description and select its status from the available options. Next, users enter an expected completion date for the action as well as a date when the action expires if it is not completed. The action no longer appears in the current actions lists on the My Reminders page when the action is expired. It does appear on the My Action Plan page if the date range entered includes the action date of the expired action. The expected completion date appears in grids as the planned date. Users also have options to select an action type and method of contact. Available values for the Action Type and Method fields on this page are defined by the organization. To complete the action, users select a responsible person. When users enter the responsible person's ID, the responsible person's name appears to the right of the ID field. Finally, users may select the strategy that this action supports.
Note: The values for the Responsible Person Type field are delivered with the system as translate values. Do not modify these translate values in any way. Any modifications to these values require a substantial programming effort.
Access the Prospect Action - Ask Information page (click the Next button on the Prospect Action - Action Detail page).
If the action type is Ask, outreach officers must enter specific ask information on this page. Users enter the monetary range (From and To amounts) that will be requested as a donation. The type of solicitor for the donation and the solicitor name are required if the action is an ask. Only resources defined with a role of Solicitor (SOL) appear in the Solicitor field.
If the action type is not Ask, the system skips this page in the component. Users can return to view the page, but the fields are unavailable for entry.
Note: The values for solicitor type are delivered with the system as translate values. Do not modify these translate values in any way. Any modifications to these values require a substantial programming effort.
Access the Prospect Action page .
This page contains a 254-character free-form text field in which outreach officers can enter brief details of the action. Users can mark the date and time of each descriptive entry by clicking the Date/Time Stamp button.
Access the Prospect Action - Assign Others to Action page.
If users want to assign additional resources to the action, they can add them on the Prospect Action - Assigned Resources page. Assigned resources assist the outreach officer in completing the action either by providing information or by actual involvement in the action itself. Roles indicate the assigned resource's relation to the action; the institution defines these values.
To add a resource, users select the resource type, and then enter the role and the ID of the resource assigned.
Note: The values for the Resource Assigned field are delivered with the system as translate values. Do not modify these translate values in any way. Any modifications to these values require a substantial programming effort.
Access the Prospect Action - Linked Initiatives to Action page.
If outreach officers want to link initiatives to an action, they can add them on the Prospect Action - Linked Initiatives page. Linking a campaign initiative to an action means that the prospect appears on the prospect list for that campaign. To begin, a user clicks the Add an Initiative button. Next, the user enters an initiative type and initiative code. The name of the initiative appears to the right of the code. The organization defines the initiative type code values on the Initiative Types page.
Access the Prospect Action - Summary page (click the Next button on the Prospect Action - Linked Initiatives page).
When the outreach officer finishes entering or editing all of the desired action information, the Prospect Action - Summary page appears. Users can print the page using their web browser's print functionality (File, Print or Ctrl+P). If a user wants to edit a section, the user can return to the step that enables editing of that part of the process by clicking the Edit button.
If outreach officers click the Send Report button, the Send Contact Report page appears where they can enter action report information. When users complete a prospect contact report using the Send Contact Report page, the system creates an enhanced contact report.
The following example shows the information contained in the contact report:
Image: Send contact report example
An example of a contact report.
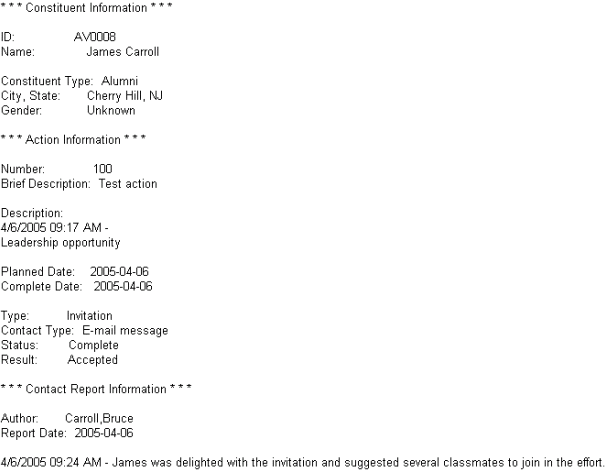
These reports provide detailed information and enable outreach officers to send copies of incomplete actions as well as completed contact reports to other resources. Your organization can use these reports as an effective communication tool.
To return directly to the summary from the edited step, users can click the last of the numbered circles in the upper-left corner of the page.
When finished viewing the summary information, if they have not already done so, users must save the transaction if they want to keep it.
To complete prospect actions, outreach officers must first access the Prospect Action - Results page, search their prospect worksets, and select prospect names. When a user selects a name, that user can then complete actions on a prospect record.
Access the Prospect Action - Results - Edit Action page (click a name in the Search Results area of the Prospect Action Results - Select a Prospect page).
This page lists each action associated with the prospect, its status, and its planned date for completion. Outreach officers click a link under the Action Description heading to select the action that they want to complete; the system displays the Prospect Action - Results page.
Access the Prospect Action - Results page (click a link under the Action Description heading on the Prospect Action - Results - Edit Action page).
In addition to the usual prospect information at the top of the page, this page also displays the name of the action.
Action Results
Outreach officers select an action status. The status has a default value of Complete. Users also must select a result code. The organization can define other values as well.
Next, users complete the Complete Date field. The current date appears by default the first time that the page is accessed for an action, but the default value can be overwritten. If the ask resulted in a commitment, enter the expected commitment amount, or the monetary amount that you expect to receive from the donor because of this action. The Actual Commitment field displays the monetary amount that the organization received because of this action.
Action Results - Pledge
Users can enter the pledge number for a pledge that resulted from the action. Users click the Details link to view the Pledge Detail page.
Action Gifts
Users can enter the gift number for a gift that was received as a result of the action. Users click the Details link to view the Gift Detail page. To add another gift to the action results, users click the Add a gift button. Users click the Add another Action button to start the process for creating a new action for that prospect.
When saving the page, if the user entered a gift number, the date and gift amount appear to the right of the gift number. The process works similarly if a user enters a pledge number. The date and time that the action was last updated appear at the bottom of the page.
Users can click the Contact Report button to go directly to the Prospect Contact Report page.
Users can complete a contact report in two ways:
If they are at the end of the process for completing an action, they can click the Contact Report button on the Prospect Action - Results detail page.
The system displays the Prospect Contact Report - Detail page.
If they are at the beginning of the process for completing a contact report, they must first access the Prospect Contact Report page, search their prospect worksets, and select prospect names.
When users select a name, they can complete a contact report for that prospect.
Access the Prospect Contact Report page ().
In addition to the usual prospect information at the top of the page, this page also displays the name of the action.
Contact Report Detail
Outreach officers first enter their author IDs (the author ID is the user ID by default) and the report dates (the report date is the current date by default). Users can view a printer-friendly version of the Prospect Contact Report summary page.
The Report field is a long free-form text area where outreach officers can enter any details of the prospect contact, such as what happened as a result of the action or notes about possible further contacts. Users click the Date/Time Stamp button to mark the date and time of each descriptive entry. If users learn new information about a new prospect, they can link other prospects to this contact report by using the Link Report to Other Prospects section.
Link Report to Other Prospects
To link the report to a prospect's spouse, click the Link to Spouse button. The spouse ID appears in the ID field. Users can then access the same contact report through either the prospect ID or the spouse ID.
Note: The Link to Spouse button appears only if a spouse exists for the prospect in the system.
To link the report to other prospects, users select a value in the ID Type field and enter an ID. The linked prospect's name appears to the right of the ID. ID type values are delivered by the system. To link to more than one prospect, users click the Link another Prospect button. Users can also click the Delete button to unlink any currently linked prospects from the action.
Users click the Save button to save the contact report. The date and time that the action was last updated appear above the Report field. Users click the Send Report button to access the Send Contact Report page. Users click the Send BioDemo Update button to access the Send BioDemo Update page.
Access the Prospect Contact Report - Contact Report Summary page (click the Printer Friendly Version link on the Prospect Contact Report - Detail page).
Users can review all contact report information online or print the complete contact report page as well using their web browser's Print functionality (File, Print or Ctrl+P).
After printing or viewing, users can return to the Prospect Contact Report - Detail page.
Access the Send Contact Report page (click the Send Report button on the Prospect Contact Report - Detail page).
When outreach officers complete a contact report and are ready to distribute it, they can use this page to send it to anyone in the organization. They can define their distribution lists by selecting the ID type of the recipients and entering the distribution ID. A user can also select a Role ID type to send the report to all users with the selected security role. A user can also enter any other email address list members to include in the distribution, separating multiple email addresses with a semicolon. A user is required to either define an ID type and distribution ID or enter an email address to send the contact report. The system sends emails to the email addresses for users as defined on the Maintain Security - User Profiles page.
The system populates the Email portion of the page with a default subject description that includes the prospect name and action description. The Email Text field contains the outreach officer's name and the entire contents of the contact report from the Prospect Contact Report Detail page. Users can edit any field and add any discussion text necessary.
When finished, a user clicks the button to trigger the workflow that sends the contact report to the defined distribution list. That user receives a confirmation message that the email was sent, then clicks OK or Cancel to return to the Send Contact Report page. If a user clicks Return instead of Send prior to sending, the system cancels the workflow and returns to the Prospect Contact Report Detail page.
Access the Send BioDemo Update page (click the Send BioDemo Update button on the Prospect Contact Report - Detail page).
During the course of managing a prospect, outreach officers occasionally learn new biodemo information. This page enables users to distribute this new information to anyone in the organization. Users can define their distribution lists by selecting the ID types of the recipients and entering their distribution IDs. A user can also select a Role ID type to send the report to all users with the selected security role. They can also enter any other email address list members that they want to include in the distribution, separating multiple email addresses with semicolons. Users are required to either define an ID type and distribution ID or enter an email address to send the contact report. The system sends emails to the email addresses for users as defined on the Maintain Security - User Profiles page.
The system populates the Email portion of the page with a default subject description that includes the prospect name and ID. The Email Text field begins with the outreach officer's name; users can then enter any updated information that is associated with the prospect.
When finished, users click Send to trigger the workflow that sends the contact report to the distribution list. They receive a confirmation message that the email was sent, then click OK or Cancel to return to the Send Contact Report page. If users click Return instead of Send prior to sending, the system cancels the workflow and returns to the Prospect Contact Report - Detail page.