Working with the Action Processor
For every action processor you need to define a processor as the implementation that performs the work.
While you can use a classic Java implementation or a state table implementation, the recommended approach is to implement using Java with code generation. This method provides code that would normally have to be written by developers.
Understanding Java with Code Generation
Understanding the Java Processor Class
Understanding Java Libraries in Design Studio
Configuring User-Defined Exit Types
Working with Java NE Connection Handlers
Understanding Java with Code Generation
The Java with code generation implementation for an action processor creates a Java processor that composes messages to be sent to a device, evaluates the response for errors, extracts output information from the response, and populates the information into output parameters.
In the Java processor with code generation, the central class is the Processor, which is editable by the developer. The Processor is generated only once and includes sample code based on the associated parameters at creation time. You should delay the creation of the processor until the action processor is associated with an atomic action that has fully defined parameters. If parameters are not yet defined or the action processor is not yet associated with the atomic action, then the generated sample code will be incomplete and, because it is generated only once, would require additional coding.
Note:
Synchronized classes or interfaces are rebuilt every time you save changes of atomic action parameters (for example, classes and interfaces are synchronized with the model and reflect the model). Therefore, you should never make code changes to any synchronized class or interface. Oracle Communications Design Studio overwrites these changes when you run the next build (with changes in the model). Developers should write code only for the processor class.There are 2 methods in the Processor:
-
execute -
init
The main method is execute. When called, it is provided with the following:
-
A number of classes to perform operations.
-
An input class that contains all input parameters.
-
An output class to populate the output parameters.
-
Access to a logger.
-
An implementation of the exit type to match responses against user-defined exit types and to set the exit type for the processor.
-
Access to the Connection Handler to send requests and get responses from a connected device.
About Processor Classes and Interfaces
Example: Typical Processor Call Sequence
Working with the Action Processor
About Processor Classes and Interfaces
The following classes and interfaces are used by the Processor:
The InputBean is generated and synchronized, tied to the parameters of the atomic action (has set and get methods for all parameters of the atomic action), and provides setters and getters for manipulating parameters.
If the parameter is a scaler (simple type), it is received as a string and can be used immediately
If the parameter is a compound parameter with named members, the InputBean returns another bean that represents the compound. The returned bean has convenience methods to get the members within the compound. A compound bean for every defined type of compound parameter is created. You also get a set of instances of these beans based on the work order (you get a list of these). If the compound parameter does not have named members, it provides a vector of the members.
Note:
Specify the compound members whenever possible. Indicating the members will simplify the coding required and eliminate possible code to mode synchronization issues.Multi-instance Compound parameters start at index one (e.g. CMPD[1]).
Bracket type (Index Parameter Identification Tokens) and delimiter (Indexed Parameter Delimiter) settings are configured on the Project editor Cartridge Locations tab in the Code Generation area. Design Studio applies these settings to all generated code within the cartridge. The following examples assume the defaults (square brackets with a period delimiter).
The following example shows a scalar parameter.
Service Action Parameter Name: SCALAR
Atomic Action Parameter Name: SCALAR
Order Format:
     SCALAR
Usage:
     String myscalar = parms.getMyScalar();
The following example shows a compound parameter with no members specified.
Service Action Parameter Name: CMPD
Atomic Action Parameter Name: CMPD
Order Format:
Entries will have the compound name as a prefix. There may be multiple entries with that prefix. For example, a compound named "CMPD" may have the following entries on an order.
     CMPD
     CMPD.X
     CMPD.Y
     CMPD.Z
Usage:
     String mycmpd = parms.getMyCmpd
       String x = parms.getMyCmpd ("X");
       String y = parms.getMyCmpd ("Y");
       String z = parms.getMyCmpd ("Z");
The following example shows a compound parameter with members.
Service Action Parameter Name: CMPDMBR
Atomic Action Parameter Name: CMPDMBR
Order Format:
     CMPDMBR.A
     CMPDMBR.B
     CMPDMBR.C
Usage:
     MyCmdMbrBean mycmpdmbr = parms.getMyCmpdMbr();
       mycmpdmbr.getA();
       mycmpdmbr.getB();
       mycmpdmbr.getC();
The following example shows a multi-instance compound parameter with no members specified.
Service Action Parameter Name: CMPDMULTI
Atomic Action Parameter Name: CMPDMULTI
Order Format:
Entries will have the compound name as a prefix. There may be multiple entries with that prefix. For example, a compound named "CMPDMULTI" may have the following entries on an order.
     CMPDMULTI[1]
     CMPDMULTI[1].X
     CMPDMULTI[1].Y
     CMPDMULTI[1].Z
     CMPDMULTI[2].X
     CMPDMULTI[2].Y
     CMPDMULTI[2].Z
Usage:
     String mycmpdmulti = parms.getMyCmpdMulti ();
       String x1 = parms.getMyCmpdMulti (1, "X");
       String y1 = parms.getMyCmpdMulti (1, "Y");
       String z1 = parms.getMyCmpdMulti (1, "Z");
       String x2 = parms.getMyCmpdMulti (2, "X");
       String y2 parms.getMyCmpdMulti (2, "Y");
       String z2 = parms.getMyCmpdMulti (2,"Z");
The following example shows a multi-instance compound parameter with members.
Service Action Parameter Name: CMPDMULTIMBR
Atomic Action Parameter Name: CMPDMULTIMBR
Order Format:
     CMPDMULTIMBR[1].A
     CMPDMULTIMBR[1].B
     CMPDMULTIMBR[1].C
     CMPDMULTIMBR[2].A
     CMPDMULTIMBR[2].B
     CMPDMULTIMBR[2].C
Usage:
     MyCmpdMultiMbrBean[] mycmpdmultimbr = parms.getMyCmpdMultiMbr();
     for (int i = 0; i <mycmpdmultimbr.length; i++)
     {
       MyCmpdMultiMbrBean bean = mycmpdmultimbr[i];
       bean.getA();
       bean.getB();
       bean.getC();
     }
The following example shows an indexed compound parameter with no members.
Service Action Parameter Name: CMPDIDX[++]
Atomic Action Parameter Name: CMPDIDX
Order Format:
Entries will have the compound name as a prefix. There may be multiple entries with that prefix. For example, a compound named "CMPDIDX" may have the following entries on an order.
     CMPDIDX[0]
     CMPDIDX[0].X
     CMPDIDX[0].Y
     CMPDIDX[0].Z
     CMPDIDX[1].X
     CMPDIDX[1].Y
     CMPDIDX[1].Z
Usage:
     String mycmpdidx = parms.getMyCmpdIdx();
       String x = parms.getMyCmpdIdx ("X");
       String y = parms.getMyCmpdIdx ("Y");
       String z = parms.getMyCmpdIdx ("Z");
Note:
The implementation will be called multiple times, providing one instance of the compound during each call.The following example shows a compound parameter with members.
Service Action Parameter Name: CMPDIDXMBR[++]
Atomic Action Parameter Name: CMPDIDXMBR
Order Format:
     CMPDIDXMBR[0].A
     CMPDIDXMBR[0].B
     CMPDIDXMBR[0].C
     CMPDIDXMBR[1].A
     CMPDIDXMBR[1].B
     CMPDIDXMBR[1].C
Usage:
     MyCmpdIdxMbrBean mycmpdidxmbr = parms.getMyCmpdIdxMbr();
       mycmpdidxmbr.getA();
       mycmpdidxmbr.getB();
       mycmpdidxmbr.getC();
Notes:
-
The implementation will be called multiple times providing one instance of the compound during each call.
-
For multi-instance compounds, member parameters cannot be set as required because the system cannot determine whether a member is present or if there are additional entries.
The Output class enables you to populate output parameters. There are convenience methods for populating parameters to varying scope within a work order. Examples of parameters are as follows:
-
Action parameters are available to the service action.
-
Input parameters.
-
Global parameters are available to everything.
-
Rollback parameters enable you to populate for the rollback action if it is defined within the atomic action.
Note:
The output parameters are not explicitly defined in the model, so there are no convenience methods. To set a parameter you need to know its string name and include it.ILogger is an interface for debug logs. When the processor is running on the Oracle Communications ASAP system, it logs to the Diagnosis log. If you are running the processor in JUnit, you can use other implementations of logger to log to the console instead.
IExitType enables you to set the exit type explicitly or by matching a response string against the user-defined exit types.
IConnectionHandler is an instance of the Connection Handler that is associated with the vendor, technology, and software load of the action processor. For the Telnet Connection Handler, the basic methods on the interface can be used to send requests (because it is string-based). For technologies (for example, SOAP or XML) that provide multiple convenience methods, the Processor may want to test the type of Connection Handler and pass it to a more specific Connection Handler to obtain access to the convenience methods. If you want to expose more explicit methods when writing a Connection Handler, you can define an interface that extends the IConnectionHandler and ensure that those methods are available through that interface. The Processor should always use an interface when interacting with the ConnectionHandler, to achieve the implementation in more than one way and allow for unit testing. For more information about unit testing, see "Understanding Unit Testing".
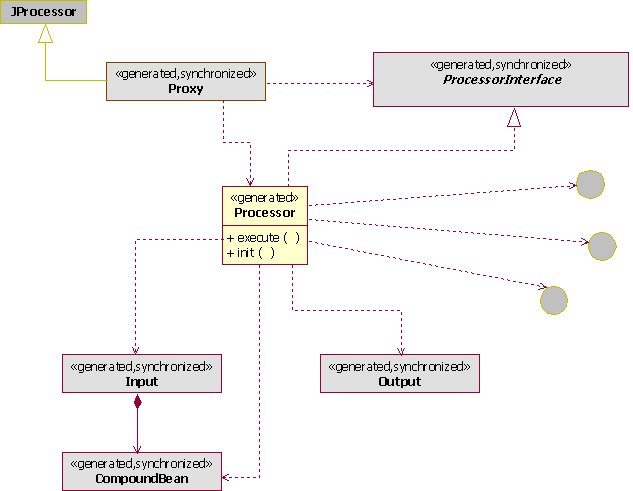
Processor needs to implement the processor interface, which is generated in the code generation and kept synchronized with the model.
Proxy is situated between the NEP and Processor class and manages the interaction between them. Proxy sets up all classes used by the Processor and initiates and calls the Processor. Most importantly, the proxy simplifies the work required by the Processor by:
-
Creating all instances of the InputBean and initializes CompoundBeans so they are available and populated through the processor.
-
Performing much of the standard logging, including the entry and exit of the processor and the contents of the parameters passed in for debugging.
-
Extending the JProcessor. This isolates the portion of the Java processor code that needs to relate directly to the version of the activation, and allows the processor, its interface, and all its related classes and interfaces to run outside of the ASAP system and, therefore, to be unit tested
Note:
When creating a Java processor from the action processor editor, the resulting class name is "Proxy" because the proxy gets initiated by the NEP (Proxy is registered to be called in the activation). When you open that implementation it opens to theProcessorclass, where you write your code for editing.
Understanding Java with Code Generation
Example: Typical Processor Call Sequence
The proxy:
-
The proxy creates the input, the output, and the exit type classes.
-
The proxy populates the exit type classes and initializes them.
-
The proxy creates the processor that will be called and initializes it.
-
If the logger needs to be used by the processor, the proxy provides this during the
initmethod call. -
The proxy invokes the processor by calling the
executemethod with the input, output, connection, and exit type. -
The processor obtains parameters from the InputBean to compose a message or command to be sent to a device.
-
The processor calls the
send requestto send that message to the device. -
The processor sets the exit type based on the response.
-
The processor sets output parameters based on the response.
The processor may parse the response to obtain additional values for populating the output parameters.
-
The proxy cleans up the processor.
-
The proxy looks at the exit type that was set and populates it for return to the NEP, and cleans up the exit type.
-
The proxy extracts all output parameters for return to the NEP and to populate the work order.
The proxy then cleans up this class and (16) the remaining classes.
Note:
The developer is only responsible for the items related to the processor (steps 6 through 9); the proxy handles all other items.Understanding Java with Code Generation
Understanding the Java Processor Class
You need to write the logic in the execute method of the processor class (there is a processor class for each atomic action) to achieve the desired action in a switch. Use the Java editor in the Package Explorer view of the Java perspective to write all code.
When implementing the action processor, Design Studio provides you with support such as automatic generation of code and sample data. In Design Studio, this is currently set up specifically for the Telnet protocol (SOAP, CORBA and other protocols require more coding; for example, you must write your own logic for send methods, requests, to extend the connection class, and so on.).
Code for the processor is autogenerated by the proxy (getter and setter methods for each parameter) which provides you with an API to manipulate the data. For example, for an incoming object, methods such as getBilling are autogenerated (the type of methods depend on the parameters specified in the service model and how they are mapped). You can use these autogenerated methods in the processor class to get the value for the parameters.
See "Understanding Java with Code Generation" for more information about autogenerating processor code.
To obtain the required method to get a value for a parameter, type the name of the parameter followed by a dot. This displays all available methods for the parameter.
Notes:
-
Do not modify the autogenerated code. All changes are overwritten during any subsequent builds.
-
Code generation does not overwrite existing Java code. If you change the target implementation, the old code remains. Clean up old code when creating a new Java implementation for an action processor with an existing Java implementation.
Writing Java Processor Execute Method Logic
Working with the Action Processor
Writing Java Processor Execute Method Logic
The basic development steps to write the logic for the execute method of a Java Processor class are as follows:
To write Java Processor execute method logic:
-
Extract parameters from InputBean (retrieve information).
-
Use these parameters to build a command.
-
Send a message or command to the switch using the send request in Telnet.
-
Handle the response by setting the user-defined exit type.
See "Creating New User-Defined Exit Types" for more information about setting the user-defined exit type.
-
Using the OutputBean, you have the option to return some parameters upstream to log, infoparm, and so on.
Occasionally, for Telnet, you may need to build some helper classes, perform data derivation, and create parsers.
Understanding the Java Processor Class
Java Processor Class Example
The following is a coding example for an atomic action.
From the Java editor of the Package Explorer view:
-
Create an atomic action and an action processor.
See "Creating Model Elements" for more information.
-
Select an ADD action and LINE entity for each.
-
In the Atomic Action editor, map the action processor to the atomic action.
See "Understanding Model Element Relationships" for more information.
-
In the Parameters tab, right-click in the Parameters area and select Simple Data Element or Select Structured Data Element. See "Adding Existing Simple and Structured Data Elements to Entities" for more information.
-
In the Parameter Details area, define values to the ASAP run-time type parameters.
-
In the Mappings tab, click the mapped action processor to open the Action Processor editor.
-
Select Java Action Processor (with Code Generation).
-
Click New.
The Studio Activation Java Implementation Wizard appears.
-
Click Finish.
A new atomic action class appears in the Java editor with basic code, such as the entry point,
getfunctions to get the parameters defined in the atomic action, and, in the end portion,sendRequestsand how the response is handled.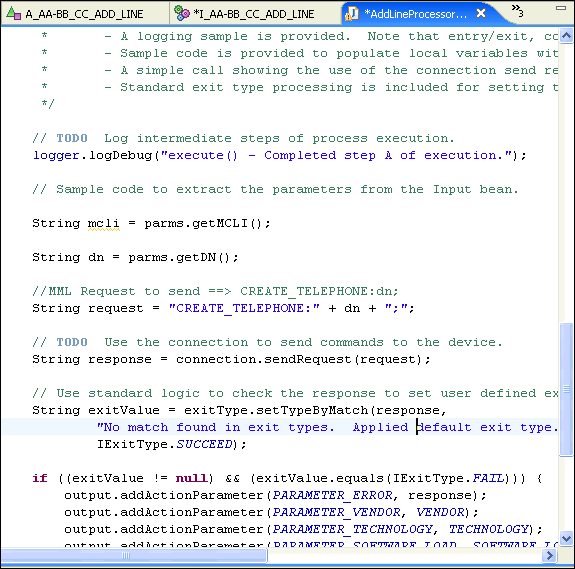
-
Build the MML (the message itself) using the Eclipse message format.
Use methods and classes. If no parameters are available in the atomic action, use a string to build the MML.
-
Send the message to the switch using the send request.
-
Set the user-defined exit type.
Understanding the Java Processor Class
Working with the Action Processor
Understanding Model Element Relationships
Loading XML String Parameter into XML Related Technologies
The autogenerated code produces content in string format for all parameter types including the XML run-time parameter type. However, some network elements require different XML technologies such as document object model (DOM), simple API for XML (SAX), XML beans, and so on. You can create Java code to perform this conversion.
For example, the following sample code loads an XML string parameter into a XML DOM parameter:
public Document buildDocumentFromString(String xmlString)
throws Exception
{
try
{
StringReader stringReader = new StringReader(xmlString);

SAXBuilder builder = new SAXBuilder();

Diagnosis.diag(1, this, "Building document for :\n" + xmlString);
Document doc = builder.build(stringReader);
return doc;
}
catch (Exception e) {
String exceptionMessage = "Exception caught : " + e.toString();
Diagnosis.diag(1, this, exceptionMessage);
throw new Exception("XML Error" + exceptionMessage);
}
}
Understanding the Java Processor Class
Working with the Action Processor
Creating Activation Run-Time Type Parameters in the Data Dictionary
Understanding Model Element Relationships
Understanding Java Libraries in Design Studio
There are several types of Java libraries available in Design Studio:
Activation libraries are utilized by many cartridges and include the following:
-
studio_2_6_0.jar
-
asaplibcommon.jar
-
JInterp.jar
Activation libraries are automatically added to the project when you create an action processor. They are added to the project classpath to enable the Java development toolkit access.
Notes:
-
The studio_2_6_0.jar file is not installed by the ASAP installation. The studio_2_6_0.jar must be added to the ASAP installation prior to deployment of a Design Studio-created cartridge. Configure the studio_2_6_0.jar, asaplibcommon.jar, and JInterp.jar files on the server. See the discussion of installing a cartridge using Design Studio in ASAP Installation Guide.
-
When you are packaging a cartridge, exclude the studio_2_6_0.jar, asaplibcommon.jar, and JInterp.jar files. These JAR files are installed on the Activation server and are shared by all cartridges If you include these JAR files, Design Studio generates an error.
Add other libraries to the lib folder under the project. Update the Java project properties to set the Java buildpath to make use of those libraries. See Eclipse help for adding folder or packages to the Java buildpath.
In the Project editor Packaging tab, select Libraries to display any jar files contained in the lib folder.
Understanding Java with Code Generation
Understanding the Java Processor Class
Understanding Java Libraries in Design Studio
Working with User-Defined Exit Types
Understanding Unit Testing
Unit testing in Design Studio does not need to be implemented to complete a cartridge, although it is highly recommended for these reasons:
-
Unit testing contributes to building quality code.
-
Unit testing provides repeatable tests for regression.
You can test the processor outside of the ASAP system because the interfaces and generative classes of the Java processor are all independent of the ASAP system and its classes (the generated InputBeans and output are not tied to ASAP). To run the processor, a TestCase is generated once (with a sample test based on information at the time of creation), after which the developer owns it and can extend it.
The unit test framework initiates all tests in test subfolder. Unit testing is implemented as a JUnit test. JUnit tests can optionally be run with the JDT Debugger.
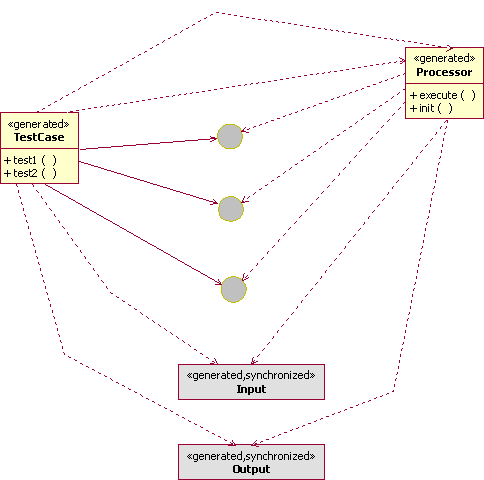
The TestCase simulates the proxy for each individual test, and:
-
Creates an implementation of the interfaces, either the real implementation or a stubbed test implementation.
-
Generates input and output beans.
-
Invokes the processor.
The TestCase is a JUnitTestCase. Each TestCase can contain many tests, and each test is defined by a no-parameter method beginning with "test".
The generated TestCase has a framework that provides a test. The test runs based on input files, which find the data and test criteria for a particular test. This framework enables developers to create simple files to define new tests. This works for any standard type of test where you pass in data and check the request to ensure it was sent as expected, and that the returned exit type is the one you expected. Also, this allows for a simple, standard response to be used inside the test.
Sample test classes are provided for simulating IExit and ILogger. A base output class provides the methods required for output classes.
Running Unit Tests with the JDT Debugger
Understanding Unit Test Property Files
Working with the Action Processor
Running Unit Test Cases
Run the TestCase class as a JUnit test, or as a Java application. Running as a JUnit test provides a richer user experience by providing results in the JUnit view. Running as a Java application allows the TestCase to be run as part of an automated test framework. Java application test case results appear in the Eclipse IDE in the Console view.
To run unit test cases:
-
Right click the TestCase class and select Run As.
-
Select JUnit Test or Java Application.
Design Studio displays the results in the JUnit view or Console view, depending on your selection in step 2. Logging information is sent to the Console View.
Running Unit Tests with the JDT Debugger
To run unit test cases with the JDT debugger:
-
Set breakpoints in your Processor class as desired.
-
Right click the TestCase class and select Run As.
-
Select JUnit Test or Java Application.
The unit test is executed and the debugger will break as appropriate, allowing for full debugger functionality, including variable inspection and code stepping.
Understanding Unit Test Property Files
You use a set of property files to set up a unit test (both are property file and follow the Java property file format):
-
testdata file (for example, TestExample.testdata)
-
testinfo file (for example, TestExample.testinfo).
Note:
The testinfo file is optional. Design Studio uses defaults if it is not present.
The testdata format for naming the input parameters is similar to that within a work order. However, you must populate the test data with atomic action labels (and not service action labels). Run the unit test as if the parameters have been previously defaulted.
Apply the defaults that are normally set by the SARM (based on what is configured in the atomic action) as if they had been applied in the test data (the processor runs after those defaults have been set). The unit test data should be based on data that has already been defaulted and based on names relating to the atomic action label (and not the service action label).
When you fill in the test data for compounds or incoming repeating elements, use square brackets to indicate the index for a compound as in the following example.
# Example Action Processor input property file
NETID=ERIC-SDP_3-6-2-HOST
MSISDN=0701234567
FAF_LIST[1].FAF_N=0701237777
FAF_LIST[1].TSC=O
FAF_LIST[1].RCO=1
FAF_LIST[1].K=400
FAF_LIST[2].FAF_N=07052
FAF_LIST[2].TSC=4
FAF_LIST[2].K=100
FAF_LIST[3].FAF_N=071
FAF_LIST[3].K=500
You can use this optional file to define the properties for which you are testing. You can also define what expected request the processor should create, the expected canned response returned to the processor, the expected exit type and whether it should be tested.
Note:
If you do not define a testinfo file, then by default the test case only tests whether the exit type is succeed (that is, to confirm that the test data has gone through).# Example Action Processor test info property file request.check=true request.value=Test Message response.value=Test Response # Exit Type values: # SUCCEED # FAIL # RETRY # MAINTENANCE # SOFT_FAIL # DELAYED_FAIL # STOP exittype.check=true exittype.value=SUCCEED
If you wish to have multiple request and response values in your test, you can specify multiple values in the testinfo file. Add a dot separated numeric suffix to the value (starting at 1).
If your request or response has multiple lines or special character, follow the standard Java property guidelines.
# Example Action Processor test info property file
request.check=true
request.value.1=Test Message 1
request.value.2=Test Message 2
response.value.1=Test Response 1
response.value.2=Test Response 2
# Exit Type values:
# SUCCEED
# FAIL
# RETRY
# MAINTENANCE
# SOFT_FAIL
# DELAYED_FAIL
# STOP
exittype.check=true
exittype.value=SUCCEED
Configuring a Unit Test
To configure a unit test:
-
Select File, select New, then select File.
-
Create a file name.testdata.
For example, you might create a file called TestExample.testdata.
Note:
Place this file in a subfolder of the action processor implementation package named test. -
Enter the text for the file.
The file format is a Java property file, so each entry specifies the parameter and its value.
-
Repeat steps 1 and 2 as necessary to create a second file name.testinfo.
For example, you might create a file called TestExample.testinfo.