| Oracle® Database 2日でPHP開発者ガイド 12c リリース1 (12.1) B71348-02 |
|


 前 |
 次 |
この章では、JSONシリアライズ形式を使用して単純なWebサービスからデータを転送する方法について説明します。このWebサービスは、PHPのGD拡張モジュールを使用してイメージを作成するクライアントからコールされます。
この章のトピックは、次のとおりです。
新規のPHPファイルac_get_json.phpを作成し、次を含めます。
<?php

/**
 * ac_get_json.php: Service returning equipment counts in JSON
 * @package WebService
 */

require('ac_db.inc.php');

if (!isset($_POST['username'])) {
    header('Location: index.php');
    exit;
}

$db = new \Oracle\Db("Equipment", $_POST['username']);

$sql = "select equip_name, count(equip_name) as cn
        from equipment
        group by equip_name";
$res = $db->execFetchAll($sql, "Get Equipment Counts");

$mydata = array();
foreach ($res as $row) {
    $mydata[$row['EQUIP_NAME']] = (int) $row['CN'];
}

echo json_encode($mydata);

?>
このWebサービスに認証機能はありません。これはAnyCoアプリケーションから見て外部になります。必要になるのは、POSTデータへのusernameの入力のみです。
このファイルはAnyCo Corpの備品割当を問い合せ、PHPのjson_encode()を使用して、統計をJSON形式で返します。EQUIPMENT表に現在格納されているデータに応じて、Webサービスから次のような出力が返されます。
{"cardboard box":1,"pen":4,"computer":2,"telephone":3,"paper":3,"car":1}
Webサービスをコールしグラフを作成する新規のPHPファイルac_graph_img.phpを作成します。初期のファイルには次が含まれています。
<?php

/**
 * ac_graph_img.php: Create a JPEG image of the equipment allocation statistics
 *
 * Do not put any text or white space before the "<?php" tag because it will
 * be incorporated into the image stream and corrupt the picture.
 *
 * @package Graph
 */

define('WEB_SERVICE_URL', "http://localhost/ac_get_json.php");

session_start();
require('ac_equip.inc.php');

$sess = new \Equipment\Session;
$sess->getSession();
if (!isset($sess->username) || empty($sess->username)
    || !$sess->isPrivilegedUser()) {
    header('Location: index.php');
    exit;
}
$data = callservice($sess);
do_graph("Equipment Count", 600, $data);

// Functions

?>
使用しているシステムに合わせて、WebサービスのURLを変更します。
このファイルにcallservice()関数を追加します。
/**
 * Call the service and return its results
 *
 * @param Session $sess
 * @return array Equipment name/count array
 */
function callservice($sess) {
    // Call the web "service" to get the Equipment statistics
    // Change the URL to match your system configuration
    $calldata = array('username' => $sess->username);
    $options = array(
        'http' => array(
            'method'  => 'POST',
            'header'  => 'Content-type: application/x-www-form-urlencoded',
            'content' => http_build_query($calldata)
        )
    );
    $ctx = stream_context_create($options);
    $result = file_get_contents(WEB_SERVICE_URL, false, $ctx);
    if (!$result) {
        $data = null;
    } else {
        $data = json_decode($result, true);

        // Sort an array by keys using an anonymous function
        uksort($data, function($a, $b) {
            if ($a == $b)
                return 0;
            else
                return ($a < $b) ? -1 : 1;
            });
        }
    return($data);
}
これはPHPのストリーム機能を使用して、URLをリクエストし統計を取得します。ストリーム・コンテキストには、サービスで必要になるpost変数としてusernameが含まれています。
JSON形式からデータがデコードされ、配列は名前順でソートされます。PHPのuksort()関数への第2引数は、データ比較を行う匿名関数です。
ac_graph_img.phpを編集し、イメージを作成する関数を追加します。
/**
 * Draw a bar graph, with bars projecting horizontally
 *
 * @param string $title The Graph's title
 * @param type $width Desired image width in pixels
 * @param array $items Array of (caption, value) tuples
 */
function do_graph($title, $width, $items) {
    $border = 50;             // border space around bars
    $caption_gap = 4;         // space between bar and its caption
    $bar_width = 20;          // width of each bar
    $bar_gap = 40;            // space between each bar
    $title_font_id = 5;       // font id for the main title
    $bar_caption_font_id = 5; // font id for each bar's title

    // Image height depends on the number of items
    $height = (2 * $border) + (count($items) * $bar_width) +
        ((count($items) - 1) * $bar_gap);

    // Find the horizontal distance unit for one item
    $unit = ($width - (2 * $border)) / max($items);

    // Create the image and add the title
    $im = ImageCreate($width, $height);
    if (!$im) {
        trigger_error("Cannot create image<br>\n", E_USER_ERROR);
    }
    $background_col = ImageColorAllocate($im, 255, 255, 255); // white
    $bar_col = ImageColorAllocate($im, 0, 64, 128);           // blue
    $letter_col = ImageColorAllocate($im, 0, 0, 0);           // black
    ImageFilledRectangle($im, 0, 0, $width, $height, $background_col);
    ImageString($im, $title_font_id, $border, 4, $title, $letter_col);

    // Draw each bar and add a caption
    $start_y = $border;
    foreach ($items as $caption => $value) {
        $end_x = $border + ($value * $unit);
        $end_y = $start_y + $bar_width;
        ImageFilledRectangle($im, $border, $start_y, $end_x, $end_y, $bar_col);
        ImageString($im, $bar_caption_font_id, $border,
            $start_y + $bar_width + $caption_gap, $caption, $letter_col);
        $start_y = $start_y + ($bar_width + $bar_gap);
    }

    // Output the complete image.
    // Any text, error message or even white space that appears before this
    // (including any white space before the "<?php" tag) will corrupt the
    // image data.  Comment out the "header" line to debug any issues.
    header("Content-type: image/jpg");
    ImageJpeg($im);
    ImageDestroy($im);
}
この関数はPHPのGD拡張モジュールを使用してグラフを作成します。デフォルトのGDフォントは若干洗練性に欠けますが、新しいフォントの追加が可能です。出力はJPEGストリームであるため、WebページのHTMLコードにイメージ・ファイルを含めるかわりに、任意の場所でPHPファイルをコールできます。
AnyCoアプリケーションでは、新規ファイルac_graph_page.phpを作成してイメージを統合します。
<?php

/**
 * ac_graph_page.php: Display a page containing the equipment graph
 * @package Graph
 */

session_start();
require('ac_equip.inc.php');

$sess = new \Equipment\Session;
$sess->getSession();
if (!isset($sess->username) || empty($sess->username)
         || !$sess->isPrivilegedUser()) {
    header('Location: index.php');
    exit;
}

$page = new \Equipment\Page;
$page->printHeader("AnyCo Corp. Equipment Graph");
$page->printMenu($sess->username, $sess->isPrivilegedUser());

echo <<<EOF
<div id='content'>
<img src='ac_graph_img.php' alt='Graph of office equipment'>
</div>
EOF;

$page->printFooter();

?>
|
注意: 'EOF;'トークンは行の先頭に配置し、その後に空白が含まれないようにします。 |
イメージはHTMLの通常のimgタグ内に配置されます。
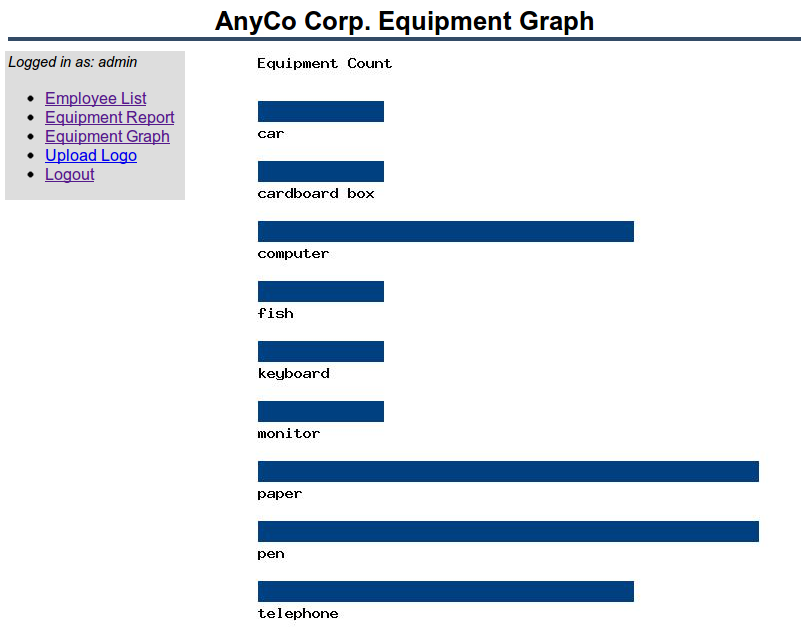
ブラウザにAnyCoアプリケーションをロードし、Administratorとしてログインします。左側のナビゲーション・メニューから「Equipment Graph」リンクをクリックします。グラフが表示されます。
イメージが表示されない場合は、エラー・メッセージなどのテキストや<?phpタグの前の空白など、ac_graph_img.phpに問題があることが考えられます。このテキストがイメージ・ストリームに含められ、その結果画像が無効になります。この種の問題をデバッグするためには、ac_graph_img.phpで$sessionチェックおよびheader()コールをコメント・アウトすると役に立ちます。次に、イメージ・ストリームの生データを表示させるため、ブラウザで次のリンクをロードします。
http://localhost/ac_graph_img.php
JSON形式は、ブラウザとPHPサーバー間のデータ転送効率を上げる目的でよく利用されます。Webサービスac_get_json.phpは、使用可能なJSONグラフィック・ライブラリの多くで直接使用できます。
