2. Administration
The Fund Manager component is equipped to manage administrative activities, which include the purging of data, maintenance of extraction information for extraction of data from the FIC application. This chapter explains these functions.
This chapter also explains the Query Builder, which can be used to construct user defined query statements to obtain information from the database.
This chapter contains the following sections:
- Section 2.1, "Purge Frequency Maintenance"
- Section 2.2, "Purge Frequency Summary Screen"
- Section 2.3, "Copying Parameterization Data"
- Section 2.4, "Purge Use Case Maintenance"
- Section 2.5, "Purge Use Case Maintenance Summary"
- Section 2.6, "Purge View"
- Section 2.7, "Purge Batch"
2.1 Purge Frequency Maintenance
This section contains the following topics:
2.1.1 Invoking Purge Frequency Maintenance Detail Screen
You can use this screen to maintain the frequency of purging for the tables in the system. According to the frequency specified here, the tables are purged during the End of Day processes.
Invoke the ‘Purge Frequency Maintenance Detail’ screen by typing ‘UTDPURGS’ in the field at the top right corner of the Application tool bar and clicking on the adjoining arrow button. The ‘Purge Frequency Maintenance Detail’ screen is displayed. Select ‘New’ from the Actions menu in the Application tool bar or click new icon to enter the details.
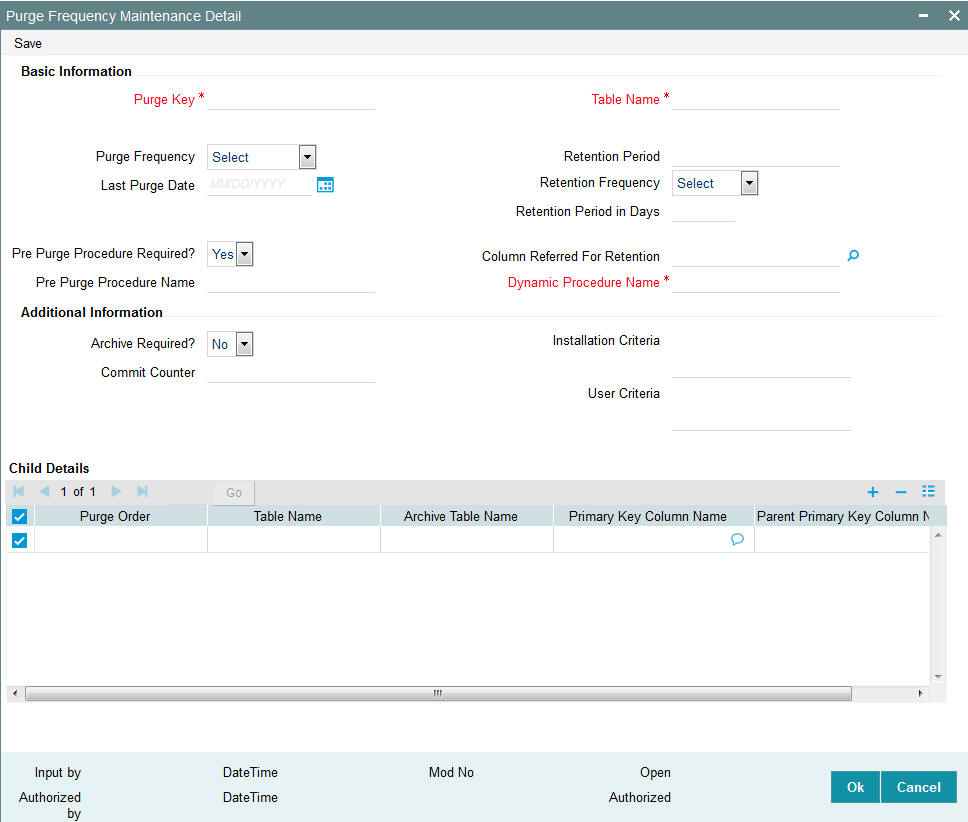
Basic Information Section
Purge Key
Purge key is the purge name that you need to maintain.
Table Name
Display Only
The name of the table for which a purge frequency must be set up is displayed here.
Purge Frequency
Alphanumeric, Mandatory
Specify the frequency at which the selected table must be purged as part of the End of Day processes. You can use the drop-down list to make your choice. Following are the options available in the drop-down list:
- Daily
- Weekly
- Bi-Weekly
- Monthly
- Quarterly
- Half Yearly
- Yearly
- Not Scheduled
If purge frequency is maintained as not scheduled, the system will ignore this purge activity from execution during EOD.
Last Purge Date
Display Only
The most recent date on which the purge was performed is displayed in this field.
Retention Period
Display Only
The system will compute retention period in days based on retention period and frequency maintained.
Retention Frequency
Select the retention frequency from the drop-down. Following are the options available in the drop-down list:
- Daily
- Weekly
- Bi-Weekly
- Monthly
- Quarterly
- Half Yearly
- Yearly
Retention Period in Days
Display
The system will calculate the days based on the Retention Period Value and Frequency, system will calculate the days and is displayed here. For instance, If Retention Period is 1, and Retention Frequency is selected as weekly then 7 will be displayed in this field (1*7days in a week=7)
Additional Information Section
Archive Required?
Select ‘Yes’ if you want backup to be taken before purge. Else select ‘No’.
If you select ‘Yes’, the system will copy the existing data into corresponding purge tables specified in the grid.
Note
Actual Table and corresponding purge table should be in same number of columns and order of columns. If there is mismatch, dynamic procedure creation will fail and maintenance cannot be authorized.
If you select ‘No’, the system will delete the data from the table.
Column referred for Retention
Displays the Column in the table which will be referred before processing purge. If purge is already processed, then process will start from the last purge date.
Installation Criteria
Enter the installation criteria based on which the purge will be maintained.
If any new purge activity is maintained, the same can be provided during first time maintenance only. Subsequent amendment of this value is restricted.
User defined Criteria
You can amend the purge details before process and enter the user defined criteria.
User defined Criteria is an additional criteria which will be appended to installation criteria to filter parent table data to be archived.
Dynamic Procedure Creation Related
Dynamic Procedure Name
Specify the name of the dynamic procedure to be created.
The system will create dynamic procedure during authorization. The system will validate the parameters provided for purging. If the specified procedure name already exists, then the system displays an override message.
Authorization will fail if dynamic procedure cannot be created without errors.
Pre Purge Procedure Related
You can execute a pre-defined procedure before the purging activity. Following are the options available:
- Yes
- No
If you select ‘Yes’, then the system will capture Pre Purge Procedure Name.
If you select ‘No’, then Pre Purge Procedure Name is not required.
Commit Counter
Specify commit frequency for archival/purging activity. If maintained, it should be greater than zero. If you do not provide commit frequency, then the system will consider static maintenance available. In the absence of static data, system will default 10000 as commit counter.
Archived Table Information
Table Name
Specify the archived table name.
Archived Table Name
The archived table name will be displayed.
The system performs the following validations for Purge Order:
- Purge Order defines the order in which the tables needs to be purged.
- Purge order for Master table should be 0.
- If master table is not provided in the grid, the system will use master table only for identifying the data for purge; during purge process the system will purge only the tables provided in the grid.
- If no table information are provided in the grid, the system will delete the parent table data based on the criteria provided. If no criteria is provided, then the system will truncate the table.
- Purge order of child tables should be greater than 0.
- Purging of master table will be done after purging of all the child tables (if master table is provided in the grid).
- Primary Key Column Name and Parent Primary Key Column Name. Column names of master and child tables to be provided here.
- Details of child table to be provided in Primary Key Column Name and details of master table to be provided in Parent Primary Key Column Name
- Data is mandatory for all child tables
2.2 Purge Frequency Summary Screen
This section contains the following topics:
- Section 2.2.1, "Retrieving Record in Purge Frequency Summary Screen"
- Section 2.2.2, "Editing Purge Frequency Maintenance"
- Section 2.2.3, "Viewing Purge Frequency Maintenance record"
- Section 2.2.4, "Deleting Purge Frequency Maintenance record"
- Section 2.2.5, "Authorizing Purge Frequency Maintenance "
- Section 2.2.6, "Amending Purge Frequency Maintenance"
- Section 2.2.7, "Authorizing Amended Purge Frequency Maintenance"
- Section 2.2.8, "Copying Attributes"
2.2.1 Retrieving Record in Purge Frequency Summary Screen
You can retrieve a previously entered record in the Summary Screen, as follows:
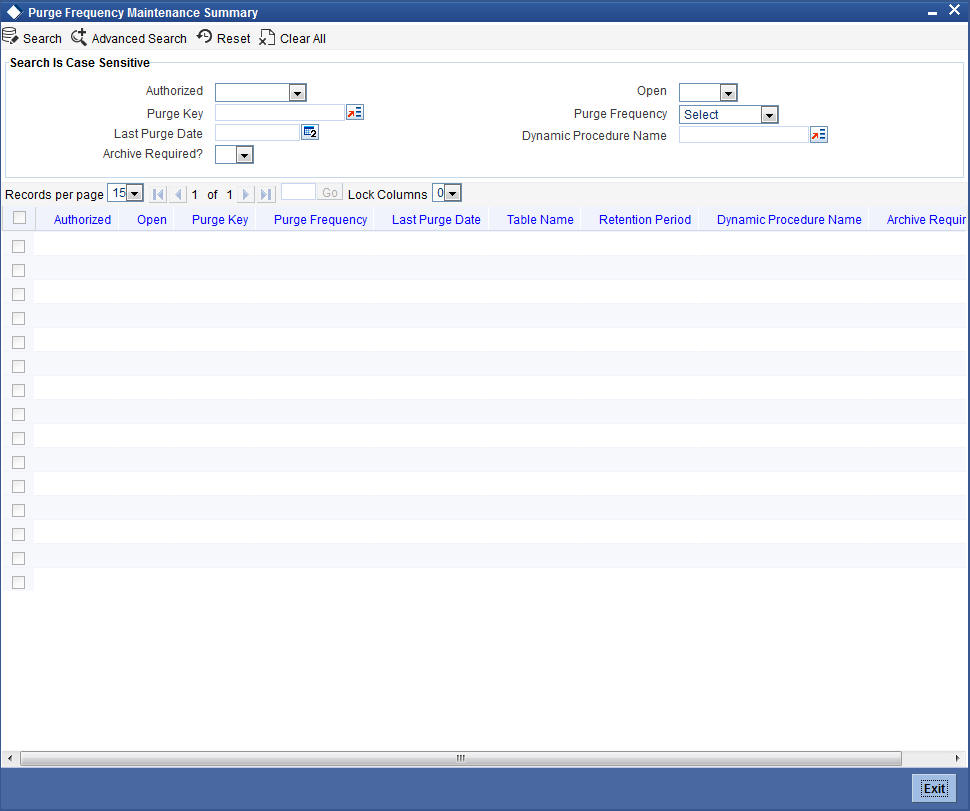
Invoke the ‘Purge Frequency Maintenance Summary’ screen by typing ‘UTSPURGS’ in the field at the top right corner of the Application tool bar and clicking on the adjoining arrow button. Specify any or all of the following details in the corresponding fields:
- The status of the record in the Authorized field. If you choose the ‘Blank Space’ option, then all the records are retrieved.
- The status of the record in the Open field. If you choose the ‘Blank Space’ option, then all records are retrieved
- The Purge Key
- The Purge Frequency
- The Last Purge Date
- Archive Required
- Dynamic Procedure Name
Click ‘Search’ button to view the records. All the records with the specified details are retrieved and displayed in the lower portion of the screen.
Note
You can also retrieve the individual record detail from the detail screen by querying in the following manner:
- Press F7
- Input the Purge Key.
- Press F8
You can perform Edit, Delete, Amend, Authorize, Reverse, Confirm operations by selecting the operation from the Action list. You can also search a record by using a combination of % and alphanumeric value.
Example
You can search the record for Purge Key by using the combination of % and alphanumeric value as follows:-
- Search by A%: System will fetch all the records whose Purge Key starts from Alphabet ‘A’. For example, AGC17, AGVO6, AGC74 etc.
- Search by %7: System will fetch all the records whose Purge Key ends by numeric value’ 7’. For example AGC17, GSD267, AGC77 etc.
- Search by %17%:- System will fetch all the records whose Purge Key
contains the numeric value 17. For example, GSD217, GSD172, AGC17 etc.
2.2.2 Editing Purge Frequency Maintenance
You can modify the details of Purge Frequency Maintenance that you have already entered into the system, provided it has not subsequently authorized. You can perform this operation as follows:
- Invoke the Purge Frequency Summary screen from the Browser.
- Select the status of the record that you want to retrieve for modification in the Authorized field. You can only modify records that are unauthorized. Accordingly, choose the unauthorized option.
- Specify any or all of the details in the corresponding fields to retrieve the record that is to be modified.
- Click ‘Search’ button. All unauthorized records with the specified details are retrieved and displayed in the lower portion of the screen.
- Double click the record that you want to modify in the list of displayed records. The Purge Frequency Maintenance Detail screen is displayed.
- Select Unlock Operation from the Action list to modify the record. Modify the necessary information.
- Click Save to save your changes. The Purge Frequency Maintenance Detail screen is closed and the changes made are reflected in the Purge Frequency Summary screen.
2.2.3 Viewing Purge Frequency Maintenance record
To view a record that you have previously input, you must retrieve the same in the Purge Frequency Summary screen as follows:
- Invoke the Purge Frequency Summary screen from the Browser.
- Select the status of the record that you want to retrieve for viewing in the Authorized field. You can also view all records that are either unauthorized or authorized only, by choosing the Unauthorized/Authorized option.
- Specify any or all of the details of the record in the corresponding fields on the screen and click ‘Search’ button. All records with the specified fields are retrieved and displayed in the lower portion of the screen.
- Double click the record that you want to view in the list of displayed records. The Purge Frequency Maintenance Detail screen is displayed in View mode.
2.2.4 Deleting Purge Frequency Maintenance record
You can delete only unauthorized records in the system. To delete a record that you have previously entered:
- Invoke the Purge Frequency Summary screen from the Browser.
- Select the status of the record that you want to retrieve for deletion.
- Specify any or all of the details and click ‘Search’ button. All records with the specified fields are retrieved and displayed in the lower portion of the screen.
- Double click the record that you want to delete in the list of displayed records. The Purge Frequency Maintenance Detail screen is displayed.
- Select Delete Operation from the Action list. The system prompts you to confirm the deletion and the record is physically deleted from the system database.
2.2.5 Authorizing Purge Frequency Maintenance
An unauthorized Purge Frequency must be authorized in the system for it to be processed. To authorize a record:
- Invoke the Purge Frequency Summary screen from the Browser.
- Select the status of the record that you want to retrieve for authorization. Typically, choose the unauthorized option.
- Specify any or all of the details and click ‘Search’ button. All records with the specified details that are pending authorization are retrieved and displayed in the lower portion of the screen.
- Double click the record that you wish to authorize. The Purge Frequency Maintenance Detail screen is displayed. Select Authorize operation from the Action List.
When a checker authorizes a record, details of validation, if any, that were overridden by the maker of the record during the Save operation are displayed. If any of these overrides results in an error, the checker must reject the record.
2.2.6 Amending Purge Frequency Maintenance
After a Purge Frequency Maintenance is authorized, it can be modified using the Unlock operation from the Action List. To make changes to a record after authorization:
- Invoke the Purge Frequency Summary screen from the Browser.
- Select the status of the record that you want to retrieve for authorization. You can only amend authorized records.
- Specify any or all of the details and click ‘Search’ button. All records with the specified details that are pending authorization are retrieved and displayed in the lower portion of the screen.
- Double click the record that you wish to authorize. The Purge Frequency Maintenance Detail screen is displayed in amendment mode. Select Unlock operation from the Action List to amend the record.
- Amend the necessary information and click on Save to save the changes.
2.2.7 Authorizing Amended Purge Frequency Maintenance
An amended Purge Frequency Maintenance must be authorized for the amendment to be made effective in the system. The authorization of amended records can be done only from Fund Manager Module and Agency Branch module.
The process of subsequent authorization is the same as that for normal transactions.
2.2.8 Copying Attributes
If you want to create a new Purge Frequency Maintenance with the same attributes of an existing maintenance, you can copy the attributes of an existing Purge Frequency Maintenance to a new one.
To copy the attributes:
- Retrieve the record whose attributes the new Purge Frequency should inherit. You can retrieve the record through the Summary screen or through the F7-F8 operation explained in the previous sections of this chapter.
- Click on Copy.
Indicate the ID for the new Purge Frequency Maintenance. You can, however, change the details of the new maintenance.
2.3 Copying Parameterization Data
This section contains the following topics:
2.3.1 Copying Parameterization Data
You can copy parameterization data from Oracle FLEXCUBE Investor Servicing environment to any other environment and vice versa. The data from Oracle FLEXCUBE Investor Servicing can be exported into an excel sheet or an XML format.
If ‘Excel Export Required’ option is checked for a function id in the ‘Function Description Maintenance’ screen then an ‘Export’ button is enabled in the summary screen of that function id. In the Summary screen you can query records based on the query parameters available and then select the required records to be exported and click ‘Export’ button. On clicking ‘Export’ button, system would export the data into an excel sheet and opens the excel sheet with data populated. You can then save the excel sheet.
Note
The records can be exported either in .XLS or .XLSX format. The format of the export file must be maintained in ‘CSTB_PARAM’ against the parameter ‘EXCEL_FORMAT’.
You can also import data into Oracle FLEXCUBE Investor Servicing environment using the ‘Excel Import’ screen. You can invoke this screen by typing the function id ‘CSDXLUPD‘ in the field at the top right corner of the Application tool bar and clicking on the adjoining arrow button.

The following details are captured here:
File Name
Select the excel file to be imported by clicking ‘Browse’ button.
Total No of Records
The total number of records to be uploaded is displayed here.
Function Identification
The function id mentioned in the excel file chosen is displayed here.
Batch Reference
The unique reference number generated for an upload is displayed here.
Post Upload Status
Select the status to be set for the file post upload, from the drop-down list. The following statuses are available in the drop-down list:
- Authorized
- Unauthorized
- Hold
Override Action
Select the action to be taken if an override message is encountered, from the drop-down list. The following options are available:
- Ignore
- Error
Action
The action is displayed here.
No of failed records
The total number of records which failed to get uploaded is displayed here.
Generate or Upload
Select the action to be taken for importing the file, from the drop-down list. The following options are available for selection:
- Generate – Select this option if an XML has to be generated from the imported file. This will be stored in the path maintained in CSBT_PARAM parameter EXCEL_IMPORT_XML_SPOOL_AREA
- Upload – Select this option if the data has to be uploaded as an excel file itself.
Note
To start the upload process click ‘Upload’ button. Once you click this button system starts importing the data from the excel file.
Source
Specify the source code of the file to be used for generating the XML file. You need to specify the source if you have chosen ‘Generate’ option in the ‘Generate or Upload’ field.
Excel File Upload Details
The following details are captured here:
Record Id
The unique number of the record uploaded is displayed here.
Record Key
The record key is displayed here.
Status
The upload status of the record is displayed here.
Excel Upload Errors
Record Id
The unique number of the record, which encountered error while uploading, is displayed here.
Error Code
The error code corresponding to the error encountered during upload is displayed here.
Error Message
The error message corresponding to the error code displayed is defaulted here.
2.4 Purge Use Case Maintenance
This section contains the following topics:
2.4.1 Invoking Purge Use Case Maintenance Screen
You can provide the purge fund data along with relevant audit/ history information using ‘Purge Use Case Maintenance’ screen. All tables from which data will be archived/purged will be available as factory shipped maintenance. You can purge or archive fund data based on predefined criteria. You can also purge or archive fund information along with associated maintenances, transaction data and audit trail information.
There will be a pre purge procedure which will populate the identified records for authorization. The screen will also identify records which cannot be purged for business reasons.
On authorization of the pre purged record, the system will actual archive/ purge process based on the maintained schedule. The system will log the detail of records which could not be purged along with reasons.
The system will purge/ archive all fund data including the following information:
- Fund Rules (UTNFNDRL)
- Fund Bank Account (UTDFNDAC)
- Fund Entity (UTDFNENT)
- Fund Calendar (UTDHOLID)
- Fund conversion (UTDFNCVR)
- Fund Dividend Records including payment/ reinvestment records at fund level
- Fund WHT (UTDWHTAX)
- Fund Price (UTDFPRIC)
- Periodic Load (UTDPERLM)
- Fund Switch Restriction (UTDFNSWR)
- GL (UTDGLISD)
- Mock Dividend (UTDMOCKD)
- UH Balledger
- BOD Outstanding Units
- Corporate Action Tables
- Fund User (UTDFNDUS)
- Fund Sub Acc Mapping (UTDFSAMS)
- Fund Price Holiday (UTDFPHOL)
- Fund Investment Component (UTDFICRM)
- Fund CPMF (UTDFCPMF)
- Fund Agency Limit (UTDFALMT)
- Auto-switch Set up (UTDASSSD)
- ADHOC price (UTDAHPRM)
- Agent Price Basis (UTDAGTPR)
- Fund UH Category Holding Period (UTDMINHL)
- Unit Price Rounding (UTDPRRRL)
- Target-based Fee (UTDTGBFE)
Note
Only the data which is not interlinked to any other record will be purged/archived. Interlinked data which will lead to system inconsistency will not be archived/purged. Data once archived cannot be restored back to main tables.
You can invoke the ‘Purge Use Case Maintenance’ screen by typing ‘UTDFNPUR’ in the field at the top right corner of the Application tool bar and clicking on the adjoining arrow button.

You can specify the following details:
Basic Information
Purge Function
Alphanumeric; 16 Characters; Mandatory
Specify the purge function details.
Purge Frequency
Mandatory
Select the purge frequency from the drop-down list. The list displays the following values:
- Daily
- Monthly
- Fortnight
- Quarterly
- Half Yearly
- Yearly
Last Purge Date
Display
The system displays the last purge date.
Pre Purge Mode
Mandatory
Select the pre purge model from the drop-down list. The list displays the following values:
- EOD
- Manual
Commit Counter
Numeric; 8 Characters; Mandatory
Specify the commit counter.
Archive Required?
Optional
Select if archive is required or not from the drop-down list. The list displays the following values:
- Yes
- No
Table Name
Alphanumeric; 50 Characters; Mandatory
Specify the table name.
Retention Period Basis
Mandatory
Select the retention period basis from the drop-down list. The list displays the following values:
- Daily
- Monthly
- Fortnight
- Quarterly
- Half Yearly
- Yearly
Retention Period
Numeric; 8 Characters; Optional
Specify the retention period.
Column Referred For Retention
Alphanumeric; 50 Characters; Mandatory
Specify the column referred for retention.
Post Purge Mode
Mandatory
Select the post purge mode from the drop-down list. The list displays the following values:
- EOD
- Manual
- Automatic
User Criteria
Alphanumeric; 50 Characters; Mandatory
Specify the user criteria details.
Purge Key Details
Purge Key
Alphanumeric; 8 Characters; Mandatory
Specify the purge key. Alternatively, you can select purge key from the option list. The list displays all valid purge keys maintained in the system.
Purge Order
Numeric; 2 Characters; Mandatory
Specify the purge order.
Pre Purge Procedure Name
Alphanumeric; 50 Characters; Mandatory
Specify the pre purge procedure name.
Dependent Purge Key
Alphanumeric; 8 Characters; Mandatory
Specify the dependent purge key. Alternatively, you can select dependent purge key from the option list. The list displays all valid dependent purge keys maintained in the system.
2.5 Purge Use Case Maintenance Summary
This section contains the following topics:
- Section 2.5.1, "Retrieving Record in Purge Use Case Record"
- Section 2.5.2, "Editing Purge Use Case Record"
- Section 2.5.3, "Viewing Purge Use Case Record"
- Section 2.5.4, "Deleting Purge Use Case Record"
- Section 2.5.5, "Authorizing Purge Use Case Record "
- Section 2.5.6, "Amending Purge Use Case Record"
- Section 2.5.7, "Authorizing Amended Purge Use Case Record"
2.5.1 Retrieving Record in Purge Use Case Record
You can retrieve a previously entered record in the Summary Screen, as follows:
Invoke the ‘Purge Use Case Maintenance Summary’ screen by typing ‘UTSFNPUR’ in the field at the top right corner of the Application tool bar and clicking on the adjoining arrow button. Specify any or all of the following details in the corresponding fields:
- The status of the record in the Authorized field. If you choose the ‘Blank Space’ option, then all the records are retrieved.
- The status of the record in the Open field. If you choose the ‘Blank Space’ option, then all records are retrieved
- Purge Function
- Retention Period
- Purge Frequency
- Retention Period Basis
- Pre Purge Mode
- Post Purge Mode
Click ‘Search’ button to view the records. All the records with the specified details are retrieved and displayed in the lower portion of the screen.
Note
You can also retrieve the individual record detail from the detail screen by querying in the following manner:
- Press F7
- Input the Purge Frequency
- Press F8
You can perform Edit, Delete, Amend, Authorize, operations by selecting the operation from the Action list. You can also search a record by using a combination of % and alphanumeric value.
Example
You can search the record for Purge Key by using the combination of % and alphanumeric value as follows:
- Search by A%: System will fetch all the records whose Purge Frequency starts from Alphabet ‘A’. For example, AGC17, AGVO6, AGC74 etc.
- Search by %7: System will fetch all the records whose Purge Frequency ends by numeric value’ 7’. For example AGC17, GSD267, AGC77 etc.
- Search by %17%:- System will fetch all the records whose Purge Frequency
contains the numeric value 17. For example, GSD217, GSD172, AGC17 etc.

2.5.2 Editing Purge Use Case Record
You can modify the details of Purge Use Case Maintenance that you have already entered into the system, provided it has not subsequently authorized. You can perform this operation as follows:
- Invoke the Purge Use Case Maintenance Summary screen from the Browser.
- Select the status of the record that you want to retrieve for modification in the Authorized field. You can only modify records that are unauthorized. Accordingly, choose the unauthorized option.
- Specify any or all of the details in the corresponding fields to retrieve the record that is to be modified.
- Click ‘Search’ button. All unauthorized records with the specified details are retrieved and displayed in the lower portion of the screen.
- Double click the record that you want to modify in the list of displayed records. The Purge Use Case Maintenance Detail screen is displayed.
- Select Unlock Operation from the Action list to modify the record. Modify the necessary information.
- Click Save to save your changes. The Purge Use Case Maintenance Detail screen is closed and the changes made are reflected in the Purge Use Case Maintenance Summary screen.
2.5.3 Viewing Purge Use Case Record
To view a record that you have previously input, you must retrieve the same in the Purge Use Case Maintenance Summary screen as follows:
- Invoke the Purge Use Case Maintenance Summary screen from the Browser.
- Select the status of the record that you want to retrieve for viewing in the Authorized field. You can also view all records that are either unauthorized or authorized only, by choosing the Unauthorized/Authorized option.
- Specify any or all of the details of the record in the corresponding fields on the screen and click ‘Search’ button. All records with the specified fields are retrieved and displayed in the lower portion of the screen.
- Double click the record that you want to view in the list of displayed records. The Purge Use Case Maintenance Detail screen is displayed in View mode.
2.5.4 Deleting Purge Use Case Record
You can delete only unauthorized records in the system. To delete a record that you have previously entered:
- Invoke the Purge Use Case Maintenance Summary screen from the Browser.
- Select the status of the record that you want to retrieve for deletion.
- Specify any or all of the details and click ‘Search’ button. All records with the specified fields are retrieved and displayed in the lower portion of the screen.
- Double click the record that you want to delete in the list of displayed records. The Purge Use Case Maintenance Detail screen is displayed.
- Select Delete Operation from the Action list. The system prompts you to confirm the deletion and the record is physically deleted from the system database.
2.5.5 Authorizing Purge Use Case Record
An unauthorized Purge Use Case Maintenance must be authorized in the system for it to be processed. To authorize a record:
- Invoke the Purge Use Case Maintenance Summary screen from the Browser.
- Select the status of the record that you want to retrieve for authorization. Typically, choose the unauthorized option.
- Specify any or all of the details and click ‘Search’ button. All records with the specified details that are pending authorization are retrieved and displayed in the lower portion of the screen.
- Double click the record that you wish to authorize. The Purge Use Case Maintenance Detail screen is displayed. Select Authorize operation from the Action List.
When a checker authorizes a record, details of validation, if any, that were overridden by the maker of the record during the Save operation are displayed. If any of these overrides results in an error, the checker must reject the record.
2.5.6 Amending Purge Use Case Record
After a Purge Use Case Maintenance is authorized, it can be modified using the Unlock operation from the Action List. To make changes to a record after authorization:
- Invoke the Purge Use Case Maintenance Summary screen from the Browser.
- Select the status of the record that you want to retrieve for authorization. You can only amend authorized records.
- Specify any or all of the details and click ‘Search’ button. All records with the specified details that are pending authorization are retrieved and displayed in the lower portion of the screen.
- Double click the record that you wish to authorize. The Purge Use Case Maintenance Detail screen is displayed in amendment mode. Select Unlock operation from the Action List to amend the record.
- Amend the necessary information and click on Save to save the changes.
2.5.7 Authorizing Amended Purge Use Case Record
An amended Purge Use Case Maintenance must be authorized for the amendment to be made effective in the system. The authorization of amended records can be done only from Fund Manager Module and Agency Branch module.
The process of subsequent authorization is the same as that for normal transactions.
2.6 Purge View
This section contains the following topics:
2.6.1 Invoking Purge View Screen
You can authorize the pre-purge records. Once the record is authorized, the system will generate an interface file to verify the pre-purge records.
You can view the purge details using ‘Purge View’ screen. You can invoke this screen by typing ‘UTDPURVW’ in the field at the top right corner of the Application tool bar and clicking on the adjoining arrow button.

You can specify the following details:
Purge Use Case Key
Alphanumeric; 16 Characters; Mandatory
Specify the purge use case key. Alternatively, you can select purge use case key from the option list. The list displays all valid purge use case key maintained in the system.
Pre Purge Executed date
Display
The system displays the pre purge executed date based on the selected purge use case key..
Pre Purge Executed Appdate
Display
The system displays the pre purge executed app date based on the selected purge use case key.
Batch Ref Number
Display
The system displays the batch reference number.
Clicking authorize button, the system will authorize the records and will also extract a interface file in text format and will be placed in the export file path. You can use this extract to pre purge records to verify the data being purged. Once authorized, the system will purge/archive record where validations are successful as per purge schedule.
2.7 Purge Batch
This section contains the following topics:
2.7.1 Invoking Purge Batch Screen
You can execute the pre-purge and post-purge process using ‘Purge Batch’ screen. You can invoke this screen by typing ‘UTDPURBT’ in the field at the top right corner of the Application tool bar and clicking on the adjoining arrow button.

You can specify the following details:
Purge Use Case Key
Alphanumeric; 16 Characters; Mandatory
Specify the purge use case key. Alternatively, you can select purge use case key from the option list. The list displays all valid purge use case key maintained in the system.
Purge Selection
Mandatory
Select the purge status from the drop-down list. The list displays the following values:
- Pre Purge - A pre purge procedure will be run (either manual or during EOD) and will populate relevant records picked up by the pre purge procedure for purge/archival
- Post Purge - The post-purge process will be run manually or automatically or during EOD for purge/archival. For manual operation, you can use ‘Purge Batch’ screen and for automatic operation, the same will happen during the authorize button click itself.
Note
Purge keys with pre/post as manual only will be listed in the purge batch screen option list based on the purge selection.
Click ‘Execute’ button to execute the purge batch.
There will be a pre purge procedure which will populate the identified records for authorization. The screen will also identify records which cannot be purged for business reasons.
On authorization of the pre purged record, the system will archive/purge process based on the maintained schedule. The system will also log the detail of records which could not be purged along with reasons.
Once archived or purged, unitholder details will not be visible in any of the following screens
- Unitholder details including bank, contact details, add info etc (UTDUH)
- UH Deal (UTDUHDEL)
- IDS (UTDUHIDS)
- LOI (UTDUHLOI)
- NPI Preference (UTDUHNPI)
- FATCA/CRS Maintenances (UTDFATMT)
- KYC doc (UTDKYCCD)
- Audit Trail
- Close/reopen (UTDACCLS)
- CIF- UH Mapping (UTDCIFUH)
- Entity Notepad (UTDNTPDE)
- IRRF Preference (UTDUHIOF)
- Non Tax Limits (UTDUHNTX)
- COE Preference (UTDUHCOE)
- Help Desk (UTDHLPDS)
- Distribution Void (UTDDVOID)
- Cheque Book Request (UTDCHKRQ)
- NAV Alert (UTDUHNAV)
- UH KIID
- UH Across Schema Find
- UT transaction screens (UTDTXN01 TO UTDTXN10, UTDADJ02, UTDADJ03, UTDTXNCU, UTDCNTXN, UTDTXNB, UTDCNVTX, UTDTXNLT, UTDSIN, UTDOLT)
- Policy Transaction Screens (LEDPLAN, LEDPLTOP, LEDPLSUR,LEDPLSWI, LEDPLJNL, LEDFINWD, LEDPLREV)
- Consolidated Enquiry (UTSCOINQ)