2. Creating Electronic Fund Transfer Interfaces
Oracle FLEXCUBE Investor Servicing (FC-IS) provides the AMC with the facility of interfacing with external clearing bureaus and clearing banks. The interface is facilitated through electronic funds transfer (EFT), and specific transfer instruction data can be generated as EFT files that are sent to these clearing bureaus.
In the FC-IS system, you can create transfer instructions to be sent to the clearing bank of the AMC from where transfers can be effected to the unit holder bank accounts, for the following business events:
- Redemption Payments: For all the payments that need to be effected through transfer to unit holder bank account due to redemption transactions on any given date, you can generate an EFT file in the system with all the relevant transfer instruction data and the amounts. This file can then be exported to the clearing bank of the AMC.
- Dividend Payments: For all dividend payments that must be effected through transfer to unit holder bank accounts, on a given date, an EFT file can be generated that contains all the relevant transfer instruction data and the amounts. This file can then be manually transmitted to the clearing bank of the AMC that will actually effect the transfers.
- Broker Commission Payments: For all payments through transfer to an agent or broker bank accounts due to commission accrual on any given date, an EFT file can be generated that contains the transfer details and the amounts. This file can be exported to the clearing bank of the AMC.
You can also create transfer instructions to an external clearing bureau for the purpose of debiting the relevant unit holder accounts in the case of debit orders. A hand-off file can be generated with the transfer instruction information that can be sent to an external clearing bureau that will debit the relevant unit holder bank accounts and credit the AMC account as applicable.
In case of NPI payments to a trust, you can generate a single EFT file that contains all the transfer details and the total NPI amount that must be paid to charitable trusts.
This chapter describes the functions in the FC-IS system that you can use to create these transfer instructions EFT files.
This chapter contains the following sections:
- Section 2.1, "Create Transfer Instruction Files"
- Section 2.2, "Few Basic Terms"
- Section 2.3, "EFT Files Generation"
- Section 2.4, "EFT Batch Generation Screen"
- Section 2.5, "EFT Batch Maintenance Summary Screen"
- Section 2.6, "Marking a Batch for Re-Export"
- Section 2.7, "Payment Clearing Screen"
- Section 2.8, "Payment Clearing Summary Screen"
2.1 Create Transfer Instruction Files
The following screens in the system facilitate the creation and generation of these transfer instructions interface files:
- The EFT Setup (Detail and Summary) Screen that you can access fron the EFT Setup menu in the Browser.
- The Payment Clearing Screen that you can access from the Payment Clearing menu in the Browser.
2.2 Few Basic Terms
You must have a clear understanding of a few basic terms before you use these screens to generate the EFT files:
Batch
A batch is a logical group of records that forms a single transfer instruction EFT file. Accordingly, one single batch can include transfer instructions records that could apply to any one of the four business events mentioned above – redemption payments, dividend payments, broker commission payments or debit orders, as of the date on which (the effective date) the hand-off files are to be generated.
Instruction Type
Each of the four business events that will result in transfer instructions being sent to the clearing bureau (for debit orders) or clearing bank (for redemption payments, dividend payments or broker commission payments), is designated within the system as an instruction type. Therefore, a single batch can contain records that pertain to a single instruction type, for a given date.
Instruction Medium
The instruction medium is the method using which the interfacing with the external entity is achieved. Therefore, the medium could be an automated clearing bureau, an electronic funds transfer, a SWIFT interface, and so on.
Taking a typical example, if the generated transfer instruction files are exported to an external clearing bank, they may need to be exported through an electronic funds transfer. In this case, the instruction medium would be EFT or electronic funds transfer.
Settlements and Link Settlement Numbers
Settlement of the records in a batch involves the debiting or crediting of the applicable bank accounts. For each account that is impacted by the debit or credit entries due to the settlement, the system generates a number known as the link settlement number. This number is typically used for tracking the record in the different stages of the settlement.
If more than one of the records retrieved for a batch are to be settled by crediting or debiting the same unit holder account, then the system internally deems the settlement to be a single one. It also assesses the number of such settlements, and displays the same.
For example, in the case of redemption payments, let us suppose that a certain unit holder A has performed redemption transactions T1 and T2, and that these transactions have been allocated on the date 3rd – April - 2000. Let us suppose that the only bank account to be credited as a result of these transactions is AC1. When you extract redemption payment records for the date 3rd - April - 2000 in this screen, the system retrieves T1 and T2. When it finds, during the process of extraction, that both the proceeds of both transactions are to be credited to a single account AC1, it deems both the transactions as a single settlement, and assigns a single link settlement number, for both these transactions.
For a single link settlement number, all the underlying transactions must be cleared or rejected together.
2.3 EFT Files Generation
Typically, it is recommended that you perform the generation of an EFT batch file after the End of Day process at the Fund Manager has been preformed by the Operator users.
You can create and generate the transfer instruction files in the system by using the following procedures, in sequence:
- For the date on which the hand-off instruction files are to be generated, for sending to the clearing bureau, you must extract the records that must appear in these files. You can use the EFT Batch Maintenance (Detail) screen to do this.
- After you have extracted and saved the batch in the EFT Batch Generation screen, authorize it using the EFT Batch Maintenance (Summary) screen.
- The user that has generated the batch record in the EFT Batch Maintenance (Detail) screen cannot authorize the batch. Typically, a user belonging to the Supervisor user group can authorize the batch in the EFT Batch Maintenance (Summary) screen.
- After authorization, you can generate and export the actual transfer instruction interface file that contains the batch records using the interface processing functions in the system.
Refer to the Interfaces chapter of this User Manual for a detailed discussion of the interface processing functions.
Re-exporting Batch EFT File
Once a batch has been authorized, it cannot be generated again for the same instruction type, for the same date.
If the transmitted EFT batch file is misplaced due to any reason, then you can re-export the same batch again. The saved batch data is exported. You can use the Mark Batch for Re-Export screen to do this. The Interface processing function may be used again to re-transmit the EFT batch file.
2.4 EFT Batch Generation Screen
This section contains the following topics:
- Section 2.4.1, "Invoking the EFT Setup Detail Screen"
- Section 2.4.2, "Generating EFT Batch in this Screen"
- Section 2.4.3, "Reports Printed on Saving EFT Batch"
2.4.1 Invoking the EFT Setup Detail Screen
You can use the ‘EFT Setup Detail’ screen to generate a batch for an EFT file. You can invoke this screen by typing ‘UTDEFTSD’ in the field at the top right corner of the Application tool bar and clicking on the adjoining arrow button.
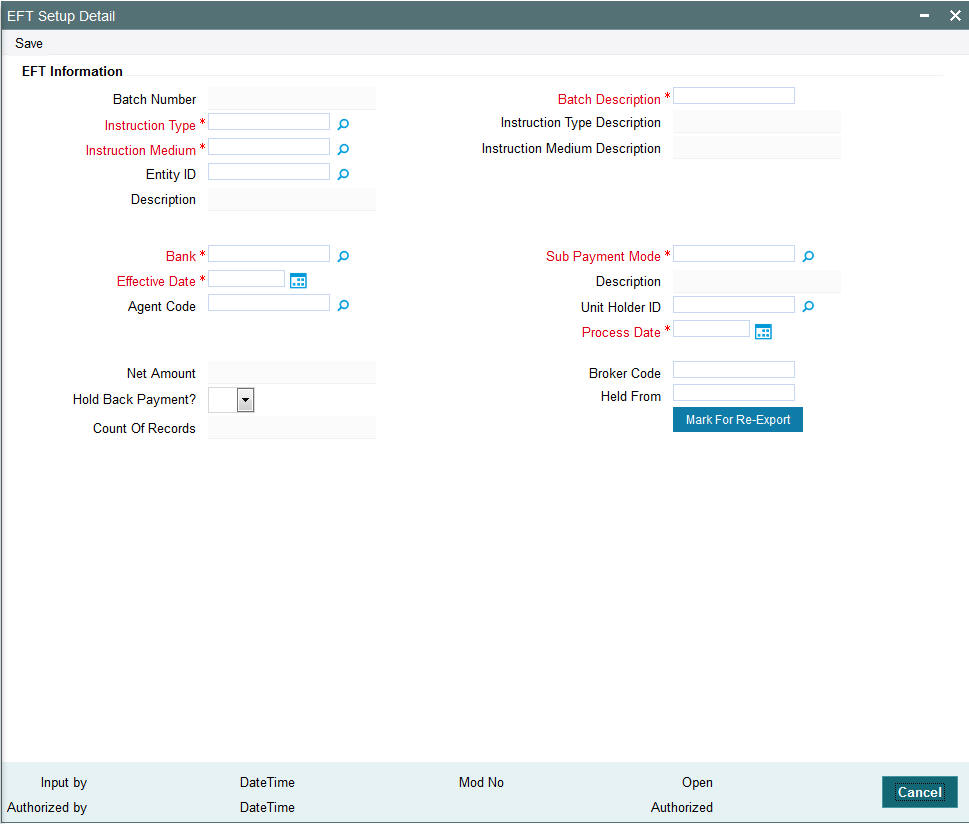
2.4.2 Generating EFT Batch in this Screen
To create a batch that can be used for generating and exporting an EFT file, you must
- Specify the following mandatory information in the applicable fields
in the header or main portion of this screen:
- The Instruction Type that will determine the records that must be extracted for this batch.
- The Effective Date for which the records must be extracted for this batch
- The Batch Description
- Click the Extract button. The job is submitted and the corresponding procedure is run. The Asynchronous Process screen is opened, where the current status of the job is indicated.
- All the relevant transaction records pertaining to the specified Instruction Type and Effective Date are extracted, and the amounts involved are summed across all the transaction and displayed in the Instruction Information section in the lower portion of the screen. This displayed row will also contain the number of records that are tagged with a link settlement number
- To view the records in detail, with the actual transaction numbers, and the bank account details, click the View Details button. The records that make up the batch are displayed transaction-wise in the Instruction Details section in the lower portion of the form.
- Choose the Save option from the File menu or click on the Save button to save the batch.
Select ‘New’ from the Actions menu in the Application tool bar or click new icon to enter the details of the EFT Setup Screen.
The EFT Setup Screen depicts the following EFT information:
Batch Number
System Generated Information
The Batch Number is a unique identifier that is assigned to each batch that is generated in this screen. When you have extracted all the records in this screen, the Batch Number is generated when you choose the Save option and the system successfully saves the batch.
The Batch Number consists of a 20-character number, and is generated by the system according to the following logic:
Characters 1-2 |
‘BN’ |
Characters 3-4 |
The instruction type, ‘DO’ for debit orders, ‘RE’ for redemption payments, ‘BC’ for broker commission payments and ‘DI’ for dividend payments. |
Characters 5-12 |
The date stamp (as ‘yyyymmdd’ format) |
Characters 13-20 |
A running serial number prefixed with zeros |
Instruction Type
Alphanumeric, Mandatory
Select the type of business event that results in the EFT file transfer to the external bureau in the form of this batch. The records that will be extracted by the system in this screen will be filtered according to the instruction type that you specify here.
Instruction Type Description
When you select the instruction type, the description for the respective instruction type is displayed.
The following types are available:
- Debit Orders
- Redemption Payouts
- Dividend Payouts
- Broker Commission Payouts
- NPI Payments to Trust
For instance, if you specify the instruction type as Redemption Payouts, the system will retrieve only records of redemption transactions that have been allocated on the specified date.
The drop down list in this field contains all the instruction types that have been identified for the AMC and the interface. The instruction types are set up in the system by the implementers at installation time.
Instruction Medium
Display Only
The instruction medium is the method using which the interfacing with the external entity is achieved. Therefore, the medium could be an automated clearing bureau, an electronic funds transfer, a SWIFT interface, and so on.
Taking a typical example, if the generated transfer instruction files are exported to an external clearing bank, they may need to be exported through an electronic funds transfer. In this case, the instruction medium would be EFT or electronic funds transfer.
At the time of installation of the system, the implementers set up the different instruction mediums as applicable to the AMC. Each instruction type is mapped to an instruction medium. Therefore, when you specify the instruction type, the instruction medium that is mapped to the selected instruction type is displayed here, and it cannot be altered.
Instruction Medium Description
When you select the Instruction medium, the description for the respective instruction medium is displayed for the EFT Setup.
Entity ID
The ID of the entity involved in the transaction is displayed here.
Bank
The code of the bank, in which the transfer account is located, from which the settlement will be done for the transaction, is displayed here.
Sub Payment Mode
Select the sub payment mode from the option list.
Effective Date
Mandatory
Specify the date for which the records must be extracted for this batch.
- For redemption payments, the redemption transactions that have occurred on the date you specify here must have been allocated.
- For dividend payments, the following events must have already occurred
for the date you specify here:
- The fund dividend should have been declared and authorized for all funds earlier than the date you specify here.
- The dividend that has been declared must already have been processed for the date you specify here.
- For broker commissions, the commissions that are accruing to the broker on the date you specify here must already have been processed in the system.
- For debit orders, the date you specify here must be the date of generation of the standing instructions transaction. Therefore, it must always be a future date.
Therefore, for redemption payments, broker commission payments and dividend payments, the date you specify here can be a past date, subject to the conditions mentioned above.
Process Date
The application date is displayed here. This is the date on which the batch record is saved in this screen.
Agent Code
Select the agent code from the option list.
Unit Holder ID
Select the ID of the respective unit holder from the option list.
Batch Description
30 Characters Maximum, Alphanumeric, Mandatory
Give a brief narrative description for the batch.
Net Amount
The net amount involved in the transaction is displayed here.
Held Back Payments?
Select ‘Yes’ or ‘No’ to specify whether any payments are held back or not.
Broker Code
Enter the broker code.
Held From
Enter from when the payment is held back.
Actual Transaction Number
The number of the allotted transaction in the system that has been extracted for this batch is displayed here.
For dividend payments and commission payments, it is the corresponding payment number. For redemption transactions, it is the actual redemption transaction number in the system. For debit orders, it is the actual system-generated Standing Instructions transaction number that is assigned when the transaction is actually generated in the system.
Mark for Re-Export
Click ‘Mark For Re-Export’ button to mark the records for re-export.
2.4.3 Reports Printed on Saving EFT Batch
When you save an EFT batch in this screen, the following reports are printed:
- The Instruction Batch Report, containing the following details:
- Batch Number and Description
- Instruction Description
- Instruction Medium
- Net Amount
- Process Date and Effective Date
- Authorization Status and Batch Status
- Rejection Reason, if any.
- The EFT Batch Details Report, containing the following details:
- The Link Settlement Numbers, if any
- The transaction amounts, at the settlement number level, and a sum for the entire batch
- The transfer bank account details at the link settlement number level
2.5 EFT Batch Maintenance Summary Screen
This section contains the following topics:
- Section 2.5.1, "Invoking the EFT Batch Maintenance Summary Screen"
- Section 2.5.2, "Retrieving Batch in EFT Setup Summary Screen"
- Section 2.5.3, "Editing Record"
- Section 2.5.4, "Viewing Record"
- Section 2.5.5, "Authorizing Record"
- Section 2.5.6, "Amending Record"
- Section 2.5.7, "Authorizing Amended Record"
2.5.1 Invoking the EFT Batch Maintenance Summary Screen
After you have extracted an EFT batch, you must have another user authorize it to be effective in the system.
Before the EFT batch is authorized, you can edit it as many times as necessary. You can also delete it before it is authorized.
Invoke the ‘EFT Setup Summary’ screen by typing ‘UTSEFTSD’ in the field at the top right corner of the Application tool bar and clicking on the adjoining arrow button.
The ‘EFT Setup Summary’ screen can be used for the following operations on EFT batches:
- Retrieval for viewing
- Authorizing batches
- Marking a batch for re-export
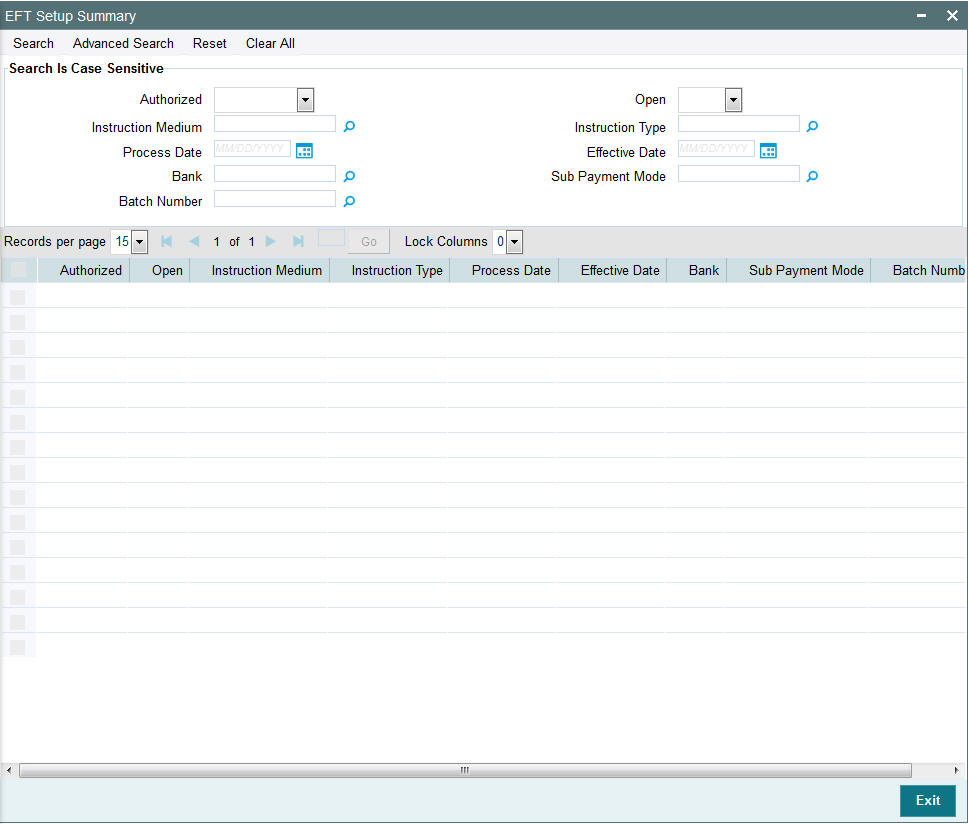
2.5.2 Retrieving Batch in EFT Setup Summary Screen
You can retrieve a previously entered record in the EFT Setup Summary screen, as follows:
In the browser select Transaction screen and click on Summary, specify any or all of the following details in the corresponding fields:
- The status of the transaction in the Authorized field. If you choose the “Blank Space” option, then all the records are retrieved.
- The status of the Transaction in the Open field. If you choose the “Blank Space” option, then all the records are retrieved.
- The medium of instruction, in the Instruction Medium field.
- The type of instruction, in the Instruction Type field.
- The date of process, in the Process Date field.
- The effective date, in the Effective Date field.
- The code of bank, in the Bank field.
- The mode of sub payment for the transaction, in the Sub Payment Mode field.
- Batch Number
After you have specified the required details, click the Query button. All transactions with the specified details are retrieved and displayed in the lower portion of the screen.
Note
You can also retrieve the individual record detail from the detail screen by doing query in the following manner:-
- Press F7.
- Input the Instruction Type.
- Press F8.
You can perform Edit, Delete, Amend, Authorize, Reverse, Confirm operations by selecting from the Action list.
You can also search the record by using combination of % and alphanumeric value.
For example
You can search the record for Batch Number by using the combination of % and alphanumeric value as follows:-
- Search by A%: System will fetch all the records whose Instruction Type starts from Alphabet ‘A’. Ex: AGC17, AGVO6, AGC74 and so forth.
- Search by %7: System will fetch all the records whose Instruction Type ends by numeric value’ 7’. Ex: AGC17, GSD267, AGC77 and so forth.
- Search by %17%: System will fetch all the records whose Instruction Type contains the numeric value 17. Ex: GSD217, GSD172, AGC17 and so forth.
2.5.3 Editing Record
You can modify the details of a record that you have already entered into the system, provided it has not been subsequently authorized. You can perform this operation as follows:
- Invoke the EFT Setup Summary screen from the Browser.
- Select the status of the transaction that you want to retrieve for modification in the Authorized field. You can only modify records of transactions that are unauthorized. Accordingly, choose the unauthorized option from the drop down list.
- Specify any or all of the details of the records in the corresponding fields on the screen to retrieve the record that is to be modified. All unauthorized transactions with the specified details are retrieved and displayed in the lower portion of the screen.
- Double click the record that you want to modify in the list of displayed records. The EFT Setup Detail screen is displayed.
- Select Unlock Operation from Action list to modify the record. Modify the necessary information
- Click Save to save your changes. The EFT Setup Detail screen is closed and the changes made are reflected in the EFT Setup Summary screen.
2.5.4 Viewing Record
To view a transaction that you have previously entered, you must retrieve the same in the EFT Setup Summary screen, as follows:
- Invoke the EFT Setup Summary Screen from the Browser.
- Select the status of the record that you want to retrieve for viewing in the Authorization Status field. You can also view all transactions that are either unauthorized or authorized only, by choosing the Unauthorized / Authorized option.
- Specify any or all of the details of the record in the corresponding fields on the screen, and click ‘Search’ button. All records with the specified details are retrieved and displayed in the lower portion of the screen.
- Double click the record that you want to view in the list of displayed records, in the lower portion of the screen. The EFT Setup Detail screen is opened in view mode.
- Select Delete operation from the Action list. The system prompts you to confirm the deletion, and the record is deleted physically from the system database.
2.5.5 Authorizing Record
An unauthorized record must be authorized in the system for it to be processed.
To authorize a record you must first retrieve the same in the EFT Setup Summary screen.
- Invoke the EFT Setup Summary screen from the Browser.
- Select the status of the record that you want to retrieve for authorization. Typically, choose the unauthorized option from the drop down list.
- Specify any or all of the details of the record in the corresponding fields on the screen. Click ‘Search’ button. All transactions with the specified details that are pending authorization are retrieved and displayed in the lower portion of the screen.
- Double click the record that you wish to authorize. The EFT Setup screen is opened in view mode.
- Select Authorize operation from Action list.
- Select the A option in the Auth Reject Status field. Then click the Authorize Marked Records button to complete the authorization.
- To mark all retrieved records for authorization,
- In the retrieved list, specify the value of each transaction in the Transaction Value field.
- Click the Mark All for Authorize link.
- Click the Authorize Marked Records button to complete the authorization.
When the checker authorizes a transaction, details of validations, if any, that were overridden by the maker of the transaction during the Save operation, are displayed. If any of these overrides results in an error, the checker must reject the transaction.
2.5.6 Amending Record
After a record is authorized, it can be modified using the Unlock operation from Action list. To make changes to a record after authorization, you must invoke the Unlock operation which is termed as Amend Operation.
- Invoke the EFT Setup Summary screen from the Browser.
- Select the status of the record that you wish to retrieve for amendment. You can only amend records of transactions that are authorized.
- Specify any or all of the details of the record in the corresponding fields on the screen. All record with the specified details are retrieved and displayed in the lower portion of the screen.
- Double click the record that you want to amend. The EFT Setup screen will be displayed in Amendment mode. Click the Unlock operation from the Action list to amend the record.
- Amend the necessary information. Click the Save button to save your changes.
2.5.7 Authorizing Amended Record
An amended record must be authorized for the amendment to be made effective in the system.
Authorization of amended records can only be done from Fund Manager Module and Agency branch Module.
The process of authorization is subsequently the same as that for normal transactions.
2.5.8 Copying Attributes
If you want to create a new record having the same attributes of an existing record, you can copy the attributes of the existing record to the new record.
To copy the attributes of an existing record to a new record:
- Retrieve the record whose attributes the new record should inherit. You can retrieve the record through the Summary screen or through the F7 - F8 operation which are explained in the previous section.
- In the EFT Setup Detail screen, click on ‘Copy’ Action.
- Indicate the ID for the new record. You can however change the details of the new records if required.
2.6 Marking a Batch for Re-Export
Once a batch has been authorized, it cannot be generated again for the same instruction type, for the same date.
If the data is lost due to any reason, or the EFT file is misplaced, then you can re-export the same batch again. The saved data is exported again. You can use the Mark EFT Batch for Re-Export option in the Operation field, in the EFT Batch Maintenance (Summary) to do this.
Only batches that have been authorized and subsequently processed at least once can be marked for re-export.
To mark a batch for re-export in the EFT Batch Maintenance Summary screen,
- Select Mark for Re-Export in the Operation field.
- Retrieve the batch that you must re-export. Specify the appropriate search criteria, and retrieve the batch.
- When you have successfully retrieved the batch, the details of the batch are displayed in the grid portion of the screen. The following details are displayed for the batch:
- The Batch ID and description
- The Process Date and the Effective Date for the batch
- The count of the number of link settlements for the batch
- To mark a batch for re-export, check the Re-Export check box in the row corresponding to the batch in the grid.
- Similarly, mark as many batches as required, for Re-Export
- When you have finished, choose the Save option from the File menu or click the Save button to save the marked batches.
2.7 Payment Clearing Screen
This section contains the following topics:
- Section 2.7.1, "Invoking the Payment Clearing Detail Screen"
- Section 2.7.2, "Fields in Payment Clearing Screen"
2.7.1 Invoking the Payment Clearing Detail Screen
In an exported EFT batch file, if the external clearing bureau directs that some settlements must be reconciled in the system, you can use the ‘Payment Clearing Detail’ screen to do this. You can invoke this screen by typing ‘UTDPYCLR’ in the field at the top right corner of the Application tool bar and clicking on the adjoining arrow button. Select ‘New’ from the Actions menu in the Application tool bar or click new icon to enter the details of the Payment Clearing screen.
![]()
2.7.2 Fields in Payment Clearing Screen
The following are the fields in the Payment Clearing Screen:
- Level
- AMC Distributor
- Fund ID
- ISIN Code
- Payment Mode
- Specific Number
- Date Range
- From
- To
Payment Clearing
The following are the fields under Payment clearing section:
- Transaction Number
- Txn Dtl
- Payment Mode Description
- Payment Details
- Clearing Date
- Clearing Status
- Drawee Bank Name
- Pledgee Branch
- Txn Base Currency
- Instrument Status
- Remarks
- Sys Reference Number
- Check Status
- Clearing Level
- Auth Status
- Maker ID
- Maker DT Stamp
- Checker ID
- Checker DT Stamp
2.8 Payment Clearing Summary Screen
This section contains the following topics:
- Section 2.8.1, "Invoking the Payment Clearing Summary Screen"
- Section 2.8.2, "Retrieving Record in Payment Clearing Summary Screens"
- Section 2.8.3, "Editing Transaction"
- Section 2.8.4, "Viewing Transaction"
- Section 2.8.5, "Deleting Transaction"
- Section 2.8.6, "Authorizing Transaction"
- Section 2.8.7, "Amending Transaction"
- Section 2.8.8, "Authorizing Amended Transactions"
- Section 2.8.8, "Authorizing Amended Transactions"
- Section 2.8.10, "To Clear or Reject Settlement"
2.8.1 Invoking the Payment Clearing Summary Screen
You can invoke the ‘Payment Clearing Summary’ screen by typing ‘UTSPYCLR’ in the field at the top right corner of the Application tool bar and clicking on the adjoining arrow button.
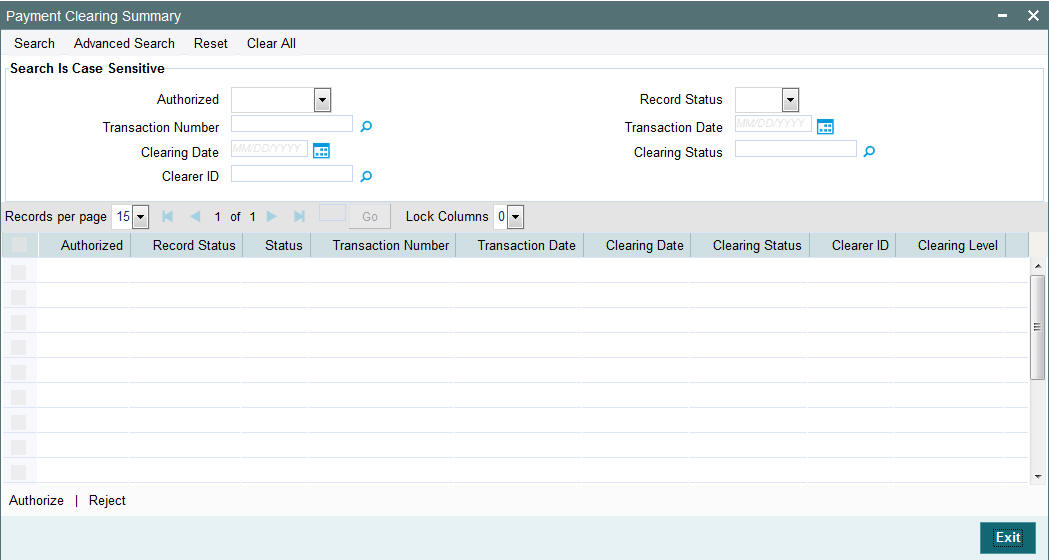
2.8.2 Retrieving Record in Payment Clearing Summary Screens
You can retrieve a previously entered transaction in the Summary screen, as follows:
- In the browser, select Payment Clearing screen and click on Summary,
specify any or all of the following details in the corresponding fields:
- The status of the transaction in the Authorized field. If you choose the “Blank Space” option, then all transactions are retrieved.
- The status of the Transaction in the Record Status field. If you choose the “Blank Space” option, then all transactions are retrieved
- The number of the transaction, in the Transaction Number field.
- The dates of the transaction, in the Transaction Date field.
- The date of clearing, in the Clearing Date field.
- The status of clearing, in the Clearing Status field.
- The ID of the clearer, in the ClearerID field.
After you have specified the required details, click ‘Search’ button. All transactions with the specified details are retrieved and displayed in the lower portion of the screen.
Note
You can also retrieve the individual record detail from the detail screen by doing query in the following manner:
- Press F7.
- Input the Transaction Number.
- Press F8.
You can perform Edit, Delete, Amend, Authorize, Reverse, Confirm operation by selecting from the Action list.
You can also search the record by using combination of % and alphanumeric value.
For example
You can search the record for Transaction Number by using the combination of % and alphanumeric value as follows:-
- Search by A%: The system will fetch all the records whose Transaction Number starts from Alphabet ‘A’. Ex: AGC17, AGVO6, AGC74 and so forth.
- Search by %7: The system will fetch all the records whose Transaction Number ends by numeric value’ 7’. Ex: AGC17, GSD267, AGC77 and so forth.
- Search by %17%: The system will fetch all the records whose Transaction Number contains the numeric value 17. Ex: GSD217, GSD172, AGC17 and so forth.
2.8.3 Editing Transaction
You can modify the details of a transaction that you have already entered into the system, provided it has not been subsequently authorized. You can perform this operation as follows:
- Invoke the Payment Clearing screen from the Browser.
- Select the status of the transaction that you want to retrieve for modification in the Authorization Status field. You can only modify records of transactions that are unauthorized. Accordingly, choose the unauthorized option from the drop down list.
- Specify any or all of the details of the transaction in the corresponding fields on the screen to retrieve the transaction that is to be modified. All unauthorized transactions with the specified details are retrieved and displayed in the lower portion of the screen.
- Double click the record that you want to modify in the list of displayed transactions. The Payment Clearing Detail screen is displayed.
- Select Unlock Operation from Action list to modify the record. Modify the necessary information
- Click Save to save your changes. The Transaction Detail screen is closed and the changes made are reflected in the Transaction Summary screen.
2.8.4 Viewing Transaction
To view a transaction that you have previously entered, you must retrieve the same in the Payment Clearing Summary screen, as follows:
- Invoke the Payment Clearing Summary Screen from the Browser.
- Select the status of the transaction that you want to retrieve for viewing in the Authorization Status field. You can also view all transactions that are either unauthorized or authorized only, by choosing the Unauthorized / Authorized option.
- Specify any or all of the details of the transaction in the corresponding fields on the screen, and click ‘Search’ button. All transactions with the specified details are retrieved and displayed in the lower portion of the screen.
- Double click the transaction that you want to view in the list of displayed transactions, in the lower portion of the screen. The Payment Clearing Detail screen is opened in view mode.
2.8.5 Deleting Transaction
You can delete only unauthorized transactions in the system.
To delete a transaction that you have previously entered, you must retrieve the same in the Payment Clearing Summary screen, as follows:
- Invoke the Payment Clearing Summary screen from the browser.
- Select the status of the transaction that you want to retrieve for deletion.
- Specify any or all of the details of the transaction in the corresponding fields on the screen, and click ‘Search’ button. All transactions with the specified details are retrieved and displayed in the lower portion of the screen.
- Double click the transaction that you want to delete in the list of displayed transactions, in the lower portion of the screen. The Payment Clearing Detail screen is opened in view mode.
- Select Delete operation from the Action list. The system prompts you to confirm the deletion, and the record is deleted physically from the system database.
2.8.6 Authorizing Transaction
An unauthorized transaction must be authorized in the system for it to be processed.
To authorize a transaction, you must first retrieve the same in the Payment Clearing Summary screen.
- Invoke the Payment Clearing Summary screen from the Browser.
- Select the status of the transaction that you want to retrieve for authorization. Typically, choose the unauthorized option from the drop down list.
- Specify any or all of the details of the transaction in the corresponding fields on the screen. Click ‘Search’ button. All transactions with the specified details that are pending authorization are retrieved and displayed in the lower portion of the screen.
- Double click the transaction that you wish to authorize. The Payment Clearing screen is opened in view mode.
- Select Authorize operation from Action list.
When the checker authorizes a transaction, details of validations, if any, that were overridden by the maker of the transaction during the Save operation, are displayed. If any of these overrides results in an error, the checker must reject the transaction.
2.8.7 Amending Transaction
After a transaction is authorized, it can be modified using the Unlock operation from Action list. To make changes to a transaction after authorization, you must invoke the Unlock operation which is termed as Amend Operation.
- Invoke the Payment Clearing Summary screen from the Browser.
- Select the status of the transaction that you wish to retrieve for amendment. You can only amend records of transactions that are authorized.
- Specify any or all of the details of the transaction in the corresponding fields on the screen. All transactions with the specified details are retrieved and displayed in the lower portion of the screen.
- Double click the transaction that you want to amend. The Transaction screen will be displayed in Amendment mode. Click the Unlock operation from the Action list to amend the transaction.
- Amend the necessary information. Click the Save button to save your changes.
2.8.8 Authorizing Amended Transactions
- An amended transaction must be authorized for the amendment to be made effective in the system.
- Authorization of amended transactions can only be done from Fund Manager Module and Agency branch Module.
2.8.9 Copying Attributes
If you want to create a new transaction having the same attributes of an existing transaction, you can copy the attributes of the existing transaction to the new transaction.
To copy the attributes of an existing transaction to a new transaction:
- Retrieve the transaction whose attributes the new transaction should inherit. You can retrieve the transaction through the Payment Clearing Summary screen or through the F7 F8 operation which are explained in the previous section.
- In the Payment Clearing Detail screen, click on ‘Copy’ Action.
- Indicate the ID for the new transaction. You can however change the details of the new transactions if required.
2.8.10 To Clear or Reject Settlement
- In the Payment Clearing screen, select the Transaction option in the Level field.
- In the Payment Mode field, select the Link Settlement Number option. You must key in the link settlement number for the settlement that you want to clear or reject in the Specific Number field.
- Click the Show button to retrieve all the transactions that are to
be settled together for the specified Link Settlement Number. The system
retrieves the details for these transactions and displays the same in
the lower grid portion of the screen. The following details are displayed
for each transaction:
- The Transaction Number
- The Txn Dtl
- The Payment Mode Description
- The Payment Details
- The transfer account details (the Bank Name, Branch Name, Account Type, Account Number, Account Currency and Account Name)
- The clearing instrument number
- You must specify the clearing date for the settlement in the Clearing Date field. In the case of link settlement numbers, all the transactions must be cleared together or rejected together. Individual transactions cannot be cleared or rejected in isolation. Therefore, you must specify the clearing dates for all the transactions together
- After you have specified the clearing dates for all the transactions, select the Clear All option to mark all the transactions for clearing, or the Reject All option, to mark all the transactions for rejection.
- Click the Save button to actually effect the clearance of the settlement.