4. Product
Each of the Life and Endowment Products that the Life and Endowment Company provides to the Policy Holders must be defined in the Oracle FLEXCUBE Investor Servicing (FCIS) system. The Policy Holders buy policies in any of these products depending upon their need and requirements.
Note
Products can be defined through the Fund Manager component only.
The Product Maintenance screen allows you to capture the generic characteristics of the Product you wish to maintain. The next section gives you step-by-step instructions to do the same.
This chapter contains the following sections:
- Section 4.1, "Product Definition"
- Section 4.2, "Product Summary Screen"
- Section 4.3, "Product and Transaction Sub Type"
- Section 4.4, "Product Transaction Sub Type Mapping Summary"
4.1 Product Definition
This section contains the following topics:
- Section 4.1.1, "Creating and Saving Product"
- Section 4.1.2, "Invoking Screen"
- Section 4.1.3, "Product Details Tab"
- Section 4.1.4, "Additional Investments Tab"
- Section 4.1.5, "Bank Details Tab"
- Section 4.1.6, "Withdrawal Tab "
- Section 4.1.7, "Portfolio Mapping Tab"
- Section 4.1.8, "Premium and Annuity Details Tab"
- Section 4.1.9, "Loan and Funding Details Tab"
- Section 4.1.10, "Income Distribution Rule Tab"
- Section 4.1.11, "Transaction Currency Tab"
- Section 4.1.12, "FATCA Information Tab"
4.1.1 Creating and Saving Product
The following are the steps you need to follow to define a Product. Each of these steps is explained in detail in subsequent sections.
- Invoke the Product Maintenance screen.
- Enter information in the Product Maintenance screen.
- Save the information entered.
4.1.2 Invoking Screen
Invoke the ‘Product Maintenance Detail’ screen by typing ‘LEDPROD’ in the field at the top right corner of the Application tool bar and clicking on the adjoining arrow button.
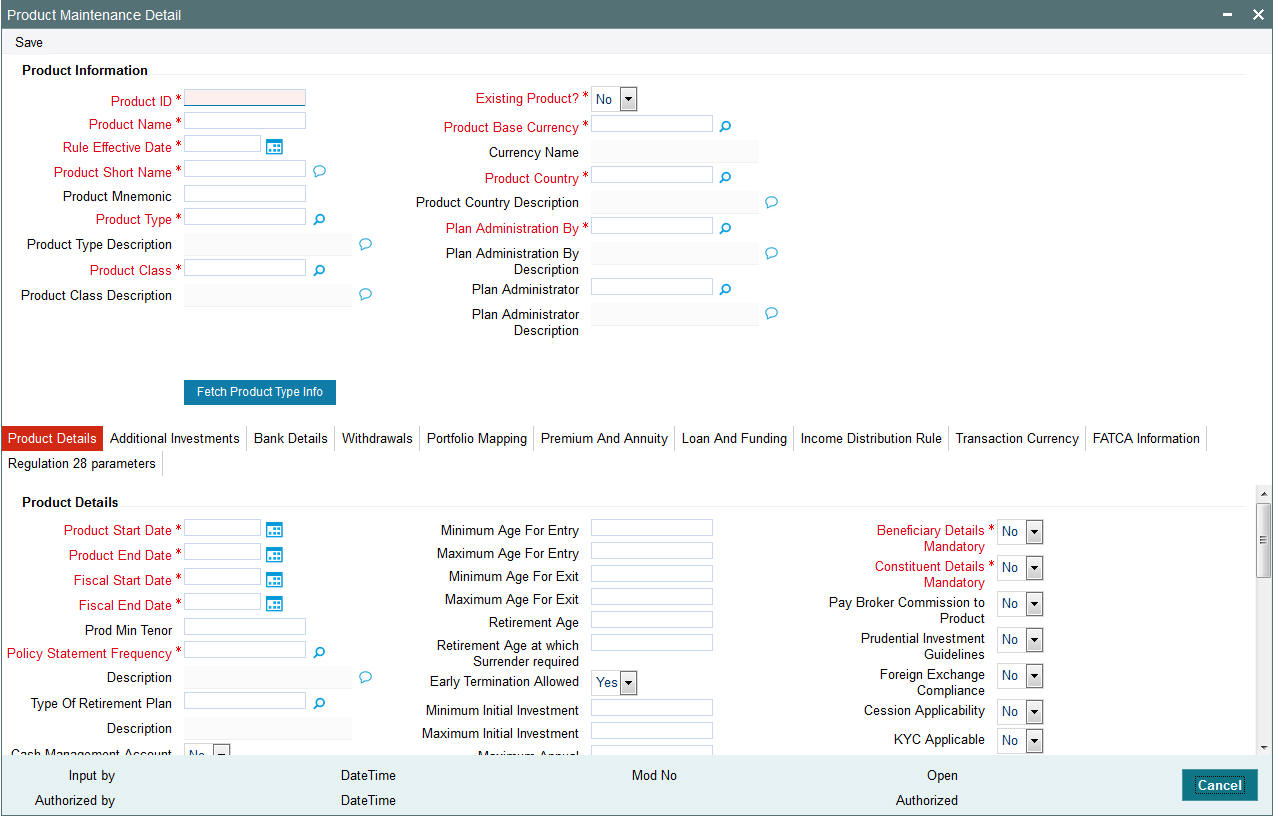
Select ‘New’ from the Actions menu in the Application tool bar or click new icon to enter the details of the Product.
Product Information Section
Product ID
10 Characters Maximum, Alphanumeric, Mandatory
Specify a unique identification for the product that is being defined through this screen. This identification will be used whenever subsequent reference is made to this product in the system. The ID you enter can contain a maximum of 4 characters.
Product Name
60 Characters Maximum, Alphanumeric, Mandatory
Give the Product ID a description which will help you identify the same easily.
Product Short Name
20 Characters Maximum, Alphanumeric, Mandatory
Specify a short name for the product.
Product Mnemonic
10 Characters Maximum, Alphanumeric, Mandatory
Specify a mnemonic for the product. The mnemonic is typically used as an identifier to run queries or to generate reports regarding the product.
Product Type
Mandatory
The various Product Types you have already maintained through the Product Type Maintenance screen will be available for selection in the option list. Select the Product Type that is applicable to the Product.
Product Class
Mandatory
The Product Classes that you have specified through the System Parameters screen will be available for selection in the option list.
Rule Effective Date (dd/MM/yyyy)
Mandatory
Specify the date from which the Product profile definition will become effective for all transactions in this product.
By default, this date is displayed as the next working day in the system.
Product Country
Mandatory
Select the country where the product will operate, from the options provided in the option list. When the system computes the withholding tax applicable on annuity payments in this Product, the base country information that is specified here is taken into consideration.
Product Base Currency
Mandatory
Select the currency that the Product will use, from the options provided in the option list. The currency that you choose for the product will be the reference currency for all the fields identified as part of the Product.
Existing Product?
Mandatory
Select ‘Yes’ to indicate that the product is an existing product. For an existing product, the Product Start Date is earlier than the application date. If any existing business products need to be entered into the system, this field facilitates easy conversion of the same.
Plan Administration By
Mandatory
Select the entity that will administer the plan. The option list includes all the options that you have maintained in the System Parameters Maintenance screen for the Parameter Code POLICYCODE.
Refer to the chapter ‘Maintaining System Parameters’ in the ‘Security’ User Manual for further information on the System Parameters Maintenance.
Plan Administrator
Mandatory
Select the administrator for the entity that you have chosen. The option list includes all the entities that you have maintained in the Single Entity Maintenance screen.
Refer to the chapter ‘Maintaining Reference Information’ in the ‘Reference Information’ User Manual for further information on the Single Entity Maintenance screen.
WHT Applicable
Mandatory
Select the option to indicate withholding tax needs to be calculated on the reinvested income from the policies in this Product. The options in the drop-down are as follows:
- ReInvestment
- Divident Payout
- ReInv&Divid
- ReInv&Annuity
- Annuity&Divid
- ReInvestment&Divident&Annuity
4.1.3 Product Details Tab
Click ‘Product Details’ tab to enter the details.
Product Start Date (dd/MM/yyyy)
Date Format, Mandatory
Specify the date on and beyond which the Product is available for transactions by the Policy Holders.
Note
This date must not be earlier than the Application Date, except if the Product is an existing one.
Product End Date (dd/MM/yyyy)
Date Format, Mandatory
Specify the date on and beyond which the Product is not available for transactions by the Policy Holders.
Note
This date must not be earlier than the Application Date and the Maturity Date of a policy.
Prod Min Tenor
Mandatory and Enabled only if Maturity Date Basis for Product Type is ‘Minimum Tenor’
Specify the minimum age for policies in this Product, in terms of number of years. The age, in number of years, is referred to as the ‘term’ of the Product, and is considered from the Start Date of the Product.
Note
This field will be enabled only if you have selected the option ‘Minimum Tenor’ against the field ‘Maturity Date Basis’ for the Product Type, in the Product Type Maintenance screen.
Retirement Age
Mandatory and Enabled only if Maturity Date Basis for Product Type is ‘Retirement Age’
Specify the age that will be considered as retirement age for Policy Holders under this product. After this age, the Policy Holders with policies in this Product will become eligible for retirement benefits, if any.
This field will be enabled only if, for the Product Type, in the Product Type Maintenance screen:
- You have selected the option ‘Yes’ against the field ‘Retirement Features Supported?’
- You have selected the option ‘Retirement Age’ against the field ‘Maturity Date Basis’
Minimum Age for Entry
Numeric, Optional
The minimum age before which a Policy Holder cannot subscribe to a policy under a Product of this Product Type, will be displayed.
Maximum Age for Entry
Numeric, Optional
Specify the maximum age after which a Policy Holder cannot subscribe to a policy under a Product of this Product Type.
Minimum Age for Exit
Numeric, Optional
Specify the minimum age before which a Policy Holder cannot close a policy under a Product of this Product Type.
Maximum Age for Exit
Numeric, Optional
Specify the maximum age after which a Policy Holder is not allowed to have holdings in the Product.
Note
The age limits that you have specified for the Product Type through the Product Type Maintenance screen will be displayed in the above fields. You will be allowed to change the same for a Product if, for the Product Type, you have selected the option Override Age Limit.
Minimum Initial Investment
Numeric, Optional
Specify the minimum amount that a Policy Holder has to contribute to hold a policy in this Product at the time of policy creation.
Maximum Initial Investment
Numeric, Optional
Specify the maximum amount that a Policy Holder can invest while making an initial investment in a policy in this Product.
Note
The Policy Holder can top up the policy later if additional investment is allowed for the Product. The same can be indicated through the screen that is invoked when you click on the Additional Investments link. The same is explained in subsequent sections.
Tax Deductible Contributions Allowed?
Mandatory
This field will be enabled only if, for the Product, you have selected the option IRA Enabled. Select ‘Yes’ to indicate tax deductible contributions are allowed for the IRA Product.
Maximum Annual Contribution
This field is locked for non retirement products.
Early Termination Allowed?
Optional
A policy in a Product can be terminated earlier than the Maturity Date of the Product. Select ‘Yes’ if such a termination is desired to be applied to policies in this Product.
Policy Statement Frequency
Mandatory
Specify the frequency at which policy statements must be generated for a Policy Holder who has subscribed to a policy in this Product.
Fiscal Start Date
Mandatory
Specify the date on which the fiscal year begins.
Fiscal End Date
Mandatory
Specify the date on which the fiscal year ends.
Type of Retirement Plan
Optional
Select the type of IRA.
Note
This field will be applicable to those Product Types for which you have selected the option ‘Yes” against the field ‘IRA Applicable’.
Retirement Age at which Surrender required
Optional
Specify the age at which the Policy Holder must surrender the policy.
Prod Remarks
Optional
You may enter remarks on the Product, if necessary.
WAC Method
Optional
Select the WAC method from the drop-down list. The list displays the following values:
- Regular WAC
- Life WAC
Reinvest IRA Income?
Optional
Select the option ‘Yes’ to indicate the income from IRA Plan is to be reinvested in the same plan. Select the option ‘No’ to indicate the income is to be paid out to the Policy Holder.
Note
This field will be applicable to those Product Types for which you have selected the option ‘Yes’ against the field ‘IRA Applicable’.
Beneficiary Details Mandatory
Mandatory
This field will by default be checked. During product amendment system checks if there are any policies associated to the product in which case you will not be allowed to uncheck this option.
Note
If this option is checked it is mandatory to specify beneficiary details in the policy maintenance screen.
Pay Broker Commission to product
Optional
Select ‘Yes’ if pay broker commission is set to the product.
CGT Applicable
Mandatory
Select ‘Yes’ if CGT is applicable.
Constituent Details Mandatory
Mandatory
If you select ‘Yes’, it is mandatory to specify constituent details in the ‘Policy Maintenance’ screen.
Auto Clear Prov Bal
Indicate whether 100% outflow transactions based on the product should include provisionally allotted units. You can specify any of the following options:
- Option not allowed: Provisionally allotted units should not be considered while processing 100% outflow transactions.
- Allowed – Default checked: Provisionally allotted units should be considered while processing 100% outflow transactions by default.
- Allowed – Default unchecked: Provisionally allotted units will not be considered while processing 100% outflow transactions by default. However, you can check this option while performing transactions.
Generate Redemption for CGT
Mandatory
Select ‘Yes’ to generate redemption for CGT.
KYC Applicable
Mandatory
If you select ‘Yes’, the transaction limit will be checked at the time of capture of Policy Transactions.
Note
System level existing workflow of KYC would still be applicable irrespective of the status selected
Auto Clear Reinvestments
Mandatory
Indicate whether 100% outflow transactions based on the product should include freeze held and reinvestment units. You can specify any of the following options:
- Option not allowed: Freeze held/reinvestment units should not be considered while processing 100% outflow transactions.
- Allowed – Default checked: Freeze held/reinvestment units should be considered while processing 100% outflow transactions by default.
- Allowed – Default unchecked: Freeze held/reinvestment units will not be considered while processing 100% outflow transactions by default. However, you can check this option while performing transactions.
Foreign Exchange Compliance
Optional
Indicate if you are defining rules for Foreign exchange compliance.
You can define rules by selecting either Prudential Investment Guidelines or Foreign Exchange Compliance. The rules are defined on the number of investment components available or also a combination of these investment components. There is no restriction placed on the number of components which can be selected to define a rule.
For example you can specify two components for a rule; for a rule sequence 1, you can define two components, with a threshold percentage within 0-100 =
Rule ID |
Description |
Components selected for the rule |
Operator (<, >, ≤, ≥, =) |
Threshold percentage (0 – 100%) |
Rule1 |
PIG Compliance-Total Cash |
CA1; CA2 |
≤ |
100 |
Rule 2 |
FOREXCOMPLIANCE |
CA2; EQ2; PR2 |
≤ |
15 |
Cession Applicability
Optional
Indicate whether you want to allow policies associated with this product for policy cession maintenance.
Refer to the chapter “Policy Cession Maintenance” in the LEP User Manual for details.
ROA Applicable
Optional
Indicate whether a Rate of accumulation is applicable for a product.
The initial administrator and broker will use the market value at policy level to derive the fee return value. the Fee is calculated based on the gross amount of the individual transaction value.
For an ROA function to be applicable, a cumulative load would be setup and mapped in the Load Product.
CGT Reporting Currency
Optional
Specify the currency in which the capital gains and capital gains tax amount should be reported. The capital gains and capital gains tax amount, which is computed at the fund level in the fund base currency, will be converted in terms of the reporting currency using the default exchange rate. If you do not maintain a reporting currency, the system will convert the capital gains and capital gains tax amount only in terms of the product and policy base currency.
Prudential Investment Guidelines
Indicate if you need to define the rules for Prudential Investment guidelines. You can either select Prudential Investment Guidelines or Foreign Exchange compliance.
Include Current TXN for ROA
Specify whether the current transaction should be considered for calculating ROA.
Include Switches for ROA
Indicate whether switch transactions affect ROA computation.
ROA Computation Method
Select the appropriate method to calculate the right of accumulation from the option list. The ROA may be calculated on the basis of:
- Amount invested in the policy by the policy holder
- Holdings of the customer as on that date
- Holdings subscription price as on that date
- The current days transaction value
Include Reinvestments for ROA
Indicate whether the reinvestments affect the ROA calculation.
Cash Management Account Applicability
Select ‘Yes’ if you want to make the Cash Management Account feature available in this product, else select ‘No’.
If you have chosen this option, you need to also specify your choices for CMA Fund, Restrict CMA for Initial Investments and Redeem Periodic Fee from CMA Fund. This lays the rules for the operation of the CMA Fund.
CMA Fund
Specify a fund to be the CMA fund. You can select from the option list.
Restrict CMA for Initial Investments
Select ‘Yes’ if you wish to restrict initial investments for the CMA Fund. Else select ‘No’.
Redeem Periodic Fee from CMA Fund
Select ‘Yes’ if you want the system to treat the specified CMA fund, as the preferred fund for periodic fee redemptions. Else select ‘No’.
If you have chosen this option, then system would treat CMA Fund as preferred fund for periodic fee redemptions, provided no preferred fund is selected at Policy Level.
Refer the section ‘Annexure for CMA’ in the chapter ‘Policy’ in this User Manual for details on the operation of Cash Management Account.
4.1.4 Additional Investments Tab
Click ‘Additional Inv’ tab to enter the details.
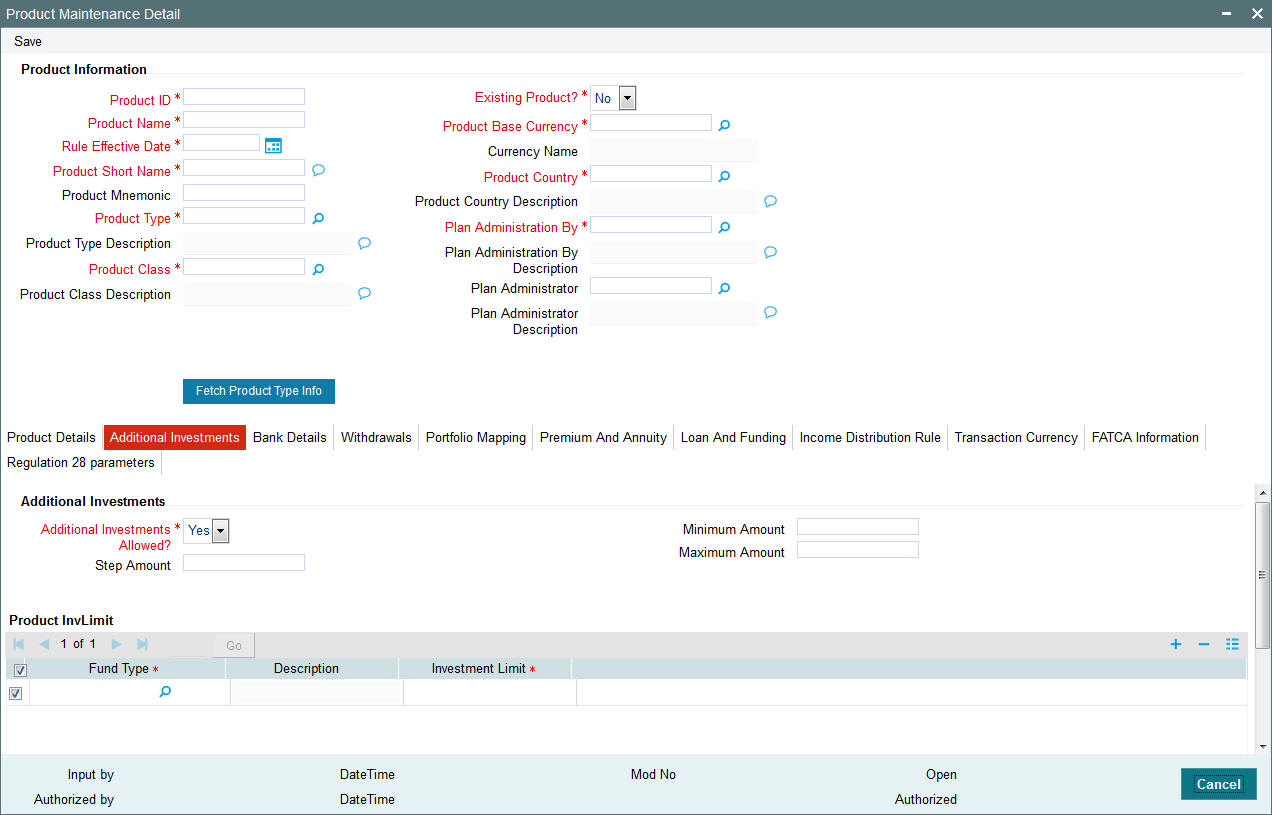
Additional Investments Section
Additional Investments Allowed?
Mandatory
Select this option to indicate the Policy Holder can make an additional investment in a policy in this product.
Note
The other fields in this screen will be enabled only if you select this option.
Minimum Amount
Mandatory
Specify the minimum additional investment amount.
Maximum Amount
Mandatory
Specify the maximum amount to which an additional investment can be made.
Step Amount
Numeric, Optional
Enter a value that indicates the steps of initial investment amount in which a Policy Holder can invest to subscribe to a policy in this Product.
For example, it could be that some products support only steps of 500 currency units while some other will support steps of 100 currency units.
Product InvLimit Section
In the Investment Limit section, you can enter information in the following fields:
Fund Type
Mandatory
Select the funds from the option list in which the Policy Holder can make an additional investment.
You can specify the details of more than one fund by clicking add icon, which adds a field wherein you can choose another fund.
Investment Limit
Mandatory
For each fund, specify the ratio in which the additional investment is allowed to be made.
Note
- The sum total of the ratio you enter, should add up to 100.
- When a Policy Holder makes an additional investment in a policy, the system will calculate the holding in the funds belonging to the fund type for which you have specified an investment limit. If the current holdings plus the new investment exceed the investment limit you have specified, the system will not allow the Policy Holder to make an additional investment in funds belonging to this fund type.
4.1.5 Bank Details Tab
In certain cases, the proceeds of payments such as collection of management fees, surrender at a policy level to handle exceptional situations like death, and so on, may need to be made to a default product bank account and not to the Policy Holder bank account. Several bank accounts can be associated with a product.
Note
This section is mandatory. You will have to enter information in all fields.
Click ‘Bank Det’ tab to enter the details.
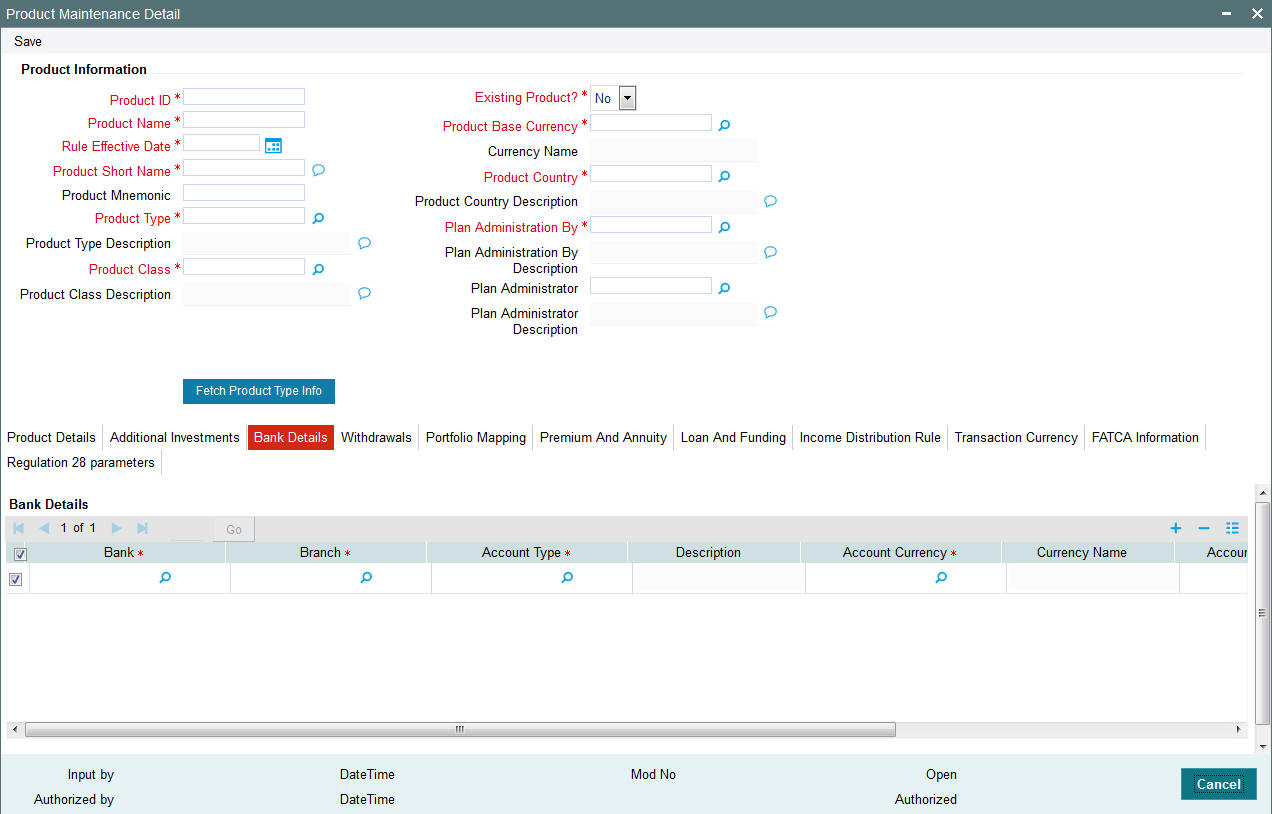
Bank Details Section
Bank
Mandatory
Select the name of the bank where the Product account resides, from the option list.
Branch
Mandatory
Select the name of the branch of the bank where the Product account resides, from the option list.
Account Type
Mandatory
Select the type of the Product account from the option list.
Account Currency
Mandatory
Select the currency of the Product account from the option list.
Account Number
Mandatory
Specify the account number of the Product account.
Default Bank
Mandatory
Select this option to indicate this is the default bank account. You will need to specify one default bank account for every currency.
Note
You can specify the details of more than one bank by clicking add icon, which adds a field wherein you can choose another bank.
IBAN
36 Characters Only; Alphanumeric; Optional
Specify the IBAN (International Bank Account Number) of the account holder.
4.1.6 Withdrawal Tab
The information you enter in this screen will be applicable only for the minimum tenor that you have specified in the ‘Product Maintenance’ screen. Once the policy has matured, these details will not be valid.
Click ‘WithDrawals’ tab to enter the details.
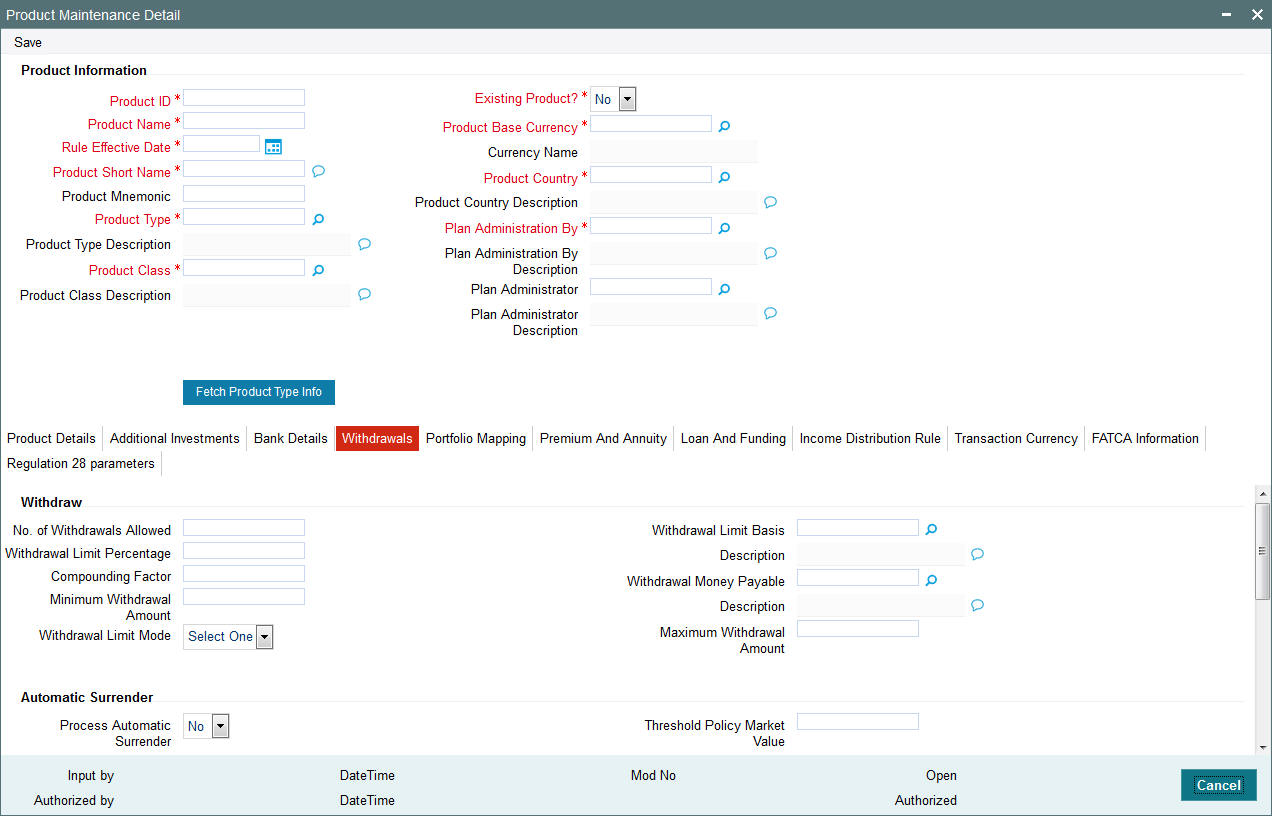
Withdraw Section
No. of Withdrawals Allowed
Optional
Specify the number of partial surrender transactions that can be performed by the Policy Holder during the tenor of the policy. You have to mention the number above zero to select the applicable transaction sub types.
Withdrawal Limit Mode
Optional
Select the option ‘Percentage’ to indicate the withdrawal details will be specified in terms of the percentage of holdings. Select the option ‘Amount’ to indicate the withdrawal details will be specified in terms of the withdrawal amount.
Withdrawal Limit Percentage
Optional
This field will be enabled if you have specified the Withdrawal Limit Mode as Percentage. Specify the maximum percentage of holdings that the Policy Holder is allowed to withdraw.
Withdrawal Limit Basis
Optional
This field will be enabled if you have specified the Withdrawal Limit Mode as Percentage. Specify the applicability of the withdrawal percentage. The percentage you have specified might apply to the Contribution Amount, Compounded Contribution or Market Value.
Minimum Withdrawal Amount
Optional
This field will be enabled if you have specified the Withdrawal Limit Mode as Amount. Specify the minimum amount that a Policy Holder can be withdraw from the holdings.
Maximum Withdrawal Amount
Optional
This field will be enabled if you have specified the Withdrawal Limit Mode as Amount. Specify the maximum amount that a Policy Holder can be withdraw from the holdings.
Compounding Factor
Optional
This field will be enabled if you have specified the Withdrawal Limit Mode as Percentage and the Withdrawal Limit Basis as Compounded Contribution. Specify the compounding factor to be used in calculations.
Withdrawal Money Payable
Optional
Specify whether the withdrawal money is payable to the customer, administrator or product account.
Automatic Surrender Section
Process Automatic Surrender
Indicate whether a policy should be automatically surrendered if the market value of the policy goes below a threshold amount. Consequently, when you do surrender, by default, the money will be transferred to the unitholder's bank account. But, here, the money will be transferred to the bank account of the product and not to the unitholder.
Threshold Policy Market Value
You will be allowed to enter the threshold policy market value, if you have selected ‘Yes’ for Automatic Surrender. If the policy market value reaches less than the amount that you specify here, the system will automatically trigger a 100% policy withdrawal transaction.
Adjustment Transaction Sub Types Section
Specify the applicable transaction sub types for the adjustment withdrawal. If you do not specify it, then all outflow transactions would affect withdrawal counter at policy level.
Available Transaction Sub Types
Mandatory
The transaction sub types in the column ‘Applicable AdjTxn Type' are the transactions that can be mapped to this withdrawal.
You can add the transaction sub types by clicking add icon.
4.1.7 Portfolio Mapping Tab
You will need to maintain the Product Portfolio details. A Product Portfolio contains the funds that are mapped to the Product and available to customers for investing when they take a policy in that Product.
Note
This section is mandatory. You will have to enter information in all fields.
Click ‘PortFolio Mapping’ tab to enter the details.
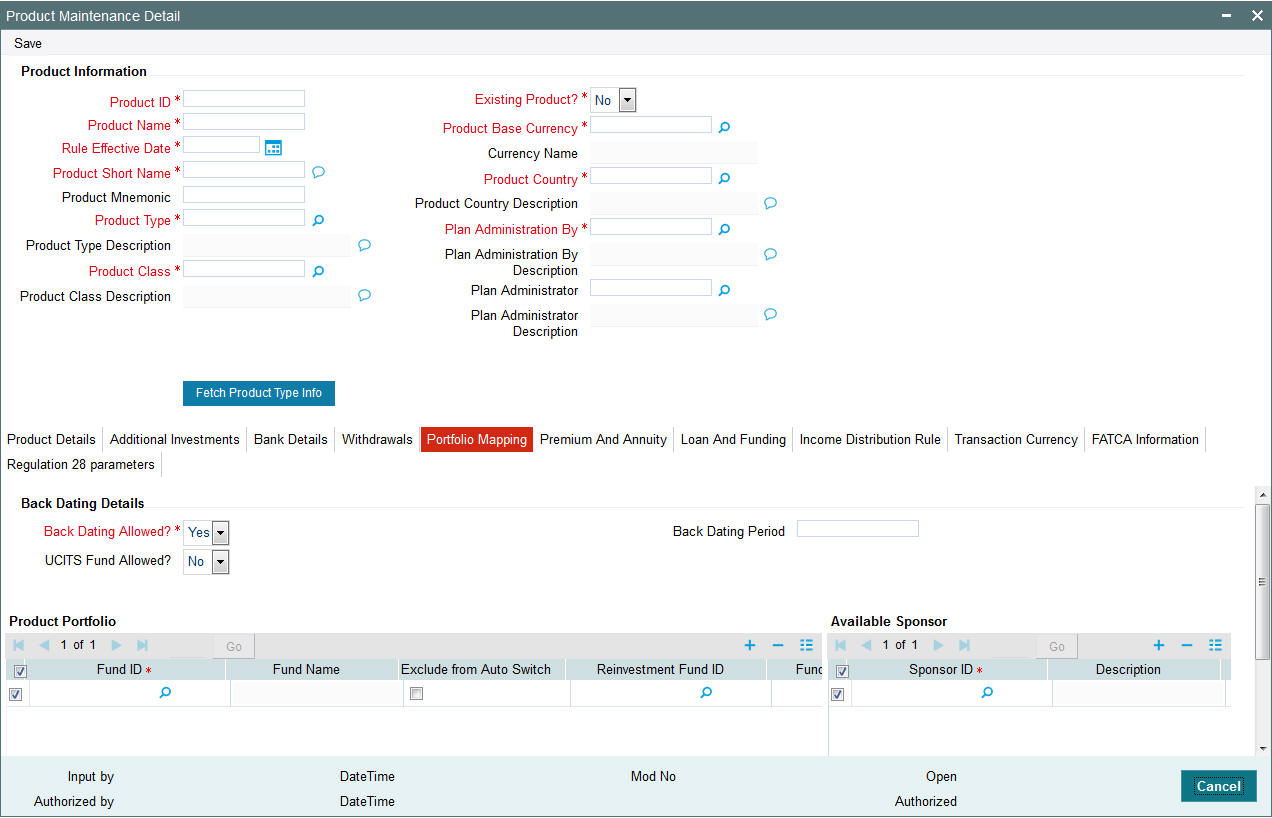
BackDating Details Section
BackDating Allowed?
Mandatory
Select this option to indicate back dating is allowed for transactions carried out for policies under this product. You will be allowed to change this option for a fund under the product.
BackDating Period
Optional
This field will be enabled if you have specified that back dating is allowed for transactions under this product. Specify the number of days by which the transaction can be back dated.
UCITS Allowed?
Select if UCITS is allowed or not from the adjoining drop-down list. Following are the options available:
- Yes
- No
If you select ‘Yes’, during the portfolio mapping, you can select UCITS funds as part of portfolio. If you select ‘No’, then during portfolio mapping, the system will not allow you to select a UCITS fund. The system will display the following error message:
The product does not allow UCITS funds
Once the product is authorised ‘UCITS Fund’ field is non amendable.
Available Sponsor Section
You can add the ‘Sponsor ID’ by selecting the values from the option list.
Product Port Folio Section
You can add the ‘Fund ID’ and ‘Reinvestment Fund ID’ by selecting the values from the option list. The Fund Name of the selected Fund ID is displayed in the ‘Fund Name’ field.
Note
During modify operation, if you remove the funds from the existing product portfolio, then the system displays an override message as ‘Funds removed from the product are (list of funds).
4.1.8 Premium and Annuity Details Tab
You will be able to see this link only if you have chosen a product type for which the option ‘Premium and Annuity Applicable?’ is set to ‘Yes’.
Click ‘Premium & Annuity’ tab to enter the details.
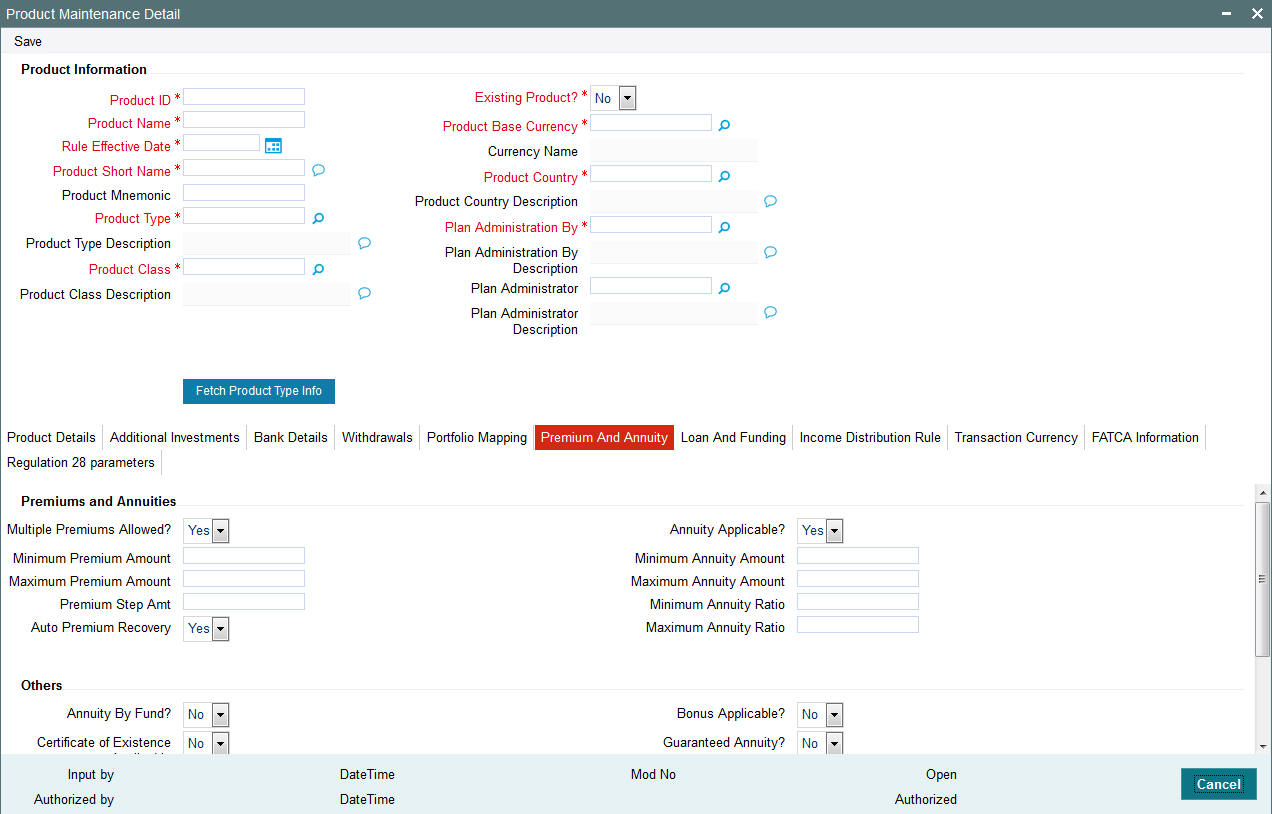
Premiums and Annuities Section
Multiple Premiums Allowed?
Mandatory
You can select ‘Yes’ if multiple premiums are allowed on the Product.
Auto Premium Recovery
Mandatory
If you select ‘Yes’, the system will automatically generate all pending premium transactions if one of the following cases is applicable:
- The premium payment that has stopped, becomes ‘Active’ again
- Premium payments are not made, the status of the same is marked ‘PUP’ by the AMC. Once the premium payment is made, the AMC changes the status to ‘Active’
If you select ‘No’, then no pending premium transactions are generated.
Minimum Premium Amount
Mandatory
Specify the minimum premium amount that the Policy Holder needs to pay.
Maximum Premium Amount
Mandatory
Specify the maximum premium amount that the Policy Holder needs to pay.
Premium Step Amount
Mandatory
Specify the step amount for payment of premium. The premium amount will be a multiple of the step amount.
Annuity Applicable?
Mandatory
An annuity is a deferred payment made to the Policy Holder over a period, for lump-sum payments or premium payments received from the Policy Holder. You can select ‘Yes’ if annuities are applicable to this product.
Note
The next few fields Minimum Annuity Amount, Maximum Annuity Amount, Minimum Annuity Ratio and Maximum Annuity Ratio are enabled only if you have selected the option ‘Annuity Applicable?’
Minimum Annuity Amount
Mandatory
Specify the minimum amount to be paid out as annuity to the Policy Holder for any policy in the Product.
Maximum Annuity Amount
Mandatory
Specify the maximum amount allowed to be paid out as annuity to the Policy Holder for any policy in this Product.
Minimum Annuity Ratio
Mandatory
Specify the ratio of annuity to the net investment amount. This will determine the lower limit of annuity amount payable in a policy.
Note
This will be used for the 5/20 validation during Batch functions.
Refer to the chapter Batch Functions in this User Manual for further information on the 5/20 validation.
Maximum Annuity Ratio
Mandatory
Specify the ratio of annuity to the net investment amount. This will determine the upper limit of annuity amount payable in a policy.
Note
This will be used for the 5/20 validation during Batch functions.
Refer to the chapter Batch Functions in this User Manual for further information on the 5/20 validation.
Others Section
Certificate of Existence Applicable?
Optional
You can select ‘Yes’ to indicate the Policy Holder needs to produce a certificate of existence.
Guaranteed Annuity?
Optional
Select ‘Yes’ to indicate annuity is guaranteed on a policy in this Product.
Annuity By Fund?
Optional
Specify whether annuities are paid out for on the basis of the funds in the Product.
Bonus Applicable?
Optional
Select ‘Yes’ to indicate this Product declares a bonus.
Life Cover Applicable
Mandatory
Select ‘Yes’ to indicate whether the Policy Holder has an option to opt for a life cover while subscribing to this Product.
Life Cover Amount
Mandatory if ‘Life Cover Applicable’ box is checked
Specify the amount to be paid by the Policy Holder as a fee for obtaining the life cover for any policy held by him in this Product.
Note
This field is enabled only if you have selected the option ‘Life Cover Applicable’.
Annuity Tax Computation Basis
Optional
If the Withholding Tax Applicable for Annuity is selected, you can select the annuity tax computation basis from the drop-down list as Policy or Policy Holder.
If the maintenance for Annuity Tax Basis at the product level is at policy holder, the gross annualized amount for all policies pertains to the Policy Holder gets added up for a Product. If it is at Policy level, gross annualized amount of the Policy level would be taken.
4.1.9 Loan and Funding Details Tab
You will be able to see this link only if, for the product, you have selected the option ‘Yes’ against the field ‘Funding Features Supported?’, in the ‘Product Type Maintenance’ screen.
The funding rules that you specify in this screen, are valid only till the maturity date of the product.
Click ‘Loan & Funding’ tab to enter the details.
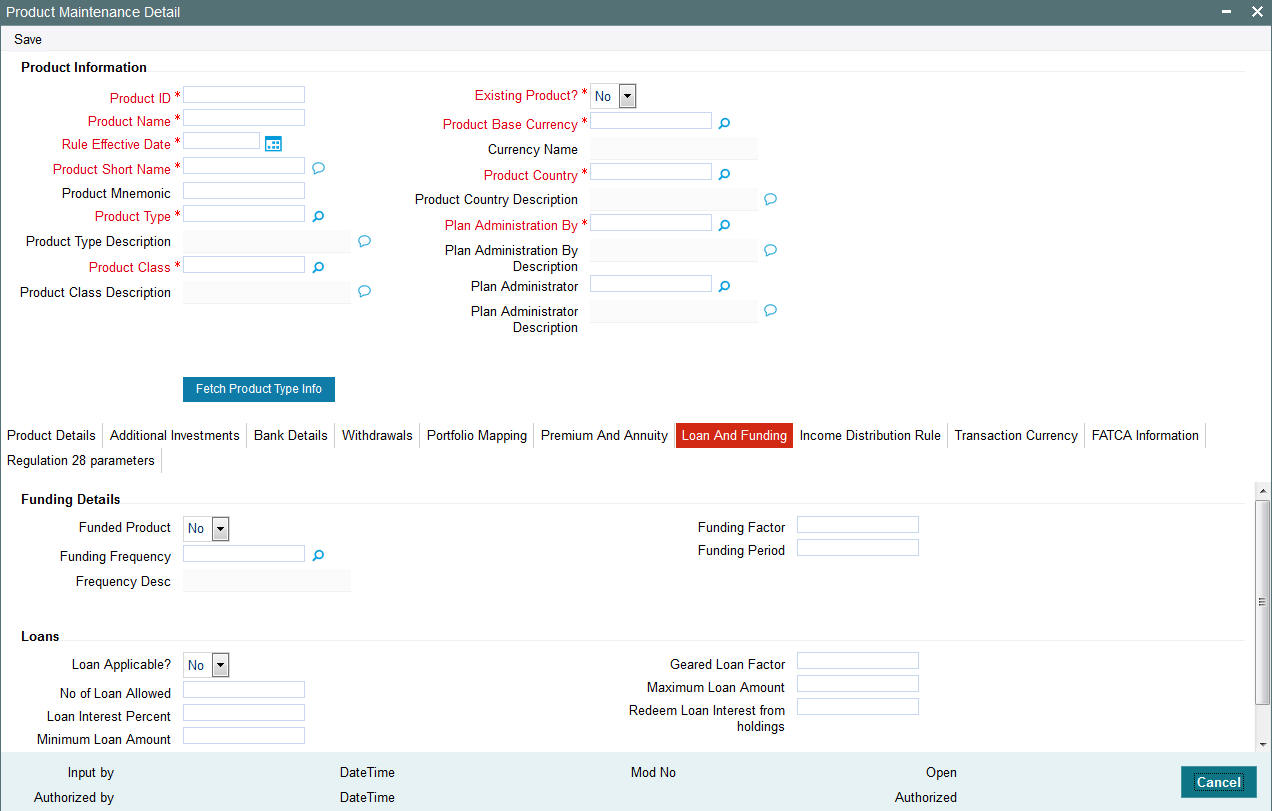
Funding Details Section
Funding Frequency
Mandatory if ‘Funded Product’ is ‘Yes’
Specify the frequency at which the funded amount will be repaid to the investor.
Note
You cannot change the funding frequency for a policy.
Funding Period (Months)
Mandatory if ‘Funded Product’ is ‘Yes’
Specify the duration of the repayment period, at the end of which the entire funded amount will be paid back to the investor.
Note
You can change the same for a policy.
Funded Product?
Optional
Specify whether the Product is a funded product, wherein a portion of the initial investment and subsequent top-ups, if any, will be retained.
Funding Factor
Mandatory if ‘Funded Product’ is ’Yes’
Specify the funding factor that is applicable to policy transactions in this Product. This must be expressed as a percentage and cannot exceed one hundred percent.
Note
You will be allowed to change this at the policy creation level for the initial contribution and then at the transaction level for top ups.
Loans Section
Loan Applicable?
Select ‘Yes’ if Loan is applicable, else ‘No’.
Geared Loan Factor
Enter the geared loan factor.
No of Loan Allowed
Enter the number of loans allowed.
Minimum Loan Amount
Enter the minimum loan amount.
Maximum Loan Amount
Enter the maximum loan amount.
Loan Interest Percent
Enter the loan interest percent.
Redeem Loan Interest from holdings
Enter the redeem loan interest from holdings.
4.1.10 Income Distribution Rule Tab
You will be able to see this link only if, for the product, you have selected the option ‘No’ against the field ‘Reinvest IRA Income?’. As you have specified that the IRA income should not be reinvested, you will need to specify the income distribution. You are allowed to specify different distribution modes depending on the age of the Policy Holder.
Click ‘Income Distribution Rule’ tab to enter the details.
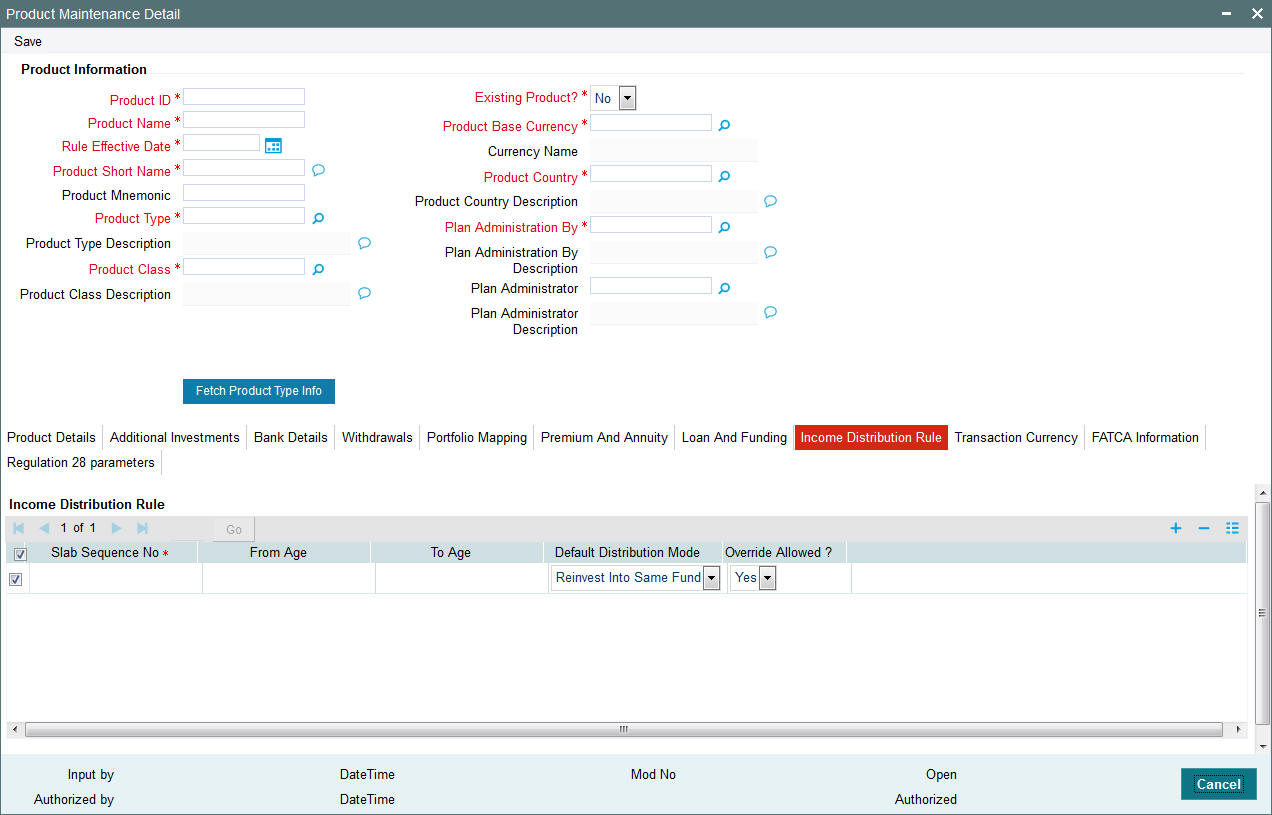
Slab Sequence No
Mandatory
Specify the sequence of the age slab.
From Age and To Age
Mandatory
Specify the ages between which the distribution mode you select will be applicable.
Def Dis Mode
Mandatory
Specify whether the dividend income distributed will be reinvested or paid out. The option you select will be valid between the ‘From Age’ and ‘To Age’ you have specified.
Override Allow
Mandatory
If you select the option ‘Yes’, you will be allowed to override the distribution mode that you have specified, for the Policy Holder, through the ‘Income Distribution SetUp’ screen.
4.1.11 Transaction Currency Tab
An LEP product can support multiple currencies. The base currency of the policy can be any of the currencies supported by the product. If the product and policy base currencies are different and if the load is maintained at product level, the policy transaction amount in product base currency is used to derive the load slab. You also need to maintain product base currency in the transaction currency list.
You can maintain the list of currencies supported by the product in ‘Transaction Currency’ tab.
![]()
You can specify the following details in this screen:
Currency Code
Mandatory
Specify the currency supported by the LEP product or select the currency from the option list provided.
Currency Name
The name corresponding to the currency code selected previously gets displayed here.
Saving the information entered
When you have entered all the mandatory information, click ‘Ok’ button.
The system displays the confirmation message as “Record Successfully Saved ”.
This indicates the record has been saved. Click ‘Ok’ button.
4.1.12 FATCA Information Tab
In this section you can capture the details regarding Foreign Account Tax Compliance Act. Click on ‘FATCA Information’ tab to maintain the details.
You can specify the following information:
FATCA Applicable
Alphanumeric; Optional
Select Yes or No to indicate whether FATCA is applicable. However, the system defaults the value ‘No’.
FATCA Classification
Alphanumeric
Select the classification of FATCA from the adjoining option list.FATCA Classification is mandatory if FATCA Applicable is ‘Yes’.
FATCA Reason
Alphanumeric; Optional
Specify the reason for FATCA classification.
Employer ID Number
Alphanumeric
Specify the employer ID number. The Employer ID Number is mandatory if the FATCA Applicable is ‘Yes’.
FATCA Effective Date
Date Format
Specify the FATCA Effective Date if FATCA is applicable.
FATCA Effective Date cannot be lesser than the product rule effective date.
4.2 Product Summary Screen
This section contains the following topics:
- Section 4.2.1, "Invoking the Product Summary Screen"
- Section 4.2.2, "Retrieving Product in Product Screen"
- Section 4.2.3, "Editing Product"
- Section 4.2.4, "Viewing Product"
- Section 4.2.5, "Deleting Product"
- Section 4.2.6, "Authorizing Product"
- Section 4.2.7, "Amending Product"
- Section 4.2.8, "Authorizing Amended Product"
4.2.1 Invoking the Product Summary Screen
You can invoke the ‘Product Summary’ screen by typing ‘LESPROD’ in the field at the top right corner of the Application tool bar and clicking on the adjoining arrow button.
4.2.2 Retrieving Product in Product Screen
You can retrieve a previously entered record in the Summary screen, as follows:
- Specify any or all of the following details in the Product Summary screen:
- Select the status of the record in the Authorized field. If you choose the “Blank Space” option, then all the records are retrieved.
- Select the status of the record in the Open field. If you choose the “Blank Space” option, then all the records are retrieved.
- Product ID
- Product Name
- Rule Effective Date
After you have specified the required details, click ‘Search’ button. All records with the specified details are retrieved and displayed in the lower portion of the screen.
Note
You can also retrieve the individual record detail from the detail screen by doing query in the following manner:
- Press F7.
- Input the Product Type.
- Press F8.
You can perform Edit, Delete, Amend, Authorize, Reverse, Confirm operation by selecting from the Action list.
You can also search the record by using combination of % and alphanumeric value.
4.2.3 Editing Product
You can modify the details of a record that you have already entered into the system, provided it has not been subsequently authorized. You can perform this operation as follows:
- Invoke the Product Summary screen from the Browser.
- Select the status of the record that you want to retrieve for modification in the Authorization Status field. You can only modify records that are unauthorized. Accordingly, choose the Unauthorized option from the drop down list.
- Specify any or all of the details of the record in the corresponding fields on the screen to retrieve the record that is to be modified. All unauthorized records with the specified details are retrieved and displayed in the lower portion of the screen.
- Double click the record that you want to modify in the list of displayed records. The Product Detail screen is displayed.
- Select Unlock Operation from Action list to modify the record. Modify the necessary information.
- Click Save to save your changes. The Product Detail screen is closed and the changes made are reflected in the Product Summary screen.
4.2.4 Viewing Product
To view a Product you have previously entered, you must retrieve the same in the Product Summary screen, as follows:
- Invoke the Product Summary Screen from the Browser.
- Select the status of the Product Type that you want to retrieve for viewing in the Authorization Status field. You can also view all records that are either unauthorized or authorized only, by choosing the Unauthorized/ Authorized option.
- Specify any or all of the details of the records in the corresponding fields on the screen, and click ‘Search’ button. All transactions with the specified details are retrieved and displayed in the lower portion of the screen.
- Double click the record that you want to view in the list of displayed records, in the lower portion of the screen. The Product screen is opened in view mode.
4.2.5 Deleting Product
You can delete only unauthorized records in the system.
To delete a record that you have previously entered, you must retrieve the same in the Product Summary screen, as follows:
- Invoke the Product Summary screen from the browser.
- Select the status of the record that you want to retrieve for deletion.
- Specify any or all of the details of the record in the corresponding fields on the screen, and click ‘Search’ button. All records with the specified details are retrieved and displayed in the lower portion of the screen.
- Double click the record that you want to delete in the list of displayed records, in the lower portion of the screen. The Product Detail screen is opened in View mode.
- Select Delete operation from the Action list. The system prompts you to confirm the deletion, and the record is deleted physically from the system database.
4.2.6 Authorizing Product
An unauthorized record must be authorized in the system for it to be processed.
To authorize a record, you must first retrieve the same in the Product Summary screen.
- Invoke the Product Summary screen from the Browser.
- Select the status of the record that you want to retrieve for authorization. Typically, choose the Unauthorized option from the drop down list.
- Specify any or all of the details of the record in the corresponding fields on the screen. Click ‘Search’ button. All records with the specified details that are pending authorization are retrieved and displayed in the lower portion of the screen.
- Double click the record that you wish to authorize. The Product Detail screen is opened in View mode.
- Select Authorize operation from Action list.
When the checker authorizes a record, details of validations, if any, that were overridden by the maker of the record during the Save operation, are displayed. If any of these overrides results in an error, the checker must reject the transaction.
4.2.7 Amending Product
After a record is authorized, it can be modified using the Unlock operation from Action list. To make changes to a record after authorization, you must invoke the Unlock operation which is termed as Amend Operation.
- Invoke the Product Summary screen from the Browser.
- Select the status of the record that you wish to retrieve for amendment. You can only amend records that are authorized.
- Specify any or all of the details of the record in the corresponding fields on the screen. All records with the specified details are retrieved and displayed in the lower portion of the screen.
- Double click the record that you want to amend. The Product screen will be displayed in Amendment mode. Click the Unlock operation from the Action list to amend the record.
- Amend the necessary information. Click the Save button to save your changes.
4.2.8 Authorizing Amended Product
An amended product must be authorized for the amendment to be made effective in the system.
Authorization of amended records can only be done from Fund Manager Module and Agency branch Module. The process of authorization is subsequently the same as that for normal transactions.
4.3 Product and Transaction Sub Type
This section contains the following topics:
4.3.1 Mapping Product and Transaction Sub Type
The ‘Product Transaction Sub Type Mapping Detail’ screen as shown in the screenshot allows you to link available sub type codes, maintained under transaction sub type maintenance to a particular product, such as Redemption, Subscription.
4.3.2 Invoking Screen
Invoke the ‘Product Transaction Sub Type Mapping Detail’ screen by typing ‘LEDPRSUB’ in the field at the top right corner of the Application tool bar and clicking on the adjoining arrow button.
The following screen is invoked:

Select ‘New’ from the Actions menu in the Application tool bar or click new icon to enter the details of the Product Transaction Sub Type Mapping.
Product ID
Mandatory
Specify the product identity number.
Transaction Type
Mandatory
Specify the transaction type for which the Transaction sub type is mapped or linked from the transaction sub type maintenance screen.
Product Name
The Product name of the product for which transaction sub type is mapped is defaulted once the Product Id is selected.
Product Short Name
The short name attributed to the Product is defaulted once you have selected the Product ID.
4.3.2.1 Sub Type Mapping Section
Sub Type
If you have activated Product Transaction sub type mapping then the sub types applicable for particular transaction types are defaulted/ populated from available for the transaction sub types maintained as part of Product Transaction sub type screen. Otherwise the sub types are populated from Transaction sub type screen.
For system generated transaction sub types FLEXCUBE defaults the values entered.
4.4 Product Transaction Sub Type Mapping Summary
This section contains the following topics:
- Section 4.4.1, "Invoking Product Transaction Sub Type Mapping Summary"
- Section 4.4.2, "Retrieving Product Transaction Sub Type Mapping "
- Section 4.4.3, "Editing Product Transaction Sub Type Mapping"
- Section 4.4.4, "Viewing Product Transaction Sub Type Mapping"
- Section 4.4.5, "Deleting Product Transaction Sub Type Mapping"
- Section 4.4.6, "Authorizing Product Transaction Sub Type Mapping"
- Section 4.4.7, "Amending Product Transaction Sub Type Mapping"
- Section 4.4.8, "Authorizing Amended Product Transaction Sub Type Mapping"
4.4.1 Invoking Product Transaction Sub Type Mapping Summary
Invoke the ‘Product Sub Type Mapping Summary’ screen, by typing ‘LESPRSUB’ in the field at the top right corner of the Application tool bar and clicking on the adjoining arrow button.
4.4.2 Retrieving Product Transaction Sub Type Mapping
You can retrieve a previously entered record in the Summary screen, as follows:
- Invoke the Product Transaction Sub Type Mapping Summary screen from the Browser.
- Select the status of the record in the Authorized field. If you choose the “Blank Space” option, then all the records are retrieved.
- Select the status of the record in the Open field. If you choose the “Blank Space” option, then all the records are retrieved.
- Product ID
- Ref Type
After you have specified the required details, click ‘Search’ button. All records with the specified details are retrieved and displayed in the lower portion of the screen.
Note
You can also retrieve the individual record detail from the detail screen by doing query in the following manner:
- Press F7.
- Input the product ID.
- Press F8.
You can perform Edit, Delete, Amend, Authorize, Reverse, Confirm operation by selecting from the Action list.
You can also search the record by using combination of % and alphanumeric value.
4.4.3 Editing Product Transaction Sub Type Mapping
You can modify the details of a record that you have already entered into the system, provided it has not been subsequently authorized. You can perform this operation as follows:
- Invoke the Product Transaction Sub Type Mapping Summary screen from the Browser.
- Select the status of the record that you want to retrieve for modification in the Authorization Status field. You can only modify records that are unauthorized. Accordingly, choose the Unauthorized option from the drop down list.
- Specify any or all of the details of the record in the corresponding fields on the screen to retrieve the record that is to be modified. All unauthorized records with the specified details are retrieved and displayed in the lower portion of the screen.
- Double click the record that you want to modify in the list of displayed records. The Product Transaction Sub Type Mapping Detail screen is displayed.
- Select Unlock Operation from Action list to modify the record. Modify the necessary information.
- Click Save to save your changes. The Product Transaction Sub Type Mapping Detail screen is closed and the changes made are reflected in the Product Transaction Sub Type Mapping Summary screen.
4.4.4 Viewing Product Transaction Sub Type Mapping
To view a Product Transaction Sub Type Mapping you have previously entered, you must retrieve the same in the Product Transaction Sub Type Mapping Summary screen, as follows:
- Invoke the Summary Screen from the Browser.
- Select the status of the Product Transaction Sub Type Mapping that you want to retrieve for viewing in the Authorization Status field. You can also view all records that are either unauthorized or authorized only, by choosing the Unauthorized/ Authorized option.
- Specify any or all of the details of the records in the corresponding fields on the screen, and click ‘Search’ button. All transactions with the specified details are retrieved and displayed in the lower portion of the screen.
- Double click the record that you want to view in the list of displayed records, in the lower portion of the screen. The Product Transaction Sub Type Mapping screen is opened in view mode.
4.4.5 Deleting Product Transaction Sub Type Mapping
You can delete only unauthorized records in the system.
To delete a record that you have previously entered, you must retrieve the same in the Product Transaction Sub Type Mapping Summary screen, as follows:
- Invoke the Product Transaction Sub Type Mapping Summary screen from the browser.
- Select the status of the record that you want to retrieve for deletion.
- Specify any or all of the details of the record in the corresponding fields on the screen, and click ‘Search’ button. All records with the specified details are retrieved and displayed in the lower portion of the screen.
- Double click the record that you want to delete in the list of displayed records, in the lower portion of the screen. The Product Transaction Sub Type Mapping Detail screen is opened in View mode.
- Select Delete operation from the Action list. The system prompts you to confirm the deletion, and the record is deleted physically from the system database.
4.4.6 Authorizing Product Transaction Sub Type Mapping
An unauthorized record must be authorized in the system for it to be processed.
To authorize a record, you must first retrieve the same in the Product Transaction Sub Type Mapping Summary screen.
- Invoke the Product Transaction Sub Type Mapping Summary screen from the Browser.
- Select the status of the record that you want to retrieve for authorization. Typically, choose the Unauthorized option from the drop down list.
- Specify any or all of the details of the record in the corresponding fields on the screen. Click ‘Search’ button. All records with the specified details that are pending authorization are retrieved and displayed in the lower portion of the screen.
- Double click the record that you wish to authorize. The Product Transaction Sub Type Mapping Detail screen is opened in View mode.
- Select Authorize operation from Action list.
When the checker authorizes a record, details of validations, if any, that were overridden by the maker of the record during the Save operation, are displayed. If any of these overrides results in an error, the checker must reject the transaction.
4.4.7 Amending Product Transaction Sub Type Mapping
After a record is authorized, it can be modified using the Unlock operation from Action list. To make changes to a record after authorization, you must invoke the Unlock operation which is termed as Amend Operation.
- Invoke the Product Transaction Sub Type Mapping Summary screen from the Browser.
- Select the status of the record that you wish to retrieve for amendment. You can only amend records that are authorized.
- Specify any or all of the details of the record in the corresponding fields on the screen. All records with the specified details are retrieved and displayed in the lower portion of the screen.
- Double click the record that you want to amend. The Product Transaction Sub Type Mapping screen will be displayed in Amendment mode. Click the Unlock operation from the Action list to amend the record.
- Amend the necessary information. Click the Save button to save your changes.
4.4.8 Authorizing Amended Product Transaction Sub Type Mapping
An amended Product Transaction Sub Type Mapping must be authorized for the amendment to be made effective in the system.
Authorization of amended records can only be done from Fund Manager Module and Agency branch Module. The process of authorization is subsequently the same as that for normal transactions .