9. Policy Cession Maintenance
Whenever a policy is marked with a Cession ID, the parameters that characterize the Cession ID will affect the subsequent events in the policy, such as generation of transfer transactions, allowing of redemption transactions and policy closure, or policy surrender.
Note
Cession IDs can be attached to policies through the Fund Manager component only.
The Policy Cession Maintenance screen allows you to attach a Cession ID to a policy. The next section gives you step-by-step instructions to do the same.
This chapter contains the following sections:
9.1 Attach Cession ID to Policy
This section contains the following topics:
- Section 9.1.1, "Invoking Policy Cession Maintenance Detail Screen"
- Section 9.1.2, "Saving Information Entered"
9.1.1 Invoking Policy Cession Maintenance Detail Screen
The following are the steps you need to follow to define a Product. Each of these steps is explained in detail in subsequent sections.
- Invoke the Policy Cession Maintenance screen.
- Enter information in the Policy Cession Maintenance screen.
- Save the information entered.
You can invoke the ‘Policy Cession Maintenance Detail’ screen by typing ‘LEDPLCES’ in the field at the top right corner of the Application tool bar and clicking on the adjoining arrow button.
The following screen is invoked:
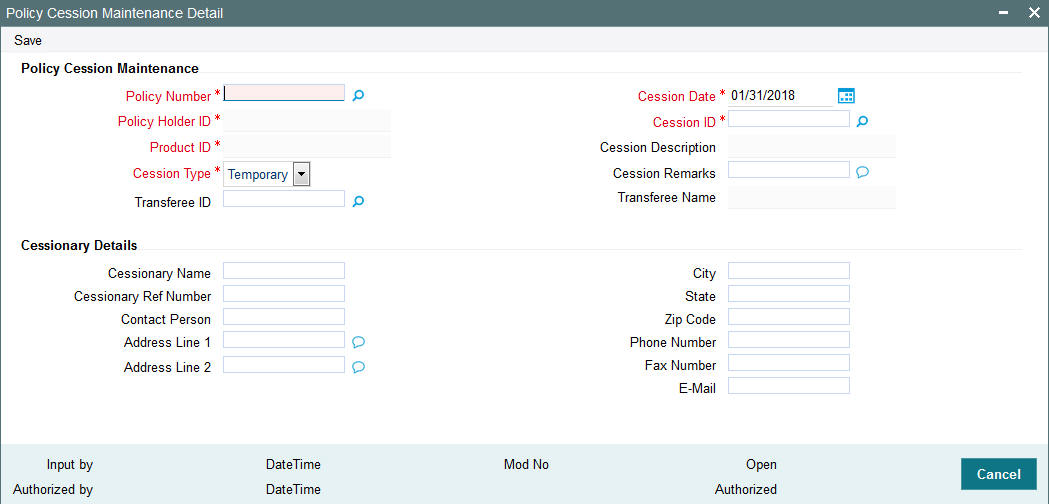
You can specify the following fields in this screen:
Policy Cession Maintenance section
In the Policy Cession Maintenance section, you will have to enter information in the following fields:
Policy Number
Alphanumeric, Mandatory
Select the number of the Policy that must be marked with a Cession ID.
Note
This number must represent an authorized, enabled and active policy (for which at least one underlying transaction has been generated, authorized and allocated).
The Policy Number entered here must represent a Policy that comes under a Product that is authorized and active.
You can use the button alongside this field to view a list of valid policies and select the required one.
When you specify the Policy Number, all the details of the Policy are picked up from the policy record and populated in the corresponding fields in this form.
Cession Date
Display
The date on which the transfer is affected, is the Policy Cession Date. It is deemed to be the application date itself, which is displayed here by default. It cannot be changed.
Policy Holder ID
Display
The name and ID of the Policy Holder whose Policy is to be marked with a Cession ID, is displayed here.
Product ID
Mandatory
Explanation needed from Dev/ Testing team.
Cession Type
Mandatory
Select the Cession Type that is to be applied to the specified Policy, from the drop-down list.
Note
If the type chosen here is ‘Temporary’, then only the Cession ID must be captured with remarks. If it is ‘Permanent’, then the Transferee ID must also be captured.
Cession ID
Mandatory
Select the Cession ID that is to be applied to the specified policy, from the option list.
Note
The list will contain permanent cessions if the Cession Type specified is ‘Permanent’ and temporary cessions if the Cession Type chosen is ‘Temporary’.
Transferee ID
Mandatory if the Cession Type is ‘Permanent’
Select, from the option list, the ID of the Policy Holder to whom the policy must be transferred, when it is marked with the specified Cession ID. This must be a valid Unit Holder in the system, and must not have a Policy in the same Product.
Cession Remarks
255 Characters Maximum, Alphanumeric, Optional
You can capture any descriptive/narrative text pertaining to this Policy Cession record in this field.
Note
If the ‘Cession Applicable’ field at the ‘Product Level’ is checked in the ‘Cession Maintenance’ screen, the system will allow the policies under this product for Policy Cession Maintenance.
Cessionary Details Section
In the Cessionary Details section, you will have to enter information in the following fields:
Cessionary Name
Optional
Specify the name of the cessionary (policy-holder ceding the policy).
Cessionary Ref Number
16 Characters Alphanumeric, Optional
Specify a unique reference number that will be used to identify the transaction in the system.
Contact Person
40 Character Maximum, Alphanumeric, Optional
For corporate investors, enter the name of the contact person at the cessionary office.
Address Lines 1-2
Each line is 255 Character Maximum, Alphanumeric.
Specify the postal address that is to be used for correspondence with the cessionary.
City
40 Character Maximum, Alphanumeric, Optional
Specify the name of the city of residence of the cessionary.
State/ Country
60 Character Maximum, Alphanumeric, Optional
Specify the state/country in which the city of residence of the investor is cessionary.
Zip Code
10 Characters Maximum, Alphanumeric, Optional
Specify the zip code of the specified city of residence of the cessionary.
Phone Number
15 Character Maximum, Alphanumeric, Optional
Enter the contact telephone numbers of the cessionary.
Fax Number
15 Character Maximum, Alphanumeric, Optional
Enter the fax number of the cessionary.
E - Mail ID
30 Characters Maximum, Alphanumeric; Optional
Specify the Email address of the cessionary.
9.1.2 Saving Information Entered
When you have entered all the mandatory information, click ‘Ok’ button.
The following message will be displayed:
The system displays the confirmation message “Record Successfully Saved”.
This indicates the record has been saved. Click ‘Ok’ button.
9.2 Policy Cession Summary Screen
This section contains the following topics:
- Section 9.2.1, "Retrieving Policy Cession in Policy Cession Screen"
- Section 9.2.2, "Editing Policy Cession"
- Section 9.2.3, "Viewing Policy Cession"
- Section 9.2.4, "Deleting Policy Cession"
- Section 9.2.5, "Authorizing Policy Cession"
- Section 9.2.6, "Amending Policy Cession"
- Section 9.2.7, "Authorizing Amended Policy Cession"
9.2.1 Retrieving Policy Cession in Policy Cession Screen
You can retrieve a previously entered record in the Summary screen, as follows:
You can invoke the ‘Policy Cession Summary’ screen by typing ‘LESPLCES’ in the field at the top right corner of the Application tool bar and clicking on the adjoining arrow button
Specify any or all of the following details in Policy Cession Summary screen:
- Select the status of the record in the Authorized field. If you choose the “Blank Space” option, then all the records are retrieved.
- Select the status of the record in the Open field. If you choose the “Blank Space” option, then all the records are retrieved.
- Product ID
- Effective Date
After you have specified the required details, click ‘Search’ button. All records with the specified details are retrieved and displayed in the lower portion of the screen.
Note
You can also retrieve the individual record detail from the detail screen by doing query in the following manner:
- Press F7.
- Input the Product ID.
- Press F8.
You can perform Edit, Delete, Amend, Authorize, Reverse, Confirm operation by selecting from the Action list.
You can also search the record by using combination of % and alphanumeric value.
Example:
You can search the record for Product Type by using the combination of % and alphanumeric value as follows:
- Search by A%: System will fetch all the records whose Product Type starts from Alphabet ‘A’. For example, AGC17, AGVO6, AGC74 etc.
- Search by %7: System will fetch all the records whose Product Type ends by numeric value’ 7’. For example, AGC17, GSD267, AGC77 etc.
- Search by %17%:- System will fetch all the records whose Product
Type contains the numeric value 17. For example, GSD217, GSD172, AGC17
etc.

9.2.2 Editing Policy Cession
You can modify the details of a record that you have already entered into the system, provided it has not been subsequently authorized. You can perform this operation as follows:
- Invoke the Policy Cession Summary screen from the Browser.
- Select the status of the record that you want to retrieve for modification in the Authorization Status field. You can only modify records that are unauthorized. Accordingly, choose the Unauthorized option from the drop down list.
- Specify any or all of the details of the record in the corresponding fields on the screen to retrieve the record that is to be modified. Click ‘Search’ button. All unauthorized records with the specified details are retrieved and displayed in the lower portion of the screen.
- Double click the record that you want to modify in the list of displayed records. The Policy Cession Detail screen is displayed.
- Select Unlock Operation from Action list to modify the record. Modify the necessary information.
- Click Save to save your changes. The Policy Cession Detail screen is closed and the changes made are reflected in the Policy Cession Summary screen.
9.2.3 Viewing Policy Cession
To view a Policy Cession you have previously entered, you must retrieve the same in the Policy Cession Summary screen, as follows:
- Invoke the Policy Cession Summary Screen from the Browser.
- Select the status of the record that you want to retrieve for viewing in the Authorization Status field. You can also view all records that are either unauthorized or authorized only, by choosing the Unauthorized/ Authorized option.
- Specify any or all of the details of the records in the corresponding fields on the screen, and click ‘Search’ button. All records with the specified details are retrieved and displayed in the lower portion of the screen.
- Double click the record that you want to view in the list of displayed records, in the lower portion of the screen. The Product With-Holding Tax screen is opened in view mode.
9.2.4 Deleting Policy Cession
You can delete only unauthorized records in the system.
To delete a record that you have previously entered, you must retrieve the same in the Policy Cession Summary screen, as follows:
- Invoke the Policy Cession Summary screen from the browser.
- Select the status of the record that you want to retrieve for deletion.
- Specify any or all of the details of the record in the corresponding fields on the screen, and click ‘Search’ button. All records with the specified details are retrieved and displayed in the lower portion of the screen.
- Double click the record that you want to delete in the list of displayed records, in the lower portion of the screen. The Policy Cession Detail screen is opened in View mode.
- Select Delete operation from the Action list. The system prompts you to confirm the deletion, and the record is deleted physically from the system database.
9.2.5 Authorizing Policy Cession
An unauthorized record must be authorized in the system for it to be processed.
To authorize a record, you must first retrieve the same in the Policy Cession Summary screen.
- Invoke the Policy Cession Summary screen from the Browser.
- Select the status of the record that you want to retrieve for authorization. Typically, choose the Unauthorized option from the drop down list.
- Specify any or all of the details of the record in the corresponding fields on the screen. Click ‘Search’ button.All records with the specified details that are pending authorization are retrieved and displayed in the lower portion of the screen.
- Double click the record that you wish to authorize. The Policy Cession Detail screen is opened in View mode.
- Select Authorize operation from Action list.
When the checker authorizes a record, details of validations, if any, that were overridden by the maker of the record during the Save operation, are displayed. If any of these overrides results in an error, the checker must reject the transaction.
9.2.6 Amending Policy Cession
After a record is authorized, it can be modified using the Unlock operation from Action list. To make changes to a record after authorization, you must invoke the Unlock operation which is termed as Amend Operation.
- Invoke the Policy Cession Summary screen from the Browser.
- Select the status of the record that you wish to retrieve for amendment. You can only amend records that are authorized.
- Specify any or all of the details of the record in the corresponding fields on the screen. . Click ‘Search’ button. All records with the specified details are retrieved and displayed in the lower portion of the screen.
- Double click the record that you want to amend. The Policy Cession screen will be displayed in Amendment mode. Click the Unlock operation from the Action list to amend the record.
- Amend the necessary information. Click the Save button to save your changes.
9.2.7 Authorizing Amended Policy Cession
An amended Product With-Holding Tax must be authorized for the amendment to be made effective in the system.
Authorization of amended records can only be done from Fund Manager Module and Agency branch Module. The process of authorization is subsequently the same as that for normal transactions.