2. Ensuring Security for Fund Manager
In any financial environment, security of information is of paramount importance. Access to information must be made available in a carefully monitored manner. Controlling and maintaining these aspects also includes management of the people (or users) who will process this information on a day to day basis. Therefore, an efficient Security Management System is an important factor that will determine the strength and stability of a financial system.
This chapter takes you through the Security Maintenance features of the Oracle FLEXCUBE system. You will learn how to use the security features in the system to suit your requirements and customize them for your environment.
This chapter is intended for the following persons in your bank or AMC:
Person |
Operation |
Oracle FLEXCUBE Implementers |
To set up the initial start-up parameters in the individual client workstations. To set up security management parameters for the AMC or AMC branch. |
SMS Administrator for the Bank/ AMC |
To set the SMS AMC or AMC branch parameters. To identify the Branch level SMS Administrators. |
SMS Administrator for the Branch |
To create User and Role profiles for the branches of your AMC. Will also grant access to the various functions to the Users. |
A Oracle FLEXCUBE user |
Any user of Oracle FLEXCUBE whose activities are traced by the Security Management System. |
This chapter contains the following sections:
- Section 2.1, "Security Management"
- Section 2.2, "Some Important Terms"
- Section 2.3, "Other Features of Security Management System"
- Section 2.4, "Role Profiles"
- Section 2.5, "User Profile"
- Section 2.6, "Clearing Users"
- Section 2.7, "SMS Parameters"
- Section 2.8, "User Details Modification in Bulk"
- Section 2.9, "Modules"
2.1 Security Management
In Oracle FLEXCUBE, you can ensure security management at all levels in any kind of environment. This is due to a combination of the following features:
- User-level Access Control
- Business function-level Access Control
- Operation-level Access Control
Simply translated, this means that a person within your environment can:
- Only access the system as an authorized user
- Only access certain allowed functions within the system
- Only perform certain allowed operations on the function for which access is allowed
2.2 Some Important Terms
Before you operate the security management system of your Oracle FLEXCUBE installation, you must understand some important terms that you will encounter during the process.
System Administrators
Typically, at the time of installation, two users are created by default in the system database. These two users are the system administrators. The system administrators subsequently create all users and user roles in the system,
The system administrator user profiles would be typically created to enable the security managers in your bank or AMC, to log in to the system.
Functions
A function is any operation related to business maintenance or processing in the system. Most typically, each menu item appearing in the main menu could be thought of as a function. For a user, you can control access to different functions in the system.
Any functions related to the Fund Manager component can be thought of as back office functions, and any functions related to the Agency Branch could be thought of as front office components.
The functions are made available by the Oracle FLEXCUBE implementers, at the time of installation.
User Profile
Each user who will use the system is given a unique profile in the database. This profile is known as a user profile.
The profile of a user contains the User ID, the password and the functions to which the user has access. A user can be assigned access to either back office (Fund Manager) functions, or front office (Agency Branch) functions, depending upon the tasks that the user must perform in your organization.
Roles
It is likely that users working in the same department at the same level of hierarchy need to have similar user profiles. In such cases, you can define a Role Profile, which includes access rights to the functions that are common to a group of users. A user can be linked to a Role Profile by which you give the user access rights to all the functions in the Role Profile.
A role profile could contain either back office (Fund Manager) functions or front office (Agency Branch) functions.
2.3 Other Features of Security Management System
This section contains the following topics:
- Section 2.3.1, "Restricted Number of Unsuccessful Attempts"
- Section 2.3.2, "Restricted Access to Branches"
- Section 2.3.3, "Restricted Access to AMC Branches"
- Section 2.3.4, "All Activities Tracked"
2.3.1 Restricted Number of Unsuccessful Attempts
You can define the maximum number of unsuccessful attempts after which a User ID should be disabled. The password of a user can be made applicable only for a fixed period. This forces the user to change the password at regular intervals thus reducing security risks. Further, you can define passwords that could be commonly used by a user as Restrictive Passwords at the user, user role and bank level. A user cannot use any password that is listed as a Restrictive Password at any of these levels.
2.3.2 Restricted Access to Branches
You can indicate the branches from where a user can operate. Click on the User Branch Restrictions button in the User Profile Definition screen to define the branches from where a user can operate.
2.3.3 Restricted Access to AMC Branches
For mutual fund account customers, you can indicate the branches of the AMC from where a user can operate. Click on the Module button in the User Profile Definition screen to define the branches of the AMC from where a user can be allowed to operate.
2.3.4 All Activities Tracked
Extensive log is kept of all the activities on the system. You can generate reports on the usage of the system anytime. These reports give details of unsuccessful attempts at accessing the system along with the nature of these attempts. It could be an unauthorized user attempting to use the system, an authorized user trying to run a function without proper access rights, and so forth.
2.4 Role Profiles
This section contains the following topics:
- Section 2.4.1, "Defining Role Profiles"
- Section 2.4.2, "Classifying Role Profile"
- Section 2.4.3, "Copying Role Profile of Existing Role"
- Section 2.4.4, "Deleting Role Profile"
- Section 2.4.5, "Retrieving Role Profile in Role Definition Screen"
- Section 2.4.6, "Authorizing Role Profile"
- Section 2.4.7, "Editing Role Profile"
2.4.1 Defining Role Profiles
Role profiles are defined in the Role Definition screen. You can invoke the ‘Role Definition’ screen by typing ‘SMDROLDF’ in the field at the top right corner of the Application tool bar and clicking on the adjoining arrow button.
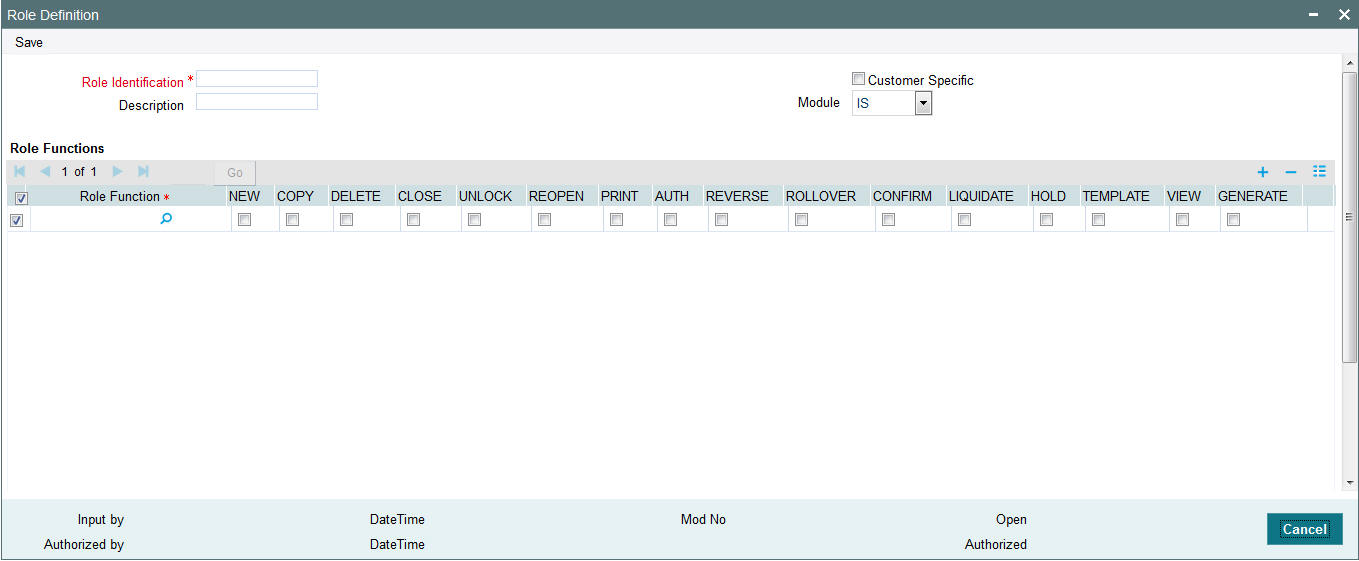
Role Identification
Alphanumeric, Mandatory
Specify a unique identifier for the role profile.
Description
Alphanumeric, Mandatory
This is the key text which describes and qualifies the role profile, and is indicative of its characteristics.
Customer Specific
Optional
Check this box to indicate that the role profile has been set up for a specific customer of your AMC or AMC branch who might access the system from a remote terminal to inquire about their transactions or investor accounts.
Module
Optional
Select the default module for users linked to the role profile.
Role Functions
After you have defined the basic attributes of a role profile (the Role ID, Description, Module and whether it is customer- specific) you should define the functions to which the role profile has access. The various functions in the system fall under five categories, corresponding to the menu options in the Agency Branch main menu.
A role profile could contain either back office (Fund Manager) functions or front office (Agency Branch) functions.
Select the function that you want to link to the role profile.
For each function, you can allow or disallow specific record-level operations. These operations are displayed as a horizontal list, alongside the Maintenance Functions label, with each operation spelled out vertically.
In the selected function row, check the box pertaining to each operation you want to allow for the role profile.
You can allow any of the following operations at record level for the role profile in any function:
2.4.1.1 Static Tables
- New (Define a new record).
- Copy (Copy details of an existing record).
- Delete (Delete an existing record).
- Close (Close an existing record).
- Unlock (to amend an existing record).
- Reopen (Reopen an existing record).
- Print (Print the details of selected records).
- Authorize (Authorize any maintenance activity on a record).
2.4.1.2 Contracts and On-line Transaction Processing
- View (to see the details of the contract).
2.4.1.3 Reports
- Generate (to generate reports).
- View (view the reports).
- Print (print the reports).
To delete the access rights you have specified for a function, select the required Function ID row and check the Delete box at the extreme right end of the row.
To edit the access rights you have specified for a function, select the required Function ID row and check the Edit box at the extreme right end of the row.
2.4.2 Classifying Role Profile
By default, a Role Profile you define will be for the users who are employees of your AMC or AMC branch. You can indicate that the profile is for customers who might login from remote terminals to inquire on their transactions and balances.
2.4.3 Copying Role Profile of Existing Role
Often, you may have to create a Role Profile that closely resembles an existing one. In such a case, you can copy the existing profile on to the new one.
To copy a role, you need to retrieve the record whose attributes you wish to copy. This is done as follows:
- Click the F7 button.
- Input the Role ID.
- Click on F8.
All the details related to the particular Role Id are displayed by the system. Choose the Copy button from the row of buttons at the topmost row of the screen All the details of the profile except the Role ID will be copied and displayed. Enter a unique Role ID. You can change any of the details of the profile before saving it.
If you have retrieved an existing role profile and you want to copy it to a new role profile, click the Copy button in the topmost row of buttons in the screen. The Copy Information screen is opened, and you can specify the Role ID and Description for the new role profile.

All the details of the existing profile are copied onto the new role profile. Again, you can change any of the details of the profile before saving it.
2.4.4 Deleting Role Profile
A Role Profile should be deleted only if there are no users linked to it. Thus, before deleting a role profile, you should modify each user profile attached to it and delete the link to the role.
To delete an existing role profile, you have to retrieve the record that you wish to delete. This is done as follows:
- Click the F7 button.
- Input the Role ID.
- Click on F8.
All the details related to the particular Role Id are displayed by the system. Then select the Delete button from the topmost row of buttons in the screen. If the role is linked to any user, a warning message will be displayed. This message will bring your attention to the fact that the user profile to which the role is linked will not be the same if the role profile is deleted.
You will be prompted to confirm the deletion. The Role Profile will be deleted only if you confirm the deletion.
2.4.5 Retrieving Role Profile in Role Definition Screen
To retrieve a role profile that you have previously set up in the Role Definition screen, choose the ‘Query’ button from the topmost row of buttons in the screen. The Query screen is opened.
- Click F7.
- Input the Role Id.
- Click F8.
All the details related to the particular Role Id are displayed by the system.
2.4.6 Authorizing Role Profile
Before you link any users to a role, a user other than the one that defined it must authorize it. To authorize a role profile,
- Retrieve the role profile record so that it is displayed in the Role Definition screen.
- Click F7, input the Role ID and click F8. All the details pertaining
to the Role ID specified are displayed. Choose the Auth button from the
topmost row of buttons in the screen. The Maintenance Authorization Details
screen is displayed. The detail of each modification that was made to
the record, in the sequence of occurrence is shown in this screen. For
each modification, the following details are displayed:
- The sequence number for the modification, in the Mod No. field.
- The operation that resulted in the modification, the Action field.
- The user that effected the modification, in the Input By field.
- The time at which the modification occurred, in the Date Time field.
- In the lower grid portion, the changed values for each modification are displayed.
- You can authorize any of the modified records, or all of them. Check the box in the Authorize field in the desired row, to mark it for authorization.
When you have marked the required modifications for authorization, click the OK button to effect the authorization. The Maintenance Authorization Details screen is closed, and you are returned to the Role Definition screen.
2.4.7 Editing Role Profile
You can make changes to an authorized role profile as follows:
- Retrieve the role profile record so that it is displayed in the Role Definition screen.
- Click the Edit button from the topmost row of buttons in the screen. The record is now in readiness for modification.
- After making your changes, click the Save button from the topmost row of buttons in the screen to save your changes. The record is now an edited, unauthorized record. Another user must now authorize it for it to be effective again.
2.5 User Profile
This section contains the following topics:
- Section 2.5.1, "Defining User Profile"
- Section 2.5.2, "Restrictive Passwords Button"
- Section 2.5.3, "Modules Button"
- Section 2.5.4, "Roles Button"
- Section 2.5.5, "Functions Button"
- Section 2.5.6, "Branches Button"
- Section 2.5.7, "Disallowed Functions Button"
- Section 2.5.8, "Dashboard Maintenance Button"
- Section 2.5.9, "Other Attributes for User Profile"
- Section 2.5.10, "Copying User Profile of Existing User"
- Section 2.5.11, "Deleting User Profile"
- Section 2.5.12, "Retrieving User Profile in User Profile Definition screen"
- Section 2.5.13, "Authorizing User Profile"
- Section 2.5.14, "Editing User Profile"
2.5.1 Defining User Profile
A User Profile defines the activities that a user can carry out on the system. It also contains the user ID, the name through which the user will access the system and the password.
You can invoke the ‘User Admin’ screen by typing ‘SMDUSRDF’ in the field at the top right corner of the Application tool bar and clicking on the adjoining arrow button.

Specify the following basic information for the user profile, in the User Details section in this screen:
User Details
User Identification
Alphanumeric; 12 Characters; Mandatory
Specify a unique identifier for the user.
Name
Alphanumeric; 35 Characters; Mandatory
Specify the name of the user.
External Identifier
Alphanumeric; 20 Characters; Optional
Specify the External Identifier. External user is an alternative name for user id where two users cannot have same External identifier.
LDAP DN
Alphanumeric; 500 Characters; Optional
Specify LDAP DN details that is maintained in SSO screen.
The application will verify if only one user ID in FLEXCUBE Investor Service is mapped to the subject (DN) while authentication via SSO.
MFA Applicable
Optional
Select if Multi Factor Authorization (MFA) is applicable or not from the drop-down list. The list displays the following values:
- Yes
- No
MFA ID
Alphanumeric; 50 Characters; Optional
Specify the multi factor authorization ID.
If ‘MFA Applicable’ field is selected as ‘Yes’, then ‘MFA ID’ is mandatory.
Language
Alphanumeric; 3 Characters; Mandatory
Specify the preferred language for the user profile. Alternatively, you can also select language from the option list. The list displays all valid language code maintained in the system.
Home Branch
Alphanumeric; 3 Characters; Mandatory
Specify the home branch details.
Home Module
Alphanumeric; 30 Characters; Mandatory
Specify the default module from which the user profile will operate.
Debug Window Enabled
Optional
Check this box to enable debug window.
Show Dashboard
Optional
Check this box to show dashboard.
Classification
Optional
Select one of the classification options:
- Staff
- Auto End Of Day
- Customer
You can classify a user as belonging to one of the following categories:
User |
Description |
Staff |
A user of the system who is an employee of your AMC. You can include any of the functions available in the system in the user profile. Ideally, you should not include functions that are part of End of Cycle or End of Day operations in the profile of a Staff user. |
Customer |
A customer who would want to log into the system from a remote terminal. You can include only those functions through which the customer can inquire into balances and transactions. |
AEOD |
A user at the AMC who is responsible for running the automated End of Day operations. You can include any of the functions available in the system in the user profile. Ideally, you should include only functions that are part of End of Cycle operations in the profile of a AEOD user. |
You can indicate this through the Classification field in the User Profile Definition screen.
Access To Classified Information
Optional
Select if access to classified information is allowed or not from the drop-down list. The list displays the following values:
- Allowed
- Disallowed
View PII
Optional
Select if Personal Identifiable Information has to be viewed or not from the drop-down list. The list displays the following values:
- Yes
- No
By default, ‘View PII’ field is set to ‘Yes’.
If you select ‘No’, then you need to amend user roles with View only Roles to all ‘Personal Identifiable Information’ related screens. This is usually applicable to a user with only back-office role.
Modules
Investments
Optional
Check this box if the user is investment module user.
Corporate
Optional
Check this box if the user is corporate module user.
Status Description
User Status
Optional
Check one of the user status by checking the appropriate radio button:
- Enabled
- Hold
- Disabled
- Locked
Time Level
Numeric; 1 Character; Mandatory
Specify the time level.
Status Changed On
Display
The system displays the most recent date of status change of user profile.
Last Signed On
Display
The system displays the last logged in details
Invalid Logins
Cumulative
Display
The system displays the number of successive invalid login attempts (in a single session) after which the user ID will be disabled for this profile.
Successive
Display
The system displays the number of successive invalid login attempts (spread across different sessions) after which the user ID will be disabled for this profile.
After you have entered these basic details, you can specify any of the following information for the user profile, depending upon the necessity.
Note
When authentication of credentials is unsuccessful due to an incorrect user ID, then the user ID will not be logged in the audit logs. In case the user ID is correct and the password is wrong, the attempt is logged in the audit log and the successive and cumulative failure count is incremented. When the user ID and password are correct, this is logged into the audit logs.
User Passwords
Password
Alphanumeric; 32 Characters; Optional
Specify the user password to login. The static data AUTO_GEN_PASS_REQ is provided. The defaulted value ‘Y’ indicates whether the auto generation of the password is required or not.
Note
If the application level parameter which indicates the auto generation of the password is required or not is set to Y (Yes), then this field will be disabled and the system will create a random password in accordance with the parameters maintained at the level of the bank. The new password will be send to the respective user via mail.
At the time of setting up the Oracle FLEXCUBE Investor Servicing, the number of repeated successive parameters allowed in a password will be indicated.
For instance, if the number of repeated successive parameters allowed in a password has been set as ‘2’, then the user password can have a character repeating only twice. Suppose, if the number of repeated successive parameters has been specified as 2, a user password like AAA777 will be invalid. A valid password would be AA77.
Password Changed On
Display
The system displays the date when the password was last changed.
Alphanumeric; 50 Characters; Optional
Specify the e-mail ID of the user.
Start Date
Date Format; Mandatory
Select the start date for the user password from the adjoining calendar.
End Date
Date Format; Optional
Select the end date for the user password from the adjoining calendar.
Note
The System is also configured to disallow the use of a pre-set number of previous passwords. This pre-set number is assigned at the time of installation, as a system parameter; the number can be subsequently changed if required, by changing this system parameter.
Access Control
Optional
Select the access control from the drop-down list. The list displays the following values:
- UI
- Gateway
- Both
The system is configured to disallow the use of a pre-set number of previous passwords. This pre-set number is assigned at the time of installation. As a system parameter; the number can be subsequently changed if required by changing this system parameter.
Amount Limits
Limit Currency
Alphanumeric; 3 Characters; Mandatory
Specify the currency to be mapped for transaction amount and auth amount.
Transaction Amount
Numeric; 18 Characters; Mandatory
Specify the maximum amount value that the user can specify while entering a transaction request from an investor.
Auth Amount
Numeric; 18 Characters; Mandatory
Specify the maximum amount value of an investor transaction that the user can authorize.
Date Format
Optional
Select the date format from the drop-down list. The list displays the following values:
- M/D/YYYY
- M/D/YY
- MM/DD/YY
- MM/DD/YYYY
- YY/MM/DD
- YYYY-MM-DD
- DD-MMM-YY
- DD-MMM-YYYY
- DD/MM/YYYY
- DD-MM-YYYY
Auto Auth
Optional
Select auto authorization status from the drop-down list. The list displays the following values:
- Yes
- No
Amount Format
Optional
Select the amount format from the drop-down list. The list displays the following values:
- Dot Comma
- Comma Dot
- Comma
Number Format
Optional
Select one of the number format options to be used:
- XXX,XXX,XXX,XXX
- XX,XX,XX,XX,XXX
2.5.2 Restrictive Passwords Button
You can maintain a list of passwords that the user is most likely to use. For example, a user may tend to use the names of loved ones, the AMC or AMC branch, department, etc. as a password as they are easy to remember. This might be a security risk as it will be easy for another person to guess a password. To prevent this, you can maintain a list of passwords that the user should not use. This list of restrictive passwords will be checked before a password is accepted when the user is changing passwords. If the password entered by the user is listed, it will not be accepted.
Click ‘Restricted Passwords’ button in the User Profile Definition screen, left margin of the screen. The Restricted Passwords screen is opened, where you can define a list of such passwords.
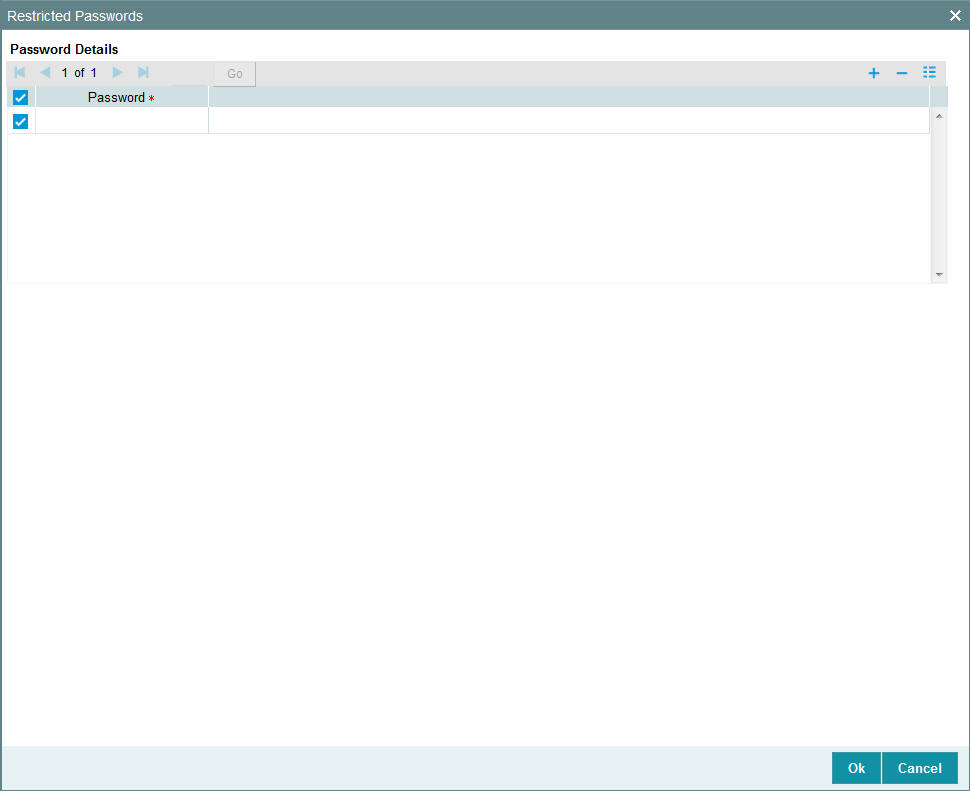
Password Details
Password
Alphanumeric; 12 Characters; Mandatory
Specify the restricted password.
The user for whom you are defining the restrictive passwords cannot use the restrictive passwords defined in this screen.
2.5.3 Modules Button
You can restrict the user to operate only from certain Modules, or certain branches of an AMC. To define such a restrictive list of AMC’s or AMC branches, click ‘Module’ button in the left margin of the User Profile Definition screen. The Module screen is displayed

User AMC
Module
Alphanumeric; 30 Characters; Optional
Specify the module ID. Alternatively, you can select module ID from option list. The list displays all valid module ID maintained in the system.
2.5.4 Roles Button
Click ‘Roles’ button to attach the user profile you are defining to a role. The User Roles screen will be displayed.
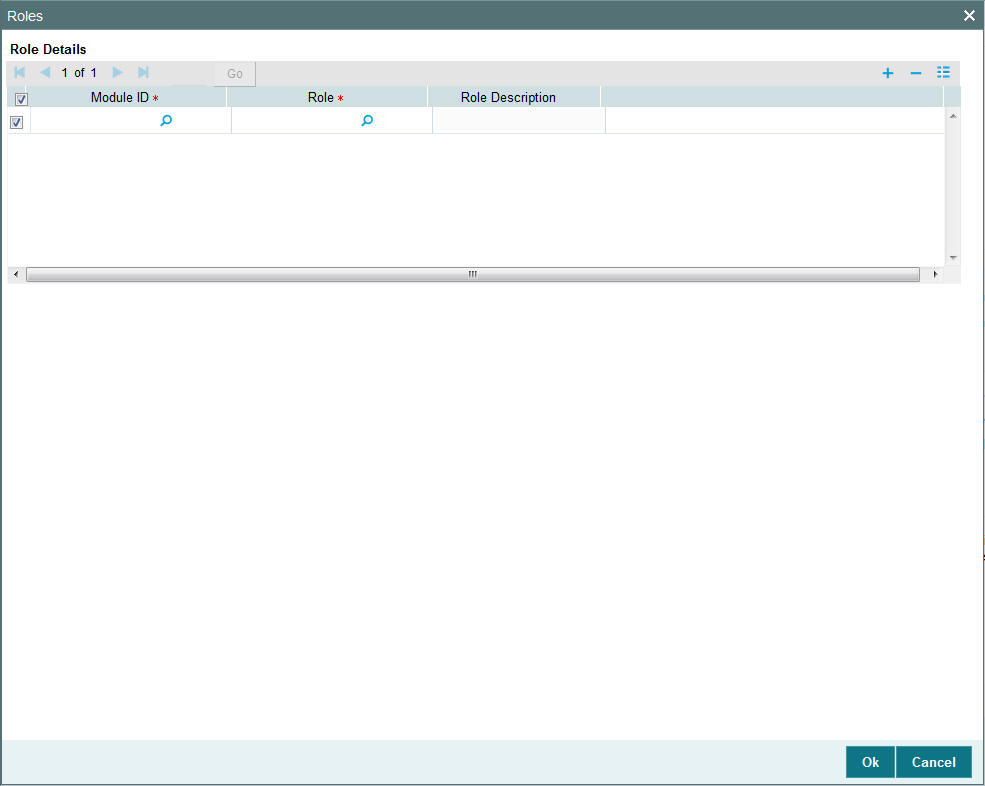
You can specify the following details:
Module ID
Alphanumeric; 30 Characters; Mandatory
Specify the module ID. Alternatively, you can select module ID code from the option list. The list displays all valid module ID maintained in the system.
Role
Alphanumeric; 15 Characters; Mandatory
Specify the role defined to the user.
Role Description
Display
The system displays the description for the selected role.
A role profile could contain either back office (Fund Manager) functions or front office (Agency Branch) functions.
When you have selected the required roles, click the OK button to save your changes.
2.5.5 Functions Button
In addition to attaching a user profile to a role, you can give rights to individual functions. For a user profile to which no role is attached, you can give access to specific functions. If you have one of the following:
- Attached one or more roles to a user profile
- You have given access to individual functions to a profile to which roles are attached.
A user profile could be given access to either back office (Fund Manager) functions or front office (Agency Branch) functions, depending upon the tasks that the user has to perform within your organization.
The rights for Function IDs that figure in both the role and user specific functions will be applied as explained in the following example.
Click ‘Functions’ button in the User Profile Definition screen to give access to functions for the user profile you are defining. The User Functions screen will be displayed.
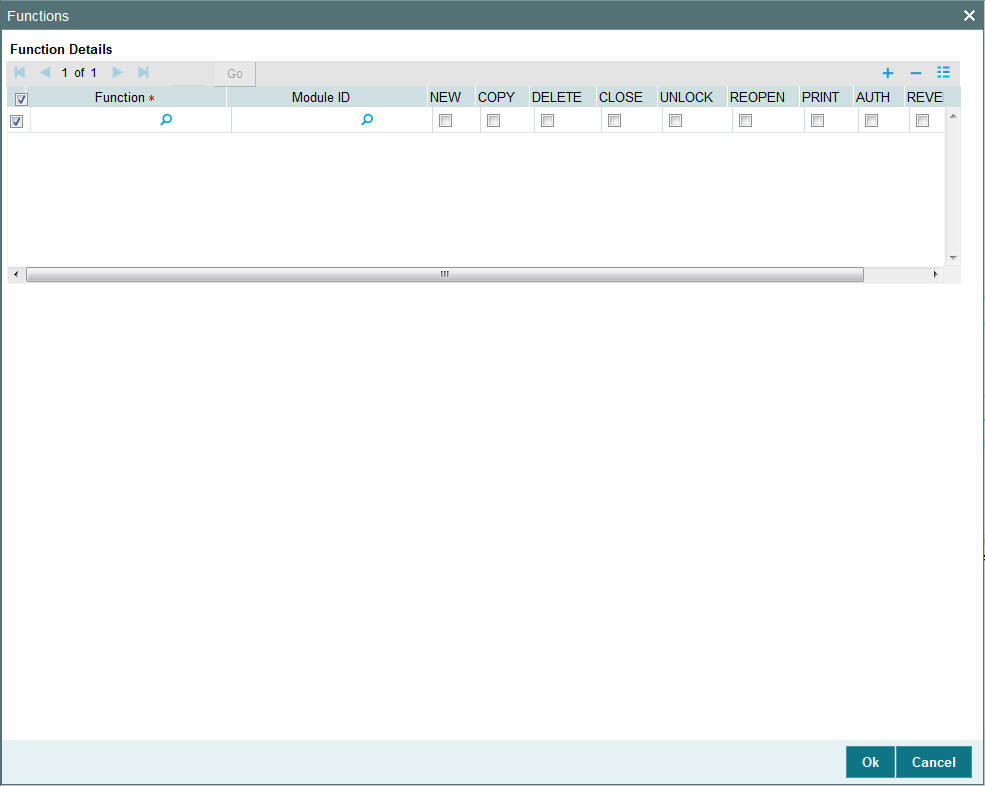
Function
Alphanumeric; 3 Characters; Mandatory
Specify the branch code from the option list.
Module ID
Alphanumeric; 30 Characters; Mandatory
Specify the module ID from the option list.
You can allow any of the following operations at record level for the user profile, in any function:
2.5.5.1 Static Screens
- New (Define a new record)
- Copy (Copy details of an existing record)
- Delete (Delete an existing record)
- Close (Close an existing record)
- Unlock (to amend an existing record)
- Reopen (Reopen an existing record)
- Print (Print the details of selected records)
- Authorize (Authorize any maintenance activity on a record)
- Reverse (Reverse an existing record)
2.5.5.2 Contracts and On-line Transaction Processing
- View (to see the details of the contract).
2.5.5.3 Reports
- Generate (to generate reports).
- View (view the reports).
- Print (print the reports).
To delete the access rights you have specified for a function, select the required Function ID row and check the Delete box to the left of the Function ID field.
To edit the access rights you have specified for a function, select the required Function ID row and check the Edit box to the left of the Delete field.
2.5.6 Branches Button
For Staff and End of Day users, you can specify the branches from which they can operate. Click ‘Branches’ button in the User Profile Definition screen to define the branches in which the user should be allowed to operate.

Branches
Optional
Select one of the options from the following list:
- Allowed
- Disallowed
To prepare a list of branches from which the user is disallowed, choose the Disallowed option. Specify the branches that are disallowed for a user.
Similarly, to prepare a list of branches from which the user is allowed to operate, choose the Allowed option.
Branch List
Branch
Alphanumeric; 3 Characters; Optional
Specify the branch code.
Branch Name
Display
The system displays the name of the branch for the selected branch code.
Allowing User to Operate from Different Branches
When you create a User Profile, it will be attached to the branch where it is created. This means that the user can execute the functions defined for the profile from this branch. For a user profile, you can indicate that the user can access other branches also. The kind of functions a user can perform in a branch other than the one where the user profile is created depends on the category of the user.
Allowing User to Operate from Different Branches of AMC
For mutual fund account customers, you can define a list of branches of the AMC from which the user would be allowed to operate. To define this list, click the AMC button in the User Profile Definition screen.
User Belonging to Staff Category
In each branch, you should create a user profile called the Guest. The functions defined for this branch will be applicable for a user of a different branch. Typically, this profile should have access to functions like inquiry into balances, etc. If this Guest profile is not created in a branch, a user not belonging to that branch will not be allowed to change branch to it.
The branch where the user profile is created is called the Home branch and the other branches are called Host branches.
User Belonging to AEOD Category
For such a user, the functions defined for the user profile where the profile created (the Home branch) will be applicable in every branch (Host branch).
User Belonging to Customer Category
A user of this category can log on only to the branch where the profile is created.
2.5.6.1 User Transaction and Auth Limits
You cannot capture any transaction, if the transaction amount is greater than the maximum transaction amount. Also, you cannot authorise any transaction if the transaction amount is greater than the maximum authorization amount.
This validation is applicable only for UT transactions, Bulk transaction, adjustment transaction, light weight transaction and LEP – initial investment, top up, surrender and switch transaction types.
The validation will not be applied if there is no exchange rate currency maintained for the limit currency of the user and the transaction currency.
2.5.7 Disallowed Functions Button
You can define a list of functions that the user is not allowed to operate, out of the functions list already associated with the user profile. To define such a restrictive list of functions, click ‘Disallowed Functions’ button in the left margin of the User Profile Definition screen.
The ‘Disallowed Functions’ screen is displayed. All the functions that are associated with the user profile are listed in the Available box.

Function
Alphanumeric; 8 Characters; Mandatory
Select the functions that you wish to disallow for the user.
2.5.8 Dashboard Maintenance Button
Click ‘Dashboard Maintenance’ button in ‘User Admin’ screen to map the dashboards. The ‘Dashboard Maintenance’ screen is invoked.

User ID
Display
The system displays the user ID.
User Name
Display
The system displays the user name for the selected user ID.
Click ‘Populate’ button, to view the following details:
- Function
- Description
- Sequence Number
Clause Wizard
Click ‘Clause Wizard’ button to invoke the following screen:
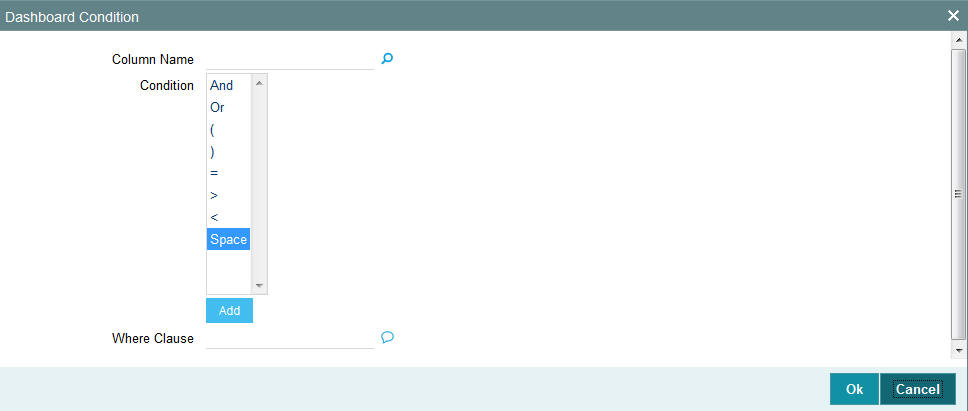
You can specify the following details:
Column Name
Alphanumeric; 35 Characters; Optional
Specify the column name. Alternatively, you can select column name from the option list. The list displays all valid column names maintained in the system.
Condition
Optional
Select the conditions from the drop-down list.
Where Clause
Alphanumeric; 35 Characters; Optional
Specify the where clause.
Show In Dashboard
Optional
Check this box to show in dashboard.
The system will default the value based on the value set at ‘User settings’ screen. If you uncheck this box, then the value will be applied upon change in modules.
2.5.9 Other Attributes for User Profile
Other than the attributes you have defined for a user profile, such as the role association, function access rights, restrictive passwords and branch restrictions, you can define any of the following attributes. Click on the appropriate button in the group of buttons displayed in the left margin of the screen:
- The Rights button to define grant rights and grant queues for the user profile
- The User Till Restrictions button to define till restrictions for the user profile.
- The User Account Class Restrictions button to define a restrictive list of account classes for the user profile.
- The User GL Restrictions button to define a restrictive list of Node GL’s and sub nodes.
2.5.10 Copying User Profile of Existing User
Often, you may have to create a user profile that closely resembles an existing one. In such a case, you can copy the existing profile on to the new one.
Click F7, input the User Identification and click F8. All the details pertaining to the User Identification specified are displayed. Choose the Copy button from the row of buttons at the topmost row of the screen. All the details of the profile except the User ID will be copied and displayed. Enter a unique User ID. You can change any of the details of the profile before saving it.
If you have retrieved an existing user profile and you want to copy it to a new user profile, click the Copy button in the topmost row of buttons in the screen. The Copy Information screen is opened, and you can specify the User ID for the new user profile.
All the details of the existing profile are copied onto the new user profile. Again, you can change any of the details of the profile before saving it.
2.5.11 Deleting User Profile
A user profile can be deleted only if the user is currently not logged on to the system.
To delete an existing user profile, retrieve the record of the user profile so that it is displayed in the main portion of the User Profile Definition screen. Then select the Delete button from the topmost row of buttons in the screen. If the user is logged in to the system, a warning message will be displayed and you cannot delete the profile.
If the user is not logged in, you will be prompted to confirm the deletion. The user profile will be deleted only if you confirm the deletion.
2.5.12 Retrieving User Profile in User Profile Definition screen
To retrieve a user profile that you have previously set up in the User Profile Definition screen, choose the Query button from the topmost row of buttons in the screen. The Query User screen is opened.
To retrieve a record:
- Press F7
- Input the data
- Press F8 to query the data
In this screen, you can specify the parameters that will the system will use to locate the user profile in the database and retrieve it.
When the record is retrieved based on your search specifications, it is displayed in the User Definition screen.
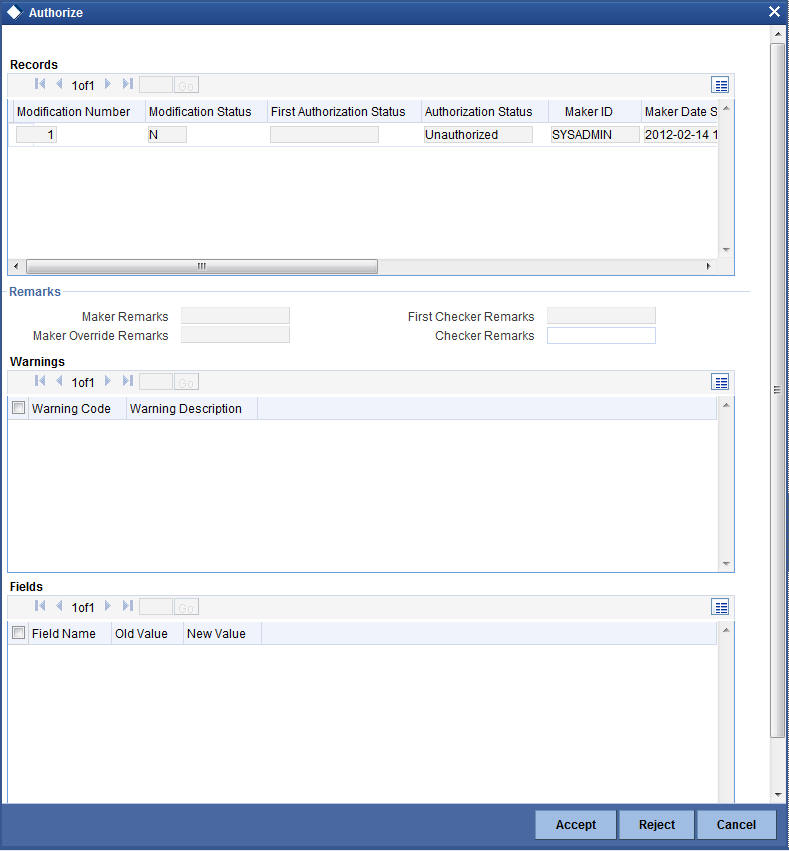
2.5.13 Authorizing User Profile
Before you link any users to a user, a user other than the one that defined it must authorize it.
To authorize a user profile:
- Retrieve the user profile record so that it is displayed in the User Definition screen.
- Click the Auth button from the topmost row of buttons in the screen.
The Authorize User Admin screen is displayed. The details of each modification
that was made to the record, in the sequence of occurrence is shown in
this screen. For each modification, the following details are displayed:
- The sequence number for the modification, in the Mod No. field.
- The operation that resulted in the modification, the Action field.
- The user that effected the modification, in the Input By field.
- The time at which the modification occurred, in the Date Time field.
- In the lower grid portion, the changed values for each modification are displayed.
- You can authorize any of the modified records, or all of them. Check the box in the Authorize field in the desired row, to mark it for authorization.
When you have marked the required modifications for authorization, click ‘Ok’ button to effect the authorization. The Maintenance Authorization Details screen is closed, and you are returned to the User Definition screen.
2.5.14 Editing User Profile
You can make changes to an authorized user profile as follows:
- Retrieve the user profile record so that it is displayed in the User Profile Definition screen.
- Click the Edit button from the topmost row of buttons in the screen. The record is now in readiness for modification.
- After making your changes, click the Save button from the topmost row of buttons in the screen to save your changes. The record is now an edited, unauthorized record. Another user must now authorize it for it to be effective again.
- Fields in User Profile Definition Screen
Status Bar Information
In this section, the following details are displayed for any user profile record:
- The user that has created the user profile, in the Input By field.
- The date and time of user profile creation, in the Date Time field.
- The user that has authorized the user profile, in the Authorized By field.
- The date and time of user profile authorization, in the Date Time field.
- The serial sequence number of the most recent modification of the user profile, in the Mod No field.
- The authorization status of the record, in the Authorized field.
- The open status of the record, in the Open field.
2.6 Clearing Users
This section contains the following topics:
2.6.1 Clearing User that has Exited System Abnormally
If a user exits the system abnormally, the administrative users can clear the logged in user profile so that the user can log in normally again
To clear a user, log in to the system as an administrative user, and type ‘SMDCLUSR’ in the field at the top right corner of the Application tool bar and click the adjoining arrow. The ‘Clear User Profile’ screen is displayed.
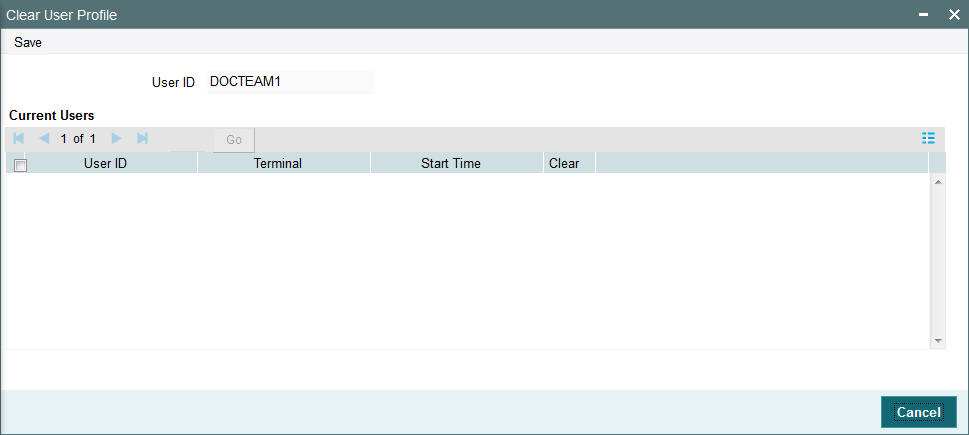
In this screen, press F7 and select the User Id from the adjoining option list which displays the users logged in currently. After specifying the user id to be cleared, press F8. Upon pressing F8, system displays the terminal and start time information.
Now click on the unlock icon from the toolbar menu and then click on save icon. The system will clear the selected user id and will display the message as ‘SMS User Profile Cleared’
Click on OK to confirm..
To clear a user, check ‘Clear’ in the required row, and then click ‘Clear’ button.
2.7 SMS Parameters
This section contains the following topics:
2.7.1 Setting up SMS Parameters
You can set up certain parameters related to invalid logins and passwords using the ‘SMS Parameters Maintenance’ screen. You can invoke the ‘SMS Parameters Maintenance’ screen by typing ‘SMDPARAM’ in the field at the top right corner of the Application tool bar and clicking on the adjoining arrow button. The screen is displayed below:
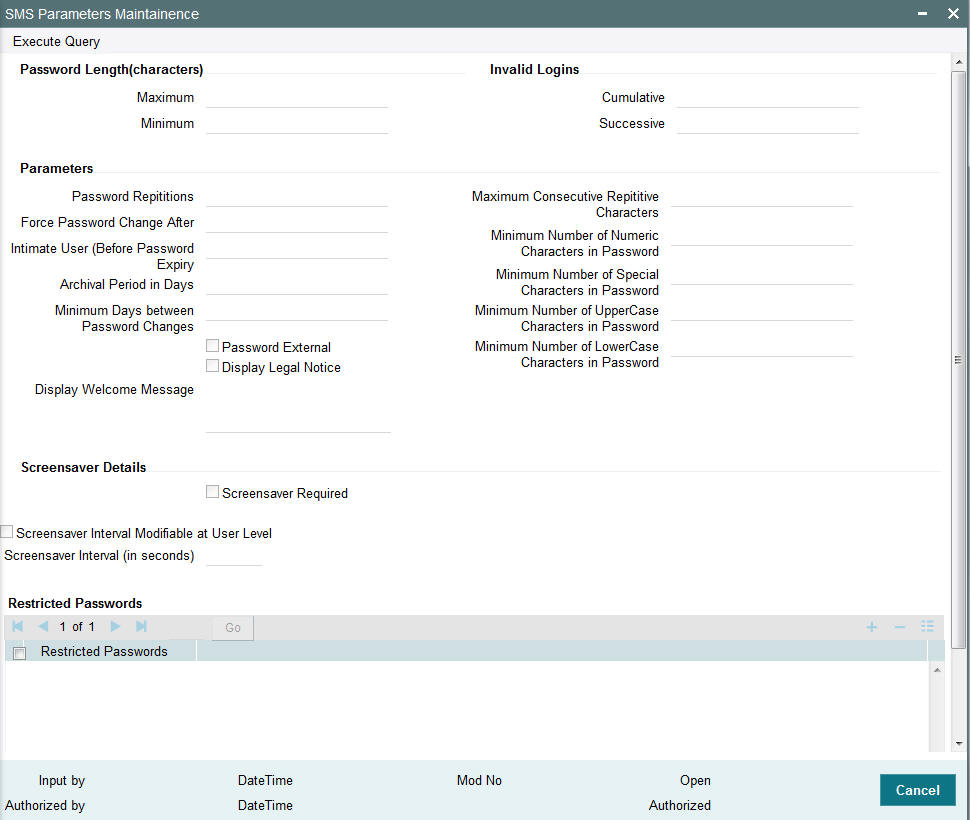
Password Length (characters)
Maximum
Numeric; Optional
Indicate the maximum number of characters to be used for a password. The number of characters in a user password is not allowed to exceed the maximum length that you specify here.
The maximum length of password defaults to 15.
Minimum
Numeric; Optional
Indicate the minimum number of characters to be used for a password. The number of characters in a user password is not allowed to fall below the minimum length that you specify here.
The minimum length of password defaults to 8. The minimum length that you specify must not exceed the maximum length that you have specified.
Invalid Logins
Cumulative
Numeric, Optional
Specify the allowable number of cumulative invalid attempts made during the course of a day, as well as the allowable number of consecutive or successive invalid attempts made at a time. In either case, if the number of invalid attempts exceeds the stipulated number, the user ID is disabled.
Successive
Numeric, Optional
Specify the allowable number of times an invalid login attempt is made by a user. Each user accesses the system through a unique User ID and password. While logging on to the system, if either the User ID or the Password is wrong, it amounts to an invalid login attempt. If the number of invalid attempts exceeds the stipulated number, the user ID is disabled.
Note
When authentication of credentials is unsuccessful due to an incorrect user ID, then the user id will not be logged in the audit logs. In case the user id is correct and the password is wrong, the attempt is logged in the audit log and the successive and cumulative failure count is incremented. When the user id and password are correct, this is logged into the audit logs.
Parameters
Password Repetitions
Numeric, Optional
Specify the number of previous passwords that cannot be set as the new current password, when a password change occurs.
Force Password Change after
Numeric, Optional
Specify the number of calendar days for which the password should be valid. After the specified number of days has, it is no longer a valid password and the user will be forced to change the password.
Minimum Days between Password Changes
Numeric, Optional
Specify the minimum number of calendar days that must elapse between two password changes. After a user has changed the user password, it cannot be changed again until the minimum number of days you specify here have elapsed.
Display Welcome Message
Optional
Check this option if you want to display welcome message when the login screen is launched.
Welcome Text Message
Alphanumeric; Conditional
If you have selected the ‘Display Welcome Message’ option, then specify the welcome text message to be displayed on launching the login screen,
Intimate Users (before password expiry)
Numeric, Optional
Specify the number of working days before password expiry that a warning is to be issued to the user. When the user logs into the system (the stipulated number of days before the expiry date of the password), a warning message will continue to be displayed till the password expires or till the user changes it.
Maximum Consecutive Repetitive Characters
Numeric, Optional
Define the maximum number of allowable repetitive characters occurring consecutively, in a user password. This specification is validated whenever a user changes the user password.
Minimum Number of Numeric Characters in Password
Numeric, Optional
Define the minimum number of numeric characters allowed in a password. The system validates the password at the time of creating a User ID in User admin screen and at the time when a user chooses to change his password.
- .Minimum No of Special Characters = 1
Minimum Number of Special Characters in Password
Numeric, Optional
Define the minimum number of special characters allowed in a password. The system validates the password at the time of creating a User ID in User admin screen and at the time when a user chooses to change his password.
- Minimum No of Special Characters = 1
Minimum Number of Upper Case Characters in Password
Numeric, Optional
You can define the minimum number of upper case characters allowed in a user password. The allowed upper case characters are from the US-ASCII character set only. The system validates the password at the time of creating a User ID in User admin screen and at the time when a user chooses to change his password.
If you do not specify the limits, the following default values will be used:
- Minimum No of Upper Case Characters = 1
- Maximum No of Numeric Characters = Maximum Password Length
Minimum Number of Lower Case Characters in Password
Numeric, Optional
You can define the minimum number of lowercase characters allowed in a user password. The allowed lower case characters are from the US-ASCII character set only. The system validates the password at the time of creating a User ID in User admin screen and at the time when a user chooses to change his password.
If you do not specify the limits, the following default values will be used:
- Minimum No of Lower Case Characters = 1
- Maximum No of Numeric Characters = Maximum Password Length
2.8 User Details Modification in Bulk
This section contains the following topics:
2.8.1 Modifying User Details in Bulk
You can change or reset user passwords in bulk if you have the system admin rights. After modification of the user list, click ‘Save’. The modified user list will be stored in a temporary table. The lists of users which are modified and mapped with a unique sequence number will not be available until the particular sequence number is authorized. When the particular sequence number is authorized those user details will be changed and updated.
You can invoke this screen by typing ‘SMDCHPWD’ in the field at the top right corner of the Application tool bar and clicking on the adjoining arrow button.
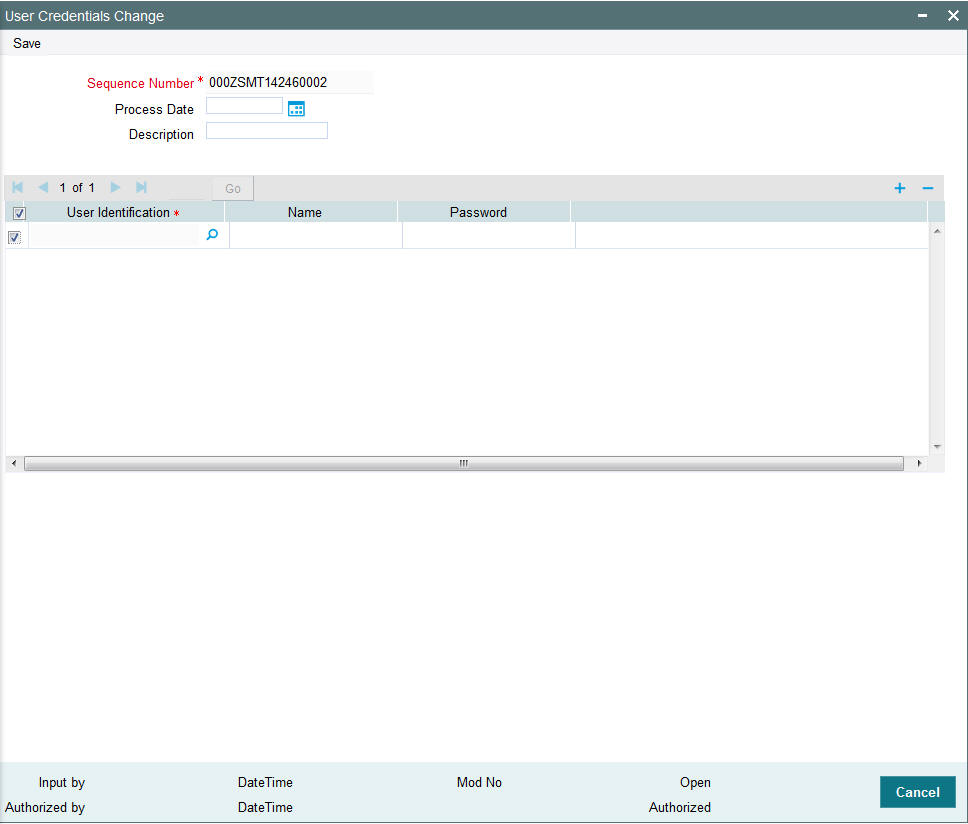
In this screen, the following information is to be provided.
Sequence Number
Alphanumeric, Mandatory
Click on ‘New’ icon to generate a new ‘Sequence Number’.
Process Date
Date Format
Select a date by clicking on the calendar icon beside the field. This field is generally useful for querying purpose.
Description
Alphanumeric, Optional
Provide a description of what modification is being done on selected user ids.
User Id
Alphanumeric, Mandatory
Select the User Id to be changed from the option list provided.
Name
Alphanumeric, Optional
Name of the user specific to the selected user id will be displayed in this field.
Password
Optional
Password of the selected user id will be displayed here. This field will be editable only if the ‘Auto Generation Required’ option is not selected at the application level. If the ‘Auto Generation Required’ option is checked, the password will be auto generated by the application.
Reset Password
Optional
Select this checkbox to reset the password in case of user ids where password needs to be auto generated.
2.9 Modules
This section contains the following topics:
2.9.1 Setting up Modules
Typically, in an AMC, an installation of Oracle FLEXCUBE Investor Servicing installs the following components:
- Fund Manager
- Agency Branch
In a network scenario, the following situations are also possible:
- A single AMC with a single installation may have two or more “instances” of each component, or all components, as necessary.
- A multi-AMC situation where a number of AMC’s are networked and each has one or more installation of all components.
In either case, each installation of any or all of the components may have a different instance, or schema. However, for the purpose of multi-networking and enabling a user to log in to the system with a single user ID from any component, a single Security Management System database is necessary that contains the repository of all users in all the different instances.
Each instance of the installation, in a multi-networked situation, is referred to a Module.
A Module, therefore, is an instance of either one of the components, connecting to a single SMS database.
At the time of installation, the installation process sets up the Fund Manager module in the system, with a default agent and branch code.
Subsequently, the Sysadmin User must set up the Agency Branch module.
Subsequently, if any new agency branch modules need to be created, the Sysadmin User can create them using the ‘Module Setup’ screen. You can invoke this screen by typing ‘SMDMODUL’ in the field at the top right corner of the Application tool bar and click the adjoining arrow. The screen is displayed below:
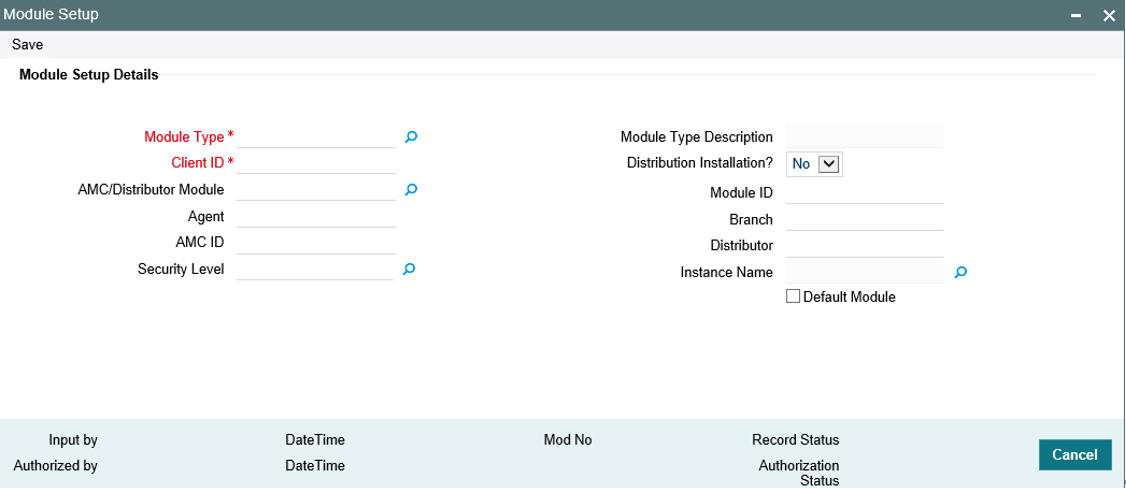
To set up a module, proceed in the following manner:
- Click on the Module Profile button in the Restricted Access screen. The system displays the Module Profile Maintenance screen. The profile of the logged-in module is displayed. Click on the Add button to specify a new module. To make changes to the logged-in module, click the Amend button.
- Proceed to specify all the details of the Module that you want to
set up, in the following sequence:
- The ID of the Module, in the Module ID field. This must be unique, and if any duplicates are detected by the system, a warning message is displayed.
- The connect string that identifies the instance for the module in the system registry, in the Connect String field. The connect string must contain the DSN name, user name and the password.
- The agent and branch combination that will together be created as a Module, in the Agent Code and Branch Code fields. You can use the drop down lists to make your choice.
- The type of module you are setting up, in the Module Type field. This could be Fund Manager or Agency Branch.
- The ID of the client where the module is being created, in the Client ID field.
- Click save icon to save your user profile record. The system confirms the saving of the record.
The record is saved into the SMS database.
2.9.2 Operations on Module Record
After you have set up a module, you must have another user authorize it so that it would be effective in the system.
Before the module is authorized, you can edit its details as many times as necessary. You can also delete it before it is authorized.
After authorization, you can only make changes to any of the details through an amendment.
The Module Profile Maintenance screen can be used for the following operations on modules:
- Retrieval for viewing
- Editing unauthorized modules
- Deleting unauthorized modules
- Authorizing modules
- Amending authorized modules.
2.10 Row Level Security Maintenance
This section contains the following topics:
2.10.1 Invoking Row Level Security Maintenance Screen
You can enable or disable RLS policy using ‘Row Level Security Maintenance’ screen. You can invoke this screen by typing ‘UTDRLSMT’ in the field at the top right corner of the Application tool bar and click the adjoining arrow.

You can specify the following details:
Table Name
Alphanumeric; 30 Characters; Optional
Specify the table name. Alternatively, you can select table name from the option list. The list displays all valid table name maintained in the system.
Enabled
Optional
Select if row level security to be enabled or not from the drop-down list. The list displays the following values:
- Yes
- No
Default Status To
Optional
Select the defaulted status from the drop-down list. The list displays the following values:
- Yes
- No
Click ‘Execute Query’ button to display the following details:
- Policy Name
- Table name
- Policy Function
Enabled
Optional
Select if RLS policies to be enabled or not from the drop-down list. The list displays the following values:
- Yes
- No
By default all the policy will be disabled.
Note
You can create new maintenance but will be restricted to delete or amend existing/ created policies.
On enabling the policy rule, the system will create new RLS policy. On disabling the system will drop the RLS policy.
Note
In case of enabling or disabling RLS policy, you should either enable it or disable it all. In case of partial enabling, the system behaviour could differ.