5. Processing Transactions - II
This chapter contains the following sections:
- Section 5.1, "Subscription Transaction Detail"
- Section 5.2, "Unitholder Deal Summary"
- Section 5.3, "Mandatory Information for All Transaction Types"
- Section 5.4, "Unit Holder Balances Summary"
- Section 5.5, "Contract Notes for Transactions"
- Section 5.6, "Entering Payment Details for Transactions"
- Section 5.7, "Enrich Exchange Rate Detail"
- Section 5.8, "Payment Clearing Detail"
- Section 5.9, "Transaction Load Override"
- Section 5.10, "Global Order"Section 5.11, "GO Maintenance Summary"
- Section 5.11, "GO Maintenance Summary"
- Section 5.12, "Global Order Confirmation Detail"
- Section 5.13, "Global Order Confirmation Summary"
- Section 5.14, "GO Reconciliation Details"
- Section 5.15, "GO Reconciliation Summary"
- Section 5.16, "Global Order Settlement Details"
- Section 5.17, "Global Order Settlement Summary"
- Section 5.18, "Global Order Status"
- Section 5.19, "ISA Transfer"
- Section 5.20, "One Legged Transfer Summary"
- Section 5.21, "Distribution Void Detail"
- Section 5.22, "Distribution Void Summary"
- Section 5.23, "Intra-day Checks for Transactions"
- Section 5.24, "UH Portfolio Readjustment Details"
- Section 5.25, "UH Portfolio Readjustment Summary"
- Section 5.26, "Help Desk Facility"
- Section 5.27, "Help Desk Summary"
- Section 5.28, "Sending and Receiving Messages"
- Section 5.29, "RTA Transfer Details"
- Section 5.30, "RTA Transfer Summary"
- Section 5.31, "Consolidation of Portfolios"
- Section 5.32, "Batch Update of Transaction Date"
- Section 5.33, "Tracking Cheques"
5.1 Subscription Transaction Detail
This section contains the following topics:
- Section 5.1.1, "Invoking Subscription Transaction Details"
- Section 5.1.2, "Transaction Tab "
- Section 5.1.3, "Allocation Details Button"
- Section 5.1.4, "KYC & Document Tab"
5.1.1 Invoking Subscription Transaction Details
For any transaction type, you can use the Transaction Detail screen to enter new transactions into the system.
You can access this screen if it is contained the menu access privileges given to the user group or user role that your user profile is associated with, as set up by the User Administrator for the agency branch installation.
Typically, all users belonging to the Teller user group can enter new transactions in this screen.
Client Information Section
In this section, specify the details of the CIF customer or the investor that has requested for the transaction.
To retrieve a CIF customer number or a unit holder number, click Find.
CIF Number
Alphanumeric, Optional
Specify the number of the CIF customer for whom the transaction is being entered, in this field.
You must select a CIF that is not restricted (or does not belong to a restricted category) for the fund into which the transaction is being entered. If not, the system does not allow the transaction to be saved.
Unit Holder
12 Characters Maximum, Alphanumeric, Optional. This information is mandatory if you have specified a CIF number.
Select the unit holder for whom the transaction request is being entered.
When you specify the CIF Number, all the unit holders that fall under the CIF are displayed in the drop down list in this field. You can make your choice from this list.
If you have selected a unit holder for the selected CIF using the Find link, the name and number of the selected unit holder is displayed here.
You must select a unit holder that is not restricted (or does not belong to a restricted category) for the fund into which the transaction is being entered. If not, the system does not allow the transaction to be saved.
To Client Information Section
In this section, you must specify the unit holder or the CIF unit holder to whom the transfer of ownership is being affected in the case of transfer transactions.
This section is not applicable to any other transaction type other than transfer.
CIF Number
Alphanumeric, Optional
Specify the number of the CIF customer to whom the transfer is being effected, in this field.
You must select a CIF that is not restricted (or does not belong to a restricted category) for the fund into which the transaction is being entered. If not, the system does not allow the transaction to be saved.
Unit Holder
12 Characters Maximum, Alphanumeric, Optional. This information is mandatory if you have specified a CIF number.
Select the unit holder to whom the transfer of ownership is being affected.
When you specify the CIF Number, all the unit holders that fall under the CIF are displayed in the drop down list in this field. You can make your choice from this list.
If you have selected a unit holder for the selected CIF using the Find link, the name and number of the selected unit holder is displayed here.
You must select a unit holder that is not restricted (or does not belong to a restricted category) for the fund into which the transaction is being entered. If not, the system does not allow the transaction to be saved.
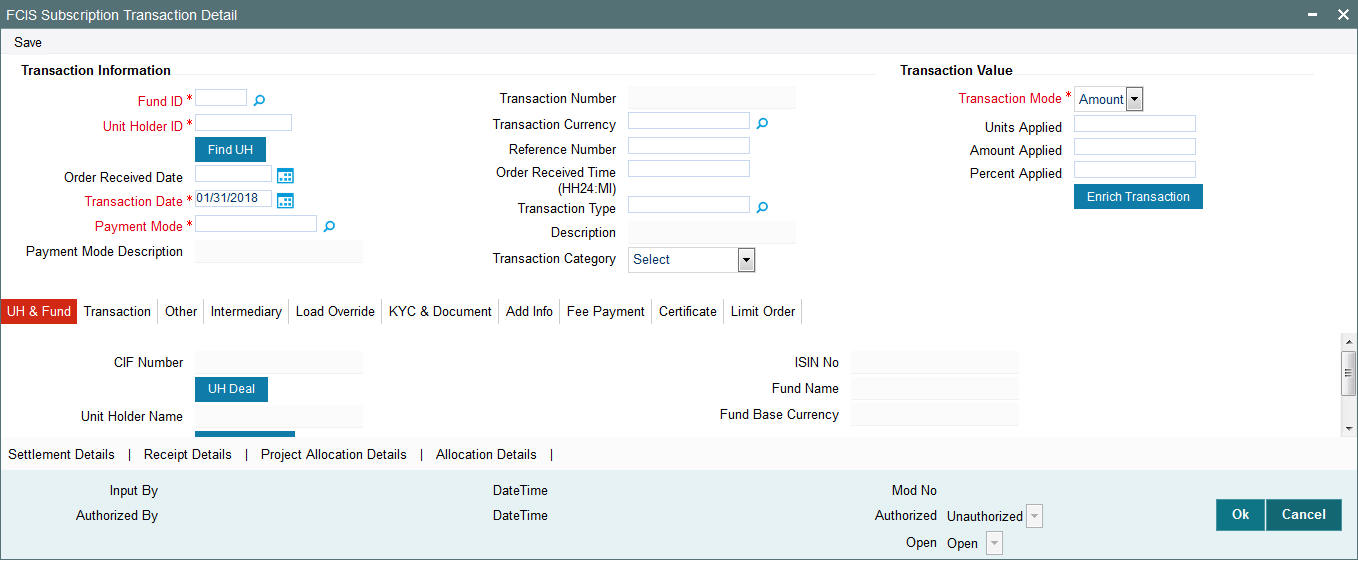
5.1.2 Transaction Tab
![]()
The following are the fields in the screen:
Unit Holder ID
Specify the Unit holder for the transaction entered. To locate a unit holder click on “Find”
Transaction Date
Date format (dd-mm-yyyy), Mandatory
Specify the date on which the transaction request is being entered into the system. The application date is displayed here by default, and is deemed to be the transaction date.
You can enter an earlier date (for a backdated transaction) that falls within the backdating limit specified for the fund in which the transaction is being requested.
The date that you specify here must not be a designated holiday in the system. If you do specify a holiday, the system prompts you to specify a different date.
For check redemption transactions, you must specify the issue date of the check here.
For redemption, switch or transfer transactions, if the unit holder account has a stop instruction (i.e., is frozen), then you can only input the transaction if the transaction date is ahead of the Stop Account Release Date specified in the account profile. For transfer transactions, this validation is made only for the transferor account.
In case of future dated transactions, the transaction date cannot be greater than the future dating limit specified in the Transaction Processing Rules screen.
Reference Number
16 Characters Alphanumeric, Mandatory
Specify a unique reference number that will be used to identify the transaction in the system. Typically, this number is the number of the application that is used to enter this transaction. It will be the initial identification for the transaction, before the actual transaction number is generated by the system.
If the reference number is designated to be a system-generated number for the agency branch, this field is disabled when you open the screen. The system will internally generate and display this number when you save the transaction.
Fund Id
Alphanumeric, Mandatory
Select the fund in which the transaction is being requested.
The funds displayed in the drop down list are authorized funds with a latest prevalent set of fund rules and rule effective date. They are also funds for which the type of transaction that you are entering is permissible, as defined in the Transaction Processing Rules records for the funds.
When you select the fund, the name of the fund as specified in the Fund Demographics screen is displayed in the Fund name field. Also, the base currency for the fund is retrieved from the fund rules and displayed in the Fund Base Currency field in this screen.
Transaction Number
16 Character Maximum, Alphanumeric, System-generated
This is a unique number automatically assigned to each transaction by the system. It is internally generated upon successful entry of the transaction and after all validations have been made. The transaction number generated by the system is in the format TT-YYYY-JJJ-NNNNNNN
Where,
TT - Transaction type (01 - IPO Subscription, and so on)
YYYY - Year of processing
JJJ - Julian date
NNNNNNN- Running sequence number for the day
ISIN Code
12 Characters Maximum; Alphanumeric; Mandatory
Select the ISIN Code of the fund in which the transaction is being requested, from the options provided. If you specify the ISIN Code of a fund, the ID of the fund is displayed in the Fund field and name of the fund is displayed in the Fund Name field.
Fund Base Currency
Display Only
When you select the fund in which the transaction is being entered, the base currency of the fund is retrieved from the fund rules and displayed here.
Price Basis
Alphanumeric, Mandatory
The default price basis defined in the Distributor Price Basis Setup, if any, for the fund, transaction type, distributor and investment account type involved in the transaction, is displayed in this field.
If no price basis has been maintained in the Distributor Price Basis Setup, the default price basis specified for the fund and transaction type for the transaction, from the fund rules, is displayed here.
You can override the default when you enter the transaction.
From Price Date
This field is enabled when you select the fund in which the requested transaction is to be put through. The price date is arrived at by taking into consideration several conditions. You can modify the same.
If you have defined a different trade cycle for the fund in the ‘Override Trade Cycle Date’ screen and the transaction falls within the override period mentioned in this maintenance, the system will default the price date from the maintenance.
Note
This field is enabled only if you select a fund for which you have indicated forward pricing is applicable.
Refer the chapter ‘Other Fund Activities’ for more details on maintaining alternate trade cycles for a fund.
Price Basis for From Fund (For Switch Transactions Only)
Alphanumeric, Mandatory
The default price basis defined in the Distributor Price Basis Setup, if any, for the ‘from’ fund, transaction type, distributor and investment account type involved in the transaction, is displayed in this field.
If no price basis has been maintained in the Distributor Price Basis Setup, the default price basis specified for the ‘from’ fund and transaction type for the transaction, from the fund rules, is displayed here.
You can override the default when you enter the transaction.
Price Basis for To Fund (For Switch Transactions only)
Alphanumeric, Mandatory
The default price basis defined in the Distributor Price Basis Setup, if any, for the ‘to’ fund, transaction type, distributor and investment account type involved in the transaction, is displayed in this field.
If no price basis has been maintained in the Distributor Price Basis Setup, the default price basis specified for the ‘to’ fund and transaction type for the transaction, from the fund rules, is displayed here.
You can override the default when you enter the transaction.
Transaction Type
Alphanumeric; Mandatory
Specify whether the transaction involves an initial purchase, subsequent purchase or a limit order buy or sell transaction.
When the transaction is saved, the system checks to see if the balance for the unit holder at a customer / investment type is zero, or if there is no underlying balance. If so, and the type of transaction selected is not ‘Initial Purchase’, the system displays a warning, which can be overridden.
Also, if the ‘Initial Purchase’ option is chosen, and the unit holder holds any balance at the customer / investment type level, or if there is any underlying balance, the system displays a warning, which can be overridden.
In case of Switch transactions, specify the type of switch the unitholder has opted for. The values defined as a part of Parameter Maintenance will be available in the drop-down list.
In case of Transfer transaction, you can specify whether the transaction involves scrip-less to scrip-based conversions and vice versa. In case of scrip-less to scrip-based conversions, select the option ‘Book to Certificate’ and in case of scrip-based to scrip-less conversion, select ‘Certificate to Book’.
Liquidation Indicator
Alphanumeric; Mandatory
Specify if the redemption transaction involves a limit order sell, by selecting it from the list.
Product
Alphanumeric, Mandatory
If the selected investor is eligible for tax-exemption, select the tax product in which the investor wishes to purchase units, in this field. When you select the product, you are indicating to the system that this transaction will affect the used up amount of the non-taxable limit set up for the selected unit holder in the Non-Tax Limits Setup options.
The proceeds of the transaction will also be reflected in the system database as non-taxable holdings for the investor.
To Fund
Alphanumeric, Mandatory for switch transactions
Select the fund to which the selected unit holder has requested to switch or exchange the investment. If you specify the Fund ID, the ISIN Code of the fund is displayed in the To ISIN Code field.
To ISIN Code
12 Characters Maximum; Alphanumeric; Mandatory
Select the ISIN Code of the fund to which the selected unit holder has requested to switch or exchange the investment, from the options provided. If you specify the ISIN Code of a fund, the ID of the fund is displayed in the To Fund field.
From Issued Balances
Optional
In the case of transaction types other than IPO or subscription, specify whether the transaction value must be reckoned from the unit holder’s issued balances or the non-issued balances. Select ‘Yes’ to indicate that the value must be reckoned from the issued balances, and ‘No’ to indicate that it must be reckoned from the non-issued balances.
The issued balances are the portions of the unit holder’s balance for which certificates have been issued. The non-issued balance is that portion for which certificates have not been issued. The unit holder can choose to enter into transactions (other than IPO and subscription) using either portion of the balance, but not both in a single transaction.
If you select the option ‘Both’ and the selected unitholder has requested certificates, system will first try to redeem all the units from the certificates provided. If units in excess of the certificates provided are to be redeemed, system will first redeem the scrip-less holdings using FIFO logic. In such cases, during transaction entry, system will check whether the unit holder has sufficient scrip-less certificate balance to process the redemption transaction.
The following example illustrates this:
Case 1
Assume that a unitholder has 1000 certificate balance and 1000 scrip-less balance. During redemption entry the investor specifies 1200 units to be redeemed and provides certificates worth 800 units, then system will redeem 800 units from the scrip-based holdings and the remaining 400 from scrip-less holdings.
Case 2
Assume that the unitholder has 1000 certificate balance and 1000 scrip-less balance. During redemption entry the investor specifies 1400 units to be redeemed and provides certificates worth 300 units, system will not allow you to save this redemption, since the unitholder does not have sufficient scrip-less holdings.
Certificates Required?
Optional
For funds that have the certificate option as specified in the Shares Characteristics rules, specify whether the selected unit holder has requested certificates. If yes, then choose the Yes option in this field, and specify the number of certificates requested in the Number of Certificates field.
Number of Certificates
Mandatory only if you have chosen the ‘Yes’ option in the Certificate Required field.
Select the denomination of certificates, whether single or multiple, that will be involved in the transaction, if certificates have been requested.
- For IPO and subscription, specify whether the unit holder has requested a single certificate or multiple certificates.
- For redemption, switch and transfer, specify whether a single certificate or multiple certificates are being redeemed, switched or transferred. For transfer transactions, specify whether the transferee unit holder has requested single or multiple certificates.
If you choose the ‘Multiple’ option in this field, then the certificates involved in the transaction will be reckoned in denominations governed by the maximum and minimum certificate denominations specified for the fund in the Shares Characteristics rule.
Transaction Mode
Alphanumeric, Mandatory
Select the mode in which the transaction is being requested. An investor can choose to transact using a specific amount, or a certain number of units held, or a percentage of the units held. Accordingly, select the appropriate option.
For check redemption transactions, which you enter for an investor with check writing facility in a fund for which check writing is allowed, the mode of the transaction is considered by default to be ‘amount’. It cannot be changed.
For redemption transactions involving scrip-based and Certificate option funds, you can choose to transact using a specific amount.
Fee Calculation Basis
Optional
Specify whether the transaction fee should be computed in terms of the fund base currency or the transaction currency.
If the Fee currency is based on transaction currency then the load amount will be calculated in terms of the transaction currency and all Fund Base Currency equivalents for Settlement Amount, Net Amount and Gross Amount will be calculated after converting the FBC equivalent from Amount in Transaction Currency.
This option will be displayed only if the fee computation in terms of the transaction currency is allowed for the fund involved in the transaction.
This option is applicable only for IPO subscription, subscription, redemption and switch transactions.
Gross or Net
Alphanumeric, Mandatory
Specify whether the value of the transaction is to be considered as a gross value from which the loads would be deducted or as a net figure apart from the loads.
For check redemption transactions, which you enter for an investor with check writing facility in a fund for which check writing is allowed, the value of the transaction is considered by default as a net figure, and it cannot be changed.
Transaction Currency
Alphanumeric, Mandatory
Select the currency in which the payments for the transaction will be made or accepted. The drop down list contains currencies that are valid as transaction currencies for the fund, from the Fund Transaction Currency list in the fund rules.
If the specified unit holder’s preferred currency is a valid transaction currency for the fund, it is displayed here by default. If not, the base currency for the selected fund is displayed here by default. In either case, you can change these default specifications and make your choice from the list.
Exchange Rate Source
Alphanumeric, Mandatory
Select the exchange rate source from which the exchange rates are to be derived for the transaction. The default source for the AMC is displayed here, from the Defaults Maintenance.
Transaction Value
Numeric, Optional
Specify the value of the transaction here. You could express this either as a specific amount, a specific number of shares, or a percentage of shares, as applicable.
If you specify an amount or a number of shares here, the value should fall within the following ranges:
- It must be greater than the minimum transaction amount (or minimum number of shares) specified for the selected transaction type in the Transaction Processing Rules profile for the fund.
- It must be less than the maximum transaction amount (or maximum number of shares) specified for the selected transaction type in the Transaction Processing Rules profile for the fund.
- It must be factorable by the step amount range (or the step units range) specified for the selected transaction type in the Transaction Processing Rules profile for the fund.
- For check redemption transactions, which you enter for an investor with check writing facility in a fund for which check writing is allowed, the transaction amount that you specify here must fall within the minimum and maximum limits specified in the fund rules, for such transactions.
For instance, If the step amount is 10 and the minimum amount is 100, the allowable values are 100,110, 120 etc.
For transactions by gross amount, a transaction value that exceeds the Minimum Amount for Tax ID that has been specified in the fund rules, the system validates the availability of the PAN Number in the unit holder account profile. If the PAN Number has not been specified in the profile, you must enter a transaction value that does not exceed the Minimum Amount for Tax ID value, or make a change to the unit holder account and specify the PAN Number, and then attempt to input the transaction.
Amount in Fund Base Currency
Display Only
When you specify an amount as the transaction value, the system computes the equivalent of the same in the base currency of the selected fund and displays it here.
Interest Amount
The system computes the interest amount based on the interest calculation days, interest rate provided by you in the ‘Interest Calculation Screen’ (explained below). You will be able to change the amount displayed if required.
Interest Calculator
Click ‘Details’ button in the ‘Transaction‘ tab of the ‘FCIS Subscription Transaction Detail’ screen, to invoke the Interest Calculation Screen.
![]()
The following are the fields in this screen:
Calculation Type
Mandatory
Select the calculation type from option list. The options available are:
- Simple
- Complex
Basis Days
Mandatory, Numeric
Select the interest basis days, based on which the interest will be calculated. The options available are:
- 360 days
- 365 days
Transaction Interest Calculation Section
Amount
Display Only
The transaction value provided by you is displayed here. You will not be able to change the amount displayed.
Transaction Currency
Display Only
The system displays the transaction currency that is selected in the ‘Subscription’ screen.
Interest Amount
Display
The system computes the interest amount based on the interest calculation days, and interest rate provided by you. You cannot change the amount displayed.
Click ‘Calculate’ button after providing the necessary information for the system to compute the interest amount. The interest amount will be calculated and displayed in the field ‘Interest Amount’.
Payment Date
Display Only
When you make a deposit to the bank, the date of payment will be displayed here.
No. of Days
Display Only
The system displays the number of days the interest calculation has to be done for a policy.
Note
- Click ‘Ok' button to return to the transaction screen
- Click ‘Cancel’ button to withdraw the data entered and you can not save the data
- Click ‘Calculate’ button after providing the interest calculation days and interest rate to calculate the interest amount.
- Click ‘Refresh’ button if you require making any changes to the data provided by you.
For more details, refer to ‘Maintaining Interest Rate Details’ section which is discussed later in this chapter.
Override Exchange Rate?
Check Box, Optional
Select this option if you want to override the computed exchange rate.
The ‘Calculate’ link for exchange rate calculation
To compute the exchange rate that will be applied for the transaction, select this link. The system computes the exchange rate and displays it in the Exchange Rate Applied field.
Exchange Rate Applied
Numeric, Mandatory
When you select the exchange rate source, the system computes the actual exchange rate applied using the transaction currency, fund base currency and the value of the transaction, and displays the same here.
You can override this value when you enter the transaction. To do so, select the Override Exchange Rate box, and then specify the desired exchange rate value in this field.
When you override the computed exchange rate, the overridden value must fall within the fluctuation range allowed for the transaction currency - fund base currency pair, in the Currency Pair Setup records.
FX Deal Date
Date; Optional
The system will display the ‘FX Deal Date’ during transaction enrichment for subscription, redemption and pseudo-switch transactions, which you can override if required. However, if the date you specify is lesser than the application date or greater than the FX Value Date, the system will display an error message. The date should also be a TBC working day.
The date defaulted by the system will include the allocation lag for the fund; if the date so derived (after allowing for the allocation lag) is a TBC holiday, the system will display the next TBC working day.
Note
- If the client country parameter ‘FORWARD_FX_RATE’ is set as false, the system will allow only the application date as the FX deal date.
- For all transactions other than subscription, redemption and pseudo-switch, the system will use the spot FX rate where the FX Value date, FX deal date and the Transaction date are the same
FX Value Date
Date; Optional
The system will display the settlement date in this field. For subscription transactions, the date will be inclusive of the maximum clearing period for the instrument, based on the actual calendar and taking into account TBC holidays. For multi-payment transactions, the settlement date would be inclusive of the maximum clearing period of all the instruments supported in the transactions.
For redemption transactions, the date derived will include the payment lag based on the payment lag calendar basis and after taking into account TBC holidays.
You can override this value, if required.
Note
If the client country parameter ‘FORWARD_FX_RATE’ is set as false, the system will allow only the application date as the FX value date.
If the system-derived FX deal date is greater than the date derived by the system as the FX Value Date or specified by you after overriding the default value), the system will default the FX Deal Date here
Communication Mode
Alphanumeric, Optional
Specify the mode through which the transaction request was communicated. This could either be Direct or Telephone.
For check redemption transactions, which you enter for an investor with check writing facility in a fund for which check writing is allowed, you must specify the communication mode as ‘Check Writing’.
Whenever an initial subscription with a mode of communication that is part of the restrictive list maintained for the fund, is entered into the system, system throws up an error and does not allow you to save the transaction.
LOI Transaction
Alphanumeric, Optional
If the unit holder subscribing to the fund is designated as a Letter of Intent investor, then specify if the present transaction is to be deemed and processed as a Letter of Intent transaction. This information is applicable only for IPO, subscription and switch-in transactions.
Payment Mode
Alphanumeric, Mandatory
Select the mode in which the unit holder intends to pay the applicable charges levied for the transaction. The payment could be made through:
- Cash
- Check
- Check – Banker’s Check
- Check – Self Check
- Draft
- Credit Card
- Account Transfer
- In Kind Payment
- Multi Payment Facility
For check redemption transactions, the payment mode is not applicable.
Settlement Date
Date Format; Optional
The system computes the settlement date for the transaction according to the payment lag defined for the transaction type, in the Transaction Processing Rules for the fund. The settlement date is computed as (Transaction Date + Payment Lag), and displayed in this field. You can alter the computed date and specify the required date in this field.
If you have defined a different trade cycle for the fund in the ‘Override Trade Cycle Date’ screen and the transaction falls within the override period mentioned in this maintenance, the system will default the settlement date from the maintenance.
Refer the chapter ‘Other Fund Activities’ for more details on maintaining alternate trade cycles for a fund.
If the client country parameter ‘HSBCSPECIFIC’ is set to true for your installation, system will allow you to enter a settlement date greater than, equal to or lesser than the transaction date only in case of subscription transactions.
EUSD Option
Optional
The EUSD option specified for the unit holder is defaulted here provided the fund is a ‘EUSD In Scope’ fund. However, you can modify this value. The options available are
- Withholding tax
- Exchange of information
- Tax exemption certificate
System calculates the EUSD tax based on the option specified here. However, EUSD tax is deducted from the settlement amount only if the EUSD option is Withholding tax.
Dealing Date
Date Format; Optional
The dealing date as maintained for the fund in the Specific Fund Price Date Setup screen is defaulted to this field. The date displayed here can be altered, if required, and you can specify the desired dealing date.
In case dealing date is not maintained for the fund or the fund is not a specific price date fund, dealing date will be equal to the transaction date and cannot be changed.
If you have defined a different trade cycle for the fund in the ‘Override Trade Cycle Date’ screen and the transaction falls within the override period mentioned in this maintenance, the system will default the dealing date from the maintenance.
Refer the chapter ‘Other Fund Activities’ for more details on maintaining alternate trade cycles for a fund.
Completion Date
Display
The date of completion of the transaction is displayed here.
If your installation has not requested for KYC checks, then:
- Allocation happens before clearing/settlement – In this case, during clearing, the transaction is marked as completed and the Completion date is defaulted with the Clearing date.
- Allocation happens after clearing – In this case, during allocation, transaction is marked as completed and Completion date is defaulted with the Allocation date.
The Completion Date can only be viewed in modes other than the New Mode.
Completion Date is applicable only for subscription, redemption, switch and transfer transactions.
Change in Beneficial Ownership
For transfer transactions, check this box to indicate that the transaction involves a change in beneficial ownership of transferred units.
Remarks
255 Characters Maximum, Alphanumeric, Optional
Descriptive text about the transaction can be entered here.
During transaction amendment, you can capture any appropriate remarks for the amendment here.
Lock-in Period for Gain Days
Numeric, Optional
The default lock-in period for the funds where IOF/IRRF are applicable is defaulted here. This can however be modified.
Note
Reversals are not allowed post allocation. However if there is any judicial blocking (partial or full) or the subscription is partially redeemed the reversals will not be allowed.
Reversal Code
Optional
This field is only available during transaction amendment, and you can use it to capture the appropriate rejection code, if any, for the amendment. The codes available in the option list are specific to the transaction type being amended.
Additionally, you can also specify appropriate remarks for the amendment in the Remarks field.
Cancel Instruction
Alphanumeric; Optional
You can use this field to indicate whether standing instructions defined in respect of a unit holder, in the selected fund, are to be cancelled. If you select this option, all standing instructions for the transaction is cancelled, including those that are to be generated after an automatic redemption occurs. Select the ‘Standing Instruction’ option in this field to indicate cancellation of standing instructions.
If this option has been chosen in the General Operating Rules for the fund, the automatic redemption process generates redemption transactions for unit holders in the fund, with the ‘Cancel Instruction’ option automatically set.
If this option has been set for the transaction in this field, the End of Day process cancels all standing instructions (irrespective of the transaction type) for the unit holder in the fund after the outflow transactions (redemption, switch and transfer) involving the unit holder have been allocated for the day.
Note
Reversal or amendment of an outflow transaction for which Cancel Instruction has been set to ‘Standing Instruction’, would re-instate the standing instructions.
Maturity Date
Date Format (dd-mm-yyyy), Optional
If the fund in which the transaction is being put through is a closed-end fund, then specify the maturity date for the transaction in this field.
In case of block transactions, enter the maturity date of the block transaction. If the system date is equal to or greater than the date specified here, and the Auto generate Unblock option is checked then system generates an automatic unblock transaction on the date specified here. If the maturity date falls on a holiday, then the unblock transaction will be generated on the next working day.
Auto generate Unblock
Optional
If this option is checked, then the transaction will be automatically unblocked by the system on the maturity date.
This is applicable only for Block transactions. Auto Generate unblock will be generated during the EOD process ‘BOD Subscription Transaction Maturity Date Settlements’.
Block ID
Mandatory
Select the ID of the transaction you wish to unblock. The option list displays the ID of all the block transactions mapped to the unitholder and fund ID specified.
This is applicable only for Unblock transactions.
Payment Allowed
Optional
For redemptions using Cash Direct accounts, you can use this field to indicate whether relevant documents related to payment for the redemption transaction have been received at the time of transaction entry.
By default, this box is checked; if you wish to withhold payment due to not receiving payment-related documents, you can uncheck this box. Transactions, in respect of which this box is unchecked, can be allotted but not confirmed.
Generate Certificates for Spillover
Optional
If this option is checked and if the last certificate is to be partially redeemed, system will generate certificate for spill-over units. By default, this option will be checked.
If you un-check this option, then in case of partial outflow if the last certificate is partially redeemed, the remaining units will be converted into scrip-less holdings.
System will mark the source of units for the relevant inflow (which is redeemed), in ageing to indicate the extent of the remaining units as Normal.
This option is applicable only for Redemption, Switch and Transfer transactions.
Auto Clear Provisional Balance
Optional
For redemption, switch or transfer transactions by 100%, you can use this field to indicate that the outflow transaction should include units in provisional balance.
If the unit holder account has any authorized/unauthorized/un allotted transaction for the same combination of fund and policy with ‘Auto Clear Provisional Balance’ checked, then you will not be allowed to check this box.
Auto Clear Reinvestments
Optional
You can use this field to indicate that 100% outflow transactions (redemption, switch and transfer) should include freeze held and reinvestment units.
Note
The ‘Auto Clear Provisional Balance’ and ‘Auto Clear Reinvestments’ fields will be checked or unchecked based on the specification for the same in the Defaults Maintenance. However, you can change the defaulted value. These options will be enabled if the transaction mode is ‘Percent’ and the transaction value is ‘100’.
Switch – In Exchange Rate Source (For Switch transactions only)
Alphanumeric, Optional
Select the exchange rate source from which the exchange rates are to be derived for the switch – in leg of the transaction. The default source for the AMC is displayed here, from the Defaults Maintenance.
The “Calculate” link for switch – in exchange rate calculation
To compute the exchange rate that will be applied for the switch – in leg transaction, select this link. The system computes the exchange rate and displays it in the Switch - In Exchange Rate Applied field.
Switch – In Exchange Rate Applied (For Switch transactions only)
Numeric, Optional
When you select the exchange rate source, the system computes the actual exchange rate applied using the transaction currency, fund base currency and the value of the switch – out settlement value, and displays the same here.
During allocation, the system picks up the prevailing exchange rate on the application date and converts the switch-out settlement amount (in the From Fund base currency) to its equivalent in the To Fund base currency as the switch -in transaction amount.
Override Switch – In Exchange Rate (For Switch transactions only)
Check Box, Optional
Select this option if you want to override the computed switch - in exchange rate.
Fee Details
In this section, specify the transaction time fee details for the requested transaction.
Calculate Fee
Click this link to trigger the computation of the transaction time fee. The system computes the fee and displays the fee value both in the base currency of the selected fund as well as in the selected currency for the transaction.
Fee in Fund Base Currency
Display Only
When you click the Calculate link, the system computes the transaction time fee in the base currency of the selected fund, and displays the same in this field.
Fee in Transaction Currency
Display Only
When you click the Calculate link, the system computes the transaction time fee in the base currency of the selected fund, and displays the same in the Fee in Fund Base Currency field. It also computes the equivalent of the same in the currency specified for the transaction, and displays the same in this field.
Override Fee?
Optional
Select this option to indicate to the system that you want to override the computed transaction fee component.
Fee after Override
Numeric, Optional
If you are overriding the computed transaction time fee, then indicate the changed value for the fee in this field.
The Save Button
Click this button to save the details you have specified. If there are any mandatory details that you have not supplied, the system does not save the transaction, but prompts you to specify the same before you can click the Save button again.
When you save a new or amended transaction by clicking this button, the transaction number for the transaction is generated and displayed.
Cancel
Click this button to clear the details that you have specified, from the screen. A newly opened screen, with only the default information is displayed, so that you can make your specifications afresh.
5.1.2.1 Projected Allocation Details Link
If you wish to see a projected picture of how the transaction would most possibly be allocated before you actually save the transaction, then click the ‘Project Allocation Details’ link.
When you do so, the system temporarily saves the transaction into temporary stores in the database and gives it a unique key string. The system then performs a ‘mock’ temporary allocation, and displays the details of the same in the Allocation Projection screen .

The following allocation details are displayed:
The Allocation Details section
Fund ID
Display Only
The ID of the fund through which the transaction is done. In the case of a switch transaction, this is the ‘switch from’ fund.
The Product ID
Display Only
The ID of the tax product, if the transaction involved a tax exemption eligible investor.
Units
Display Only
The number of units allocated in respect of the transaction.
Unit Price
Display Only
The unit price that is prevalent for the transaction type, as on the date of the temporary allocation.
Load Amount
Display Only
The sum total of loads applicable for the transaction.
The Gross Amount in Fund Base Currency
Display Only
For transactions that are put through on a gross basis, the actual transaction amount in fund base currency, without any reduction of applicable loads, is displayed here.
For transactions that are put through on a net basis, the amount displayed here is the sum of transaction amount (i.e., the transaction value) and the applicable loads, in the fund base currency.
The Net Amount in Fund Base Currency
Display only
For transactions that are put through on a gross basis, the actual transaction amount in fund base currency, after reduction of applicable loads, is displayed here.
For transactions that are put through on a net basis, the amount displayed here is the actual transaction amount in the fund base currency. The loads would be added to this value to arrive at the total settlement amount.
Settlement Amount in Transaction Currency
Display Only
The settlement amount is the amount that the unit holder (or the third party, as specified in the transaction details) would actually pay for the transaction.
For transactions that are put through on a gross basis, the gross amount in fund base currency would be converted to the equivalent amount in the transaction currency and displayed here.
For transactions that are put through on a net basis, the sum of the net amount in fund base currency and the applicable loads would be displayed here.
To understand how the amount projections are made, consider the following example:
Performance Fee Details section
For hedge funds the related performance fee details will be calculated during allocation.
The following details are displayed:
- Linked transaction number
- Identification of the data element associated with performance fee
- Description associated with the data element
- Value associated with the data element
5.1.3 Allocation Details Button
You can view the allocation details related to a transaction in ‘Transaction Allocation Details’ screen. To invoke this screen, click ‘Allocation Details’ button in Transaction Details screen.
![]()
The following details related to the allocation are displayed:
- Fund ID
- Allocation date and allotted amount
- Unit price and confirmed units
- Settlement amount in transaction currency
- Gross and Net amounts in Fund Base Currency
- Rejected number of units
The following details related to Load are displayed:
- Load Id and description
- Load amount
- Load amount in fee currency
The following details related to Performance Fee are displayed:
- Linked transaction number
- Incoming/ Outgoing transaction
- Identification of the data element associated with performance fee
- Description associated with the data element
- Value associated with the data element
5.1.4 KYC & Document Tab
You need to specify the list of required KYC documents for this transaction. System allows you to save the transaction even if the unitholder has not submitted all the required KYC documents. However, you will not be allowed to perform the completion operation on that transaction unless all the required documents have been received from the investor. This feature will be available only if your installation has requested for it.
To invoke the Transaction KYC Details Screen, click on the ‘KYC & Document’ tab. The following screen is invoked:
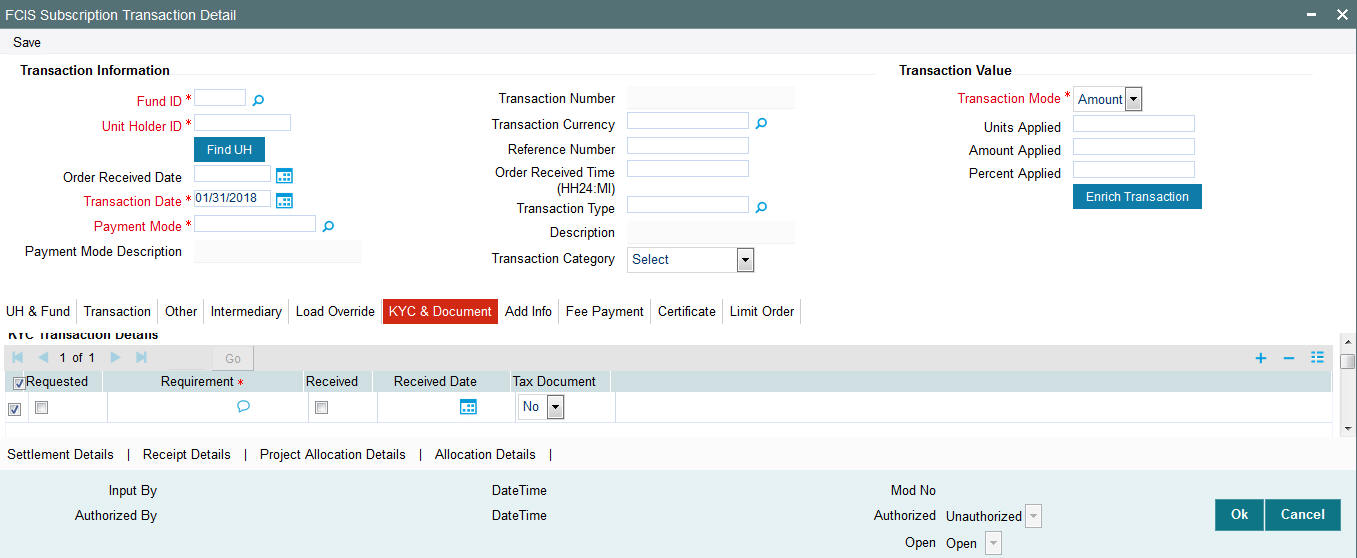
The following details will be captured:
Requested
Check those documents that have been requested from the investor.
Requirements
Specify the list of KYC documents required for this transaction.
You may add additional documents to the existing KYC list until the transaction is completed. However, if you add additional documents once the ‘All the requested KYC documentation has been received’ check box has been checked, system will uncheck the option.
Received
Check this option to indicate that the investor has submitted the required document.
Received Date (DD/MM/YYYY)
Specify the date on which the document was received.
Tax Document
Use this check box to identify the submitted document as tax document. During Subscription and IPO Subscription transactions, investor should provide Form 60/61 if investor does not have a PAN. If investor fails to provide Form60/61, transaction will not be processed and system will throw up an error.
If the account is a joint account, then Form 60/61 should be provided for all the joint holders without PAN as well. System will not allow you to save the transaction if all the tax documents are not provided by the investor.
Delete
Use this check box to identify any document that must be marked for deletion. In the desired row, check this box. When you have selected all the documents to be deleted, click the Delete Row link at the top of the section.
However, you are not allowed to delete documents marked as requested, saved and authorized.
The Add Row link
Click add icon to add a new row in this section.
Chasing Date (DD/MM/YYYY)
Optional
In case the KYC list is incomplete for the transaction and the document has been requested, enter the date on which the document chasing action must be initiated.
Each time a document is requested from the investor, you must capture a chasing date for that document.
After you have entered the required document details, click the Close button to close the screen.
This feature is only available if your installation has requested for it.
KYC Received
Check this option once all the requested documents have been received from the investor. You will not be allowed to check this option until all the requested documents have been marked as received.
You are not allowed to check this option until all the required KYC documents have been received both at the unit holder level and at the transaction level.
5.2 Unitholder Deal Summary
This section contains the following topics:
- Section 5.2.1, "Invoking Unitholder Deal Summary Screen"
- Section 5.2.2, "Broker Details Section"
- Section 5.2.3, "Settlement Details Button"
- Section 5.2.4, "Pledgee Details Tab"
- Section 5.2.5, "Fee Payment Details Tab"
- Section 5.2.6, "Certificate Details Tab"
- Section 5.2.7, "Load Override Tab"
- Section 5.2.8, "Limit Orders Tab"
- Section 5.2.9, "Allocation Details Button"
- Section 5.2.10, "Document Details Section"
- Section 5.2.11, "Add Info Tab"
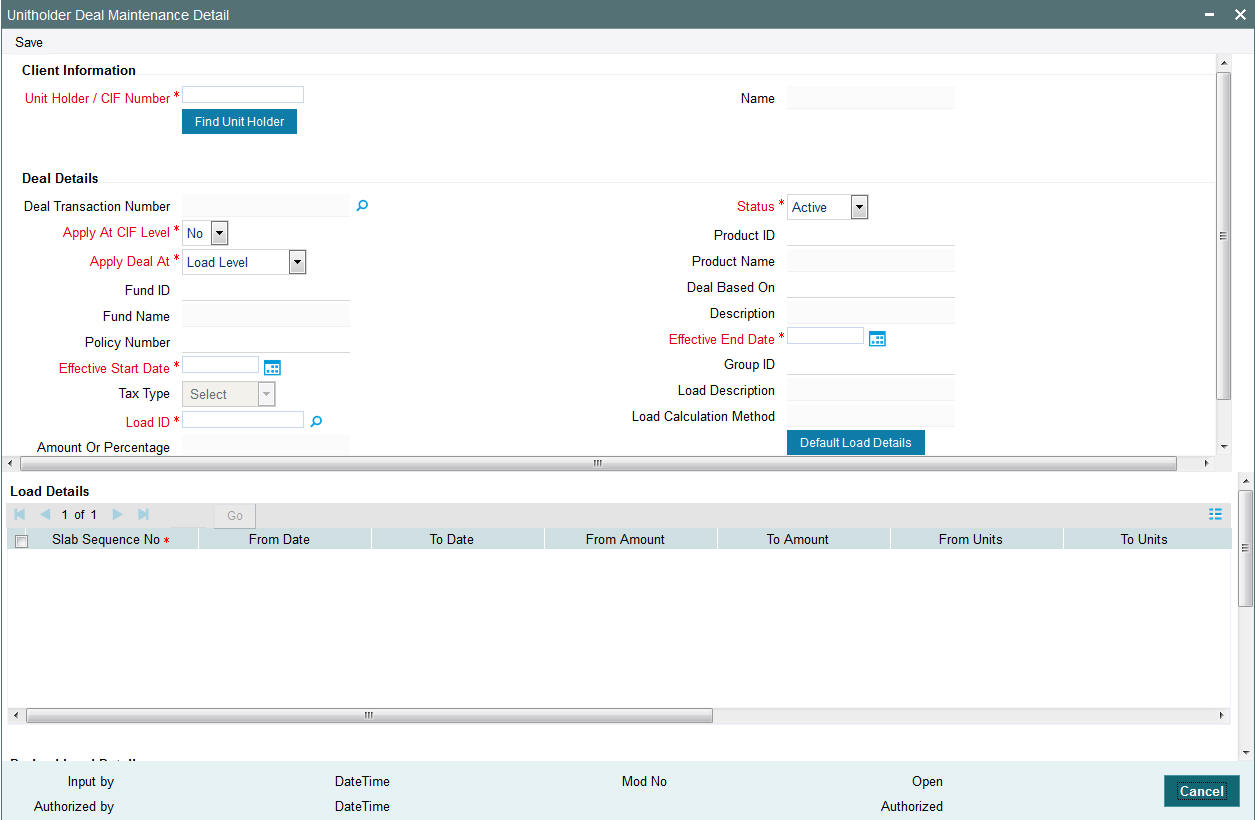
5.2.1 Invoking Unitholder Deal Summary Screen
If you wish to view the details of all the UH deals set up for the unit holder, type UTSUHDEL in the field at the top right corner of the Application tool bar and click on the adjoining arrow button. The following screen is displayed

You may wish to view the details of a particular record, in which case, you will have to enter relevant search criteria in the Quick Find Options and the Advanced Find Options. The system will display the records that match the search criteria you have specified.
The Transaction Date records matching the search criterion specified are displayed in row lists in the lower grid portion of the screen. From this results list, choose the unit holder deal that you want to view by clicking on the record twice.
When you click on the Search Unit Holder/ Customer button alongside the Action Buttons, the Unit Holder - Deal Setup screen is invoked in View mode as shown below, where you can view the details of the record.
You can invoke this screen by typing UTDUHDEL in the field at the top right corner of the Application tool bar and click on the adjoining arrow button. The following screen is displayed:
Click the ‘Close’ button to return to the Find Options screen.
5.2.2 Broker Details Section
If a broker has been identified as an intermediary for the transaction, then you must identify the same in this section, along with the commission percentage split for the broker.
If brokers are designated as mandatory for the fund in which the transaction is being put through, then you must specify at least one broker as mandatory information in this section. If brokers are not mandatory for the fund, and you do not specify any broker in this section, then the system reckons the broker as DIRECT and designates the same as the default broker.
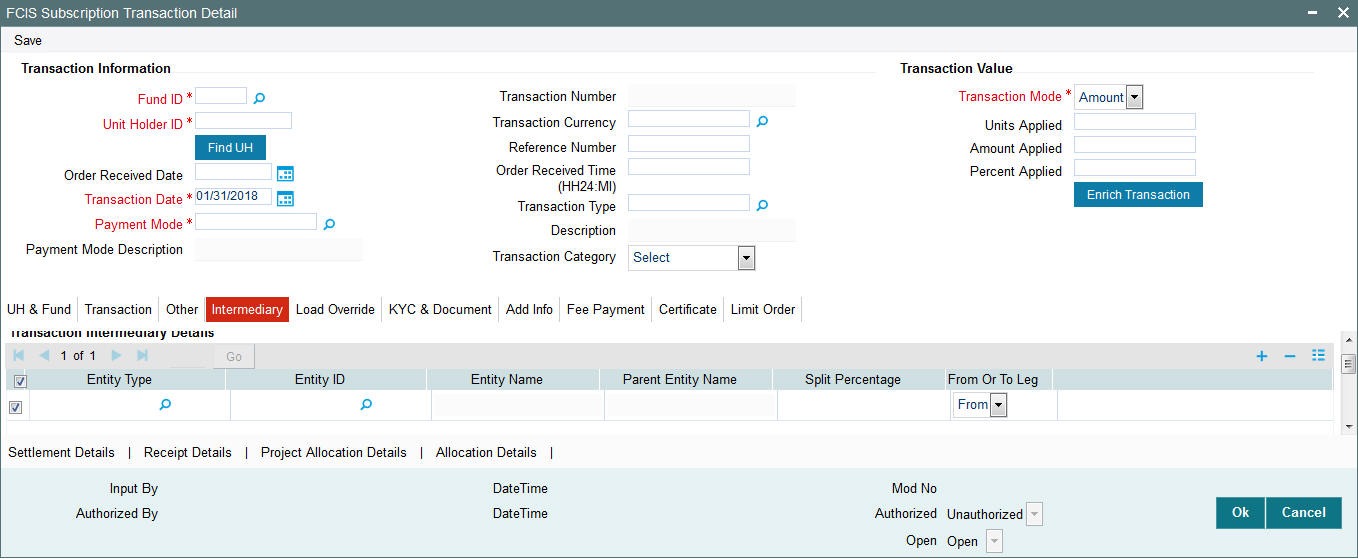
Entity ID
Alphanumeric, Optional
Select the code of the broker that has been identified as the intermediary for the transaction.
By default, the code of the unit holder’s default broker is displayed here. You can specify other brokers too by selecting them from the list. To invoke the list, click add icon that is found alongside the Broker Code field. You can also search for the broker using broker legacy codes.
Entity Name
Alphanumeric, Optional
When you select the broker code, the name of the broker is displayed. You can also choose to select the name of the broker for the transaction.
By default, the code of the unit holder’s default broker is displayed here. You can specify other brokers too by selecting them from the list. To invoke the list, click add icon that is found alongside the Broker Name field
Parent Entity Name
Display Only
When you select the broker code, the name of the parent broker for the selected broker is displayed.
Split Percentage
Numeric, Optional
Specify the percentage of total commission that is to accrue to the selected broker. The sum of all the percentages specified for any brokers identified for the transaction must equal one hundred percent.
From Or to leg
Mention the start and end point of the transaction date
Delete?
Optional
Select this option to mark the selected broker as inapplicable for the transaction.
To delete any given row in the grid, check the Delete? check box, and then click the Delete link at the right bottom of this section. The checked rows are deleted. If you delete a row in which a broker has been selected, then that broker is not deemed as an intermediary for the transaction.
To add a new row at the bottom of the grid in this section, click the Add link.
5.2.3 Settlement Details Button
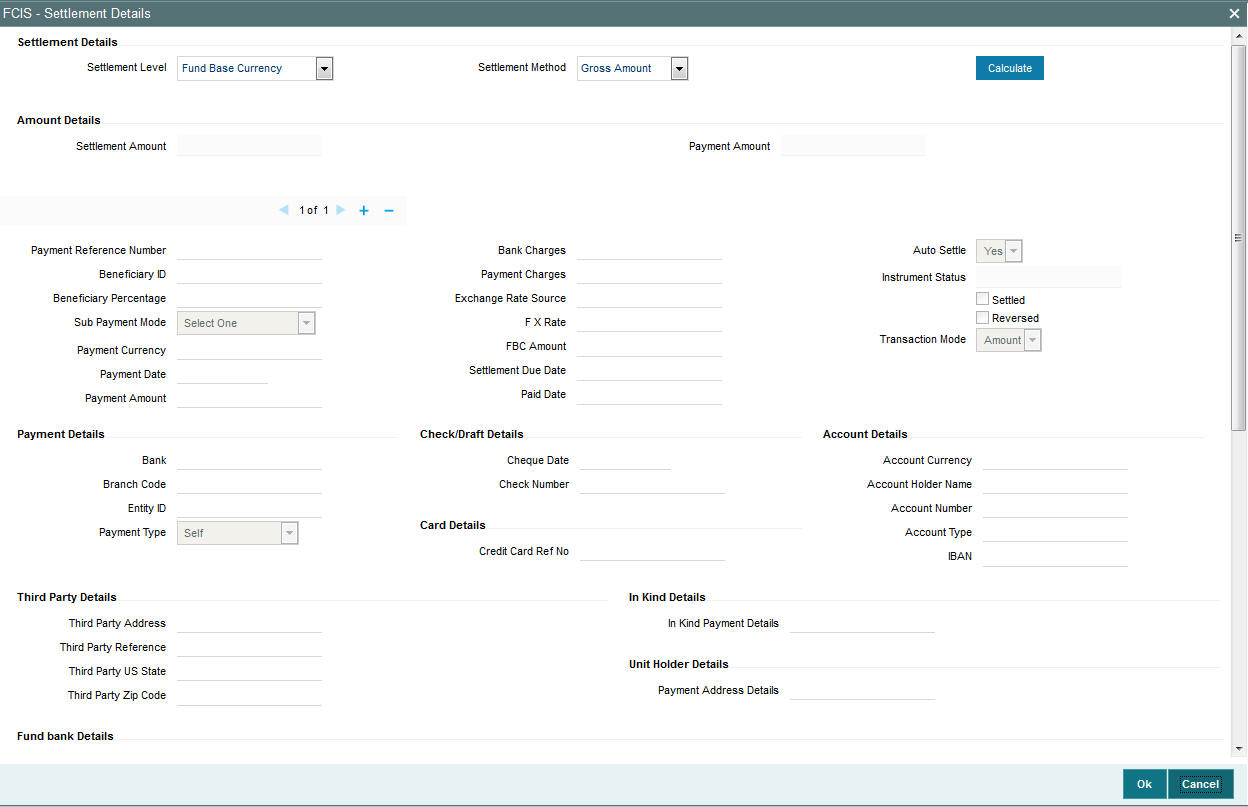
In this section, you can capture the details of settlement and payment made for the transaction in the case of IPO, subscription and redemption transactions. Payment Details link is displayed on selecting any Payment Mode other than ‘Cash’ and ‘Against Payment’. Click the Payment Details link to invoke the Settlement Information screen .
When you have entered a new IPO or Subscription transaction in this screen, you need not specify the payment details before you save the transaction. You can subsequently authorize the transaction, and then specify the payment details through the ‘Modify’ operation. The transaction will then be subsequently allocated when these payment details are cleared.
For a redemption transaction, the payment details are mandatory and you can specify the same after you save the transaction in this screen.
Following are the fields in Settlement Instructions screen:
Settlement Details Section
Settlement Level
Display
The settlement level currency defined at the segment level is defaulted here. You are not allowed to modify this.
Settlement Method
Mandatory
The settlement method is the method of comparison between the amount received from the investor and the amount utilized in case of IPO subscription and Subscription transactions. Following are the methods available:
- Gross Amount – If you choose this method, then the sum of payment amount will be compared with the gross amount of the transaction (either in the fund base currency or the transaction base currency, as specified).
- Net of Agent Fees – If you choose this option, then the sum of Payment amount in FBC will be compared with the difference between the settlement amount and the sum of all load amounts whose From and To Entity Type is Agent.
Payment Amount (in FBC) = Settlement Amount - [(To Load Amount + To Derived Load Amount) - (From Load Amount + From Derived Load Amount)]
- Net of FM Fees – If you opt for this, then the sum of Payment amount (in FBC) will be compared with the difference between the settlement amount and the sum of all load amounts whose To and From Entity Type is AMC.
Payment Amount (in FBC) = Settlement Amount - [(To Load Amount + To Derived Load Amount) - (From Load Amount + From Derived Load Amount)]
- Net of All Fees - If you choose this option, then the sum of Payment amount (in FBC) will be compared with the difference between the settlement amount and the sum of all loads whose To and From Entity type is UH.
Payment Amount (in FBC) = Settlement Amount - [(From Load Amount + From Derived Load Amount) - (To Load Amount + To Derived Load Amount)]
During clearing subscription transactions and confirming redemption transactions, system checks if the sum of the payments is equal to the settlement as per the settlement method rule specified here.
For redemption transactions, the payment amount is compared with the settlement amount and the settlement method is defaulted to ‘Gross Amount’. You will not be allowed to modify this.
Payment Details section
Payment Reference Number
Alphanumeric, Mandatory
Enter a unique reference number for this payment.
Beneficiary ID
Alphanumeric; Optional
In case of a redemption transaction, where the transaction has been initiated by the primary unit holder and the ‘Redemption Payout’ option is checked at the unit holder level (in the ‘Unit Holder Maintenance Detail’ screen), the system will default the beneficiaries maintained for the unit holder when you save the transaction. You can change these details, if required.
Additionally, the system will also default the bank details maintained at the unit holder level for the beneficiaries, if you do not capture settlement details before saving the transaction,
If multiple beneficiaries have been linked to the unit holder, the redemption proceeds will be paid to each beneficiary in the transaction base currency. The order in which the beneficiaries will be paid out is derived from the order maintained for the beneficiaries at the unit holder level.
Settlement %
Numeric; Optional
The system will default the percentage for each beneficiary from the unit holder level. You can change it, if required. If the total percentage maintained for all beneficiaries at the unit holder level does not add up to 100%, the system will include the main unit holder as a beneficiary and credit the reminder of the payout to him.
However, while modifying the defaulted details, if you remove the main unit holder and include another beneficiary and the total payout percentage does not add up to 100%, the remaining will not be paid to the main unit holder. Instead the system will credit it to the last beneficiary in the list of beneficiaries.
Note
Beneficiary ID and Settlement Percentage fields are applicable only for redemption transactions.
Sub Payment Mode
Conditional
If the mode of payment is ‘Multi payment facility’, then select the sub payment mode.
For all other modes of payment, payment mode specified for the transaction is defaulted as the sub payment mode and you are not allowed to change it.
Payment Currency
Mandatory
Specify the currency in which the payment must be made for the selected payment mode. By default, it is reckoned to be the Transaction Currency.
Payment Date (dd/mm/yyyy)
Mandatory
Enter the date of payment. By default, the transaction date is displayed. If the transaction date is not specified, then the application gets defaulted here. You can change this, if required.
Note
Payment Date cannot be back dated.
Payment Amount
Mandatory
Enter the payable amount. Amount entered here will be reckoned in the payment currency.
Bank Charges
Numeric, Display
This is the charges to be borne by the AMC. This amount is inclusive of the charges for payment. Amount entered here will be reckoned in the payment currency.
If the mode of payment is Demand Draft or Outstation Cheque, based on the load maintained for the combination of AMC and transaction currency, the applicable amount slab will be displayed here on tabbing out of the payment amount field.
While processing settlements, the bank charges will be added to the payment amount for settling the transaction.
This field will be displayed only if the client country parameter ‘BANKCHARGES’ is set to true for your bank.
Note
DD charges can be calculated in multiple currencies. The Load Id for the AMC should be defined in PARAMS maintenance delimited by “-“. For instance, EUR-5555, USD-6666, then 5555 and 6666 are Load Ids. If it is a mono-currency installation, load Id alone should be stored.
The load Id should be amount based with the return value as amount. Please note that there will not be any check to this effect and you need to maintain appropriate value since it is a one-time setup.
Exchange Rate Source
Alphanumeric, Mandatory
Select the exchange rate source from which the exchange rates are to be derived for the transaction. The source specified in the transaction screen is displayed here. You can modify this, if required.
Upon modifying the exchange rate source, if the payment currency differs from the fund base currency (FBC)/ transaction currency (TC) and if the payment amount is greater than or equal to zero, then system computes and displays the FBC Amount in the fund base currency/transaction base currency equivalent.
If both the currencies are same then the payment charges is deducted from the payment amount and displayed as FBC/TC amount in case of Subscription transactions. For redemption transactions, the payment charges is added to the payment amount and displayed as FBC/TC amount.
FX Rate
Mandatory
FX rate for the chosen exchange rate source is displayed here.
On modifying the FX rate, if the payment currency differs from the fund base currency (FBC)/transaction currency (TC), and the FX rate is greater than or equal to zero, then system calculates and displays the FBC/TC amount based on the payment amount, payment charges and FX rate.
Due Date (DD/MM/YYYY)
Display
Settlement Due date calculation is based on Payment Lag Calendar basis, payment lag and dealing date. The Payment lag calendar basis determines whether AMC, Currency, Fund or System Calendar will be considered to identify holidays.
For redemptions, Settlement due date and Settlement date/Value date is defaulted based on the Currency Cut Off Time and payment lag for the fund and redemption transaction type.
For instance, If the Cutoff time for the currency USD is 11:00 am and the Payment lag is 1 for the fund - transaction type, and the system time is well below the specified cut off time, then system will calculate the settlement due date/Settlement date by adding the payment lag (1 Business day of the currency calendar) to the dealing date of the transaction. If the System time falls after the cutoff time of the currency then settlement date/due date will be defaulted with the sum of dealing date, payment Lag + 1 Business day. If this derived date falls on currency holiday then get the next working date based on currency calendar and default it. If currency calendar is not maintained then the same date is defaulted.
For Subscriptions, Settlement due date is defaulted based on adding the dealing date, for the transaction type and payment lag maintained for the fund and subscription transaction type. If the due date falls on a holiday then the next working date is arrived based on fund calendar. If no Fund calendar is maintained, then system checks for the AMC and system calendar respectively.
If dealing date for a transaction is not specified then system calculates the dealing date based on the dealing lag maintenance and adds the payment lag maintained for the combination of fund and transaction type.
Paid Date (DD/MM/YYYY)
You need to specify the paid date for subscription transactions. In case of redemption transactions, system defaults the paid date based on the dealing date, payment lag and currency cutoff -time. However, you are allowed to modify this.
On specifying the paid date, System calculates the FBC/TC amount based on the Exchange Rate source and FX Rate entered.
Note
Paid Date cannot be less than Payment Date and the transaction date. However, it can be back dated or future dated. You will not be allowed to enter paid date if you have not specified the exchange rate information.
Auto Settle
By default, this option is set to ‘No’. However, you can change this. If you set this option to ‘Yes’, then the particular payment is settled by auto clearing process based on the settlement due date.
You can override the auto settlement process by specifying the paid date and manually settling the payment.
Payment Type
Mandatory
This defines the type of payment. Following are the options available:
- Retained By: If case of any rounding differences between the transaction amount and the payment amount, you can enter the rounding difference as a separate payment entry with the Payment type as ‘Retained By’.
- Absorbed: In case the payment received is more than the amount used for unitization then you can enter a separate payment entry with payment type as ‘Absorbed’.
- Self: Use this type if the payments are received from the customer.
- Third Party: If the beneficiary name of the bank account is different from the registered holder’s name for redemption payment then the payment type should be defaulted as ‘Third Party’. In case of subscription, if the remitter’s name is different from the registered holder’s name, then the payment type should be defaulted as ‘Third Party’.
If you have selected ‘Cheque’ or ‘Money Transfer’ as the mode of payment, then you must enter multiple instruments of the same payment type. However, if the mode of payment is ‘Multi Payment Mode’, then you can enter multiple instruments of different payment type.
Instrument Status
Display
The status of the instrument as indicated in the Payment Clearing screen is displayed here.
Settled?
Optional
Check this option if the settlement is complete.
Transactions can be marked as ‘Settled’ only if all the payment are settled and the sum of the payment amount is equal to the transaction amount in terms of the fund base currency. Also the units in Provisional Balance will be moved to Unit balance.
Note
- During allocation of a non cash based subscription transaction, system checks the clearing status of the transaction. If it is cleared, then the transaction is marked as settled and the unit holder’s unit balance will reflect the units that were allotted for that transaction.
- On authorizing the payment entries for an allotted transaction, system checks the clearing status of the transaction. If it is cleared, then the transaction is marked as settled and units allotted for that transaction will be moved from the provisional balance to unit balance for that unit holder.
- If settlement status for the transaction is settled then on changing the settlement information i.e. if the settlement amount in FBC/TC is not equal to the amount used for unitization then the settlement status will be marked as Unsettled.
Reverse?
Optional
You can reverse the payment, both multiple and single payment (s) provided there are no linked transactions. In case there is no transaction linked to the current transaction, then on reversal, system changes the settlement status as Unsettled and moves the Units from Unit Balance to Provisional Balance.
Note
Only Settled payments can be reversed. You can modify the settlement instructions of the transaction post utilization also. However, allocation happens even in the absence of any payment instruction.
Calculate Link
Click on this link to calculate Exchange rate and FBC amount based on the entered payment amount and payment charges.
Note
In the Settlement Instruction screen, you can enter the charges for payment. This feature is only available if your installation has specifically requested for it. For an exhaustive note on this feature, refer the Annexure.
Payment Details Link
Click ‘Payment Details’ button under Pymt Dtls to invoke the Payment Details screen. The payment details include the following:
- The type of payment i.e., whether the payment is being made by the unit holder that has requested the transaction or by an external third party.
- The details of the bank and branch of the bank for the payment
- The details of any payment instruments such as checks, the number, date and the clearing date.
- In the case of payment by account transfer, the details of the bank account to which /from which the payment is being made.
- The unit holder’s address details for check based payments
- The details of the unit holder’s bank
Note
- For check redemption transactions, which you enter for an investor with check writing facility in a fund for which check writing is allowed, the payment details are not applicable, and need not be specified.
- If the client country parameter ‘DEFAULTPAYMENT’ is set to true, then the settlement details maintained for the combination of unit holder, fund, transaction type, payment mode and transaction currency are defaulted.
Payment Details for Mode of Payment as Check, Credit Card, Debit Card or Draft and for Mode of Payment as Multi Payment Facility with sub mode of payment as Check, Credit Card, Debit Card or Draft
Capture the following details if the mode of payment chosen is check, credit card, debit card or demand draft:
Payment Type
Alphanumeric, Mandatory
The payment type refers to whether the payment is being made by the unit holder who has requested for the transaction or by an external third party. Accordingly, select “self” if the unit holder is making the payment, and select “third party” if the payment is being made by an external party other than the unit holder.
Drawee Branch
Alphanumeric, Mandatory
Specify the name of the bank where the payment instrument is drawn, if the mode of payment is Check, Credit Card, Debit Card or Draft.
Drawee Branch
Alphanumeric, Mandatory
Specify the branch of the selected bank where the payment is drawn, if the mode of payment is Check or Draft.
Check Number/ Card Number/Draft Number
16 Characters Maximum, Alphanumeric, Optional
Specify the number of the payment instrument, the check, the credit/debit card or the demand draft.
Check Date/ Draft Date
Date, (dd-mm-yyyy) Optional
Specify the date on which the check or demand draft is drawn.
Card Reference Number
Alphanumeric, Optional
In the case of payment by credit card or debit card, specify the reference number of the credit card/debit card that is being used to make the payment.
Unit holder Address
Alphanumeric, Optional
You may specify the address of the unit holder involved in the transaction.
Payment Details for Transfer Mode of Payment and for Mode of Payment as Multi Payment Facility with sub mode of payment as Transfer or as Advice
Capture the following details if the mode of payment chosen is transfer:
Payment Type
Alphanumeric, Mandatory
The payment type refers to whether the payment is being made by the unit holder who has requested for the transaction or by an external third party or by a broker. Accordingly, select “self” if the unit holder is making the payment, “third party” if the payment is being made by an external party other than the unit holder, and select “broker” if the payment is being made by a broker.
Maintained Bank Accounts
Alphanumeric, Mandatory
If you have chosen ‘Self’ as the payment type, bank details are defaulted based on the combination of transaction type, fund Id, payment mode and transaction currency maintained for the unit holder.
The system displays the accounts available for a unit holder (in the option list) for IPO subscription, subscription and redemption transactions in the following order:
- Account maintained for ‘All’ funds and ‘All’ transaction types
- Account for the specified fund and transaction type
- Account for the specified payment mode in the order mentioned above
- Account in the specific currency or ‘MCY’ (Multi Currency) in the order specified above
If neither transaction currency account nor multi-currency account is available, the transaction is saved as an ‘Incomplete’ one in case of subscription and IPO transactions. You will have to input payment details later to complete it. In case of redemption and pseudo-switch transactions, the system fails the transaction if the Payment Mode is ‘Transfer’ and allows saving of the transaction if the Payment Mode is ‘Cheque’.
Note
The same logic holds true for SI transactions as well.
If you selected ‘Third Party’ as the payment type, all the banks maintained in the system are available in the option list. You must choose the one that will be used to make the payment.
All those accounts belonging to the account type allowed for the combination of type of transaction and the fund involved will be available.
Branch
When you select the back account of the unit holder that is being used to make the payment, the name of the branch of the bank in which the account resides is displayed here.
In case of third party payment, all the branches maintained for the selected bank are displayed in the option list. You must choose the one that will be used to make the payment.
Account Number
When you select the back account of the unit holder that is being used to make the payment, the account number of the transfer account is displayed here.
In case of third party payment, enter the number of the back account that is being used to make the payment.
Account Type
When you select the back account of the unit holder that is being used to make the payment, the type of the transfer account is displayed here.
For third party payments, select the type of the transaction account from the drop down list.
Account Currency
Display Only
When you select the back account of the unit holder that is being used to make the payment, the currency of the transfer account is displayed here.
This currency must be the same as the transaction currency. If this is not so, the unit holder must specify an account in which the account currency is the same as the transaction currency.
Account Holder Name
Display Only
When you select the back account of the unit holder that is being used to make the payment, the name of the holder of the transfer account is displayed here.
Transfer Reference Number
Alphanumeric, Optional
Specify the reference number of the transfer that is being used to make the payment.
Broker ID
Mandatory
If you have chosen “broker” as the Payment Type, you need to specify the identification code maintained for the broker in the system.
Routing Bank Details Link
Click on this link to view the routing details for the bank. The details are picked up from the unit holder level.
For further information on this screen, refer ‘The Bank Details’ section of the Managing Investor Accounts chapter under Volume II
Payment Details Mode of Payment as In Kind Payment and for Mode of Payment as Multi Payment Facility with sub mode of payment as In Kind Payment
In Kind Payment Details
Mandatory
If the payment is made in kind instead of cash, for instance, in the form of securities or bonds, you need to capture the details of the instrument being pledged.
The following details of fund involved in the transaction and the bank details of the unit holder maintained at the unit holder level are picked up and displayed for all modes of payment and sub payment modes:
- ISIN Code
- Fund
- Fund Base Currency
- Bank and Branch Code
- Account Currency
- Account Number
- Account Name
- Whether direct debit is applicable
- Whether the account is closed
If the mode of payment is Multi Payment Facility and the sub mode of payment is Against Payment, the above mention unit holder’s bank details and the fund details are displayed.
5.2.4 Pledgee Details Tab
In case of an investor has taken a loan on the units in a fund and those units are blocked, you can indicate whether the dividend proceeds on the blocked units should be paid to the pledgor, pledgee or to hold back the payment.
This section is applicable only to Block transactions. Click on the ‘Pledgee’ tab in the FCIS Block Transaction Detail screen to invoke the following screen.

Pay Dividend To
Alphanumeric, Optional
Indicate whether the dividend proceeds on the blocked units should be paid to the pledgor, pledgee or to hold back the payment.
- If you opt to hold back, Dividend on blocked units will not be paid/reinvested until all the blocked units are unblocked.
- If you opt to pay dividend to the pledgor, dividend on blocked units will be credited to unitholder bank account depending on the UH IDS setup.
- If you opt to pay the dividend to the pledgee, dividend on blocked units will be credited to pledgee bank account irrespective of UH IDS setup.
Note
If no option is selected, then dividend on blocked units will be paid / reinvested to the unitholder account depending on the UH IDS.
You will be allowed to capture the following details only if you have chosen to pay the dividend to the pledgee.
Pledgee Name
60 Characters Maximum, Alphanumeric, Mandatory
Specify the name of the person or institution with which units are pledged for the block transaction.
Address
255 Characters Maximum, Optional
Enter the address of the pledgee.
Zip Code
6 Characters Maximum, Optional
Specify the zip code of the specified city of residence of the pledgee.
State
60 Characters Maximum, Alphanumeric, Optional
Specify the state in which the city of residence of the pledgee is located.
Pledgee Bank
12 Characters Maximum, Alphanumeric, Mandatory
From the list, select the name of the bank in which the account is held.
Pledgee Branch
12 Characters Maximum, Alphanumeric, Mandatory
From the list, select the name of the branch of the bank in which the account is held.
Account Number
16 Characters Maximum, Alphanumeric, Mandatory
Specify the number of the account held by the pledgee in the selected bank.
5.2.5 Fee Payment Details Tab
You can capture the details of any payments made towards the transaction time fee, in this section. When you select the fund in which the transaction is to be put through, this section is enabled only if any transaction time fees are mapped to the fund as chargeable for the transaction type.
Fee Payment Details for Mode of Payment as Check, Credit Card or Draft
Capture the following details if the mode of fee payment chosen is check, credit card or demand draft:
Drawee Bank
Alphanumeric, Optional
Specify the name of the bank where the fee payment instrument is drawn, if the mode of payment is Check, Credit Card or Draft.
Drawee Branch
Alphanumeric, Optional
Specify the branch of the selected bank where the fee payment is drawn, if the mode of payment is Check or Draft.
Check Number/ Card Number/Draft Number
16 Characters Maximum, Alphanumeric, Optional
Specify the number of the fee payment instrument being either check, the credit card or the demand draft.
Check Date/Credit Card Date/Draft Date
Date, (dd-mm-yyyy) Optional
Specify the date on which the check or demand draft is drawn, or the credit card payment is made.
Clearing Date
Date, (dd-mm-yyyy) Optional
Specify the date on which the check / draft is expected to be cleared.
The clearing date should not be earlier than the check / draft date, and must not be a designated holiday in the system.
Card Reference Number
Alphanumeric, Optional
In the case of fee payment by credit card, specify the reference number of the credit card that is being used to make the fee payment.
Fee Payment Details for Transfer Mode of Payment
Capture the following details if the mode of fee payment chosen is transfer:
Maintained Bank Accounts
Alphanumeric, Mandatory
All the bank accounts that have been maintained for the selected unit holder are displayed in the drop down list in this field. You must choose the one that will be used to make the fee payment. When you do, all the details of the selected account are displayed in the corresponding fields in this section.
Bank
Display Only
When you select the back account of the unit holder that is being used to make the fee payment, the name of the bank in which the account resides is displayed here.
Branch
Display Only
When you select the back account of the unit holder that is being used to make the fee payment, the name of the branch of the bank in which the account resides is displayed here.
Account Number
Display Only
When you select the back account of the unit holder that is being used to make the fee payment, the account number of the transfer account is displayed here.
Account Type
Display Only
When you select the back account of the unit holder that is being used to make the fee payment, the type of the transfer account is displayed here.
Account Currency
Display Only
When you select the back account of the unit holder that is being used to make the fee payment, the currency of the transfer account is displayed here.
This currency must be the same as the transaction currency. If this is not so, the unit holder must specify an account in which the account currency is the same as the transaction currency.
Account Holder Name
Display Only
When you select the back account of the unit holder that is being used to make the fee payment, the name of the holder of the transfer account is displayed here.
5.2.6 Certificate Details Tab
Click on the Certificates tab of the ‘FCIS Block Transaction Detail’ screen. You can capture details of certificates involved in a transaction, in this section.
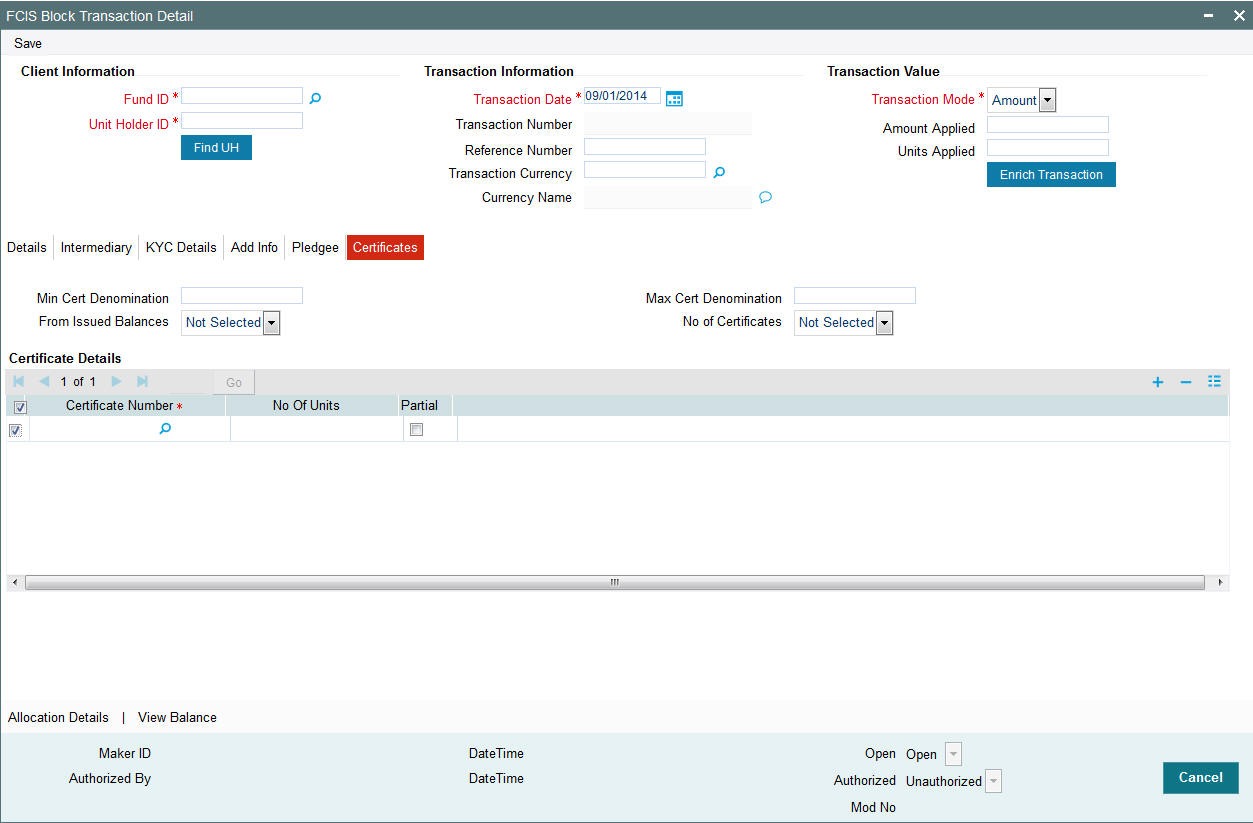
You must capture the certificate details as mandatory information for a transaction in the following circumstances:
- For all transactions involving scrip-based funds
- For all scrip-less funds in which the certificate option is available, and the unit holder requests for the issue of certificates.
The minimum and maximum certificate denominations maintained for the fund in which the transaction is being put through are retrieved and displayed here. If user overrides are designated as available in the Shares Characteristics rule for the fund, then you can override these values in this section when you are entering a transaction.
You can capture the numbers of the certificates involved in a transaction. Partial usage of the units in an issued certificate is only permissible for redemption, switch, transfer, block and unblock transaction types.
Note
In case of Transfer transactions, system marks the original certificates held by the transferor as being transferred and new certificates are generated with the transferee as the ‘To Unitholder’.
Check numbers for check redemption transactions
For check redemption transactions, which you enter for an investor with check writing facility in a fund for which check writing is allowed, you must specify the number of the check being redeemed, in this section.
Note
If more than one check is being presented for redemption, you must enter one redemption transaction for each check.
Fields in this section
Certificate Required?
Select the option Yes, to specify requirement of certificate
Minimum Certificate Denomination
Numeric, Mandatory
This is the least number of units or the minimum lot that would comprise a single certificate. This value is maintained in the Shares Characteristics rule for the fund, and is displayed here. If user overrides are designated as allowed in the Shares Characteristics rule, you can override this value and specify the required minimum lot.
Maximum Certificate Denomination
Numeric, Mandatory
This is the highest number of units or the maximum lot that would comprise a single certificate. This value is maintained in the Shares Characteristics rule for the fund, and is displayed here. If user overrides are designated as allowed in the Shares Characteristics rule, you can override this value and specify the required minimum lot.
Certificate Number
Alphanumeric, Mandatory
Specify the number of the certificate that is to be redeemed, switched, transferred, blocked, unblocked, split, consolidated or reissued, as the case may be.
When you specify the certificate number, the number of units contained in it is displayed in the Units field.
Total Units
Display Only
When you specify the certificate number, the number of units contained in it is displayed in this field.
Partial?
Select this option to indicate that only a portion of the units contained in the certificate must be used for the transaction.
For certificates that are being redeemed, switched, transferred, blocked or unblocked, you can either use the whole portion of units or a part, as requested by the unit holder.
For certificates that are being split, consolidated or reissued, partial usage of the number of units contained in the certificate is not permissible.
The following example will make this clear:
Delete?
Optional
Select this option to mark the selected row as inapplicable for the transaction.
To delete any given row in the grid, check the Delete? check box, and then click the Delete link at the right bottom of this section. The checked rows are deleted. If you delete a row in which a certificate number has been specified, then that certificate is not reckoned as part of the transaction.
To add a new row at the bottom of the grid in this section, click the Add link.
5.2.7 Load Override Tab
In this section, you can override or alter the value of any load (including derived loads, if any) mapped to the selected fund and applicable for the transaction type, which is to be computed at the time of allocation. The frequency of computation for such loads would be “allocation”.
This section is only enabled for funds that have allocation time loads mapped to them as applicable for the transaction type.
When you select the fund in which the transaction is to be put through, any mapped allocation time loads are displayed as a list in this section.
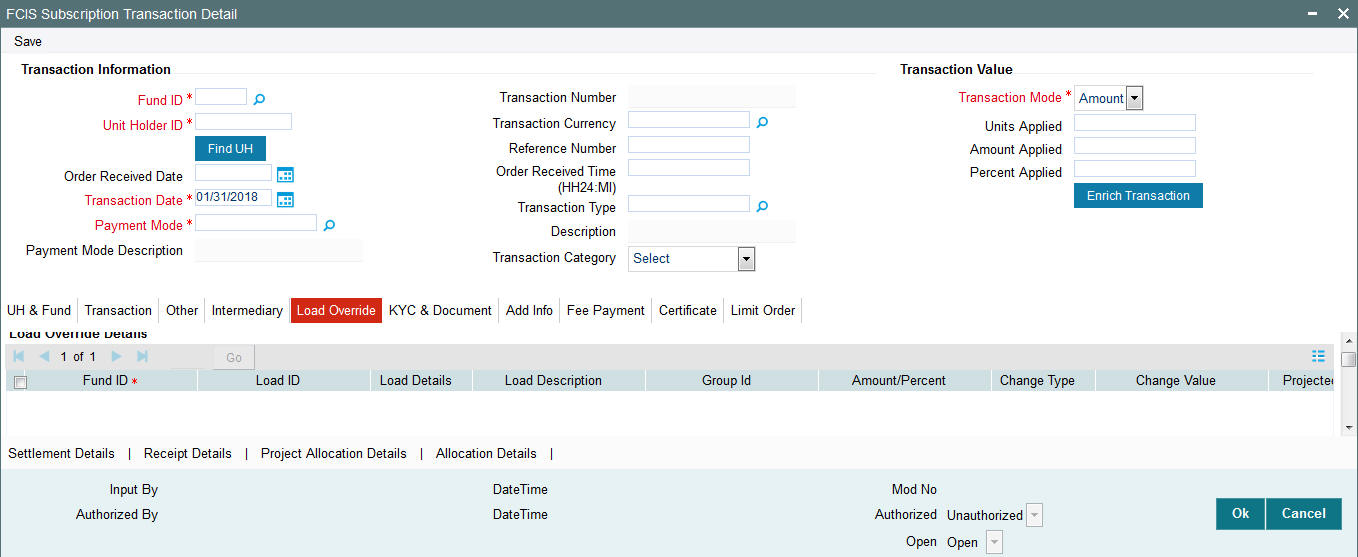
Load ID
Display Only
The ID of the allocation time load that has been mapped to the fund for the transaction type is displayed here. The load ID is displayed as a link. To view details of the load, click the ID link. The following screen is invoked:
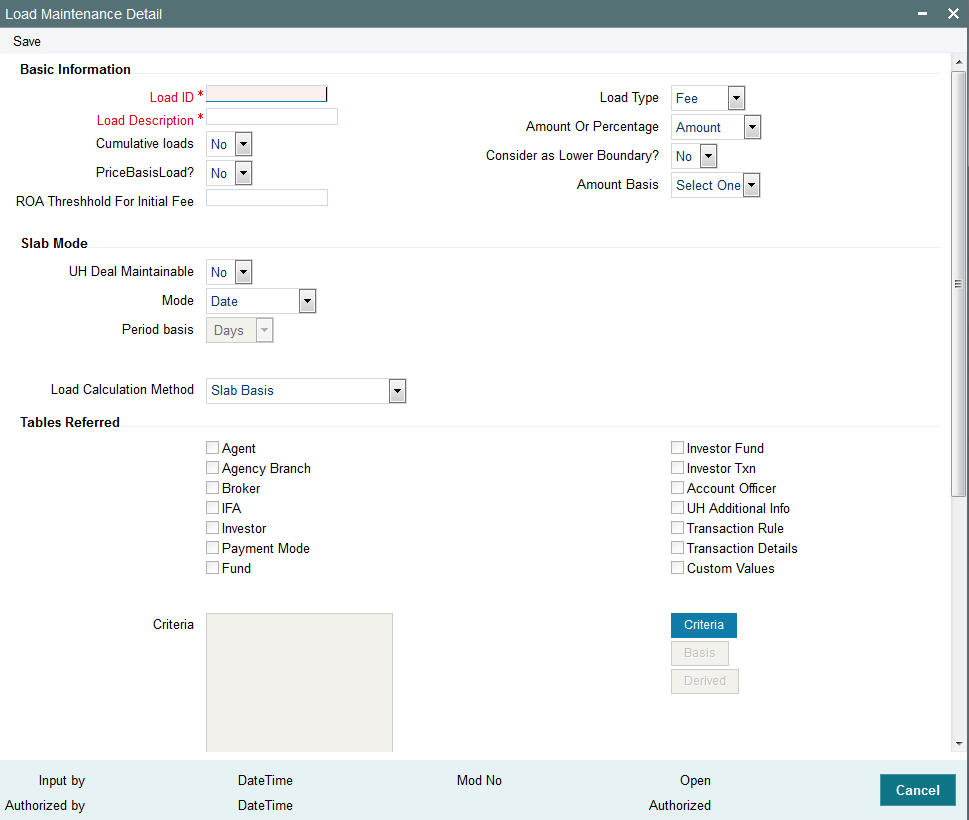
You can invoke this screen by typing UTDLOADM in the field at the top right corner of the Application tool bar and clicking on the adjoining arrow button.
If the load is criteria based, the criteria will be displayed in the Load Details screen.
If a derived load has been mapped, it is also displayed here and can be overridden.
Description
Display Only
The description of the allocation time load that has been mapped to the fund for the transaction type is displayed here.
Amount/Percentage
Display Only
The type of the allocation time load that has been mapped to the fund for the transaction type is displayed here. The ‘type’ of the load refers to the base value upon which the load is applied. There are two possible types – amount-based loads, and percentage-based loads.
Change type for each slab
Optional
When you override or alter an allocation time load at the time of entering a transaction, you can effect the change in any of the following ways:
- Discount (reducing the load return value in all the slabs)
- Increase (increasing the load return value in all slabs)
- Return Value (assigning an altered return value that will be applicable to all the loads)
To understand clearly how the override would be performed in any of these ways, let us consider an example.
Let us suppose that the following loads are mapped to the Carey Bugle Memorial Fund for all transaction types, with the processing frequency as ‘allocation’:
Load ALLOCL1, a percentage-based load with a return value of 5 % for slab 1 and 2, and 4% for slab 3.
Load ALLOCL2, a percentage-based load with a return value of 3.5% for all slabs.
Load ALLOCL3, an amount-based load with a return value of 10 USD for slabs 1 and 2, and 9 USD for slabs 3 and 4.
Let us suppose that you are accepting a subscription request into this fund, from the unit holder Mr. Bill Smith, and upon his directives, you have overridden these allocation time loads as follows:
Load ALLOCL1 is to be discounted. You choose the ‘Discount’ option in the Change Type field and specify the discount value in the Value field in the Load Override section as 1%, to be applicable to all slabs of ALLOCL1. The new percentages applicable for slabs 1 and 2 would be 4%, and for slab 3, the new percentage would be 3%.
Load ALLOCL2 is to be increased. You choose the ‘Increase’ option in the Change Type field, and specify the new return value as 1%, applicable to all slabs of ALLOCL2. The new percentage applicable for all slabs of ALLOCL2 is 4.5%.
For load ALLOCL3, you choose the ‘Return Value’ option and specify the new return value as 8 USD for all slabs of ALLOCL3. The new return value for all slabs, 1,2, 3 and 4 for the load ALLOCL3 would be reckoned as 8 USD.
Value
Numeric, Optional
Specify the altered return value for the allocation time load that you are overriding.
Amount Basis
Specify the amount basis to be considered here
To understand how the new value would work, consider the example given under the Change Type field.
5.2.8 Limit Orders Tab
Limit Order Type
Alphanumeric; Mandatory for Limit Orders
Specify whether the limit order is price based or date based.
Limit Price
Numeric; Mandatory for Price Based Orders
Specify the price for the price based limit order transaction. This represents the price equal to or below which the transaction must be put through (for buy orders), or the price equal to or above which the transaction must be put through (for sell orders).
Limit Start Date (DD/MM/YYYY)
Date Format, Mandatory
For price based limit orders, specify the date that commences the period within which the limit order must be executed. On any date on and after this, the limit order could be executed when the limit price conditions are met.
The date you specify here must be a future date.
Limit End Date (DD/MM/YYYY)
Date Format, Mandatory
For price based limit orders, specify the date that closes the period within which the limit order must be executed. Beyond this date, the limit order stands cancelled and will not be processed.
The date you specify here must be a future date, later than the Limit Start Date.
Limit Date (DD/MM/YYYY)
Date Format, Mandatory
For date based limit orders, specify the future date on which the limit order must be executed. If this date is subsequently specified as a holiday, the limit order pricing rule (Prior or After) specified in the General Operating Rules is used to determine the date on which the order would be executed.
5.2.9 Allocation Details Button
The details of subsequent allocation of the transaction, if any, are displayed in this section. When you are entering a new transaction, this tab is not available.
All fields are view only fields and no data entry is possible.
Date Allotted
This is the date on which the Fund Manager allocated the units in respect of the transaction.
Units Allotted
This is the number of units that were allocated by the Fund Manager. in respect of the transaction.
Units Confirmed
This is the number of units that were confirmed after allocation by the Fund Manager in respect of the transaction.
Units Rejected
This is the number of units, if any, that were rejected in respect of the transaction by the Fund Manager
Unit Price Applied
This is the price per unit that was prevalent for the fund and transaction type at the time of acceptance of the allotted transaction.
Provisional Shares
This is the number of provisional shares allocated in respect of the transaction by the Fund Manager. Provisional shares are allocated for transactions, the payment instrument in respect of which is pending clearance.
5.2.10 Document Details Section
In this section, you can specify the document type for the unit holder. The document types can be maintained in the System Parameters Maintenance screen. This section will be enabled only if your installation is integrated with DMS.
Document ID
Optional
You can either enter the document id in this field or choose the document id from the Document Find screen which is opened when you click ‘KYC & Document’ tab .
In the Document Find screen, specify the first name and second name of the unit holder whose document you wish to retrieve. The various documents stored against the name of the unit holder that you have entered, will be displayed. Double click on the corresponding document, to choose the same. You can also click on the document id link to view the scanned document.
Note
If you enter the document id and then click ‘KYC & Document’ tab, the Document View screen will be opened, where you will see the scanned document.
Document Type
Display
When you enter or choose the document id, this field will be updated.
Document Description
Display
When you enter or choose the document id, this field will be updated.
For further information on maintenance of system parameters, refer to the chapter ‘Maintaining System Parameters’ in Volume 1
5.2.11 Add Info Tab
To maintain any additional information for a transaction, click on the Transaction Add Info link in the Transaction input screen.
You can only maintain additional information if any information heads have been maintained in the System Parameters, to be applicable for the segment.
The information heads that you maintain are user defined.
Note
The Additional Information section allows you to capture valuation data and has no processing implications.
5.3 Mandatory Information for All Transaction Types
The transactions input detailed screen consists of the following sections:
- Client Information
- Transaction Information
- Broker Details
- Payment Details
- Fee Details
- Certificate Details
- Load Override Details
- Allocation Details
- Document Details
The mandatory information you need to supply before saving the transaction is given below as under each section. This is applicable to all transaction types:
Client Information Section
- The CIF Number for the investor, or, if this is not known, the investor number (or Unit Holder ID) in the Investor field.
- The Unit Holder ID for non-CIF investors.
Transaction Information Section
- The date of the transaction, in the Transaction Date field. If you are entering a backdated transaction, the date must be within the backdating limits specified for the fund in the Transaction Processing Rules.
- The fund in which the transaction was requested, in the Fund field. You must also specify the ISIN Code of the fund, in the ISIN Code field.
- The desired mode for the transaction, in the Transaction Mode field.
- The currency for the transaction, in the Transaction Currency field.
- The volume of the transaction, in terms of the selected transaction mode, in the Transaction Value field.
- The mode of communication that was used to request the transaction, in the Communication Mode field.
- The desired mode of payment for the transaction, in the Payment Mode field, for IPO, subscription and redemption transactions.
- Whether the applicable exchange rate that is prevalent at the time of transaction entry, must be overridden, in the Override Exchange Rate? field.
- Whether the transaction is to be initiated by gross amount / units, or net amount, in the Gross / Net field, for IPO, subscription and redemption transactions.
- The exchange rate source to be used, in the Exchange Rate Source field.
- Whether the transaction is an LOI transaction, in the LOI Transaction field.
- The maturity date for the transaction, if any, in the Maturity Date field.
- Whether the fee for the transaction is to be overridden, in the Override Fee field.
- The Price Basis for the transaction
Payment Details Section
- For redemption transactions, all the details in the Payment Details section.
- For IPO and subscription transactions, the payment type in the Payment Type field.
Fee Payment Details Section
- If fees are applicable, then all the details of fee payment, in the Fee Payment Details section.
Certificate Details Section
- The certificate numbers for certificate based transactions.
5.4 Unit Holder Balances Summary
This section contains the following topic:
5.4.1 Invoking Unit Holder Balances Summary Screen
In the ‘UnitHolder Balances Summary’ screen, you can query the database to obtain fund-wise balances of unit holders, as of a price date or settlement date. You can invoke this screen by typing ‘UTDUHBAL’ in the field at the top right corner of the Application tool bar and clicking on the adjoining arrow button.
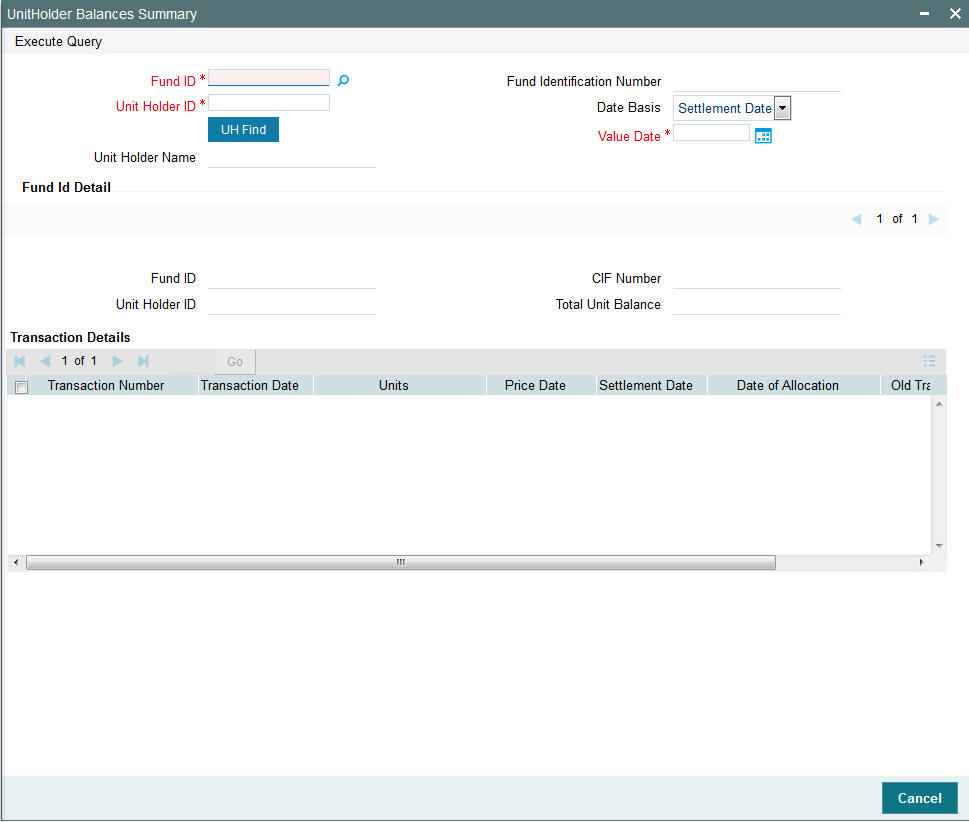
As of a price date or a settlement date, you can view the balances for:
- A specific unit holder in all funds. You must provide the ID of the required unit holder in this case.
- A specific unit holder in a specific fund. You must provide the IDs of both the required fund as well as the unit holder, in this case.
- All unit holders in a specific fund. You must provide the ID of the required fund in this case.
To obtain the required balances for viewing in this screen, you must specify the following information that would be used as search criteria:
- ID of the fund for which you require to view the unit holder balances
- ISIN Code of the fund
- Date basis. This would indicate whether you wish to view the balances as of a price date or a settlement (value date). Specifying the date basis is mandatory.
- The date (price date or settlement date, as indicated in the Date Basis), as of which you wish to view balances. Specifying the required date is mandatory.
- ID of the unit holder for which you wish to view fund-wise balances as of the indicated date
The following details are displayed in the Fund ID Detail portion of the Unit Holder Balances screen:
- ID of the fund for which the unit holder balances are displayed
- CIF of the unit holder whose balances are displayed
- ID of the unit holder
- Total Unit balance of the unit holder in the fund, as of the indicated date
- You can view a transaction-wise breakup details for the unit balance, in the Transaction Details section:
- CIF of the unit holder
- ID of the unit holder
- ID of the fund in which the transaction was put through
- Transaction number
- In case of reversals, the old transaction number
- Transaction date
- Date of Allocation
- Unit balance due to the transaction
- Date as of which the balances are displayed. This could be a price date or a settlement date
- Old Transaction Number
5.5 Contract Notes for Transactions
Confirmation reports (contract notes) for transactions allocated on a business day may be obtained by printing them through the Confirmation Reports menu item in the Queries menu. You can print the notes as often as required through the Confirmation Reports menu.
The End of Day processes on a given business day also execute an EOD job that prints contract notes in respect of transactions allocated on a given business day. The job checks to see if the contract notes have already been printed from the menu. If so, duplicates will be printed only if the ‘Duplicates Required’ option in the task parameters static information for the job has been enabled and set to ‘Yes’. If the Duplicates Required option has been set to ‘No’, duplicate contract notes are not printed by the EOD job. The Duplicates Required option is configured by the implementers at your installation, according to your requirement in respect of printing of duplicate contract notes.
If the contract notes have not been printed through the Confirmation Reports menu, the EOD job prints the contract notes.
Also, if allowed, as explained above, the EOD job prints transaction contract notes for transactions involving only those unit holders for whom the ‘File’ option has not been set as the preferred mailing mode in the unit holder account details. For transactions involving any unit holders for which the ‘File’ option has been set in the account details, the EOD job suppresses the printing of contract notes.
5.6 Entering Payment Details for Transactions
This section contains the following topics:
- Section 5.6.1, "Payment Incomplete Transactions"
- Section 5.6.2, "Gross Basis and Net Basis Transactions"
5.6.1 Payment Incomplete Transactions
When you enter a transaction request from an investor into the system (in the Transaction Details screens), you can save the transaction without entering any details of payment, in either of the following cases:
- For instance, in the case of a gross basis transaction, you would capture the mode of payment as mandatory information, but the investor need not actually furnish details of any payment instrument at the time of transaction entry.
- In the case of net basis transactions, you would not capture any payment details, as the actual amount of the transaction is not known at the time of transaction entry.
Whenever you do not enter the payment details, the transaction is saved as a payment incomplete transaction.
Further, a payment incomplete transaction can be authorized, and the payment details “completed” or entered subsequently, after authorization.
Let us understand gross basis and net basis transactions clearly.
5.6.2 Gross Basis and Net Basis Transactions
An investor may request either a gross basis or a net basis for processing a transaction, at the time when you enter the request into the system.
Let us consider an example to understand how transactions are processed on gross or net basis.
5.7 Enrich Exchange Rate Detail
This section contains the following topics:
- Section 5.7.1, "Exchange Rate Enrichment for Exchange Rate Incomplete Transactions"
- Section 5.7.2, "Invoking Enrich Exchange Rate Detail"
- Section 5.7.3, "Performing Bulk Update of Exchange Rate"
- Section 5.7.4, "Authorizing Exchange Rate Enrichments"
5.7.1 Exchange Rate Enrichment for Exchange Rate Incomplete Transactions
When you enter a transaction request from an investor into the system (in the Transaction Details screens), you can save the transaction without specifying an exchange rate, in cases where the exchange rate for the source selected for the transaction has not been uploaded or is unavailable.
Whenever you do not enter the exchange rate, the transaction is saved as an exchange rate-incomplete transaction.
Further, an exchange rate incomplete transaction can be authorized, and the exchange rate “completed” or entered subsequently, after authorization.
Transaction Enrichment
The process of entering the exchange rate for an exchange rate incomplete transaction is known as Exchange Rate Enrichment.
Why must enrichment be performed?
A transaction can only be picked up by the End of Day process for allocation of units only if it is authorized and all necessary details are present in the transaction record. If the exchange rate is not available, the equivalent transaction amount in fund base currency cannot be computed. In the event of the transaction being authorized before the exchange rate details are specified, it must be made “exchange rate-complete” before it can be picked up subsequently for allocation.
When to perform enrichment?
Exchange rate enrichment must be performed as a mandatory procedure before an exchange rate incomplete transaction is allocated.
Exchange rate enrichment must also be performed for authorized transactions generated due to a standing instruction.
5.7.2 Invoking Enrich Exchange Rate Detail
You can specify the exchange rate for exchange rate incomplete transactions in the ‘FCIS Enrich Exchange Rate Detail’. You can invoke this screen by typing ‘UTDTXNEE’ in the field at the top right corner of the Application tool bar and clicking on the adjoining arrow button.
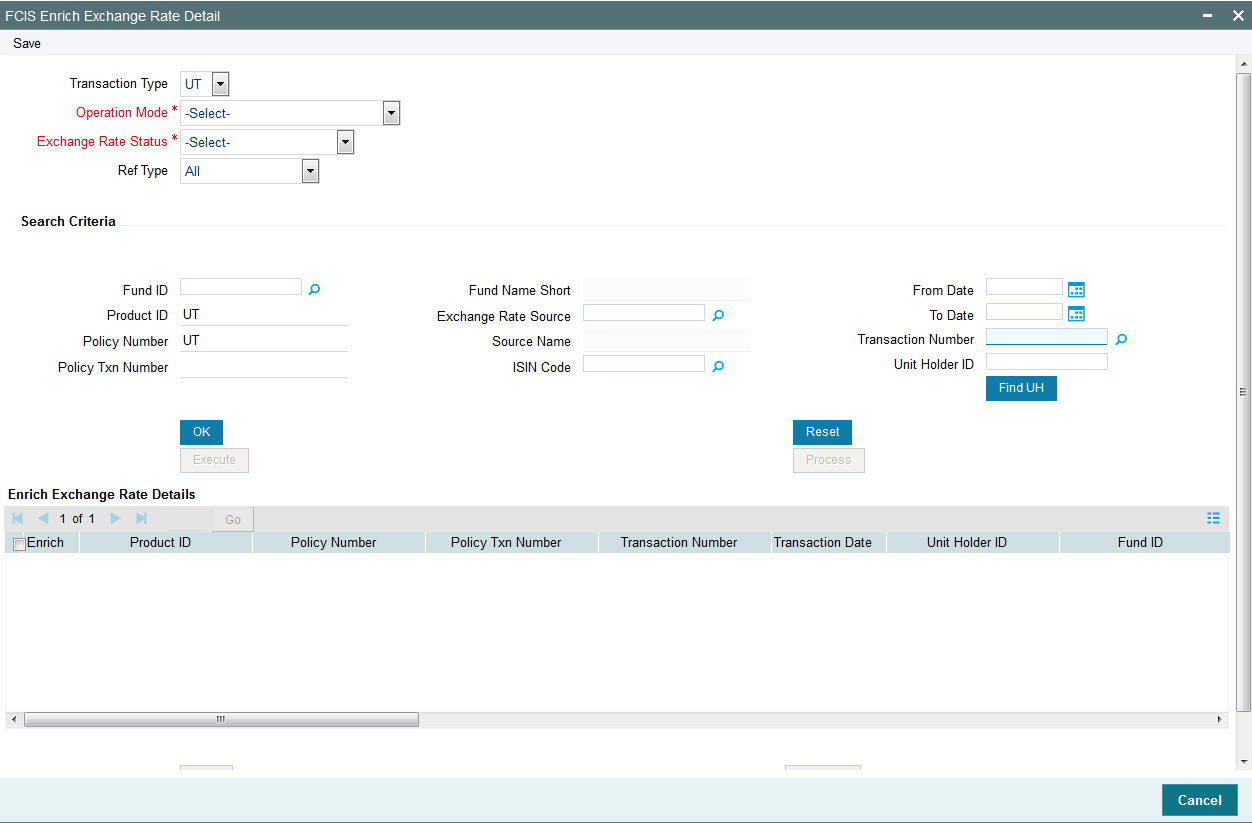
Enrich the exchange rate details in this screen as follows:
- Transaction type – You can choose either UT or LEP. If u choose UT only incomplete UT transactions will be displayed for enrichment. If you choose LEP and mention the ‘Product ID’ and ‘Policy Number’, then all the underlying incomplete UT transactions of the particular policy will be available enrichment
- Operation Mode – You can choose to enrich exchange rates, authorize, bulk exchange rate enrichment or view enrich exchange rate
- Ref type – The ref types that are available are All, Standing Instructions, IPO Subscription, Subscription, Redemption, Switch & Transfer. You can choose any of these.
- Select the ID of the fund or the ISIN Code of the fund in which the exchange rate incomplete transaction was entered, in the Fund ID and the ISIN Code fields. Select the procedure of operation in the Operation Mode field
- Select the Enrich Exchange Rate option in the Operation Mode field, in the Find Records section of the screen.
- If the transaction for which you are enriching the exchange rate is an unauthorized transaction, select the Unauthorized option in the field Exchange Rate Status.
- If the transaction for which you are entering the exchange rate is an authorized transaction for which the exchange rate has not been entered, choose the Incomplete option in the Exchange Rate Status field.
- In the Exchange Rate Source field, select the exchange rate source specified for the transaction, and click ‘Ok’ button.
- Select the product for which you wish to enrich transactions
- Select the policy number
- Select the policy transaction number that should be enriched
- All transactions that are retrieved according to your specifications
are displayed as a list in the Enrich Exchange Rate Details grid, in
the lower portion of the screen.
- For each transaction that you want to enter the exchange rate, select the row of the transaction in the list grid.
- Specify the exchange rate for the transaction.
- Click ‘Ok’ button.
5.7.3 Performing Bulk Update of Exchange Rate
Bulk Exchange rate enrichment is performed for authorized but un-allotted transactions in the system. To perform bulk update of exchange rates select ‘Bulk Exchange Rate Enrichment’ in the operation field.
Certain other fields will be displayed in this screen if you choose the operation as ‘Bulk Exchange Rate Enrichment’.
To invoke this screen type UTDTXNEE in the field at the top right corner of the Application tool bar and clicking on the adjoining arrow button.
Enrich the exchange rate details in this screen as follows:
- Select the operation mode as ‘Bulk Exchange Rate Enrichment’.
- Select the reference type for which you are performing exchange rate enrichment.
- Select the ID of the fund or the ISIN Code of the fund in which the bulk exchange rate enrichment is being performed, in the Fund ID and the ISIN Code fields.
- The date range when the transaction was processed.
- If the transaction for which you are enriching the exchange rate is an authorized but un-allotted transaction, choose the 'Complete' option in the field Exchange Rate Status
- If the transaction for which you are entering the exchange rate is an authorized transaction for which the exchange rate has not been entered, choose the ‘Incomplete’ option in the Exchange Rate Status field.
- In the Exchange Rate Source field, select the exchange rate source specified for the transaction, and click ‘Process’ button to submit the job to update the exchange rate details.
- Else, click ‘Execute’ button to update the update the exchange rate details.
5.7.4 Authorizing Exchange Rate Enrichments
After you have enriched the exchange rate in the Exchange Rate Enrichment screen, another user must authorize the enrichment for it to be effective in the system database, so that the transaction can be picked up for allocation.
To authorize the enrichment of exchange rate for a transaction, do as follows:
- Select the ID of the fund or the ISIN Code of the fund in which the transaction was entered, in respect of which exchange rate enrichment was done, in the Fund ID and the ISIN Code fields.
- Select the Authorize option in the Operation Mode field, in the Find Records section of the screen.
- Only unauthorized exchange rate enrichment transactions can be authorized. Select the Unauthorized option in the Exchange Rate Status field.
- In the Exchange Rate Source field, select the exchange rate source specified for the exchange rate enriched transaction, and click ‘Ok’ button.
- All exchange rate-enriched transactions that are retrieved according to your specifications are displayed as a list in the Records Matching The Search Criteria grid, in the lower portion of the screen.
- For each transaction for which you want to authorize the exchange rate enrichment, select the row of the transaction in the list grid.
- In the Auth Status field, select the Authorize option to mark the enrichment for authorization.
- After similarly marking as many records as necessary for payment enrichment authorization, click ‘Authorize’ button to effect the authorization.
- Transactions enriched through bulk operation need not be authorized.
5.8 Payment Clearing Detail
This section contains the following topics:
- Section 5.8.1, "Invoking Clearing Payment Instruments"
- Section 5.8.2, "Updating Clearing Status of Payment Instrument"
- Section 5.8.3, "Payment Clearing Details"
- Section 5.8.4, "Authorizing Clearing Status"
- Section 5.8.5, "Tracking Status of Returned Cheques"
- Section 5.8.6, "Authorizing Tracking Status"
5.8.1 Invoking Clearing Payment Instruments
The system provides the facility to keep track of the clearing status of payment instruments for transactions, or, in the case of LEP (Life and Endowment Products), on a policy level, on an online basis.
To update the clearing status of a payment, use the ‘Payment Clearing Detail’ screen. You can invoke this screen by typing ‘UTDPYCLR’ in the field at the top right corner of the Application tool bar and clicking on the adjoining arrow button.
![]()
5.8.2 Updating Clearing Status of Payment Instrument
To update the clearing status of a payment instrument for a transaction in the Payment Clearing screen, do as follows:
- In the Selection Criteria section, specify the following details as search parameters to retrieve the transaction records for which the payment instruments must be cleared:
- In the Mode field, select the New option.
- In the Level field, select the Transaction option.
- In the Payment Mode field, select the mode of payment specified for the transaction for which you want to update the clearing status of the payment instrument. To clear a specific payment instrument, enter the number of the instrument in the Specific Number field.
- In the Date Range fields, specify a range of dates that would signify the period between which the transaction date or the allotted date of the transaction would be found.
- Click on the Show Details button. All transactions with payment instruments
that match your search criteria are displayed, in the lower grid portion
of the screen, in a list. Transactions that satisfy the following criteria
are displayed:
- All necessary information such as payment mode, sub payment mode, payment currency, payment amount, etc. is recorded.
- FBC/TC amount equivalent and paid date (if auto settlement option is unchecked) are recorded.
- Click on the Payment Details link to invoke the Settlement Information screen. The payment details of all legs involved in the transaction is displayed.
- Click ‘Payment Details’ button under Pymt Dtls column to invoke the Payment screen.
- Specify the clearing date in the Clearing Date field. By default, the clearing date is deemed to be the application date.
- Specify any relevant remarks in the Remarks field.
- After marking as many instruments as necessary for clearing or rejection, click the Save button to save your changes.
- To clear all instruments displayed in the list, choose the Clear All button. To reject all instruments displayed in the list, choose the Reject All button. Depending on what you choose, either Clear All or Reject All, the clearing status field under the Payment Clearing grid will display the clearing status.
5.8.3 Payment Clearing Details
The following details are displayed in the Payment Clearing screen:
- The transaction number of the transactions with the selected mode of payment or a check number.
- The payment mode used in the specified transaction
- The instrument number of the payment instrument used for the transaction
- The date of the payment instrument.
- The currency of the payment instrument.
- The amount of the payment instrument.
- The bank name and branch name of the bank where the payment instrument was drawn.
5.8.4 Authorizing Clearing Status
After you have updated the clearing status for a transaction payment instrument, another user must authorize the clearing status, for it to be effective in the system data stores.
To authorize a clearing status in the Payment Clearing screen, do as follows:
- In the Selection Criteria section, specify the following details as search parameters to retrieve the transaction records for which the clearing status of payment instruments must be authorized:
- In the Mode field, select the Authorize option.
- In the Level field, select the Transaction option.
- In the Payment Mode field, select the mode of payment specified for the transaction for which you want to authorize the clearing status of the payment instrument. To authorize a specific cleared payment instrument, enter the number of the instrument in the Specific Number field.
- In the Date Range fields, specify a range of dates that would signify the period between which the transaction date or the allotted date of the transaction would be found.
- Click on the Show button. All transactions with payment instruments that match your search criteria are displayed, with the instrument details, in the lower grid portion of the screen, in a list.
- For each payment instrument that you want to authorize the clearing status, select Authorize from the drop down menu in the Auth Status field. Your specification here will mark the clearing status of the instrument for authorization.
- After marking the clearing status of as many instruments as necessary for authorization, click the Authorize button to effect the authorization. Authorization of the payment clearing of a subscription transaction will settle all unsettled redemptions linked to it.
Clearing Status
3 Character, Alphanumeric, Mandatory
Select Clear to mark the check as Cleared. Select Reject to mark the check as Returned / Rejected.
Clearing Date
Date, Mandatory
Specify the date on which the clearing takes place. By default, the clearing date is deemed to be the application date.
Remarks
255 Characters Maximum, Alphanumeric, Mandatory
Specify any relevant remarks regarding the clearing status.
5.8.5 Tracking Status of Returned Cheques
After a transaction has been allocated, the purchase transaction will have a cooling block set, which implies that no units can be redeemed from this transaction’s lots. The cooling block will be removed (transaction will be cooled off) when the status of the instrument is updated as cleared.
You can track the status of the physical instruments using the Payment Clearing screen.
![]()
To track the status of a payment instrument for a transaction in the Payment Clearing screen, do as follows:
- In the Selection Criteria section, specify the following details as search parameters to retrieve the transaction records for which the payment instruments must be tracked:
- In the Mode field, select the ‘New’ option.
- In the Level field, select the Settlement option.
- You can search for a record using any of the following criteria:
- Fund ISIN
- Fund Id
- AMC Id
- In the Payment Mode field, select the mode of payment specified for the transaction for which you want to update the status of the payment instrument. Only Cheque, Demand Draft and Money Transfer payment modes are applicable. To clear a specific payment instrument, enter the number of the instrument in the Specific Number field.
- In the Date Range fields, specify a range of dates that would signify the period between which the transaction date, the allotted date or the payment date of the transaction would be found.
- Click on the Show button. All transactions with payment instruments
that match your search criteria are displayed, in the lower grid portion
of the screen in a list.
- All necessary information such as transaction number, payment mode, clearing date, payment currency, payment amount, etc is recorded.
- Click on the Payment Details link to view the Settlement Information screen. The payment details of all legs involved in the transaction is displayed.
- Specify the status of the instrument in the Instrument Status field.
The options:
- Credit Received - Once this status is selected, system triggers automatic clearing of the associated transaction record and convert provisional units into confirmed units.
- Debit Received - Indicates that information about Cheque rejection is received from Bank.
- Reject Status Awaited - Indicates that information about Cheque rejection has been received at AMC/TA through return of physical instrument.
- Rejected - This means that both; rejected cheque and reject information from the bank have been received. Once this status is updated, system will trigger automatic reversal of the associated transaction record.
- Specify any relevant remarks in the Remarks field.
- After marking as many instruments as for tracking, click the Save button to save your changes.
If you select an Instrument Status for one or all of Instruments for a transaction that results in payment / transaction rejection, system gives the following warning message “This will reject the entire transaction. Do you want to go ahead?”
5.8.6 Authorizing Tracking Status
After you have updated the status of a transaction payment instrument, another user must authorize the instrument status, for it to be effective in the system data stores.
To authorize an instrument status in the Payment Clearing screen, do as follows:
- In the Selection Criteria section, specify the following details as search parameters to retrieve the transaction records for which the status of payment instruments must be authorized:
- From the Actions list, select the Authorize option.
- In the Level field, select the Settlement option.
- In the Payment Mode field, select the mode of payment specified for the transaction for which you want to authorize the status of the payment instrument. To authorize a specific payment instrument, enter the number of the instrument in the Specific Number field.
- In the Date Range fields, specify a range of dates that would signify the period between which the transaction date or the allotted date of the transaction would be found.
- Click on the Show button. All transactions with payment instruments that match your search criteria are displayed, with the instrument details, in the lower grid portion of the screen, in a list.
- For each payment instrument that you want to authorize the status, select Authorize from the drop down menu in the Authorization Status field. Your specification here will mark the status of the instrument for authorization.
- After marking the status of as many instruments as necessary for authorization, click the Authorize button to effect the authorization.
Instrument Status
Alphanumeric, Mandatory
Specify the status of the instrument in the Instrument Status field. The options:
- Credit Received - If this status is selected, system triggers automatic clearing of the associated transaction record and convert provisional units into confirmed units.
- Debit Received - Indicates that information about Cheque rejection is received from Bank.
- Reject Status Awaited - Indicates that information about Cheque rejection has been received at AMC/TA through return of physical instrument.
- Rejected - This means that both; rejected cheque and reject information from the bank have been received. Once this status is updated, system will trigger automatic reversal of the associated transaction record.
Note
If the record is uploaded with the status ‘Debit Received’, the options in the drop-down list are ‘Reject Status Awaited’ and ‘Rejected’.
- If the record is uploaded with the status ‘Reject Status Awaited’, the options in the drop-down list are ‘Debit Received’ and ‘Rejected’.
- If the payment mode is Money Transfer, then the options available are ‘Credit Received’ and ‘Rejected’.
- If the record is uploaded from the Bank Reconciliation screen with the status ‘Credit Received’ or ‘Rejected’, then the record will not be available in the New mode and you will not be allowed to update the instrument status.
In case of uploaded records, system adds the following in the Remarks field:
‘Through Bank Recon Upload When No Action’
5.9 Transaction Load Override
This section contains the following topics:
5.9.1 Invoking Load Override Details
In FLEXCUBE Investor Services, you have the facility of changing the return value or final amount value of a load (charge) that is applicable for a transaction requested by an investor.
To override such a load, use the ‘FCIS Transaction Load Override Detail’ screen. You can invoke this screen by typing ‘UTDTXNLO’ in the field at the top right corner of the Application tool bar and clicking on the adjoining arrow button.
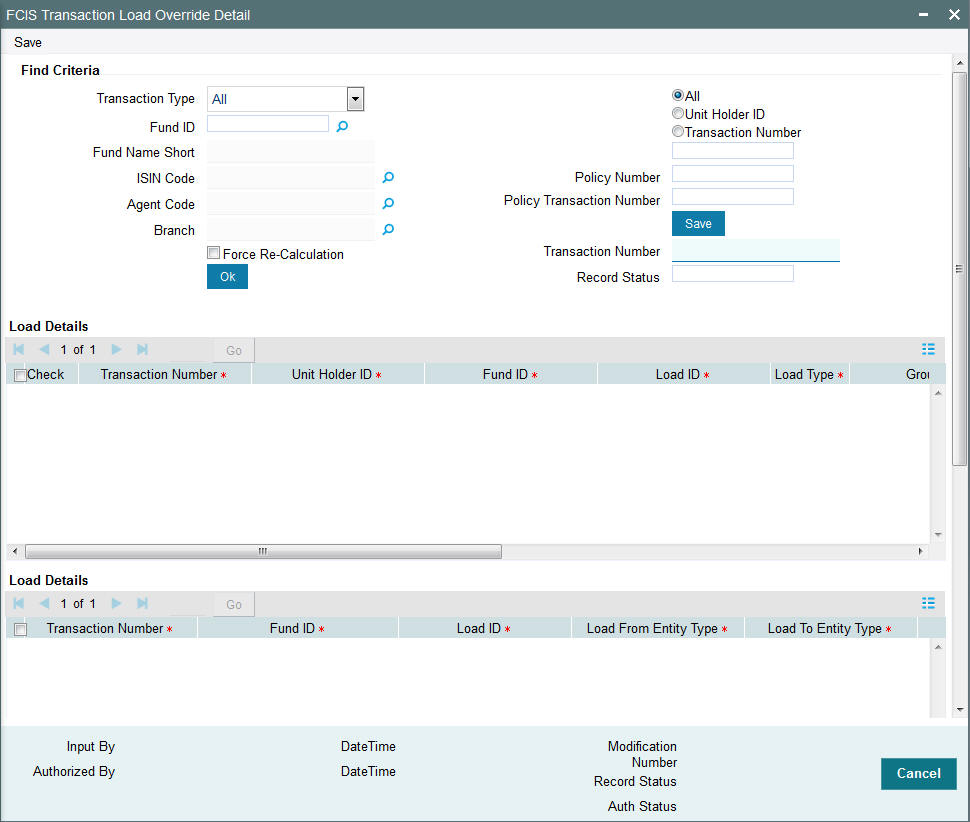
To override a load, do as follows:
- Retrieve the record of the load that you want to override by specifying
search parameters. You can specify any or all of the following to enable
the search:
- The type of transaction for which the load is applicable, in the Transaction Type field
- The unit holder ID of the investor that has requested the transaction for which you want to override a load
- The number of the transaction for which you want to override a load
- The fund (in the Fund field) in which the transaction was put through, for which you want to override a load. You can also specify the ISIN Code of the fund.
- The agency branch where the transaction was put through, in the Agent and Branch fields.
- In each field, you can choose the ALL option so that you can obtain a list of all transactions for which a load override can be performed.
- When you have specified your criteria, click OK.
- The transactions retrieved from the database as a result of the search are displayed in the lower grid portion of the screen. To override a load, click the Over Ride button at the extreme right end of the required row. The Txn Load Override screen is displayed, with the existing return value and the amount value of the load shown.
- In the Override field, specify either the new, overridden return value or the overridden amount, and click OK.
- Click the OK button to save your changes.
The following must be borne in mind at a general level, while carrying out load overrides in this screen:
- Any load that is a tax cannot be overridden. A particular Load is deemed a tax if the fund load mapping record has a value specified for the Apply Return Value On field.
- Interconnected Loads:
- In the system, two loads are deemed to be interconnected loads if the From Entity of the one is the same as the To Entity of the other. After you exercise a Load Override in this screen and attempt to save the override record, the system flashes a warning message if the concerned load is an interconnected one. The message also displays the transaction number and the connected loads. If you choose Yes in this message box, these changes will be reflected during allocation of the transaction.
- Once a load override is saved in this screen, it is removed from the view list. To retrieve it, you must specify the search criteria again.
- If the original load is a percentage based load, and is loaded to price, the original load amount displayed is a per unit figure. The following illustration will make this clear:
Let us suppose that the Transaction Price is 10, and the load percentage is 5%. The amount displayed is as follows:
5% of 10=0.5.per unit.
If the load is not loaded to price, then the actual load amount is displayed here. Considering the same example above, If the transaction amount is 1000 currency units, and the load percentage is 5%, with the load not loaded to price, the load amount displayed is as follows:
5% of 1000=50 currency units.
5.9.2 Forcing Recalculation
When you open the load override screen for the first time (i.e., before any load overrides have been performed) and retrieve some load records, the computed load amounts are not displayed in the Amount/Return Value fields in the Txn Load Override screen. This will be so if you have not checked the Force Recalculation? field check box in the main Transaction Load Override screen. To indicate to the system that load computation must be done, you must Select this option. When you do so, the original computed loads, before any overrides, is displayed in the Return Value/Amount fields in the Txn Load Override screen.
After you perform the load overrides and override some or all of the retrieved loads, the overridden load records are saved as unauthorized load overrides. At this stage, when you open the Load Override screen and retrieve the overridden load records by specifying search criteria, you have the following options:
- If you check the Force Recalculation? check box, the system will compute the loads again, without taking into account the overrides you have performed. The load amounts displayed after this computation are the original, pre-override amounts.
- If you want to revert to the saved load override record and the overridden load values, do not check the Force Recalculation? check box. The overridden load records will be retrieved and displayed.
If a load override that is performed is subsequently authorized, then you will not be able to retrieve it through specifying search criteria.
Transaction Type
Indicate the one of the following transaction type from the drop-down list:
- IPO Subscription
- Reinv IPO Subscription
- Subscription
- Reinv Subscription
- Redemption
- Switch From
- Transfer
- Block
- Unblock
- Consolidation
- Split
- Reissue
Choose one of the following options and enter the associated number for the selected option in the text box below:
- All
- Unit Holder ID
- Transaction Number
Click OK. Based on the information keyed in, in the Find Criteria section, system displays details in the following sections:
5.9.2.1 Load Details Section
System displays the following details:
- Transaction number
- Unit Holder ID
- Fund ID
- Load ID
- Load Type
- Group ID
- Transaction Amount
- Load Calculation Method
- Amount or Percentage
You need to check against the transaction for the selected transaction number in the check box provided.
5.9.2.2 Load Details Section
The system displays the following Load Details for the selected transaction number:
- Load ID
- Load From Entity Type
- Load to Entity Type
- Transaction Amount
- Transaction Date
- Load To Price
- Load VAT To Price
- Mandatory
- Priority Number
- Free Transaction
- Apply Return Value on
- No of Decimals for Load
- Round of truncate for Load
- Group ID
- To Override
Investor
Display Only
The ID of the unit holder who has made the transaction is displayed here.
Transaction Number
Display Only
In this field, the transaction numbers of the transactions, based on the selection criteria, are displayed
Fund ID
Display Only
The ID of the fund on which the transaction has occurred is displayed here
Original Return Value
Display Only
The original return value percentage of each of the applicable loads before the override is displayed here.
Original Load Amount
Display Only
The original load amount of each of the applicable loads before the override is displayed here, after being calculated based on the return value.
You are allowed to override the following details in this section:
Override Return Value
Numeric, Optional
Enter a value to override the original Return Value for the given load, for the given transaction. If nothing is entered then the Return Value will be taken as it is for allocation purposes provided the Override Load Amount is not changed. If the Return value specified is a percentage, you can override this percentage too.
If the Load Amount is changed, the change is also reflected in the Load Return Value field.
Override Load Amount
Numeric, Optional
Enter an amount to override the original Load Amount for the given load, for the given transaction. If nothing is entered then the Load Amount will be taken as it is for allocation purposes provided the Override Return Value is not changed.
If the Load Return Value is changed, the change is also reflected in the Load Amount field.
To Override
Indicate one of the following to indicate your preference for overriding, from the drop-down list:
- Both
- Return Value
- Load Amount
5.9.2.3 Derived Load Details
The system displays the following details:
- Transaction Number
- Unit Holder ID
- Fund ID
- Load ID
- Parent Load ID
- Transaction Amount
You can check against the transaction number for which transaction is done in the check box.,
If the load is criteria based, the criteria will be displayed in the Load Details screen.
If any derived loads are applicable, they are also displayed and can be overridden.
Load Type
Display Only
The type of load, indicating whether it is a fee or an incentive, is displayed here.
Transaction Amount
Display Only
The transaction amount of the given transaction is displayed here.
Calculation Method
Display Only
This Field displays the Calculation Method (either Slab, Linear or Weighted) for the particular Load.
Amount/Percent
Display Only
This Field displays whether the Return Value is displayed in Amount or Percentage.
Load Details
Original Return Value
Display Only
The original return value of each of the applicable loads before the override is displayed here, either as a percentage or a load amount.
5.9.2.4 Authorizing load Override
A user other than the one who performed the override must authorize any override of a load.
To authorize a load override, use the Transaction Load Override Authorization screen. You can access this screen by clicking the Summary option in the Txn Load Override menu item in the Transactions Input menu category of the Agency Branch main menu.
When you open this screen, the load overrides that have been exercised, that are pending authorization, are displayed along with their details.
Mark each override you want to authorize by selecting the Authorize option in the Authorize field against the required override row.
After you have marked as many records as necessary for authorization, click the Authorize button to effect the authorization.
5.10 Global Order
This section contains the following topics:
- Section 5.10.1, "Maintaining Global Order"
- Section 5.10.2, "Invoking Global Order Maintenance Detail Screen"
5.10.1 Maintaining Global Order
Global Order is a process where a distributor bulks their investor’s transactions including Subscriptions, Redemptions and send to the Asset Management Companies or to the Fund Houses as a single Transaction for processing before the funds cut-off time on daily basis. The distributors generally will have an identification number with the fund houses or AMC’s which is called as Nominee Account Number. On receipt of a bulk order or GO from the distributor, the fund house will confirm the units allotted to this distributor or to the Nominee Account.
On receipt of confirmation from fund house, distributor will then confirm the global order at his end. If there is any discrepancy in global order, then global order will go through a reconciliation mechanism to address the difference. Once the discrepancy, if any, is resolved, distributor will allocate units to underlying unit holders.
The GO will be grouped according to Fund, transaction type (subscription and redemption), transaction mode (units/amount), Transaction Category (Advised, Execution and Legacy), Account type, Indicator (gross/Net) and transaction date.This is applicable for daily price funds. For non daily price funds, the system will generate separate GO which will not include Transaction date in grouping.
5.10.2 Invoking Global Order Maintenance Detail Screen
You can maintain Global Order set up using ‘Global Order Maintenance Detail’ screen. To invoke this screen, type ‘UTDGOMNT’ in the field at the top right corner of the Application tool bar and clicking on the adjoining arrow button.
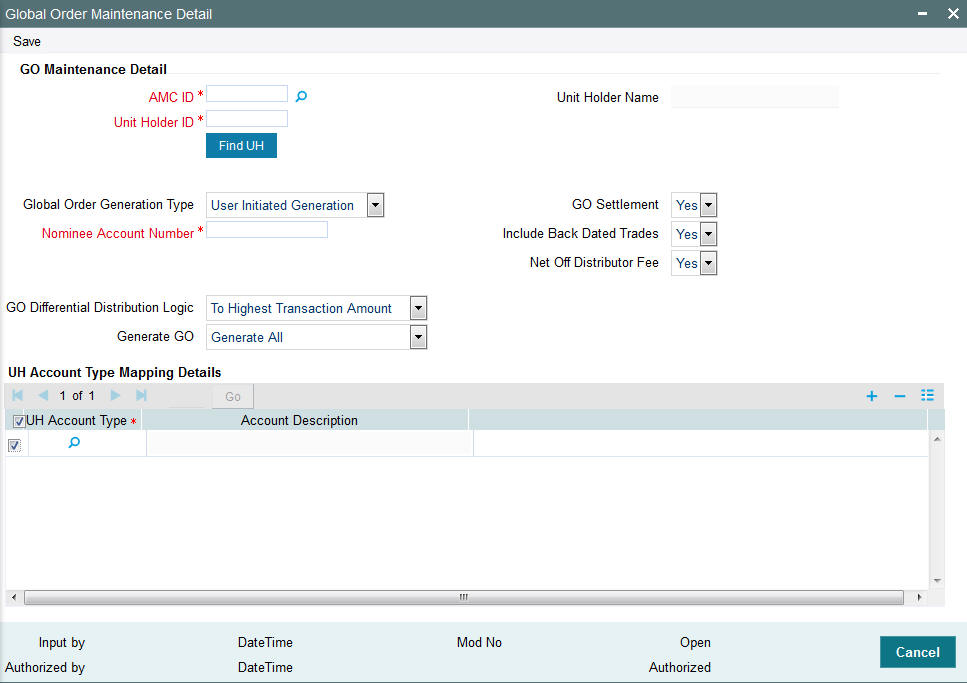
Select 'New' from the Actions menu in the Application tool bar or click new icon to enter the details of the ‘GO Maintenance Detail’ screen.
AMC ID
Alphanumeric; 12 Characters; Mandatory
Specify the AMC for which the GO is maintained. You can also select the valid AMC ID from the adjoining option list.
Unit Holder ID
Alphanumeric; 12 Characters; Mandatory
Specify the Unit Holder for which the GO is maintained. You can also select the valid Unit Holder ID from the adjoining option list.
Unit Holder Name
Display
The system displays the unit holder name for the selected Unit Holder ID.
Global Order Generation Type
Optional
Select the Global Order generation type from the drop-down list. Following are the options available in the drop-down list:
- User Initiated Generation
- Generation at Cut-off time
GO Settlement
Optional
Select the GO Settlement details from the drop-down list. Following are the options available in the drop-down list:
- Yes
- No
Nominee Account Number
Alphanumeric; 16 Characters; Mandatory
Specify the nominee account number.
Include Back Dated Trade
Optional
Select if back dated trade is included from the drop-down list. Following are the options available in the drop-down list:
- Yes
- No
GO Differential Distribution Logic
Optional
Select the GO differential distribution logic from the drop-down list. Following are the options available in the drop-down list:
- To Highest Transaction Amount
- Highest Transaction to the Lowest
If you maintain distribution logic as ‘To Highest Transaction Amount’ then the differential units will be adjusted to the transaction which has the highest transaction amount.
If you maintain distribution logic as ‘Highest Transaction Amount to Lowest’ then the system will distribute the difference amount from the highest transaction amount to the lowest in step up units.
Net Off Distributor Fee
Optional
Select if distributor fee is netted off or not from the drop-down list. Following are the options available in the drop-down list:
- Yes
- No
Generate GO
Optional
Select if all the GO should be generated or GO as per transaction category should be generated from the adjoining drop-down list. Following are the options available:
- Generate All
- Generate per transaction category
5.10.2.1 UH Account Type Mapping Details
UH Account Type
Alphanumeric; 2 Characters; Mandatory
Specify the UH account type. You can also select the valid account type from the adjoining option list.
Account Description
Display
The system displays the description for the selected UH account type.
Once GO is generated, the system will generate subscription multiple order generation message (SWIFT) /redemption multiple order generation message for subscription/redemption global orders respectively as per the Swift pooling frequency defined in the system.
For non daily priced funds, the system will generate GO as per transaction cut-off date and it will take trade cycle override into account while generating GO.
In case for a trade TBC is different from FBC, the system will only pick trades for which exchange rate is available. Exchange rate required to be maintained for the trades where exchange rate is not available. If no exchange rate is available for the trades where TBC is different from FBC then those trades will not be picked for GO.
The system will run a pre EOD batch to check if all trades for a given date have been sent across in a GO which will be based on price date.
5.11 GO Maintenance Summary
This section contains the following topics:
- Section 5.11.1, "Retrieving Global Order Maintenance Record"
- Section 5.11.2, "Viewing Global Order Maintenance Record"
- Section 5.11.3, "Editing Global Order Maintenance Record"
- Section 5.11.4, "Deleting Global Order Maintenance Record"
- Section 5.11.5, "Authorizing Global Order Maintenance Record"
- Section 5.11.6, "Amending Global Order Maintenance Record"
- Section 5.11.7, "Copying Global Order Maintenance Record"
- Section 5.11.8, "Closing Global Order Maintenance Record"
5.11.1 Retrieving Global Order Maintenance Record
You can view Global Order details using ‘GO Maintenance Summary’ screen. To invoke this screen, type ‘UTSGOMNT’ in the field at the top right corner of the Application tool bar and clicking on the adjoining arrow button.
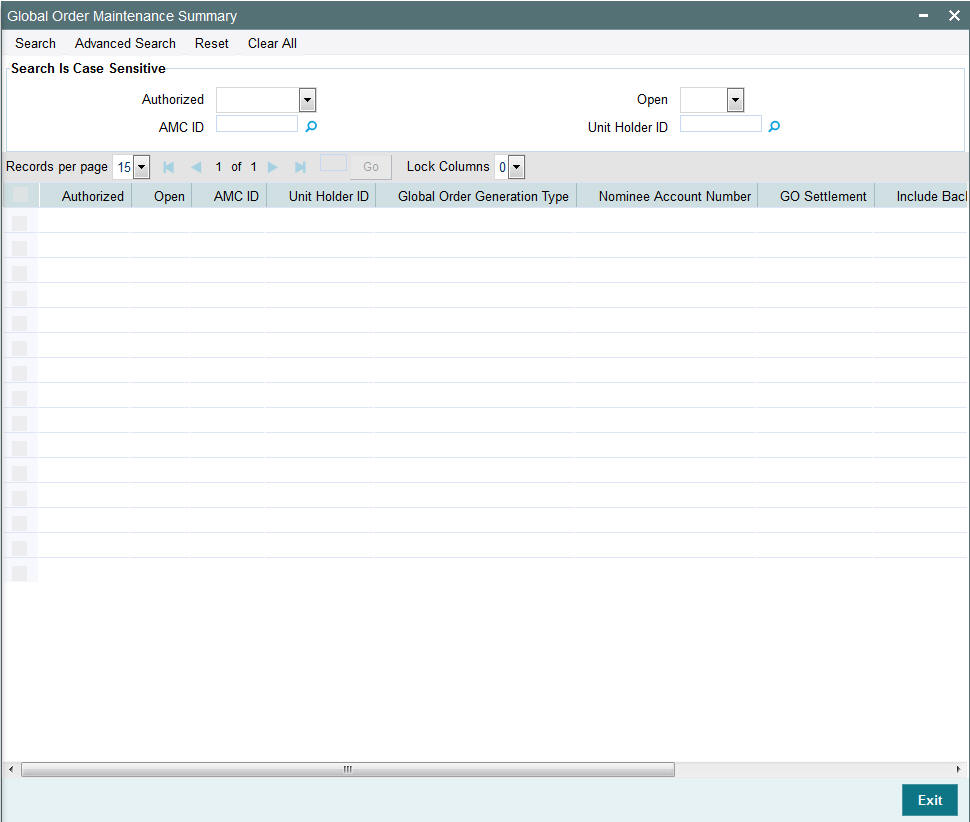
You can retrieve previously entered Global Order Maintenance as follows:
- Invoke the ‘GO Maintenance Summary’ screen from the Browser.
- Specify any or all of the following details in the screen:
- The status of the transaction in the ‘Authorized’ field. If you choose the blank space, then both the authorized and the unauthorized status records will be retrieved for the specified criteria.
- The status of the records in the ‘Open’ field. If you choose the blank space, then all the records are retrieved.
- The AMC ID
- The Unit Holder ID. If you choose the blank space, then all the records are retrieved.
- Click ‘Search’ button to view the records. All records with the specified details are retrieved and displayed in the lower portion of the screen.
After retrieving a record, you can perform the following actions in the Global Order Maintenance Detail screen:
- View a Record
- Edit a Record
- Delete a Record
- Authorize a Record
- Amend an Authorized Record
- Close a Record
- Copy a Record
5.11.2 Viewing Global Order Maintenance Record
To view a record that you have previously entered, you must retrieve the same in the ‘Global Order Maintenance Summary’ screen, as follows:
- Invoke the ‘Global Order Maintenance Summary’ screen from the Browser.
- Specify any or all of the following details in the screen:
- The status of the transaction in the ‘Authorized’ field. If you choose the blank space, then both the authorized and the unauthorized status records will be retrieved for the specified criteria.
- The status of the records in the ‘Open’ field. If you choose the blank space, then all the records are retrieved.
- The AMC ID in the ‘AMC ID’ field. If you choose the blank space, then all the records are retrieved.
- The unit holder ID in the ‘Unit Holder ID’ field. If you choose the blank space, then all the records are retrieved.
- Click ‘Search’ button to view the records. All records with the specified details are retrieved and displayed in the lower portion of the screen.
- Double click the record that you want to view in the list of displayed records. The ‘Global Order Maintenance Detail’ screen is displayed in the view mode.
5.11.3 Editing Global Order Maintenance Record
You can modify the Global Order details that you have already entered into the system, provided it has not been subsequently authorized. You can perform this operation as follows:
- Invoke the ‘Global Order Maintenance Summary’ screen from the Browser.
- Specify any or all of the following details in the screen:
- The status of the transaction in the ‘Authorized’ field. If you choose the blank space, then both the authorized and the unauthorized status records will be retrieved for the specified criteria.
- The status of the records in the ‘Open’ field. If you choose the blank space, then all the records are retrieved.
- The AMC ID in the ‘AMC ID’ field. If you choose the blank space, then all the records are retrieved.
- The unit holder ID in the ‘Unit Holder ID’ field. If you choose the blank space, then all the records are retrieved.
- Click ‘Search’ button to view the records. All records with the specified details are retrieved and displayed in the lower portion of the screen.
- Double-click the record that you want to modify in the list of displayed records. The ‘Global Order Maintenance Detail’ screen is displayed.
- Select Unlock operation from the Action list to modify the record. Modify the necessary information.
- Click Save to save your changes. The ‘Global Order Maintenance Detail’ screen is closed and the changes made are reflected in the ‘Global Order Maintenance Summary’ screen.
5.11.4 Deleting Global Order Maintenance Record
You can delete only unauthorized records in the system. To delete a record that you have previously entered:
- Invoke the ‘Global Order Maintenance Summary’ screen from the Browser.
- Specify any or all of the following details in the screen:
- The status of the transaction in the ‘Authorized’ field. If you choose the blank space, then both the authorized and the unauthorized status records will be retrieved for the specified criteria.
- The status of the records in the ‘Open’ field. If you choose the blank space, then all the records are retrieved.
- The AMC ID in the ‘AMC ID’ field. If you choose the blank space, then all the records are retrieved.
- The unit holder ID in the ‘Unit Holder ID’ field. If you choose the blank space, then all the records are retrieved.
- Click ‘Search’ button to view the records. All records with the specified details are retrieved and displayed in the lower portion of the screen.
- Double-click the record that you want to delete. The ‘Global Order Maintenance Detail’ screen is displayed.
- Select Delete operation from the Action list. The system prompts you to confirm the deletion, and the record is deleted physically from the system database.
Note
The maker of the record can only delete the unauthorized record.
5.11.5 Authorizing Global Order Maintenance Record
Apart from the maker, someone else must authorize an unauthorized global order record deal in the system for it to be processed. To authorize a record:
- Invoke the ‘Global Order Maintenance Summary’ screen from the Browser.
- ‘The status of the transaction in the ‘Authorized’ field. Choose the ‘Unauthorized’ status.
- Click ‘Search’ button to view the records. All the records with the specified details that are pending authorization are retrieved and displayed in the lower portion of the screen.
- Select the Authorization operation from the Action list to authorize the selected record.
5.11.6 Amending Global Order Maintenance Record
After a global order record is authorized, it can be modified using the Unlock operation from Action list. To make changes to a record after authorization:
- Invoke the ‘Global Order Maintenance Summary’ screen from the Browser.
- Select the status of the transaction that you wish to retrieve for amendment. You can only amend only authorized records.
- Click ‘Search’ button to view the records. All records with the specified details are retrieved and displayed in the lower portion of the screen.
- Double click the record that you want to amend. The ‘Global Order Maintenance Detail’ screen is displayed in the amendment mode. Click the Unlock operation from the Action list to amend the record.
5.11.7 Copying Global Order Maintenance Record
To create a new record with details similar to a previously created record, refer to the following steps:
- Specify any or all of the following details in the screen:
- The status of the transaction in the ‘Authorized’ field. If you choose the blank space, then both the authorized and the unauthorized status records will be retrieved for the specified criteria.
- The status of the records in the ‘Open’ field. If you choose the blank space, then all the records are retrieved.
- The AMC ID in the ‘AMC ID’ field. If you choose the blank space, then all the records are retrieved.
- The unit holder ID in the ‘Unit Holder ID’ field. If you choose the blank space, then all the records are retrieved.
- Click ‘Search’ button to view the records. All records with the specified details are retrieved and displayed in the lower portion of the screen.
- Double-click the record that you want to delete. The ‘Global Order Maintenance Detail’ screen is displayed.
- Click Copy from the action list in the ‘Details’ screen, to create a new record with the same details.
5.11.8 Closing Global Order Maintenance Record
To close an authorized record, refer to the following steps:
- Specify any or all of the following details in the screen:
- The status of the transaction in the ‘Authorized’ field. If you choose the blank space, then both the authorized and the unauthorized status records will be retrieved for the specified criteria.
- The status of the records in the ‘Open’ field. If you choose the blank space, then all the records are retrieved.
- The AMC ID in the ‘AMC ID’ field. If you choose the blank space, then all the records are retrieved.
- The unit holder ID in the ‘Unit Holder ID’ field. If you choose the blank space, then all the records are retrieved.
- Click ‘Search’ button to view the records. All records with the specified details are retrieved and displayed in the lower portion of the screen.
- Double-click the record that you want to delete. The ‘Global Order Maintenance Detail’ screen is displayed.
- Click Close from the action list in the ‘Details’ screen.
You can re-open any closed record at a later point in time.
5.12 Global Order Confirmation Detail
This section contains the following topic:
5.12.1 Invoking Global Order Confirmation Detail Screen
You can specify the price received from the fund house against the GO using ‘GO Confirmation Detail’ screen. the system which provide the details of price uploaded for the Global Orders. To invoke this screen, type ‘UTDGOCNF’ in the field at the top right corner of the Application tool bar and clicking on the adjoining arrow button.

Select 'New' from the Actions menu in the Application tool bar or click new icon to enter the details of the ‘GO Confirmation Detail’ screen. You can enter the following in this screen:
GO Number
Alphanumeric; 16 Characters; Mandatory
Specify the Global Order number.
If you click on ‘Populate’ button, the following fields are displayed:
GO Date
Display
The system displays the Global Order date.
AMC ID
Display
The system displays the AMC ID.
Fund ID
Display
The system displays the fund ID.
Transaction Category
Display
The system displays the transaction category. One of the following values are displayed in this field:
- Legacy
- Advised Business
- Execution Only
GO Transaction Type
Display
The system displays the GO transaction type.
Unit Holder ID
Display
The system displays the unit holder ID.
Unit Holder Name
Display
The system displays the unit holder name.
UH Account Type
Display
The system displays the UH account type.
Nominee Account Number
Display
The system displays the nominee account number.
GO Mode
Optional
Select the GO mode from the drop-down list. Following are the options available in the drop-down list:
- Unit
- Amount
GO Status
Optional
Select the Global Order status from the drop-down list. Following are the options available in the drop-down list:
- Confirmed
- Rejected
- Pending Confirmation
- Amount Mismatch
- Unit Mismatch
- Price Mismatch
For Amount based order, if confirmation amount is mismatch then system will save record with Status as ‘Amount Mismatch’.
For Unit based order, if confirmation unit is mismatch then system will save record with Status as ‘Unit Mismatch’.
For Amount/ unit based order, if confirmation price is different than the fund price (for transaction date and transaction type combination) then system will save GO with status as ‘Price Mismatch’.
If unit/ amount and confirmation price matches then system will save the GO with confirmed status as ‘GO Confirmed’.
You can change the GO status manually to either GO confirmed or GO rejected in the GO Confirmation screen. All other statuses are defaulted by the system without manual intervention. Once GO is rejected, post confirmation of rejected order and all underlying transactions in the GO will be rejected. These will not be taken up for allocation.
GO Units
Display
The system displays the Global Order units.
GO Confirmed Units
Alphanumeric; 8 Characters; Optional
Specify the Global Order confirmed units.
GO Amount
Display
The system displays the Global Order amount.
GO Confirmed Amount
Alphanumeric; 8 Characters; Optional
Specify the Global Order confirmed amount.
GO Confirmed Price
Alphanumeric; 8 Characters; Optional
Specify the Global Order confirmed price.
The system will consider the confirmation price received against a GO as the fund price for the GO confirmation date.
GO Price Date
Display
The system displays the Global Order price date.
Remarks
Alphanumeric; 255 Characters; Mandatory
Specify remarks, if any.
The ‘GO Confirmation Detail’ screen will support all messages received via Swift Messages and will be enabled for any manual confirmation.
If no confirmation is received from the fund house, then GO will not be reversed, however, it will reflect GO status as ‘Pending Confirmation’ in ‘GO Confirmation Detail’ screen.
The system will run the pre-EOD batch to check if all GOs generated for the day have been confirmed. The batch will also include unconfirmed GOs for back dated. Only if GO is confirmed, the underlying trades will be allotted.
5.13 Global Order Confirmation Summary
This section contains the following topics:
- Section 5.13.1, "Retrieving Global Order Confirmation Record"
- Section 5.13.2, "Viewing Global Order Confirmation Record"
- Section 5.13.3, "Editing Global Order Confirmation Record"
- Section 5.13.4, "Deleting Global Order Confirmation Record"
- Section 5.13.5, "Authorizing Global Order Confirmation Record"
- Section 5.13.6, "Copying Global Order Confirmation Record"
- Section 5.13.7, "Closing Global Order Confirmation Record"
5.13.1 Retrieving Global Order Confirmation Record
You can view Global Order Confirmation details using ‘GO Confirmation Summary’ screen. To invoke this screen, type ‘UTSGOCNF’ in the field at the top right corner of the Application tool bar and clicking on the adjoining arrow button to perform the following operations:
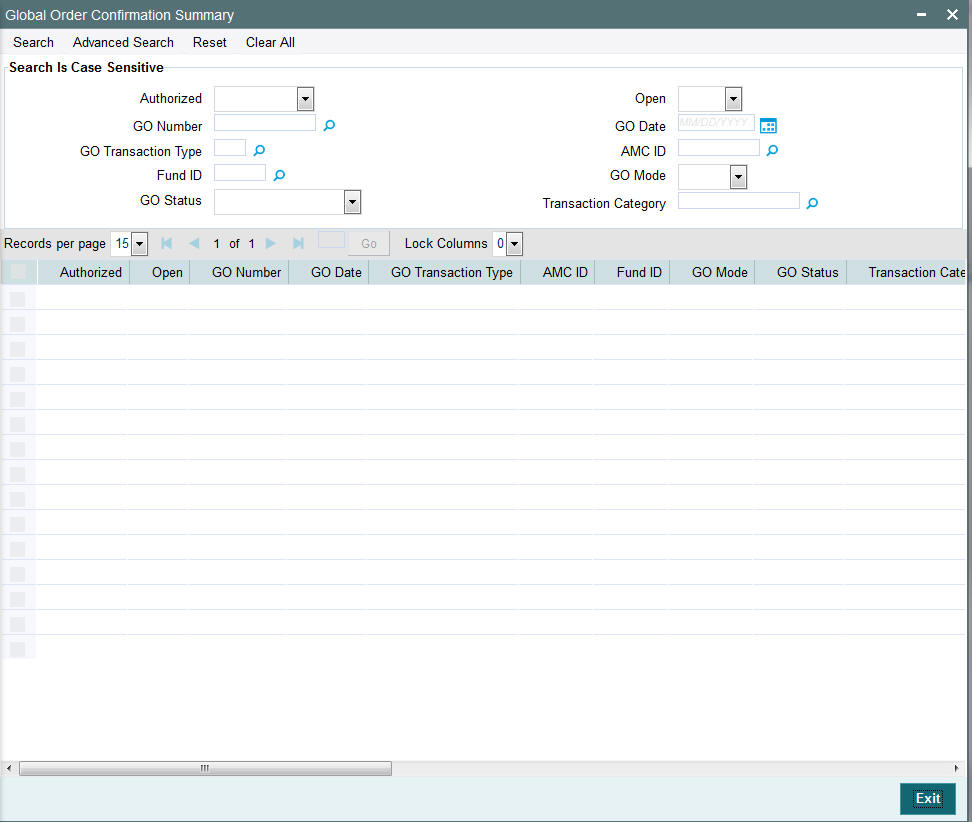
You can retrieve a previously entered Global Order Confirmation Details as follows:
- Invoke the ‘GO Confirmation Summary’ screen from the Browser.
- Specify any or all of the following details in the screen:
- The status of the transaction in the ‘Authorized’ field. If you choose the blank space, then both the authorized and the unauthorized status records will be retrieved for the specified criteria.
- The status of the records in the ‘Open’ field. If you choose the blank space, then all the records are retrieved.
- GO Number
- GO Date
- GO Transaction Type
- AMC ID
- Fund ID
- GO Mode
- GO Status
- Transaction Category. If you choose the blank space, then all the records are retrieved.
- Click ‘Search’ button to view the records. All records with the specified details are retrieved and displayed in the lower portion of the screen.
After retrieving a record, you can perform the following actions from the Global Order Confirmation Detail screen:
- View a Record
- Edit a Record
- Delete a Record
- Authorize a Record
- Close a Record
- Copy a Record
5.13.2 Viewing Global Order Confirmation Record
To view a record that you have previously entered, you must retrieve the same in the ‘GO Confirmation Summary’ screen, as follows:
- Invoke the ‘GO Confirmation Summary’ screen from the Browser.
- Specify any or all of the following details in the screen:
- The status of the transaction in the ‘Authorized’ field. If you choose the blank space, then both the authorized and the unauthorized status records will be retrieved for the specified criteria.
- The status of the records in the ‘Open’ field. If you choose the blank space, then all the records are retrieved.
- The AMC ID in the ‘AMC ID’ field. If you choose the blank space, then all the records are retrieved.
- Click ‘Search’ button to view the records. All records with the specified details are retrieved and displayed in the lower portion of the screen.
- Double click the record that you want to view in the list of displayed records. The ‘GO Confirmation Detail’ screen is displayed in the view mode.
5.13.3 Editing Global Order Confirmation Record
You can modify the Global Order confirmation details that you have already entered into the system, provided it has not been subsequently authorized. You can perform this operation as follows:
- Invoke the ‘GO Confirmation Summary’ screen from the Browser.
- Specify any or all of the following details in the screen:
- The status of the transaction in the ‘Authorized’ field. If you choose the blank space, then both the authorized and the unauthorized status records will be retrieved for the specified criteria.
- The status of the records in the ‘Open’ field. If you choose the blank space, then all the records are retrieved.
- The AMC ID in the ‘AMC ID’ field. If you choose the blank space, then all the records are retrieved.
- Click ‘Search’ button to view the records. All records with the specified details are retrieved and displayed in the lower portion of the screen.
- Double click the record that you want to modify in the list of displayed records. The ‘GO Confirmation Detail’ screen is displayed.
- Select Unlock operation from the Action list to modify the record. Modify the necessary information.
- Click Save to save your changes. The ‘GO Confirmation Detail’ screen is closed and the changes made are reflected in the ‘GO Confirmation Summary’ screen.
5.13.4 Deleting Global Order Confirmation Record
You can delete only unauthorized records in the system. To delete a record that you have previously entered:
- Invoke the ‘GO Confirmation Summary’ screen from the Browser.
- Specify any or all of the following details in the screen:
- The status of the transaction in the ‘Authorized’ field. If you choose the blank space, then both the authorized and the unauthorized status records will be retrieved for the specified criteria.
- The status of the records in the ‘Open’ field. If you choose the blank space, then all the records are retrieved.
- The AMC ID in the ‘AMC ID’ field. If you choose the blank space, then all the records are retrieved.
- Click ‘Search’ button to view the records. All records with the specified details are retrieved and displayed in the lower portion of the screen.
- Double click the record that you want to delete. The ‘GO Confirmation Detail’ screen is displayed.
- Select Delete operation from the Action list. The system prompts you to confirm the deletion, and the record is deleted physically from the system database.
Note
The maker of the record can only delete the unauthorized record.
5.13.5 Authorizing Global Order Confirmation Record
Apart from the maker, someone else must authorize an unauthorized global order confirmation record deal in the system for it to be processed. To authorize a record:
- Invoke the ‘GO Confirmation Summary’ screen from the Browser.
- ‘The status of the transaction in the ‘Authorized’ field. Choose the ‘Unauthorized’ status.
- Click ‘Search’ button to view the records. All the records with the specified details that are pending authorization are retrieved and displayed in the lower portion of the screen.
- Select the Authorization operation from the Action list to authorize the selected record.
5.13.6 Copying Global Order Confirmation Record
To create a new record with details similar to a previously created record, refer to the following steps:
- Specify any or all of the following details in the screen:
- The status of the transaction in the ‘Authorized’ field. If you choose the blank space, then both the authorized and the unauthorized status records will be retrieved for the specified criteria.
- The status of the records in the ‘Open’ field. If you choose the blank space, then all the records are retrieved.
- The AMC ID in the ‘AMC ID’ field. If you choose the blank space, then all the records are retrieved.
- The unit holder ID in the ‘Unit Holder ID’ field. If you choose the blank space, then all the records are retrieved.
- Click ‘Search’ button to view the records. All records with the specified details are retrieved and displayed in the lower portion of the screen.
- Double-click the record that you want to delete. The ‘Global Order Confirmation Detail’ screen is displayed.
- Click Copy from the action list in the ‘Details’ screen, to create a new record with the same details.
5.13.7 Closing Global Order Confirmation Record
To close an authorized record, refer to the following steps:
- Specify any or all of the following details in the screen:
- The status of the transaction in the ‘Authorized’ field. If you choose the blank space, then both the authorized and the unauthorized status records will be retrieved for the specified criteria.
- The status of the records in the ‘Open’ field. If you choose the blank space, then all the records are retrieved.
- The AMC ID in the ‘AMC ID’ field. If you choose the blank space, then all the records are retrieved.
- The unit holder ID in the ‘Unit Holder ID’ field. If you choose the blank space, then all the records are retrieved.
- Click ‘Search’ button to view the records. All records with the specified details are retrieved and displayed in the lower portion of the screen.
- Double-click the record that you want to delete. The ‘Global Order Confirmation Detail’ screen is displayed.
- Click Close from the action list in the ‘Details’ screen.
You can re-open any closed record at a later point in time.
5.14 GO Reconciliation Details
This section contains the following topic:
5.14.1 Invoking Global Order Reconciliation Detail
The system will compare the confirmation message received from the fund house with the original message generated. If there is a mismatch in the fund price received from the fund house for this order compared to fund price received for an earlier order having same fund ID/transaction type/ transaction date, then same will get reflect in the ‘GO Reconciliation’ screen. You can manually correct the status message as ‘Confirmed’ or ‘Rejected’ which will be confirmed from the fund house.
If the latest GO price is different from the existing fund price, then you need to confirm the GO price. Update the correct price in the GO, once the price issue is sorted out. On updating the correct price, all the GO will have the same price for the transaction date/fund/transaction type combination.
IF GO price is correct, you can update other GO (for same transaction date/transaction type/fund) and even fund price. On update, all the GO will have same price for the transaction date/fund/transaction type combination. Once the price is amended with the correct price, you can authorize the transaction from ‘GO Reconciliation’ screen.
The mismatch transaction will no longer reflect in the ‘GO Reconciliation’ screen once authorized.
To invoke this screen, type ‘UTDGORCN’ in the field at the top right corner of the Application tool bar and clicking on the adjoining arrow button to perform the following operations:
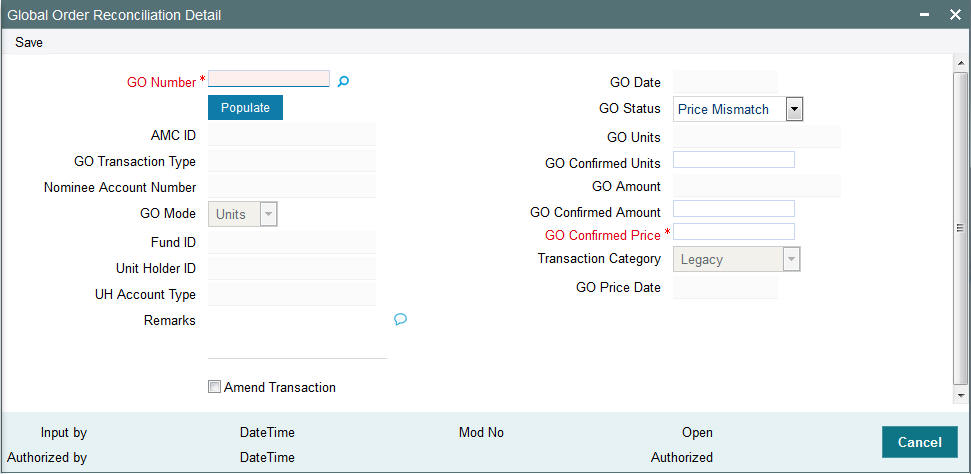
Select 'New' from the Actions menu in the Application tool bar or click new icon to enter the details of the ‘GO Confirmation Detail’ screen.
GO Number
Alphanumeric; 16 Characters; Mandatory
Specify the Global Order number.
If you click on ‘Populate’ button, the following fields are displayed:
GO Date
Display
The system displays the Global Order date.
AMC ID
Display
The system displays the AMC ID.
Fund ID
Display
The system displays the fund ID.
GO Transaction Type
Display
The system displays the GO transaction type.
Nominee Account Number
Display
The system displays the nominee account number.
UH Account Type
Display
The system displays the UH account type.
GO Mode
Display
The system displays the GO mode
GO Status
Optional
Select the Global Order status from the drop-down list. Following are the options available in the drop-down list:
- Price Mismatch
- Amount Mismatch
- Unit Mismatch
- Confirmed
- Rejected
The system will compare the confirmation message received from the fund house with the original message generated
In case, if there is a mismatch in the fund price received from the fund house for this order compared to fund price received for an earlier order having same fund id/transaction type/transaction date, then same will get reflect in the “GO Reconciliation” screen for manual correction with status message as ‘Confirmed Price Mismatched’.
The correct price will be confirmed from the fund house outside the system.
If the latest GO price is different from the existing fund price, you need to confirm GO price.
Once the price issue is sorted out, you should update the correct price in the GO.
IF GO price is correct, then update the fund price. On update, all the GO will have same price for the transaction date/fund/transaction type combination.
Once the price is amended with the correct price, you should authorize the transaction from ‘GO Reconciliation’ screen.
The mismatch transaction will no longer reflect in the GO Reconciliation screen once authorized.
GO Confirmed Price
Alphanumeric; 8 Characters; Mandatory
Specify the Global Order confirmed price.
GO Units
Display
The system displays the Global Order units.
The confirmation message received from the fund house will be compared with the original message generated.
For a units based order, in case, if there is a mismatch in the GO Units Value received from the fund house, then same will get reflect in the ‘GO Reconciliation’ screen for manual correction with status message as ‘Confirmed Units Mismatched’
The correct value will be confirmed from the fund house outside the system
Once the units issue is sorted out, you need to update the units with correct units in ‘GO Reconciliation’ screen
Once the units are amended with the correct Units, you should authorize the transaction from GO Reconciliation screen
The mismatch transaction will no longer reflect in the GO Reconciliation screen once authorized.
GO Confirmed Units
Alphanumeric; 8 Characters; Optional
Specify the Global Order confirmed units.
Once the GO is confirmed all the underlying transactions will be picked up for allocation by allocation batch. Once the underlying GO trades are allocated during EOD, the system will do a reconciliation of allotted units against confirmed units.
If there is a difference in the allotted units, the same will be reflected in the “GO Reconciliation” screen with a status message “GO Allotted Units Mismatched”. This will be before rounding difference process.
To sort the difference, the system will calculate the threshold units in ‘Fund Rules’ screen. If the difference units are more than the threshold units maintained, you need to manually round off the units.
If the difference units falls under the threshold units maintained, the system will automatically rounded off using a distribution logic with values as “To Highest Transaction Amount” and “Highest Transaction Amount to Lowest”
This distribution logic are applicable to funds, which fall under the AMC for which Distribution logic has been maintained
If user maintained distribution logic as “To Highest Transaction Amount” then the system will adjust the differential units to the transaction which has the highest transaction amount.
If user maintained distribution logic as “Highest Transaction Amount to Lowest” then system will distribute the difference amount from the highest transaction amount to the lowest in step up units.
If the AMC confirmed units are more than the system allotted, then system calculates Negative (-ve) differential units. If the AMC confirmed units are less than the system allotted, then system calculates Positive (+ve) differential units
Once the rounding difference is sorted out, this transaction will no longer reflect in the “GO Reconciliation” screen.
The difference units distributed based on the logic will be tracked separately during allocation
Based on the logic- system will update the allocated units with extra or reduced units
GO Amount
Display
The system displays the Global Order amount.
GO Confirmed Amount
Alphanumeric; 8 Characters; Optional
Specify the Global Order confirmed amount.
The confirmation message received from the fund house will be compared with the original message generated
For an amount based order In case, if there is a mismatch in the GO Amount Value received from the fund house, then same will get reflect in the ‘GO Reconciliation’ screen for manual correction with status message as “Confirmed Amount Mismatched”
The correct value will be confirmed from the fund house outside the system
Once the Amount issue is sorted out, you need to update the amount with correct amount in GO Reconciliation screen
Once the amount are amended with the correct amount, you should authorize the transaction from ‘GO Reconciliation’ screen
The mismatch transaction will no longer reflect in the ‘GO Reconciliation’ screen once authorized.
GO Price Date
Display
The system displays the Global Order price date.
Remarks
Alphanumeric; 255 Characters; Optional
Specify remarks, if any.
Amend Transaction
Mandatory
Select this option if you want the system to automatically amend the underlying transactions.
Once the GO is confirmed all the underlying transactions will be picked up for allocation by allocation batch. Once the underlying GO trades are allocated during EOD, system will do a reconciliation of allotted units against confirmed units.
If there is a difference in the allotted units, the same will be reflected in the ‘GO Reconciliation Detail’ screen with the status message as “GO Alloted Units Mismatched”
This will be before rounding difference process.
If the AMC confirmed units are more than the system allotted, then the system will calculate Negative (-ve) differential units.
If the AMC confirmed units are less than the system has allotted, then the system will calculate Positive (+ve) differential units
Once the rounding difference is sorted out, this transaction will no longer reflect in the ‘GO Reconciliation Detail’ screen.
The GO Reconciliation screen will show any unconfirmed global orders and those with a price mismatch or those where the allotted units does not match the confirmed number of units during de-aggregation.
In case the confirmation message is not received on any date, the system will show all the transactions with, confirmation related columns as BLANK and the Confirmation Status field will show the message as “Confirmation message pending”.
5.15 GO Reconciliation Summary
This section contains the following topics:
- Section 5.15.1, "Retrieving Global Order Reconciliation Record"
- Section 5.15.2, "Viewing Global Order Reconciliation Record"
- Section 5.15.3, "Editing Global Order Reconciliation Record"
- Section 5.15.4, "Deleting Global Order Reconciliation"
- Section 5.15.5, "Authorizing Global Order Reconciliation Record"
- Section 5.15.6, "Copying Global Order Reconciliation Record"
- Section 5.15.7, "Closing Global Order Reconciliation Record"
5.15.1 Retrieving Global Order Reconciliation Record
You can view Global Order Confirmation details using ‘GO Reconciliation Summary’ screen. To invoke this screen, type ‘UTSGORCN’ in the field at the top right corner of the Application tool bar and clicking on the adjoining arrow button.
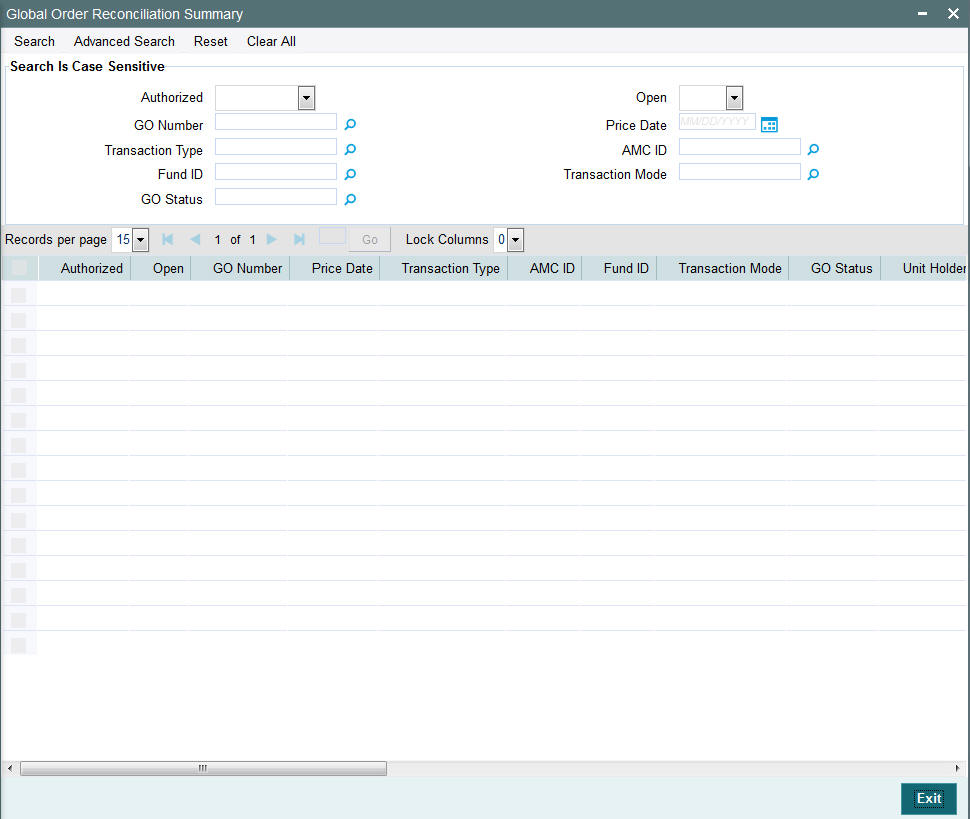
You can retrieve a previously entered Global Order Reconciliation Details as follows:
- Invoke the ‘GO Reconciliation Summary’ screen from the Browser.
- Specify any or all of the following details in the screen:
- The status of the transaction in the ‘Authorized’ field. If you choose the blank space, then both the authorized and the unauthorized status records will be retrieved for the specified criteria.
- The status of the records in the ‘Open’ field. If you choose the blank space, then all the records are retrieved.
- The AMC ID
- GO Number
- Price Date
- Transaction Type
- Transaction Mode
- GO Status
- The Fund ID. If you choose the blank space, then all the records are retrieved.
- Click ‘Search’ button to view the records. All records with the specified details are retrieved and displayed in the lower portion of the screen.
After retrieving a record, you can perform the following actions in the ‘Global Order Reconciliation Detail’ screen:
- View a Record
- Edit a Record
- Delete a Record
- Authorize a Record
- Close a Record
- Copy a Record
5.15.2 Viewing Global Order Reconciliation Record
To view a record that you have previously entered, you must retrieve the same in the ‘GO Reconciliation Summary’ screen, as follows:
- Invoke the ‘GO Reconciliation Summary’ screen from the Browser.
- Specify any or all of the following details in the screen:
- The status of the transaction in the ‘Authorized’ field. If you choose the blank space, then both the authorized and the unauthorized status records will be retrieved for the specified criteria.
- The status of the records in the ‘Open’ field. If you choose the blank space, then all the records are retrieved.
- The AMC ID in the ‘AMC ID’ field. If you choose the blank space, then all the records are retrieved.
- The Fund ID in the ‘Fund ID’ field. If you choose the blank space, then all the records are retrieved.
- Click ‘Search’ button to view the records. All records with the specified details are retrieved and displayed in the lower portion of the screen.
- Double-click the record that you want to view in the list of displayed records. The ‘GO Reconciliation Detail’ screen is displayed in the view mode.
5.15.3 Editing Global Order Reconciliation Record
You can modify the Global Order Reconciliation details that you have already entered into the system, provided it has not been subsequently authorized. You can perform this operation as follows:
- Invoke the ‘GO Reconciliation Summary’ screen from the Browser.
- Specify any or all of the following details in the screen:
- The status of the transaction in the ‘Authorized’ field. If you choose the blank space, then both the authorized and the unauthorized status records will be retrieved for the specified criteria.
- The status of the records in the ‘Open’ field. If you choose the blank space, then all the records are retrieved.
- The AMC ID in the ‘AMC ID’ field. If you choose the blank space, then all the records are retrieved.
- The Fund ID in the ‘Fund ID’ field. If you choose the blank space, then all the records are retrieved.
- Click ‘Search’ button to view the records. All records with the specified details are retrieved and displayed in the lower portion of the screen.
- Double click the record that you want to modify in the list of displayed records. The ‘GO Reconciliation Detail’ screen is displayed.
- Select Unlock operation from the Action list to modify the record. Modify the necessary information.
- Click Save to save your changes. The ‘GO Reconciliation Detail’ screen is closed and the changes made are reflected in the ‘GO Reconciliation Summary’ screen.
5.15.4 Deleting Global Order Reconciliation
You can delete only unauthorized records in the system. To delete a record that you have previously entered:
- Invoke the ‘GO Reconciliation Summary’ screen from the Browser.
- Specify any or all of the following details in the screen:
- The status of the transaction in the ‘Authorized’ field. If you choose the blank space, then both the authorized and the unauthorized status records will be retrieved for the specified criteria.
- The status of the records in the ‘Open’ field. If you choose the blank space, then all the records are retrieved.
- The AMC ID in the ‘AMC ID’ field. If you choose the blank space, then all the records are retrieved.
- The fund ID in the ‘Fund ID’ field. If you choose the blank space, then all the records are retrieved.
- Click ‘Search’ button to view the records. All records with the specified details are retrieved and displayed in the lower portion of the screen.
- Double click the record that you want to delete. The ‘GO Reconciliation Detail’ screen is displayed.
- Select Delete operation from the Action list. The system prompts you to confirm the deletion, and the record is deleted physically from the system database.
Note
The maker of the record can only delete the unauthorized record.
5.15.5 Authorizing Global Order Reconciliation Record
Apart from the maker, someone else must authorize an unauthorized global order confirmation record deal in the system for it to be processed. To authorize a record:
- Invoke the ‘GO Reconciliation Summary’ screen from the Browser.
- ‘The status of the transaction in the ‘Authorized’ field. Choose the ‘Unauthorized’ status.
- Click ‘Search’ button to view the records. All the records with the specified details that are pending authorization are retrieved and displayed in the lower portion of the screen.
- Select the Authorization operation from the Action list to authorize the selected record.
5.15.6 Copying Global Order Reconciliation Record
To create a new record with details similar to a previously created record, refer to the following steps:
- Specify any or all of the following details in the screen:
- The status of the transaction in the ‘Authorized’ field. If you choose the blank space, then both the authorized and the unauthorized status records will be retrieved for the specified criteria.
- The status of the records in the ‘Open’ field. If you choose the blank space, then all the records are retrieved.
- The AMC ID in the ‘AMC ID’ field. If you choose the blank space, then all the records are retrieved.
- The unit holder ID in the ‘Unit Holder ID’ field. If you choose the blank space, then all the records are retrieved.
- Click ‘Search’ button to view the records. All records with the specified details are retrieved and displayed in the lower portion of the screen.
- Double-click the record that you want to delete. The ‘Global Order Reconciliation Detail’ screen is displayed.
- Click Copy from the action list in the ‘Details’ screen, to create a new record with the same details.
5.15.7 Closing Global Order Reconciliation Record
To close an authorized record, refer to the following steps:
- Specify any or all of the following details in the screen:
- The status of the transaction in the ‘Authorized’ field. If you choose the blank space, then both the authorized and the unauthorized status records will be retrieved for the specified criteria.
- The status of the records in the ‘Open’ field. If you choose the blank space, then all the records are retrieved.
- The AMC ID in the ‘AMC ID’ field. If you choose the blank space, then all the records are retrieved.
- The unit holder ID in the ‘Unit Holder ID’ field. If you choose the blank space, then all the records are retrieved.
- Click ‘Search’ button to view the records. All records with the specified details are retrieved and displayed in the lower portion of the screen.
- Double-click the record that you want to delete. The ‘Global Order Reconciliation Detail’ screen is displayed.
- Click Close from the action list in the ‘Details’ screen.
You can re-open any closed record at a later point in time.
5.16 Global Order Settlement Details
This section contains the following topic:
5.16.1 Invoking Global Order Settlement Detail Screen
You can maintain the pending transactions for the settlement using ‘GO Settlement Detail’ screen.
To invoke this screen, type ‘UTDGOSTL’ in the field at the top right corner of the Application tool bar and clicking on the adjoining arrow button to perform the following operations:
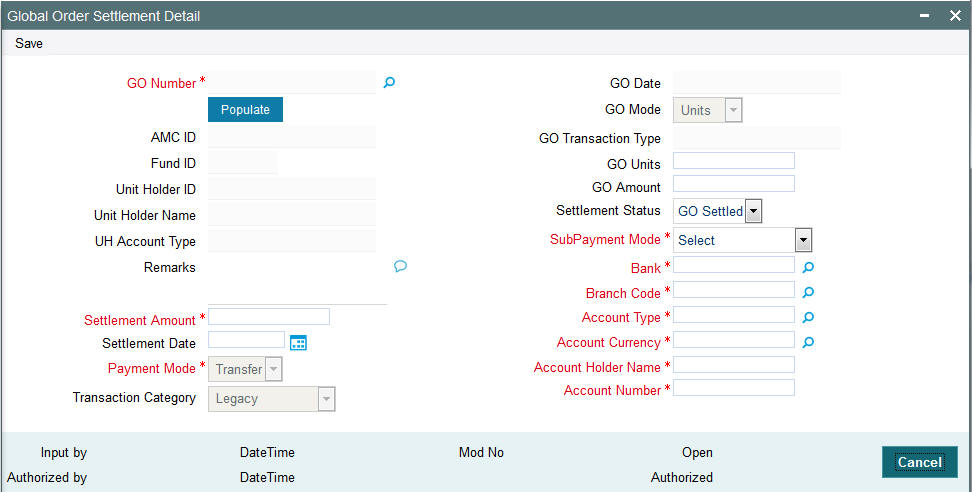
Select 'New' from the Actions menu in the Application tool bar or click new icon to enter the details of the ‘GO Settlement Detail’ screen.
GO Number
Alphanumeric; 16 Characters; Mandatory
Specify the Global Order number.
If you click on ‘Populate’ button, the following fields are displayed:
GO Date
Display
The system displays the Global Order date.
AMC ID
Display
The system displays the AMC ID.
Fund ID
Display
The system displays the fund ID.
GO Transaction Type
Display
The system displays the GO transaction type.
Unit Holder Name
Display
The system displays the unit holder name.
UH Account Type
Display
The system displays the UH account type.
GO Mode
Display
The system displays the GO mode
GO Units
Alphanumeric; 8 Characters; Optional
Specify the GO units.
GO Amount
Alphanumeric; 8 Characters; Optional
Specify the GO amount.
Settlement Status
Optional
Select the settlement status from the adjoining drop-down list. Following are the option available:
- GO Settled
Sub Payment Mode
Mandatory
Select sub payment mode from the adjoining drop-down list. Following are the options available:
- Money Transfer
- Telegraphic Transfer
- Wire Transfer
Bank
Alphanumeric; 4 Characters; Mandatory
Specify the bank code. This adjoining option list displays all valid bank code maintained in the system. You can choose the appropriate one.
Branch Code
Alphanumeric; 4 Characters; Mandatory
Specify the branch code. This adjoining option list displays all valid branch code maintained in the system. You can choose the appropriate one.
Account Type
Numeric; 3 Characters; Mandatory
Specify the type of account. This adjoining option list displays all valid account type maintained in the system. You can choose the appropriate one.
Account Currency
Alphanumeric; 3 Characters; Mandatory
Specify the currency details. This adjoining option list displays all valid currency code maintained in the system. You can choose the appropriate one.
Account Holder Name
Alphanumeric; 8 Characters; Mandatory
Specify the account holder name.
Account Number
Alphanumeric; 8 Characters; Mandatory
Specify the account number.
Settlement Amount
Alphanumeric; 8 Characters; Mandatory
Specify the settlement amount.
Settlement Date
Date Format; Optional
Specify the settlement date.
Payment Mode
Optional
Select the mode of payment from the drop-down list. Following are the options available in the drop-down list:
- Cash
- Cheque
- Money Transfer
Transaction Category
Optional
Select the transaction category from the adjoining drop-down list. The available values are:
- Legacy
- Advised Business Only
- Execution Only
Remarks
Alphanumeric; 255 Characters; Mandatory
Specify remarks, if any.
5.17 Global Order Settlement Summary
This section contains the following topics:
- Section 5.17.1, "Retrieving Global Order Settlement Record"
- Section 5.17.2, "Viewing Global Order Settlement Record"
- Section 5.17.3, "Editing Global Order Settlement Record"
- Section 5.17.4, "Deleting Global Order Settlement Record"
- Section 5.17.5, "Authorizing Global Order Settlement Record"
- Section 5.17.6, "Amending Global Order Settlement Record"
- Section 5.17.7, "Copying Global Order Settlement Record"
- Section 5.17.8, "Closing Global Order Settlement Record"
5.17.1 Retrieving Global Order Settlement Record
You can view Global Order Settlement details using ‘GO Settlement Summary’ screen. To invoke this screen, type ‘UTSGOSTL’ in the field at the top right corner of the Application tool bar and clicking on the adjoining arrow button..

You can retrieve a previously entered Global Order Settlement Details as follows:
- Invoke the ‘GO Settlement Summary’ screen from the Browser.
- Specify any or all of the following details in the screen:
- The status of the transaction in the ‘Authorized’ field. If you choose the blank space, then both the authorized and the unauthorized status records will be retrieved for the specified criteria.
- The status of the records in the ‘Open’ field. If you choose the blank space, then all the records are retrieved.
- GO Number
- Transaction Date
- GO Transaction Type
- The AMC ID
- The Fund ID
- Transaction Mode
- Transaction Category
- Settlement Status. If you choose the blank space, then all the records are retrieved.
- Click ‘Search’ button to view the records. All records with the specified details are retrieved and displayed in the lower portion of the screen.
After retrieving a record, you can perform the following actions in the Global Order Settlement Detail screen:
- View a Record
- Edit a Record
- Delete a Record
- Authorize a Record
- Amend an Authorized Record
- Close a Record
- Copy a Record
5.17.2 Viewing Global Order Settlement Record
To view a record that you have previously entered, you must retrieve the same in the ‘GO Settlement Summary’ screen, as follows:
- Invoke the ‘GO Settlement Summary’ screen from the Browser.
- Specify any or all of the following details in the screen:
- The status of the transaction in the ‘Authorized’ field. If you choose the blank space, then both the authorized and the unauthorized status records will be retrieved for the specified criteria.
- The status of the records in the ‘Open’ field. If you choose the blank space, then all the records are retrieved.
- The AMC ID in the ‘AMC ID’ field. If you choose the blank space, then all the records are retrieved.
- The Fund ID in the ‘Fund ID’ field. If you choose the blank space, then all the records are retrieved.
- Click ‘Search’ button to view the records. All records with the specified details are retrieved and displayed in the lower portion of the screen.
- Double click the record that you want to view in the list of displayed records. The ‘GO Settlement Detail’ screen is displayed in the view mode.
5.17.3 Editing Global Order Settlement Record
You can modify the Global Order Settlement details that you have already entered into the system, provided it has not been subsequently authorized. You can perform this operation as follows:
- Invoke the ‘GO Settlement Summary’ screen from the Browser.
- Specify any or all of the following details in the screen:
- The status of the transaction in the ‘Authorized’ field. If you choose the blank space, then both the authorized and the unauthorized status records will be retrieved for the specified criteria.
- The status of the records in the ‘Open’ field. If you choose the blank space, then all the records are retrieved.
- The AMC ID in the ‘AMC ID’ field. If you choose the blank space, then all the records are retrieved.
- The Fund ID in the ‘Fund ID’ field. If you choose the blank space, then all the records are retrieved.
- Click ‘Search’ button to view the records. All records with the specified details are retrieved and displayed in the lower portion of the screen.
- Double click the record that you want to modify in the list of displayed records. The ‘GO Settlement Detail’ screen is displayed.
- Select Unlock operation from the Action list to modify the record. Modify the necessary information.
- Click Save to save your changes. The ‘GO Settlement Detail’ screen is closed and the changes made are reflected in the ‘GO Settlement Summary’ screen.
5.17.4 Deleting Global Order Settlement Record
You can delete only unauthorized records in the system. To delete a record that you have previously entered:
- Invoke the ‘GO Settlement Summary’ screen from the Browser.
- Specify any or all of the following details in the screen:
- The status of the transaction in the ‘Authorized’ field. If you choose the blank space, then both the authorized and the unauthorized status records will be retrieved for the specified criteria.
- The status of the records in the ‘Open’ field. If you choose the blank space, then all the records are retrieved.
- The AMC ID in the ‘AMC ID’ field. If you choose the blank space, then all the records are retrieved.
- The fund ID in the ‘Fund ID’ field. If you choose the blank space, then all the records are retrieved.
- Click ‘Search’ button to view the records. All records with the specified details are retrieved and displayed in the lower portion of the screen.
- Double click the record that you want to delete. The ‘GO Settlement Detail’ screen is displayed.
- Select Delete operation from the Action list. The system prompts you to confirm the deletion, and the record is deleted physically from the system database.
Note
The maker of the record can only delete the unauthorized record.
5.17.5 Authorizing Global Order Settlement Record
Apart from the maker, someone else must authorize an unauthorized global order confirmation record deal in the system for it to be processed. To authorize a record:
- Invoke the ‘GO Reconciliation Summary’ screen from the Browser.
- ‘The status of the transaction in the ‘Authorized’ field. Choose the ‘Unauthorized’ status.
- Click ‘Search’ button to view the records. All the records with the specified details that are pending authorization are retrieved and displayed in the lower portion of the screen.
- Select the Authorization operation from the Action list to authorize the selected record.
5.17.6 Amending Global Order Settlement Record
After a global order settlement record is authorized, it can be modified using the Unlock operation from Action list. To make changes to a record after authorization:
- Invoke the ‘GO Settlement Summary’ screen from the Browser.
- Select the status of the transaction that you wish to retrieve for amendment. You can only amend only authorized records.
- Click ‘Search’ button to view the records. All records with the specified details are retrieved and displayed in the lower portion of the screen.
- Double click the record that you want to amend. The ‘GO Settlement Detail’ screen is displayed in the amendment mode. Click the Unlock operation from the Action list to amend the record.
Amend the necessary information. Click the Save button to save the changes.
5.17.7 Copying Global Order Settlement Record
To create a new record with details similar to a previously created record, refer to the following steps:
- Specify any or all of the following details in the screen:
- The status of the transaction in the ‘Authorized’ field. If you choose the blank space, then both the authorized and the unauthorized status records will be retrieved for the specified criteria.
- The status of the records in the ‘Open’ field. If you choose the blank space, then all the records are retrieved.
- The AMC ID in the ‘AMC ID’ field. If you choose the blank space, then all the records are retrieved.
- The unit holder ID in the ‘Unit Holder ID’ field. If you choose the blank space, then all the records are retrieved.
- Click ‘Search’ button to view the records. All records with the specified details are retrieved and displayed in the lower portion of the screen.
- Double-click the record that you want to delete. The ‘Global Order Settlement Detail’ screen is displayed.
- Click Copy from the action list in the ‘Details’ screen, to create a new record with the same details.
5.17.8 Closing Global Order Settlement Record
To close an authorized record, refer to the following steps:
- Specify any or all of the following details in the screen:
- The status of the transaction in the ‘Authorized’ field. If you choose the blank space, then both the authorized and the unauthorized status records will be retrieved for the specified criteria.
- The status of the records in the ‘Open’ field. If you choose the blank space, then all the records are retrieved.
- The AMC ID in the ‘AMC ID’ field. If you choose the blank space, then all the records are retrieved.
- The unit holder ID in the ‘Unit Holder ID’ field. If you choose the blank space, then all the records are retrieved.
- Click ‘Search’ button to view the records. All records with the specified details are retrieved and displayed in the lower portion of the screen.
- Double-click the record that you want to delete. The ‘Global Order Settlement Detail’ screen is displayed.
- Click Close from the action list in the ‘Details’ screen.
You can re-open any closed record at a later point in time.
5.18 Global Order Status
This section contains the following topic:
5.18.1 Retrieving Global Order Status Record
You can view the status of a GO at different stages using ‘GO Status Summary’ screen. To invoke this screen, type ‘UTSGOENQ’ in the field at the top right corner of the Application tool bar and clicking on the adjoining arrow button.
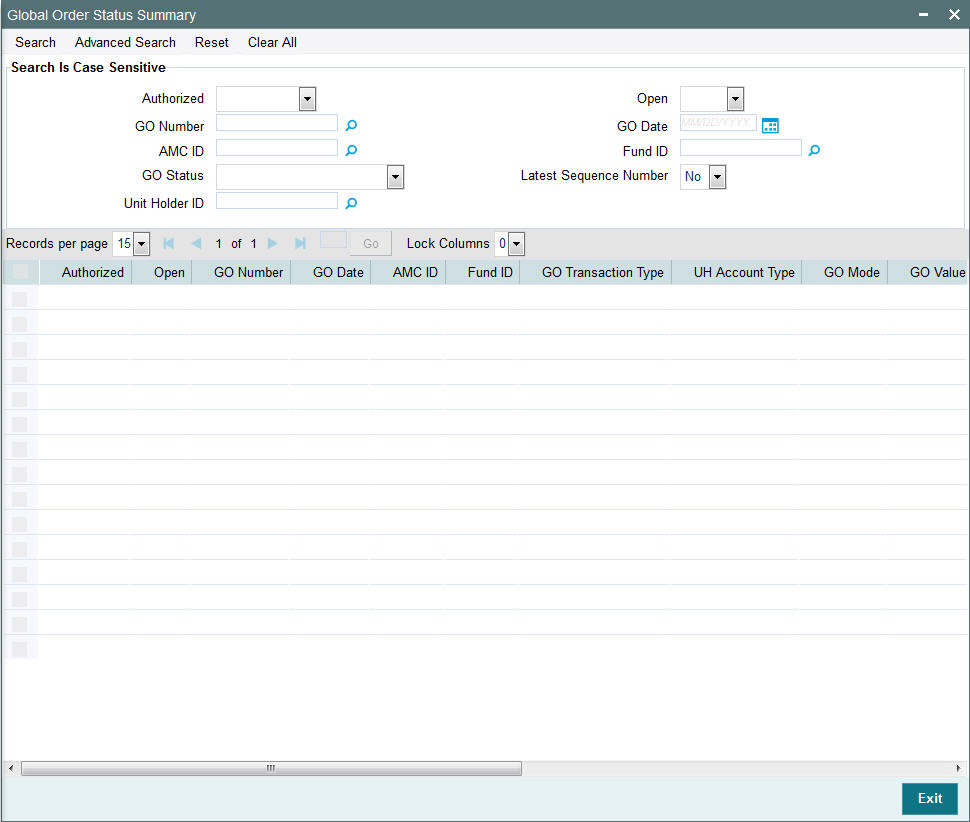
You can retrieve previously entered Global Order Status Details as follows:
- Invoke the ‘GO Status Summary’ screen from the Browser.
- Specify any or all of the following details in the screen:
- The status of the transaction in the ‘Authorized’ field. If you choose the blank space, then both the authorized and the unauthorized status records will be retrieved for the specified criteria.
- The status of the records in the ‘Open’ field. If you choose the blank space, then all the records are retrieved.
- The GO Number
- The GO Date
- AMC ID
- Fund ID
- GO Status
- Latest Sequence Number. If you choose the blank space, then all the records are retrieved.
- Click ‘Search’ button to view the records. All records with the specified details are retrieved and displayed in the lower portion of the screen.
5.19 ISA Transfer
This section contains the following topics:
- Section 5.19.1, "Maintaining ISA Transfer"
- Section 5.19.2, "Invoking One Legged Transfer Screen"
- Section 5.19.3, "Validating ISA Transactions"
5.19.1 Maintaining ISA Transfer
You can maintain ISA transfer details using ‘One Legged Transfer’ screen. This screen supports the following transactions:
- Transfer out
- Transfer in
- In Specie Transfer out
- In Specie Transfer in
Transfer Out
This is a one legged transfer which is used to redeem holdings. On selecting the transfer out option, the system will auto calculate the number of units and will populate the Fund Grid.
Transfer out will be a Redemption transactions and it will go as per aging logic maintained at fund level.
The system will generate the underlying Transactions by units on authorisation of the transaction in the Transaction value field of the detail section. Under this One-legged Transfer, when all transactions are generated successfully, a unique reference number will be generated and this reference will be reference number for underlying transactions.
The system will generate the redemption transactions on authorisation of this one-legged transfer. While generating if one of the transactions fail due to any of the validations, all underlying transactions will be rolled back. For failed transaction, the system will display an error message.
The payment preference maintained at the time of Uh creation will be used as settlement mode. Transfer out can be used for ISA/non ISA accounts
Transfer In
This is a one legged amount based transfer. You can enter the transfer amount and fund details. On authorisation, the system will generate authorised subscription transactions at the fund Level. A new ref type (OI - One Legged Transfer In) will be available for such transfers.The settlement mode for such transactions will be cash.
The Current Year ISA Subscription Amount will be used to update the ISA Limits. The system will validate the ISA amounts against the existing limits if the Unitholder Account already exists.
If the ISA transfer in transaction exceeds the ISA allowance/ limit for the current tax year then on authorization of the transaction the system display an error message as “Exceeds the ISA allowance for the current tax year”.
The system will consider the current ISA Transfer in transactions at the time of ISA allowance/ limit computation for the tax year. The system will not allow backdated transfers. However, you can record date of transfer which can be back dated.
The system will use amount captured in the current year ISA subscription amount limit field to update utilised amount for the unitholder.
In Specie Transfer Out
An investor can Transfer out his ISA account to another ISA manager during the current ISA tax year. This will essentially be a one- legged unit based transaction. Following are the different options available:
- Any year ISA - The system will auto calculate number of units that can be transferred and will populate the fund Grid.
- Previous Year ISA full – The system will auto calculate number of units that can be transferred and will lock the fund grid
- Current year ISA- The system will auto calculate number of units that can be transferred and will lock the fund grid
- Previous year ISA partial – The system will auto calculate number of units that can be transferred. However, you can modify this.
On authorisation of the record, the system will generate redemption transactions at the Fund Level. In specie redemption transactions will have payment mode as ‘In Kind’
Inspecie Transfer Out will record these transfers.While saving, the system will automatically populate the Current Year ISA Subscription Amount and the Previous Year ISA amounts.
If any un-allotted transactions are available at the time of ISA Transfer out transactions, the system will display an error message as “Un-Allotted Transactions available. Please do the Transfer once all Units are Priced!”.
After an Any year ISA, the system will transfer the transactions,. If there is an investment in the ISA account then the system will display an error message as “ISA account transferred- New investments not allowed” while saving
Note
This will not apply for system generated transactions. This check will only be done for the Tax Year when the Full Transfer was done. Post that tax year this validation will not be applied.
The system will display G1/G2 split of units (at fund level) under transfer. This will also be applicable to non ISA accounts.
In-specie Transfer-In
You can transfer your ISA account to another ISA manager during the current ISA tax year by either a complete ISA transfer or a Partial ISA transfer. This will essentially be a one- legged unit based transaction.
The system will allow you to select ISA manger and based on the ISA manager chosen, the system will validate the transfer in funds against the list of funds mapped to ISA manager.
If the fund does not exist in the list maintained at the Entity level then the system will display the an error message as “Fund not in Acceptance list for ISA manager”.
The validation will be based on the Fund ID and the New ISA manager captured at the time of in-specie Transfer in transaction. This will be unit based transfer, you will not be allowed to enter Amount.
On authorisation of the record, the system will generate an authorized Net Unit-based Subscription Transactions at the Fund Level. Inspecie Transfer In will be made available for these transactions.The settlement mode for these transactions will be ‘In Kind’.
The Current Year ISA Subscription Amount will be used to validate the ISA Limits.
If the ISA transfer in transaction exceeds the ISA allowance/ limit for the current tax year, then on save of the transaction the system displays an error message as “Exceeds the ISA allowance for the current tax year”
The system will consider the current ISA Transfer in transactions at the time of ISA allowance/ limit computation for the tax year.
You can record G1/G2 split of units under transfer at fund level. Backdated transfers will not be allowed. There will be no limit validation for previous year ISA transfer in. The previous year ISA transfer in date can be lesser than account opening date.
First ISA transaction date will also be recorded during transaction capture.
5.19.2 Invoking One Legged Transfer Screen
You can specify ISA transfer details using ‘One Legged Transfer’ screen. You can invoke this screen by typing ‘UTDOLT’ in the field at the top right corner of the Application tool bar and clicking on the adjoining arrow button.
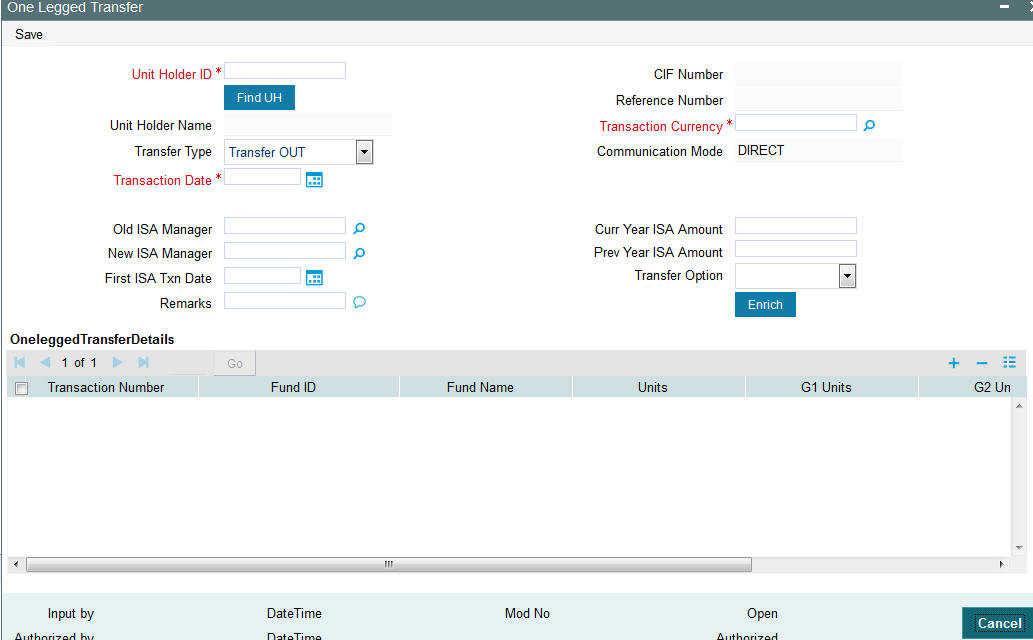
You can specify the following details:
Unit Holder ID
Alphanumeric; 8 Characters; Mandatory
Specify the unit holder ID.
Unit Holder Name
Display
The system displays the unit holder name for the selected Unit Holder ID while saving.
CIF Number
Alphanumeric; 8 Characters; Mandatory
Specify the customer ID.
Transfer Type
Optional
Select the type of transfer from the adjoining drop-down list. Following are the options available:
- Transfer In
- Transfer Out
- In Specie Transfer Out
- In Specie Transfer In
Reference Number
Display
The system displays the reference name.
Transaction Date
Date Format; Mandatory
Specify the transaction date.
Transaction Currency
Alphanumeric; 3 Characters; Mandatory
Specify the transaction currency.
ISA Related
Old ISA Manager
Alphanumeric; 8 Characters; Optional
Specify old ISA Manager details. This adjoining option list displays all valid old ISA manager details maintained in the system. You can choose the appropriate one.
New ISA Manager
Alphanumeric; 8 Characters; Optional
Specify new ISA Manager details. This adjoining option list displays all valid new ISA manager details maintained in the system. You can choose the appropriate one.
First ISA Transaction Date
Date Format; Optional
Specify first ISA transaction date.
Current Year ISA Amount
Alphanumeric; 8 Characters; Optional
Specify the current year ISA amount.
Prev Year ISA Amount
Alphanumeric; 8 Characters; Optional
Specify the previous year ISA amount.
Transfer Option
Optional
Select the transfer option from the adjoining drop-down list. Following are the options available:
- Any Year ISA
- Previous Year ISA
- Current Year ISA
- ISA Partial
One Legged Transfer Details
Transaction Number
Display
The system displays the transaction number on authorization.
Fund ID
Alphanumeric; 8 Characters; Mandatory
Specify the fund ID. This adjoining option list displays all valid fund ID maintained in the system. You can choose the appropriate one.
Fund Name
Display
The system displays the name of the fund for the selected fund ID.
Units
Numeric; 8 Characters; Optional
Specify the in-specie transfer in units.
This field is enabled only for in-specie transfer in type of transaction.
G1 Units
Numeric; 8 Characters; Optional
Specify the in-specie transfer in G1 units.
This field is enabled only for in-specie transfer in type of transaction.
G2 Units
Numeric; 8 Characters; Optional
Specify the in-specie transfer in G2 units.
This field is enabled only for in-specie transfer in type of transaction.
5.19.3 Validating ISA Transactions
Any ‘IN’ transaction captured for unitholder ID having account type as ISA will be validated for breach of overall limit within the date range maintained for the account type in ‘Account Type Maintenance’ screen.The validation will be based on transaction date. This validation is only for the mapped ref types.
If any backdated transactions are entered for previous year (less than from date), the system will display the warning message as “Entered transaction does not belong to current period- Do you wish to continue?”.
Limit validations will be done for transactions entered for previous ISA year.
If any future dated transactions are entered for coming tax year (greater than To date), the system will display the warning message as “Entered transaction does not belong to current period- Do you wish to continue?”.
Limit validations will be done for transactions entered for coming ISA year.
ISA validations will again be subject to appropriate ref type being mapped in the ‘Account Type Maintenance’ screen. If ref type is not mapped in ‘Account Type Maintenance’ screen, the transaction will not be validated for limit breach validation.
If an IN transaction is reversed or cancelled utilized amount will be reset.
If a transaction is breaching ISA limit maintained at account type level, then the system will display a warning message.
Gross amount in Fund base currency will be used to validate the amount limit breach. For user entered transaction, there will be online check if the transaction amount is breaching the limit. For unit based transactions, the system will use the latest available NAV to calculate the amount.
In case of cross currency transactions,,latest exchange rate maintained for default source will be used when account type currency is different from fund base currency
In case of standing instructions, there will be no validations during setup. During SI transaction generation, the system will validate for overall limit breach and if breaching will not generate the SI transaction, it will log in error table.
Apart from online check, there will be limit breach check at allocation level. Any transaction breaching the overall limit will not be allocated.
5.20 One Legged Transfer Summary
This section contains the following topics:
- Section 5.20.1, "Retrieving ISA Transfer Details"
- Section 5.20.2, "Editing ISA Transfer Details"
- Section 5.20.3, "Viewing ISA Transfer Details"
- Section 5.20.4, "Deleting ISA Transfer Details"
- Section 5.20.5, "Authorizing ISA Transfer Details"
- Section 5.20.6, "Amending ISA Transfer Details"
5.20.1 Retrieving ISA Transfer Details
You can view ISA transfer details using ‘One Legged Transfer - Summary’ screen. To invoke this screen, type ‘UTSOLT’ in the field at the top right corner of the Application tool bar and clicking on the adjoining arrow button.
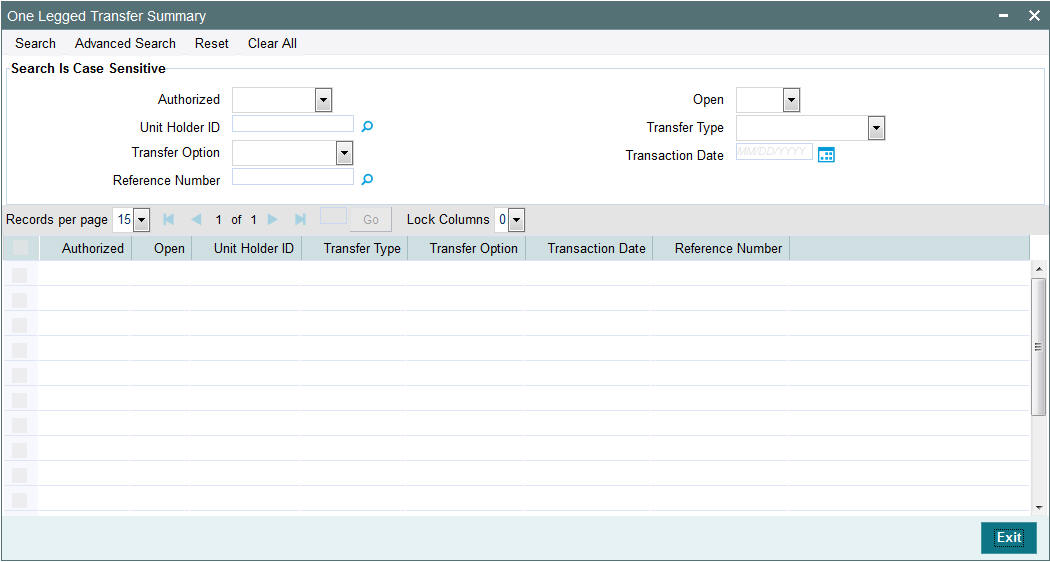
You can retrieve previously entered ISA Transfer Details as follows:
- Invoke the ‘One Legged Transfer - Summary’ screen from the Browser.
- Specify any or all of the following details in the screen:
- The status of the transaction in the ‘Authorized’ field. If you choose the blank space, then both the authorized and the unauthorized status records will be retrieved for the specified criteria.
- The status of the records in the ‘Open’ field. If you choose the blank space, then all the records are retrieved.
- Unit Holder ID
- Transfer Type
- Transfer Option
- Transaction Date
- Reference Number
- If you choose the blank space, then all the records are retrieved.
Click ‘Search’ button to view the records. All the records with the specified details are retrieved and displayed in the lower portion of the screen.
Note
You can also retrieve the individual record detail from the detail screen by querying in the following manner:
- Press F7
- Input the Unit Holder ID
- Press F8
You can perform Edit, Delete, Amend, Authorize, Reverse, Confirm operations by selecting the operation from the Action list. You can also search a record by using a combination of % and alphanumeric value.
Example
You can search the record for Account Type by using the combination of % and alphanumeric value as follows:
- Search by A%: The system will fetch all the records whose Unit Holder ID starts from Alphabet ‘A’. For example, AGC17, AGVO6, AGC74 and so forth.
- Search by %7: The system will fetch all the records whose Unit Holder ID ends by numeric value’ 7’. For example, AGC17, GSD267, AGC77 and so forth.
- Search by %17%: The system will fetch all the records whose Unit Holder ID contains the numeric value 17. For example, GSD217, GSD172, AGC17 and so forth
5.20.2 Editing ISA Transfer Details
You can modify the ISA Transfer Details that you have already entered into the system, provided it has not been subsequently authorized. You can perform this operation as follows:
- Invoke the ‘One Legged Transfer - Summary’ screen from the Browser.
- Select the status of the record that you want to retrieve for modification in the Authorized field. You can only modify records that are unauthorized. Accordingly, choose the unauthorized option.
- Specify any or all of the details in the corresponding fields to retrieve the record that is to be modified.
- Click ‘Search’ button. All unauthorized records with the specified details are retrieved and displayed in the lower portion of the screen.
- Double click the record that you want to modify in the list of displayed records. The ‘One Legged Transfer - Detail’ screen is displayed.
- Select Unlock Operation from the Action list to modify the record. Modify the necessary information.
- Click Save to save your changes. The ‘One Legged Transfer - Summary’ screen is closed and the changes made are reflected in the ‘One Legged Transfer - Summary’ screen.
5.20.3 Viewing ISA Transfer Details
To view a record that you have previously input, you must retrieve the same in the ‘One Legged Transfer - Summary’ screen as follows:
- Invoke the ‘One Legged Transfer - Summary’ screen from the Browser.
- Select the status of the record that you want to retrieve for viewing in the Authorization Status field. You can also view all records that are either unauthorized or authorized only, by choosing the Unauthorized/ Authorized option.
- Specify any or all of the details of the record in the corresponding fields on the screen.
- Click ‘Search’ button. All records with the specified fields are retrieved and displayed in the lower portion of the screen.
- Double click the record that you want to view in the list of displayed records. The ‘One Legged Transfer - Detail’ screen is displayed in View mode.
5.20.4 Deleting ISA Transfer Details
You can delete only unauthorized records in the system. To delete a record that you have previously entered:
- Invoke the ‘One Legged Transfer - Summary’ screen from the Browser.
- Select the status of the record that you want to retrieve for deletion.
- Specify any or all of the details in the corresponding fields on the screen.
- Click ‘Search’ button. All records with the specified fields are retrieved and displayed in the lower portion of the screen.
- Double click the record that you want to delete in the list of displayed records. The ‘One Legged Transfer - Detail’ screen is displayed.
- Select Delete Operation from the Action list. The system prompts you to confirm the deletion and the record is physically deleted from the system database.
5.20.5 Authorizing ISA Transfer Details
An unauthorized fund restriction record must be authorized in the system for it to be processed. To authorize a record:
- Invoke the ‘One Legged Transfer - Summary’ screen from the Browser.
- Select the status of the record that you want to retrieve for authorization. Typically, choose the unauthorized option.
- Specify any or all of the details in the corresponding fields on the screen.
- Click ‘Search’ button. All records with the specified details that are pending authorization are retrieved and displayed in the lower portion of the screen.
- Double click the record that you wish to authorize. The ‘One Legged Transfer - Summary’ screen is displayed. Select Authorize operation from the Action List.
When a checker authorizes a transaction, the system will create UT transactions and displays only the corresponding transaction overrides.
5.20.6 Amending ISA Transfer Details
After a fund restriction record is authorized, it can be modified using the Unlock operation from the Action List. To make changes to a record after authorization:
- Invoke the ‘One Legged Transfer - Summary’ screen from the Browser.
- Select the status of the record that you want to retrieve for authorization. You can only amend authorized records.
- Specify any or all of the details in the corresponding fields on the screen.
- Click ‘Search’ button. All records with the specified details that are pending authorization are retrieved and displayed in the lower portion of the screen.
- Double click the record that you wish to authorize. The ‘One Legged Transfer - Detail’ screen is displayed in amendment mode. Select Unlock operation from the Action List to amend the record.
- Amend the necessary information and click on Save to save the changes.
5.21 Distribution Void Detail
This section contains the following topics:
5.21.1 Invoking Distribution Void Detail Screen
You can do void processing at UH and transaction level. You can specify the unit holder ID or specific transaction number, and then that specific UH/transaction will be void in system with immediate effect (post authorization). You can capture void reason during void save.
The account can be voided for a given date range.
You can specify the void details by using ‘Distribution Void Detail’ screen. To invoke this screen, type ‘UTDDVOID’ in the field at the top right corner of the Application tool bar and clicking on the adjoining arrow button to perform the following operations:
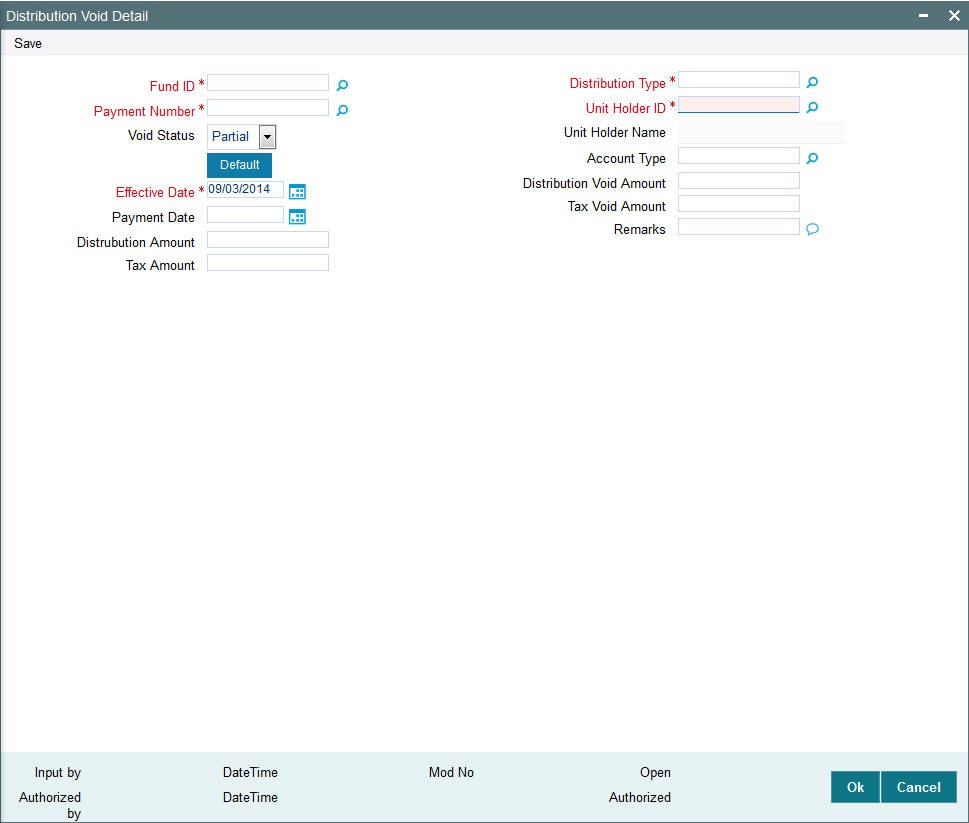
You can specify the following details:
Fund ID
Alphanumeric; 6 Characters; Mandatory
Specify the fund ID. This adjoining option list displays all valid fund ID maintained in the system. You can choose the appropriate one.
Payment Number
Alphanumeric; 8 Characters; Mandatory
Specify the payment number. This adjoining option list displays all valid payment number maintained in the system. You can choose the appropriate one.
Payment Date
Date Format; Optional
Specify payment date.
Effective Date
Date Format; Mandatory
Specify the application date.
Distribution Type
Alphanumeric; 8 Characters; Mandatory
Select the type of distribution. This adjoining option list displays all valid fund ID maintained in the system. You can choose the appropriate one.
Unit Holder ID
Alphanumeric; 8 Characters; Mandatory
Specify the unit holder ID. You can also click on ‘FundUH’ button to select the valid unit holder ID.
Account Type
Optional
Select the type of account. This adjoining option list displays all valid fund ID maintained in the system. You can choose the appropriate one.
Unit Holder Name
Display
The system displays the unit holder name.
Distribution Amount
Numeric; 8 Characters; Optional
Specify the distribution amount.
Tax Amount
Numeric; 8 Characters; Optional
Specify the valid tax amount.
Void Status
Optional
Select the void status from the adjoining drop-down list. Following are the options available:
- Full
- Partial
- Un-Void
Distribution Void Amount
Alphanumeric; 8 Characters; Optional
Specify the distribution void amount.
This field is enabled only if you have selected ‘Void Status’ as ‘Partial’.
Tax Void Amount
Alphanumeric; 8 Characters; Optional
Specify the distribution void tax amount.
This field is enabled only if you have selected ‘Void Status’ as ‘Partial’.
Remarks
Alphanumeric; 255 Characters; Mandatory
Specify remarks, if any.
5.21.2 Validating ISA Void
Distribution Void
You can maintain partial Voids and full amount void values at a unit holder distribution level using distribution void feature.
You can mark the distribution record as fully void or partially void by selecting Full/Partial option in ‘Void Status’ field.
If you select ‘Partial void’ option, then you can provide the Void Distribution amount and the void Tax amount. You can also amend this maintenance and change the status to Blank.
You can amend the distribution void amount and distribution void tax amount with effective date being the application date. The system will store the latest effective date record in the system as latest record which will be available for amending the void record.
The distribution void processing is only for reporting purpose and will not have any systemic impact on tax credit.
Tax Credit
You can process tax credit transactions by providing the details such as fund ID dividend payment number, account type. the system will default the tax credit date to the application date. Based on this, any tax deducted from the unitholder will be credited back to the unitholder.
In case, if the unitholder is marked as void or any transaction belonging to unitholder is marked as Void, then the tax credit will not happen the system will mark the record as error and log the details into a table.
Tax credit Reversal batch will trigger reversal of Tax credit reinvestments and Tax credit payments.
To reverse the Tax Credit Reinvestment transaction, you will have to select the Fund and Processing mode as reverse so that payment number are available for selection. On selection of payment number and entering remarks, you should run the reversal batch process.
Payment numbers which are gone through Tax Credit processing will only be available for reversal processing. If Tax Credit Reversal has been performed for a payment, such payment number will be available for Tax Credit processing again. However, such payment number will not be available for Tax Credit Reversal processing until such payment is go through Tax Credit processing subsequently.
On Reversal of Tax Credit, the system will place reversal entries for tax credits reinvested and internally track reversal of tax credit payments. You should reverse after the paydate with the system treating the reversal of reinvestment transactions and payments in the same way the distribution reversal process does.
On successful reversal processing, if there are dependent transactions like redemptions, switch out and transfer out linked to tax credit Reinvestments, then such transactions will not be reversed and these details will be logged.
In case the dividend is reversed before tax credit processing, then such dividends will not come for Tax Credit Processing. In case dividend is reversed after tax credit processing, you will have to reverse the tax credit separately.
If Dividend is amended, then revised dividends will come for Tax credit processing. In such case, revised Tax amount will come for credit processing for dividend payments and reinvestments. If you amend the dividend after tax credit, in such case, tax credit will to be reversed and reprocessed.
Dividend Reversals
If dividend is reversed after tax credit, the dividend reversal or dividend reprocess batch will not trigger the reversal of Tax Credit transactions, because Dividend reprocessing and Tax Credit batch is independent activities. You will have to manually trigger tax credit reversal batch.
5.22 Distribution Void Summary
This section contains the following topics:
- Section 5.22.1, "Retrieving Void Details"
- Section 5.22.2, "Editing Void Details"
- Section 5.22.3, "Viewing Void Details"
- Section 5.22.4, "Deleting Void Details"
- Section 5.22.5, "Authorizing Void Details"
- Section 5.22.6, "Amending Void Details"
5.22.1 Retrieving Void Details
You can view void details using ‘Distribution Void Summary’ screen. To invoke this screen, type ‘UTSVOID’ in the field at the top right corner of the Application tool bar and clicking on the adjoining arrow button.

You can retrieve a previously entered void Details as follows:
- Invoke the ‘Distribution Void Summary’ screen from the Browser.
- Specify any or all of the following details in the screen:
- The status of the transaction in the ‘Authorized’ field. If you choose the blank space, then both the authorized and the unauthorized status records will be retrieved for the specified criteria.
- The status of the records in the ‘Open’ field. If you choose the blank space, then all the records are retrieved.
- Unit Holder Name
- Unit Holder ID
- Transaction Number
- From Date
- To Date
- Void Level
- If you choose the blank space, then all the records are retrieved.
Click ‘Search’ button to view the records. All the records with the specified details are retrieved and displayed in the lower portion of the screen.
Note
You can also retrieve the individual record detail from the detail screen by querying in the following manner:
- Press F7
- Input the Unit Holder ID
- Press F8
You can perform Edit, Delete, Amend, Authorize, Reverse, Confirm operations by selecting the operation from the Action list. You can also search a record by using a combination of % and alphanumeric value.
Example
You can search the record for Unit Holder ID by using the combination of % and alphanumeric value as follows:
- Search by A%: The system will fetch all the records whose Unit Holder ID starts from Alphabet ‘A’. For example, AGC17, AGVO6, AGC74 and so forth.
- Search by %7: The system will fetch all the records whose Unit Holder ID ends by numeric value’ 7’. For example, AGC17, GSD267, AGC77 and so forth.
- Search by %17%: The system will fetch all the records whose Unit Holder ID contains the numeric value 17. For example, GSD217, GSD172, AGC17 and so forth
5.22.2 Editing Void Details
You can modify the Void Details that you have already entered into the system, provided it has not been subsequently authorized. You can perform this operation as follows:
- Invoke the ‘Distribution Void Summary’ screen from the Browser.
- Select the status of the record that you want to retrieve for modification in the Authorized field. You can only modify records that are unauthorized. Accordingly, choose the unauthorized option.
- Specify any or all of the details in the corresponding fields to retrieve the record that is to be modified.
- Click ‘Search’ button. All unauthorized records with the specified details are retrieved and displayed in the lower portion of the screen.
- Double click the record that you want to modify in the list of displayed records. The ‘Distribution Void Detail’ screen is displayed.
- Select Unlock Operation from the Action list to modify the record. Modify the necessary information.
- Click Save to save your changes. The ‘Distribution Void Summary’ screen is closed and the changes made are reflected in the ‘Distribution Void Summary’ screen.
5.22.3 Viewing Void Details
To view a record that you have previously input, you must retrieve the same in the ‘Distribution Void Summary’ screen as follows:
- Invoke the ‘Distribution Void Summary’ screen from the Browser.
- Select the status of the record that you want to retrieve for viewing in the Authorization Status field. You can also view all records that are either unauthorized or authorized only, by choosing the Unauthorized/ Authorized option.
- Specify any or all of the details of the record in the corresponding fields on the screen.
- Click ‘Search’ button. All records with the specified fields are retrieved and displayed in the lower portion of the screen.
- Double click the record that you want to view in the list of displayed records. The ‘Distribution Void Detail’ screen is displayed in View mode.
5.22.4 Deleting Void Details
You can delete only unauthorized records in the system. To delete a record that you have previously entered:
- Invoke the ‘Distribution Void Summary’ screen from the Browser.
- Select the status of the record that you want to retrieve for deletion.
- Specify any or all of the details in the corresponding fields on the screen.
- Click ‘Search’ button. All records with the specified fields are retrieved and displayed in the lower portion of the screen.
- Double click the record that you want to delete in the list of displayed records. The ‘Distribution Void Detail’ screen is displayed.
- Select Delete Operation from the Action list. The system prompts you to confirm the deletion and the record is physically deleted from the system database.
5.22.5 Authorizing Void Details
An unauthorized fund restriction record must be authorized in the system for it to be processed. To authorize a record:
- Invoke the ‘Distribution Void Summary’ screen from the Browser.
- Select the status of the record that you want to retrieve for authorization. Typically, choose the unauthorized option.
- Specify any or all of the details in the corresponding fields on the screen.
- Click ‘Search’ button. All records with the specified details that are pending authorization are retrieved and displayed in the lower portion of the screen.
- Double click the record that you wish to authorize. The ‘Distribution Void Summary’ screen is displayed. Select Authorize operation from the Action List.
When a checker authorizes a transaction, details of validation, if any, that were overridden by the maker of the transaction during the Save operation are displayed. If any of these overrides results in an error, the checker must reject the transaction.
5.22.6 Amending Void Details
After a fund restriction record is authorized, it can be modified using the Unlock operation from the Action List. To make changes to a record after authorization:
- Invoke the ‘Distribution Void Summary’ screen from the Browser.
- Select the status of the record that you want to retrieve for authorization. You can only amend authorized records.
- Specify any or all of the details in the corresponding fields on the screen.
- Click ‘Search’ button. All records with the specified details that are pending authorization are retrieved and displayed in the lower portion of the screen.
- Double click the record that you wish to authorize. The ‘Distribution Void Detail’ screen is displayed in amendment mode. Select Unlock operation from the Action List to amend the record.
Amend the necessary information and click on Save to save the changes.
5.23 Intra-day Checks for Transactions
This section contains the following topics:
- Section 5.23.1, "Invoking Intra-day Transaction Check Screen"
- Section 5.23.2, "Pre-EOD Check for Intra-day Transaction Validation"
5.23.1 Invoking Intra-day Transaction Check Screen
For a fund, limits on transaction volumes (minimum and maximum limits for both amount and units) are defined in the Transaction Processing Rules, for each transaction type. The limits so defined are validated whenever individual transactions are allocated in the system.
You may require the transaction limits for a fund to be checked for and enforced at any of the following levels of aggregation:
- For transactions across all unit holder accounts transacting in a fund
- For transactions across all accounts in a CIF which transacts in the fund
- For transactions across all identification types and identification numbers transacting in the fund
To specify the level at which the check must be performed, you can use the Intra-Day Transaction Check screen, which you can invoke from the Fund Manager menu.
To invoke this screen, type UTDIDYCK in the field at the top right corner of the Application tool bar and clicking on the adjoining arrow button.
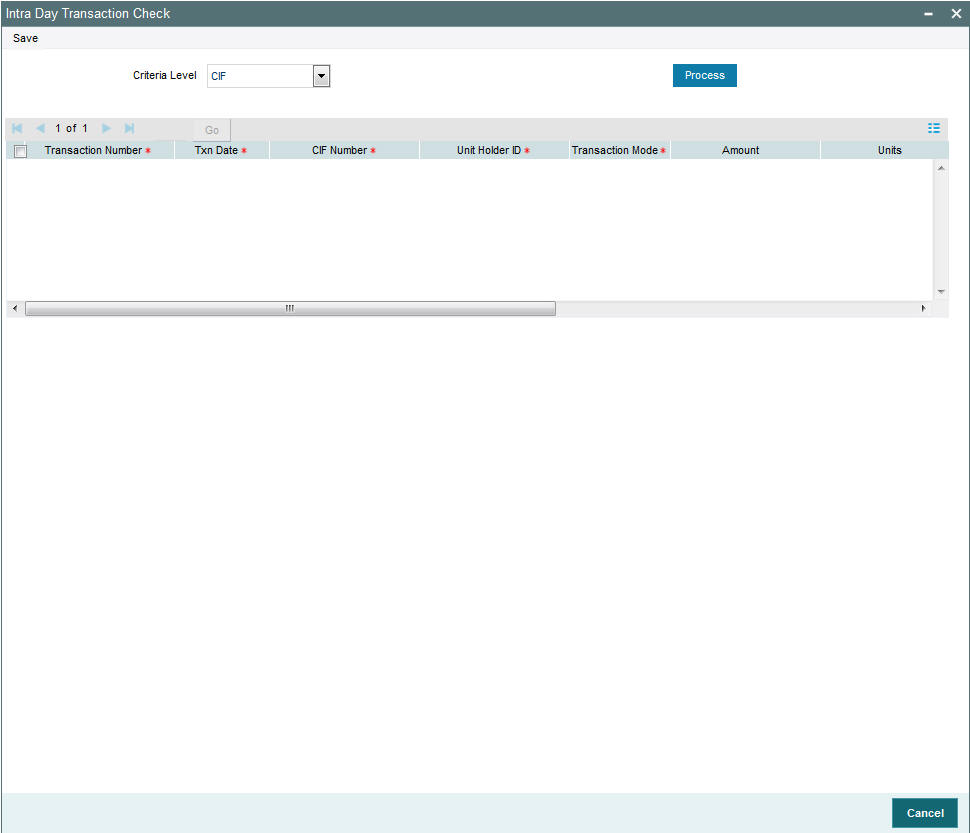
In this screen, you specify the aggregation level at which the check must be performed, in the Criteria field. Click ‘Process’ button to apply the check. The system aggregates all the unallocated transactions into each fund at the level you have specified, and displays those transactions that violate the limits maintained in the Transaction Processing Rules for the fund.
Criteria Level
Alphanumeric; Mandatory
Select the level at which transactions must be aggregated for enforcement of the transaction limit check. The system aggregates all unallocated transactions into each fund at the level you have specified, and displays those transactions that violate the limits maintained in the Transaction Processing Rules for the fund.
You can specify any of the following levels:
- CIF - Across all accounts in a CIF which transacts in the fund
- Unit Holder - Across all unit holder accounts transacting in a fund
- Identification Number - Across all identification types and identification numbers transacting in a fund
5.23.2 Pre-EOD Check for Intra-day Transaction Validation
During the Pre-EOD processes, the system checks for the transactions that violate the minimum / maximum limits defined for the fund, aggregated at CIF level, and ensures that they are not put through.
In the Transaction Processing Rules, the following minimum and maximum limits have been maintained:
Fund ID |
Transaction Type |
Minimum Amount |
Maximum Amount |
Minimum Units |
Maximum Units |
Royal Trust Growth Fund |
Subscription |
1,000 |
10,000,000 |
100 |
1,000,000 |
The details of unit holders transacting in the Royal Trust Growth Fund are as follows:
Unit Holder ID |
CIF |
Account Type |
Identification Type |
Identification Number |
UH1 |
CIF1 |
CPFOA |
NRIC |
N0001 |
UH2 |
CIF1 |
CPFSA |
NRIC |
N0001 |
UH3 |
CIF1 |
Cash |
Passport |
A80899 |
UH4 |
CIF2 |
ASPFOA |
NRIC |
N0001 |
The following transactions are entered into the Royal Trust Growth Fund:
Transaction Number |
Unit Holder |
CIF |
Transaction Type |
Transaction Mode |
Amount |
Units |
S1 |
UH1 |
CIF1 |
Subscription |
Amount |
10,000,000 |
|
S2 |
UH2 |
CIF1 |
Subscription |
Units |
|
1,000,000 |
S3 |
UH3 |
CIF1 |
Subscription |
Amount |
900 |
|
S4 |
UH4 |
CIF2 |
Subscription |
Units |
|
90 |
When the intra-day check is enforced, the following transactions violate the check:
At Unit Holder aggregation level
The transactions S3 and S4 are displayed in the Intra-Day Transaction Check screen, since the transaction volumes are below the minimum transaction amount and minimum transaction units for subscription maintained for the fund in the Transaction Processing Rules.
At CIF aggregation level
The transactions S1 and S3 are summed for CIF 1, and the sum (10,000,900) exceeds the maximum amount for subscription transactions for the Royal Trust Growth Fund. Therefore, S1 and S3 are displayed in the Intra-Day Transaction Check screen.
Also, the number of units for transaction S2 falls below the minimum units for subscription transactions for the Royal Trust Growth Fund. Therefore, S2 is displayed in the Intra-Day Transaction Check screen.
At Identification Number level
The transactions S2 and S4 are summed for NRIC – N0001, and the sum (10,000,090 units) exceeds the maximum units for subscription transactions for the Royal Trust Growth Fund. Therefore, S2 and S4 are displayed in the Intra-Day Transaction Check screen.
Also, the number of units for transaction S3 falls below the minimum amount for subscription transactions for the Royal Trust Growth Fund. Therefore, S3 is displayed in the Intra-Day Transaction Check screen.
5.24 UH Portfolio Readjustment Details
This section contains the following topics:
- Section 5.24.1, "Readjusting Unit Holder Portfolio"
- Section 5.24.2, "Main Tab"
- Section 5.24.3, "Transaction Details Tab"
- Section 5.24.4, "Errors Tab"
5.24.1 Readjusting Unit Holder Portfolio
You can define percentage of the readjusted portfolio fund wise for a given Unit Holder using the ‘Readjustment of UH Portfolio’ screen. Based on this percentage defined, the system will readjust portfolio by means of switch/pseudo switch on the given funds of the unit holder. All the switch and pseudo switch transactions are unit based transactions. You can invoke this screen by typing ‘UTDUHPR’ in the field at the top right corner of the Application tool bar and click the adjoining arrow. The screen is displayed below:

Select 'New' from the Actions menu in the Application tool bar or click new icon to enter the details of the ‘Readjustment of UH Portfolio’ screen.
5.24.2 Main Tab
Unit Holder ID
Mandatory
Specify the unit holder ID. You can also click ‘Find UH’ button to find the authorized unit holders. The system displays a list of authorized unit holders maintained in the system.
Aggregate Currency
Optional
In case the readjustments are between the funds of different fund base currency (FBC), then you have to specify the aggregate currency. Specify the aggregate currency. You can also select the aggregate currency from the adjacent option list. The option list consists of all the valid and authorized currency codes maintained in the system. While processing the transaction, the system will convert the currencies of the current holdings of the selected funds into aggregate currency for the purpose of comparing and achieving the required portfolio.
The system triggers an error message if there are funds involving more than one FBC and if the aggregate currency is not specified. However, if all the funds defined in the screen are having same fund base currency, then the system defaults the aggregate currency with the same fund base currency. For instance, if all the funds defined are having FBC as ‘USD’, then on saving the details, the system will default aggregate currency as ‘USD’.
Note
The aggregate currency chosen should be the FBC of at least one of the funds selected.
Readjustment Status
Display
Based on the status of the readjustment, the status is displayed here. The following are the status available:
- Not Processed
- Transaction Generated
- Failure during transaction Generation
You can modify the details only if the readjustment status is ‘Not Processed”.
Note
For a given unit holder, there can be only one ‘Not Processed’ readjustment.
Readjustment ID
Display
On saving the details, the readjustment ID is generated. Later, you can use this number to query the details.
Cancelled
Optional
The system will not generate the transactions that are ‘authorized but are yet to be processed’. This option is enabled only during amending operation.
Fund ID
Mandatory
Specify the fund ID. You can also select the fund ID from the option list provided. The option list displays the valid fund IDs maintained in the system. You should at least specify two funds for readjustments and for the given unit holder, at least one of the funds defined should have the settled unit balance.
Fund Name
Display
Based on the fund ID selected, the fund name is displayed.
Fund Base Currency
Display
Based on the fund ID selected, the fund base currency is displayed.
% Holding after Readjustment
Mandatory
Define the percentage of the readjusted portfolio for the unit holder. After readjustment, this is the percentage of the total holdings of the settled units for the selected funds. The total percentage should added up to hundred percent.
5.24.3 Transaction Details Tab
Click ‘Transaction Details’ tab to view the generated transaction details.
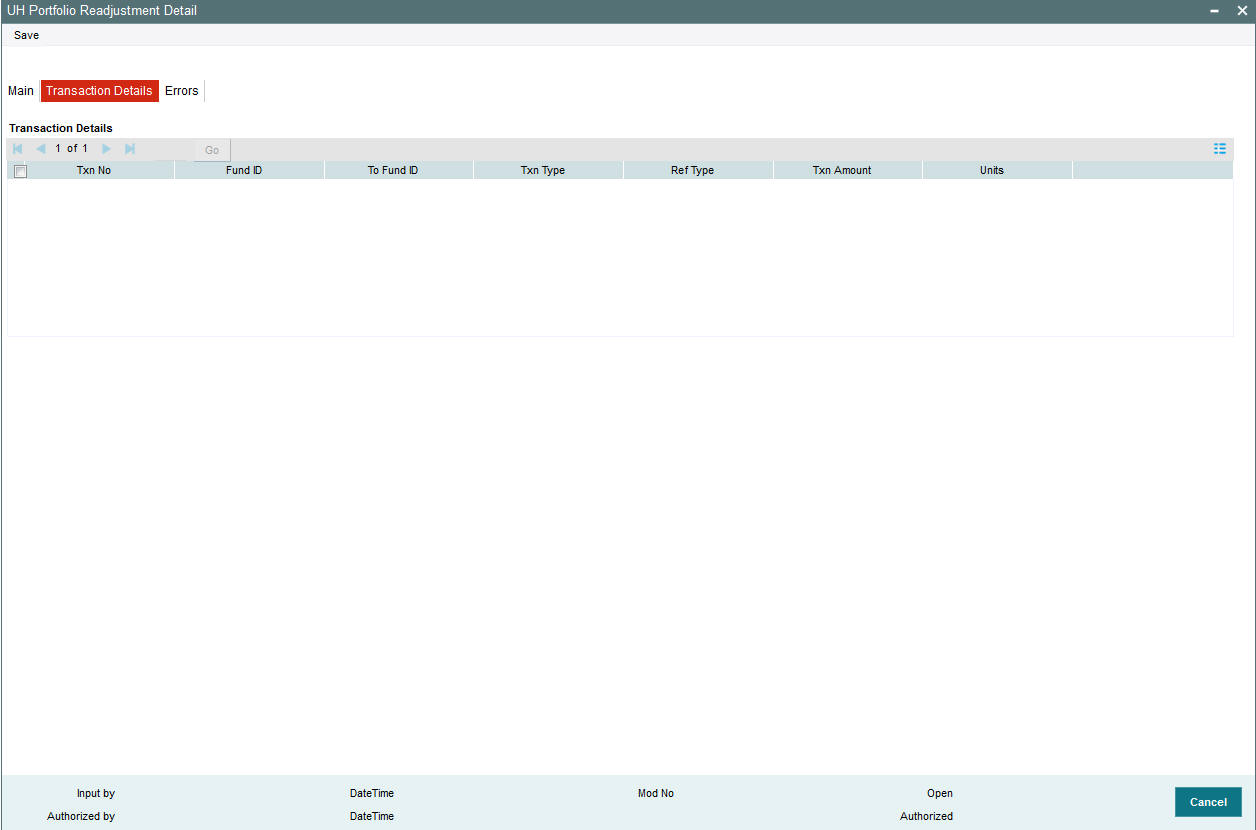
The following details are displayed:
- Transaction Number
- Transaction Type
- Fund ID
5.24.4 Errors Tab
During transaction generation, if one of the transactions fails, then the system will log an error as 'Transaction Processing Failed'. It will not generate the partial successful transactions. The failed reasons can be viewed under ‘Errors’ tab. Click ‘Errors’ tab to view the error details:
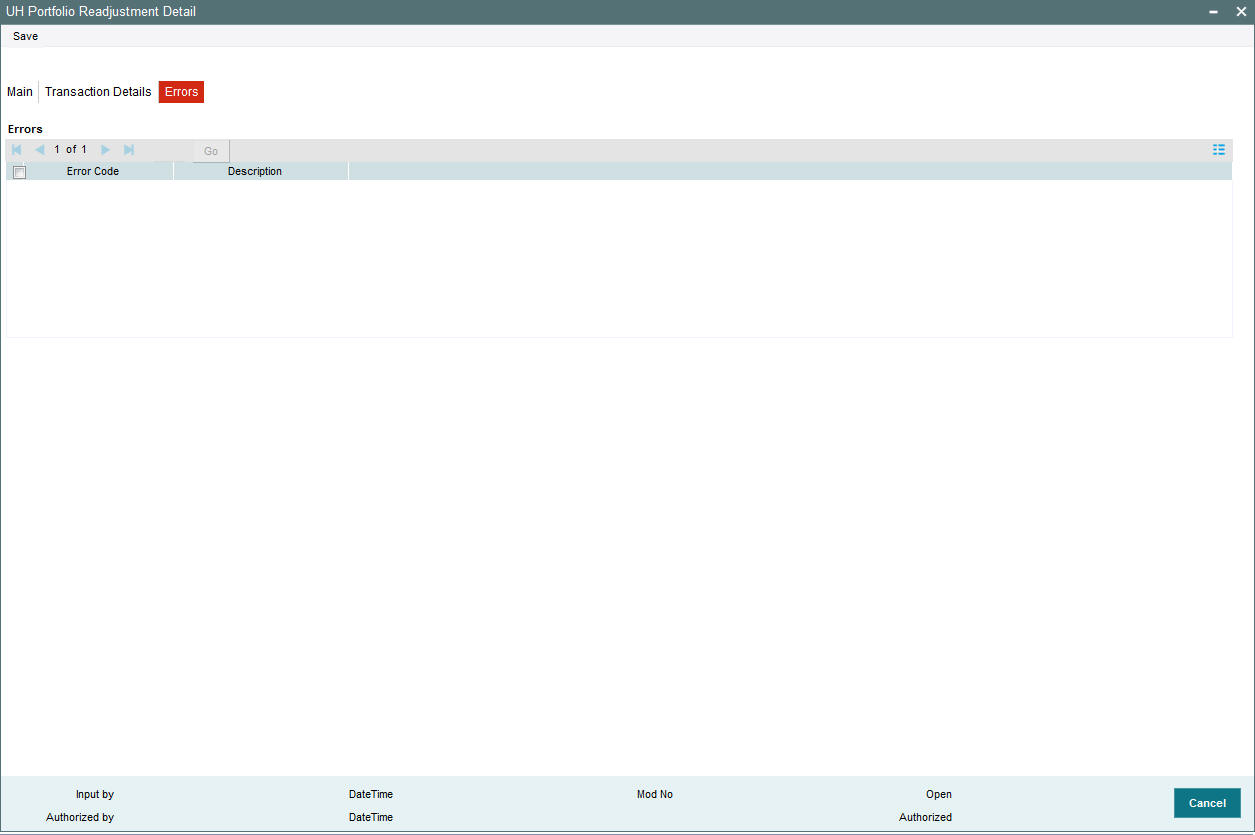
Note
In case of pseudo switch, the transaction currency for the subscription transaction will be the fund base currency of the redemption transaction fund.
5.24.5 Processing Readjustment Portfolios
As part of EOD process, all the settled units as on date are considered for readjustments. The total current holdings are arrived using the latest NAV of the funds involved. The current holdings of each fund are compared with the required readjusted portfolio (both amounts are in aggregate currency). The transaction type to be used is based on the net inflows and outflows required to achieve the required readjustment. If a switch transaction is required among these funds, the system will generate normal switch or pseudo switch based on the funds involved belong to the same AMC or different AMC respectively. The readjustment request is rejected if there is any amount block on one of the fund where in units has to be switched out.
5.25 UH Portfolio Readjustment Summary
This section contains the following topics:
- Section 5.25.1, "Retrieving Readjustment Portfolio"
- Section 5.25.2, "Editing Readjustment Portfolio"
- Section 5.25.3, "Viewing Readjustment Portfolio "
- Section 5.25.4, "Deleting Readjustment Portfolio"
- Section 5.25.5, "Authorizing Readjustment Portfolio"
- Section 5.25.6, "Amending Readjustment Portfolio"
5.25.1 Retrieving Readjustment Portfolio
The portfolio readjustment details must be authorized by another user. You can invoke ‘UH Portfolio Readjustment Summary’ screen by typing ‘UTSUHPR’ in the field at the top right corner of the Application tool bar and click the adjoining arrow. The screen is displayed below:
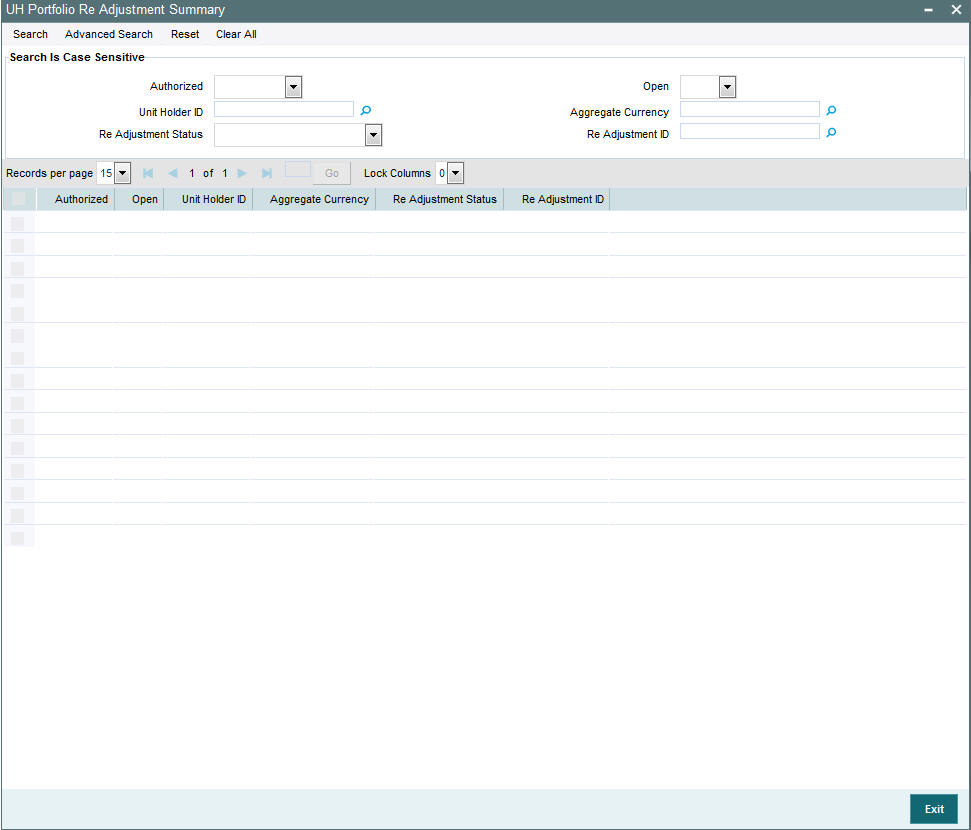
You can retrieve a previously entered broker deal as follows:
- Invoke the ‘UH Portfolio Readjustment Summary’ screen from the Browser.
- Specify any or all of the following details in the screen:
- The status of the transaction in the ‘Authorized ’ field. If you choose the blank space, then both the authorized and the unauthorized status records will be retrieved for the specified criteria.
- The status of the records in the ‘Open’ field. If you choose the blank space, then all the records are retrieved.
- The aggregate currency
- The readjustment ID in the ‘Re Adjustment ID’ field. If you choose the blank space, then all the records are retrieved.
- The Readjustment status in the ‘Re Adjustment Status’ field.
- Click ‘Search’ button to view the records. All records with the specified details are retrieved and displayed in the lower portion of the screen.
You can perform Edit, Delete, Amend and Authorize operation by selecting from the Action list.
5.25.2 Editing Readjustment Portfolio
You can modify the details of the readjustment portfolio that you have already entered into the system, provided it has not been subsequently authorized. You can perform this operation as follows:
- Invoke the ‘UH Portfolio Readjustment Summary’ screen from the Browser.
- Specify any or all of the following details in the screen:
- The status of the transaction in the ‘Authorized’ field. If you choose the blank space, then both the authorized and the unauthorized status records will be retrieved for the specified criteria.
- The status of the records in the ‘Open’ field. If you choose the blank space, then all the records are retrieved.
- The unit holder ID in the ‘Unit Holder ID’ field. If you choose the blank space, then all the records are retrieved.
- The readjustment ID in the ‘Re Adjustment ID’ field. If you choose the blank space, then all the records are retrieved.
- The Readjustment status in the ‘Re Adjustment Status’ field.
- Click ‘Search’ button to view the records. All records with the specified details are retrieved and displayed in the lower portion of the screen.
- Double click the record that you want to modify in the list of displayed records. The ‘UH Portfolio Readjustment Detail’ screen is displayed.
- Select Unlock operation from the Action list to modify the record. Modify the necessary information.
- Click Save to save your changes. The ‘UH Portfolio Readjustment Detail’ screen is closed and the changes made are reflected in the ‘UH Portfolio Readjustment Summary’ screen.
5.25.3 Viewing Readjustment Portfolio
To view a record that you have previously entered, you must retrieve the same in the ‘UH Portfolio Readjustment Summary’ screen, as follows:
- Invoke the ‘UH Portfolio Readjustment Summary’ screen from the Browser.
- Specify any or all of the following details in the screen:
- The status of the transaction in the ‘Authorized’ field. If you choose the blank space, then both the authorized and the unauthorized status records will be retrieved for the specified criteria.
- The status of the records in the ‘Open’ field. If you choose the blank space, then all the records are retrieved.
- The unit holder ID in the ‘Unit Holder ID’ field. If you choose the blank space, then all the records are retrieved.
- The readjustment ID in the ‘Re Adjustment ID’ field. If you choose the blank space, then all the records are retrieved.
- The Readjustment status in the ‘Re Adjustment Status’ field.
- Click ‘Search’ button to view the records. All records with the specified details are retrieved and displayed in the lower portion of the screen.
- Double click the record that you want to view in the list of displayed records. The ‘UH Portfolio Readjustment Detail’ screen is displayed in the view mode.
5.25.4 Deleting Readjustment Portfolio
You can delete only unauthorized records in the system. To delete a record that you have previously entered:
- Invoke the ‘UH Portfolio Readjustment Summary’ screen from the Browser.
- Specify any or all of the following details in the screen:
- The status of the transaction in the ‘Authorized’ field. If you choose the blank space, then both the authorized and the unauthorized status records will be retrieved for the specified criteria.
- The status of the records in the ‘Open’ field. If you choose the blank space, then all the records are retrieved.
- The unit holder ID in the ‘Unit Holder ID’ field. If you choose the blank space, then all the records are retrieved.
- The readjustment ID in the ‘Re Adjustment ID’ field. If you choose the blank space, then all the records are retrieved.
- The Readjustment status in the ‘Re Adjustment Status’ field.
- Click ‘Search’ button to view the records. All records with the specified details are retrieved and displayed in the lower portion of the screen.
- Double click the record that you want to delete. The ‘UH Portfolio Readjustment Detail’ screen is displayed.
- Select Delete operation from the Action list. The system prompts you to confirm the deletion, and the record is deleted physically from the system database.
Note
The maker of the record can only delete the unauthorized record.
5.25.5 Authorizing Readjustment Portfolio
Apart from the maker, someone else must authorize an unauthorized broker deal in the system for it to be processed. To authorize a record:
- Invoke the ‘UH Portfolio Readjustment Summary’ screen from the Browser.
- ‘The status of the transaction in the ‘Authorized’ field. Choose the ‘Unauthorized’ status.
- Click ‘Search’ button to view the records. All the records with the specified details that are pending authorization are retrieved and displayed in the lower portion of the screen.
- Select the Authorization operation from the Action list to authorize the selected record.
5.25.6 Amending Readjustment Portfolio
After a broker deal record is authorized, it can be modified using the Unlock operation from Action list. To make changes to a record after authorization:
- Invoke the ‘UH Portfolio Readjustment Summary’ screen from the Browser.
- Select the status of the transaction that you wish to retrieve for amendment. You can only amend only authorized records.
- Click ‘Search’ button to view the records. All records with the specified details are retrieved and displayed in the lower portion of the screen.
- Double click the record that you want to amend. The ‘UH Portfolio Readjustment Detail’ screen is displayed in the amendment mode. Click the Unlock operation from the Action list to amend the record.
- Amend the necessary information. Click the Save button to save the changes.
5.26 Help Desk Facility
This section contains the following topics:
- Section 5.26.1, "Invoking Help Desk Detail Screen"
- Section 5.26.2, "Initiating and Processing Queries"
5.26.1 Invoking Help Desk Detail Screen
The FLEXCUBE Investor Services system provides the facility of querying and reporting between entities in the system.
To query about any other entity or report information (such as complaints) regarding any entity in the system, use the Help Desk Detail’ screen. You can invoke this screen by typing ‘UTDHLPDS’ in the field at the top right corner of the Application tool bar and clicking on the adjoining arrow button.
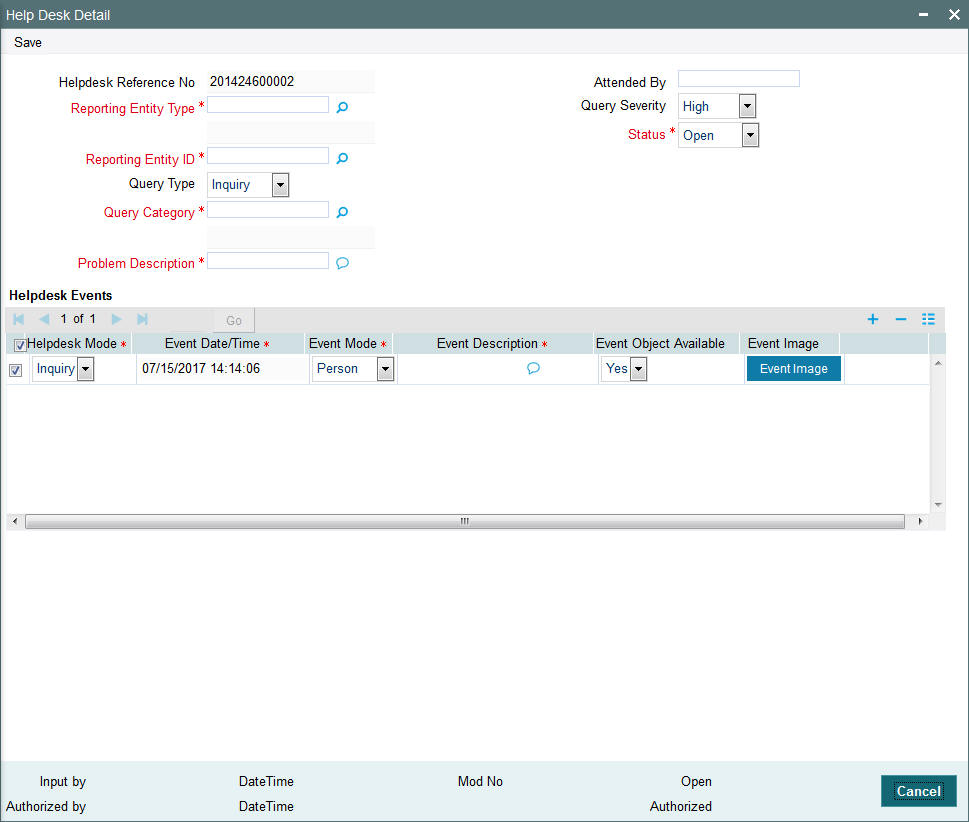
You can use this screen to
- Initiate a query regarding any information requested by any entity that is defined in the system.
- Process or follow-up any such queries
- Edit, view or close any queries
5.26.2 Initiating and Processing Queries
To initiate (or process) a query, in the Help Desk (Detail) screen, specify the following in the Help Details section:
- The type of entity that is initiating the query, in the Reporting Entity Type field. Also select the ID of the reporting entity in the Reporting Entity ID field.
- The type of query, in the Query Type field. The query could be an inquiry, or an action. Select the appropriate option.
- The category of the query, in the Query Category field. Choose the required option from the drop down list.
- The degree of criticality of the query, in the Query Severity field.
- If you are following up a previously entered query, select the status of the query in the Status field.
- The description of the report, or query, in the Problem Description field.
- The name of the person who will attend the query, in the Attended By field.
- Also specify the following in the Helpdesk Events section:
- The mode of the query, or the query type, in the Helpdesk Mode field.
- The mode through which the query is being made, in the Event Mode field.
- The description of the query, in the Event Description field.
- Any image, such as a document or fax, regarding the query or report, in the Event Image field. Click the Scan button to specify this.
- Click the Save button to save your query.
Any follow up or processing of the query can likewise be entered in a similar manner, as described above.
To add a new row to the Helpdesk Events grid, choose the Add button.
Helpdesk Reference Number
Display Only
Every query you initiate in the system is assigned a unique reference number by the system. If you are entering a new query in this screen, this field is empty and locked, and when you specify all the information that is mandatory for initiating a query, the reference number is generated by the system when you Save the information.
If you have retrieved a query for viewing or processing, the reference number of the retrieved query is displayed here and it cannot be altered.
Attended by
Alphanumeric, Optional
Specify the name of the person who is assigned to attend to the details of the query.
Reporting Entity Type
Alphanumeric, Mandatory
Specify the type of entity that is initiating the query. Choose from the drop down list.
Query Severity
Alphanumeric, Mandatory
Specify the criticality of the query, by selecting it from the drop down list. This could be one of the following: Low, Moderate or High.
Reporting Entity ID
Alphanumeric, Mandatory
Specify the ID of the entity that is initiating the query.
Status
Alphanumeric, Mandatory
When you are initiating a new query, this field is locked and has a default value, “Open”, signifying that the query is yet to be processed. Subsequently, when you retrieve the record of a query in this screen, and edit the same, you can update the status of the query by making the appropriate selection in this field. A query can be open, closed or being followed up. Accordingly, choose the desired option from the drop down list.
Query Type
Alphanumeric, Mandatory
Specify the type of query that is being initiated, by selecting it from the drop down list. This could be one of the following: Inquiry or Complaint.
Query Category
Alphanumeric, Mandatory
Specify the subject of the query, by selecting it from the drop down list.
Problem Description
255 Characters Maximum, Alphanumeric, Optional
Narrate the problem, if any, or the statement of the query, in a few words.
Helpdesk Events Section
You must specify the details of the modes in which any query is initiated or followed up, in this section.
Helpdesk Mode
For new queries, the mode specified here must be Inquiry. When you are capturing details of action taken or following up a query, the mode specified here could be Action or Inquiry, as is applicable.
Event Date / Time
The time at which the query/follow up action was received is displayed here.
Event Mode
Specify the mode through which the query / follow up action was received.
Event Description
Give a brief description, if any, about how the query / follow up action was received.
Event Image
If the details of the query / follow up action is contained in a document, specify the path to the same here.
Event Object Available
Indicate from the drop-down list if the event object is available or not.
5.27 Help Desk Summary
This section contains the following topics:
- Section 5.27.1, "Retrieving a Query Record"
- Section 5.27.2, "Editing a Query Record"
- Section 5.27.3, "Viewing a Query Record"
- Section 5.27.4, "Deleting a Query Record"
- Section 5.27.5, "Authorizing Query Record"
- Section 5.27.6, "Amending a Query Record"
- Section 5.27.7, "Authorizing a Query Record"
5.27.1 Retrieving a Query Record
To view or edit a helpdesk query, use the ‘Help Desk Summary’ screen. You can invoke this screen by typing ‘UTSHLPDS’ in the field at the top right corner of the Application tool bar and clicking on the adjoining arrow button.
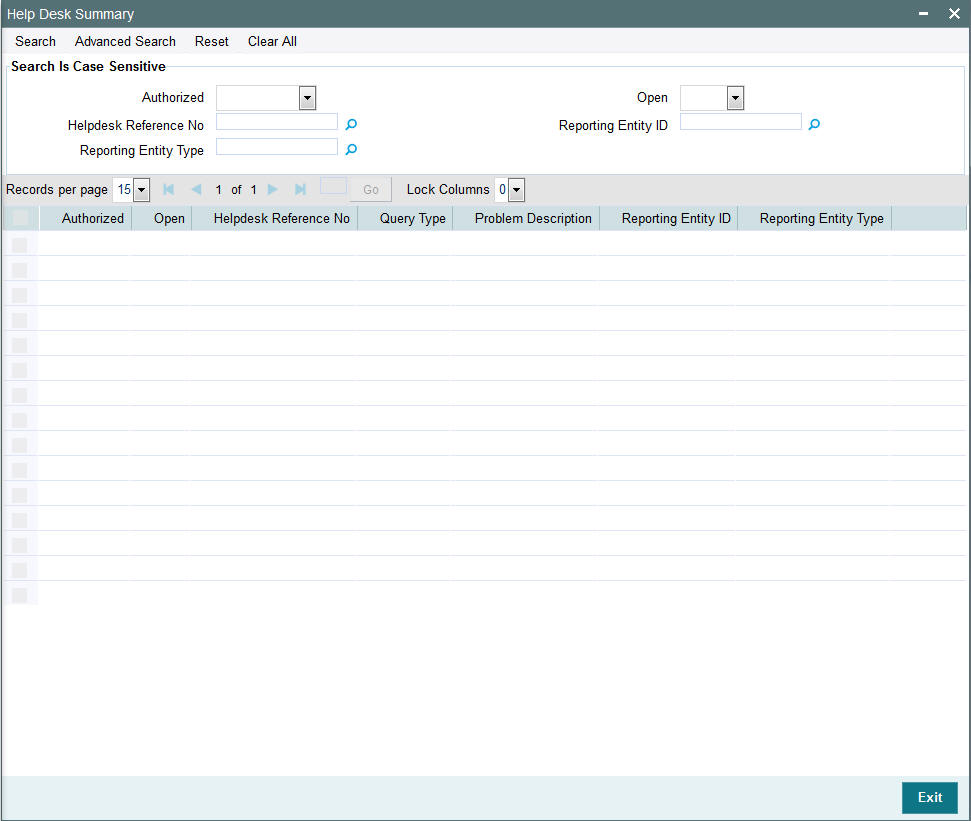
You can retrieve a previously entered query record in the Help Desk Summary screen, as follows:
- In the browser, select the Help Desk Summary from the Transaction menu category of the Agency Branch module:
- The status of the transaction in the Authorized field. If you choose the “Blank Space” option, then all the transactions that involve the specified unit holder are retrieved.
- The status of the Transaction in the Open field. If you choose the “Blank Space” option, then all the transactions that involve the specified unit holder are retrieved.
- The Helpdesk Reference Number
After Consolidation Transaction are entered into the system, you can perform any of the following operations:
- Edit or delete them, provided they are still unauthorized.
- Retrieve and view them.
- Have them authorized by another user.
5.27.2 Editing a Query Record
You can modify the details of a Help Desk record that you have already entered into the system, provided it has not been subsequently authorized. You can perform this operation as follows:
- In the main menu, invoke the Transaction menu. Select Help Desk, choose the Summary option. The Help Desk Summary screen is opened.
- In the Authorized field, select the status of the adjustment transaction that you want to retrieve for modification. You can only modify records of transactions that are unauthorized. Accordingly, choose the Unauthorized option from the drop down list.
- To retrieve the adjustment transaction that is to be modified, specify any or all of the details of the transaction in the corresponding fields on the screen. All unauthorized transactions with the specified details are retrieved and displayed in the lower portion of the screen.
- Select the adjustment transaction type that you want to modify in the list of displayed transactions, in the lower portion of the screen
- The Help Desk Detail screen is opened by double clicking on the selected row, with the selected transaction displayed.
- To modify the record you can select the Unlock operation form the drop down Actions List
- You can modify the required records for an unauthorized transaction.
- Accordingly, modify the necessary information, and click the Save button to save your changes.
- The Help Desk Detail screen is closed and the changes made are reflected in the Help Desk Summary screen.
5.27.3 Viewing a Query Record
To view a Help Desk record that you have previously entered, you must retrieve the same in the Help Desk Summary screen, as follows:
- From the main menu, invoke the Transaction menu. Select Help Desk, and choose the Summary option. The Help Desk Summary screen is opened.
- In the Authorization Status field, select the status of the Consolidation Transaction that you want to retrieve for viewing. You can view records of transactions that are:
- Unauthorized
- Authorized
To retrieve the Help Desk record that is to be viewed, specify any or all of the details of the transaction in the corresponding fields on the screen, and click
All transactions with the specified details are retrieved and displayed in the lower portion of the screen.
Select the Help Desk record that you want to view in the list of displayed transactions, in the lower portion of the screen.
The Help Desk Detail screen is opened by double clicking the selected record, with the selected record displayed in view mode.
5.27.4 Deleting a Query Record
You can delete only unauthorized Help Desk record in the system.
To delete a Help Desk record that you have previously entered, you must retrieve the same in the Help Desk Summary screen, as follows:
- From the main menu, invoke the Transaction Input menu. Select Help Desk and choose the Summary option. The Help Desk Summary screen is opened.
- In the Authorized field, select the status of the Help Desk that you want to retrieve for deletion. You can only delete records of transactions that are unauthorized. Accordingly, choose the Unauthorized option from the drop down list.
- To retrieve the Help Desk that is to be deleted, specify any or all of the details of the transaction in the corresponding fields on the screen, and click 'Search'. All Help Desk records with the specified details are retrieved and displayed in the lower portion of the screen.
- Select the Help Desk that you want to delete in the list of displayed transactions, in the lower portion of the screen.
- The Help Desk Detail screen is opened by double clicking on the selected row in view mode, with the selected Help Desk record displayed.
- Select Delete operation from the Action list. The system prompts you to confirm the deletion, and the record is deleted physically from the system database.
5.27.5 Authorizing Query Record
An unauthorized record must be authorized in the system for it to be processed. To authorize a record:
- Invoke the Help Desk Summary screen from the Browser.
- Select the status of the record that you want to retrieve for authorization. Typically, choose the Unauthorized option.
- Specify any or all of the details of the record in the corresponding fields on the screen. Click 'Search'. All transactions with the specified details that are pending authorization are retrieved and displayed in the lower portion of the screen.
- Double click the transaction that you wish to authorize. The Help Desk Detail screen is displayed. Select Authorize operation from Action.
- When the checker authorizes a transaction, details of validations, if any, that were overridden by the maker of the transaction during the Save operation, are displayed. If any of these overrides results in an error, the checker must reject the transaction.
5.27.6 Amending a Query Record
Authorization of amended transactions can only be done from Fund Manager Module and Agency branch Module.
Select the status of the Help Desk record that you wish to retrieve for amendment. You can only amend records of transactions that are authorized.
Specify any or all of the details of the Help Desk record in the corresponding fields on the screen. All transactions with the specified details are retrieved and displayed in the lower portion of the screen.
Double click the adjustment transaction that you want to amend. The Help Desk. Click the Unlock operation from the Action list to amend the transaction.
Amend the necessary information. Click 'OK' to save your changes. Only escalation details can be changed during an amend operation.
5.27.7 Authorizing a Query Record
An amended Help Desk record must be authorized for the amendment to be made effective in the system. The authorization of amended records can only be done from Fund Manager Module and Agency branch Module.
The process of authorization is subsequently the same as that for normal transactions.
5.28 Sending and Receiving Messages
This section contains the following topics:
- Section 5.28.1, "Invoking Send/ Receive Messages Screen"
- Section 5.28.2, "Send Messages Tab"
- Section 5.28.3, "Receive Messages Tab"
5.28.1 Invoking Send/ Receive Messages Screen
Messages can be relayed to and fro between modules in the system. Use the ‘Send / Receive Messages’ screen to do this. You can invoke this screen by typing ‘UTDSEREM’ in the field at the top right corner of the Application tool bar and clicking on the adjoining arrow button.

5.28.2 Send Messages Tab
Agent Code
Specify the Agent Code of the module to which you are sending the message
Branch Code
Specify the branch Code of the module to which you are sending the message,
Message
Enter the message that has to be sent.
To send a message, specify the Agent and Branch Code of the module to which you are sending the message, and key in the text of the message in the Message field box. Then click the Send button.
To receive a message, specify the Agent and Branch Code of the module from which you are receiving the message, and click the Receive button. The text of the incoming message is displayed in the Message field box.
5.28.3 Receive Messages Tab

Agent
This displays the entity from which the message has come. For outgoing messages, it will display the current entity code.
Branch Name
This displays the bank name to which the agent belongs.
Timestamp
This displays the time when the message had come.
User ID
This displays the User ID of the person from whom the message has come from.
Message
The text of the message that has been received is displayed here.
Delete
Click on Delete Message button to delete the message.
5.29 RTA Transfer Details
This section contains the following topics:
- Section 5.29.1, "Invoking RTA Transfer Details"
- Section 5.29.2, "Transfers IN Details Tab"
- Section 5.29.3, "Transfer Out Details Tab"
- Section 5.29.4, "Channel Transfers Details Tab"
5.29.1 Invoking RTA Transfer Details
The RTA Transfers Detail In and Out screen captures the details that are present in the RTA incoming interface related data store. In the case of a transfer out transaction, the transaction is generated and needs to be confirmed by the bank. To invoke this screen, click on the main menu item Maintenance and then click on Details under the sub-menu item RTA Transfer Detail.
You can also invoke this screen by typing ‘UTDRTAIO’ in the field at the top right corner of the Application tool bar and clicking on the adjoining arrow button.
![]()
The following details can be captured here:
RTA Transfer Detail
Reference Number:
16 Character Maximum, Alphanumeric, Mandatory
Specify a reference number for the account. This will be deemed as a unique alphanumeric identifier for the account. It could be the serial number that is given on the application form through which the investor has invested in the AMC. It could also be any alphanumeric value given by the investor, to identify the account.
Transaction Type
Mandatory
Specify the type of transfer, the options being
- Transfer In
- Transfer Out
- Channel Transfer
CIF
12 Characters Maximum, Alphanumeric, Mandatory
Specify the CIF number of the customer for whom you are creating a transferring the units.
RTA/Channel
10 Character Maximum, Alphanumeric, Mandatory
Select the RTA from the drop down list.
Unitholder ID
12 Characters Maximum, Alphanumeric, Mandatory
It may be defaulted based on the selection from Unit holders for CIF; else you need to specify the unit holder ID here.
Name
Specify the name of the RTA/Channel here.
5.29.2 Transfers IN Details Tab
![]()
AMC ID
12 Characters Maximum, Alphanumeric, Mandatory
Select the code of the AMC in whose funds the investor wishes to invest, from the list provided. You capture this information for the purpose of identifying the AMC to which the unit holder belongs, and in whose database the unit holder account will reside.
Fund ID
Alphanumeric, Mandatory
Select the fund id into which the unit holder wishes to invest.
Folio No/Check Digit
Alphanumeric, Mandatory
Specify the folio for the AMC if the unit holder does not have prior records of transactions with the AMC specified, else is it defaulted depending on the unit holder ID and the AMC ID.
Transaction Date
The default date here would be the application date; however you will be able to edit it.
Amount
Numeric, Mandatory
This is arrived at by multiplying the number of units and the cost price of each.
Units
Specify the number of units the unit holder wishes to buy.
Cost Price
Specify the cost of each unit.
Note
Conditions required to be fulfilled for validations for transfer in transactions
- Transfer in is not allowed in case the unit holder does not have folio for the given AMC and transaction is subsequent.
- Back dated and future dated transactions are not allowed
- If cross branching is 'No', unit holder should belong to the logged in branch
Registrar should be mapped to the fund selected
5.29.3 Transfer Out Details Tab
Click on the Transfer Out tab to invoke the following screen:
![]()
Fund ID
Display
The fund in which the transaction was put through is displayed here
Balance Units
Display
The unit balance of your holding is displayed here.
NAV
Display
Display the current NAV of your holdings.
Market Value
Display
This displays the market value of all your holdings which is derived at by multiplying the Balance Units with the current NAV.
Select?
The box needs to be checked against the fields which are to be processed.
Note
Conditions required to be fulfilled for validations for transfer out transactions
- Fund price needs to be available
- Sufficient balance is required in the unit holders fund
- Transfer out transaction amount should be a multiple of step amount as defined in Fund Rule.
5.29.4 Channel Transfers Details Tab
Click on the Channel Transfers Details tab to invoke the following screen:
![]()
FCIS provides the facility to transfer an investor along with all the transactions done prior to the transfer to the new channel. The following transfers will be allowed under Channel Transfer:
- Channel to Channel
- Channel to Non channel
Channel transfers cannot be triggered from non channel agency branches.
Transfer Branch Code
Specify the branch of the agent to whom the investor is being transferred.
Branch Name
Upon selection of the branch code, the associated branch name gets populated.
Broker Code
Select the code of the broker to whom the investor is being transferred.
Broker Name
Upon selection of the broker code, the associated broker name gets populated.
Rule Effective Date
Specify the date from when the unitholder transfer that is currently being set up should become effective.
Remarks
Descriptive text about the transfer can be entered here.
On authorizing the transfer, system will check for the following:
- Any unauthorized transaction exists with previous channel for the specified rule effective date
- Any authorized transaction to be allocated on or greater than the specified rule effective date
- Any allotted transaction to be cleared or settled on or greater than the specified rule effective date
- Any blocked or pledged transaction
If any of the above mentioned checks fail, system will not allow you to save and authorize the transfer. System will also verify if any balance is available in any of the funds involved in the transfer. If not, system will not allow you to save or authorize the transfer. Channel Transfer will be effective on confirmation of the Authorised channel transfer through the RTA Summary screen.
5.30 RTA Transfer Summary
This section contains the following topics:
- Section 5.30.1, "Retrieving RTA Transfer Details"
- Section 5.30.2, "Editing RTA Transfer Details"
- Section 5.30.3, "Viewing RTA Transfer Details"
- Section 5.30.4, "Deleting RTA Transfer Details"
- Section 5.30.5, "Authorizing RTA Transfer Details"
- Section 5.30.6, "Amending RTA Transfer Details"
5.30.1 Retrieving RTA Transfer Details
After you have all the mandatory RTA Transfer (in and out) details you can views the details of the RTA Transfers using the ‘RTA Transfers Summary’ screen. You can invoke this screen by typing ‘UTSRTAIO’ in the field at the top right corner of the Application tool bar and clicking on the adjoining arrow button.
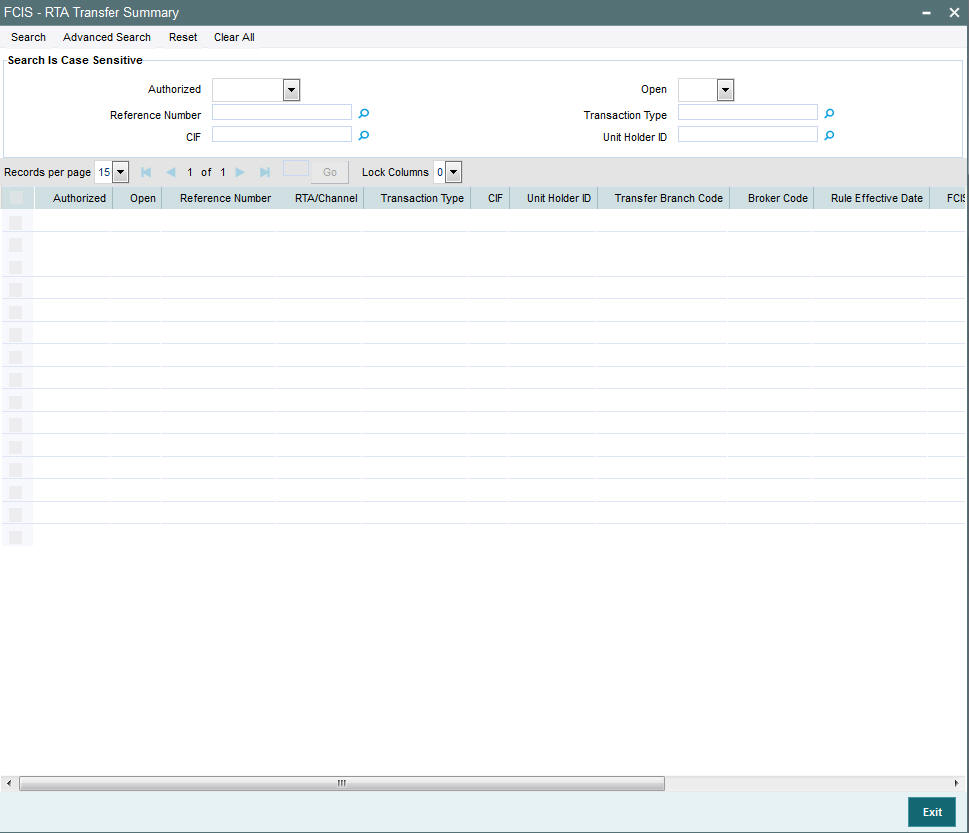
The RTA transfer details maintained must be authorized by another user. You can use the ‘FCIS RTA Transfer Summary’ screen to perform the following operations:
You can retrieve a previously entered RTA transfer details as follows:
Invoke the ‘FCIS RTA Transfer Summary’ screen from the Browser.
Specify any or all of the following details in the screen:
- The status of the transaction in the ‘Authorization Status’ field. If you choose the blank space, then both the authorized and the unauthorized status records will be retrieved for the specified criteria.
- The status of the records in the ‘Record Status’ field. If you choose the blank space, then all the records are retrieved.
- The unit holder ID in the ‘Unit Holder ID’ field. If you choose the blank space, then all the records are retrieved.
- The transaction type in the ‘Transaction Type’ field. If you choose the blank space, then all the records are retrieved
- The reference number in the ‘Reference Number’ field
- The customer information number in the 'CIF Number' field
Click ‘Search’ button to view the records. All records with the specified details are retrieved and displayed in the lower portion of the screen.
5.30.2 Editing RTA Transfer Details
You can modify the details of the RTA transfer details that you have already entered into the system, provided it has not been subsequently authorized. You can perform this operation as follows:
Invoke the ‘FCIS RTA Transfer Summary’ screen from the Browser.
- Specify any or all of the following details in the screen:
- The status of the transaction in the ‘Authorization Status’ field. If you choose the blank space, then both the authorized and the unauthorized status records will be retrieved for the specified criteria.
- The status of the records in the ‘Record Status’ field. If you choose the blank space, then all the records are retrieved.
- The unit holder ID in the ‘Unit Holder ID’ field. If you choose the blank space, then all the records are retrieved.
- The transaction type in the ‘Transaction Type’ field. If you choose the blank space, then all the records are retrieved
- The reference number in the ‘Reference Number’ field
- The customer information number in the 'CIF Number' field
Click ‘Search’ button to view the records. All records with the specified details are retrieved and displayed in the lower portion of the screen.
Double click the record that you want to modify in the list of displayed records. The ‘FCIS RTA Transfer Details’ screen is displayed.
Select Unlock operation from the Action list to modify the record. Modify the necessary information.
Click Save to save your changes. The ‘FCIS RTA Transfer Details’ screen is closed and the changes made are reflected in the ‘FCIS RTA Transfer Summary’ screen.
5.30.3 Viewing RTA Transfer Details
You can modify the details of the RTA transfer details that you have already entered into the system, provided it has not been subsequently authorized. You can perform this operation as follows:
Invoke the ‘FCIS RTA Transfer Summary’ screen from the Browser.
Specify any or all of the following details in the screen:
- The status of the transaction in the ‘Authorization Status’ field. If you choose the blank space, then both the authorized and the unauthorized status records will be retrieved for the specified criteria.
- The status of the records in the ‘Record Status’ field. If you choose the blank space, then all the records are retrieved.
- The unit holder ID in the ‘Unit Holder ID’ field. If you choose the blank space, then all the records are retrieved.
- The transaction type in the ‘Transaction Type’ field. If you choose the blank space, then all the records are retrieved
- The reference number in the ‘Reference Number’ field
- The customer information number in the 'CIF Number' field
Click ‘Search’ button to view the records. All records with the specified details are retrieved and displayed in the lower portion of the screen.
Double click the record that you want to modify in the list of displayed records. The ‘FCIS RTA Transfer Details’ screen is displayed.
5.30.4 Deleting RTA Transfer Details
You can modify the details of the RTA transfer details that you have already entered into the system, provided it has not been subsequently authorized. You can perform this operation as follows:
Invoke the ‘FCIS RTA Transfer Summary’ screen from the Browser.
- Specify any or all of the following details in the screen:
- The status of the transaction in the ‘Authorization Status’ field. If you choose the blank space, then both the authorized and the unauthorized status records will be retrieved for the specified criteria.
- The status of the records in the ‘Record Status’ field. If you choose the blank space, then all the records are retrieved.
- The unit holder ID in the ‘Unit Holder ID’ field. If you choose the blank space, then all the records are retrieved.
- The transaction type in the ‘Transaction Type’ field. If you choose the blank space, then all the records are retrieved
- The reference number in the ‘Reference Number’ field
- The customer information number in the 'CIF Number' field
3. Click ‘Search’ button to view the records. All records with the specified details are retrieved and displayed in the lower portion of the screen.
4. Double click the record that you want to modify in the list of displayed records. The ‘FCIS RTA Transfer Details’ screen is displayed.
5. Select Delete operation from the Action list. The system prompts you to confirm the deletion, and the record is deleted physically from the system database.
Note: The maker of the record can only delete the unauthorized record.
5.30.5 Authorizing RTA Transfer Details
Apart from the maker, someone else must authorize an unauthorized RTA transfer details in the system for it to be processed. To authorize a record:
Invoke the ‘FCIS RTA Transfer Summary’ screen from the Browser.
The status of the transaction in the ‘Authorization Status’ field. Choose the ‘Unauthorized’ status.
Click ‘Search’ button to view the records. All the records with the specified details that are pending authorization are retrieved and displayed in the lower portion of the screen.
Select the Authorization operation from the Action list to authorize the selected record.
5.30.6 Amending RTA Transfer Details
The RTA transfer details can be modified using the Unlock operation from Action list. To make changes to a record:
Invoke the ‘FCIS RTA Transfer Summary’ screen from the Browser.
Select the status of the transaction that you wish to retrieve for amendment. You can only amend only unauthorized records.
Click ‘Search’ button to view the records. All records with the specified details are retrieved and displayed in the lower portion of the scree.
Double click the record that you want to amend. The ‘‘FCIS RTA Transfer Details’ screen is displayed in the amendment mode. Click the Unlock operation from the Action list to amend the record.
Amend the necessary information. Click the Save button to save the changes.
5.31 Consolidation of Portfolios
The flow chart below explains how the RTA interface would handle transfer and consolidation of portfolios.
Transfer with Consolidation Logic:
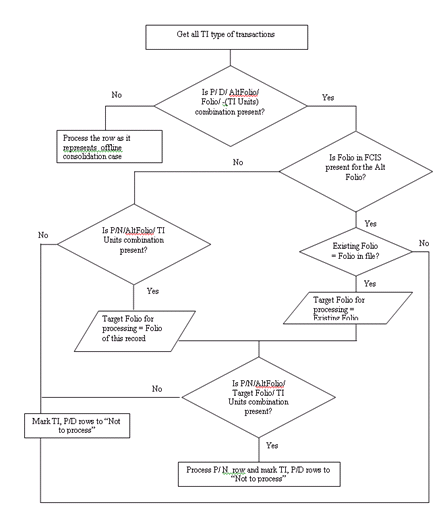
Only Consolidation:
This is a case where the unit holder has invested in an IPO fund of an AMC and later subscribed into another fund of the same AMC. The folio number is allocated to the user after subscription confirmation, the RTA however allocates a new folio for the IPO subscription. In this case a consolidation of folio is required.
Note
No Transfer In type of record would be available in this case as it is just a consolidation of the folio numbers.
The flow chart below illustrates the above logic
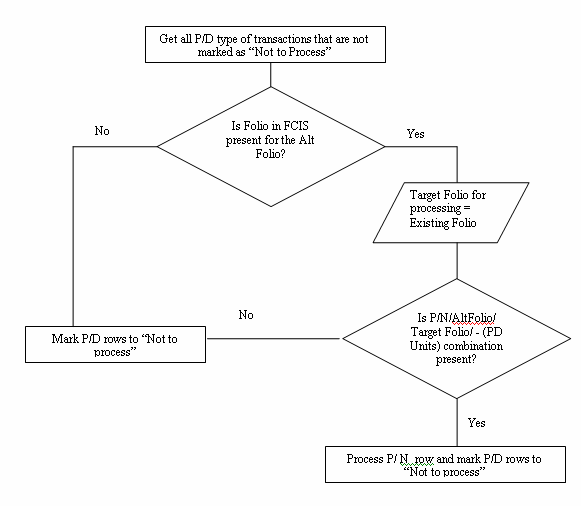
5.32 Batch Update of Transaction Date
This section contains the following topic:
5.32.1 Invoking Batch Update of Transaction Date Screen
A pre EOD check is done to if there are any future dated transactions for which the transaction date falls on a holiday. If so, you will not be allowed to proceed with the EOD process.
Use the ‘Batch Update Of Transaction Date’ screen to modify the Transaction date for different transactions for the fund.
You can invoke this screen by typing ‘UTDBUTD’ in the field at the top right corner of the Application tool bar and clicking on the adjoining arrow button.

Fund ID
Numeric, Mandatory
Enter the fund id for which the transaction date needs to be modified.
ISIN Code
Alphanumeric; Optional
Select the ISIN Code of the fund in which the transaction was put through, from the options provided. If you specify the ISIN Code of a fund, the ID of the fund is displayed in the Fund field.
Transaction type
Drop down, Mandatory
Select the transaction type from the drop down list for which the modification will be allowed. The default option will be “All”.
Current transaction date
Date, Mandatory
Enter the transaction date that falls on a Holiday
Modified Transaction Date
Date; Mandatory
Enter the new transaction date to which the transactions is to be updated. This transaction date is defaulted to the next working day of the current transaction date. You are allowed to modify this date.
The system will freshly calculate the price date for these transactions in case for specific fund price dates.
Operation
Specify the operation for which the update has been enabled
5.33 Tracking Cheques
This section contains the following topic:
5.33.1 Invoking Cheque Tracking Summary Screen
You can track the status of checks issued for dividend payments as well as redemption, incentive payments and entity commission payments in the system.
You can also view details of cheques uploaded into the system for payment tracking purposes. A dividend cheque will be considered as expired if the system date is greater than the cheque date or the sum cheque reissue date and expiry period as specified in PARAMS maintenance. Cheque status tracking is allowed for only those type of transaction maintained in PARAMS maintenance
Use the ‘Cheque Tracking Summary’ screen to do this. You can invoke this screen by typing ‘UTSCHQTR’ in the field at the top right corner of the Application tool bar and clicking on the adjoining arrow button.
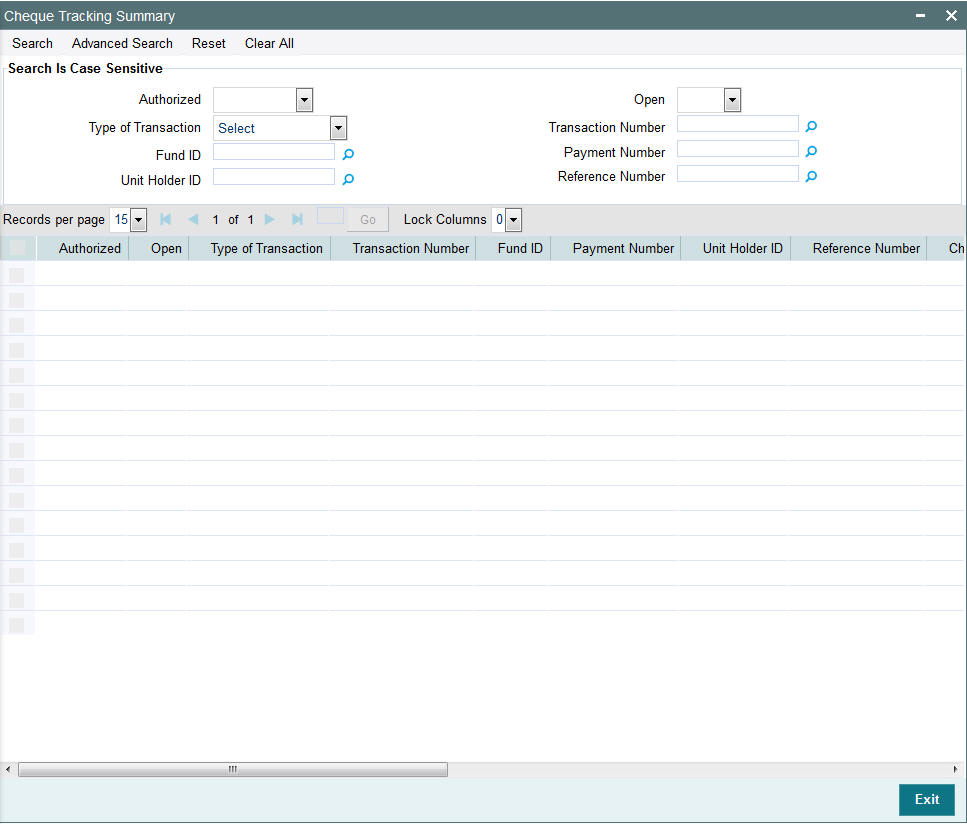
Specify the following information in this screen to view or track the status of checks:
- The ID of the fund, for which the dividend was declared, or the transactions that resulted in a redemption, incentive payment or entity commission payment were put through. You can also specify the ISIN Code of the fund.
- The ID of the unitholder involved in the transaction.
- The bank to which the payment is directed, from which the unit holder will cash the payment instrument
- The branch of the selected bank where the payment is drawn
- In case of Redemption payments, the dates of the transaction, in the ‘Transaction From Date’ and ‘Transaction To Date’ fields.
Click the Refresh button, in the Action list. The details of the check are displayed in the grid portion of the screen
Type of Transaction
Alphanumeric, Mandatory
Specify the type of transaction for which you wish to track the cheque. The options are:
- Dividend
- Redemption
- Bonus
- Entity Commission
Transaction Number
Specify the transaction number from the adjoining option list.
Payment Number
Specify the payment number from the adjoining option list.
Reference Number
Specify the reference number from the adjoining option list.
Fund ID
Mandatory
Specify the ID of the fund in which the transaction was put through.
UnitHolder ID
Mandatory
Select the ID of the unitholder by clicking on the Advanced Summary button. This invokes the Find Options where you can search for the specified UH that you want to select.
Click ‘Search’ button. In the ‘New’ mode check dividend payments which are not cleared are displayed in the grid below.
The following additional fields are displayed:
Payment Number
Display
All the related payment numbers that satisfy the search criteria are available in the drop-down list.
Transaction Number
Display
If dividend tracking is done at transaction level, then all the related transaction numbers are displayed in the drop-down list.
Besides the above, the following fields are displayed :
- Reference number
- Cheque amount
- Cheque currency
- Cheque date
- Cheque number
- Drawee bank
- Drawee branch
- Cheque status
- Sys reference number
- MICR code
Duplicate
Optional
Check this option to indicate that the cheque must be reissued again. This field is applicable only for ‘Amend’ mode.
If you check this option, the following two additional fields will be displayed on the screen:
- New Cheque Number: Enter the number of the re-issued cheque.
- New Issue Date: Enter the new date of the re-issued cheque.
The status of the existing cheque will be updated as Invalid, Lost, Cancelled, Stopped, Bounced or Duplicate, as specified by you and mark the status of new record as ACTIVE.
Click ‘Ok’ button. The system will fetch all the records that satisfy the search criteria. Select 'New' from the Actions menu in the Application tool bar or click new icon. To invoke this screen, type UTDCHQTR in the field at the top right corner of the Application tool bar and clicking on the adjoining arrow button. The following screen is displayed:
![]()
The following details as specified in the Cheque Tracking Summary screen are displayed:
- Type of Transaction
- Reference Number
- Fund ID
- Transaction Number
- Payment Number
Drawee Bank
Alphanumeric, Mandatory
Select the name of the bank where the cheque is drawn, from the drop down list.
Drawee Branch
Alphanumeric, Mandatory
Select the branch of the selected bank where the cheque is drawn.
Cheque Number
Specify the number of the cheque.
Cheque Date
Date, (dd-mm-yyyy) Mandatory
Specify the date on which the cheque is drawn.
Cheque Currency
Display
The date on which the cheque is drawn is displayed here.
Cheque Amount
Display
The amount for which the cheque is drawn is displayed here.
Cheque Status
Indicate the status of the Cheque. In the New mode, only ‘Active’ status will be allowed.
MICR Code
Alphanumeric, Mandatory
Enter the MICR code of the cheque.
In the ‘Amend’ mode, system will display all Cheque Dividend Payments, which are not cleared along with details like Cheque number and Cheque Date. If you want to re-issue a cheque, check the option ‘Duplicate’. In such cases, you need to specify the new cheque number, cheque date and status of the previous cheque must be specified. For dividend cheques, date can not be less than the dividend payment date. Once a status of Cheque record is marked as ‘CLEARED’ or ‘REINVESTMENT’, you cannot amend this record. To invoke this screen type UTSCHQTR in the field at the top right corner of the Application tool bar and clicking on the adjoining arrow button.
In the ‘Edit’ mode, you can edit the existing check number and check date only if the record selected for edit is unauthorized. Once a status of Cheque record is marked as ‘CLEARED’ or ‘REINVESTMENT’, you cannot edit this record.
5.33.1.1 Reinvestment Processing for Expired Cheques
The following Unit holder - Fund dividend payment records will be considered for processing reinvestments:
- The option ‘Auto Reinvestment for Unclaimed cheque’ is checked
- Partial or complete Unit holder dividend payment has been done by dividend Cheques.
- Dividend Payment Status is A – ACTIVE
- Cheque Date and the Cheque Expiry Period is less than or equal to application date.
- The option ‘Auto Reinvestment for Unclaimed cheque with Zero Balance’ is checked Or the option ‘Auto Reinvestment for Unclaimed cheque with Zero Balance’ is unchecked and Unit holder has a balance in the underlying fund.
If all the above mentioned conditions are satisfied, system initiates a reinvestment transaction for the unit holder – Fund combination.
- If Cheque expiry date is a holiday then system picks up this record on the next business day for reinvestment processing.
- Transaction date for this reinvestment transaction will be defaulted with the application date.
- The transaction will be identified with the sub type U – Unclaimed Dividend Reinvestment.
- System will update the check status in ConsolidatedChequeTbl as R – Reinvestment for Unclaimed Cheque once the reinvestment is processed.
- System will not process reinvestments for unclaimed unit holder – dividend payments, where Fund has been closed on or before the check expiry date.