Verify that the SAN host communicates with the Oracle FS System LUNs after installing the FSPM software.
Note: In this section, all references to GUI screens refer to the layout of the Oracle FS System Manager (GUI) version 6.1. Other GUI versions are organized differently, but all versions offer equivalent functionality. Review the Administrator’s Guide for details on how to access the features in older versions of the GUI.
To use the GUI to validate the LUN configuration, perform these steps:
- In the GUI, navigate to .
- Verify that the individual entries for the host ports are grouped under the host name.Examples of before and after FSPM installation are shown below:Figure 1 Example of Host Ports grouped under Unassociated Host Name before FSPM installation
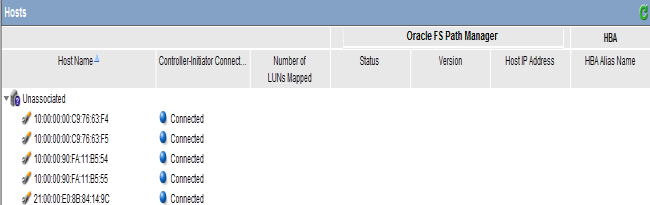 Figure 2 Example of Host Ports grouped under Host Name after FSPM installation
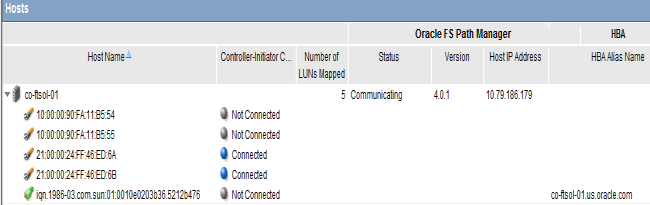 Note:
Note:The following Oracle FS Path Manager Status, Controller-Initiator Connectivity messages can be displayed on the Hosts page:
- FSPM Status
- Communicating: The host control path is logged in to the Pilot. Note: Communicating status is required for the FSPM control path to report path status and use the Oracle FS System to collect FSPM diagnostic logs.
- Not Registered: A control path from an FSPM with this name has never logged in to the Pilot.
- Not Communicating: The FSPM host control path was logged in to the Pilot but is not now logged in to the Pilot.
- Controller-Initiator Connectivity
- Connected: The host SAN connection is logged in to a Controller on the Oracle FS System.
- Not connected: The host SAN connection is not logged in to a Controller on the Oracle FS System.
- Create new LUNs on the Oracle FS System for this host and set up mappings of LUNs to the new host entry.Note: Windows does not recognize any LUN number over 254. If you configure a LUN for the host using a number greater than LUN 254, the LUN is not be seen by Windows.
- Verify that the LUNs appear on the host. If the LUNs do not appear, select Rescan Disks in the Windows Disk Manager.
Result:The LUNs should become available as drives on the host. If the drives do not appear, restart the host. - Verify the FSPM version you installed. Select the name of the new host and the select to view the version information. The operating system and FSPM versions shown in the illustration can differ from your configuration.Figure 3 Detailed FSPM information
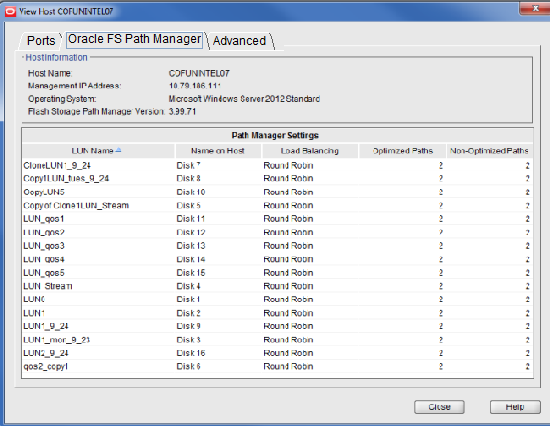
- Review the LUN names on the Oracle FS System under the LUN Name column.The column titled LUN Name on Host shows the name that Windows has allocated to the LUN device on the host.Note: After you map a LUN to the host, it can take two or three minutes for FSPM to make the LUN accessible at the host and report its name and other information to the GUI. You may need to refresh the GUI screen to see the information when it is reported as there can be a delay between the time the configuration change was made and when the change is displayed on the GUI.
- Review the load balancing algorithm being used for each LUN to determine if you need to change the current load balancing setting.
- To change load balancing, complete these steps. From select the host that is mapped to theLUN
- Select and change the load balancing setting. You can also change the load balancing from Windows. Regardless of where you change the load balancing setting, both Windows and Oracle FS System use the same setting.
- Review the numbers of optimized and non-optimized paths currently reported by FSPM under the Optimized Paths and Non-Optimized Paths.Figure 4 Host-LUN Mapping view

- Select the and verify that the host and LUN connections are as expected.
Result:The Host-LUN Mapping tab should display the LUNs that are mapped to the host and information about the LUN. Verify that the following information is displayed:- Each LUN name as allocated by Windows on the host.
- The LUN numbers used to make the LUN visible to the host
- An indication whether or not each SAN port on the host has a connection to at least one port on the Controller
- Format and set up the drives for use in Windows.