- Prerequisites:
Before handling a component, touch a grounded surface to discharge any static electricity.
Attach an electrostatic discharge (ESD) wrist strap to your wrist, and ensure that you have an ESD mat. Stand on the ESD mat while replacing components
Caution
Do not connect the PDUs to any external power source until all components and internal cables have been installed. Caution
Turn off all the PDUs or do not connect component power cords to PDUs until all components have been installed and all internal private management interface (PMI) and private interconnect (PI) cables have been connected. Caution
Work with a partner or use a mechanical lift for assistance. The Pilot weighs approximately
39.9 lbs (18.1 kg). Two people are required to carry the
chassis.Caution
Deploy any rack anti-tilt mechanisms before installing the Pilot into the rack to prevent the rack from tipping over during component installation.Caution
Always load equipment into a rack from the bottom up so that the rack will not become top-heavy and tip over.Caution
Slide rail mounted components are not to be used as a shelf or a work space.- Push the slide rails as far as possible into the slide rail assemblies in the rack.
- Using two people, one at each side of the Pilot, position the Pilot so that the back ends of the mounting brackets are aligned with the slide rail assemblies that are mounted in the rack.
- Insert the mounting brackets into the slide rails, and then push the Pilot into the rack until the mounting brackets encounter the slide rail stops (approximately 30 cm, or 12 inches).Figure 1 Pilot with mounting brackets inserted into the slide rails
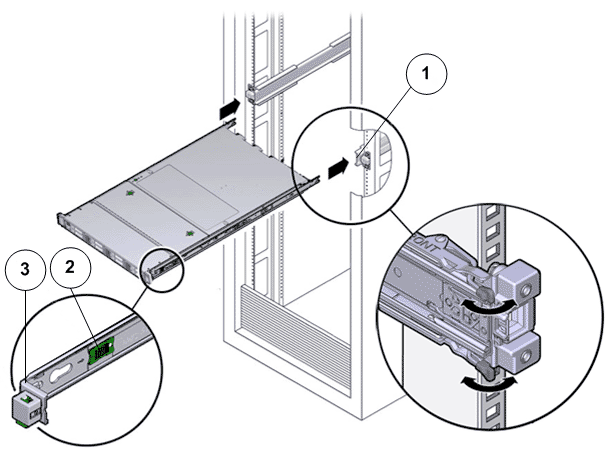
- Legend
1 Mounting brackets inserted into the slide rail 2 Slide rail release button 3 Slide rail lock
- Simultaneously push and hold the slide rail release buttons on each mounting bracket while you push the Pilot into the rack. Continue pushing the Pilot into the rack until the slide rail locks (on the front of the mounting brackets) engage the slide rail assemblies until you hear an audible click.Figure 2 Pilot inserted into the rack
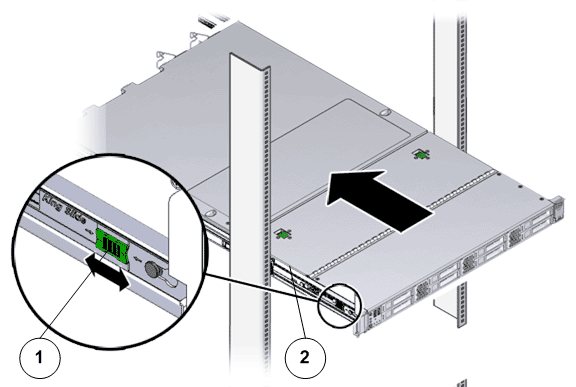
- Legend
1 Slide rail button 2 Mounting bracket
CautionVerify that the Pilot is securely mounted in the rack and that the slide rail locks are engaged with the mounting brackets before you install the cable management arm.