2 Setting Up the Process Integration for Revenue Management
This chapter describes how to set up the process integration for revenue management and lists the prerequisites. It discusses how to perform setup tasks, configure and generate general ledger (G/L) data in Oracle Communications Billing and Revenue Management (BRM), and how to transform the G/L data.
Prerequisites
Complete these tasks before you set up the process integration for revenue management:
-
Install Oracle Data Integrator (ODI).
-
Install Oracle Communications BRM Integration Pack for Oracle E-Business Suite: Revenue Accounting (the Revenue Accounting pre-built integration).
-
Install BRM and complete the initial setup tasks. See Oracle Communications Billing and Revenue Management Installation Guide for more information about installation and initial setup.
-
Install Oracle E-Business Suite and Oracle General Ledger Release 11.5.10 CU2 or 12.1.1 and complete its initial setup tasks. See Oracle General Ledger Implementation Guide for more information about initial setup.
-
Install Oracle E-Business Suite General Ledger Release 11.5.10 CU2 Seed Patch 6012471 or Oracle E-Business Suite General Ledger Release 12.1.1 Seed Patch 8344349. If the patch is absent or not available, make the following changes manually in Oracle General Ledger:
-
Add the Portal G/L Journal Source.
-
Add the following journal categories:
-
Unbilled unearned
-
Unbilled earned
-
Billed unearned
-
Billed earned
-
Prior billed earned
-
Billed
-
Unbilled
-
-
Note:
If you are applying Seed Patch to Oracle E-Business Suite General Ledger Release 12.1.1, manually change the journal category Prior Billed earned to Prior billed earned in Oracle General Ledger.Journal categories are case-sensitive and must match the BRM configuration.
For more information about installing and setting up the Revenue Accounting pre-built integration and required software, see Oracle Application Integration Architecture Installation and Upgrade Guide for Pre-Built Integrations.
Setting Up Oracle General Ledger for the Process Integration for Revenue Management
To set up Oracle General Ledger to support the process integration for revenue management:
-
Define your set of books (SOB) with Oracle E-Business Suite.
-
Load the journal entry source seed data.
You can also specify whether you want Oracle General Ledger to store journal reference information from BRM for a particular source.
Seed data is provided using a patch. See "Prerequisites" for the patch number or manual steps if the seed patch is not available.
-
Load the journal entry categories seed data.
Seed data is provided using a patch. See "Prerequisites" for the patch number or manual steps if the seed patch is not available.
-
If you want Journal Import to assign sequential numbers to your journal entries, enable sequential numbering, specifying Automatic as both your numbering method and document generation method.
-
Run the Optimizer program to create indexes for your account segments.
-
Define the concurrent program controls to improve the performance of Journal Import by setting the amount of disk space and memory it uses.
The Journal Import program requires approximately 1.4 megabytes of memory to run. You can also specify whether to save your Journal Import data each time you run Journal Import. Journal Import runs faster if you do not archive your data.
-
Disable dynamic insertion. Journal Import runs much faster when it is not required to create new account combinations dynamically.
-
Set the status of the accounting period (for which the integration is running) to either Open or Future Enterable.
Setting Up the Process Integration for Revenue Management
To set up the process integration for revenue management:
-
Configure Oracle General Ledger and its Accounting Flexfield.
-
Map and configure Oracle General Ledger accounts into BRM.
-
Generate G/L data in BRM.
Rerun reports if the system identifies errors. The system moves G/L data to the directory that you specified in BRM and ODI.
-
Use ODI to pick up the G/L data and load the Oracle General Ledger GL_INTERFACE table with the accounting transactions.
Handle re-runs. If an error occurs, you must fix the source system and export the XML files again.
-
Import the journals into Oracle General Ledger.
Manually or automatically import the reports into journal entries.
Optionally, you can delete the interface data if the system identifies an error before importing the interface data.
Use Oracle General Ledger to review and post or delete. With deletion, the system deletes the data from both the interface tables and the journals.
-
Post journals to Oracle General Ledger accounts.
Manually or automatically post the imported journal entries into the corresponding Oracle General Ledger accounts.
Optionally, delete the journal entries if the system identifies an error after the batch is imported but before it is posted.
Optionally, reverse the journal if the system identifies an error after posting.
-
Reconcile or review journal entries.
Review journal entries and, if errors occurred, create the appropriate adjustment entries.
Setting Up BRM for the Process Integration for Revenue Management
To set up BRM to support the process integration for revenue management:
-
Configure the Oracle General Ledger export configuration file.
In addition to the standard configuration parameters, you must also specify the Source System Identifier, which is the value of the SOB Id (with Oracle E-Business Suite R11.5.10 CU2) or Ledger Id (with Oracle E-Business Suite R12.1.1) mapping in the integration layer configuration file.
-
Customize the policy opcode PCM_OP_GL_POL_EXPORT_GL to map the BRM G/L account names to the appropriate Oracle General Ledger accounts.
Mapping is achieved by modifying the relevant fields in the generated ledger report object. The Oracle General Ledger accounts must be the concatenation of the individual Oracle General Ledger segment values separated by the V segment separator string. This segment separator string must be the same as the one configured in the integration layer. For example, the system can map an internal BRM G/L account name such as west.california to an Oracle General Ledger account XXX/YYY/ZZZ if the three Oracle General Ledger segments have values of XXX, YYY, ZZZ, and the segment separator.
Note:
Customizing the opcode is only required if the BRM G/L account names are different from the Oracle General Ledger account names (including the segment separator). If the BRM and Oracle General Ledger account names are the same, then you are not required to transform the names using the policy opcode. Also, the segment separator string is not required to be V, but both the policy opcode and the integration layer configuration must use the same separator string.
See Oracle Communications Billing and Revenue Management Collecting General Ledger Data for more information.
Setting Up the Integration Layer
For the integration layer, you must configure the parameters in the AIAConfigurationProperties.xml file, including the mapping of the Source System Identifier to the SOB Id (with Oracle E-Business Suite R11.5.10 CU2) or Ledger Id (with Oracle E-Business Suite R12.1.1).
By just using the Gross, Net, or certain revenue account types when the Oracle General Ledger account configuration contains --N/A-- for the output values, list the account types that the integration layer must ignore in order not to get an error.
For more information about configuring ODI, see the Oracle Fusion Middleware Installation and Upgrade Guide for Oracle Application Integration Architecture Foundation Pack.
Configuring and Generating G/L Data in BRM
This section discusses these topics:
Configuring Data in BRM
Before running any G/L data, you must set up BRM to:
-
List all BRM G/L accounts.
-
Create G/L IDs that assign G/L codes to BRM balance impacts.
-
Configure the summarization of BRM G/L accounts into the Oracle General Ledger accounts.
You can map BRM revenue into Oracle General Ledger accounts in two ways:
-
Configure the BRM G/L accounts independently of the Oracle General Ledger accounts, and map the Oracle General Ledger accounts within the policy opcode.
-
Configure the Oracle General Ledger accounts within BRM G/L configuration files.
-
If you cannot configure the exact name of an Oracle General Ledger account, then you must customize BRM to configure the proper account ID. No pattern for configuring the accounts is specified, but typically BRM G/L reporting is more detailed than Oracle General Ledger, where accumulation is done.
Each G/L segment contains its own set of G/L IDs (and accounts). The balance impacts always use the G/L IDs that are dependent on the product rated against, and they are independent of the G/L segment with which the account is associated. The segments do not necessarily match the Oracle General Ledger segments, but they should to simplify the integration.
For more information, see Oracle Communications Billing and Revenue Management Collecting General Ledger Data.
Generating Data in BRM
BRM can generate summary and detailed reports. You can use the summary report for this integration to Oracle General Ledger. You can start with detailed report data and customize it to summarize the data, but what is handed to the integration is always a summary report.
You can pick a segment for reporting or, by default, all configured segments are reported.
In BRM, you must configure the G/L account IDs to correspond with the target accounts in Oracle General Ledger.
For more information, see the discussions of loading general ledger configuration data and exporting general ledger reports to XML files in Oracle Communications Billing and Revenue Management Collecting General Ledger Data.
Picking Up and Transforming the G/L Data
The process integration for revenue management uses ODI to pick up the BRM data files, transform them from XML, and load the Oracle General Ledger GL_INTERFACE table. After the interface table is loaded, you use Oracle General Ledger to import and post the journals.
In BRM, you configure the OutputDirectory to be the same directory that you specified in the AIAConfigurationProperties.xml file. After generating a BRM G/L data file, when the file enters that directory, ODI picks it up and transforms it to the Oracle General Ledger interface table.
Figure 2-1 illustrates the process of loading the data to the GL_INTERFACE table.
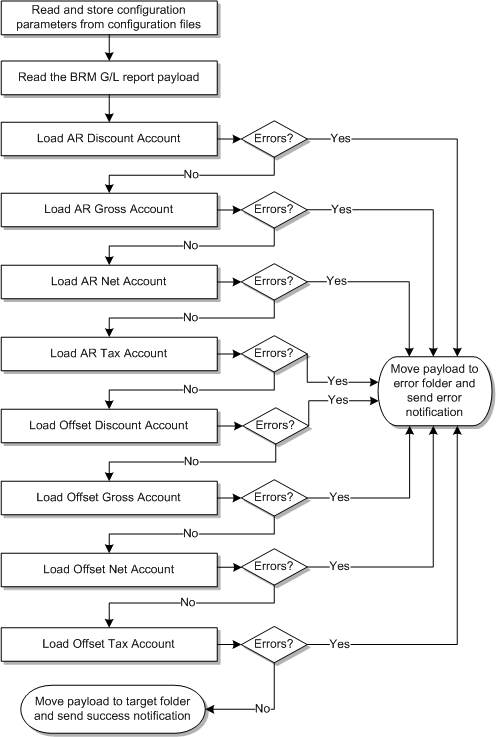
When this business process initiates, ODI does the following:
-
Reads and stores configuration parameters from the configuration files.
-
Reads the BRM XML file.
-
Checks for the value of the property TargetID from the AIAConfigurationProperties.xml file and executes the mapping for either Oracle E-Business Suite Release 11.5.10 CU2 or 12.1.1.
-
Checks to see if the AR discount account element is configured to be filtered out.
If it is, then the system moves to the next element. Otherwise, it loads the AR discount account element.
If the load is successful, the system moves to the next element.
If the load fails, the system moves the BRM XML file to the error folder, stops processing, and sends an email notification that the load failed.
-
Checks to see if the AR gross account element is configured to be filtered out.
If it is, then the system moves to the next element. Otherwise, it loads the AR gross account element.
If the load is successful, the system moves to the next element.
If the load fails, the system moves the BRM XML file to the error folder, stops processing, and sends an email notification that the load failed.
-
Checks to see if the AR net account element is configured to be filtered out.
If it is, then the system moves to the next element. Otherwise, it loads the AR net account element.
If the load is successful, the system moves to the next element.
If the load fails, the system moves the BRM XML file to the error folder, stops processing, and sends an email notification that the load failed.
-
Checks to see if the AR tax account element is configured to be filtered out.
If it is, then the system moves to the next element. Otherwise, it loads the AR tax account element.
If the load is successful, the system moves to the next element.
If the load fails, the system moves the BRM XML file to the error folder, stops processing, and sends an email notification that the load failed.
-
Checks to see if the offset discount account element is configured to be filtered out.
If it is, then the system moves to the next element. Otherwise, it loads the offset discount account element.
If the load is successful, the system moves to the next element.
If the load fails, the system moves the BRM XML file to the error folder, stops processing, and sends an email notification that the load failed.
-
Checks to see if the offset gross account element is configured to be filtered out.
If it is, then the system moves to the next element. Otherwise, it loads the offset gross account element.
If the load is successful, the system moves to the next element.
If the load fails, the system moves the BRM XML file to the error folder, stops processing, and sends an email notification that the load failed.
-
Checks to see if the offset net account element is configured to be filtered out.
If it is, then the system moves to the next element. Otherwise, it loads the offset net account element.
If the load is successful, the system moves to the next element.
If the load fails, the system moves the BRM XML file to the error folder, stops processing, and sends an email notification that the load failed.
-
Checks to see if the offset tax account element is configured to be filtered out.
If it is, then the system moves to the next element. Otherwise, it loads the offset tax account element.
If the load is successful, the system moves to the final step.
If the load fails, the system moves the BRM XML file to the error folder, stops processing, and sends an email notification that the load failed.
-
Finally, the system moves the successful payload to the target folder and sends an email notification that the load is successful.