F Configuring Multiple BRM Instances for Communications Integrations
This appendix provides an overview of how system codes are used to identify each system instance in Oracle Application Integration Architecture (Oracle AIA) and describes how to configure additional Oracle Communications Billing and Revenue Management (BRM) instances for the process integrations in Oracle AIA for Communications.
Understanding System Codes in Oracle AIA
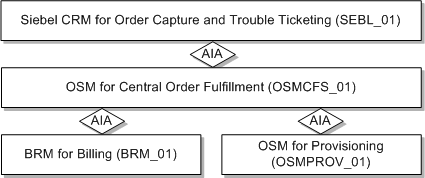
Each system instance is identified in Oracle AIA by a unique identifier, called a system code. The system codes help Oracle AIA identify the source or destination of a message.
Table F-1 describes the system codes that comes with Oracle AIA as delivered:
Table F-1 System Code Descriptions
| System Code | Description |
|---|---|
|
SEBL_01 |
The Siebel Customer Relationship Management (Siebel CRM) instance for order capture and trouble ticketing. |
|
BRM_01 |
One BRM instance for order billing. |
|
OSMCSF_01 |
The central fulfillment system (CFS) instance of Oracle Communications Order and Service Management (OSM) system. This is the instance responsible for customer orders in order management. |
|
OSMPROV_01 |
The provisioning system instance of OSM. |
Oracle AIA uses cross-reference (xref) tables to maintain mapping of system-specific identifiers (account ID, product ID, and so on). One xref table exists per entity. In an xref table, columns are created for each system instance. System codes are used as column names.
Oracle AIA uses domain value maps (DVMs) to map values of enumeration type attributes (such as country code, state code, price type, and so on). One DVM exists for each enumeration type attribute. Columns are created for each system instance. System codes are used as column names.
System codes are also used to identify the sender and target in the enterprise business message (EBM) header for a given EBM message. Also in AIAConfigurationProperties.xml, system code values are used to name the properties that require instance-specific values such as EndPointURI (each system has a different end point URI). An example of such a property is:
<Property name="Routing.BRMSUBSCRIPTIONService.BRM_01.EndpointURI">eis/BRM</Property>
Because OSM communicates to Oracle AIA using AIA EBMs, AIA Common IDs, and AIA DVM values, you do not require separate columns for OSMCFS_01 and OSMPROV_01 in DVMs and xrefs. Also, because Oracle AIA-OSM communications is using automatic queue synchronizations, no OSM-specific properties are in AIAConfigurationProperties.xml.
See "Building AIA Integration Flows" in Oracle Fusion Middleware Developer's Guide for Oracle Application Integration Architecture Foundation Pack for more information.
OSM also recognizes the fulfillment topologies and assigns logical names to each system instance. These logical names should match the system codes configured in Oracle AIA.
Configuring Multiple BRM Instances - General Steps
Use this sample information as an overview of the process.
Assume that you have three billing instances. As shown in the previous section, the installation as delivered configures one BRM instance. To configure the second and third BRM instances, follow these steps. These steps guide you through the process to add billing instances. Repeat them for each additional BRM instance.
These abbreviations are used in this example:
-
BRM_01: The first BRM instance that is installed as delivered.
-
BRM_02: The second BRM instance for which the following sample configuration should be followed.
-
BRM_03: The third BRM instance for which the following sample configuration should be followed.
Caution:
The person performing this setup must have a working knowledge of Composite, Oracle Mediator, and JDeveloper IDE.See Oracle Fusion Middleware Developer's Guide for Oracle Application Integration Architecture Foundation Pack for more information about Composite, Oracle Mediator, and JDeveloper IDE.
To configure a second BRM instance:
-
Modify all of the DVMs that have BRM columns to include the BRM_02 and BRM_03 columns.
-
Copy the values from BRM_01 to BRM_02 and BRM_03 for all columns in the DVM table.
The following is a list of the DVMs for which BRM_02 and BRM_03 column and values must be added:
PRICE_TYPE.dvm
ACCOUNTBALANCEADJUSTMENT_TAXTREATMENT.dvm
PLANTIER_EFFECTIVITYMODE.dvm
CONTACT_SALUTATION.dvm
PRICE_OVERRIDETYPECODE.dvm
ACCOUNTBALANCEADJUSTMENT_STATUS.dvm
RATEDATA_DISCOUNTBRACKETCODE.dvm
COLLECTION_ACTIONNAME.dvm
PRICE_BILLINGPERIODCODE.dvm
ACCOUNTBALANCEADJUSTMENT_REASON.dvm
SALESORDER_LINESTATUS.dvm
RATEPLAN_TAXAPPLICABILITYCODE.dvm
COLLECTION_SUBSTATUS.dvm
RECEIVEDPAYMENT_TYPE.dvm
ADDRESS_COUNTRYID.dvm
CUSTOMERPARTY_PAYPROFILE_DELIVERYPREF.dvm
RESOURCE.dvm
INSTALLEDPRODUCT_STATUS.dvm
ACCOUNTBALANCEADJUSTMENT_USAGEALLOCATION_TAXTREATMENT.dvm
MULTIPLE_DISCOUNT_PER_EVENT.dvm
CUSTOMERPARTY_PAYPROFILE_PAYMETHODCODE.dvm
COLLECTION_PRIORITY.dvm
CUSTOMERPARTY_TYPECODE.dvm
CUSTOMERPARTY_PAYPROFILE_PAYTERMCODE.dvm
CUSTOMERPARTY_STATUSCODE.dvm
PRICETYPE_EVENT.dvm
STATE.dvm
ACCOUNTBALANCEADJUSTMENT_SUBSTATUS.dvm
SALESORDER_ACTIONCODE.dvm
PHONENUMBER_TYPE.dvm
ENTITY_TO_TARGET_APPLICATION.dvm
STOP_DISCOUNTING.dvm
PROVISIONING_TAG.dvm
PRICECHARGETYPEUOM.dvm
COLLECTION_STATUS.dvm
PLANTIER_RESTRICTIONTYPE.dvm
APPLIES_TO.dvm
PRICE_DISCOUNTTYPECODE.dvm
DAYS_OF_WEEK.dvm
CUSTOMERPARTY_PAYPROFILE_CREDIT_CARDTYPE.dvm
DISCOUNT_VALIDITY.dvm
RATEDATA_CANCELATIONPRORATIONCODE.dvm
LINEPRICE_TYPECODE.dvm
CUSTOMERPARTY_BILLPROFILE_BILLTYPECODE.dvm
RATEPLAN_TYPECODE.dvm
PRICECHARGETYPE.dvm
CUSTOMERPARTY_ACCOUNTTYPECODE.dvm
TARGET_ID.dvm
CURRENCY_CODE.dvm
RATEPLAN_UNITCODE.dvm
CUSTOMERPARTY_BILLPROFILE_FREQUENCYCODE.dvm
PRICE_IMPACTCLASSIFICATIONCODE.dvm
SALESORDER_STATUS.dvm
RATEDATA_PURCHASEPRORATIONCODE.dvm
ACCOUNTBALANCEADJUSTMENT_TYPE.dvm
CUSTOMERPARTY_PAYPROFILE_BANKACCOUNTTYPE.dvm
ADDRESS_COUNTRYSUBDIVID.dvm
GL_CODE.dvm
PRICE_MARKUPBASISCODE.dvm
ITEM_BILLING_TYPE_CODE.dvm
PLANIMPACT_UNITCODE.dvm
ITEM_BILLINGTYPECODE.dvm
PARTIAL_PURCHASE.dvm
LINEPRICE_UOMCODE.dvm
PROVINCE.dvm
TROUBLETICKET_AREA.dvm
-
Once all the columns have been added, load the DVMs to the Metadata Services (MDS) repository using the update deployment plan.
See "Building AIA Integration Flows" in Oracle Fusion Middleware Developer's Guide for Oracle Application Integration Architecture Foundation Pack for more information.
-
-
Add BRM_02 and BRM_03 columns to the following XRef tables:
INSTALLEDPRODUCT_ID
CUSTOMERPARTY_LOCATIONREFID
CUSTOMERPARTY_CONTACT_PHONECOMMID
PaymentTermXREF
CUSTOMERPARTY_ADDRESSID
CUSTOMERPARTY_ACCOUNT_FAXCOMMID
PRICELINETYPE_ID
CUSTOMERPARTY_BILLPROFILEID
ITEMFORMULAMATERIAL_ID
PRICELINE_ID
CUSTOMERPARTY_PARTYCONTACTID
CUSTOMERPARTY_ACCOUNT_PHONECOMMID
CUSTOMERPARTY_CONTACT_FAXCOMMID
MANUFACTURINGROUTING_ID
CUSTOMERPARTY_PARTYID
SALESORDER_LINEID
CUSTOMERPARTY_ACCOUNT_COMMID
ITEMFORMULA_ID
ITEM_ITEMID
CUSTOMERPARTY_CONTACT_EMAILCOMMID
CUSTOMERPARTY_ACCOUNTID
SALESORDER_ID
ORGANIZATION_ID
CUSTOMERPARTY_CONTACTID
CUSTOMERPARTY_DEFAULTBALANCEGROUPID
CUSTOMERPARTY_PAYPROFILEID
CUSTOMERPARTY_CONTACT_COMMID
PRODUCTIONRECIPE_ID
CUSTOMERPARTY_PARTYLOCATIONID
-
Load the Xrefs to the MDS repository using update deployment plan.
The values are populated automatically into the new columns when the products are synchronized.
-
Add additional BRM connection factories that point to the new BRM_02 and BRM_03 instances:
-
Go to the WebLogic Console, navigate to Deployments, OracleBRMJCA15Adapter.
-
Add the following two new instances under the Configuration, Outbound Connection Pools tab:
eis/BRM2
eis/BRM3
-
Enter the Connection String property value as ip host port. For example:
ip example.com 12345
-
Enter the Username property value as root.0.0.0.1
-
Save your changes.
-
Update and start the adapter.
-
-
Modify all the BRM Provider service configurations in the AIAConfigurationProperties.xml file, which is located in:
$AIA_HOME/aia_instances/INSTANCE_NAME/AIAMetaData/config
The service configuration contains the Partner link details to BRM services used in that particular BPEL Service. For example, Endpoint URI. This Endpoint URI determines which edge application to use and the location to reach the application.
To route the messages to the appropriate BRM instance:
-
Modify the BRM Provider service configuration for all the partner links.
In the Communications pre-built integrations for this release the following services are used to route the messages to the BRM instance. Change the properties for these services:
ProcessFulfillmentOrderBillingBRMCommsProvABCSImpl
ProcessFulfillmentOrderBillingBRMCommsAddSubProcess
ProcessFulfillmentOrderBillingBRMCommsUpdateSubProcess
ProcessFulfillmentOrderBillingBRMCommsSuspendResumeSubProcess
ProcessFulfillmentOrderBillingBRMCommsDeleteSubProcess
ProcessFulfillmentOrderBillingBRMCommsMoveAddSubProcess
UpdateCreditAlertBRMCommsProvABCSImpl
SyncCustomerPartyListBRMCommsProvABCSImpl
QueryServiceUsageBRMCommsProvABCSImpl
QueryReceivedPaymentListBRMCommsProvABCSImpl
QueryInvoiceListBRMCommsProvABCSImpl
QueryInstalledProductListBRMCommsProvABCSImpl
QueryCustomerPartyListBRMCommsProvABCSImpl
QueryAccountBalanceAdjustmentBRMCommsProvABCSImpl
ProcessInstalledProductSpecialRatingSetListBRMCommsProvABCSImpl
CreateReceivedPaymentBRMCommsProvABCSImpl
CreateAccountBalanceAdjustmentBRMCommsProvABCSImpl
-
To update the AIAConfigurationProperties.xml file in the MDS repository, login to the AIA Console (http://<host>:<port>/AIA). Go to Setup and select the AIA Configuration tab. Click Reload.
The following is a sample service configuration. Enter the highlighted statements:
<Property name="Routing.BRMBALService_ptt.BRM_01.EndpointURI">eis/BRM</Property>
<Property name="Routing.BRMBALService_ptt.BRM_02.EndpointURI">eis/BRM2</Property>
<Property name="Routing.BRMBALService_ptt.BRM_03.EndpointURI">eis/BRM3</Property>

<Property name="Routing.BRMSUBSCRIPTIONService.BRM_01.EndpointURI">eis/BRM</Property>
<Property name="Routing.BRMSUBSCRIPTIONService.BRM_02.EndpointURI">eis/BRM2</Property>
<Property name="Routing.BRMSUBSCRIPTIONService.BRM_03.EndpointURI">eis/BRM3</Property>

<Property name="Routing.BRMCUSTService.BRM_01.EndpointURI">eis/BRM</Property>
<Property name="Routing.BRMCUSTService.BRM_02.EndpointURI">eis/BRM2</Property>
<Property name="Routing.BRMCUSTService.BRM_03.EndpointURI">eis/BRM3</Property>
-
Creating a New Consumer for Product Synchronization
The following steps must be followed to create a consumer for every new BRM instance. This consumer is used for product synchronization:
To create a consumer for product sync:
-
Create a new SOAProject project in Oracle JDeveloper, using the name SyncProductInfoChangeBRMAQ2.
-
Drag a new AQ Adapter component in the exposed services swimlane to display the Adapter Configuration Wizard - Welcome page.
-
Click Next to display Step 2 (Service Name).
Go to the Service Name field and enter SyncProductInfoChangeBRMAQ2, as shown in Figure F-2.
Figure F-2 Adapter Configuration Wizard - Step 2 of 9
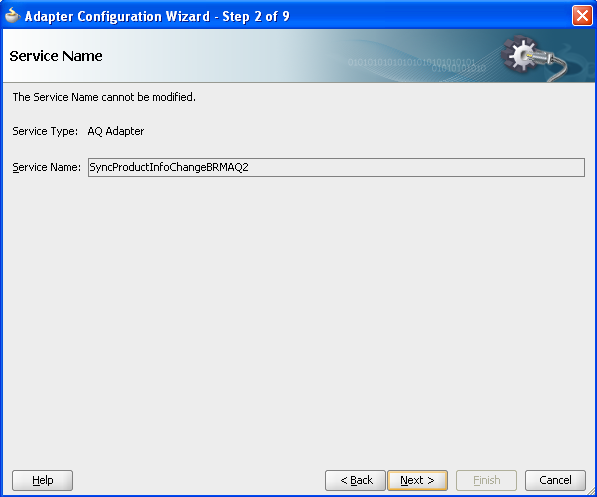
Description of "Figure F-2 Adapter Configuration Wizard - Step 2 of 9"
-
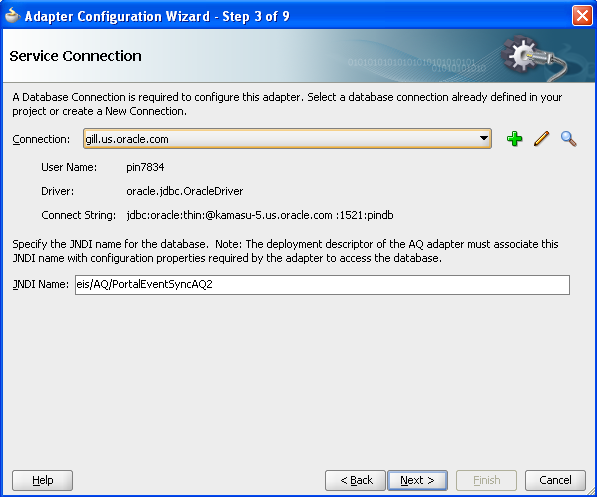
Click Next to display Step 3 (Service Connection).
Go to Connection and select the BRM Database Connection. Go to the JNDI Name field and enter eis/AQ/PortalEventSyncAQ2, as shown in Figure F-3.
Caution:
The JNDI name is not created here by default. You must manually create the JNDI for the consumer that you are creating using the steps provided in "Creating a Data Source and Connection Factory."Figure F-3 Adapter Configuration Wizard - Step 3 of 9
Description of "Figure F-3 Adapter Configuration Wizard - Step 3 of 9"
-
Click Next to display Step 4 (Adapter Interface).
Go to the Interface field and select Define from operation and schema (specified later), as shown in Figure F-4.
Figure F-4 Adapter Configuration Wizard - Step 4 of 9
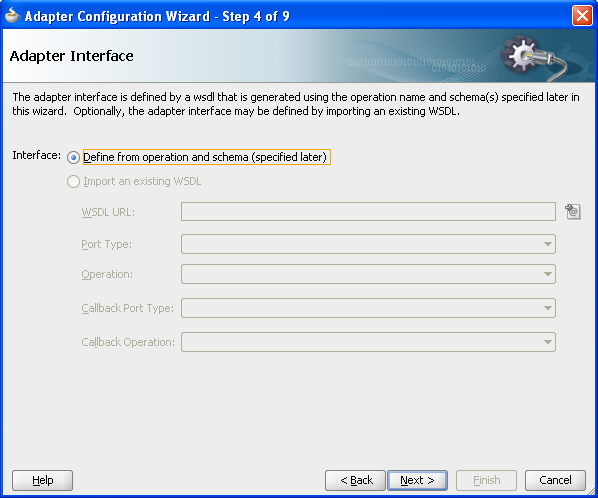
Description of "Figure F-4 Adapter Configuration Wizard - Step 4 of 9"
-
Click Next to display Step 5 (Operation).
Go to the Operation Name field and enter Dequeue, as shown in Figure F-5.
Figure F-5 Adapter Configuration Wizard - Step 5 of 9
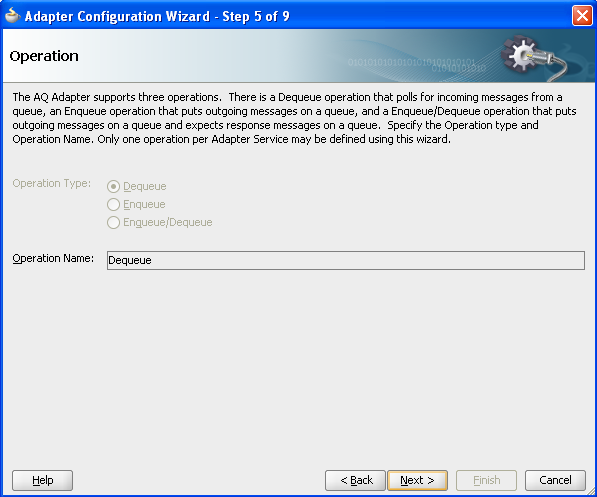
Description of "Figure F-5 Adapter Configuration Wizard - Step 5 of 9"
-
Click Next to display Step 6 (Queue Name).
Go to the Database Schema field and select the additional BRM Instance's database schema, and then enter the queue name configured for this BRM instance, as shown in Figure F-6.
Figure F-6 Adapter Configuration Wizard - Step 6 of 9
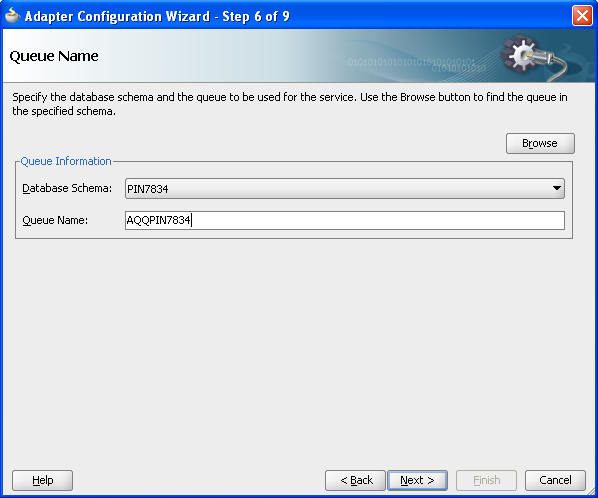
Description of "Figure F-6 Adapter Configuration Wizard - Step 6 of 9"
-
Click Next to display Step 7 (Queue Parameters).
Go to the Correlation Id field and enter ProductInfoChange, as shown in Figure F-7.
Figure F-7 Adapter Configuration Wizard - Step 7 of 9
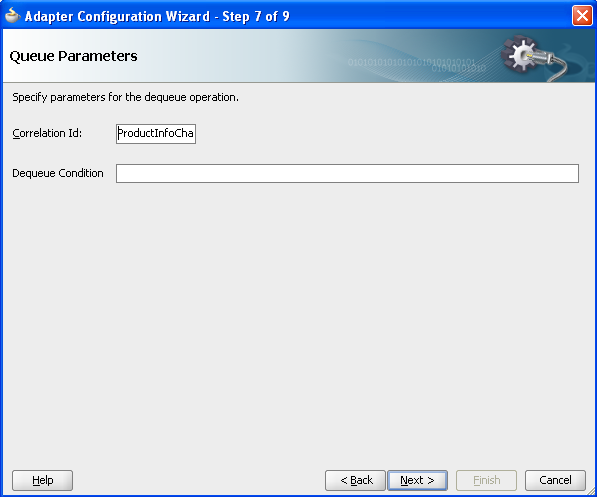
Description of "Figure F-7 Adapter Configuration Wizard - Step 7 of 9"
-
Click Next to display Step 8 (Object Payload).
Go to the Business Payload field and select Whole Object PIN_EVENT_TY, as shown in Figure F-8.
Figure F-8 Adapter Configuration Wizard - Step 8 of 9
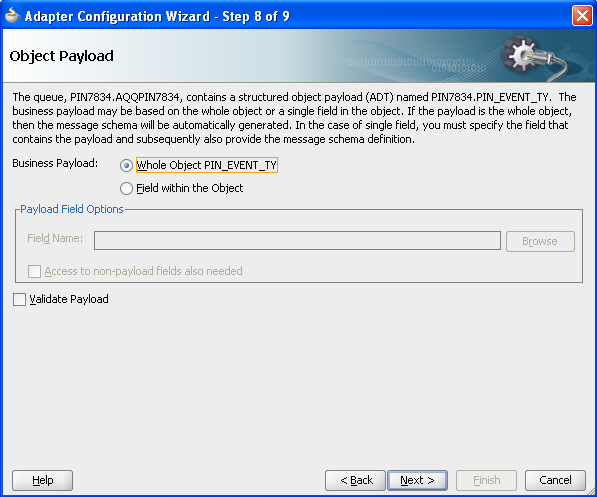
Description of "Figure F-8 Adapter Configuration Wizard - Step 8 of 9"
-
Click Next to display Step 9 (Finish).
Click Finish to create the AQ Adapter service.
You must now:
-
Create a routing rule for the associated routing service.
-
Add a routing rule from the Adapter service created to Oracle Mediator.
-
Create an External Reference for SyncProductBRMVCommsReqABCSImpl web service.
-
Add a routing rule from Oracle Mediator to SyncProductBRMCommsReqABCSImpl web service for SyncProduct operation.
-
In composite.xml, provide the port and location information from concrete WSDL of the SyncProductBRMCommsReqABCSImpl web service.
<reference name="SyncProductBRMCommsReqABCSImpl" ui:wsdlLocation="oramds:/apps/AIAMetaData/AIAComponents/ApplicationConnectorServiceLibrary/BRM/V1/RequesterABCS/SyncProductBRMCommsReqABCSImpl.wsdl"> <interface.wsdl interface="http://xmlns.oracle.com/ABCSImpl/BRM/Industry/Comms/SyncProductBRMCommsReqABCSImpl/V1#wsdl.interface(SyncProductBRMReqABCSImpl)"/> <binding.ws port="http://xmlns.oracle.com/ABCSImpl/BRM/Industry/Comms/SyncProductBRMCommsReqABCSImpl/V1#wsdl.endpoint(SyncProductBRMReqABCSImpl/SyncProductBRMReqABCSImpl)" location="http://<hostname>:<Port>/soa-infra/services/default/SyncProductBRMCommsReqABCSImpl/SyncProductBRMCommsReqABCSImpl?WSDL"/> </reference> -
Create a mapping file PIN_EVENT_TY_To_ProductChangeInfo.xsl.
-
Double-click Mediator to open the mplan.
-
Add the transformation file PIN_EVENT_TY_To_ProductInfoChange.
This file can be copied from the SyncProductInfoChangeBRMAQ/xsl folder, which is shipped with the Oracle Communications Order to Cash pre-built integration.
-
-
Make the following modification:
The namespace http://xmlns.oracle.com/xdb/<BRM_CAPS_USERNAME> must be changed. The name space can be found in <USERNAME>_PIN_EVENT_TY.xsd, which is created during the adapter creation.
Caution:
Make sure that this namespace gets changed at the two places in the xsl file. -
Deploy the Composite after the routing rule has been configured.
The same process must be followed for each additional BRM instance.
Creating a New Consumer for Discount Synchronization
The following steps must be followed to create a consumer for every new BRM instance. This consumer is used for discount synchronization:
To create a consumer for product sync:
-
Create a new SOAProject project in Oracle JDeveloper, using the name SyncDiscountInfoChangeBRMAQ2.
-
Drag a new AQ Adapter component in the exposed services swimlane to display the Adapter Configuration Wizard - Welcome page.
-
Click Next to display Step 2 (Service Name).
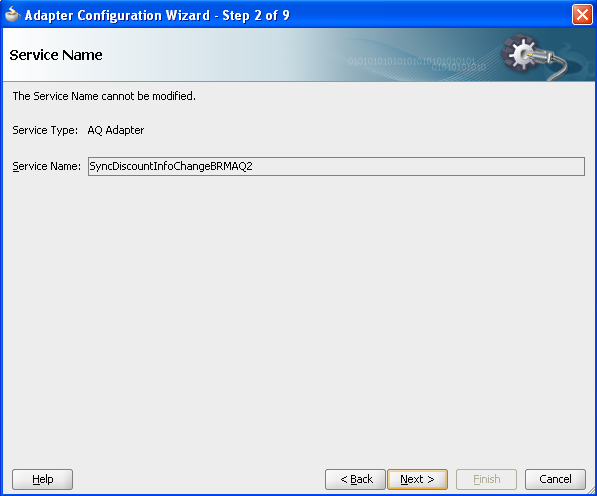
Go to the Service Name field and enter SyncDiscountInfoChangeBRMAQ2, as shown in Figure F-9.
Figure F-9 Adapter Configuration Wizard - Step 2 of 9
Description of "Figure F-9 Adapter Configuration Wizard - Step 2 of 9"
-
Click Next to display Step 3 (Service Connection).
Go to Connection and select the BRM Database Connection. Go to the JNDI Name field and enter eis/AQ/PortalEventSyncAQ2, as shown in Figure F-10.
Caution:
The JNDI name is not created here by default. You must manually create the JNDI for the consumer that you are creating using the steps provided in "Creating a Data Source and Connection Factory".Figure F-10 Adapter Configuration Wizard - Step 3 of 9
Description of "Figure F-10 Adapter Configuration Wizard - Step 3 of 9"
-
Click Next to display Step 4 (Adapter Interface).
Go to the Interface field and select Define from operation and schema (specified later), as shown in Figure F-11.
Figure F-11 Adapter Configuration Wizard - Step 4 of 9
Description of "Figure F-11 Adapter Configuration Wizard - Step 4 of 9"
-
Click Next to display Step 5 (Operation).
Go to the Operation Name field and enter Dequeue, as shown in Figure F-12.
Figure F-12 Adapter Configuration Wizard - Step 5 of 9
Description of "Figure F-12 Adapter Configuration Wizard - Step 5 of 9"
-
Click Next to display Step 6 (Queue Name).
Go to the Database Schema field and select the additional BRM Instance's database schema, and then enter the queue name configured for this BRM instance, as shown in Figure F-13.
Figure F-13 Adapter Configuration Wizard - Step 6 of 9
Description of "Figure F-13 Adapter Configuration Wizard - Step 6 of 9"
-
Click Next to display Step 7 (Queue Parameters).
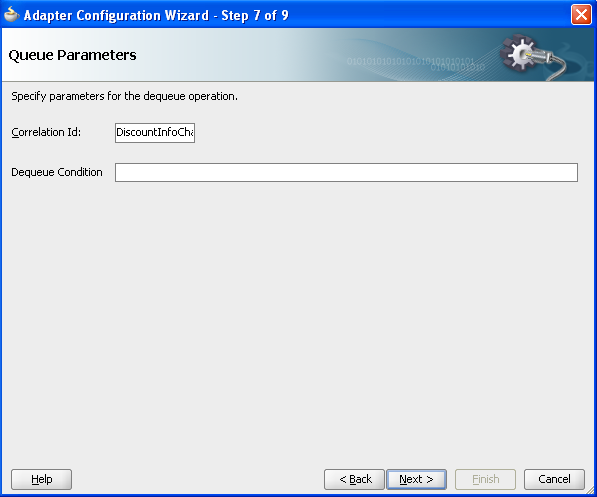
Go to the Correlation Id field and enter DiscountInfoChange, as shown in Figure F-14.
Figure F-14 Adapter Configuration Wizard - Step 7 of 9
Description of "Figure F-14 Adapter Configuration Wizard - Step 7 of 9"
-
Click Next to display Step 8 (Object Payload).
Go to the Business Payload field and select Whole Object PIN_EVENT_TY, as shown in Figure F-15.
Figure F-15 Adapter Configuration Wizard - Step 8 of 9
Description of "Figure F-15 Adapter Configuration Wizard - Step 8 of 9"
-
Click Next to display Step 9 (Finish).
Click Finish to create the AQ Adapter service.
You must now:
-
Create a routing rule for the associated routing service.
-
Add a routing rule from the Adapter service created to Oracle Mediator.
-
Create an External Reference for SyncDiscountBRMVCommsReqABCSImpl web service.
-
Add a routing rule from Oracle Mediator to SyncDiscountBRMCommsReqABCSImpl web service for SyncDiscount operation.
-
In composite.xml, provide the port and location information from concrete WSDL of the SyncDiscountBRMCommsReqABCSImpl web service.
<reference name="SyncDiscountBRMCommsReqABCSImpl" ui:wsdlLocation="oramds:/apps/AIAMetaData/AIAComponents/ApplicationConnectorServiceLibrary/BRM/V1/RequesterABCS/SyncDiscountBRMCommsReqABCSImpl.wsdl"> <interface.wsdl interface="http://xmlns.oracle.com/ABCSImpl/BRM/Industry/Comms/SyncDiscountBRMCommsReqABCSImpl/V1#wsdl.interface(SyncDiscountBRMReqABCSImpl)"/> <binding.ws port="http://xmlns.oracle.com/ABCSImpl/BRM/Industry/Comms/SyncDiscountBRMCommsReqABCSImpl/V1#wsdl.endpoint(SyncDiscountBRMReqABCSImpl/SyncDiscountBRMReqABCSImpl)" location="http://<host name>:<port>/soa-infra/services/default/SyncDiscountBRMCommsReqABCSImpl/SyncDiscountBRMCommsReqABCSImpl?WSDL"/> </reference> -
Create a mapping file PIN_EVENT_TY_To_DiscountChangeInfo.xsl.
-
Double-click Mediator to open the mplan.
-
Add the transformation file PIN_EVENT_TY_To_DiscountInfoChange.
This file can be copied from the SyncDiscountInfoChangeBRMAQ/xsl folder, which is shipped with the Oracle Communications Order to Cash pre-built integration.
-
-
Make the following modification:
The namespace http://xmlns.oracle.com/xdb/<BRM_CAPS_USERNAME> must be changed. The name space can be found in <USERNAME>_PIN_EVENT_TY.xsd, which is created during the adapter creation.
Caution:
Make sure that this namespace gets changed at the two places in the xsl file. -
Deploy the Composite after the routing rule has been configured.
The same process must be followed for each additional BRM instance.
Creating a New Consumer for Customer Updates
The following steps must be followed to create a consumer for every new BRM instance. This consumer is used for customer updates:
To create a consumer for customer updates:
-
Create a new SOAProject project in Oracle JDeveloper, using the name SyncCustomerPartyList<BRMInstanceID>CommsJMSConsumer, where the BRM Instance Id is the Id of the new BRM instance to be added. For example, SyncCustomerPartyListBRM_02CommsJMSConsumer.
-
Drag a new JMS Adapter component in the exposed services swimlane to display the Adapter Configuration Wizard - Welcome page.
-
Click Next to display Step 2 (Service Name).
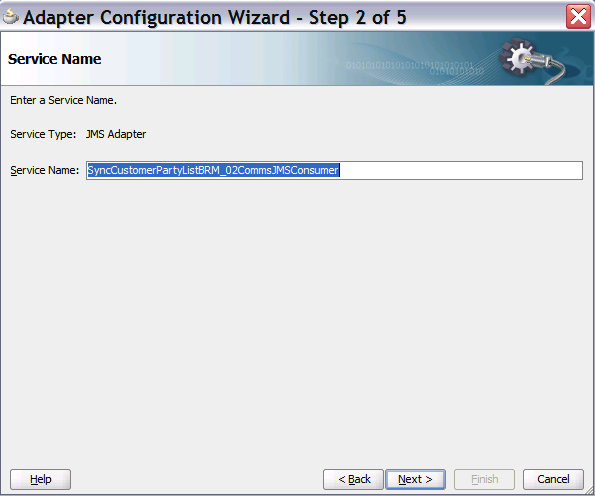
Go to the Service Name field and enter SyncCustomerPartyListBRM_02CommsJMSConsumer, as shown in Figure F-16.
Figure F-16 Adapter Configuration Wizard - Step 2 of 5
Description of "Figure F-16 Adapter Configuration Wizard - Step 2 of 5"
-
Click Next to display Step 3 (JMS Provider).
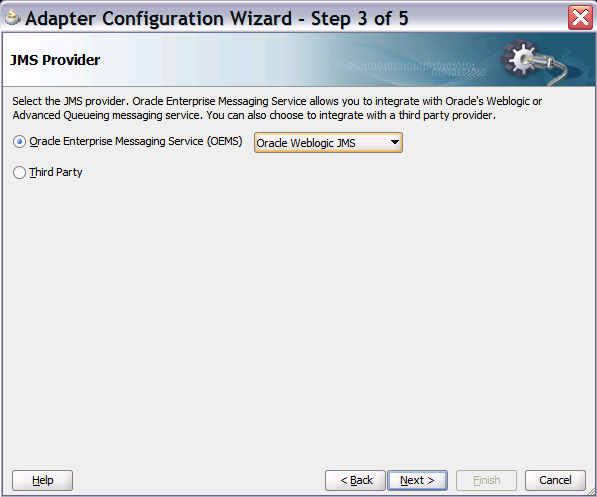
Select Oracle Enterprise Messaging Service (OEMS) as the JMS Provider and then select Oracle WebLogic JMS, as shown in Figure F-17.
Figure F-17 Adapter Configuration Wizard - Step 3 of 5
Description of "Figure F-17 Adapter Configuration Wizard - Step 3 of 5"
-
Click Next to display Step 4 (Service Connection).
Create an Application Server Connection to the Fusion Middleware (FMW) server. Go to AppServer Connection and select the corresponding FMW server connection from the drop down, as shown in Figure F-18.
Figure F-18 Adapter Configuration Wizard - Step 4 of 6
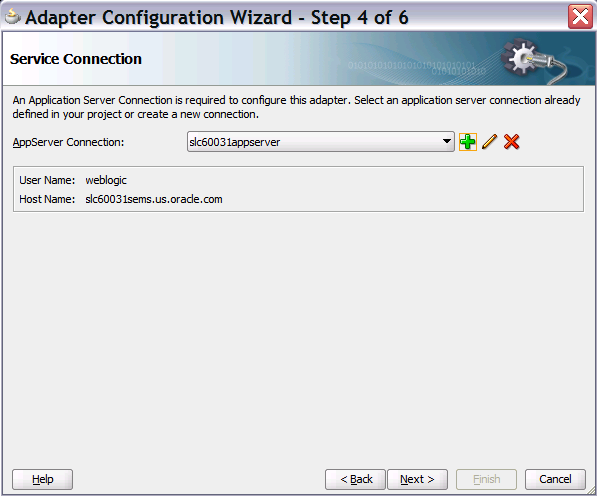
Description of "Figure F-18 Adapter Configuration Wizard - Step 4 of 6"
-
Click Next to display Step 5 (Adapter Interface).
Go to the Interface field and select Define from operation and schema (specified later), as shown in Figure F-19.
Figure F-19 Adapter Configuration Wizard - Step 5 of 9
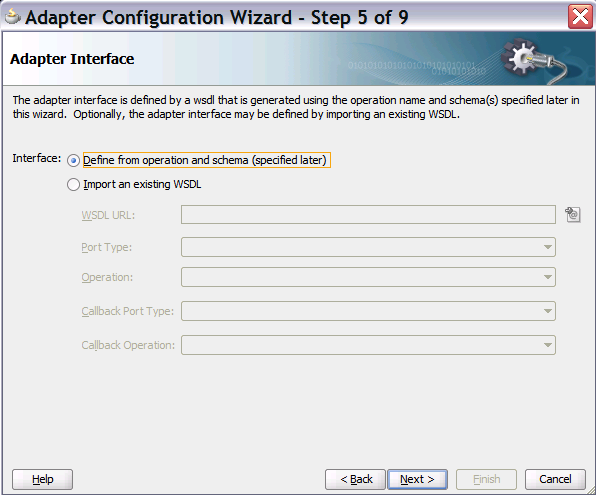
Description of "Figure F-19 Adapter Configuration Wizard - Step 5 of 9"
-
Click Next to display Step 6 (Operation).
Go to the Operation Type field and select Consume Message. Then go to the Operation Name field and enter Consume_Message, as shown in Figure F-20.
Figure F-20 Adapter Configuration Wizard - Step 6 of 9
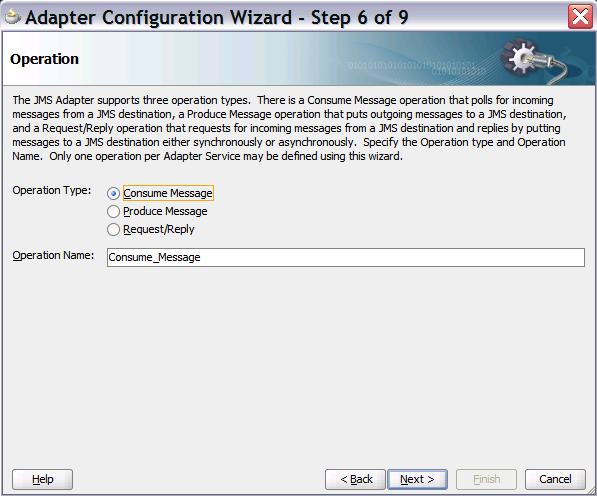
Description of "Figure F-20 Adapter Configuration Wizard - Step 6 of 9"
-
Click Next to display Step 7 (Consume Operation Parameters), as shown in Figure F-21.
Figure F-21 Adapter Configuration Wizard - Step 7 of 9
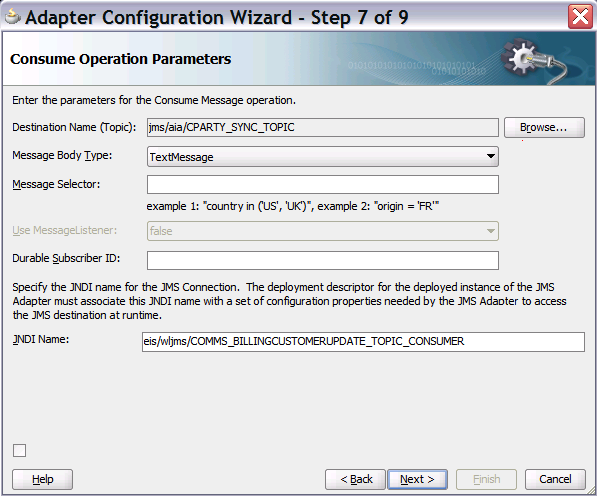
Description of "Figure F-21 Adapter Configuration Wizard - Step 7 of 9"
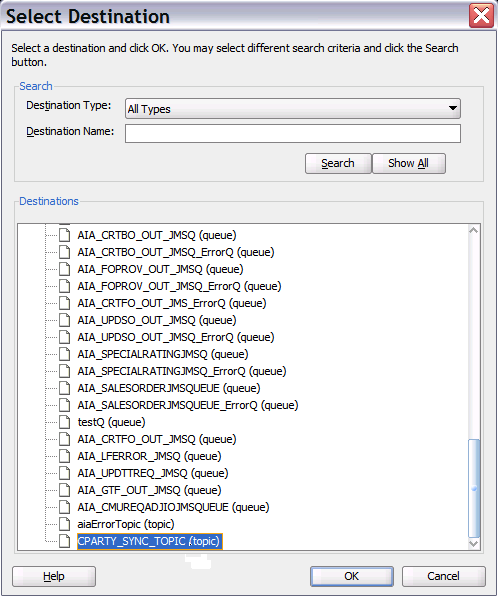
Go to the Destination Name (Topic) field and click Browse to select the required topic, as shown in Figure F-22. Click OK to return to Step 7.
Then go to the JNDI Name field and enter the JNDI name for this JMS Connection.
-
Click Next to display Step 8 (Messages).
Go to the URL field and enter oramds:/apps/AIAMetaData/AIAComponents/EnterpriseObjectLibrary/Industry/Communications/EBO/CustomerParty/V2/CustomerPartyEBM.xsd. Go to the Schema Element field and enter SyncCustoerPartyListEBM, as shown in Figure F-23.
-
Click Next to display Step 9 (Finish).
Click Finish to create the JMS Adapter service.

You must now create a routing rule for the associated routing service.
-
Create a routing rule for the associated routing service.
-
Add a routing rule against the Consumer_Message operation.
-
Select the Endpoint service to be SyncCustomerPartyListBRMCommsProvABCSImpl.
The filter expression should be like this:
xref:lookupXRef('oramds:/apps/AIAMetaData/xref/CUSTOMERPARTY_ACCOUNTID.xref','COMMON',$in.body/imp1:SyncCustomerPartyListEBM/imp1:DataArea/imp1:SyncCustomerPartyList/imp1:CustomerPartyAccount/ns4:Identification/ns4:BusinessComponentID,'BRM_01',false()) != ''
Along with the filter expression, a XSL must be added. Name the file SetActionCodeandTargtID_BRM_02.xsl. The XSL should be like this:
<corecom:Target>
  <corecom:ID>
    <xsl:text disable-output-escaping="no">BRM_02</xsl:text>
  </corecom:ID>
  <corecom:ApplicationTypeCode>
    <xsl:value-of select="aia:getSystemType('BRM_02')"/>
  </corecom:ApplicationTypeCode>
</corecom:Target>
Deploy the Composite after the routing rule has been configured.
Creating a Data Source and Connection Factory
This section provides the instructions for creating the data source and connection factory.
To create the data source and connection factory:
-
Go to the WebLogic Server - Administration Console and navigate to Services, DataSource, New Generic Data Source.
-
Enter the data source name as BRMEventSyncAQ2. Enter the JDBC name as jdbc/aia/BRMEventSyncAQ2.
-
Click, Next, Next, Next to display the Connection Properties page, as shown in Figure F-24.
Figure F-24 WebLogic Server - Administration Console - Connection Properties
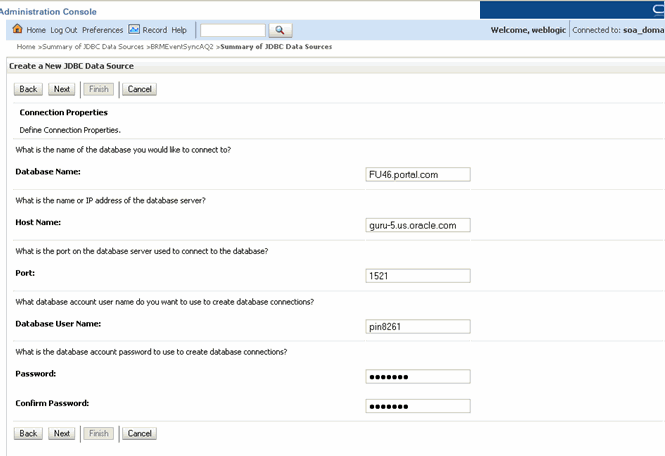
Description of "Figure F-24 WebLogic Server - Administration Console - Connection Properties"
Enter all the BRM connection properties and then
-
Click Next to display the Test Configuration page, as shown in Figure F-25.
Figure F-25 WebLogic Server - Administration Console - Test Configuration

Description of "Figure F-25 WebLogic Server - Administration Console - Test Configuration"
Click Test Configuration to verify that the provided details are correct. If the test is successful, click Finish.
-
Navigate to Deployments and click AQAdapter.
-
Go to the Configuration tab and expand the connection factory. Click New and select the connection factor.
-
Click Next. Provide the JNDI name as eis/AQ/PortalEventSyncAQ2.
-
Click Finish.
-
Click the newly created connection factory and go to the XADataSourceName field and enter jdbc/aia/BRMEventSyncAQ2. Click Enter and then click Save.
The same process must be followed for each additional BRM instance.
Creating Logical Instances in Oracle AIA
Whenever the product is synchronized to Oracle AIA (through the product lifecycle management (PLM) flows, BRM sends the instance ID in the payload to Oracle AIA to synchronize to Siebel CRM as follows:
<SyncProductReqMsg> <part xmlns:xsi=http://www.w3.org/2001/XMLSchema-instance name="SyncProduct"> <brmproductabo:ProductInfoChange xmlns:brmproductabo="http://www.portal.com/schemas/CRMSync" brmproductabo:InstanceId="BRM_01">
Logical instances are defined in the Oracle AIA Console. The logical instance, shown in Figure F-26 must be added or changed accordingly by the value given by BRM for each instance. For example, for the second BRM instance an entry must be added as shown in Figure F-26 in the AIA_SYSTEM table.
Caution:
You must restart the server after adding entries. Otherwise, the changes are not recognized.The logical instance name must be used in the AIAConfigurationProperties.xml, as specified in "To configure a second BRM instance:". For example, in Figure F-26, BRM_02 is the logical instance. Therefore, in the AIAConfigurationProperties.xml file, the end point configurator should be:
<Property name="Routing.BRMBALService_ptt.BRM_02.EndpointURI">eis/BRM2</Property>
The value eis/BRM2 is the JNDI name specified when creating new consumers.
The same process must be followed for each additional BRM instance.
Creating Service Bundles in Siebel CRM
Currently, in Typical and Reserved topologies, OSM uses the following configuration to stamp the instances. This can be changed or configured in OSM according to customer requirements so you must consult your OSM administrator before configuring the instances.
-
OSMCFS_01 - OSM Central Fulfillment (ALL Topologies)
-
BRM_01 - Billing for broadband business (Typical Topology)
-
BRM_02 - Billing for broadband residential (Typical Topology)
-
BRM_03 - Billing for voip (Typical Topology)
-
BRM_04 - Billing for both voip and broadband for all business and residential (Simple Topology)
-
BRM_05 - Billing for voip and broadband business (Reserved Topology)
-
BRM_06 - Billing for voip and broadband residential (Reserved Topology)
-
OSMPROV_01 - OSM provisioning fulfillment for voip (Reserved Topology)
-
OSMPROV_02 - OSM provisioning fulfillment for broadband US (Reserved and Typical Topology)
-
OSMPROV_03 - OSM provisioning fulfillment for broadband UK (Typical Topology)
-
OSMPROV_04 - OSM provisioning fulfillment for voip and broadband (Simple Topology)
-
WFM_01 - Work force management (Typical Topology)
-
SHP_01 - Shipping partnership Inc (Typical Topology)
-
SHP_02 - Shipping in house (Typical Topology).
| Typical Topology |
|---|
|
BRM_01 - Billing for broadband business |
|
BRM_02 - Billing for broadband residential |
|
BRM_03 - Billing for voip |
|
OSMCFS_01 - OSM Central Fulfillment |
|
OSMPROV_02 - OSM provisioning fulfillment for broadband US |
|
OSMPROV_03 - OSM provisioning fulfillment for broadband UK |
|
WFM_01 - Work force management |
|
SHP_01 - Shipping partnership Inc |
|
SHP_02 - Shipping in house |
| Reserved Topology |
|---|
|
BRM_05 - Billing for voip and broadband business |
|
BRM_06 - Billing for voip and broadband residential |
|
OSMCFS_01 - OSM Central Fulfillment |
|
OSMPROV_01 - OSM provisioning fulfillment for voip |
|
OSMPROV_02 - OSM provisioning fulfillment for broadband US |
Merging Logical BRM Instances into a Single BRM Instance
In this case the change is related to combining multiple system instances into one.
If, for example, you start with two logical BRM instances and then later you decide to consolidate to a single instance. The only changes that must be made are in the AIAConfigurationProperties.xml.
In the AIAConfigurationProperties.xml file, change the End Point configuration URI to the same JNDI name.
For example, to point both these BRM instances to go to the BRM_01 instance, just change the highlighted information:
Change this:
<Property name="Routing.BRMCUSTService.BRM_01.EndpointURI">eis/BRM</Property>
<Property name="Routing.BRMCUSTService.BRM_02.EndpointURI">eis/BRM2</Property>
To this:
<Property name="Routing.BRMCUSTService.BRM_01.EndpointURI">eis/BRM</Property>
<Property name="Routing.BRMCUSTService.BRM_02.EndpointURI">eis/BRM</Property>