35 Upgrading Pre-Built Integrations
This chapter provides an overview of the Application Integration Architecture (AIA) upgrade process for the Pre-Built Integrations included in this release.
This chapter includes the following sections:
Note:
If you have AIA 2.4 or 2.5 installed, you cannot migrate or upgrade to AIA 11.1. You must install AIA 11.6 following the steps included in Chapter 3, "Installing Pre-Built Integrations"To migrate customizations made to OOTB 2.4 or 2.5 artifacts, see the Oracle Fusion Middleware Developer's Guide for Oracle Application Integration Architecture Foundation Pack
To migrate the 2.4 or 2.5 xref data to AIA 11.6, you must use the SOA xref utility. For more information, see the Oracle Fusion Middleware Developer's Guide for Oracle SOA Suite.
If you have modified or created custom services, custom DVMs and Xrefs, you must migrate these to AIA 11.6. For more information on migrating custom services, custom DVMs and Xrefs from AIA 2.4 or 2.5 to AIA 11.6, see the Oracle Fusion Middleware Developer's Guide for Oracle Application Integration Architecture Foundation Pack
Understanding AIA Upgrade
The AIA upgrade process consists of three phases:
-
Upgrade newer AIA Release: the file-system (under $AIA_HOME) is updated with the latest content.
-
Redeploy previously deployed PIPs or DIs: update the server to the latest content by redeploying new PIPs or DIs from the new release.
-
Merge customizations and extensions: if you have customized services, you must merge the customizations.
After these three tasks are completed, you can configure and deploy new PIPs or DIs from the new release.
Upgrading the AIA Release
You must run the AIA Pre-Built Integrations Installer and point to the existing $AIA_HOME where the previous AIA version is installed. The AIA Pre-Built Integrations Installer:
-
Warns you when there is a previous release of AIA Pre-Built Integrations installed in $AIA_HOME.
-
Updates the PIP and DI content in $AIA_HOME with the latest version, after you back up AIA_HOME.
Redeploying previously deployed PIPs and DIs
After upgrading the release and merging your customizations, the previously deployed PIPs and DIs may be redeployed. FOR OOTB PIPs or DIs that require redeployment, see Upgrading Pre-Built Integrations, Upgrading AIA 11.5 Integrations and Upgrading AIA 3.1 PIPs and DIs. The required upgrade scripts are included by the PIPs or DIs in this release.
For custom PIPs or DIs, you must identify the artifacts that require redeployment by rerunning the deployment plan of the specific PIP or DI or by redeploying the specific artifacts using a custom deployment plan.
Making Upgrade-Safe Composite Customizations
This section is for developers who customize installed composites. Perform the procedure it contains during composite customization.
As part of your pre-built integrations implementation you may need to customize installed composites. For example, you may need to call different BRM opcodes than those specified in ready-to-use composites.
Customizations you make within customizable scopes in JDeveloper can be retained when upgrading Oracle AIA. The upgrade process overwrites any customizations you make outside of customizable scopes.
After upgrading, merge your customizations with the newly upgraded composites as described in Integrating Customizations to Composites After Upgrading.
To make upgrade-safe customizations to a deployed composite:
-
Open JDeveloper.
The Select Role dialog box appears.
-
Select Default Role and click OK.
-
From the Application menu, select New.
-
From the Application Template list, select SOA Application.
-
In the Application Name field, enter a name for the customized application.
-
Click Next.
-
In the Project Name field, enter the name of the BRM provider ABCS that you want to customize. For example, QueryInvoiceListBRMCommsProvABCSImpl.
-
On the Project Technologies tab, ensure that SOA appears in the Selected list.
-
Click Next.
-
From the Composite Template list, select Empty Composite.
-
Select the Customizable option.
-
Click Finish.
The project appears in the Projects section.
-
Expand the Application Resources section, then expand the Descriptors folder, and then the ADF META-INF folder.
-
Double-click the adf-config.xml element.
-
Click the MDS Configuration tab.
-
Next to Customization Configuration: Match Path = "/", click the plus sign.
The Edit Customization Class dialog box appears.
-
In the Match Class or Package Name field, enter the beginning of the name of the customization class that you want to use.
A list of matching customization classes appears.
-
Select the customization class that you want to use and click OK.
-
Select the newly-added class and click the Configure Design Time Customization Layer Values link.
The CustomizationLayerValues.xml file opens.
-
Add layer values for this customization layer. For example:
<cust-layer name="industry"> <cust-layer-value value="communications" display-name="Communications"/></cust-layer>
-
Click the Save All icon.
-
In the Projects section, select the top-level element. For example, QueryInvoiceListBRMCommsProvABCSImpl.
-
From the File menu, select Import.
-
Select SOA Archive Into SOA Project and click OK.
-
Click Browse.
-
Browse to the deploy directory under the directory where the BRM provider ABCS is copied from the Oracle AIA server. For example:
C:\DeployedFromServer\QueryInvoiceListBRMCommsProvABCSImpl\deploy
-
Select the JAR file associated with the provider ABCS and click Open.
-
Select the Import for Customization option and click Finish.
-
Click the Save All icon.
-
From the Tools menu, select Preferences.
-
In the navigation tree, select Roles.
-
Under Roles, select Customization Developer.
JDeveloper reopens in the new role.
-
In the Customization Context section, select the customization context that matches the layer values for the customization class you added earlier.
-
In the Project section, expand the top-level element.
-
Double-click the BPEL file for your composite.
The composite opens in Design mode.
-
Locate and expand the customizable scope where you want to make a customization.
-
Perform the customizations you require inside the customizable scope.
For example, to invoke a custom opcode, do the following:
-
Open the AIAConfigurationProperties.xml file, located in the AIA_home/aia_instances/instance_name/AIAMetaData/config directory.
-
Under the entry for the service that you have customized, add a new property for invoking the custom opcode and set it to true. For example:
<Property name="Routing.BRMARServices.RouteToCustOp">true</Property> -
In JDeveloper, in the BPEL file for the composite that you are customizing, create a partner link to represent the custom opcode.
-
In the switch that invokes the default BRM opcode or CAVS, add a new case with an expression linking it to the property for invoking the custom opcode.
For example, if you stored the property from AIAConfigurationProperties.xml in a variable in the composite's BPEL file, the expression might be as follows:
bpws:getVariableData('BRMARRouteToCustOp') -
Within the new case, add a transform activity to transform the incoming message to the input field list (flist) of the custom opcode.
-
After the transform activity, add an invoke activity to invoke the partner link representing the custom opcode.
-
After the invoke activity, add a transform activity to transform the output flist of the custom opcode into the expected EBM that would be generated by the default opcode.
-
If the custom opcode output flist includes any attributes that are not present in the default opcode, extend the default EBM to include the attributes, and customize the PostXformEBMtoABM extension point with a transform or an assign activity to map the attribute values.
Figure 35-1 shows the new case in JDeveloper.
Figure 35-1 Invoking a Custom Opcode Within an Upgrade-Safe Customizable Scope
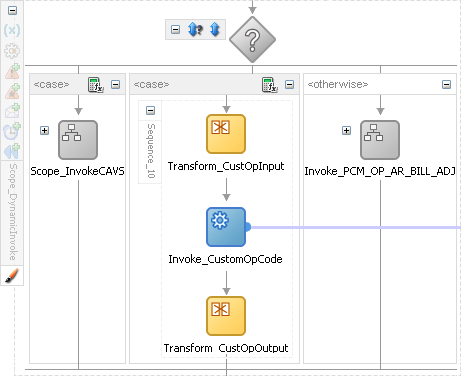
Description of "Figure 35-1 Invoking a Custom Opcode Within an Upgrade-Safe Customizable Scope"
-
-
Click the Save All icon.
-
Redeploy the custom composite using JDeveloper or a deployment plan.
For more information about customizing and developing Oracle AIA composites, see the following documents:
-
For information about customizing BPEL processes, including customization classes, layer values, transform and invoke activities, scopes, switches, and partner links, see Oracle Fusion Middleware Developer's Guide for Oracle SOA Suite.
-
For information about designing and constructing Oracle AIA artifacts, see Oracle Fusion Middleware Developer's Guide for Oracle Application Integration Architecture Foundation Pack.
-
For information about deploying applications using JDeveloper, see Oracle Fusion Middleware User's Guide for Oracle JDeveloper.
Upgrading Pre-Built Integrations
This section lists the tasks that you must perform to upgrade pre-built integrations.
AIA Upgrade Requirements
AIA Pre-Built Integrations Installer upgrades your 11.1 version PIPs and DIs to RV 11.6.
Note:
Before upgrading Pre-Built Integrations 11.1 or AIA RV 3.1.1 PIPs or DIs, you must upgrade Foundation Pack to version 11.1.1.7.0, plus the latest RUP patch. For more information and instructions, see the Oracle Fusion Middleware Installation and Upgrade Guide for Oracle Application Integration Architecture Foundation Pack. If you are using an AIA Foundation Pack release that is earlier than 11.1.1.5.0, first upgrade to release 11.1.1.5.0 using the respective upgrade guides and then upgrade to version 11.1.1.7.0, plus the latest RUP patch.To upgrade from Foundation Pack to version 11.1.1.7.0, RUP patch 17553612 or later, you must manually run the upgrade scripts found in the Oracle Fusion Middleware Installation and Upgrade Guide for Oracle Application Integration Architecture Foundation Pack. To upgrade individual PIPs or DIs, you must manually run the upgrade scripts after you upgrade Foundation Pack.
AIA Pre-Built Integrations Installer does not republish AIA content to the service registry when you upgrade from Foundation Pack 11.1.1.6.0 to 11.1.1.7.0. To upgrade the registry with AIA 11.1.1.6.0 content, you must manually republish.
AIA Foundation Pack 11.1.1.6.0 contains bug fixes in Core Infrastructure areas (CAVS, BSR, and so on). When you upgrade from 11.1.1.5.0 to 11.1.1.7.0, RUP patch 17553612 or later, these applications get redeployed. However, the upgrade does not have any impact because your data is preserved and all fixes are backward compatible.
Note:
The upgrade of individual components is not supported in this release.Software and Hardware Requirements
The system requirements for the upgrade (CPU/memory/disk space) are the same as those discussed under Hardware Requirements.
For more details on the software requirements for your specific PIPs or DIs, see Chapter 2, "Software Requirements".
Performing Preupgrade Tasks for Pre-Built Integrations
Before running the AIA Pre-Built Integrations Installer, you must:
-
Navigate a command prompt to the <AIA_HOME> parent directory: For example: "cd $AIA_HOME/..." (Go to the <AIA_HOME> directory and move up one directory higher).
-
Change the file permissions for the <AIA_HOME> directory and all subdirectories recursively to Read/Write/Execute for User/Group/Other owners. For example: chmod -R 777 <AIA_HOME>.
-
Back up your existing AIA_HOME before you start the 11.5 AIA Pre-Built Integrations Installer.
Note:
These steps must be performed to upgrade every PIP or DI in Upgrading AIA 11.5 Integrations and Upgrading AIA 3.1 PIPs and DIs.Back up extended solution artifacts
Following the AIA extensibility model, as documented in the extensibility sections of the Oracle Application Integration Architecture - Foundation Pack: Concepts and Technologies Guide and the Oracle Application Integration Architecture - Foundation Pack: Integration Developer's Guide, you created or updated one or more of the following artifacts:
-
Custom EBOs:
These are AIA schema extensions performed on EBOs. Though the AIA Foundation Pack Installer automatically preserves these schema extensions, it is advisable to back up the custom directory. For example, all custom xsd files for core EBOs are accessed as http://hostname:port/AIAComponents/EnterpriseObjectLibrary/Core/Custom/EBO/
If you are using the oracle application server, you can access this folder from SOA_HOME/Apache/Apache/htdocs/AIAComponents/EnterpriseObjectLibrary/Core/Custom/EBO/
-
Custom XSLTs:
These are the extensions performed on the AIA Transformation style sheet. Foundation Pack does not contain any Extensible Stylesheet Language Transformations (XSLTs) for its components and utilities. Because the process content is delivered only in PIPs or DIs, you must manually back up the XSLTs if you have developed any for the custom integrations, and reapply them as a postupgrade step.
-
Custom EBS WSDL:
If you have customized any EBS WSDL that is delivered or shipped with AIA Foundation Pack, you must back it up and restore it manually as a postupgrade step
Performing Preupgrade Tasks for Product MDM 11.3
Before you upgrade the Product MDM pre-built integration from PIP version 11.2 to 11.3, upgrade Foundation Pack to 11.1.1.7.0 and apply patch 17553612 or later on Product MDM PIP 11.3 if not applied. Also, use the upgrade script from the 11.3 folder. The AIA Foundation Pack content patch 19010814 is mandatory before applying the upgrade scripts for 11.3.
Performing Preupgrade Tasks for Design to Release: Agile - EBS 11.2
Before you upgrade the Design to Release: Agile - EBS pre-built integration from PIP version 11.2 to 11.3, you must apply the roll-up patch 16318283: AGILE TO EBIZ ROLLUP #2 on Design to Release: Agile - EBS PIP 11.2 if not applied.
Performing Preupgrade Tasks for Design to Release: Agile - EBS 11.1
Before you upgrade the Design to Release: Agile - EBS pre-built integration from PIP version 11.1 to 11.3, you must apply the roll-up patch 15931887: AGILE TO EBIZ ROLLUP #3 on Design to Release: Agile - EBS PIP 11.1 if not applied.
Performing Upgrade Process for Pre-Built Integrations
Launching the AIA Pre-Built Integrations Installer
-
To launch AIA Pre-Built Integrations Installer:
-
Navigate to aiapip/Disk1.
-
Follow the launch instructions for your platform.
Table 35-1 Launch Instructions for AIA Pre-Built Integrations Installer
Platform To launch the AIA Pre-Built Integrations Installer Linux x86
Solaris SPARC (64-bit)
IBM AIX Based Systems (64-bit)
HP-UX 11i (64 bit)
At the command line prompt, enter:
./runInstaller -invPtrLoc <AIA_HOME>/oraInst.loc -jreLoc <location of the jre specific to your operating system. This directory should have /bin/java>
Microsoft Windows (32-bit)
Double-click setup.exe
-
Click Next.
Choosing the Existing Home Directory
-
To choose the home directory where the existing version of Pre-Built Integrations is installed:
-
Specify the home directory of your existing AIA implementation.
Note:
Provide the directory where Foundation Pack 11.1.1.6.0, RUP patch 16301959 or later was installed. The path should be available in the list. When you select the current home directory, AIA Pre-Built Integrations Installer disables the rest of the options in the screen and displays the information related to AIA (product name and version number) that is in the directory. -
Click Next.
Running the Directory Selection and Upgrade Process
-
To run the directory selection and upgrade process:
-
On the Summary screen, review the summary of upgrade information.
The summary screen provides information about the existing AIA Pre-Built Integrations installation.
-
Click Install. This upgrades the Pre-Built Integrations version.
PIP- and DI-related files get copied to the specified location. You must manually execute the PIP or DI upgrade scripts to complete the upgrade.
Upgrading AIA 11.5 Integrations
Note:
The integrations that are not listed in this section do not require updates because the contents have not changed.This section discusses the upgrade process for AIA 11.5 integrations.
Upgrading Product MDM: Base Pack
To upgrade the Product MDM: Base Pack pre-built integration from PIP version 11.2 to 11.3, apply patch 21054371, then perform the following task discussed below:
Running Upgrade Scripts for Product MDM: Base Pack
-
Navigate to <AIA_Instance>/bin and run the command source aiaenv.sh for Linux based systems and aiaenv.bat for Microsoft Windows to configure the environment.
-
Navigate to <AIAHOME>/pips/MDMProductPIM/upgrade/11.3 and run the deployment commands for your platform.
Performing Postupgrade Tasks for Product MDM: Base Pack
Configure the endpoint URLs for Oracle PIM web services as described in Configuring Endpoint URLs for Oracle PIM Web Services of this guide.
Upgrading Product MDM: BRM with Pricing Design Center
To upgrade the Product MDM: BRM option and use Oracle Communications Pricing Design Center (PDC) instead of BRM Pricing Center, you perform the following tasks:
-
Configure the PDC option using the Oracle AIA Installer. See Configuring Product MDM: PDC.
-
Deploy the PDC option using scripts. You can choose one of the following deployment options:
-
Preserve your existing BRM option and use the PDC option alongside it in future implementations. Choose this option if you have customized or extended the existing BRM option.
-
Remove the existing BRM option and replace it with the PDC option. Choose this option if you are starting with a fresh implementation and do not need to preserve customizations.
-
-
Manually deploy new PDC routing rules using a new deployment plan. Manually Deploying Routing Rules for PDC.
To upgrade the Product MDM: BRM option and use Pricing Center, see Upgrading Product MDM: BRM with BRM Pricing Center.
Configuring Product MDM: PDC
To configure the Product MDM: PDC pre-built integration:
-
Navigate to the following directory:
AIA_home/aia_instances/instance_name/bin
where:
-
AIA_home is the location you specified when you installed Oracle AIA
-
instance_name is the name of the Oracle AIA instance on which you are configuring the Product MDM: PDC pre-built integration
-
-
Run one of the following commands, depending on your environment:
-
On Linux:
source aiaenv.sh
-
On Windows:
aiaenv.bat
-
-
Navigate to the following folder:
AIA_home/bin
-
Run one of the following commands, depending on your environment:
-
On Linux:
./aiaconfig.sh
-
On Windows:
aiaconfig.bat
This launches the Deployment Configuration Wizard.
-
-
Click Next.
-
Expand Communications Pre-built Integrations, select Oracle Product Master Data Management Integration Option for BRM, and click Next.
The Integration Server Details screen appears.
-
Verify the information on this screen and click Next.
The Choose Design Center for BRM screen appears.
-
Select Yes and click Next.
The Specify Oracle Communications PDC Details screen appears.
-
Enter the following information:
-
PDC Version: The version number of the PDC installation to which you are connecting.
-
Webservice Host Name: The host name of the server where PDC web services are installed.
-
Webservice Port Name: The port on which the PDC web service server listens.
-
PDC Username: The user name used to invoke the PDC web services.
-
-
Click Next.
The Oracle Communications BRM Details screen appears.
-
Verify the information on this screen and click Next.
The Configuration Summary screen appears.
-
Verify the information on this screen and click Configure.
The system displays the progress of the configuration.
-
When the configuration completes, click Next.
The Configuration Complete screen appears.
-
Click Finish.
-
Run the deployment script as described in Deploying Product MDM: PDC.
Deploying Product MDM: PDC
To deploy the Product MDM: PDC pre-built integration using either the upgrade or deployment scripts:
-
Navigate to one of the following directories:
-
To preserve the BRM option and add the PDC option to use alongside it:
AIA_home/pips/MDMProductPDC/DeploymentPlans
-
To undeploy the BRM option and replace it with the PDC option:
AIA_home/pips/MDMProductPDC/upgrade/11.3
-
-
Run the following command:
sh deployMDMProductPDC.shNote:
For Windows, you must create and run a deployment batch file. Use the Linux script as an example. -
Deploy the new routing rules for PDC as described in Manually Deploying Routing Rules for PDC.
Manually Deploying Routing Rules for PDC
After running the Product MDM: PDC pre-built integration upgrade script, you must manually deploy the PDC option routing rules by creating and running a new deployment plan for the ItemEBSV2 and PriceListEBSV2 composites.
To manually deploy the routing rules:
-
Create a new deployment plan that contains the following text:
<Composite compositeName="ItemEBSV2" compositedir="${AIA_HOME}/pips/MDMProduct/EBS/Item/ItemEBSV2" revision="1.0" wlserver="pips.MDMProductPIM" action="deploy" overwrite="true" forceMerge="true"/><Composite compositeName="PriceListEBSV2" compositedir="${AIA_HOME}/pips/MDMProduct/EBS/PriceList/PriceListEBSV2" revision="1.0" wlserver="pips.MDMProductPIM" action="deploy" overwrite="true" forceMerge="true"/>You can see an example deployment plan for the Product MDM: PDC pre-built integration in the following directory:
AIA_HOME/pips/MDMProductPDC/DeploymentPlans
For more information about deployment plans, see Oracle Fusion Middleware Developer's Guide for Oracle Application Integration Architecture Foundation Pack.
-
From the command line, run the following command:
ant -f AIA_Home/Infrastructure/Install/AID/AIAInstallDriver.xml -DDeploymentPlan=NewDeploymentPlanPath -DPropertiesFile=AIA_Home/aia_instances/AIAInstanceName/config/AIAInstallProperties.xml
where NewDeploymentPlanPath is the path to the newly-created deployment plan.
The new composites are deployed to the Oracle AIA server.
Upgrading Product MDM: BRM with BRM Pricing Center
To upgrade the Product MDM: BRM pre-built integration from version 11.2 to 11.3 and use BRM Pricing Center instead of PDC, perform the following task discussed below.
If you are using PDC, see Upgrading Product MDM: BRM with Pricing Design Center.
Running Upgrade Scripts for Product MDM: BRM
-
Navigate to <AIA_Instance>/bin and run the command source aiaenv.sh for Linux based systems and aiaenv.bat for Microsoft Windows to configure the environment.
-
Navigate to <AIAHOME>/pips/MDMProductBRM/upgrade/11.3 and run the deployment commands for your platform.
Upgrading Product MDM: Siebel CRM
To upgrade the Product MDM: Siebel CRM pre-built integration from PIP version 11.2 to 11.3, apply patch 21054371, perform the following task discussed below:
Running Upgrade Scripts for Product MDM: Siebel CRM
-
Navigate to <AIA_Instance>/bin and run the command source aiaenv.sh for Linux based systems and aiaenv.bat for Microsoft Windows to configure the environment.
-
Navigate to <AIAHOME>/pips/MDMProductSiebel/upgrade/11.3 and run the deployment commands for your platform.
Performing Postupgrade Tasks for Product MDM: Siebel CRM
In item sync with pricelists scenario, SyncItemListPIMReqABCS service waits for a response. The response from the ProductOptimizedSyncPriceListListSiebelCommsProvABCSImpl service is sent to the requester through CommunicationsPriceListResponseEBSV2. Therefore, after you deploy the Siebel CRM services, you must update the following integration services:
-
ProductOptimizedSyncPriceListListSiebelCommsProvABCSImpl
-
SyncItemCompositionListSiebelCommsProvABCSImpl
To update the ProductOptimizedSyncPriceListListSiebelCommsProvABCSImpl service:
-
Edit the AIAConfigurationProperties.xml file that is located in <AIA_INSTANCE>/AIAMetaData/config.
-
Ensure that the following properties are listed in the AIAConfigurationProperties.xml file:
-
<Property name="EBSOverride.CommunicationsPriceListResponseEBS.SyncPriceListListResponse.Address">http://HOST_NAME:PORT_NAME/soa-infra/services/default/CommunicationsPriceListResponseEBSV2/CommunicationsPriceListResponseEBSV2_ep</Property>
-
<Property name="EBSOverride.CommunicationsPriceListResponseEBS.SyncPriceListListResponse.PortType">{http://xmlns.oracle.com/EnterpriseServices/Core/PriceList/V2}CommunicationsPriceListResponse</Property>
-
<Property name="EBSOverride.CommunicationsPriceListResponseEBS.SyncPriceListListResponse.ServiceName">{http://xmlns.oracle.com/EnterpriseServices/Core/PriceList/V2}CommunicationsPriceListResponse</Property>
-
To update the SyncItemCompositionListSiebelCommsProvABCSImpl service:
-
Edit the AIAConfigurationProperties.xml file that is located in <AIA_INSTANCE>/AIAMetaData/config.
-
Ensure that the following properties are listed in the AIAConfigurationProperties.xml file:
-
<Property name="EBSOverride.CommunicationsItemCompositionResponseEBSV1.SyncItemCompositionListResponse.Address">http://HOST_NAME:PORT_NAME/soa-infra/services/default/ProductOptimizedSyncPriceListListSiebelCommsProvABCSImpl/ProductOptimizedSyncPriceListListSiebelCommsProvABCSImpl</Property>
-
<Property name="EBSOverride.CommunicationsItemCompositionResponseEBSV1.SyncItemCompositionListResponse.PortType">{http://xmlns.oracle.com/ABCSImpl/Siebel/Industry/Comms/ProductOptimizedSyncPriceListListSiebelCommsProvABCSImpl/V1}ProductOptimizedSyncPriceListListSiebelCommsProvABCSImpl</Property>
-
<Property name="EBSOverride.CommunicationsItemCompositionResponseEBSV1.SyncItemCompositionListResponse.ServiceName">{http://xmlns.oracle.com/ABCSImpl/Siebel/Industry/Comms/ProductOptimizedSyncPriceListListSiebelCommsProvABCSImpl/V1}ProductOptimizedSyncPriceListListSiebelCommsProvABCSImpl</Property>
-
Update Product.Source.PIP Property Value
To update the Product.Source.PIP property value:
-
Edit the AIAConfigurationProperties.xml file located in <AIA_INSTANCE>/AIAMetaData/config.
-
Locate the
Product.Source.PIPproperty and change the value as follows:From:
<Property name="Product.Source.PIP">O2C</Property>To:
<Property name="Product.Source.PIP">MDM</Property>
Upgrading Design to Release: Agile - EBS
Upgrade the Design to Release: Agile - EBS 11.2/11.1 pre-built integrations by following the tasks discussed below:
Running Upgrade Scripts for Design to Release: Agile - EBS
-
If you are upgrading Agile PLM or EBS application, then perform the following steps:
-
Update application details in AIA, see Chapter 20, "Configuring and Deploying Design to Release: Agile - EBS."
-
Update application versions in the AIA system table through AIA Console -> Setup -> Systems
-
-
Navigate to <AIA_Instance>/bin and run the command
source aiaenv.shfor Linux based systems andaiaenv.batfor Microsoft Windows to configure the environment. -
Navigate to <AIAHOME>/pips/AgileToEbiz/upgrade/11.3 and run the deployment commands for your platform.
Performing Postupgrade Tasks for Design to Release: Agile - EBS
To perform postupgrade tasks from AgileToEbiz 11.2 / 11.1 to 11.3:
-
Navigate to the folder $AIA_HOME/aia_instances/<INSTANCE_NAME>/AIAMetaData/config.
-
Open AIAConfigurationProperties.xml and change the following property values listed below from your backup:
<ModuleConfiguration moduleName="Agile">
<Property name="LANG_LOCALE">English</Property>
<Property name="MULTISITE_ENABLED">TRUE</Property>
<Property name="Item.UnitCostAttribute">Site.Numeric01</Property>
<Property name="Item.AvailableQuantityAttribute">Site.Numeric02</Property>
<Property name="Item.OnHandQuantityAttribute">Site.Numeric03</Property>
<Property name="Item.ReservedQuantityAttribute">Site.Numeric04</Property>
<Property name="Change.TransferStatusAttribute">PageTwo.Text02</Property>
<Property name="Change.TransferStatusDetailedMessageAttribute">PageTwo.Multitext35</Property>
<Property name="REPLICATE_BOM_ENABLED">FALSE</Property>
<Property name="COMMON_BOM_ENABLED">FALSE</Property>
<Property name="EnableAgileATOActionItemIntegration">FALSE</Property>
</ModuleConfiguration>
-
Update MDS with the above AIAConfigurationProperties.xml changes and any other custom changes present in the AIAConfigurationProperties.xml backup file from preupgrade.
To update AIAConfigurationProperties.xml with custom serviceconfiguration elements:
-
Open the $AIA_HOME/aia_instances/$INSTANCE_NAME/config folder.
Open the AIAConfigurationProperties.xml and add the customelements under respective service configurations.
Open the deployment plan file, UpdateMetaDataDP.xml. Update the UpdateMetaDataDP.xml by inserting the include tags for AIAConfigurationProperties.xml, which you may want to add to the MDS:
<fileset dir="${AIA_HOME}/aia_instances/${INSTANCE_NAME}"><include name ="config/AIAConfigurationProperties.xml"/></fileset> -
Open the $AIA_HOME/aia_instances/$INSTANCE_NAME/bin folder.
-
Execute the following command: source aiaenv.sh
-
Access the file path, $AIA_ HOME/Infrastructure/Install/scripts. Execute the script, UpdateMetaData.xml by using the following command: ant -f $AIA_ HOME/Infrastructure/Install/scripts/UpdateMetaData.xml
-
Any custom modifications/customizations must be reapplied.
-
-
If Oracle Enterprise Repository (OER) harvesting is done as part of AgileToEbiz PIP 11.2/11.1 installations and you are harvesting upgraded content to OER, then perform the following steps:
-
Setup Oracle AIA Content Harvesting. For more information, see Section: 5.1 How to Set Up Oracle AIA Content Harvesting from "Oracle® Fusion Middleware Developer's Guide for Oracle Application Integration Architecture Foundation Pack 11g Release 1 (11.1.1.7)
-
Open the $AIA_HOME/aia_instances/$INSTANCE_NAME/bin folder.
-
Execute the following command: source aiaenv.sh
-
Access the $AIA_HOME/Infrastructure/LifeCycle/AIAHarvester folder. Execute the script, ./AIAHarvest.sh -settings $AIA_HOME/aia_instances/D2R/Infrastructure/LifeCycle/Install/PIPHarvest/AgileToEbizUpgradeHS.xml
-
-
If Oracle Enterprise Repository (OER) harvesting is not done as part of AgileToEbiz PIP 11.2/11.1 installations and you are harvesting upgraded content to OER, then perform the following steps:
-
Setup Oracle AIA Content Harvesting. For more information, see Section: 5.1 How to Set Up Oracle AIA Content Harvesting from "Oracle® Fusion Middleware Developer's Guide for Oracle Application Integration Architecture Foundation Pack 11g Release 1 (11.1.1.7)
-
Open the $AIA_HOME/aia_instances/$INSTANCE_NAME/bin folder.
-
Execute the following command: source aiaenv.sh
-
Access the $AIA_HOME/Infrastructure/LifeCycle/AIAHarvester folder. Execute the script, ./AIAHarvest.sh -settings $AIA_HOME/aia_instances/D2R/Infrastructure/LifeCycle/Install/PIPHarvest/AgileToEbizHS.xml
-
Upgrading Design to Release: Agile - SAP
Upgrade the Design to Release: Agile - SAP pre-built integrations by following the tasks discussed below:
Performing Preupgrade Tasks for Design to Release: Agile - SAP
To upgrade the Design to Release: Agile - SAP pre-built integrations from PIP version 11.1 to 11.2, you must manually execute the upgrade scripts. Before you upgrade Design to Release: Agile - SAP PIP, you must download the SAP JCO 3.0 from the SAP market place and copy the JCO.jar file in the lib directory of adapters.
Running Upgrade Scripts for Design to Release: Agile - SAP
-
Navigate to <AIA_Instance>/bin and run the command
source aiaenv.shfor Linux based systems andaiaenv.batfor Microsoft Windows to configure the environment. -
Apply the patch 15835701.
-
Navigate to <AIAHOME>/pips/AgileToSAP/upgrade/11.2 and run the deployment commands for your platform.
Upgrading Comms Agent Assisted Billing Care: Siebel CRM - BRM
Upgrade Foundation Pack first and then upgrade the Comms Agent Assisted Billing Care: Siebel CRM - BRM Pre-Built Integrations following the tasks discussed below.
Performing Preupgrade Tasks for Comms Agent Assisted Billing Care: Siebel CRM - BRM
Before upgrading the Comms Agent Assisted Billing Care: Siebel CRM - BRM Pre-Built Integrations from PIP version 11.3 to 11.4, perform the following tasks:
-
Upgrade Foundation Pack to 11.1.1.7.0 plus latest FP RUP patch.
-
Apply interim upgrade patch 20858071 to the pre-built integration.
Running Upgrade Scripts for Comms Agent Assisted Billing Care: Siebel CRM - BRM
To upgrade the integration on the Fusion Middleware server, run the command specific to your platform:
-
Navigate to <AIA_Instance>/bin and run the command
source aiaenv.shfor Linux based systems andaiaenv.batfor Microsoft Windows to configure the environment. -
Navigate to <AIAHOME>/pips/Communications/AABC/Upgrade and run the command for your platform.
-
Review the log at location <AIA_INSTANCE>/<INSTANCE_NAME>/logs/AABC-Upgrade-11_2_To_11_3-DD-MM-YYYY_HH-HH-SS.log.
-
If the Custom Multi XREF Tables/Split XREF is enabled in the environment, run createMultiTableXREFViewForCollections11_3_To_11_4.sh present under AIA_HOME/pips/Communications/AABC/Upgrade folder.
-
Review the log file in the location specified in the command or at the default location <AIA_Instance>/logs/AABC-Upgrade-11_3_To_11_4-DD-MM-YYYY_HH-HH-SS.log to verify successful completion of the task.
-
If this is the first or only pre-built integration that you are upgrading and the Custom Multi XREF Tables/Split XREF feature is enabled, you must run a script to upgrade the custom tables.
If you have already upgraded the Order to Cash pre-built integration and upgraded the custom tables, you do not need to repeat this step.
To upgrade the custom XREF tables:
-
Navigate to the following directory:
AIA_Home/pips/Communications/MULTI_XREF_TABLE_UPGRADE_11.3_To_11.4 -
Run one of the following commands, depending on your platform:
-
For UNIX-based platforms:
MULTI_XREF_TABLE_UPGRADE_11.4.sh
-
For Windows platforms:
MULTI_XREF_TABLE_UPGRADE_11.4.bat
-
-
Review the log file in the location specified in the command or at the default location <AIA_Instance>/logs/MULTI_XREF_TABLE_UPGRADE_11.4_Deployments_YYYY-MM-DD_HH-MI-SS.log to verify successful completion of the task.
-
Performing Postupgrade Tasks for Comms Agent Assisted Billing Care: Siebel CRM - BRM
You must perform the following postupgrade tasks:
-
Reconfigure MultiBRM setup in AIA Configuration file and update the MDS.
This step is required because the upgrade script forcemerges the AIA service configurations into <AIA_INSTANCE>/<INSTANCE_NAME>/AIAMetaData/config/AIAConfigurationProperties.xml.
-
Perform additional post upgrade tasks as described in Performing Postupgrade Tasks for Pre-Built Integrations and Performing Postupgrade Tasks for AIA.
Upgrading Comms Order to Cash: Siebel CRM, OSM and BRM
Upgrade Foundation Pack first and then upgrade the Comms Order to Cash: Siebel CRM, OSM and BRM Pre-Built Integration following the tasks discussed below.
Performing Preupgrade Tasks for Comms Order to Cash: Siebel CRM, OSM and BRM
Before upgrading the Comms Order to Cash: Siebel CRM, OSM and BRM Pre-Built Integration from version 11.3 to 11.4, perform the following tasks:
-
Upgrade Foundation Pack to 11.1.1.7.0 plus latest FP RUP patch.
-
Apply the interim upgrade patch 20886525 to the pre-built integration.
Running Upgrade Scripts for Comms Order to Cash: Siebel CRM, OSM and BRM
To upgrade the integration on the Fusion Middleware server, run the command specific to your platform:
-
Navigate to <AIA_Instance>/bin and run the command
source aiaenv.shfor Linux based systems andaiaenv.batfor Microsoft Windows to configure the environment. -
Navigate to <AIAHOME>/pips/Communications/O2C/Upgrade and run the command for your platform.
-
Review the log at location <AIA_INSTANCE>/<INSTANCE_NAME>/logs/O2C-Upgrade-11_3_To_11_4-DD-MM-YYYY_HH-HH-SS.log.
-
If this is the first or only pre-built integration that you are upgrading and the Custom Multi XREF Tables/Split XREF feature is enabled, you must run a script to upgrade the custom tables.
If you have already upgraded the Agent Assisted Billing Care pre-built integration and upgraded the custom tables, you do not need to repeat this step.
To upgrade the custom XREF tables:
-
Navigate to the following directory:
AIA_Home/pips/Communications/MULTI_XREF_TABLE_UPGRADE_11.3_To_11.4 -
Run one of the following commands, depending on your platform:
-
For UNIX-based platforms:
MULTI_XREF_TABLE_UPGRADE_11.4.sh
-
For Windows platforms:
MULTI_XREF_TABLE_UPGRADE_11.4.bat
-
-
Review the log file in the location specified in the command or at the default location <AIA_Instance>/logs/MULTI_XREF_TABLE_UPGRADE_11.4_Deployments_YYYY-MM-DD_HH-MI-SS.log to verify successful completion of the task.
-
Performing Postupgrade Tasks for Comms Order to Cash: Siebel CRM, OSM and BRM
You must perform the following postupgrade tasks:
-
Reconfigure MultiBRM setup in AIA Configuration file and update the MDS.
This step is required because the upgrade script forcemerges the AIA service configurations into <AIA_INSTANCE>/<INSTANCE_NAME>/AIAMetaData/config/AIAConfigurationProperties.xml.
-
Perform additional post upgrade tasks as described in Performing Postupgrade Tasks for Pre-Built Integrations and Performing Postupgrade Tasks for AIA.
Upgrading Comms Order to Cash: Siebel CRM and BRM
Upgrade Foundation Pack first and then upgrade the Comms Order to Cash: Siebel CRM and BRM Pre-Built Integrations following the tasks discussed below.
Performing Preupgrade Tasks for Comms Order to Cash: Siebel CRM and BRM
Before upgrading the Comms Order to Cash: Siebel CRM and BRM Pre-Built Integrations from version 11.3 to 11.4, perform the following tasks:
-
Upgrade Foundation Pack to 11.1.1.7.0 plus latest FP RUP patch.
-
Apply interim upgrade patch 20857917 to the pre-built integration.
Running Upgrade Scripts for Comms Order to Cash: Siebel CRM and BRM
To upgrade the integration on the Fusion Middleware server, run the command specific to your platform:
-
Navigate to <AIA_Instance>/bin and run the command
source aiaenv.shfor Linux based systems andaiaenv.batfor Microsoft Windows to configure the environment. -
Navigate to <AIAHOME>/pips/Communications/O2B/Upgrade and run the command for your platform.
-
Review the log at location <AIA_INSTANCE>/<INSTANCE_NAME>/logs/O2B-Upgrade-11_3_To_11_4-DD-MM-YYYY_HH-HH-SS.log.
-
If this is the first or only pre-built integration that you are upgrading and the Custom Multi XREF Tables/Split XREF feature is enabled, you must run a script to upgrade the custom tables.
If you have already upgraded the Agent Assisted Billing Care pre-built integration and upgraded the custom tables, you do not need to repeat this step.
To upgrade the custom XREF tables:
-
Navigate to the following directory:
AIA_Home/pips/Communications/MULTI_XREF_TABLE_UPGRADE_11.3_To_11.4 -
Run one of the following commands, depending on your platform:
-
For UNIX-based platforms:
MULTI_XREF_TABLE_UPGRADE_11.4.sh
-
For Windows platforms:
MULTI_XREF_TABLE_UPGRADE_11.4.bat
-
-
Review the log file in the location specified in the command or at the default location <AIA_Instance>/logs/MULTI_XREF_TABLE_UPGRADE_11.4_Deployments_YYYY-MM-DD_HH-MI-SS.log to verify successful completion of the task.
-
Performing Postupgrade Tasks for Comms Order to Cash: Siebel CRM and BRM
-
Reconfigure MultiBRM setup in AIA Configuration file and update the MDS.
This step is required because the upgrade script forcemerges the AIA service configurations into <AIA_INSTANCE>/<INSTANCE_NAME>/AIAMetaData/config/AIAConfigurationProperties.xml.
-
Perform additional post upgrade tasks as described in Performing Postupgrade Tasks for Pre-Built Integrations and Performing Postupgrade Tasks for AIA.
Upgrading Comms Order to Cash: Siebel CRM and OSM
Upgrade Foundation Pack first and then upgrade the Comms Order to Cash: Siebel CRM and OSM Pre-Built Integrations following the tasks discussed below.
Performing Preupgrade Tasks for Comms Order to Cash: Siebel CRM and OSM
Before upgrading the Comms Order to Cash: Siebel CRM and OSM Pre-Built Integrations from version 11.3 to 11.4, perform the following tasks:
-
Upgrade Foundation Pack to 11.1.1.7.0 plus latest FP RUP patch.
-
Apply interim upgrade patch 20858215 to the pre-built integration.
Running Upgrade Scripts for Comms Order to Cash: Siebel CRM and OSM
To upgrade the integration on the Fusion Middleware server, run the command specific to your platform:
-
Navigate to <AIA_Instance>/bin and run the command
source aiaenv.shfor Linux based systems andaiaenv.batfor Microsoft Windows to configure the environment. -
Navigate to <AIAHOME>/pips/Communications/O2A/Upgrade and run the command for your platform.
-
Review the log at location <AIA_INSTANCE>/<INSTANCE_NAME>/logs/O2A-Upgrade-11_3_To_11_4-DD-MM-YYYY_HH-HH-SS.log.
-
If this is the first or only pre-built integration that you are upgrading and the Custom Multi XREF Tables/Split XREF feature is enabled, you must run a script to upgrade the custom tables.
If you have already upgraded the Agent Assisted Billing Care pre-built integration and upgraded the custom tables, you do not need to repeat this step.
To upgrade the custom XREF tables:
-
Navigate to the following directory:
AIA_Home/pips/Communications/MULTI_XREF_TABLE_UPGRADE_11.3_To_11.4 -
Run one of the following commands, depending on your platform:
-
For UNIX-based platforms:
MULTI_XREF_TABLE_UPGRADE_11.4.sh
-
For Windows platforms:
MULTI_XREF_TABLE_UPGRADE_11.4.bat
-
-
Review the log file in the location specified in the command or at the default location <AIA_Instance>/logs/MULTI_XREF_TABLE_UPGRADE_11.4_Deployments_YYYY-MM-DD_HH-MI-SS.log to verify successful completion of the task.
-
Performing Postupgrade Tasks for Comms Order to Cash: Siebel CRM and OSM
Perform additional post upgrade tasks as described in Performing Postupgrade Tasks for Pre-Built Integrations and Performing Postupgrade Tasks for AIA.
Upgrading AIA 3.1 PIPs and DIs
Note:
The PIPs or DIs that are not listed in this section do not require updates because the contents have not changed.This section discusses the upgrade process for AIA 3.1 PIPs and DIs. The PIPs and DIs included in this section are upgraded from version 3.1 to 3.1.1 and from 3.1 to 11.2.
Upgrading the Design to Release: Agile PLM for Process - OPM PIP
Upgrade Foundation Pack first and then upgrade the Design to Release: Agile PLM for Process - OPM PIP following the tasks discussed below.
Note:
Existing patches for the Design to Release: Agile PLM for Process - OPM 3.1.1 PIP are still applicable in the 11.5 release and are not included as part of the upgrade process. After upgrading you must reapply any patches installed for the RV 3.1.Performing Preupgrade Tasks for the Design to Release: Agile PLM for Process - OPM PIP
To upgrade the Design to Release: Agile PLM for Process - OPM PIP from version 3.1 to 3.1.1, you must manually execute the upgrade scripts. You must upgrade Foundation Pack to 11.1.1.6.0, RUP patch 16301959 or later from your existing version before you can upgrade Design to Release: Agile PLM for Process - OPM PIP.
Running Upgrade Scripts for the Design to Release: Agile PLM for Process - OPM PIP
To upgrade the PIP on the Fusion Middleware server, run the command specific to your platform:
-
Navigate to <AIA_Instance>/bin and run the command
source aiaenv.shfor Linux based systems andaiaenv.batfor Microsoft Windows to configure the environment. -
Run the command for your platform
Note:
When you copy and paste the command in the command line, ensure that there is space between.xml and -. The same is true when running the undeployment command.Table 35-12 Deployment Commands for the Design to Release: Agile PLM for Process - OPM PIP
Platform Deployment Command Linux
Solaris SPARC
IBM AIX Based Systems
HP-UX
ant -f <AIA_HOME>/Infrastructure/Install/AID/AIAInstallDriver.xml
-DDeploymentPlan=<AIA_HOME>/pips/PLM4PEbizOPM/upgrade/11.1/PLM4PEbizOPMUpgrade31_To_111DP.xml
-DPropertiesFile=<AIA_HOME>/aia_instances/<aia_instance>/config/AIAInstallProperties.xml
-l <AIA_HOME>/pips/PLM4PEbizOPM/upgrade/11.1/PLM4PEbizOPMUpgrade31_To_111.log
Microsoft Windows
ant -f <AIA_HOME>\Infrastructure\Install\AID\AIAInstallDriver.xml
-DDeploymentPlan=<AIA_HOME>\pips\PLM4PEbizOPM\upgrade\11.1\PLM4PEbizOPMUpgrade31_To_111DP.xml
-DPropertiesFile=<AIA_HOME>\aia_instances\<aia_instance>\config\AIAInstallProperties.xml
-l <AIA_HOME>\pips\PLM4PEbizOPM\upgrade\11.1\PLM4PEbizOPMUpgrade31_To_111.log
-
Review the log file in the location specified in the command to verify successful deployment.
Performing Postupgrade Tasks for the Design to Release: Agile PLM for Process - OPM PIP
-
Perform additional post upgrade tasks as described in Performing Postupgrade Tasks for Pre-Built Integrations and Performing Postupgrade Tasks for AIA.
Upgrading the Lead to Order: CRM OD - EBS PIP
Upgrade Foundation Pack first and then upgrade the Lead to Order: CRM OD -EBS PIP following the tasks discussed below.
Note:
Existing patches for the Lead to Order: CRM OD -EBS 3.1.1 PIP are still applicable in the 11.5 release and are not included as part of the upgrade process. After upgrading you must reapply any patches installed for the RV 3.1.Performing Preupgrade Tasks for the Lead to Order: CRMOD - EBS PIP
To upgrade Lead to Order: CRM OD - EBS PIP from version 3.1 to 3.1.1, you must manually execute the upgrade scripts. You must upgrade Foundation Pack to 11.1.1.6.0, RUP patch 16301959 or later from your existing version before you can upgrade Lead to Order: CRM OD - EBS PIP.
Running Upgrade Scripts for the Lead to Order: CRM OD - EBS PIP
To upgrade the PIP on the Fusion Middleware server, run the command specific to your platform:
-
Navigate to <AIA_Instance>/bin and run the command source aiaenv.sh for Linux based systems and aiaenv.bat for Microsoft Windows to configure the environment.
-
Navigate to <AIA_HOME>pips/CRMODtoEbizLeadToOrder/upgrade/11.1 and run the command for your platform.
-
Review the log file in the location specified in the command to verify successful deployment.
Performing Postupgrade Tasks for the Lead to Order: CRM OD - EBS PIP
Perform additional post upgrade tasks as described in Performing Postupgrade Tasks for Pre-Built Integrations and Performing Postupgrade Tasks for AIA.
Upgrading the Order to Cash: Siebel CRM - EBS PIP
Upgrade Foundation Pack first and then upgrade the Order to Cash: Siebel CRM - EBS PIP following the tasks discussed below.
Note:
Existing patches for the Order to Cash: Siebel CRM - EBS 3.1.1 PIP are still applicable in the 11.5 release and are not included as part of the upgrade process. After upgrading you must reapply any patches installed for the RV 3.1.Performing Preupgrade Tasks for the Order to Cash: Siebel CRM - EBS PIP
To upgrade the Order to Cash: Siebel CRM - EBS PIP from version 3.1 to 3.1.1, you must manually execute the upgrade scripts. You must upgrade Foundation Pack to 11.1.1.6.0, RUP patch 16301959 or later from your existing version before you can upgrade Order to Cash: Siebel CRM - EBS PIP.
Running Upgrade Scripts for the Order to Cash: Siebel CRM - EBS PIP
To upgrade the PIP on the Fusion Middleware server, run the command specific to your platform:
-
Navigate to <AIA_Instance>/bin and run the command
source aiaenv.shfor Linux based systems andaiaenv.batfor Microsoft Windows to configure the environment. -
Run the command for your platform:
Note:
When you copy and paste the command in the command line, ensure that there is space between.xml and -. Ensure that there is space between these two when you run undeployment command too.Table 35-14 Deployment Commands for the Order to Cash: Siebel CRM - EBS PIP
Platform Deployment Command Linux
Solaris SPARC
IBM AIX Based Systems
HP-UX
ant -f <AIA_HOME>/Infrastructure/Install/AID/AIAInstallDriver.xml
-DDeploymentPlan=<AIA_HOME>/pips/OrderToCash/upgrade/11.1/OrderToCashUpgrade31_To_111DP.xml
-DPropertiesFile=<AIA_HOME>/aia_instances/<aia_instance>/config/AIAInstallProperties.xml
-l <AIA_HOME>/pips/OrderToCash/upgrade/11.1/OrderToCashUpgrade31_To_111.log
Microsoft Windows
ant -f <AIA_HOME>\Infrastructure\Install\AID\AIAInstallDriver.xml
-DDeploymentPlan=<AIA_HOME>\pips\OrderToCash\upgrade\11.1\OrderToCashUpgrade31_To_111DP.xml
-DPropertiesFile=<AIA_HOME>\aia_instances\<aia_instance>\config\AIAInstallProperties.xml
-l <AIA_HOME>\pips\OrderToCash\upgrade\11.1\OrderToCashUpgrade31_To_111.log
-
Review the log file in the location specified in the command to verify successful deployment.
Performing Postupgrade Tasks for the Order to Cash: Siebel CRM - EBS PIP
Perform additional post upgrade tasks as described in Performing Postupgrade Tasks for Pre-Built Integrations and Performing Postupgrade Tasks for AIA.
Upgrading the LSP Order Mgmt: OTM - EBS - Siebel CRM PIP
Upgrade Foundation Pack first and then upgrade the LSP Order Mgmt: OTM - EBS - Siebel CRM PIP following the tasks discussed below.
The steps to upgrade the LSP Order Mgmt: OTM - EBS - Siebel CRM PIP from version 3.1 to version 3.1.1 are the same if upgrading from the AIA 3.1 release to the AIA 11.5 release or the AIA 11.4 release to the AIA 11.5 release.
Note:
Existing patches for the LSP Order Mgmt: OTM - EBS - Siebel CRM 3.1.1 PIP are still applicable in the 11.5 release and are not included as part of the upgrade process. After upgrading you must reapply any patches installed for the RV 3.1.Performing Preupgrade Tasks for the LSP Order Mgmt: OTM - EBS - Siebel CRM PIP
To upgrade the LSP Order Mgmt: OTM - EBS - Siebel CRM PIP from version 3.1 to version 3.1.1, you must manually execute the upgrade scripts. You must upgrade Foundation Pack to 11.1.1.6.0, RUP patch 16301959 or later from your existing version before you can upgrade the Order to Cash: Siebel CRM - EBS PIP.
Note:
If you have not installed the 11.5 AIA release, run the AIA 11.5 installer on your existing AIAHOME to get the latest version of the files.Running Upgrade Scripts for the LSP Order Mgmt: OTM - EBS - Siebel CRM PIP
To upgrade the LSP Order Mgmt: OTM - EBS - Siebel CRM PIP on the Fusion Middleware server, run the command specific to your platform:
-
Navigate to <AIA_Instance>/bin and run the command
source aiaenv.shfor Linux based systems andaiaenv.batfor Microsoft Windows to configure the environment. -
Navigate to $AIA_HOME/pips/FleetOrderManagement/upgrade and run the command from your platform.
-
Review the log file in the location specified in the command to verify successful deployment.
Performing Postupgrade Tasks for the LSP Order Mgmt: OTM - EBS - Siebel CRM PIP
Perform additional postupgrade tasks as described in Performing Postupgrade Tasks for Pre-Built Integrations and Performing Postupgrade Tasks for AIA.
Performing Postupgrade Tasks for Pre-Built Integrations
You must perform the following key tasks after you successfully upgrade to pre-built integrations 11.5:
-
Deploy any custom processes that were developed.
If you plan to use any of the enhanced or new features in pre-built integrations 11.1, including the EBO changes, you must update these custom processes before re-deployment.
-
Merge extensions.
Any xsl extensions and wsdl customizations maintained in AIA HOME / SOA HOME must be merged with the preupgrade back up changes after comparison.
-
Restore customizations.
Any custom code developed and maintained in AIA HOME / SOA HOME must be restored.
-
Upgrading ABCS Service Generator input.xml
The input.xml files created in previous versions of the pre-built integrations do not directly work with 11.1.1.7.0 version of ABCS Service Generator. You must move GenerateReferenceWSDLFileIndicator element from GenerateOutputFiles section to each TargetService where you must reference the WSDL. This flag must be added to each of the targetservice sections.
Log in to the AIA Console to verify that the following components are working:
-
OER (optional):
Ensure that the services and objects can be searched for and viewed. If you had any integration scenarios published, check whether they are accessed as well.
-
CAVS:
Check that the existing Test and Simulator definitions defined can still be viewed and are functional.
-
Error Handling and Setup:
Verify that the existing setup data (Setup Tab Page) is unchanged and two new columns (ERROR_TYPE, ERROR_EXT_HANDLER) are added to the Error Notifications table.
-
Integrate customizations made to composites as described in Integrating Customizations to Composites After Upgrading.
-
Perform additional post upgrade tasks as described in Performing Postupgrade Tasks for AIA..
Integrating Customizations to Composites After Upgrading
Perform the following procedure on any upgraded composites that were previously customized using JDeveloper. Only customizations that were made within customizable scopes, as described in Making Upgrade-Safe Composite Customizations, are retained. This procedure assumes familiarity with JDeveloper and customizing composites.
To integrate your custom composites after upgrading:
-
Open JDeveloper.
The Select Role dialog box appears.
-
Select Default Role and click OK.
-
In the Projects section, select the top-level element.
-
From the File menu, select Import.
-
Select SOA Archive Into SOA Project and click OK.
-
Click Browse.
-
Browse to the directory where the upgraded version of the deployed composite is copied. For example:
C:\DeployedCodeFromServer\ABCS\ABCS_V2\deploy
where DeployedCodeFromServer is the directory where the deployed composite is copied, ABCS is the composite name, and ABCS_V2 is the upgraded version of the composite.
-
Select the JAR file for the new composite and click Open.
-
Select the Import for Customization option and click Finish.
-
From the Tools menu, select Preferences.
-
From the navigation tree, select Roles.
-
Under Roles, select Customization Developer.
JDeveloper reopens in the new role.
-
In the Projects section, expand the composite and double-click the BPEL file.
-
Locate the customizable scope where the customizations were made.
-
Confirm that the customizations appear and resolve any conflicts.
-
Redeploy the custom composite using JDeveloper or a deployment plan.
Performing Postupgrade Tasks for AIA
Evaluate the upgrade log file for any exceptions or warnings:
-
For pre-built integrations, the upgrade DP log is created on the name of the integration. For example, if you are upgrading the CRMOD to Ebiz Lead to Order PIP, the name of the log file is AIA_HOME/pips/CRMODtoEbizLeadToOrder/upgrade/11.1/CRMODtoEbizLeadToOrderUpgradeDP31_TO_111.log.
The following warning message describes the EOL content:
runCustomExtTracer:
[java] java.io.UTFDataFormatException: Invalid byte 1 of 1-byte UTF-8 sequence.
-
For objects that were identified to have been extended, the AIA Pre-Built Integrations Installer logs the list of EBOs that it found extended by you. These are reported in the following way:
[java] /slot/ems1846/oracle/FP_Upgrade_9June_1/patchset/AIAComponents/EnterpriseObjectLibrary/Core/Custom/EBO/InstalledProduct/V2/CustomInstalledProductEBO.xsd
[java] :[Element: <xsd:sequence [Namespace: http://www.w3.org/2001/XMLSchema]/>]element updated
-
Every major task performed by the AIA Pre-Built Integrations Installer is audited in the file. Here are some sample audit comments:
undeployAIAUI:
[echo] - Undeploying the Ear AIAApplication.ear
[java] 08/08/09 16:12:33 Notification ==>Application UnDeployer for AIAApplication STARTS.
DeployAIAUI:
[echo] - Deploying the Ear AIAApplication.ear
[oracle:deploy] Deploying application AIAApplication.
[oracle:deploy] Application deployer for AIAApplication COMPLETES.
[echo] - Deployment of AIAApplication.ear completed
From the backups that you performed, compare the following files and manually merge the configuration settings, as required:
You should consider restoring files from the backups of the <aia_instance>/AIAMetaData/config folder.
For more information about how to perform implementation-related configurations, see Oracle Fusion Middleware Developer's Guide for Oracle Application Integration Architecture Foundation Pack.