- Remove the access window on the air duct to remove the heat sink and CPU.
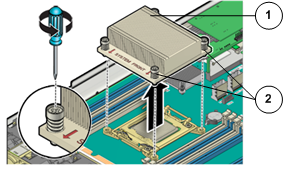
- Loosen the four Phillips screws on the four sides of the heat sink that secure the heat sink to the Replication Engine chassis a few turns at a time in a diametrically opposed pattern using a Phillips Number 2 screwdriver.
Figure 1: Loosen four screws to remove heat sink
- Legend
-
1 Heat sink 2 Phillips screws that secure the heat sink
Note: Loosen one screw, then loosen the screw opposite that screw on the heat sink to prevent it from warping the motherboard on which it is mounted. - Gently twist the heat sink left and right, while pulling upward, to separate the heat sink from the top of the CPU.Note: A thin layer of thermal grease separates the heat sink and the CPU. This thermal grease also acts as an adhesive.CautionDo not allow the thermal grease to contaminate the work space or other components.
- Lift up the failed heat sink and set aside on an antistatic mat.
- Visually inspect the failed heat sink to verify if the thermal grease has dried out and use an alcohol pad to clean the thermal grease from the underside of the heat sink.Note: Be careful not to get the thermal grease on your fingers, as this could result in contamination of components.CautionFailure to clean the heat sink before removing the CPU can result in the accidental contamination of the CPU socket or other components.