| Oracle® Communications Network Service Orchestration Solution Getting Started Release 1.0 E58676-02 |
|
|
PDF · Mobi · ePub |
| Oracle® Communications Network Service Orchestration Solution Getting Started Release 1.0 E58676-02 |
|
|
PDF · Mobi · ePub |
Getting Started
Release 1.0
E58676-02
February 2015
This document provides information about the software requirements, installation, integration, and use of Oracle Communications Network Service Orchestration Solution.
The Network Service Orchestration solution enables you to create, implement, and manage the life cycles of your network services and their deployment as interconnected virtual network functions (VNFs) on virtual resources. The solution uses Oracle Communications Design Studio, Oracle Communications Unified Inventory Management (UIM) and Oracle Communications ASAP. The solution enables you to quickly create network services and virtual network functions by integrating with Oracle Communications Application Orchestrator, which manages the life cycles of VNFs. The solution is extensible and allows integration with third-party VNF managers.
The Network Service Orchestration solution provides the following functionality:
Definition of VNFs and Network Services. You can define and model VNFs and network services depending on the network functions that you want to virtualize on your network. In Network Functions Virtualization (NFV), defining and modeling VNFs and network services is referred to as onboarding VNF descriptors and network service descriptors. See "Defining VNFs and Network Services" for more information.
Instantiation of VNFs and Network Services. You can quickly create VNFs and network services so that they are active in your network. You can manage the life cycles of your VNFs and network services and control the resources that they use. See "Creating VNFs and Network Services" for more information.
Scaling of VNFs and Network Services. You can dynamically extend or reduce resources granted to your virtual network functions. See "Setting VNF Scaling Thresholds" for more information.
The Network Service Orchestration solution uses the defined elements and standards of the Network Functions Virtualization (NFV) reference framework.
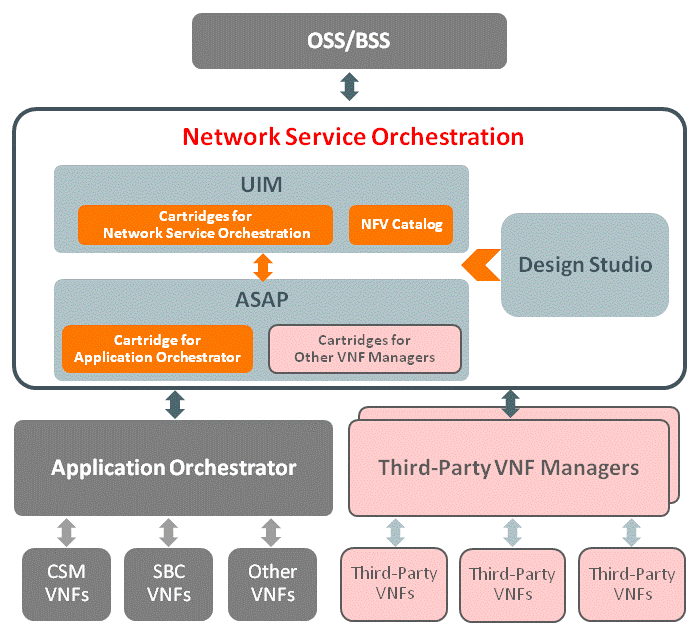
Figure 1 illustrates the Network Service Orchestration solution architecture.
Figure 1 Network Service Orchestration Solution Architecture
To implement the Network Service Orchestration solution, you require the following software:
Oracle Communications Unified Inventory Management 7.2.5
Oracle Communications ASAP 7.2.0.4.1
Oracle Communications Application Orchestrator 1.0.2
Oracle Communications Design Studio 7.2.4
Oracle Communications ASAP Cartridge for Oracle Communications Application Orchestrator 1.0
The Network Service Orchestration solution uses the Oracle Communications Information Model to represent inventory items and business practices. The Oracle Communications Information Model is based on industry standards, such as the Shared Information/Data (SID) model developed by the TeleManagement Forum. The information model contains resource entities, service entities, common patterns, definitions, and common business entities.
For specific, technical details, about the Oracle Communications Information Model and the UIM information model, see Oracle Communications Information Model Reference and UIM Information Model Reference.
The Network Service Orchestration solution maps NFV concepts to UIM model elements. The solution defines a number of NFV descriptors in the form of Design Studio specifications. These specifications are used by UIM and ASAP to create NFV events for managing the life cycles of VNFs and services.
VNF descriptors describe the behavior of virtual functions that are mastered in the Network Service Orchestration cartridges. Network services are assembled from the defined units of behavior provided by the VNFs and Physical Network Functions (PNFs) in the cartridges. Network Service descriptors therefore structure how these network services are populated in the cartridges.
Table 1 describes the NFV entities and their corresponding UIM entities.
Table 1 NFV Entities and UIM Entities
| NFV Entity | UIM Entity | Description |
|---|---|---|
|
Network Service (NS) |
Service |
Represents a network service formed by VNFs on the NFV Infrastructure. |
|
Virtual Network Function (VNF) |
Logical device |
Represents a virtual network function. |
|
Network Service Descriptor (NSD) |
Service specification |
Describes the deployment requirements, operational behavior, and policies required by network services that are created based on this descriptor. |
|
VNF Descriptor (VNFD) |
Logical Device specification Service specification |
Describes the deployment requirements, operational behavior, and policies required by VNFs that are created based on this descriptor. |
|
Physical Network Function (PNF) |
Physical Device specification |
Defines a network function that runs on dedicated specialized hardware. |
|
PNF Descriptor (PNFD) |
Physical Device specification |
Describes the deployment requirements, operational behavior, and policies required by PNFs that are created based on this descriptor. |
|
Network Function Group (NFG) |
Device interface |
A group of network functions (both physical and virtual) that use the same policies, rules, and binary images. |
|
Virtual Deployment Unit (VDU) |
Device interface |
A deployable subset of a VNF with a particular operational behavior. |
To define and model VNFs and network services for your network, you work in Design Studio. In Design Studio, you define specifications and properties for your VNFs, network services, and their hierarchical and related components. The specifications form the VNF Descriptors and Network Service Descriptors that are used throughout the Network Service Orchestration Solution.
After you define specifications for your VNFs and network services, you package them into cartridges and deploy them into UIM and ASAP. You use the specifications to create instances of VNFs and network services for your network.
The Network Service Orchestration solution provides cartridges that contain sample specifications that you can use to create VNFs, network services, and other resources for your network. For more information about Network Service Orchestration Solution cartridges, see "Contents of the Network Service Orchestration JAR and ZIP Files" and "Deploying the Network Service Orchestration Cartridges".
Before you a create a VNF in UIM, you must have defined and modeled a corresponding VNF specification and other related specifications in Design Studio. See "Defining VNFs and Network Services".
To create an instance of a VNF, you work in UIM. In UIM, you create entities based on the specifications that were defined and modeled in Design Studio.
The Network Service Orchestration cartridges contain sample specifications that you can use to create VNFs, services, and other resources for your network.
Before you create a VNF, ensure that you have configured VDUs and NF Groups in manual scaling mode in Application Orchestrator. See Application Orchestrator 1.0 User Guide.
To create a VNF:
In UIM, create a business interaction based on the NFV Service Request specification. See UIM Online Help for information about creating entities in UIM.
Create a logical device based on a VNF specification to represent the VNF.
For example, in an IMS Core network, a logical device in UIM can represent a Core Session Manager (CSM).
Under the VNF logical device entity, create a device interface based on an NF Group specification.
Under the NF Group device interface, create a device sub-interface based on a VDU specification. While creating the device sub-interface, specify a valid IP address for the device sub-interface that represents a virtual machine (VM).
Create a service based on the VNF Descriptor service specification and associate the VNF logical device that you created in step 2 with the service.
Under the service, create a service configuration based on the appropriate Service Configuration specification.
Associate the NFV Service Request business interaction that you created in step 1 with the Service configuration.
For the Service configuration, update each configuration item as appropriate:
Reference the NF Group device interface that you created in step 4.
Assign the VDU device interface.
Approve and issue the NFV Service Request business interaction.
UIM sends the request to ASAP, which deploys the VNF on the virtual machines in the network.
After the successful deployment of a VNF in the network, UIM receives a response from ASAP and completes the NFV service request automatically.
A network service comprises multiple interconnected VNFs. To create a network service comprising multiple VNFs:
In UIM, create a business interaction based on the NFV Service Request specification.
Create a service based on the Network Service specification and create a corresponding service configuration to represent the overall network service.
Associate the NFV Service Request business interaction that you created in step 1 with the Service configuration for the network service.
Associate the VNF services that you created earlier to the Network Service configuration.
Approve and issue the NFV Service Request business interaction to create the network service and its constituent VNFs.
The solution provides scaling capabilities that enable you to scale up or scale down your network services and VNFs.
To automatically scale up or scale down a VNF, you configure Key Performance Indicator (KPI) thresholds. Application Orchestrator scales up or scales down a VNF based on the threshold parameters. Before you configure KPI thresholds in UIM, you must set the scaling mode to Auto at the NF Group level in Application Orchestrator.
To configure KPI thresholds:
In UIM, create a business interaction based on the NFV Service Request specification. See UIM Online Help for information about creating entities in UIM.
Create an NF Group service for the NF Group for which you want to configure KPI thresholds.
Configure KPI thresholds for the NF Group service. For example, configure the following KPI thresholds:
Calls Per Second
Active Sessions
Active Local Contacts
CPU Utilization
Memory Utilization
Approve and issue the NFV Service Request business interaction.
For more information about KPI thresholds, see Application Orchestrator 1.0 User Guide.
You can also manually add, remove, and replace resources in a network service by creating and deleting VNFs using new NFV Service Request business interactions.
You can terminate a VNF that is no longer needed on the network. When you terminate a VNF, the VNF is removed and its resources are released from the network.
To terminate a VNF:
In UIM, create a business interaction based on the NFV Service Request specification.
Specify the VNF service that you want to terminate and disconnect the VNF service.
UIM creates a service configuration automatically.
Associate the NFV Service Request business interaction with the service configuration.
Approve and issue the NFV Service Request business interaction.
UIM sends the request to ASAP, which terminates the VNF and undeploys the VMs on the network.
After ASAP undeploys the VM in the network, UIM completes the NFV Service Request business interaction automatically.
The Network Service Orchestration RESTful API provides the northbound interface to the Network Service Orchestration solution. Operation Support Systems (OSS) and VNF managers can query data from the solution's resource inventory.
The root URL for the Network Service Orchestration RESTful API is:
HTTP Connection: http://uim_host:port/ocnso/1.0/vnfs
SSL Connection: https://uim_host:port/ocnso/1.0/vnfs
where uim_host is the host on which UIM is installed and port is the port number.
You can use the VNF API to retrieve information about VNFs that are configured on your network.
Table 2 describes the VNF API resources.
| Resource | Method | Description |
|---|---|---|
|
/vnfs?expandDetails=true/false |
GET |
Retrieves complete details about all the existing VNFs and their VDUs. The output displays the following details about each VNF:
The output displays the following details about each VDU of a VNF:
The expandDetails parameter is optional. |
|
/vnfs/vnfId |
GET |
Retrieves details about the specified VNF and the list of VDUs that the VNF contains. |
To install and integrate the required software:
Install UIM on a WebLogic server. See UIM 7.2.4 Installation Guide for UIM installation instructions.
Note:
If you are upgrading to UIM 7.2.5 from UIM 7.2.4, follow the steps for upgrading from UIM 7.2.3 to UIM 7.2.4 in the UIM 7.2.4 Installation Guide. The steps for upgrading to UIM 7.2.5 from UIM 7.2.4 are the same as the steps for upgrading from UIM 7.2.3 to UIM 7.2.4.If you are upgrading to UIM 7.2.5 from an earlier release of UIM, follow the instructions for upgrading to UIM 7.2.4 in the UIM 7.2.4 Installation Guide.
Install ASAP on a WebLogic server. See ASAP 7.2 Installation Guide for ASAP installation instructions.
Integrate UIM and ASAP. See "Integrating UIM and ASAP".
Extract the Network Service Orchestration ZIP file and open the designStudio\sampleBuildScripts\build.properties file and update the following parameters:
WL_HOST: Specify the name of the WebLogic administration server on which UIM is installed.
WL_PORT: Specify the port number of the WebLogic administration server on which UIM is installed.
WL_SERVER_NAME: Specify the name of the standalone managed server or the cluster server on which UIM is installed.
CMWS_USER: Specify the user name of the Cartridge Management Web service (CMWS) user.
CMWS_PASSWORD: Specify the password for the CMWS user.
EAR_PATH: Specify UIM_Home/app/7_2_5/custom.ear, where UIM_Home is the directory in which you installed UIM.
WL_HOME: Specify the path where WebLogic Server is installed.
After you integrate the required software, deploy the Network Service Orchestration cartridges. See "Deploying the Network Service Orchestration Cartridges" for more information.
To integrate UIM and ASAP:
Configure the WebLogic server on which you installed UIM. See "Configuring the WebLogic Server for UIM" for instructions.
Configure the WebLogic server on which you installed ASAP. See "Configuring the WebLogic Server for ASAP" for instructions.
To configure the WebLogic server on which you installed UIM:
Log in to the Oracle WebLogic Server Administration Console.
Deploy the WLS_Home/common/deployable-libraries/jersey-bundle-1. 9.war file as a library, specifying the standalone managed server or the cluster server on which UIM is installed as the target. See the Oracle WebLogic Server documentation for instructions.
Create a work manager component using the Maximum Threads Constraint definition type with the following parameters:
Name: invSOMaxThreadConstraint
Count: 1
Target: Specify the standalone managed server or the cluster server on which UIM is installed.
Create a work manager with the following parameters:
Name: asapWSMDBWorkManager
Target: Specify the standalone managed server or the cluster server on which UIM is installed.
Maximum Threads Constraint: invMaxThreadConstraint
Create another work manager with the following parameters:
Name: inventorySOMDBWorkManager
Target: Specify the standalone managed server or the cluster server on which UIM is installed.
Maximum Threads Constraint: invSOMaxThreadConstraint.
Create a Store-and-Forward Agent with the following parameters:
Name: NSO_UIM_Activation_SAF_Agent
Persistent Store: inv_jms_store. If UIM is installed in a cluster server, specify any one of the persistent stores. For example, specify inv_jms_store-0.
Agent Type: Sending-Only
Target: Specify the default standalone managed server on which UIM is installed.
Create a JMS system module with the following parameters:
Name: NSO_UIM_Activation_JMS_Module
Target: Specify the standalone managed server or the cluster server on which UIM is installed.
For the NSO_UIM_Activation_JMS_Module JMS system module, create a sub-deployment with the following parameters:
Sub-deployment Name: NSO_UIM_Activation_JMS_Server
Target: inv_jms_server. If UIM is installed in a cluster server, specify any one of the JMS servers as target. For example, specify inv_jms_server-0.
For the NSO_UIM_Activation_JMS_Module JMS system module configuration:
Create a JMS resource with the following parameters:
Name: NSO_UIM_Activation_XVTEventTopic
JNDI Name: NSO.UIM.Activation.XVTEventTopic
Type: Queue
Sub-deployment: NSO_UIM_Activation_JMS_Server
Target: inv_jms_server. If UIM is installed in a cluster server, specify any one of the JMS servers as target. For example, specify inv_jms_server-0.
Create a JMS resource with the following parameters:
Name: inventorySOQueue
JNDI Name: inventorySOQueue
Type: Queue
Sub-deployment: NSO_UIM_Activation_JMS_Server
Target: inv_jms_server. If UIM is installed in a cluster server, specify any one of the JMS servers as target. For example, specify inv_jms_server-0.
For the NSO_UIM_Activation_JMS_Module JMS module:
Create a remote SAF context with the following parameters:
Name: NSO_UIM_Activation_SAF_Context
URL: t3://asap_hostname:asap_port, where asap_hostname is the host on which ASAP is installed and asap_port is the port number
User Name: Specify the WebLogic server administration user name.
Password: Specify the WebLogic server administration password.
Create an SAF error handling configuration with the following parameters:
Name: NSO_UIM_Activation_Error_Handler
Log Format: %header%,%properties%,%body%
Create an SAF Imported Destination with the following parameters:
Name: NSO_UIM_Activation_Imported_Destination
Remote SAF Context: NSO_UIM_Activation_SAF_Context
SAF Error handling: NSO_UIM_Activation_Error_Handler
SAF Default Time-to-Live: 3600000
For the NSO_UIM_Activation_Imported_Destination SAF imported destination, create an SAF queue with the following parameters:
Name: NSO_UIM_Activation_MessageQueue
Remote JNDI Name: System.env_ID.ApplicationType.ServiceActivation.Application.1-0;7-2;ASAP.Comp.MessageQueue, where env_ID is the environment ID that you used for your ASAP installation
Local JNDI Name: NSO.UIM.Activation.MessageQueue
Activate the changes and restart the WebLogic server on which UIM is installed.
To configure the WebLogic server on which you installed ASAP:
Log in to the Oracle WebLogic Server Administration Console.
Deploy the WL_Home/server/lib/jms-notran-adp.rar file as an application, specifying the standalone server or the managed server on which ASAP is installed as the target. See the Oracle WebLogic Server documentation for instructions.
In the WebLogic server on which you installed ASAP, create a Store-and-Forward Agent with the following parameters:
Name: NSO_ASAP_UIM_SAF_Agent
Persistent Store: env_id.JMSJDBCStore, where env_id is the environment ID that you used for your ASAP installation.
Agent Type: Sending-Only
Target: Specify the default standalone managed server on which ASAP is installed.
Create a JMS system module with the following parameters:
Name: NSO_ASAP_UIM_JMS_Module
Target: Specify the standalone server or the managed server on which ASAP is installed.
For the NSO_ASAP_UIM_JMS_Module JMS system module:
Create a remote SAF context with the following parameters:
Name: NSO_ASAP_UIM_SAF_Context
URL: t3://uim_hostname:uim_port, where uim_hostname is the host on which UIM is installed and uim_port is the port number. If UIM is installed in a cluster server, specify any one of the URLs of the managed server.
User Name: Specify the WebLogic server administration user name.
Password: Specify the WebLogic server administration password.
Create an SAF error handling configuration with the following parameters:
Name: NSO_ASAP_UIM_Error_Handler
Log Format: %header%,%properties%,%body%
Create an SAF Imported Destination with the following parameters:
Name: NSO_ASAP_UIM_Imported_Destination
Remote SAF Context: NSO_ASAP_UIM_SAF_Context
SAF Error Handling: NSO_ASAP_UIM_Error_Handler
Target: Specify the standalone server or the managed server on which ASAP is installed.
For the NSO_ASAP_UIM_Imported_Destination SAF imported destination, create an SAF queue with the following parameters:
Name: NSO_ASAP_UIM_XVTEventTopic
Remote JNDI Name: NSO.UIM.Activation.XVTEventTopic
Local JNDI Name: NSO.ASAP.UIM.ActivationEventForwarder
SAF Default Time-to-Live: 3600000
Create a JMS source bridge destination with the following parameters:
Name: NSO_ASAP_UIM_EventTopic_Bridge_Source
Connection URL: t3://asap_hostname:asap_port, where asap_hostname is the host on which ASAP is installed and asap_port is the port number
Connection Factory JNDI Name: javax.jms.TopicConnectionFactory
Destination JNDI Name: System.env_id.ApplicationType.ServiceActivation.Application.1-0;7-2;ASAP.Comp.XVTEventTopic
Destination Type: Topic
User Name: Specify the WebLogic server administration user name.
Password: Specify the WebLogic server administration password.
Create a JMS destination bridge with the following parameters:
Name: NSO_ASAP_UIM_EventTopic_Bridge_Target
Connection URL: t3://asap_hostname:asap_port, where asap_hostname is the host on which ASAP is installed and asap_port is the port number
Connection Factory JNDI Name: javax.jms.TopicConnectionFactory
Destination JNDI Name: NSO.ASAP.UIM.ActivationEventForwarder
Destination Type: Queue
User Name: Specify the WebLogic server administration user name.
Password: Specify the WebLogic server administration password.
Create a bridge with the following parameters:
Name: NSO_ASAP_UIM_EventTopic_Bridge
Selector: OSS_EVENT_TYPE = 'javax.oss.order.OrderStateChangeEvent' AND OSS_API_CLIENT_ID = 'UIM_NFV' AND OSS_ORDER_CURRENT_STATE in ('closed.completed','open.running.suspended.failed')
Specify the messaging bridge to start automatically
Source bridge destination: NSO_ASAP_UIM_EventTopic_Bridge_Source
Target bridge destination: NSO_ASAP_UIM_EventTopic_Bridge_Target
Messaging Provider: WebLogic Server 7.0 or higher
Target: Specify the name of the server on which you installed ASAP
Enable QOS Degradation Allowed and Preserve Msg Property
Activate the changes and start the jms-notran-adp resource adapter.
Restart the WebLogic server on which ASAP is installed.
Note:
Ensure that the status of the NSO_ASAP_UIM_EventTopic_Bridge bridge displays Active.Before you deploy the Network Service Orchestration cartridges, you must install and integrate the required software. See "Installing and Integrating the Required Software" for more information.
The Network Service Orchestration super JAR file contains the following cartridges:
OracleComms_UIM_NSO_Common
OracleComms_UIM_NSO_VNFCatalog
OracleComms_UIM_NSO_NSCatalog
A cartridge is a collection of entity specifications, characteristics, rulesets, and code that is defined in an Oracle Communications Design Studio project. The project is then compiled into a deployable JAR file known as a cartridge.
When you deploy a cartridge into UIM, the data it contains becomes available in UIM. For example, if you deploy a cartridge that includes several different types of VNF specifications, those specifications become available for the creation of VNF instances in UIM.
You can deploy the Network Service Orchestration super JAR file into a UIM run-time environment by using the Design Studio Cartridge Management Tool or by using the UIM Cartridge Deployer Tool. See UIM Cartridge and Technology Pack Guide for more information about deploying technology packs.
Note:
Before deploying the Network Service Orchestration super JAR file, deploy the base cartridges. For information about deploying the base cartridges, see UIM Cartridge and Technology Pack Guide.To deploy the Network Service Orchestration cartridges:
Deploy the UIM base cartridges into UIM. For information on how to deploy the base cartridges, see UIM Cartridge and Technology Pack Guide.
From a command prompt, navigate to the designStudio\sampleBuildScripts directory of the Network Service Orchestration ZIP file and run the following command, which deploys the Network Service Orchestration super JAR:
ant deploySolutionCartridge
Open the UIM_Home/config/nso.properties file, where UIM_Home is the directory in which UIM is installed, and update the ASAP_ENV_ID property value with the ASAP environment ID.
From a command prompt, navigate to the designStudio\sampleBuildScripts directory of the Network Service Orchestration ZIP file and run the following command, which updates the custom.ear file:
ant updateApplication
In WebLogic Server Administration Console, redeploy UIM_Home/app/7_2_5/custom.ear as an application.
Extract the OracleComms_ASAP_OCAO.sar file from the OCAO_version_release_number.tar TAR file.
In ASAP, deploy the OracleComms_ASAP_OCAO.sar ASAP cartridge. See ASAP Cartridge Development Guide for instructions about deploying cartridges into ASAP.
Note:
Before deploying the ASAP cartridge, ensure that ASAP and WebLogic server are running.Restart the servers on which ASAP is installed.
Table 3 describes the contents of the Network Service Orchestration JAR and ZIP files.
Table 3 Network Service Orchestration JAR and ZIP File Contents
| Directory | Directory Content Description |
|---|---|
|
deploy/ individualJarsForSuperJar |
Individual JAR files that comprise the super JAR file. See "Network Service Orchestration Individual JAR Files" for more information. |
|
deploy/ superJarToDeploy |
The super JAR file. See "Network Service Orchestration Super JAR File" for more information. |
|
designStudio/ cartridgeZips |
Cartridge project ZIP files. See "Network Service Orchestration ZIP Files" for more information. |
|
designStudio/ sampleBuildScripts |
Sample Ant build scripts. See "Network Service Orchestration Sample Ant Build Scripts" for more information. |
The Network Service Orchestration cartridge contains individual JAR files that comprise the super JAR file. Each individual JAR file is deployable.
Important:
Before deploying the Network Service Orchestration cartridge JAR files, you must deploy the base cartridges if not previously deployed. For information on how to deploy the base cartridges, see UIM Cartridge and Technology Pack Guide.Oracle recommends that you deploy the super JAR file. If you deploy the JAR files individually, you must install them in a specific order.
The Network Service Orchestration cartridge individual JAR files must be deployed in the following order:
OracleComms_UIM_NSO_Common
OracleComms_UIM_NSO_VNFCatalog
OracleComms_UIM_NSO_NSCatalog
The Network Service Orchestration cartridge contains the OracleComms_UIM_NSO_*.jar super JAR file.
Note:
The asterisk in the JAR file name represents a five-segment release version number followed by a build number. The five-segment release version numbers represent the following:Major Version Number
Minor Version Number
Maintenance Pack
Generic Patch
Customer Patch
The Network Service Orchestration super JAR file contains the entire contents of the solution and is ready for deployment.
See UIM Cartridge and Technology Pack Guide for more information about deploying cartridges into UIM.
The Network Service Orchestration cartridge contains one project ZIP file for every cartridge or model project, and each ZIP file contains a project in its pre-compiled state (the project name is the root directory). Import cartridge ZIP files into Design Studio. See the Design Studio Help for information about importing archive files.
The Network Service Orchestration cartridge includes sample Ant build scripts for automating cartridge project builds. See Design Studio System Administrator's Guide for more information about automating builds.
For more information, see the following documentation:
UIM Installation Guide: Describes the requirements for installing UIM, installation procedures, and post-installation tasks.
UIM System Administrator's Guide: Describes administrative tasks such as working with cartridges and technology packs, maintaining security, managing the database, configuring Oracle Map Viewer, and troubleshooting.
ASAP Installation Guide: Describes the requirements for installing ASAP, installation procedures, and post-installation tasks.
Application Orchestrator 1.0. Documentation: Describes how Application Orchestrator manages the life cycles of VNFs.
Design Studio Installation Guide: Describes the requirements for installing Design Studio, installation procedures, and post-installation tasks.
ASAP Cartridge for Application Orchestrator 1.0 Cartridge Guide: Describes the contents of Oracle Communications ASAP Cartridge for Oracle Communications Application Orchestrator 1.0.
UIM Security Guide: Provides guidelines and recommendations for setting up UIM in a secure configuration.
UIM Concepts: Provides an overview of important concepts and an introduction to using both UIM and Design Studio.
UIM Developer's Guide: Explains how to customize and extend many aspects of UIM, including the data model, life-cycle management, topology, security, rulesets, user interface, and localization.
Design Studio Developer's Guide: Describes how to customize, extend, and work with cartridges.
UIM Web Services Developer's Guide: Describes the UIM Web Service operations and how to use them, and describes how to create custom Web services.
UIM Information Model Reference: Describes the UIM information model entities and data attributes, and explains patterns that are common across all entities.
Oracle Communications Information Model Reference: Describes the Oracle Communications information model entities and data attributes, and explains patterns that are common across all entities. The information described in this reference is common across all Oracle Communications products.
UIM Cartridge and Technology Pack Guide: Provides information about how you use cartridges and technology packs with UIM. Describes the content of the base cartridges.
For step-by-step instructions to perform tasks, log in to each application to see the following:
Design Studio Help: Provides step-by-step instructions for tasks you perform in Design Studio.
UIM Help: Provides step-by-step instructions for tasks you perform in UIM.
For information about Oracle's commitment to accessibility, visit the Oracle Accessibility Program website at http://www.oracle.com/pls/topic/lookup?ctx=acc&id=docacc.
Oracle customers that have purchased support have access to electronic support through My Oracle Support. For information, visit http://www.oracle.com/pls/topic/lookup?ctx=acc&id=info or visit http://www.oracle.com/pls/topic/lookup?ctx=acc&id=trs if you are hearing impaired.
Oracle Communications Network Service Orchestration Solution Getting Started, Release 1.0
E58676-02
Copyright © 2015, Oracle and/or its affiliates. All rights reserved.
This software and related documentation are provided under a license agreement containing restrictions on use and disclosure and are protected by intellectual property laws. Except as expressly permitted in your license agreement or allowed by law, you may not use, copy, reproduce, translate, broadcast, modify, license, transmit, distribute, exhibit, perform, publish, or display any part, in any form, or by any means. Reverse engineering, disassembly, or decompilation of this software, unless required by law for interoperability, is prohibited.
The information contained herein is subject to change without notice and is not warranted to be error-free. If you find any errors, please report them to us in writing.
If this is software or related documentation that is delivered to the U.S. Government or anyone licensing it on behalf of the U.S. Government, then the following notice is applicable:
U.S. GOVERNMENT END USERS: Oracle programs, including any operating system, integrated software, any programs installed on the hardware, and/or documentation, delivered to U.S. Government end users are "commercial computer software" pursuant to the applicable Federal Acquisition Regulation and agency-specific supplemental regulations. As such, use, duplication, disclosure, modification, and adaptation of the programs, including any operating system, integrated software, any programs installed on the hardware, and/or documentation, shall be subject to license terms and license restrictions applicable to the programs. No other rights are granted to the U.S. Government.
This software or hardware is developed for general use in a variety of information management applications. It is not developed or intended for use in any inherently dangerous applications, including applications that may create a risk of personal injury. If you use this software or hardware in dangerous applications, then you shall be responsible to take all appropriate fail-safe, backup, redundancy, and other measures to ensure its safe use. Oracle Corporation and its affiliates disclaim any liability for any damages caused by use of this software or hardware in dangerous applications.
Oracle and Java are registered trademarks of Oracle and/or its affiliates. Other names may be trademarks of their respective owners.
Intel and Intel Xeon are trademarks or registered trademarks of Intel Corporation. All SPARC trademarks are used under license and are trademarks or registered trademarks of SPARC International, Inc. AMD, Opteron, the AMD logo, and the AMD Opteron logo are trademarks or registered trademarks of Advanced Micro Devices. UNIX is a registered trademark of The Open Group.
This software or hardware and documentation may provide access to or information about content, products, and services from third parties. Oracle Corporation and its affiliates are not responsible for and expressly disclaim all warranties of any kind with respect to third-party content, products, and services unless otherwise set forth in an applicable agreement between you and Oracle. Oracle Corporation and its affiliates will not be responsible for any loss, costs, or damages incurred due to your access to or use of third-party content, products, or services, except as set forth in an applicable agreement between you and Oracle.
|
Copyright © 2015, Oracle and/or its affiliates. All rights reserved. Legal Notices |
|