18 Overview to Manual Receipts Processing
This chapter contains these topics:
18.1 Objectives
-
To update invoices for payment
-
To enter receipts that match to invoices
-
To enter receipts when you cannot match them to specific invoices
-
To enter receipts directly to the general ledger
-
To select invoices for receipt application
-
To create chargeback invoices for disputed amounts
-
To create write-offs and adjustments
-
To spread unapplied receipts to invoices
-
To void and reverse non-sufficient funds (NSF) receipts
18.2 About Manual Receipts Processing
One of the most important steps in the accounts receivable process is to quickly enter payments received from your customers in order to recognize your current cash position. The Accounts Receivable system provides the flexibility you need to enter and maintain various types of receipts.
Manual receipts processing consists of:
-
Updating invoices for payment
-
Working with invoice match receipts
-
Working with other types of receipts
-
Approving and posting receipts
-
Working with alternate methods of application
-
Revising receipts
-
Printing receipt information
When you work with receipts processing, be aware the action code and search type security may affect your ability to inquire upon, add, or change customer information. You must have the appropriate combination of action code/search type security to work with customer information.
18.2.1 Which Form Do You Use to Enter Manual Receipts?
Depending on the amount of account information you have for a customer, you can use either of the following forms to enter manual receipts:
| Form | Description |
|---|---|
| Receipts Entry (Heads Down) | Use this form when you need a fast way to enter receipts and already know the customer number and amounts. It is convenient if you enter receipts from an input form, such as a bank deposit statement. |
| Receipts Entry (Heads Up) | Use this form to display all open activity for a customer. You can pre-load all open items and then select them as paid. When you use this form to enter receipts, you typically pre-load account information for a particular customer, parent account, or statement before applying a receipt. |
The examples shown in this section use the Receipts Entry (Heads Up) form. However, you can use Receipts Entry (Heads Down) to complete any of the tasks included in this section.
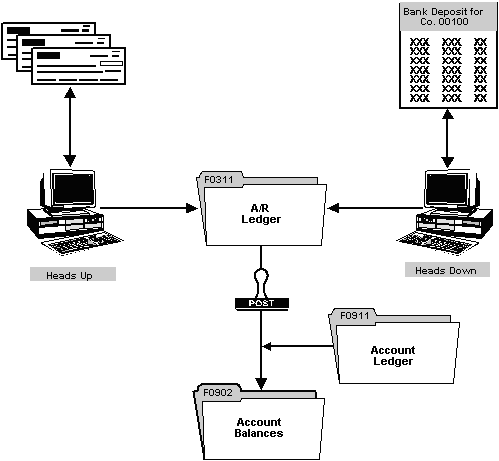
18.2.2 What Are the Steps for Processing Manual Receipts?
You use the standard JD Edwards World three-tier processing steps to manage manual receipts. They are:
-
Enter
-
Review
-
Post
The following illustrates the receipts entry process.
18.2.3 What Does the System Require to Process Manual Receipts?
The system requires certain information to process receipts and apply them to the open items in a customer's account. Concepts that you should be familiar with include:
-
Dates (deposit dates and system dates)
-
Original document (invoice) types
-
Matching document (receipt) types
-
Type of input codes
18.2.3.1 Dates
The system uses one of the following dates to process receipts:
| Date | Description |
|---|---|
| Receipt item date | You enter this date on Receipts Entry. This is the date shown on the customer's receipt or item. |
| Deposit date (G/L) | You enter this date on Receipts Entry. |
18.2.3.2 Original Document Types
When you display open items for a customer, each pay item consists of an original document type. Common document types include:
| Type | Description |
|---|---|
| RI (Regular Invoice) | This is an invoice that you create using either standard invoice entry or speed invoice entry. |
| RR (Recurring Invoice) | This is a recurring invoice that you create using standard invoice entry and indicating the frequency and number of payments. |
| RU (Unapplied Receipt) | This is a receipt that you do not match to a specific invoice. The system applies this receipt to the customer's overall account to reduce the open balance. |
| RB (Chargeback Invoice) | This is an amount that is in dispute. The system creates a new invoice transaction. |
| RM (Credit Memo) | This is an overpaid amount. |
18.2.3.3 Matching Document Types
After you enter receipts, adjustments, and so on, the system assigns a matching document type to each original transaction. Common matching document types include:
| Type | Description |
|---|---|
| RC | Receipt |
| RE | Change to the invoice gross amount |
| RO | Void receipt |
| RV | NSF (non-sufficient funds) receipt |
| RA | Adjustment |
| RQ | Chargeback amount (always associated with original document type RB) |
| RS | Spread of unapplied receipt |
18.2.3.4 Type of Input Codes
The system applies each receipt according to the type of input code you enter. The following lists the type of input (TI) codes and the action that the system takes during processing:
| Code | Description |
|---|---|
| Blank (No processing) | The system does not try to match the receipt to an invoice pay item. |
| B (Balance Forward) | The system automatically applies the receipt to the oldest invoices in chronological order of net due date. |
| I (Invoice Match) | The system applies the receipt to the invoices you specify. You can choose to allow or disallow discounts. |
| D (Disallowed Discount) | The system:
|
| U (Unapplied Receipt) | You apply the receipt to a particular customer account, not to a specific invoice. The system reduces the total of the customer's open amount due by the amount of the receipt, but does not apply the receipt to specific invoices. |
| C (Chargeback) | This indicates that an invoice amount is in dispute. The system creates a new invoice for the disputed amount. |
| G (General Ledger) | The system applies the receipt directly to a G/L account without applying it to any invoice. Use this code for miscellaneous, non-A/R receipts. |
| A (Adjustment) | This is a manual adjustment for minor write-offs or outstanding items, such as disputed tax or freight charges. If you use this code, you must also enter a reason code for the adjustment. |
| W (Write-off) | The system applies the receipt to the invoice and automatically writes off the difference. You can write off both overpayments and underpayments. If you use this code, you must also enter a reason code for the write-off. |
| S (Spread) | You distribute an unapplied receipt or credit memo and apply it to open invoices. |
| F (Automatic Currency Gain/Loss) | The system automatically creates this code to record a currency gain or loss when you enter a receipt. |
| R (Range of Invoices) | You can use this code to specify the beginning and ending range of invoices to which you want to apply receipts. This is similar to the I (invoice match) code. |
| X (Exclude from Range) | You can use this code to indicate those invoices within the range to exclude from the receipt application. |
| 1 (Invoice Match - Net Amount with Discount) | The system applies the receipt to the net amount of specific invoices (gross amount less the discount). If you use this code, you cannot change the discount information. |
| 2 (Invoice Match - Total Open Amount without Discount) | The system applies the receipt to the entire open amount of specific invoices and ignores the discount. If you use this code, you cannot change the discount information. |
| 9 (Invoice Match - Multiple Invoices with One Receipt) | You use this code to delete one line item at a time from the unposted receipt. |
18.2.3.5 Automatic Update of TI Code
You can use any of the Ledger Inquiries (F15, F16, F18, and F19) to automatically apply receipt amounts to open items in a balance forward manner (oldest due date to newest) by entering the desired TI code to use in the processing option and filling in the receipt amount before using the ledger inquiry function key. This will cause the TI code from the processing option to be loaded on each line from oldest to newest until the receipt amount is reached or all open items have been paid. For customer, parent or single statement Ledger Inquiries, if the amount of the receipt is greater than all open items, the program will create an unapplied cash entry for the remaining amount. Any line items which have a credit balance will have such balance added to the amount of the receipt and applied against other open items.
The default TI code which may be set in the processing option can be changed by using F20 to display the Cash Receipts Status window (P0300W). A change made through this window does not change the processing option. The next time the program is run, the default TI code that is set up in the processing option will apply. Once all automatic entries have been created, they will be displayed for your review. You can accept all entries as they are presented by pressing Enter or you can make any necessary changes.
If the default Type Input code is '1' or '2', partial cash applications will not be attempted. If the receipt amount is not sufficient to fully pay all selected invoices, cash will be automatically applied only to those invoices that can be paid in full. Any remaining amounts must be manually applied.
18.2.3.6 Function Keys
Several function keys are used in receipts entry. Some of the commonly used keys are described below:
| Key | Description |
|---|---|
| Display Account Ledger (F15) | Enter the Customer Number in the field at the top of the screen and press F15 to display all open invoices for that customer. |
| Display Account by Parent Address (F18) | Enter the Parent Number in the field at the top of the screen and press F18 to display all open invoices for customers with that Parent Number. |
| Display Account by Statement Number (F19) | If you want to display invoices for multiple statements use F19. This will display a screen in which you can enter as many statement numbers as you like and when you exit back to Cash Receipts, all open invoices for those statements will be displayed.
If you want to display invoices for one statement, use Customer Ledger Inquiry (F16), enter the statement number at the top of the screen and select the desired invoices using option 4 or select all of the invoices by pressing F10. The selected invoices will have an asterisk (*) in the option field. Once you have selected the desired invoices, press F3 to return to the Cash Receipts program. |
| Customer Ledger Inquiry (F16) | Press F16 to exit to the Customer Ledger Inquiry program. This program has many criteria available for selecting and sequencing invoices. Once the desired invoices are displayed, they can be selected individually using option 4 or all of the displayed invoices can be selected by pressing F10. The selected invoices will have an asterisk (*) in the option field. Once you have selected all you want, press F3 to return to the Cash Receipts program. The invoices you selected will be returned and loaded into the detail area in the order they were displayed on the Customer Ledger Inquiry screen.
Multi-currency considerations - Instead of entering a company number in the Company field in the Receipts Entry Header Information, you may enter a valid currency code in this field. This will limit the ledger display to companies with this currency. Also, you may enter a currency in the Currency field in the header to limit the display to invoices with this transaction currency. If no value is entered in this field, it will default to the customer's currency and display only invoices in that currency. When displaying the domestic side of foreign invoices (mode = 'D'), you can enter an asterisk (*) in the Currency field. This indicates that you want to select invoices regardless of transaction currency. After entering the receipt or item information in the header section and performing the ledger inquiry of your choice, all open items for the selected type of ledger inquiry will display. The amount to be applied and the discount to be taken will depend up on the Cash Receipt Entry processing option settings for whether the discount is available to be taken or not. |
| Top/Search Bottom (F5/F6) | Once the ledger is loaded you may move to the bottom of the detail displayed (F6) or move to the top (F5) for ease in searching. |
| Toggle Display Formats (F2) | Function key F2 will change the display format. There are eight different formats. A processing option in Cash Receipt Entry determines which formats are displayed and in what order when using the F2 key. One format has a Gross Amount column on the far right and the other puts the Adjustment Reason, G/L Class Code and Company field in its place and puts an Asset ID field in the detail area for General Ledger type entries. |
| Recalculate Detail (F8) | Function key F8 recalculates the Days Prior to Discount Date and also determines the proper values for TI codes of 1 and 2 (see TI codes above). Because the Days Prior to Discount Date is calculated using the G/L Date on the screen, if you change the G/L Date, you may need to use F8 to recalculate the Days Prior to Discount Date. |
| Summarization (F10) | A processing option has been set up to allow invoice pay items which have the same due date to be summarized when a ledger inquiry is done. Summarized Pay Items are identified by an asterisk (*) in the Pay Item field. When applying cash to a Summarized Pay Item, you must use an invoice match Type Input Code (I).
Regardless of how the summarization processing option is set, you can also use function key F10 to toggle between summarized and un-summarized mode. After toggling summarize mode on or off, redisplay the ledger with the appropriate ledger load function key. |
18.2.3.7 Reason Code
A reason code may be entered with any Type Input (TI) code. The reason code will always be edited against User Defined Code 03/AR. Also, if it is entered in conjunction with an A or W TI code, the reason code will be validated against the Automatic Accounting Instructions (AAI) as described in the sections about adjustments and write-offs. When a reason code is used and the remark field is blank, the description associated with the reason code will be copied into the remark for that entry.
18.2.3.8 Remark
The Cash Receipt Entry screen contains two Remark fields. A Remark field is provided in the header portion of Receipts Entry allowing you to enter an overall receipt remark. The Remark in the detail area is provided for an invoice level remark.
If the detail area Remark field is blank, the receipt Remark from the header field will be written to this field. If you enter a remark in the detail area, the cash receipts record in the AR Ledger file (F0311) will be written with this remark.
A processing option allows you to specify whether a non-blank invoice remark in the detail area will be overlaid with the receipt remark from the header field. (A remark explicitly typed in the fold area will never be overlaid with the header remark.) When re-inquiring on a receipt, the remark from the first line of the detail will be displayed in the header remark field. This is not necessarily the remark that was typed in the header remark field during entry.
When changing a receipt, the header remark will not be used to update changed records since this is merely the remark from the first line (see paragraph above). If you wish to change a remark, do so in the remark field in the fold area of the detail line.
18.2.3.9 Special Considerations
All receipt numbers must be unique within a batch. If you have received more than one receipt with the same number, they must be entered in separate batches even if they are for different customers. The batch number field at the top of the screen is used for inquiry purposes (since receipt number alone may not uniquely identify a record for re-inquiry). This field will be preloaded with a new batch number for purposes of adding new receipts, and will be ignored if a value is entered while adding.