6 Additional Adjustments
This chapter contains these topics:
6.1 Objectives
-
To create adjustments that incorporate free goods
-
To create accrual adjustments that create accounting entries but do not affect the price on the sales order
-
To create rebate accrual adjustments
-
To define rebate accrual detail information
-
To define rebate thresholds
-
To generate credit notes to allow credit for adjustments
-
To set up basket-level adjustments
-
To repost the sales order history so that past activities can be reposted for rebate credits
-
To set up order-level adjustments
6.2 Overview
You can use additional adjustments to:
-
Create free goods adjustments
-
Create accrual adjustments
-
Set up rebate adjustments
-
Generate credit notes
-
Repost sales rebate history
-
Work with repricing
You can create additional adjustments that provide sales incentives other than the traditional line-item price discount. For example, you can encourage sales by including free goods with a purchase or give a discount based on a total order amount (repricing). You can also accrue commissions on sales by creating an accrual adjustment.
Accruals allow you to reserve monetary amounts through journal entries for such items as commissions, adjustments, and rebates. You can track the monetary amount but the order price does not change.
6.3 Creating Free Goods Adjustments
Free goods are often items that help promote, display, or accompany the product that is being ordered. For example, for certain products you may want the free goods to be the display case, posters, or additional promotional items such as buttons, hats, or shirts used by employees to highlight a sale.
From Price Management (G4222), choose Advanced Price and Adjustments
From Advanced Price and Adjustments (G42311), choose Price and Adjustment Schedule
You must create a valid adjustment to which you attach your free goods. When you set up the free goods criteria, you define how the system applies the price and quantity of the free goods. It also defines how or if it should factor the price of the free goods into the price of the products actually being sold.
The free goods do not have to be the same as the item on the sales detail line to which the free goods adjustment is attached. For example, your company could offer a promotion that gives the customer one free case of motor oil when they buy ten cases of motor oil. Because the items do not have to be the same, you could offer customers a free oil filter when they buy ten cases of motor oil. You can specify multiple item numbers to be given as free goods and the quantity of each.
Any adjustment can have free goods associated with it. You specify:
-
The quantity of free goods to be included.
-
Whether the free good is a stock or non-stock item.
-
The unit price of the free goods, if desired. In most cases, this price is zero. However, you can specify a reduced price for the item, such as, when you offer a purchase-with-purchase promotion.
You can set up free goods to work with kits or configured items. However, the Free Good Processing Type at the parent and component level must be set to 1 (Separate Line). If you set the Free Good Processing Type to 2 (Net Down Unit Price) or 3 (Net Down Quantity), the system process the free good as if you had set it to 1. Also, the system does not allow you to provide a kit or configured item as a free good.
6.3.1 Before You Begin
-
Define an adjustment. See Section 4.10, "Setting Up Adjustment Details."
To create a free goods adjustment
On Price and Adjustment Schedule
Figure 6-1 Price and Adjustment Schedule screen

Description of "Figure 6-1 Price and Adjustment Schedule screen"
-
Choose the option for Adjustment Detail.
Figure 6-2 Pricing Preference Profile screen

Description of "Figure 6-2 Pricing Preference Profile screen"
-
Price Preference Profile appears. Choose the combination for the free goods.
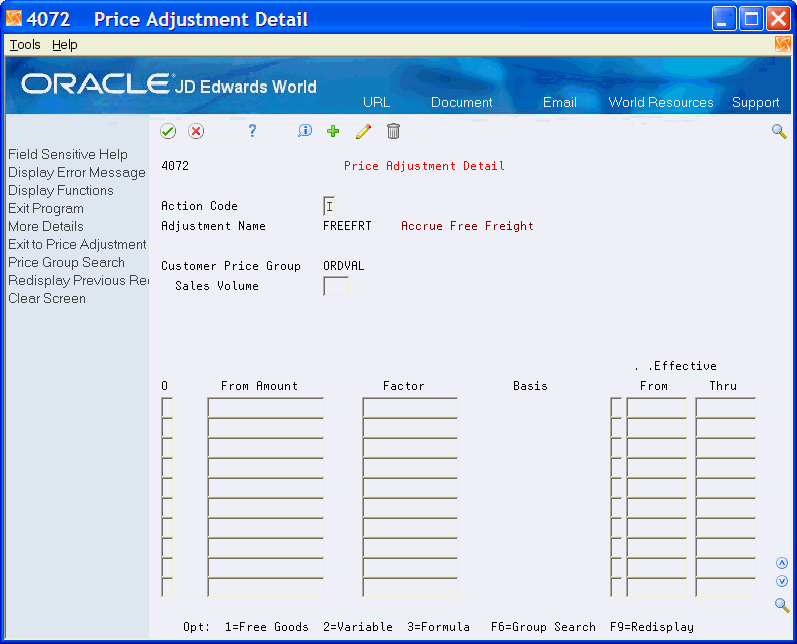
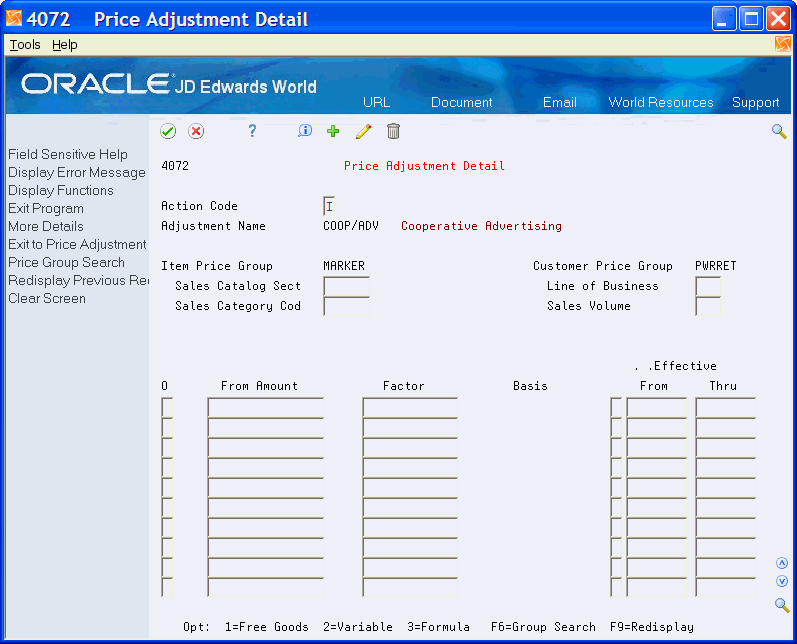
Figure 6-3 Price Adjustment Detail screen
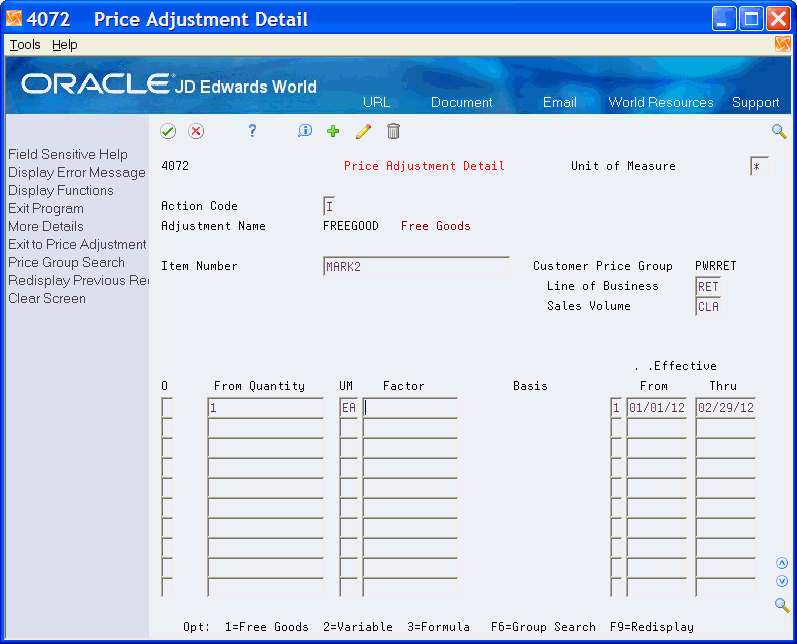
Description of "Figure 6-3 Price Adjustment Detail screen"
-
On Price Adjustment Detail, choose an existing adjustment that offers the free goods.
-
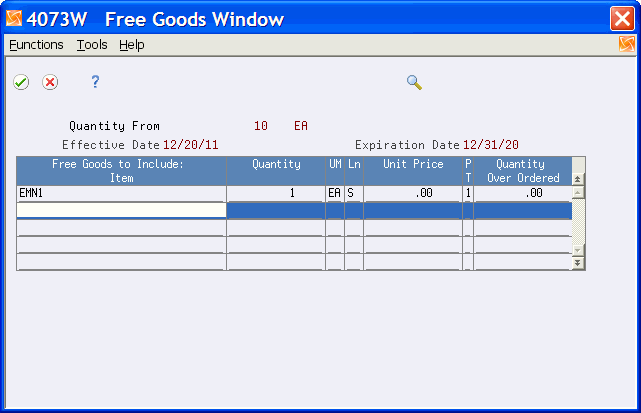
To access Free Goods, choose the option.
-
On Free Goods, enter the following fields:
-
Item
-
Quantity
-
Unit of Measure
-
Line Type
-
Unit Price
-
Processing Type
-
Quantity Over Ordered
-
| Field | Explanation |
|---|---|
| Item | A number that the system assigns to an item. It can be in short, long, or 3rd item number format.
Form-specific information Enter the item number of the free goods item. |
| Quantity | The quantity of units affected by this transaction.
Form-specific information Enter the quantity of the free goods item to give away when the system uses this adjustment. |
| UM | A user defined code (00/UM) that indicates the quantity in which to express an inventory item, for example, CS (case) or BX (box). |
| Ln | A code that controls how the system processes lines on a transaction. It controls the systems with which the transaction interfaces (General Ledger, Job Cost, Accounts Payable, Accounts Receivable, and Inventory Management). It also specifies the conditions under which a line prints on reports and is included in calculations. Codes include:
S – Stock item J – Job cost N – Non-stock item F – Freight T – Text information M – Miscellaneous charges and credits W – Work order |
| Unit Price | The price of a related item in a pricing or discount policy. For example, with a policy of "Buy one, get one free," the free item is the related item. Enter this price in the unit of measure of the related item quantity.
Form-specific information Since this item is usually included on the order at no charge, the value of this field might be zero. |
| P T | A code that indicates how you want the system to process free good items.
Valid codes are: 1 – Separate line item. The system writes the free good item to the Sales Order Detail table (F4211) as a separate line item. For example, the customer buys 10 items at 1 dollar each and gets 2 free. The system writes two lines to the file: one line for 10 items at a total of 10 dollars and one line for 2 items at a total of zero. 2 – Net down price. The system adds the free good item to the original sales detail line. It recalculates unit price based on the original extended price added to the total free goods price. The customer is responsible for the cost of the original order quantity. For example, the customer buys 10 items at 1 dollar each and gets 2 free. The system writes one line to the Sales Order Detail line for 12 items, but the total price is for 10 items (10 dollars; unit price of each item = 83 cents). 3 – Net down quantity. The system adds the free good item to the Sales Order Detail table as a separate line item, but subtracts the quantity of the free items from the total quantity of the original items. For example, the customer buys 10 items at 1 dollar each and receives 2 free. The customer is charged for the original order quantity (10) less the free goods (2), so in this example, the charge is 8 dollars. Note: When you use processing type 2 or 3, the free good item must be identical to the original item ordered. |
| Quantity Over Ordered | Indicates the multiple at which the system adds free goods to an order when the order quantity exceeds the Quantity From established for the adjustment.
For example, the Quantity From is 10 and the Quantity Over Ordered is 3. The customer receives free goods when the order is for 10 or more. Additionally, the customer receives a free item for every multiple of the value in the Quantity Over Ordered field. In our example, the customer would receive free goods for every multiple of 3. If the order is for 25, the customer receives 6 free goods, 1 free good for the Quantity From of 10 and another free good for every multiple of 3 after 10. This includes the purchased quantities of 13, 16, 19, 22, and 25. |
6.3.2 What You Should Know About
| Topic | Description |
|---|---|
| Assigning a customer to a group based on category codes | In Base Pricing, one customer can belong to only one customer group.
In Advanced Pricing, a customer can belong to a customer detail group without being attached to that group in Customer Billing Instructions. A customer can belong to numerous groups, depending on the customer's category codes. |
| Entering an Item Price Group, a Customer Price Group, or an Order Detail Group | If you enter any of the price groups in the definition for a free goods adjustment, the price group defaults into the adjustment detail and cannot be changed. |
| Offer of multiple free goods | You can specify multiple free goods, but the customer cannot choose from the list of free goods. All free goods must be applied to the orders. |
| Credit orders | Free goods do not display as negative on credit orders. |
| Work Orders | You can set up a free good with a W (work order) line type. The system generates an internal work order for a free goods line. You must set the Free Good Processing Type to 1 (Separate Line). |
| Files | The system stores free goods information in the F4073 file, which is updated by the P4072, P407201 & P4073W. |
| AAIs | AAI 4230 writes the base price into revenue and AAI 4270 writes the adjustment. |
| Order and basket repricing | Free goods work with order repricing and basket repricing. |
| Attaching the schedule | You must attach the schedule to the Customer Billing Instructions or to the Adj Schedule field of each sales order header.
You may also use the Price Adjustment Schedule preference to enable the system to place a default preferred schedule in the Adjustment Schedule field of each sales order detail line. |
6.4 Methods for Applying Free Goods to Sales Orders
The method for applying free goods to sales orders is indicated by the processing type in the free goods window.
6.4.1 Separate Line
Using processing type 1, the system writes the free goods to the sales order detail file (F4211) as a separate line item. The free goods can be a separate item from the item that you ordered and it can have a different unit of measure (UOM). As a result, this method can give away any item or a variety of items. For example, the customer buys 10 items at $1 each and gets 2 free. The system writes 2 lines to the file: one line for 10 items at a total of 10 dollars and one line for 2 items at a total of zero.
6.4.2 Net Down the Price
Using Processing Type 2, Net Down Price, the system adds the Free Good to the original sales order detail line. It recalculates unit price based on the original extended price added to the total free goods price. The customer is responsible for the cost of the original order quantity. The item and UOM of the free good must be the same as that of the item you ordered. For example, the customer buys 10 items at $1 each and gets 2 free. The system writes one line to the Sales Order Detail line for 12 items, but the total price is 10 dollars; unit price of each item = 83 cents).
6.4.3 Net Down the Quantity
Using Processing Type 3, Net Down Quantity, requires that the free item be the same item and the same unit of measure as the ordered items. This method produces a soft error number 4000 "Quantity Changed Due to Free Goods." For example, the customer buys 10 items at $1 each and receives 2 free. The customer is charged for the original order quantity (10) less the free goods (2), so in this example, the charge is 8 dollars.
6.4.4 Quantity Over Ordered
Using Processing Type 1 in the free goods window, the system looks first at the From Quantity in Price Adjustment Detail. The system uses the quantity field from the free good's window to default the quantity of the free good back to the Sales Order. The Quantity Over Ordered field enables customers to receive multiple quantities of the free good based on quantity increments. For example, with a Quantity From value of 10, a free good quantity of 1 and a Quantity Over Ordered of 5, customers receive one free good when they purchase 10. Also, the Quantity Over Ordered generates an additional free good for every multiple of five over a quantity of ten on the Sales Order. If the customer orders a quantity of 25, they receive 3 additional free items for a total of 4 free items.
6.4.5 Record Free Good as Discount at Sales Update
You can set the processing option for the Sales Update (P42800) program to record free goods as a discount. When you activate the processing option, the system creates a GL entry for the free good adjustment, using an account number from AAI 4270. The system records the list price as revenue and uses the difference between the list price and the actual price to calculate the adjustment. For example, if the list price of the free good is $10 and the actual price is zero, the GL entries reflects a $10 credit to revenue and a $10 debit to the price adjustment account. If you do not activate the processing option, the system records the actual price as revenue and does not record an adjustment.
6.5 Creating Accrual Adjustments
You can create adjustments so the system accrues the amount of an adjustment instead of applying the adjustment to the order line. You can use accrual adjustments to calculate and enter an adjustment for such items as commissions and royalties.
From Sales Order Management (G42), choose Price Management (G4222)
From Price Management (G4222), choose Advanced Price and Adjustments
From Advanced Price and Adjustments (G42311), choose Price and Adjustment Schedule
You identify an accrual adjustment by entering the Adjustment Control Code in Price Adjustment Definitions. The system does not roll the price adjustment into the unit price or print the adjustment on the invoice. Instead, the system records the adjustment to history and posts the adjustment to the General Ledger during the next sales update.
Accruals are adjustments that accumulate amounts that you pay at a later date to a specific account.
6.5.2 Example: Accruing Commissions and Royalties
You can use adjustments to accrue amounts to be paid as commissions or royalties. For example, your sales manager for the east coast earns a commission for any sale within the territory. When you enter a sales order for a customer in that territory, accounting entries are made. One of the entries is for the amount of the commission accrued by the sales manager. The accrued commission entry does not display on any customer order screen.
6.5.3 Example: Posting an Accrual Adjustment
The difference between a regular journal entry and an accrual journal entry is shown in this example of posting credit and debit entries. The entry item has a base price of 100 and an adjustment of 10.
The regular entry would consist of three entries:
-
Debit Accounts Receivable 90
-
Debit Adjustments 10
-
Credit Revenue 100
The accrual entry would consist of four entries:
-
Debit Accounts Receivable 100
-
Debit Adjustments (commissions) 10
-
Credit Revenue 100
-
Credit Accrual (commissions payable) 10
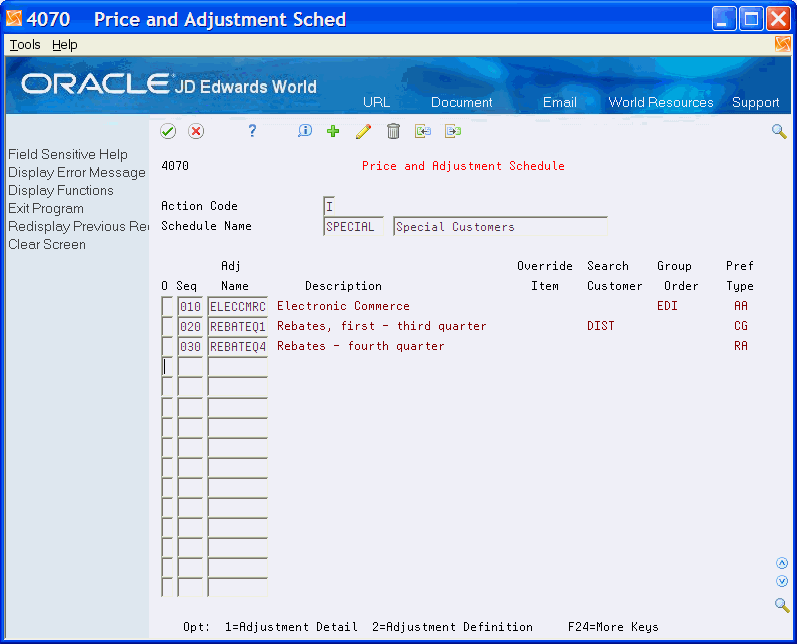
On Price and Adjustment Schedule
Figure 6-5 Price and Adjustment Schedule (Accrual Adjustments) screen
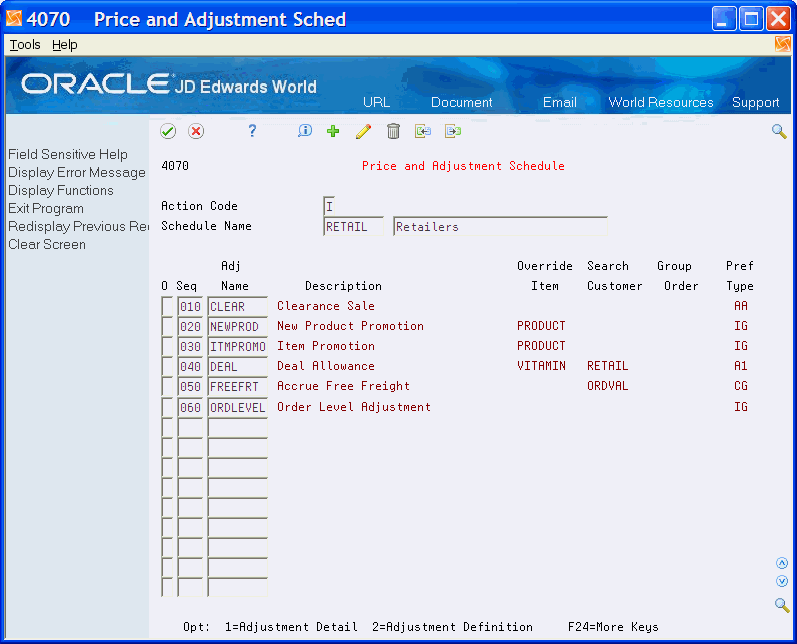
Description of "Figure 6-5 Price and Adjustment Schedule (Accrual Adjustments) screen"
-
Access Price Adjustment Definitions.
Figure 6-6 Price Adjustment Definition screen
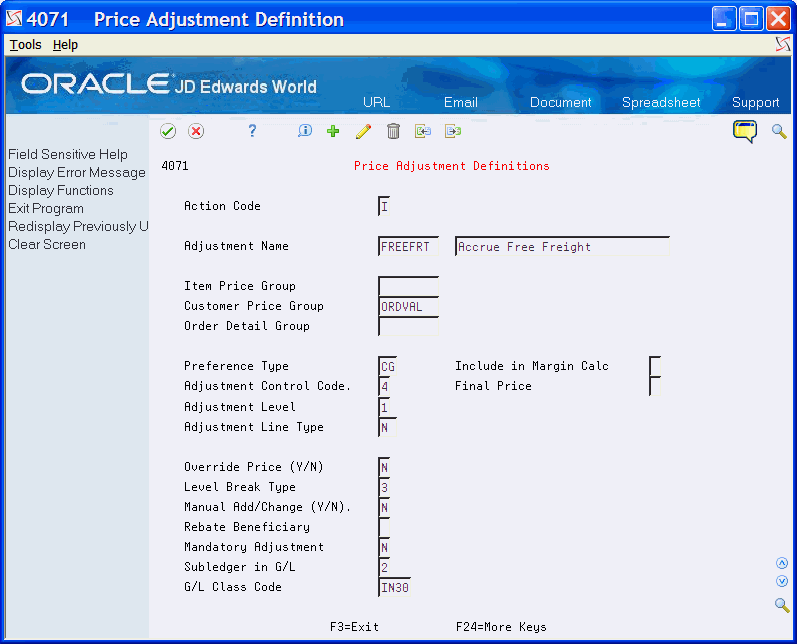
Description of "Figure 6-6 Price Adjustment Definition screen"
-
Complete the following fields:
-
Adjustment Control Code
-
G/L Class Code
-
-
Return to Price and Adjustment Schedule.
-
On the line of the adjustment, choose the option to access Price Adjustment Detail.
-
An intermediate screen may appear. The Pricing Preference Profile screen lists your defined hierarchy sequence.
Figure 6-7 Pricing Preference Profile (Defined Hierarchy) screen
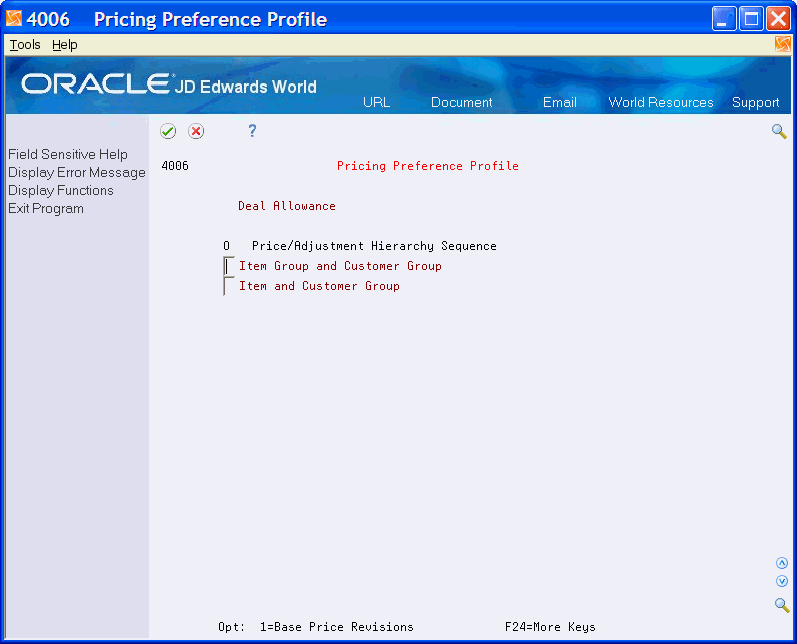
Description of "Figure 6-7 Pricing Preference Profile (Defined Hierarchy) screen"
-
Choose the option to access Price Adjustment Detail on the profile line.
Figure 6-8 Price Adjustment Detail (Accrual Adjustments) screen
Description of "Figure 6-8 Price Adjustment Detail (Accrual Adjustments) screen"
-
Complete the following fields:
-
From Amount
-
Factor
-
Basis
-
Effective Dates
-
| Field | Explanation |
|---|---|
| Adjustment Control Code | A code that specifies how the adjustment appears on the invoice and whether you want the system to create a separate line in the Sales Order Detail table (F4211).
Value for accruals is: 4 – The system records the adjustment to history and posts it to the general ledger during a sales update. It does not add the adjustment into the unit price or print it on the invoice. Use Control Code 4 to create an accrual adjustment. |
| G/L Class Code | The table of Automatic Accounting Instruction accounts that allows you to predefine classes of automatic offset accounts for Accounts Payable, Accounts Receivable, and other systems.
G/L offsets might be assigned as follows:
If you leave this field blank during data entry, the system uses the default value from the Customer Master Information table (F0301) or the Supplier Master Information table (F0401). The post program uses the G/L Offset class to create automatic offset entries. The G/L class directs AAI 4280 (accrual) and AAI 4270 (price adjustments). Note: Do not use code 9999. It is reserved for the post program and indicates that offsets should not be created. |
6.5.4 What You Should Know About
6.6 Setting Up Rebate Adjustments
Businesses use rebates to encourage customers to purchase a greater volume of goods or services over a period of time. If the total they buy reaches a certain threshold level, you can issue a rebate to them.
You calculate rebates based on the total amount, total quantity, or total weight of multiple orders, which accumulate to a volume history file (F4078). You also accumulate a rebate amount to the general ledger to recognize the liability.
When a customer's total sales activity reaches a rebate threshold, the system calculates the rebate amount. At this point, you can generate a credit order to the beneficiary of the rebate amount.
You define the rebate adjustment to specify how much of each eligible sales order the system accrues to the general ledger.
Complete the following tasks to set up rebates adjustments:
-
Creating Rebate Accrual Adjustments
-
Defining Rebate Accrual Details
-
Defining Rebate Thresholds
-
Reviewing Rebate Information
-
Processing Rebate Accruals
6.7 Creating Rebate Accrual Adjustments
From Sales Order Management (G42), enter 27
From Sales Order Advanced and Technical Operations (G4231), choose Advanced Price and Adjustments
From Advanced Price and Adjustments (G42311), choose Price and Adjustment Schedule
You define the rebate adjustment to specify how much of each eligible sales order the system accrues to the general ledger.
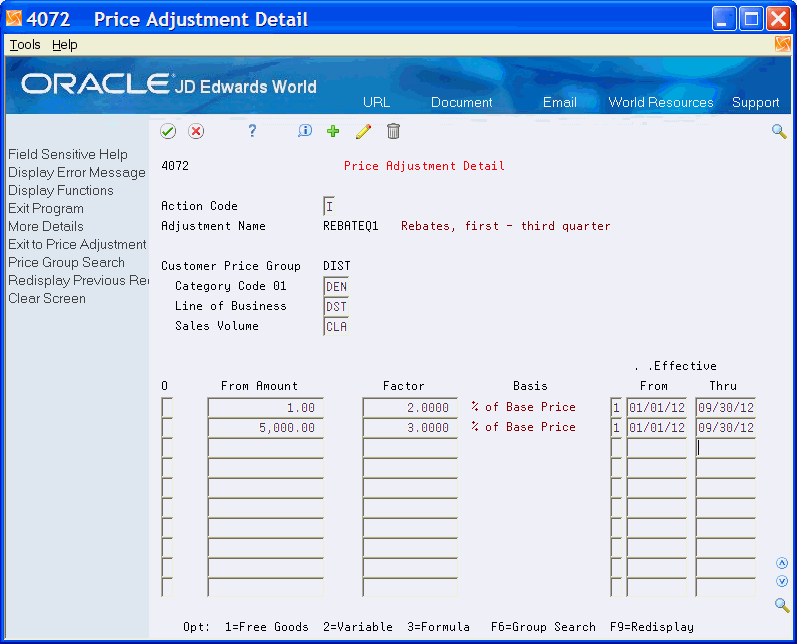
6.7.1 Example: Creating a Rebate Accrual Adjustment
You define a volume rebate for customer 4183 and item CLRD100.
-
You define the rebate adjustment to accrue rebate information to the general ledger. You define the factor as 4% to indicate to accrue 4% of each order detail line to the general ledger. The factor value must be negative for the system to write amounts correctly to the accounts.
-
You define rebate thresholds. The rebate is paid at 2% over 100,000 and 3% over 200,000. The currency is U.S. dollars. The rebate is effective from June 20, 2017 through December 31, 2017.
On June 30, 2017, you enter an order for customer 4183 and item CLRD100 in the amount of 50,000.
During sales update, the system updates sales volume history with sales quantity and amount information. Sales totals are compared with rebate thresholds to determine whether the system should calculate a rebate amount. The system also creates journal entries in the general ledger to recognize the potential rebate liability.
In this example, the order total is less than the first rebate threshold, so no rebate amount is calculated. Volume history is updated with the following information:
-
Order history total = 50,000
-
Rebate amount = 0
The system creates journal entries with a batch type of I to record the sale of goods:
-
Debit accounts receivable = 50,000
-
Credit sales = 50,000
It also creates journal entries to recognize the rebate liability (4% of the order amount):
-
Debit accrual discount (4% x 50,000) = 2,000
-
Credit rebate payable = 2,000
You designate the rebate payable account in AAI table 4280.
You enter additional orders for customer 4183 and item CLRD100.
-
July 15, 2017 for 100,000
-
July 30, 2017 for 100,000
During sales update, the system updates volume history:
-
Order history total = 250,000
-
Rebate amount = 7,500
Because the customer reached the second rebate threshold, the system calculated the rebate amount at 3% of the order history total (250,000 x 0.03 = 7,500.00). You must run the Generate Credit Note program (P42770) to issue a credit order to the customer for the rebate due.
To create the journal entries, the system still uses the 4% defined for the accrual adjustment. During sales update, the system creates the following journal entries for these two orders:
-
Debit accounts receivable 200,000
-
Credit sales 200,000
-
Debit accrual discount 8,000
-
Credit rebate payable 8,000
Note the total rebate payable in the general ledger is 10,000 (2,000 + 8,000), but the rebate payable amount in volume history is 7,500.
On August 1, you generate credit orders. Although the system has made general ledger entries, you must run the Generate Credit Notes program to issue a credit order. The system pulls the general ledger class code for the credit order from the adjustment so it knows which AAI to use. It uses the beneficiary from the adjustment as the Sold To address.
Next, you run Sales Update to create general ledger entries for the credit order.
-
Debit revenue 7,500
-
Credit accounts receivable 7,500
If you defined rebate thresholds to reset the rebate amount field, the system updates the volume history file as follows:
-
Rebate amount 0
-
Rebate paid 7,500
To create a rebate accrual adjustment
On Price and Adjustment Schedule
Figure 6-9 Price and Adjustment Schedule (Rebate Accrual) screen

Description of "Figure 6-9 Price and Adjustment Schedule (Rebate Accrual) screen"
-
Access Price Adjustment Definition.
Figure 6-10 Price Adjustment Definition (Rebate Accrual) screen

Description of "Figure 6-10 Price Adjustment Definition (Rebate Accrual) screen"
-
Complete the following fields:
-
Adjustment Control Code
-
Adjustment Level
-
Level Break Type
-
Rebate Beneficiary
-
| Field | Explanation |
|---|---|
| Adjustment Control Code | A code that specifies how the adjustment appears on the invoice and whether you want the system to create a separate line in the Sales Order Detail table (F4211).
Value for rebates is: 5 – The system records the adjustment to history and posts it to the general ledger during a sales update. The system also accumulates each order line's quantity, weight, and amount to rebate history (F4078). It does not add the adjustment into the unit price or print it on the invoice. Use Control Code 5 to create a rebate adjustment. |
| Adjustment Level | Specifies the level at which the adjustment is calculated:
1 – Line Level: The system calculates the adjustment based on information in the sales detail line. 2 – Basket Level: The system lets you group multiple sales detail lines and calculate the adjustment based on information accumulated from all the lines. You group items by Basket Pricing Group (RPRC) in Item Branch Information (F4102) or by setting up a complex item group. 3 – Order Level: The system lets you group sales order lines from the same order and calculate the adjustment based on information accumulated from all the lines. You group items by Order Pricing Group (ORPR) in Item Branch Information. P – Trip level: The system calculates delivery pricing during delivery document printing if that option is chosen. You must specify "P" for trip-based pricing to work. For Agreement Penalty Schedules Enter 1 to calculate the penalty at the sales order detail line level. |
| Level Break Type | A code that indicates how level breaks occur in the Price Adjustment Detail (V4072). Valid codes are:
1 – Quantity. The system determines the correct adjustment based on the quantity ordered in the sales order. You can set up different adjustment breaks for different units of measure. 2 – Weight. The system uses the weight of the line to retrieve the proper adjustment level break. 3 – Amount. The system uses the extended amount of the sales detail line before any adjustments are applied, to retrieve the proper adjustment level break. When Currency Conversion is switched on, all amount level breaks are stored and displayed based on the floating decimals of the currency code. |
| Rebate Beneficiary | A code (system 40/type RA) that identifies the beneficiary of a rebate. The party you identify here becomes the recipient of the credit order you create when a customer reaches a rebate threshold. The customer and the beneficiary may or may not be the same address. The beneficiary becomes the Sold-To Address of the credit order. |
6.8 Defining Rebate Accrual Details
From Sales Order Management (G42), enter 27
From Sales Order Advanced and Technical Operations (G4231), choose Advanced Price and Adjustments
From Advanced Price and Adjustments (G42311), choose Price and Adjustment Schedule
You define the details of the rebate accrual adjustment when you set up a price and adjustment schedule. The price adjustment detail for rebates determines the rate at which you can set aside funds into an accrual account, which covers the rebate amounts that you would pay to customer who reached the threshold.
To define rebate accrual details
On Price and Adjustment Schedule
Figure 6-11 Price and Adjustment Schedule (Accrual Details) screen

Description of "Figure 6-11 Price and Adjustment Schedule (Accrual Details) screen"
-
Access Price Adjustment Detail.
Figure 6-12 Price Adjustment Detail (Accrual Details) screen
Description of "Figure 6-12 Price Adjustment Detail (Accrual Details) screen"
-
Complete the following required fields:
-
From Quantity
-
Factor
-
Basis
-
Effective From/Thru
-
6.8.1 What You Should Know About
| Topic | Description |
|---|---|
| Order the display of the screen | The pricing hierarchy you define determines how the system displays this screen. |
| Defining information for the general ledger | The information you enter in the Factor and Basis fields defines how you want to accrue a rebate amount for each eligible sales detail line to the general ledger. |
6.9 Defining Rebate Thresholds
From Sales Order Management (G42), enter 27
From Sales Order Advanced and Technical Operations (G4231), choose Advanced Price and Adjustments
From Advanced Price and Adjustments (G42311), choose Price and Adjustment Schedule
You use rebate thresholds to establish limits at which a customer is eligible for a rebate. Customer sales totals that you accumulate in volume history are compared against the thresholds to determine whether the customer is eligible for a rebate and at what level.
The system uses the rebate factor to calculate the rebate amount.
6.9.1 Example: Defining a Rebate Threshold
For example, you can define a 2% rebate for all customers in the Midwest at a threshold of 100,000. The system tracks the sales volume of every Midwest customer separately. When a customer's sales volume reaches 100,000, you can issue a rebate to the customer.
6.9.2 Before You Begin
-
Before you can define rebate thresholds, you access the Threshold Date Pattern window, where you can review defined thresholds and the periods they are effective. From the Threshold Date Patterns window, you access Threshold Maintenance to add or change rebate thresholds.
On Price and Adjustment Schedule
Figure 6-13 Price and Adjustment Schedule (Rebate Thresholds) screen
Description of "Figure 6-13 Price and Adjustment Schedule (Rebate Thresholds) screen"
-
Access Price Adjustment Detail.
Figure 6-14 Price Adjustment Detail (Rebate Thresholds) screen
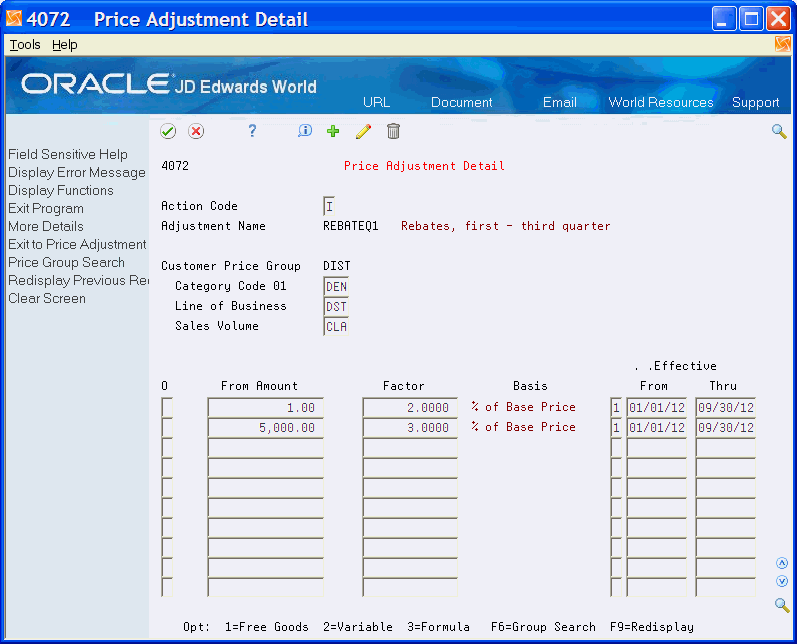
Description of "Figure 6-14 Price Adjustment Detail (Rebate Thresholds) screen"
-
Select Exit to Rebate Maintenance (F8).
Figure 6-15 Threshold Date Patterns screen
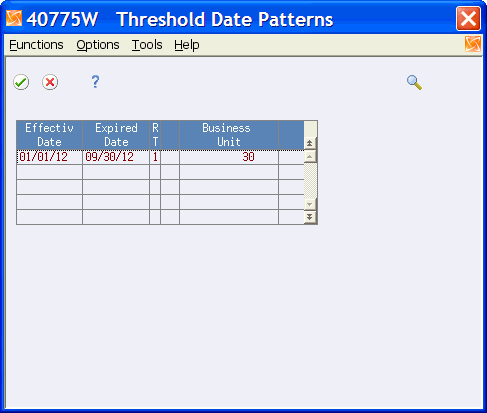
Description of "Figure 6-15 Threshold Date Patterns screen"
-
On Threshold Date Patterns, select option for Exit to Maintenance in Add/Change Mode.
-
On Threshold Maintenance, complete date fields to define beginning and ending dates for the rebate.
-
Effective Date
-
Expired Date
-
Business Unit
-
Rebate Type
-
Currency Code
-
Unit of Measure
-
Threshold Quantity
-
Rebate Factor
-
Reset
-
| Field | Explanation |
|---|---|
| Rebate Type | A code (system 43/RT) that indicates whether the rebate is a percentage of the quantity purchased or a fixed currency amount. |
| Threshold | A quantity that the system compares against accumulated sales volume to determine if a rebate should be awarded. You can define thresholds as quantities, weights, or sales amounts. Use the Level Break Type field in the adjustment definition to define the type of threshold. |
| Rebate Factor | A value you enter to indicate how you want to calculate the rebate amount. The code you enter in the Rebate Type field controls how the rebate is applied. For example, you could award a fixed amount or you could calculate a percentage of accumulated sales. |
| Reset | A code that identifies how to handle future sales when a customer reaches a rebate threshold. Valid codes are:
1 – Yes, reset sales history totals (F4078) and rebate paid to date to zero when you create a credit order for the given customer/rebate total. 0 – No, do not reset sales history totals and rebate paid when you create a credit order, but leave them at their current values. |
6.9.3 What You Should Know About
| Topic | Description |
|---|---|
| Pricing Preference Profile screen | When you select Price Adjustment Detail from Price and Adjustment Schedule, an interim screen displays. Pricing Preference Profile displays the hierarchy you established. Select the line for which you want to work with details. |
6.10 Reviewing Rebate Information
You may retrieve rebate history for each customer. This provides you a tracking system for both past rebates and the current status or orders that qualify for rebates. You can review rebate information by completing the following tasks:
-
Review the Volume History
-
Print the Rebate History Register
6.10.1 Reviewing the Volume History
From Sales Order Management (G42), choose Sales Order Inquiries
From Sales Order Inquiries (G42112), choose Customer Service
You can review rebate history and rebates paid to date at various levels for each customer. The sales volume to date displays by quantity, amount, and volume. The information is more detailed as you continue your inquiry.
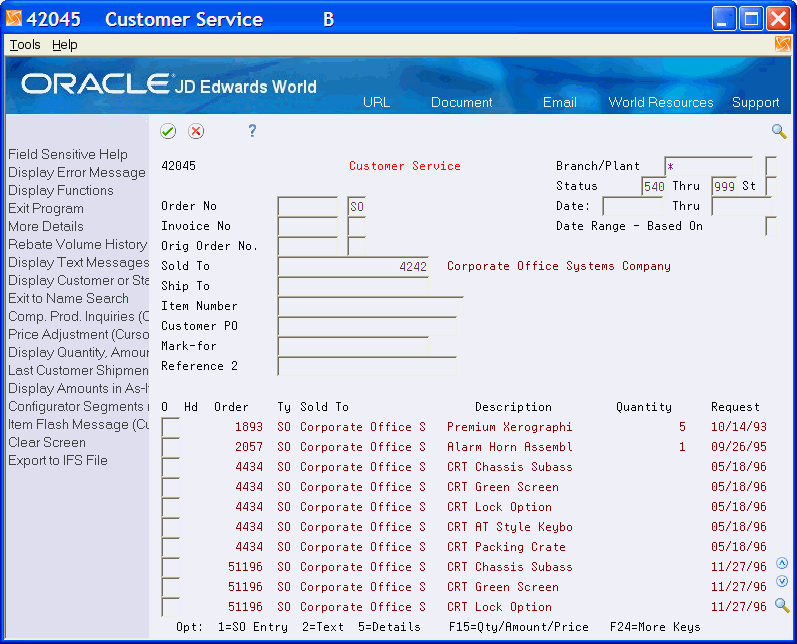
|
Note: You can find more details about Rebate Due and Rebate Paid to Date. Press F4 to open the program P4078W. |
-
Access Rebate Volume History (F5).
Figure 6-18 Volume History Inquiry screen
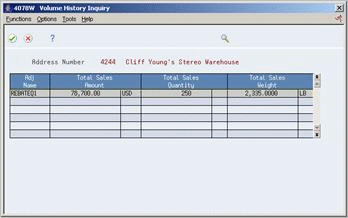
Description of "Figure 6-18 Volume History Inquiry screen"
-
Highlight the line, and choose Volume History by Sales Detail from Options
Figure 6-19 Volume History by Sales Detail screen
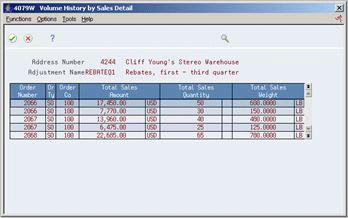
Description of "Figure 6-19 Volume History by Sales Detail screen"
-
Review the details of each sales order that makes up the volumes.
6.10.2 Printing Rebate History Register
From Sales Order Management (G42), choose Price Management
From Price Management (G4222), choose Advanced Price and Adjustments
From Advanced Price and Adjustments (G42311), choose Print Rebate History Register
The Volume History Register report lists customers and their sales that qualify for rebates along with rebate paid to date and achieved information.
6.11 Processing Rebate Accruals
Sales Update accrues the rebate information in the history files (F4078 and F4079), and updates the general ledger.
6.11.1 AAIs and Journal Entries
The 4270 and 4280 AAI tables are used to record the discount and rebate information. The Sales Discounts account is properly debited, and the Rebates Payable account is properly credited, because the Factor on the adjustment was set up as negative.
Both the 4270 and 4280 AAI tables use the GL class code from the adjustment definition. If the GL class code is blank in the definition, the GL class code on the order is used.
In addition to creating journal entries to account for our obligation to the customer for the rebate they have earned, P42800 also creates a record in the Rebate History By Sales Detail File F4079, which captures the quantity, weight and amount of the line that had the rebate applied to it. F4079 contains a record for every sales order detail line that contributed to reaching the threshold(s). This information is also used to update (or create, if this is the first order) the total sales quantity, weight and amount in the Sales Rebate History File F4078. The Open Rebate Amount in F4078 is populated or updated if the customer has reached at least the lowest threshold level to earn the rebate.
6.12 Generating Credit Notes
From Price Management (G4222), choose Advanced Price and Adjustments
From Advanced Price and Adjustments (G42311), choose Generate Credit Notes
You generate credit notes (credit orders) to remit rebates. When you generate credit notes, you create a credit order for each beneficiary of a rebate amount accumulated in the volume history file.
6.12.1 Before You Begin
-
Set up rebate adjustments
-
Review information in the sales detail table
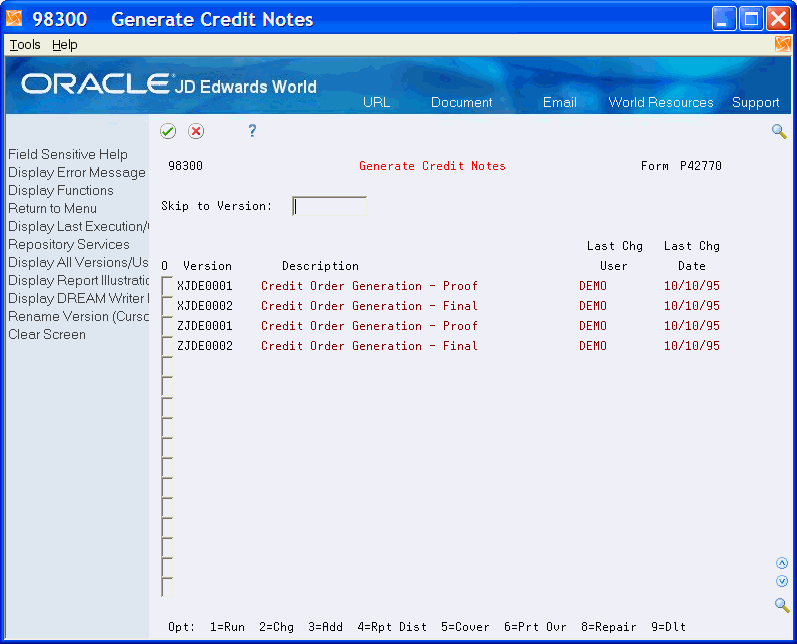
-
Select the version that contains the credit information you want to generate.
-
You can run a proof copy.
-
Review the information.
-
Make necessary changes.
-
Run the final copy.
6.12.2 What You Should Know About
6.13 Reposting Sales Rebate History
You can obtain sales history information for an item, a customer, or a combination of the two. You repost the sales history to record rebate information that you have not been accruing. Typically, you use this program to accumulate rebate information for past sales. You accumulate order information from order history and calculate rebate amounts based on the order history.
From Price Management (G4222), choose Advanced Price and Adjustments
From Advanced Price and Adjustments (G42311), choose Report Sales Rebate History
You can use the processing options to control whether volume totals contain information from the beginning of account activity (start over) or from current totals (add to current totals).
To repost sales rebate history
On Repost Sales Rebate History
Figure 6-21 Repost Sales Rebate History screen
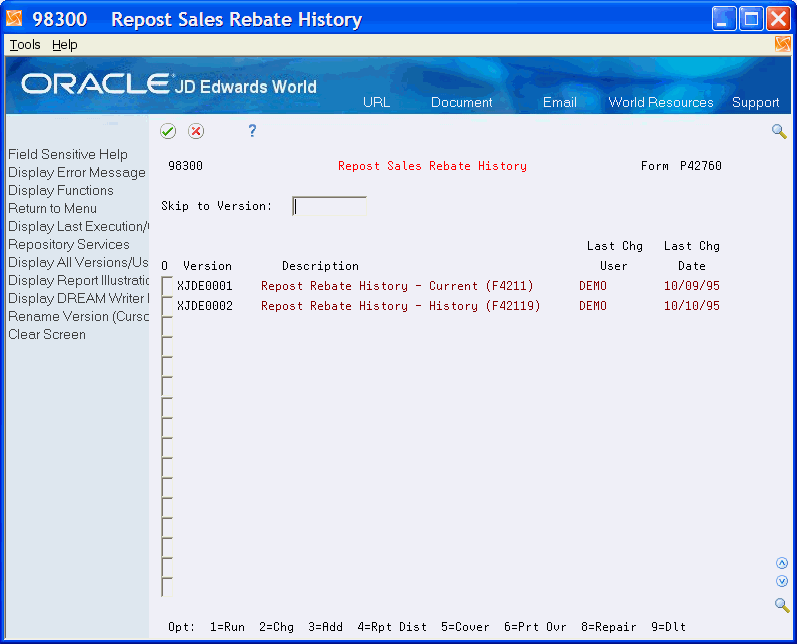
Description of "Figure 6-21 Repost Sales Rebate History screen"
-
Select the version to repost.
-
Run the repost.
6.14 Work with Repricing
You can set up adjustments to reprice sales orders. You reprice sales orders:
-
To allow additional discounts or markups on groups of items
-
To give different pricing to special items or customers
-
To give global discounts based on the total quantity, weight, or amount of items within a product family
You set up repricing based on the amount of the order, weight of the items, or the total quantity of all items ordered.
6.14.2 What You Should Know About
6.15 Creating Basket-Level Adjustments
From Sales Order Advanced and Technical Operations (G4231), choose Advanced Price and Adjustments
From Advanced Price and Adjustments (G42311), choose Price and Adjustment Schedule
From Price and Adjustments Schedule, choose option for Price Adjustments Definitions
Basket repricing changes the price for items that belong to the same repricing group. The system searches the detail lines of a sales order to determine the items in a basket group. When it finds items that belong to the group, it updates the order line with the new price.
You reprice sales orders:
-
In batch mode, using the Order and Basket Level Pricing (P42750) program. The system bases new prices on the price in the original sales order detail line. It performs basket repricing first and then order repricing.
-
Interactively during order entry by pressing the appropriate function key from Sales Order Entry Detail. The batch program performs basket repricing first and then order repricing. You can also choose to process basket and order reprice separately.
-
Automatically at order entry when you set the processing option of the Sales Order Entry Detail program.
6.15.1 Example: Creating Basket-Level Adjustments
For example, you enter an order for the following items. Each item belongs to a basket group.
| Line | Item Name | Unit Price | Group Name |
|---|---|---|---|
| Line 1 | PEN | 10.00 | SUPPLIES |
| Line 2 | RULER | 2.00 | SUPPLIES |
| Line 3 | ERASER | 1.00 | SUPPLIES |
The system determines that the basket group SUPPLIES is eligible for a discount of 0.25 per item. It calculates the new prices:
| Line | Item Name | Unit Price | Group Name |
|---|---|---|---|
| Line 1 | PEN | 9.75 | SUPPLIES |
| Line 2 | RULER | 1.75 | SUPPLIES |
| Line 3 | ERASER | 0.75 | SUPPLIES |
To create basket-level adjustments
On Price Adjustment Definitions
Figure 6-22 Price Adjustment Definition (Basket-Level) screen

Description of "Figure 6-22 Price Adjustment Definition (Basket-Level) screen"
-
Complete the steps to create an adjustment definition or review the adjustment definition information.
-
Complete the following fields:
-
Adjustment Control Code as 1 or 2
-
Adjustment Level as 2
-
-
Add the adjustment to an adjustment schedule.
Figure 6-23 Price and Adjustment Schedule (Basket-Level) screen
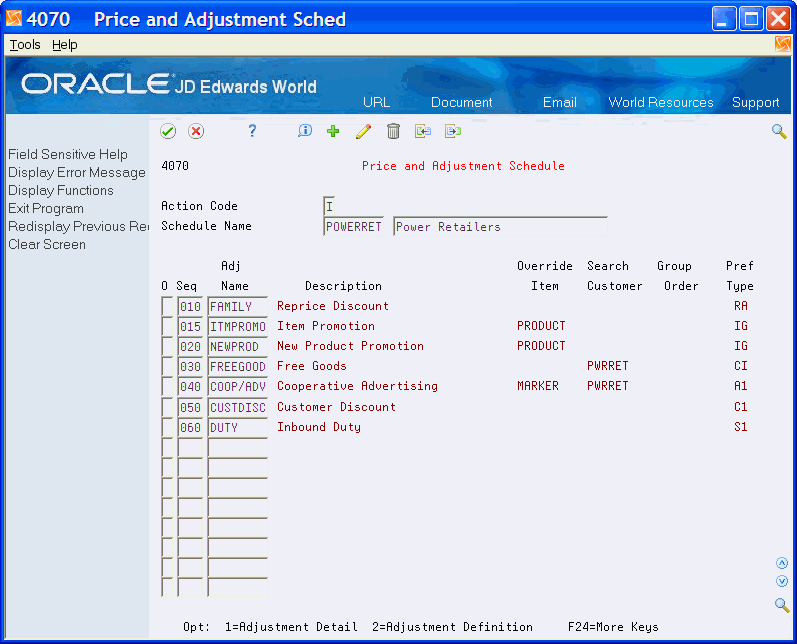
Description of "Figure 6-23 Price and Adjustment Schedule (Basket-Level) screen"
-
Define the new price adjustment detail.
Figure 6-24 Price and Adjustment Detail (Define New Basket-Level) screen
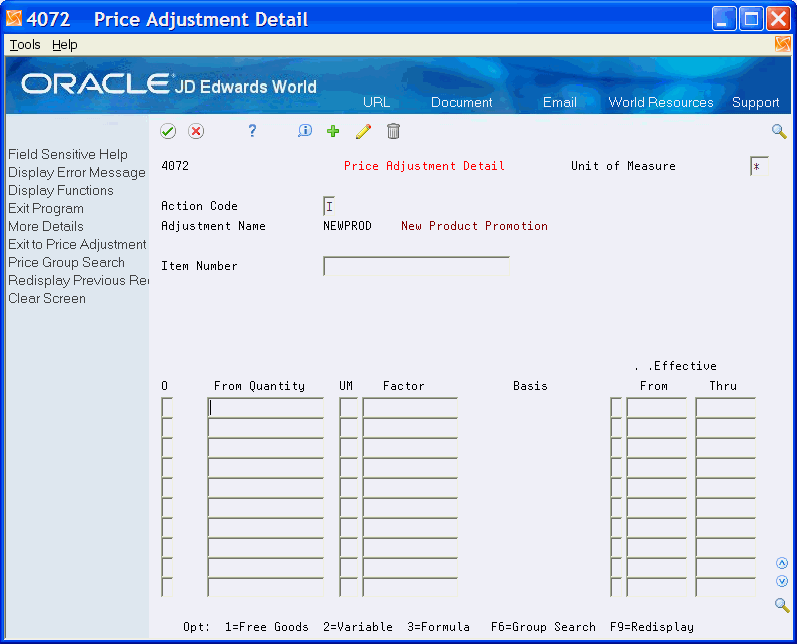
Description of "Figure 6-24 Price and Adjustment Detail (Define New Basket-Level) screen"
-
To attach items to a basket repricing group, access Item Branch/Plant Information
Figure 6-25 Item Branch/Plant Information (Basket Repricing) screen
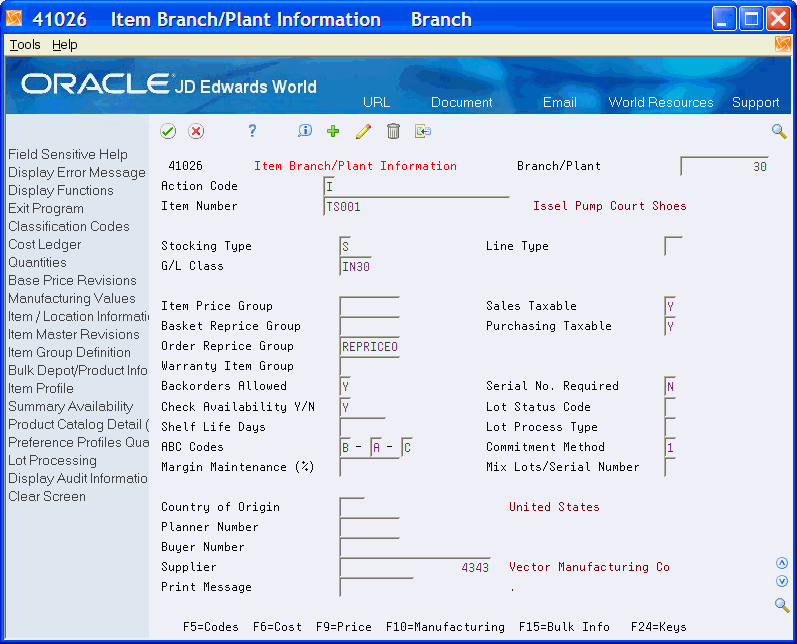
Description of "Figure 6-25 Item Branch/Plant Information (Basket Repricing) screen"
-
On Item Branch/Plant Information, complete the following field:
-
Basket Reprice Group
-
| Field | Explanation |
|---|---|
| Adjustment Control Code | A code that specifies how the adjustment appears on the invoice and whether you want the system to create a separate line in the Sales Order Detail table (F4211).
Valid values for baskets are: 1 – The system adds the adjustment amount into the unit price and records the adjustment detail to the Price Adjustment History table (F4074). The system does not print the adjustment on the invoice. 2 – The system adds the adjustment amount to the unit price and records the adjustment detail to the Price Adjustment History table (F4074). It prints the adjustment on the invoice. 4 – The system records the adjustment to history and posts it to the general ledger during a sales update. It does not add the adjustment into the unit price or print it on the invoice. Use Control Code 4 to create an accrual adjustment. 5 – The system records the adjustment to history and posts it to the general ledger during a sales update. The system also accumulates each order line's quantity, weight, and amount to rebate history (F4078). It does not add the adjustment into the unit price or print it on the invoice. Use Control Code 5 to create a rebate adjustment. |
| Adjustment Level | Specifies the level at which the adjustment is calculated:
2 – Basket Level: The system lets you group multiple sales detail lines and calculate the adjustment based on information accumulated from all the lines. You group items by Basket Pricing Group (RPRC) in Item Branch Information (F4102) or by setting up a complex item group. If you base the adjustment on the basket reprice group named in Item Branch/Plant Information, leave the Item Group, Customer Group, and Sales Group fields blank. If you base the adjustment on a complex price group, enter the name of the group in one of the previously mentioned fields. |
| Basket Reprice Group | You can assign items with common repricing characteristics to a basket reprice group in Item Branch/Plant Information (P41026).
If the items qualify for an additional discount, that discount is reflected as a change in unit and extended price for each qualifying item in the original order line. |
6.15.2 What You Should Know About
6.16 Creating Order-Level Adjustments
From Sales Order Advanced and Technical Operations (G4231), choose Advanced Price and Adjustments
From Advanced Price and Adjustments (G42311), choose Price and Adjustments Schedule
From Price and Adjustments Schedule, choose option for Price Adjustment Definitions
You use order repricing to reprice items based on order groups. The system uses information in each detail line of an order to determine items in an order group. If it finds items that belong to the group, it creates an adjustment for the order as a whole and writes a new order detail line with the amount of the adjustment.
Order-level repricing is often used to add a line for freight costs. The weight, number, or some other variable of the entered items determines the amount of the additional line item. In this example, the added line adds freight costs.
6.16.1 Example: Creating Order-Level Adjustments
When you apply the line item to an order group, you enter an order using the same items as in the basket repricing example. The items all belong to an order repricing group called SUPPLIES. The system determines that the group SUPPLIES is eligible for a discount of 0.25. It does not recalculate prices but adds a new line to the order to reflect the order discount.
| Line | Item Name | Unit Price | Group Name |
|---|---|---|---|
| Line 1 | PEN | 10.00 | SUPPLIES |
| Line 2 | RULER | 2.00 | SUPPLIES |
| Line 3 | ERASER | 1.00 | SUPPLIES |
| Line 4 | Discount | <0.25> |
To create an order-level adjustment
On Price Adjustment Definitions
Figure 6-26 Price Adjustment Definition (Order-Level) screen

Description of "Figure 6-26 Price Adjustment Definition (Order-Level) screen"
-
Complete the following fields:
-
Adjustment Control Code as 3
-
Adjustment Level as 3
-
-
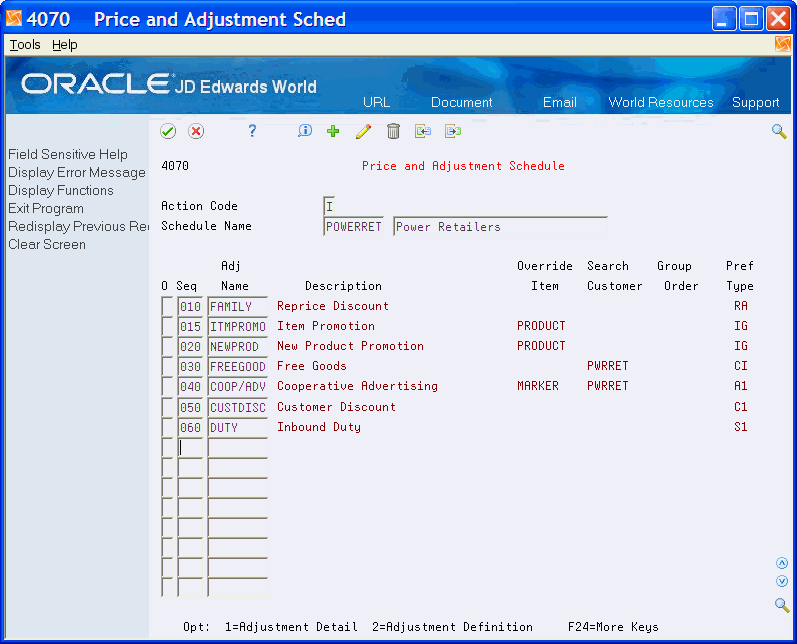
Add the adjustment to an adjustment schedule.
Figure 6-27 Price and Adjustment Schedule (Order-Level) screen
Description of "Figure 6-27 Price and Adjustment Schedule (Order-Level) screen"
-
Define the reprice adjustment detail.
Figure 6-28 Price Adjustment Detail (Order-Level) screen
Description of "Figure 6-28 Price Adjustment Detail (Order-Level) screen"
-
To attach the item to an order repricing group, access the Item Branch/Plant Information.
Figure 6-29 Item Branch/Plant Information (Order Repricing) screen

Description of "Figure 6-29 Item Branch/Plant Information (Order Repricing) screen"
-
Complete the following fields:
-
Order Reprice Group
-
| Field | Explanation |
|---|---|
| Adjustment Control Code | A code that specifies how the adjustment appears on the invoice and whether you want the system to create a separate line in the Sales Order Detail table (F4211).
The valid value for order-level adjustments is: 3 – The system creates a separate detail line in the Sales Order Detail table. It does not add the adjustment into the unit price or record it to the history table. The system does not include this type of adjustment when it calculates the current net price. |
| Adjustment Level | Specifies the level at which the adjustment is calculated:
3 – Order Level: The system lets you group sales order lines from the same order and calculate the adjustment based on information accumulated from all the lines. You group items by Order Pricing Group (ORPR) in Item Branch Information. If you base the adjustment on the order reprice group named in Item Branch/Plant Information, leave the Item Group, Customer Group, and Sales Group fields blank. If you base the adjustment on a complex price group, enter the name of the group in one of the previously mentioned fields. |
| Order Reprice Group | You can assign items with common repricing characteristics to an order reprice group in Item Branch/Plant Information (P41026). You can have different categories based on location. Order repricing is a process in which:
Typical quantity breaks in this situation might be the total weight or the total dollar value of the entire order. If the items qualify for additional discount, that discount is reflected as a flat dollar amount in a new discount line. This process supplements the repricing function and operates in the same batch program. |
6.16.2 What You Should Know About
6.17 Repricing Sales Orders
You can provide a discount for your customer by repricing sales orders. You can reprice the order using one of three methods:
-
Reprice after inquiring on an order
-
Reprice at basket or order level
-
Reprice automatically
6.17.1 Reprice After Inquiring on Order
After re-inquiring on the order in Order Entry (P4211), press F18 to reprice the order. The version of P42750 being called must have the processing option set to allow sales detail lines to be repriced repeatedly.
6.17.2 Reprice at Basket or Order Level
Run the Advanced Order/Basket Reprice program from menu G42311.
6.17.3 Reprice Automatically
Reprice automatically after the order is accepted. Set the processing option for Sales Order Entry (P4211) for auto order repricing.
6.17.4 Troubleshooting
Things to look at if the system does not calculate the reprice:
-
Verify the schedule on the order lines.
-
If the reprice group is a simple price group, verify that it is in the correct field in Item Branch/Plant Information.
-
If the reprice group is a complex price group, verify that the category codes for the item or customer or sales order detail fields match the defined subgroups.
-
Verify that the order date is within the effective dates of the adjustment.
-
Verify that the line meets all the adjustment detail criteria (quantity, amount, weight, UOM, and currency).
-
Verify whether there is a trade discount on the order. The trade discount overrides advanced pricing adjustments.
-
Verify whether or not someone has manually entered the price (PROV = 1 in F4211).