15 Set Up Trading Partner Master
This chapter contains the topic:
15.1 Setting Up Trading Partner Master
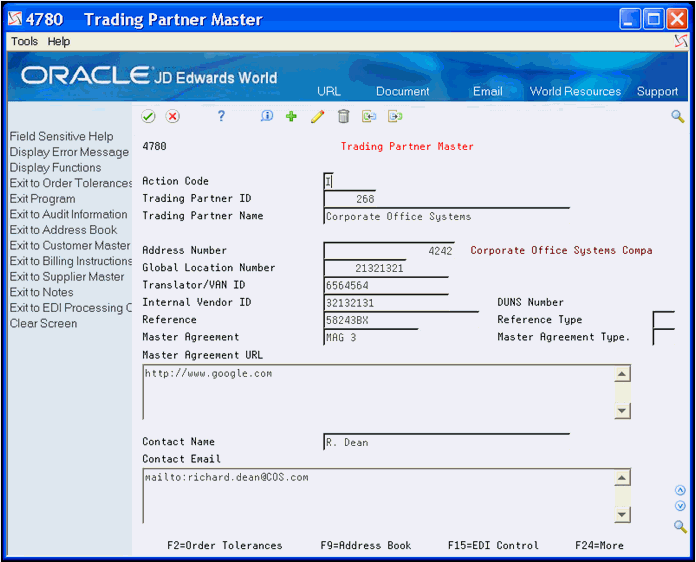
The Trading Partner Master program (P4780) is a central repository for trading partner information. No other JD Edwards World programs currently use any of this information; however, the system can use the fields in the Trading Partner Master table (F4780) as substitute values for variables in e-mail templates that the system creates for the e-mail error notifications.
You can either manually enter the Trading Partner ID or have the system assign it using Next Numbers. You must manually enter the Trading Partner Name and the program does not require the Address Number. The system enters values from the Customer Master table into the DUNS Number field.
When you enter a value in the:
-
Master Agreement URL field, the system prefaces it with http://.
-
Contact E-mail field, the system prefaces it with mail to.
When you double click:
-
The master agreement URL, a browser window displays with the specific URL.
-
The contact e-mail address, your e-mail software opens.
To set up trading partner master information
From Email Error Notification Setup (G4731), choose Trading Partner Master
-
On Trading Partner Master, complete the following optional field:
-
Trading Partner ID
-
-
Complete the following fields and click Add.
-
Trading Partner Name
-
Address Number
-
Global Location Number
-
Translator/VAN ID
-
Internal Vendor ID
-
Reference
-
Reference Type
-
Master Agreement
-
Master Agreement Type
-
Master Agreement URL
-
Contact Name
-
Contact Email
Figure 15-1 Trading Partner Master screen

Description of ''Figure 15-1 Trading Partner Master screen''
-
| Field | Explanation |
|---|---|
| Trading Partner ID | The text that names or describes the party that exchanges EDI documents with you. |
| Trading Partner Name | The text that names or describes the party that exchanges EDI documents with you. |
| Global Location Number | The GLN (Global Location Number) provides a standard means to identify legal entities, trading partners, and locations to support the requirements of electronic commerce.
Examples of parties and locations that can be identified with a GLN: Functional entities - e.g. a purchasing or accounting department. Physical entities - e.g. a warehouse, loading dock, or delivery point. Legal entities - e.g. buyers, sellers, whole companies, subsidiaries, or divisions. |
| Translator/VAN ID | The ID number for the trading partner in the Translator/VAN (Value Added Network) system that transmits the EDI documents. |
| Internal Vendor ID | The ID number that the trading partner has assigned to identify your company as one of its suppliers. |
| Reference | An alphanumeric value used as a cross-reference or secondary reference number. Typically, this is the customer number, supplier number, or job number. |
| Reference Type | A user defined code (47/RT) that identifies the type of information stored in the Reference field. |
| Master Agreement | The name or ID of the agreement with the trading partner. |
| Master Agreement Type | A user defined code (47/AT) that identifies the type of agreement stored in the Master Agreement field. |
| Master Agreement URL | This is the actual URL address for the master agreement.
Each URL address must have the prefix 'http://' appended to the actual URL address. You may type this in yourself or, if it is not found, the system will insert it automatically. In order for the URL to function correctly, you must be using Client Access 5250 Emulation. In order to activate this feature, set the Emulator Type to '1' in User Display Preferences (Hidden Selection 85). |
| Contact Name | The name of the contact at the trading partner. |
| Contact Email | This is the actual Email address for the contact.
Each Email address must have the prefix 'mailto:' appended to the actual Email address. You may type this in yourself or, if it is not found, the system will insert it automatically. In order for the Email to function correctly, you must be using Client Access 5250 Emulation. In order to activate this feature, set the Emulator Type to '1' in User Display Preferences (Hidden Selection 85). |