Apache Livy enables easy interaction with a Spark and Hive cluster over a REST interface. It enables easy submission of Spark jobs or snippets of Spark code, synchronous or asynchronous result retrieval, and Spark Context management, through a simple REST interface or an RPC client library. Perform the following configurations to enable Apache Livy:
To configure Apache Livy, perform the following steps:
1. Download Apache Livy version 0.4 or 0.5 from the Apache website.
File Name: apache-livy-0.5.0-incubating-bin.zip
NOTE |
File name for version 0.4 is apache-livy-0.4.0-incubating-bin.zip. |
2. Extract the file under the edge node or named node of the CDH cluster, where you have access to HADOOP HOME and SPARK HOME directory.
The extracted folder is created as LIVY_HOME.
3. Configure the $LIVY_HOME/conf/livy.conf file for the following properties:
livy.server.port = 8998
livy.spark.master = yarn
livy.repl.enable-hive-context = true
livy.server.launch.kerberos.keytab = /scratch/ofsaa/ofsaa.keytab
livy.server.launch.kerberos.principal = ofsaa@OFS682.ORACLE.COM
livy.repl.enableHiveContext = true
4. Configure the following environment variables for Apache Livy in the $LIVY_HOME/conf/livy-env.sh file:
### directory of JDK used for CDH
export JAVA_HOME=/scratch/software/jdk1.8.0_101
### spark 2.x home directory from CDH
export SPARK_HOME=/scratch/cloudera/parcels/SPARK2/lib/spark2
export SPARK_CONF_DIR=/etc/spark2/conf
export HADOOP_CONF_DIR=/etc/hadoop/conf:/etc/hive/conf
5. After configuring the Apache Livy, restart using the following commands:
$LIVY_HOME/bin/livy-server stop
$LIVY_HOME/bin/livy-server start
To verify the server log, see the $LIVY_HOME/logs/livy-<user>-server.out file.
If you want to use Sparkmagic to communicate with Apache Livy through HTTPS or SSL-TLS 1.2, you must perform the following actions to configure Apache Livy as a secure endpoint:
· Generate a keystore file, certificate, and truststore file for the Apache Livy server or use a third-party SSL certificate.
· Update Apache Livy with the keystore details.
· Restart the Apache Livy server.
Following are the steps to create the self-signed certificate and configure Apache Livy to use HTTPS or SSL-TLS 1.2:
1. Generate a keystore file for the Apache Livy server using the following command:
keytool -genkey -alias <host> -keyalg RSA -keysize 1024 –dname CN=<host>,OU=ofsaa,O=ofsaa,L=redwood,ST=ca,C=us –keypass <keyPassword> -keystore <keystore_file> -storepass <storePassword>
2. Create a certificate using the following command:
keytool -export -alias <host> -keystore <keystore_file> -rfc –file <cert_file> -storepass <StorePassword>
3. Create a truststore file using the following command:
keytool -import -noprompt -alias <host> -file <cert_file> -keystore <truststore_file> -storepass <truststorePassword>
4. Update the livy.conf file with the keystore details. For example:
livy.keystore = /home/ofsaa/livy-0.5.0-incubating-bin/keystore.jks
livy.keystore.password = storepass123
livy.key-password = keypass123
5. After configuring the Apache Livy server, restart using the following commands:
$LIVY_HOME/bin/livy-server stop
$LIVY_HOME/bin/livy-server start
To verify the server log, see the $LIVY_HOME/logs/livy-<user>-server.out file.
NOTE |
· This section is applicable only during Stage and Results on Hive installation. · Ensure that you have the proper role to access this screen. |
To configure a Cluster, you must configure DMT and provide the Apache Livy Interface details to add a New Cluster, add appropriate roles to the user:
1. Navigate to Data Management Framework, select Data Management Tools, select DMT Configuration, select Register Cluster, and then select Edit Cluster.
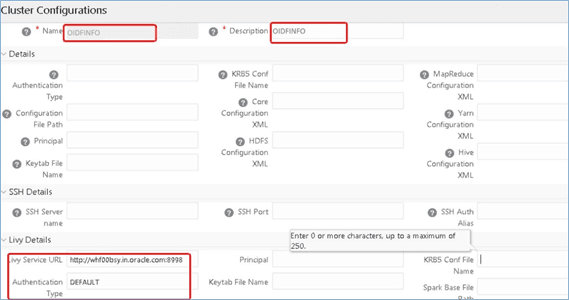
2. Specify the following details in the Cluster Configurations window:
§ Name
§ Description
§ Livy Details
3. In the Livy Service URL field, enter the Apache Livy Server URL (HTTP or HTTPS) of your environment.
4. Click Save to save the Cluster Configurations. The service URL enables easy interaction with a Spark and Hive cluster over a REST interface.