 Add button in the Data Quality
Rules tool bar. Add button is disabled if you
have selected any checkbox in the grid. The Data
Quality Definition window is displayed.
Add button in the Data Quality
Rules tool bar. Add button is disabled if you
have selected any checkbox in the grid. The Data
Quality Definition window is displayed.You can create a Data Quality Rule definition by specifying the DQ Definition details along with the type of validation check on the required table and defining the required validation conditions to query and correct the transformed data. Data Quality Rules can be defined on entities of Infodom as well as on Data sources which are defined from the Data Sources window. Before defining DQ Rule on a Data Source, the Source Model generation should have been done.
NOTE |
Data Quality Rules can be defined only on the DI Sources whose underlying schema resides in the same database, where OFSAAI METADOM or atomic schema exists. If you are defining Data Quality check on a Data Management Source, only quality check will be done; data correction will not be done since it is an external source. |
To create Data Quality Rule in the Data Quality Rule Summary window:
1. Click Add button in the Data Quality
Rules tool bar. Add button is disabled if you
have selected any checkbox in the grid. The Data
Quality Definition window is displayed.
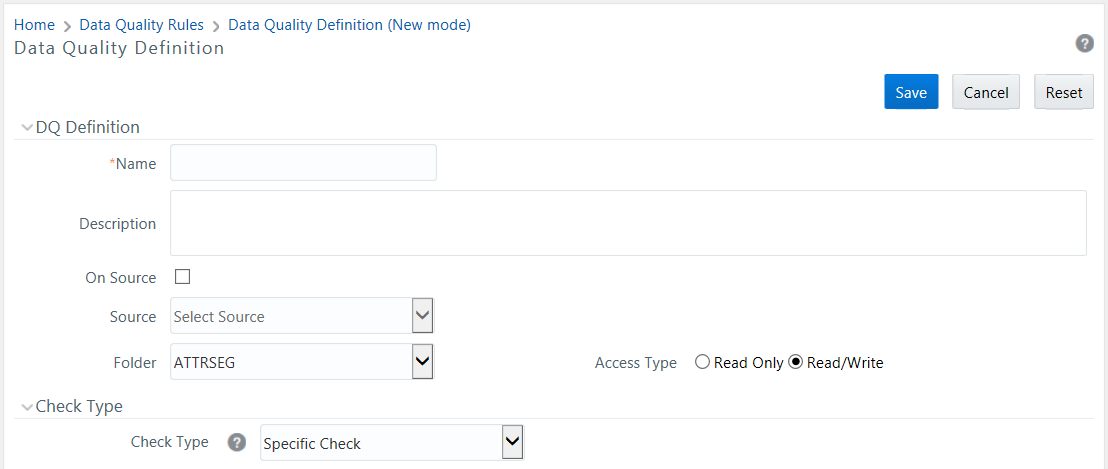
2. In the DQ definition section, do the following:
§ Enter the Name by which you can identify the DQ definition.
§ Enter a Description or related information about the definition.
§ Select the On DI Source checkbox if you want to define data quality check on a Data Source. This is optional.
1 Select the required Data Source from the drop-down list. The Source drop-down list displays sources created on Oracle DB and Hive DB if it is RDBMS Information Domain or sources created on Hive DB if it is Hive Information Domain.
§ Select the Folder (available for selected Information Domain) from the drop-down list.
§ Select the Access Type as either Read Only or Read/Write. The Read Only option enables only the creator to modify the rule details. Other users can only view the DQ rules. The Read/Write option enables all users to view, modify any fields (including Access Type), and delete the DQ rule.
3. Select the Check Type from the drop-down list. The options are Specific Check, Generic Check, and Control Total Check.
You can mouse-over  button
for information.
button
for information.
This check is used to define conditions based on individual checks on a single column.
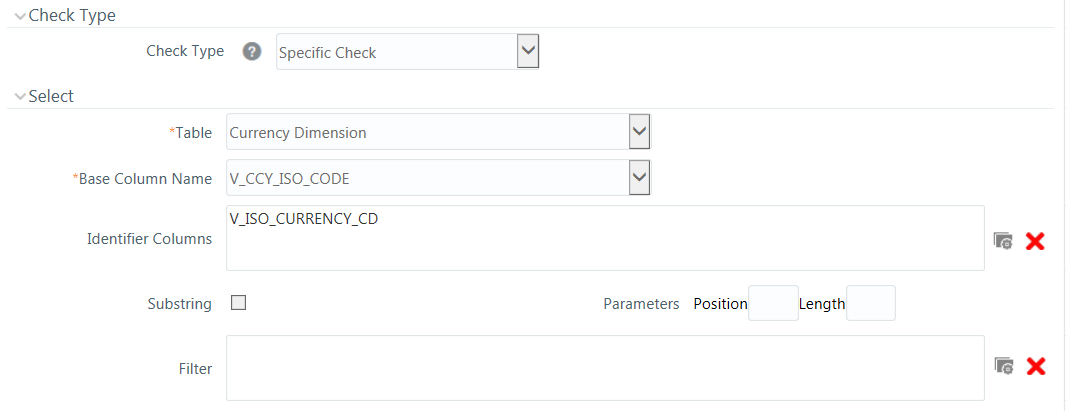
If Specific Check is selected, do the following:
1. Select Table and Base Column Name from the drop-down list. The list displays all the tables which are marked for Data Quality Rule in a data model; that is, based on ENABLE_CLASSIFICATION parameter. For more information, see Table Classification section.
2. Click  button and select the Identifier
Columns. The list displays all PK columns of the selected base
table.
button and select the Identifier
Columns. The list displays all PK columns of the selected base
table.
This feature allows you to view the DQ results report based on the selected
identifier columns apart from the PK columns. You can select up to 8 Identifier
columns including the PK columns. It is mandatory to select the PK Columns.
3. If you have selected Base Column of type Varchar/Char, select the Substring checkbox and enter numeric values in Parameters Position and Length characters fields.
4. Click button and define the Filter
condition using the Specify Expression window.
For more information, see Define
Expression.
NOTE |
While defining the filter condition, you can also include the Runtime Parameter name which you would be specifying in Additional Parameters condition while executing the DQ Rule. |
5. Define the required Validation Checks by selecting the appropriate grid and specify the details. You can define nine specific validation checks based on Range, Data Length, Column Reference/Specific Value, List of Value/Code, Null Value, Blank Value, Referential Integrity, Duplicity, and Custom Check/Business.
NOTE |
A minimum of one Validation check must be defined to generate a query. |
§ Ensure that you select Enable checkbox for every check to be applied as a part of rule.
§ While defining any of the validation checks, you need to specify the Severity as Error or Warning or Information. You can add an Assignment only when the Severity is selected as Warning or Information. Assignments are added when you want to correct or update record(s) in base column data / selected column data. However, selecting severity as Error indicates there are no corrections and only facilitates in reporting the quantity of bad records.

Check Type |
Description |
Range Check |
Range Check identifies if the base column data falls outside a specified range of Minimum and Maximum value. Example: If the
Base Table is STG_CASA, Base Column is N_MIN_BALANCE_YTD, Minimum
value is 9, and Maximum value is 99, then the check with the Inclusive checkbox enabled (by default) is
defined as, ‘STG_CASA.N_MIN_BALANCE_YTD < 9 and STG_CASA.N_MIN_BALANCE_ If the Inclusive checkbox is not selected for Minimum and Maximum, then the check is defined as, ‘If STG_CASA.N_MIN_BALANCE_YTD <= 9 and STG_CASA.N_MIN_BALANCE_YTD >= 99’. Here the base column data less than 10 and greater than 98 are identified as invalid, where 9 and 99 are also included in the validation and considered as invalid. Select Enabled checkbox. This option is available only if the selected Base Column is either of Date or Number data type. Select the Severity as Error, Warning, or Information. If the selected Base Column is of “Date” type, select Minimum and Maximum date range using the Calendar. If the selected base column is of “Number” type, enter the Range value. You can specify numeric, decimal, and negative values for number Data type. The Inclusive checkbox is selected by default and you can deselect the same to include the specified date/value during the validation check. Click (Optional) If the Severity is set to Warning/Information: Select the Assignment checkbox. Select the Assignment Type from the drop-down list. For more information, see Populating Assignment Type Details in the References section. Specify the Assignment Value. Select the Message Severity from the drop-down list. Select the Message from the drop-down list. |
Data Length Check |
Data Length Check checks for the length of the base column data using a min and max value, and identifies if it falls outside the specified range. Example: If the Base Table is STG_CASA, Base Column is N_MIN_BALANCE_YTD, Minimum value is 9 and Maximum value is 12, then the check is defined as, ‘If length of STG_CASA.N_MIN_BALANCE_YTD < 9 and length of STG_CASA.N_MIN_BALANCE_YTD > 12’. Here the base column data with characters less than 9 and greater than 12 are identified as invalid. Select Enabled checkbox. Select the Severity as Error, Warning, or Information. Specify the Minimum data length characters. Specify the Maximum data length characters. Click |
Column Reference / Specific Value Check |
Column Reference / Specific Value Check compares the base column data with another column of the base table or with a specified direct value using the list of pre-defined operators. Example: If the Base Table is STG_CASA, Base Column is N_MIN_BALANCE_YTD, and if Column Reference check is defined against a specific value ‘100’ with the operator ‘>=’ then the check is defined as, ‘If STG_CASA.N_MIN_BALANCE_YTD < 100’. Here the base column data with value less than 100 are considered as invalid. Or, if Column Reference check is defined against another column N_MIN_BALANCE_MTD with the operator ‘=’ then the check is defined as, ‘If STG_CASA.N_MIN_BALANCE_YTD <> STG_CASA.N_MIN_BALANCE_MTD’. Here the reference column data not equal to the base column data is considered as invalid. Select Enabled checkbox. This option is available only if the selected Base Column is either of Date or Number data type. Select the Severity as Error, Warning, or Information. Select the Mathematical Operator from the drop-down list. Select the Filter Type as one of the following: Select Specific Value and specify the Value. You can specify numeric, decimal, and negative values for number Data type. Select Another Column and select Column Name form the drop-down list. Click (Optional) If the Severity is set to Warning/Information: Select the Assignment checkbox. Select the Assignment Type from the drop-down list. For more information, see Populating Assignment Type Details in Reference section. Specify the Assignment Value. Select the Message Severity from the drop-down list. Select the Message from the drop-down list. |
List of Value / Code Check |
List of Value / Code Check can be used to verify values where a dimension / master table is not present. This check identifies if the base column data does not matches with any value or code specified in a list of values. Example: If the Base Table is STG_CASA, Base Column is N_MIN_BALANCE_YTD, and the list of values is mentioned are “100, 101, 102, 103, 104”, then the check is defined as, ‘If STG_CASA.N_MIN_BALANCE_YTD is NOT IN (‘100, 101, 102, 103, 104)’. Here the base column data apart from the one specified (i.e. 100, 101, 102, 103, 104) are considered as invalid. Or, for Code Check, If the Base Table is CURRENCY_MASTER, Base Column is COUNTRY_CODE, and the list of values is mentioned are ‘IN’, ‘US’, ‘JP’, then the check is defined as, ‘If CURRENCY_MASTER.COUNTRY_CODE is NOT IN (‘IN’, ‘US’, ‘JP’)’. Here the base column data apart from the one specified (i.e. ‘IN’, ‘US’, ‘JP’) are considered as invalid. Select Enabled checkbox. Select the Severity as Error, Warning, or Information. Select the Filter Type as one of the following: Select Input Values and specify the List of Values. You can specify numeric, decimal, string (Varchar /char), and negative values. Select Code and
click Click (Optional) If the Severity is set to Warning or Information: Select the Assignment checkbox. Select the Assignment Type from the drop-down list. For more information, see Populating Assignment Type Details in the References section. Specify the Assignment Value. Select the Message Severity from the drop-down list. Select the Message from the drop-down list. |
Null Value Check |
Null Value Check identifies if “NULL” is specified in the base column. Example: If the Base Table is STG_CASA and the Base Column is N_MIN_BALANCE_YTD, then the check is defined as, ‘If STG_CASA.N_MIN_BALANCE_YTD is NULL’. Here the base column data, which is null, are considered as invalid. Select Enabled checkbox. Select the Severity as Error, Warning, or Information. Click (Optional) If the Severity is set to Warning or Information: Select the Assignment checkbox. Select the Assignment Type from the drop-down list. For more information, see Populating Assignment Type Details in the References section. Specify the Assignment Value. Select the Message Severity from the drop-down list. Select the Message from the drop-down list. |
Blank Value Check |
Blank Value Check identifies if the base column is blank without any values considering the blank space. Example: If the Base Table is STG_CASA and Base Column is N_MIN_BALANCE_YTD, then the check is defined as, ‘If Length of data of STG_CASA.N_MIN_BALANCE_YTD after trim is null’. Here the base column data that is blank/empty are considered as invalid. Select Enabled checkbox. Select the Severity as Error, Warning, or Information. Click (Optional) If the Severity is set to Warning or Information: Select the Assignment checkbox. Select the Assignment Type from the drop-down list. For more information, see Populating Assignment Type Details in the References section. Specify the Assignment Value. Select the Message Severity from the drop-down list. Select the Message from the drop-down list. |
Referential Integrity Check |
Referential Integrity Check identifies all base column data which has not been referenced by the selected column of the referenced table. Here, the reference table and columns are user specified. Example: If the
Base Table is STG_CASA, Base Column is N_MIN_BALANCE_YTD, Reference
table is STG_CASA_TXNS, and reference column is N_TXN_AMOUNT_NCY,
then the check is defined as, ‘(not exists (select STG_CASA_TXNS.N_TXN_AMOUNT_NCY
from STG_CASA_TXNS where STG_CASA_TXNS.N_TXN_AMOUNT_NCY=STG_CASA.n_min_ This check can be used to validate attributes like Geography dimension, currency dimension, and so on. Select Enabled checkbox. Select the Severity as Error, Warning, or Information. Select the Table (Referential Integrity Check dimension table) from the drop-down list. The base table selected under the Select grid is excluded from the drop-down list. Select the Column from the drop-down list. The list displays those columns that have the same Data Type as that of the Base Column selected under Select grid. Select the Is Composite Key checkbox if the base column is part of a Composite Key. Enter the Additional Reference Condition for the Composite Key. For example, baseTable.column2=refTable.column2 and baseTable.column3=refTable.column3 where column1, column2, column3 are part of the Composite Keys, baseTable.column1 is the base column and refTable.column1 is the reference column. Click Note: SELECT privilege should be granted to METADOM (atomic schema) user on Base Table and Reference Table for all DQ rules which are defined on “Data Management Sources”. |
Duplicate Check |
Duplicate Check can be used when a combination of column is unique and identifies all the duplicate data of the base table in terms of the columns selected for the duplicate check. Example: If the Base Table is STG_CASA, base column is N_MIN_BALANCE_YTD, and duplicity columns are selected as N_MIN_BALANCE_MTD and N_MIN_BALANCE_ITD, then the check is defined as, ‘If there are duplicate values for the combination of columns STG_CASA. N_MIN_BALANCE_YTD, STG_CASA.N_MIN_BALANCE_MTD, and STG_CASA. N_MIN_BALANCE_ITD are considered as invalid’. Select Enabled checkbox. Select the Severity as Error, Warning, or Information. Click Click |
Custom Check/Business Check |
Custom Check/Business Check is a valid SQL query to identify the data with the query specified as the Custom/business SQL. You can define the SQL, but the Select clause of the query has to follow the order as specified in the template of the Custom Check panel. Example: When you want all the bad records based on two column selection from same table, such as - Identify all the error records from Investments table where the account number is not null and account group code is null: select PK_NAMES,PK_1,PK_2,PK_3,PK_4,PK_5,PK_6,PK_7,PK_8,ERROR_COLUMN from (SELECT NULL PK_NAMES, NULL PK_1,NULL PK_2,NULL PK_3,NULL PK_4,NULL PK_5,NULL PK_6,ACCOUNT_NUMBER PK_7, ACCOUNT_GROUP_CD PK_8,1 ERROR_COLUMN FROM FSI_D_INVESTMENTS WHERE ACCOUNT_GROUP_CD IS NULL AND ACCOUNT_NUMBER IS NOT NULL) Select Enabled checkbox. Select the Severity as Error, Warning, or Information. Enter the Custom/Business Check parameters within the brackets. Ensure that each parameter is separated by a comma. Note: Threshold evaluation is not done for Custom Check DQ executions in Hive Information Domains. |
6. Click Generate Query. The details are validated and the validated query along with the status is displayed in the Generated Query section.
7. Click Save. The defined Data Quality Rule definition is displayed in the Data Quality Rule Summary window with the status as “Saved”.
8. Additional conditions would be appended to the RI check criteria, that is, to the NOT EXISTS clause in conjunction with an AND.
NOTE |
For all checks except Referential Integrity Check, the additional condition is expected to be defined on the base table; whereas for RI check, it can be done on the base table as well as the reference table. |
Generic Check is used to define conditions based on multiple columns of a single base table. These checks are not pre-defined and can be specified (user-defined) as required.
If Generic Check is selected, do the following:
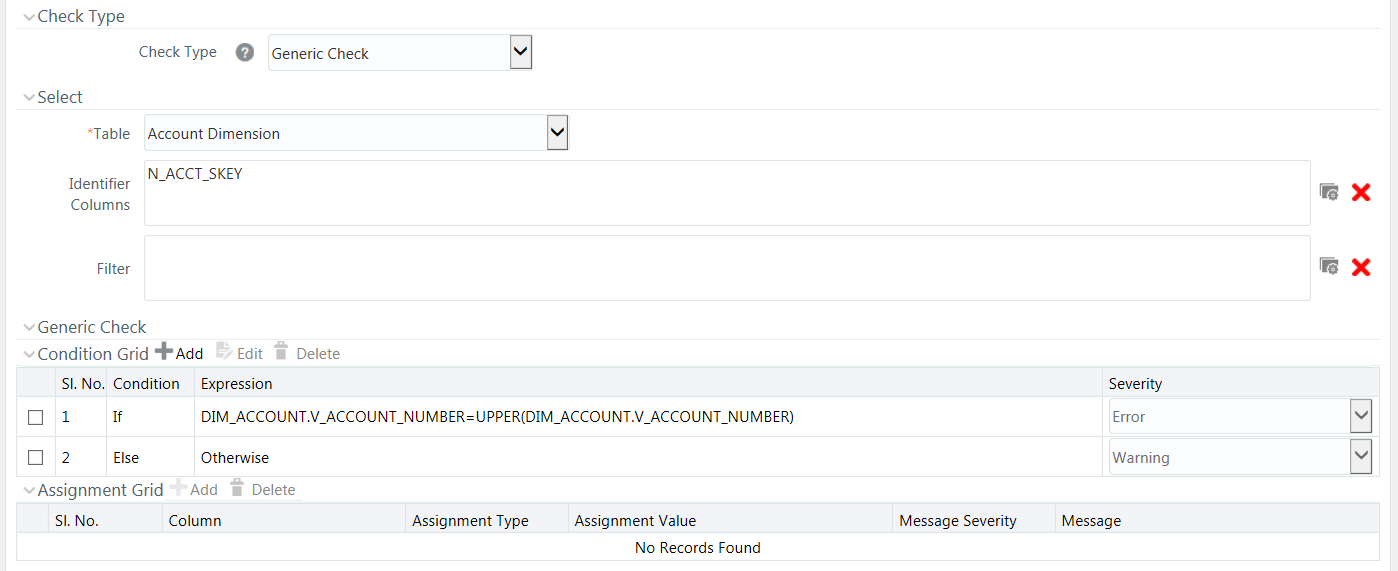
1. Select Table Name from the drop-down list. The list displays all the tables which are marked for Data Quality Rule in a data model; that is, based on ENABLE_CLASSIFICATION parameter. For more information, see Table Classification section.
2. Click button and define the Filter
condition using the Specify Expression window.
For more information, see Define
Expression.
NOTE |
While defining the filter condition, you can also include the Runtime Parameter name which you would be specifying in Additional Parameters condition while executing the DQ Rule. |
3. Click  Add button in the Condition
grid. The Specify Expression window is displayed.
Define the Condition expression. For more information, see Define Expression.
Add button in the Condition
grid. The Specify Expression window is displayed.
Define the Condition expression. For more information, see Define Expression.
NOTE |
The length of the condition is restricted to 4000 characters. |
The Expression is displayed with the “IF” and “Else” conditions along with the Severity status as Error or Warning or Information.
You can change the Severity by selecting the checkbox corresponding to the condition and selecting the Severity as Warning or Information from the drop-down list.
NOTE |
You can add an Assignment only when the Severity is selected as Warning or Information. Assignments are added when you want to correct or update record(s) in base column data / selected column data. There can be one or more assignments tagged to a single condition. However, selecting severity as Error indicates there are no corrections and only facilitates in reporting the quantity of bad records. |
4. Select the
checkbox adjacent to the required Condition expression and click Add button in the Assignment
grid. The assignment details are populated.
NOTE |
You can add an Assignment only if the Severity is Warning or Information. There can be one or more assignments tagged to a single condition. |
5. Specify the Assignment details as tabulated.
Field |
Description |
Column Name |
Select the Column Name from the drop-down list. |
Assignment Type |
Select the Assignment Type from the drop-down list. For more information, see Populating Assignment Type Details in the References section. |
Assignment Value |
Select the Assignment Value from the drop-down list according to the Assignment Type selected. |
Message Severity |
Select the Message Severity as either 1 or 2 from the drop-down list. |
Message |
Select the required Message for the Severity from the drop-down list. |
You can also add multiple assignments by clicking Add button in Assignment
grid.
NOTE |
Minimum of one condition needs to be defined to save the Rule. |
6. Click Save. The defined Data Quality Rule definition is displayed in the Data Quality Rule Summary window with the status as “Saved”.
Using Control Total check, you can compare a constant reference value or reference entity against single or multiple values obtained by applying aggregate functions on the columns of a master/main table, with supporting dimensional filters. The dimensional filters can be time, currency, geography or so on.
There is no data correction configurable for the Control Total check. This check provides summary level information on the entity used, attributes used, aggregate function applied, dimension-filters, group-by columns/predicates selected, number of records subject to the check and so on.
Example of Control Total check based on Constant/Direct Value
Consider an example where you want to check the sum of loan amount for currency code ‘INR’ is greater than or equal to a Constant Value. In the LHS, select Table as “stg_loan_transactions”, Dimensional Filter as “dim_currency.n_currency_code=‘INR’“ and Group By as “dim_legal_entities.le_code, lob.lob_code, dim_branch.branch_code, dim_prodcut.product_id”. In this case, the query for LHS Criteria will be
Select sum(end_of_period_balance)
from stg_loan_transactions SLT, dim_currency DC
where SLT.n_currency_skey=DC.n_currency_skey and DC.n_currency_code = ‘INR’ and fic_mis_date = ‘12/12/2015’
group by dim_legal_entities.le_code, lob.lob_code, dim_branch.branch_code, dim_prodcut.product_id”
If the result of the aggregate function is greater than or equal to the specified constant value, it will be marked as Success, else Failure. After execution, the results can be viewed in DQ reports.
Example of Control Total check based on Reference Entity
Consider an example where you want to compare the sum of loan amount for currency code ‘INR’ with the sum of transaction amount for currency code ‘INR’ for a period with MIS DATE as 12/12/2015. In the LHS, select Table as “stg_loan_transactions”, Dimensional Filter as “dim_currency.n_currency_code=‘INR’“ and Group By as “dim_legal_entities.le_code, lob.lob_code, dim_branch.branch_code, dim_prodcut.product_id”. In the RHS, select Table as “gl_master”, Dimensional Filters as “dim_currency.n_currency_code=‘INR’“ and fic_mis_date = 12/12/2015, and Group By as “dim_legal_entities.le_code, lob.lob_code, dim_branch.branch_code, dim_prodcut.product_id”. In this case, the query for LHS criteria will be same as given in the previous example and the query for RHS criteria will be:
select sum(end_of_period_balance)
from gl_master GM, dim_currency DC, dim_time_date DTD
where GM.n_currency_skey = DC.n_currency_skey and GM.gl_code = ‘LES_001’ and DTD.fic_mis_date = ‘12/12/2015’ and DC.n_currency_skey = ‘INR’
group by dim_legal_entities.le_code, dim_lob.lob_code, dim_branch.branch_code, dim_prodcut.product_id
Consider you have selected the Operator as “>=”. Then, if the result of the aggregate function in the LHS is greater than or equal to the result of the aggregate function in the RHS, it will be marked as Success, else Failure. After execution, the results can be viewed in DQ reports.
If Control Total Check is selected, do the following:
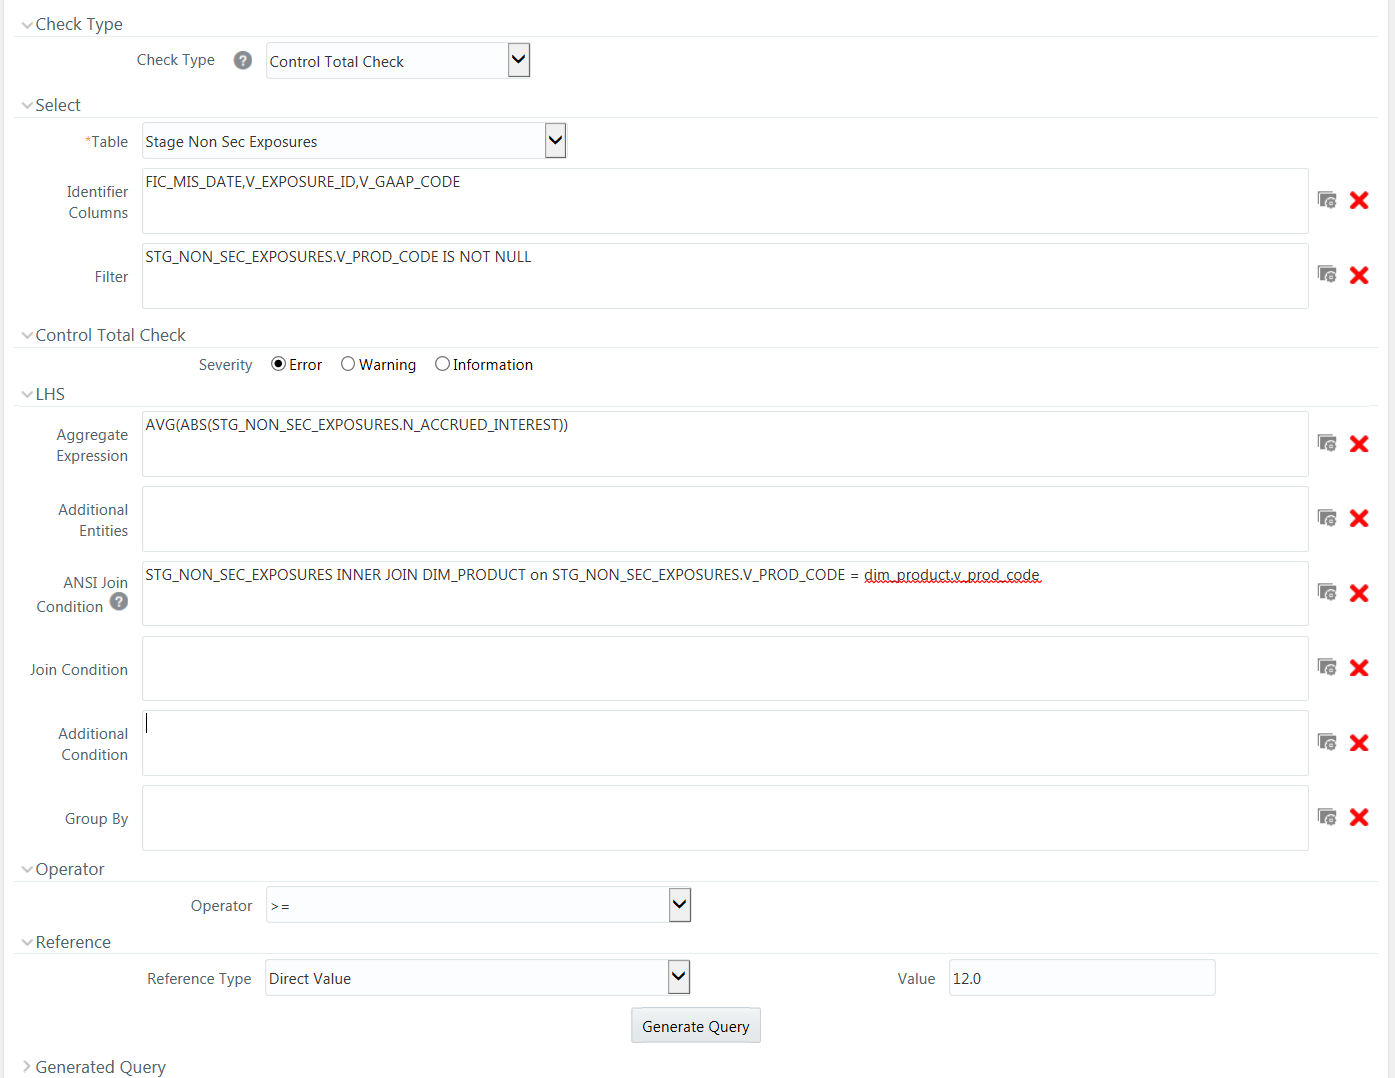
1. Select Table Name from the drop-down list. The list displays all the tables which are marked for Data Quality Rule in a data model; that is, based on ENABLE_CLASSIFICATION parameter. For more information, see Table Classification section.
2. Click button and select the Identifier Columns from the
Column Selection window. The list displays
all PK columns of the selected base table.
This feature allows you to view the DQ results report based on the selected
identifier columns apart from the PK columns. You can select up to 8 Identifier
columns including the PK columns. It is mandatory to select the PK Columns.
3. Click button and define the Filter
condition using the Specify Expression window.
For more information, see Define Expression.
NOTE |
While defining the filter condition, you can also include the Runtime Parameter name which you would be specifying in Additional Parameters condition while executing the DQ Rule. |
4. Select the Severity as Error, Warning or Information.
5. Enter the details in the LHS grid as tabulated:
Field |
Description |
Aggregate Expression |
Click |
Additional Entities |
Click |
ANSI Join Condition |
Specify ANSI Join condition if you have added Additional Entities. For DQ rules defined on source, prefix the table names with “$SOURCE$” if you are directly entering the ANSI Join Condition in the Expression editor. |
Join Condition |
Specify Join condition if you have added Additional Entities. |
Additional Condition |
Specify additional condition if any. |
Group By |
Specify the group by predicates/
columns by clicking Note: The group-by columns need not match the filter criteria columns in the where clause of LHS. If Group By columns are not selected on LHS and RHS, a single row on LHS will be compared with a single row on RHS. |
Group By Join Condition |
Specify the Group By Join condition in the form LHS.GRPBY_COL1 = RHS.GRPBY_COL1 AND LHS.GRPBY_COL2 = RHS.GRPBY_COL2 and so on. LHS and RHS will be joined based on this. If the number of Group By columns on LHS does not match with the number of Group By columns on RHS, it is mandatory to enter Group By Join Condition. If Group By Join Condition is not specified and the number of Group By columns on LHS and RHS are equal, Group By Join Condition will be automatically generated in the form “LHS.GRPBY_COL1 = RHS.GRPBY_COL1 AND LHS.GRPBY_COL2 = RHS.GRPBY_COL2”. If Group By columns are present only on LHS, every row on LHS will be compared against the single row on RHS. Group By Join Condition will be generated in the form “RHS.R_ID=1”. If Group By columns are present only on RHS, the single row in LHS will be compared against every row on RHS. Group By Join Condition will be generated in the form “LHS.L_ID=1”. |
6. Select the appropriate Operator from the drop-down list. The available operators are >, <, =, <>, <=, and >=. Evaluation is done based on the selected numeric operator.
7. Select the Reference Type as:
§ Direct Value- Enter the reference value in the Value field.
§ Another Entity- This is used when you want to compare LHS with a different entity with its set of attributes. Enter the details as follows:
2 Reference Base Table- Select the reference table from the drop-down list.
3 Specify Aggregate Expression, Additional Entities, ANSI Join Condition, Join Condition, Additional Condition and Group By in the respective fields. For more information, see the preceding table.
§ Relative Reference- Here Reference value is the same aggregate function on the subject entity itself, but dimensional filters can vary. Reference Base Table and Aggregate Expression are pre-seeded as in the LHS grid. You cannot modify them. Enter the other details as follows:
4 Specify Additional Entities, ANSI Join Condition, Join Condition, Additional Condition and Group By in the respective fields. For more information, see the preceding table.
NOTE |
Control Total check is allowed only on numeric columns. Group By clauses on LHS and RHS should be defined in such a way that output of RHS and LHS are semantically correct to be compared. That is, RHS and LHS should not result in two different sets that cannot be compared against. Hence, ensure the rule definitions are technically validated to meet this. |
8. Click Generate Query. The details are validated and the validated query along with the status is displayed in the Generated Query section.
9. Click Save. The defined Data Quality Rule definition is displayed in the Data Quality Rule Summary window with the status as “Saved”.
NOTE |
No corrections or assignments are done by the framework for Control Total check. |
DQ rules whether can be defined on a table is decided by a new Servlet parameter ENABLE_CLASSIFICATION, which is present in the web.xml file.
If ENABLE_CLASSIFICATION is set to Y, any tables with classification code 340 can be selected as base table for DQ rule definition. This is the old behavior.
If ENABLE_CLASSIFICATION is set to N, then irrespective of the classification any table can be selected as base table for DQ rule definition.
Data correction on partitioned table is accomplished by overwriting the particular partition specified. At run time, DQ engine look for partition information from OFSAAI object registration table REV_TAB_PARTITION. If base table is partitioned, REV_TAB_PARTITIONS table will have partition column, value and sequence registered in it.
If PARTITION_VALUE does not present in REV_TAB_PARTITIONS table for a TABLE_NAME.COLUMN_NAME, it is considered as a dynamic partition.
Hive allows operations on dynamic partition only in non-strict mode. Non-strict mode is set by DQ engine while it identifies REV_TAB_PARTITION.V_PARTITION_VALUE as null.
Static partition value can also be set with placeholders. For example, $PARAM1, $PARAM2 and the same can be mentioned as ‘Additional Parameters’ while DQ batch execution. Value for the placeholders/ additional parameters will be substituted as the static partition values during DQ run time.
 . You can also click
 to select all the available codes.
Click
to select all the available codes.
Click