
The Event Framework integrated into PMF is an event-driven Messaging Framework that uses Apache Kafka (Messaging Server) to process information asynchronously and in near real-time. Producers that are either external applications or PMF Internal Processes, send messages (notify about an event occurrence) to Kafka Topic(s). Consumers, that are internal processes within PMF, read the messages from Kafka Topic(s) and execute other events or activities configured in the PMF Canvas. The framework uses the REST transfer protocol to send messages and the JSON Data format to construct the messages.
The notification of generation of an event to a Topic can execute a workflow or any individual task asynchronously. Previously, the orchestration of workflows in PMF followed a synchronous pattern and executed the activities in the order of sequence configured. In other words, the execution or completion of activity was required before another activity in the workflow could be executed. However, with the integration of the Event Framework, in addition to the existing sequential workflow, you can now also execute asynchronously not only the workflows constructed in the PMF Canvas but also individual activities within the workflows and in any order of the desired configuration.
Figure: The Event-Based Process Flow Workflow
· Seed Data in the Event and Event Subtype Tables
· Create an Event Process Flow in the Process Modeller
· Use Case: Event-Based Framework Execution in Real-time Transaction Monitoring
The Event Framework enables the Producers to create messages as per the JSON Definition and invokes the Producer API by passing the message and the Topic ID. This message is recorded in the Event Framework Audit Table for reference purposes.
The Producer and Consumer of messages are mapped to the same Topic (a unique identifier for a data stream in Kafka) and the exchange of data takes place (In PMF, execution of Process Flows and Activities).
See the JSON Definition for Events Section in the Oracle Financial Services Analytical Applications Infrastructure Process Modelling Framework Orchestration Guide for information about JSON Definition formats and examples.
The Event Framework enables the Consumer (internal processes in PMF) to make asynchronous requests to execute activities in a process flow based on the conditions of event occurrences. The messaging service can also be used by external applications to post messages to Topics in Kafka to execute events in individual components or execute the whole process asynchronously. In other words, activities do not have to wait for other activities to be completed (as in a synchronous request) and can be messaged to execute events scheduled for the specific activities.
The Producer and the Consumer of the messages routed through the Kafka messaging server are mapped to the same topic (mapped by Producer ID, Topic ID, and Consumer ID) for the following metadata types:
· Event Type
· Event Sub Type
· Event Source
The Event and Event Subtype Tables require the initial population of data (seeding) as a configuration step.
NOTE:
Before you can use the Event-based Orchestration of Process Flow, seed the data as discussed in this section. The seeding of data is a prerequisite configuration.
To Seed Data in the Event and Event Subtype Tables, configure the arguments and Run the following script to add data to the Event Tables in the AAI Config Schema:
./SaveEventInfo.sh <EVENT_TYPE> <EVENT_SUB_TYPE> <EVENT_SOURCE> <EVENT_DESCRIPTION> <LOCALE_CODE>
Argument |
Description |
|---|---|
EVENT_TYPE |
The type of classification at the Parent level for the various tasks. For example: The type of product such as Insurance, loans, and Deposits. |
EVENT_SUB_TYPE |
The further classification of the Parent level Event Type. For example: For the Loan Event Type, the subtypes such as long-term loans, short-term loans, and loan transfers. |
EVENT_SOURCE |
The Source of the OFSAA Application for the Event to be added. |
EVENT_DESCRIPTION |
The description of the Event that is to be added. |
LOCALE_CODE |
The locale for the UI. |
For example:
./SaveEventInfo.sh ECMEVENT AML_DD ECM 'ECM_Type_EVENT' en_US
NOTE:
For more information about additional configurations related to Event Framework Metadata, see Appendix B: Set Up Event Framework Metadata.
Use the Activities in the PMF Canvas to create an Event Workflow and execute it so that the process of communication of data between the Producers (external applications or PMF Internal Processes) and consumers (PMF Internal Processes) is established and the events are triggered from the PMF Canvas. Configure to execute each task independently as events in the process flow.
To create an Event Process Flow, follow these steps:
1. Log in to the OFSAA Application.
2. Click Administration  from
the Header to display the administration tasks
in the Tiles menu.
from
the Header to display the administration tasks
in the Tiles menu.
3. Select the required Information Domain from the drop-down list.
4. Select Process Modelling Framework to display a submenu.
5. Select Process Modeller from the submenu to display the Process Modeller Window.
6. Click the
 icon in the window to
display the Process Details Drawer Window.
icon in the window to
display the Process Details Drawer Window.
Figure: The Process Details Drawer Window

7. In the Process Details Drawer Window, enter the required details as follows:
a. Enter a name in the Process Name Field. The Process ID Field is created by the application and is read-only.
b. Enter a description for the process in the Process Description Field.
c. Select Platform from the App Package ID drop-down.
d. Select Workflow Pipeline from the Type drop-down.
e. Do not select any value from Registered Topics as it does not apply to an event process.
f. Do not select any value from Spark DB as it does not apply to an event process.
g. Select the required Infodom from the Infodom drop-down.
h. Enter any appropriate tags in the Tag Field. This field is optional.
i. Select the required application segment from the Segment drop-down.
8. After entering
the details, click the Accept  icon to save it. The Process
Flow is created and is displayed in the PMF Canvas. By default, a job
of the type START is created on the Canvas.
icon to save it. The Process
Flow is created and is displayed in the PMF Canvas. By default, a job
of the type START is created on the Canvas.
9. Drag and drop the required activities from the Activity Menu into the Canvas to construct the Process Flow.
10. Drag and drop
the Event Producer  and
Event Consumer
and
Event Consumer  activities
into the Canvas.
activities
into the Canvas.
11. Click the
 icon to save the process
definition.
icon to save the process
definition.
The following illustration provides a simple example of the Event Process Flow with Producer and Consumer activities displayed on the Canvas.
For more information about configuring Consumers and Producers, see the Configure an Event Consumer and Configure an Event Producer Sections.
Figure: A Simple Representation of Event Process Flow on the PMF Canvas

After adding an Event Producer activity on the Canvas, configure the activity. You can add details for Activity, Transition, and Notifications.
To configure an Event Producer, follow these steps:
1. Click an Event Process Flow in the Process Modeller Window to display it in the PMF Canvas.
2. Double-click
the Event Producer  activity
icon, or click the Edit Activity
activity
icon, or click the Edit Activity  icon that displays when
you mouse over the activity, to display the activity configuration details
in the Producer Activity Drawer Window.
icon that displays when
you mouse over the activity, to display the activity configuration details
in the Producer Activity Drawer Window.
The window displays three tabs: Activity
 , Transition
 , and Notifications
 The Activity Tab requires mandatory details,
whereas the Transition and Notifications Tabs are optional.
The Activity Tab requires mandatory details,
whereas the Transition and Notifications Tabs are optional.
To configure details in the Activity Tab, follow these steps:
Figure: The Producer Activity Tab

a. Enter a name for the Producer Event in the Activity Name Field.
b. Enter a description for the Producer Event in the Activity Description Field. By default, the Activity Type Field displays as Event Producer and is read-only.
c. Select the appropriate status from the Status drop-down.
d. Select Yes or No from the Exclude Task drop-down.
e. In the Producer Properties Section, select the required type of message for the metadata from the Message Datafield drop-down.
f. Select the required topics from the Topics drop-down.
g. Select the required event type from the Event Type drop-down.
h. Select the required event subtype from the Event Sub Type drop-down.
i. Select the required source OFSAA application from the Source drop-down. The Event Description Field is populated based on the selection in the Event Sub Type drop-down.
j. After entering
the details, click the Accept icon to save the details.
To configure details in the Transition tab, follow these steps:
Figure: The Transition Tab

a. Click the Transition tab.
b. Click the
 icon to display the
fields required for transition details.
icon to display the
fields required for transition details.
c. Select the required job to be connected to from the Connected To drop-down.
d. Enter a name for the transition in the Transition Name Field.
e. Enter the order of execution in the Order Field. For example, 1 marks the order as to be executed first.
f. Click the
Search icon from the Decision
Rule drop-down and select the required application rule. Click
the Accept icon
to save the details.
g. Select the stroke format from the Stroke drop-down.
h. After entering
the details, click the Accept icon to save the details.
To configure details in the Notifications tab, follow these steps:
Figure: The Notifications Tab

a. Click the Notifications tab.
b. Click the
icon to display the
fields required for the Notifications.
c. Enter a name for the notification in the Notification Name Field. The Notification ID Field is auto-populated based on the ID from the application.
d. Click the
Search icon from the Condition
drop-down and select the required application rule. Click the Accept
icon to save the details.
e. Select the condition to generate the notification from the Generate drop-down.
f. Select Yes in the Enabled Field to activate the notification.
g. In the Email section, select Yes in the Email Required Field to select to receive the notification through email. Select No to disable this option.
h. Select the required email template from the Email Template Field.
i. Click the
Accept icon
to save the details.
After adding an Event Consumer activity on the Canvas, configure the activity. You can add details for Activity, Consumer, Implementation, and Notifications.
To configure an Event Consumer, follow these steps:
1. Click an Event Process Flow in the Process Modeller Window to display it in the PMF Canvas.
2. Double-click
the Event Consumer  activity
icon, or click the Edit Activity icon that displays when
you mouse over the activity, to display the activity configuration details
in the Producer Activity Drawer Window.
activity
icon, or click the Edit Activity icon that displays when
you mouse over the activity, to display the activity configuration details
in the Producer Activity Drawer Window.
The window displays four tabs: Activity
, Consumer
 , Implementation
 , and Notifications
 The details in the Notification
tab are optional.
The details in the Notification
tab are optional.
To configure details in the Activity Tab, follow these steps:
Figure: The Consumer Activity Tab

a. Enter a name for the Consumer Event in the Activity Name Field.
b. Enter a description for the Consumer Event in the Activity Description Field. By default, the Activity Type Field displays as Event Consumer and is Read-Only.
c. Select the appropriate status from the Status drop-down.
d. Select Yes or No from the Exclude Task drop-down.
e. After entering
the details, click the Accept icon to save the details.
To configure details in the Consumer tab, follow these steps:
Figure: The Consumer Tab

a. Enter a name for the consumer task in the Task Name Field. By default, the ID field displays the unique identifier for the consumer task.
b. Select the appropriate jobs from the Tasks To Execute drop-down.
c. Enter the order of execution in the Order Field. For example, 1 marks the order as to be executed first.
d. Click the
Search icon from the Conditional
Execution Rule drop-down and select the required application rule.
Click the Accept icon
to save the details.
To configure details in the Implementation tab, follow these steps:
Figure: The Implementation Tab

a. Click the Implementation Tab to select the rules required for the execution.
b. Select the required infodom from the Infodom drop-down.
c. Click the
icon to display the
popup with fields required for the Parameters
Section.
d. Select the required job to be connected to from the Connected To drop-down.
e. Select the required data field from the Data Fields drop-down.
f. Select the
required parameter type from the Parameter Type
drop-down. The options are Dynamic and Static. If you select Static, then enter the value
in the Value Field. Click the Accept
icon to save the details.
g. In the Pre/Post
Processing section, click the Search icon from
the Pre Rule drop-down and select the required
application rule to be executed before the processing of the event. Click
the Accept icon
to save the details.
h. Click the
Search icon from the Post
Rule drop-down and select the required application rule to be executed
after the processing of the event. Click the Accept
icon to save the details.
i. After entering
the details, click the Accept icon to save the details.
To configure details in the Notifications tab, follow these steps:
Figure: The Notifications Tab
a. Click the Notification tab.
b. Click the
Add icon
to display the fields required for the Notifications.
c. Enter a name for the notification in the Notification Name Field. The Notification ID Field is auto-populated based on the ID from the application.
d. Click the
Search icon from the Condition
drop-down and select the required application rule. Click the Accept
icon to save the details.
e. Select the condition to generate the notification from the Generate drop-down.
f. Select Yes in the Enabled Field to activate the notification.
g. In the Email Section, select Yes in the Email Required Field to select to receive the notification through email. Select No to disable this option.
h. Select the required email template from the Email Template Field.
i. Click the
Accept icon
to save the details.
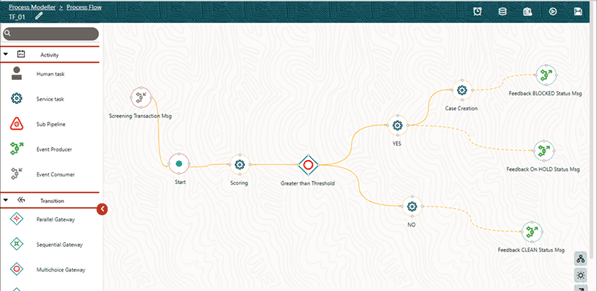
The operational mechanism of the Event Processing Pipeline is better understood with a Use Case that describes the execution of real-time Transaction Monitoring.
The following steps describe the Use Case Configuration:
1. The transactions that are to be monitored and honored are published by the Core Banking System, or the Payment Gateway, to a predefined Kafka Topic.
2. The Process Modeling Framework facilitates the configuration of a Kafka Consumer which listens to the Topic.
3. The Consumer allows configuring an Event Processing Hook (Handler) which auto-pilots any further processing that is to be done by the Handler. The Business Processing Logic starts as a part of the tasks processed by the Handler.
4. The Handler computes a complex score based on the various fields that are part of the message.
For example, the transaction amount added to the transaction withdrawal profile set for the customer for a specific look-back period exceeds a threshold and so cannot be honored.
5. A Decision Rule is configured in the Process Modelling Framework, which takes a different decision path of honoring the transaction, or rejecting the transaction, or set it up to be reviewed by a transaction filtering flow.
6. The Event Producer, which shows up further in the flow, is configured to send an appropriate message to the Core Banking System, or the Payment Gateway, based on a decision of honoring the transaction or blocking it. The Handler can be configured to produce the message and publish it back to a Topic for the Core Banking System, or Payment Gateway, to listen.
7. A loosely coupled Pipeline Event can be orchestrated using the event processing capability built in the Process Modelling Framework.
Figure: Use Case Flow Chart for Transaction Monitoring

The following illustrations of the Process Monitoring Window provides a visual view of the execution path the message has traveled:
Figure: Process Monitoring Window Showing Execution Path
The execution path of the transactions and the various Data Fields that determined the execution path can be monitored using the monitoring capability within PMF. The information shows the lineage of the data flow which has resulted in the transaction being honored or blocked or put on hold.
Figure: Process Monitoring Window Showing Lineage of Data Flow
