 button
in the Entity field. The Entity
and Attribute window is displayed.
button
in the Entity field. The Entity
and Attribute window is displayed.The available Business Hierarchies are as tabulated.
Hierarchy Type |
Description / Hierarchy Sub Type |
In a Regular Hierarchy Type, you can define the following Hierarchy Sub Types: Non Business Intelligence Enabled In a non Business Intelligence Enabled Hierarchy, you need to manually add the required levels. The levels defined will form the Hierarchy. You can Enable Business Intelligence hierarchy when you are not sure of the Hierarchy structure leaf values or the information is volatile and also when the Hierarchy structure can be directly selected from RDBMS columns. The system will automatically detect the values based on the actual data. This option can be selected to define a Parent Child Type hierarchy. |
|
A Measure Hierarchy consists of the defined measure as nodes and has only the Non Business Intelligence Enabled as Hierarchy Sub Type. |
|
A Time Hierarchy consists of the levels/nodes of high time granularity and has only the Business Intelligence Enabled as Hierarchy Sub Type. |
You can select the required Business Hierarchy from the drop-down list and specify the Hierarchy Sub Type details. The window options differ on selecting each particular Hierarchy type. Click on the following links to view the section in detail.
When you select Regular Hierarchy, you can define the Hierarchy Sub Type for Non Business Intelligence Enabled, Business Intelligence Enabled, and Parent Child Hierarchy. Select the required Hierarchy Sub Type from the drop-down list. Click on the following links to view the section in detail.
· Non Business Intelligence Enabled Hierarchy
· Business Intelligence Enabled Hierarchy
When you have selected Regular - Non Business Intelligence Enabled Hierarchy option, do the following:
1. Click button
in the Entity field. The Entity
and Attribute window is displayed.
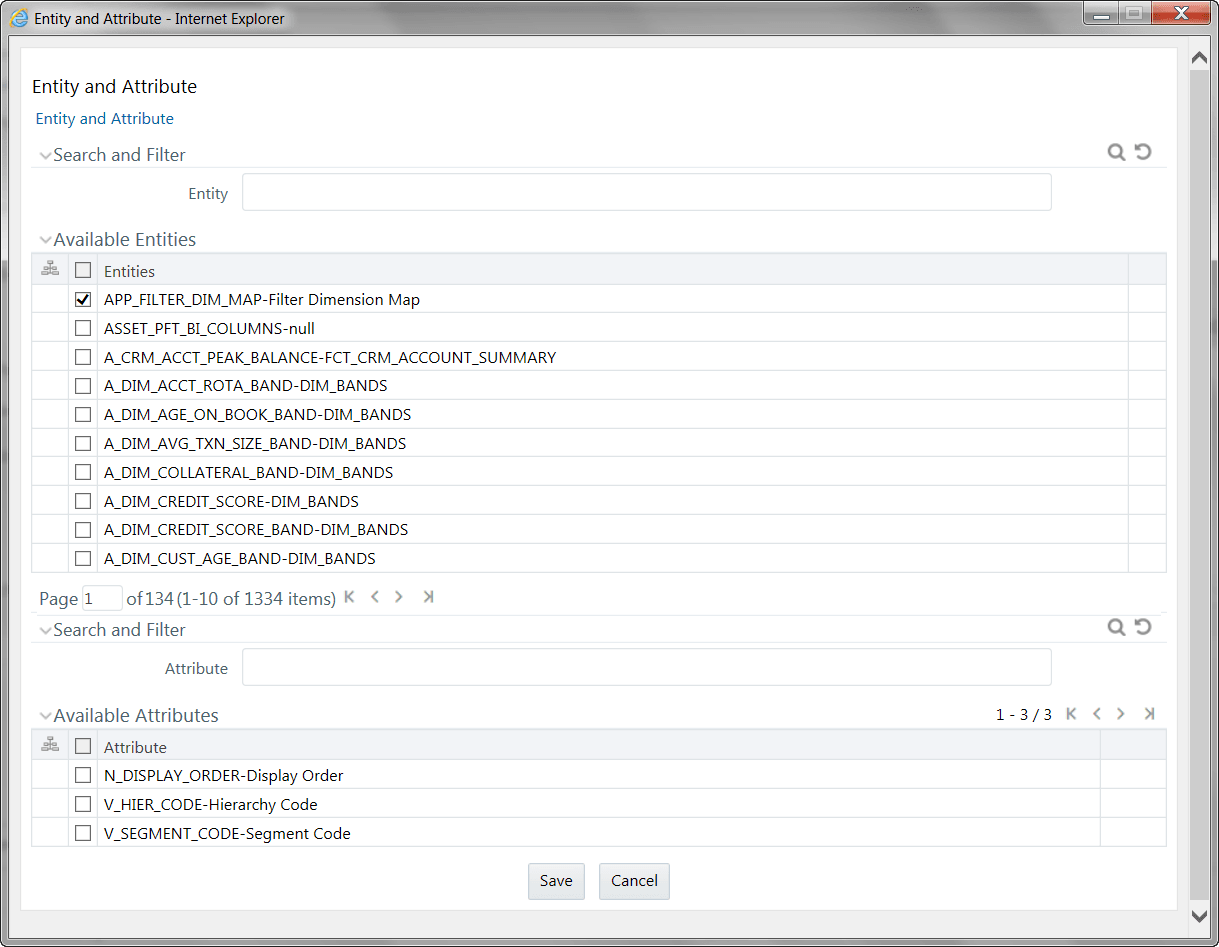
§ You can either search for a specific Entity using the Search and Filter pane or select the checkbox adjacent to the required Entity in the Available Entities list. The list of defined Attributes for the selected entity is displayed Available Attributes list.
§ You can either search for a specific Attribute using the Search and Filter pane or select the checkbox adjacent to the required Attribute in the Available Attributes list.
§ Click Save. The selected Entity and Attribute is displayed in the Add Business Hierarchy window.
NOTE |
Ensure that the values present in Attribute column do not contain new line characters. Because the hierarchy node descriptions in the hierarchy browser are considered as text fields and do not permit new line characters. |
2. Click  button
from the Business Hierarchy tool bar. The Add Node
Values window is displayed.
button
from the Business Hierarchy tool bar. The Add Node
Values window is displayed.

§ Enter the details in Hierarchy Values section as tabulated.
Field |
Description |
Node |
The Node value is auto-populated and is editable. |
Short Description |
Enter the required short description for the node. |
Node Identifier |
Click |
Sort Order |
Enter the Sort order in numeric value. Note: The sort order of the default (OTHERS) node should be greater than the rest of the nodes if this hierarchy is used in RRF Filter condition. |
§ From the Node Attributes grid, select Storage
type from the drop-down list.
There are four Storage Types
as tabulated.
Field |
Description |
Data Store |
This storage type allocates a data cell for the information to be stored in the database. The consolidated value of the data is stored in this cell. The consolidation for the node occurs during the normal process of rollup. |
Dynamic Calc |
In this storage type, no cell is allocated and the consolidation is done when the data is viewed. The consolidation for the node is ignored during the normal process of rollup. The consolidation of node occurs when you use the OLAP tool for viewing data. |
Dynamic Calc & Store |
In this storage type, a cell is allocated but the data is stored only when the data is consolidated when viewed, for the first time. The consolidation for the node is ignored during the normal process of rollup. It occurs only when you first retrieve the data from the database. |
Label |
In this storage type, a cell is not allocated nor is the data consolidated. It is only viewed. Note: The Label storage type is specific to Essbase MOLAP. Storage type is applicable only for the Regular hierarchy type and Measure. If the user wants to specify a dynamic calc option at level members in a multi-level time hierarchy, the same is provided through OLAP execution utility. |
§ Click Save. The Node values are displayed in Add Business Hierarchy window.
3. Click Save in the Add Business Hierarchy window and save the details.
In the Business Hierarchy toolbar, you can also do the following:
§ Click button
to Add subsequent node(s). For the second node
or subsequent node, you can define the Hierarchy Tree and Node Attributes
details as explained below.
Field |
Description |
Add Hierarchy Node |
Click |
Consolidation Type |
Consolidation Type option is available to Essbase MOLAP. There are six consolidation types such as Addition, Subtraction, Product, Division, Percent, and Ignore. Select the required option from the drop-down list. |
§ Click  button
by selecting the required Node level checkbox to edit the Node details.
button
by selecting the required Node level checkbox to edit the Node details.
§ Click  button
to delete the defined Node details.
button
to delete the defined Node details.
When you have selected Regular - Business Intelligence Enabled Hierarchy option, do the following:
1. Select Total Required checkbox, if you want the total of all the nodes.
2. Select List checkbox to retrieve information from database when queried.
NOTE |
List hierarchy can have only one level and you cannot select List option if the Total Required option has been selected. See List hierarchy. |
3. Click button
in the Entity field. The Entity
and Attribute window is displayed.
§ You can either search for a specific Entity using the Search field or select the checkbox adjacent to the required Entity in the Available Entities list. The list of defined Attributes for the selected entity is displayed Available Attributes list.
§ You can either search for a specific Attribute using the Search field or select the checkbox adjacent to the required Attribute in the Available Attributes list.
§ Click Save. The selected Entity and Attribute is displayed in the Add Business Hierarchy window.
NOTE |
Ensure that the values present in Attribute column do not contain new line characters. Because the hierarchy node descriptions in the hierarchy browser are considered as text fields and do not permit new line characters. |
4. Click button
from the Business Hierarchy tool bar. The Add Hierarchy
levels window is displayed.
§ Enter the details in Level Details section as tabulated.
Field |
Description |
Level |
The Level value is auto-populated and is editable. |
Short Description |
Enter the required short description for the level. |
Level Identifier |
Click |
Level Description |
Click |
§ Click Save. The Level details are displayed in Add Business Hierarchy window.
BI Hierarchy value refresh on On Load property is not functional for data loads performed through Excel Upload. It is applicable only for data loads which run through a batch process.
5. Click Save in the Add Business Hierarchy window and save the details.
In the Business Hierarchy tool bar, you can also do the following:
· Click button
to Add subsequent Levels. For the second or
subsequent levels, the levels are incremented.
· Click button
by selecting the required level checkbox to edit the Level details.
· Click button
to delete the defined Level details.
When you have selected Regular - Parent Child Hierarchy option, do the following:
1. Click button
in the Entity field. The Entity
and Attribute window is displayed.
§ You can either search for a specific Entity using the Search field or select the checkbox adjacent to the required Entity in the Available Entities list. The list of defined Attributes for the selected entity is displayed Available Attributes list.
§ You can either search for a specific Attribute using the Search field or select the checkbox adjacent to the required Attribute in the Available Attributes list.
§ Click Save. The selected Entity and Attribute is displayed in the Add Business Hierarchy window.
NOTE |
Ensure that the values present in Attribute column do not contain new line characters. Because the hierarchy node descriptions in the hierarchy browser are considered as text fields and do not permit new line characters. |
2. The Business Hierarchy section displays the pre-defined nodes such as Child code, Parent Code, Description, Storage Type, Consolidation Type, and Formula. You can modify the node values by doing the following:
§ Click button
from the Business Hierarchy tool bar. The Edit Hierarchy
Values window is displayed.
§ Click button
adjacent to the required node field and define the expression in the Expression window. For more information, see
Create
Expression.
§ Click Save. The node details are displayed in Add Business Hierarchy window.
3. Click Save in the Add Business Hierarchy window and save the details.
NOTE |
· When the size of the hierarchy is large, Parent Child Hierarchy can be configured to be treated as a Business Intelligence enabled hierarchy for optimal performance. The hierarchy behaves like a non-Business Intelligence hierarchy till a limit of the number of nodes is reached. This limit (default value is 2048) which decides a hierarchy as BI or non-BI is configurable and can be given a value considering the system and JVM capabilities. · Creating Parent Child Hierarchy with Roll-up Option - It is possible to roll up
the values of child nodes in Parent child hierarchy to the parent
level. If the parent node itself has some value and the child
nodes of it also have associated values, it is possible for the
value of the parent node to be displayed as the sum of its value
and child values. |
When you select Measure Hierarchy, the Hierarchy Sub Type is selected as Non Business Intelligence Enabled by default. To define a Measure Hierarchy in the Add Business Hierarchy window, do the following:
1. Click button
in the Entity field. The Entity
and Attribute window is displayed.
§ You can either search for a specific Entity using the Search field or select the checkbox adjacent to the required Entity in the Available Entities list. The list of defined Attributes for the selected entity is displayed Available Attributes list.
§ You can either search for a specific Attribute using the Search field or select the checkbox adjacent to the required Attribute in the Available Attributes list.
§ Click Save. The selected Entity and Attribute is displayed in the Add Business Hierarchy window.
NOTE |
Ensure that the values present in Attribute column do not contain new line characters. Because the hierarchy node descriptions in the hierarchy browser are considered as text fields and do not permit new line characters. |
2. In the Add Business Hierarchy window, select the Hierarchy Type as Measure.
3. Click button
in the Entity field. The Entity
and Attribute window opens.
§ A list of all the available entities will be listed under Available Entities. Select the required entity. The attributes for that entity will be listed under Available Attributes.
§ Select the required Attribute and click Save. Click Cancel to quit the window without saving. After saving, the Entity and Attribute will be displayed in their respective fields.
4. Click button
from the Business Hierarchy tool bar. The Add Node
Values window is displayed. Enter the details in the Node Details
section as tabulated.
Field |
Description |
Node |
The Node value is auto-populated and is editable. |
Short Description |
Enter the required short description for the node. |
§ In the Node Attributes section, do the following:
1 Select Storage type from the drop-down list. For more information, see Storage Types section.
2 Select the TB Type as First, Average, or Last from the drop-down list.
§ Click Save. The Node values are displayed in Add Business Hierarchy window.
5. Click Save in the Add Business Hierarchy window and save the details.
In the Business Hierarchy tool bar, you can also do the following:
· Click button
to Add subsequent Node/Measures. For the second
node or subsequent node, you can also define the Hierarchy Tree and Consolidation
Type details as explained below.
Field |
Description |
Select Hierarchy Node |
Click |
Consolidation Type |
Consolidation Type option is available to Essbase MOLAP. There are six consolidation types such as Addition, Subtraction, Product, Division, Percent, and Ignore. Select the required option from the drop-down list. |
· Click button
by selecting the required Node level checkbox to edit the Node details.
· Click button
to delete the defined Node details.
When you select Time Hierarchy, the Hierarchy Sub Type is selected as Business Intelligence Enabled and the “Total Required” checkbox is selected by default.
To define a Time Hierarchy in the Add Business Hierarchy window, do the following:
1. Click button
in the Entity field. The Entity
and Attribute window is displayed.
§ You can either search for a specific Entity using the Search field or select the checkbox adjacent to the required Entity in the Available Entities list. The list of defined Attributes for the selected entity is displayed Available Attributes list.
§ You can either search for a specific Attribute using the Search field or select the checkbox adjacent to the required Attribute in the Available Attributes list.
§ Click Save. The selected Entity and Attribute is displayed in the Add Business Hierarchy window.
NOTE |
Ensure that the values present in Attribute column do not contain new line characters. Because the hierarchy node descriptions in the hierarchy browser are considered as text fields and do not permit new line characters. |
2. Select the Time Hierarchy Type from the drop-down list. Depending on the selection, the Hierarchy Levels are displayed in the Business Hierarchy section.
You can also Edit the required
Hierarchy Level. Select the checkbox adjacent to the required Level and
click button. The Edit
Hierarchy Levels window is displayed. You can update Short Description,
Level Identifier, and Level Description details.
3. Specify Hierarchy Start Date by selecting Month and Day from the drop-down list.
4. Click Save and save the Time Hierarchy details.
A large hierarchy refers to a hierarchy having large number of leaf levels. In order to provide an efficient and optimized hierarchy handling, a hierarchy is defined as Large in Oracle Infrastructure. A default value is set to accommodate the number of hierarchy nodes that a hierarchy can contain, for example, 100. If a hierarchy exceeds the default value specified, then the system treats it as a large hierarchy.
NOTE |
· The maximum hierarchy node limit can be configured to a higher number in the FIC_HOME / CONFIG file. However, the recommended, default value, is 100. · A large hierarchy is possible only when you are defining a Time or BI enabled hierarchy. · A large hierarchy cannot be user-defined it is handled automatically by the system. |
A list hierarchy is a flat hierarchy i.e. with only one level. In a list hierarchy, all the nodes are displayed unlike the large hierarchy. You can create hierarchy based on business terms like, Customer, Product, Geography, and so on. The information for this hierarchy is generated from the metadata framework, which encapsulates these business terms. This enables the user to generate a report in OBIEE reporting server based on these business terms.
The advantage of defining a list hierarchy is that you need not know technical terminology or have technical knowledge. It also allows the user to specify a range of values. You can also define a summary or group total and perform a sort on the list hierarchy based on the hierarchy member value or attribute value; these two features are available only for the fact-less view.
Ensure that when you save a BI enabled hierarchy, the defined hierarchy structure is formed (in the back-end process) and stored in an xml format (as Hierarchycode.xml) in the application server. However, when you save a BI-enabled List hierarchy, the hierarchy structure is not formed and hence there will be no BIHIER.XML formed. Whenever this hierarchy is queried, the data is fetched from the atomic database.