Business Measure refers to a uniquely named data element of relevance which can be used to define views within the data warehouse. It typically implies aggregated information as opposed to information at a detailed granular level that is available before adequate transformations.
Based on the role that you are mapped to, you can access read, modify or authorize Measure. For all the roles and descriptions, see Appendix A. The roles mapped to Measure are as follows:
§ Measure Access
§ Measure Advanced
§ Measure Authorize
§ Measure Phantom
§ Measure Read Only
§ Measure Write
Business Measure function within the Infrastructure system facilitates you to create measures based on the area of analysis. While creating a measure, you can choose the aggregation type and apply business exclusion rules based on your query/area of analysis. Business Measures can be stored as Base and Computed measures and can also be reused in defining other multi-dimensional stores and query data using the various modules of Oracle Analytical Application Infrastructure.
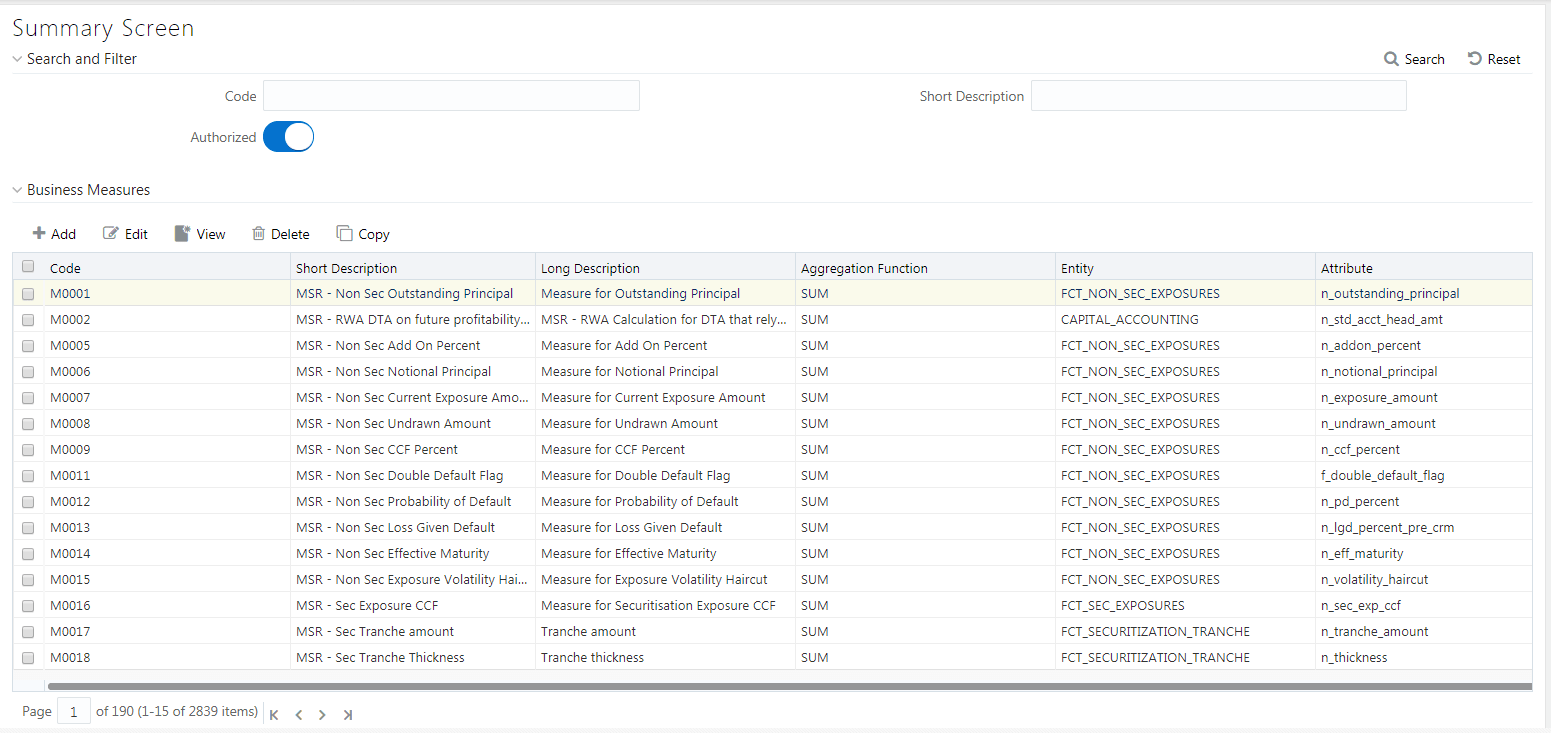
The Business Measures window displays the list of pre-defined Business Measures with their Code, Short Description, Long Description, Aggregation Function, Entity, and Attribute. You can add, view, edit, copy, and delete the required Business Measures. You can also search for a specific Business Measure based on the Code, Short Description, and Authorization status or view the list of existing Business Measures within the system.
You can create a Business Measure by specifying the Business Measure Details and defining the Business Measure Definition. You can create a business measure if you mapped with the role Measure Write with the user group.
To create a measure in the Business Measures window:
1. Click  Add button from the Business Measures tool bar.
The Add Business Measures window is displayed.
Add button from the Business Measures tool bar.
The Add Business Measures window is displayed.
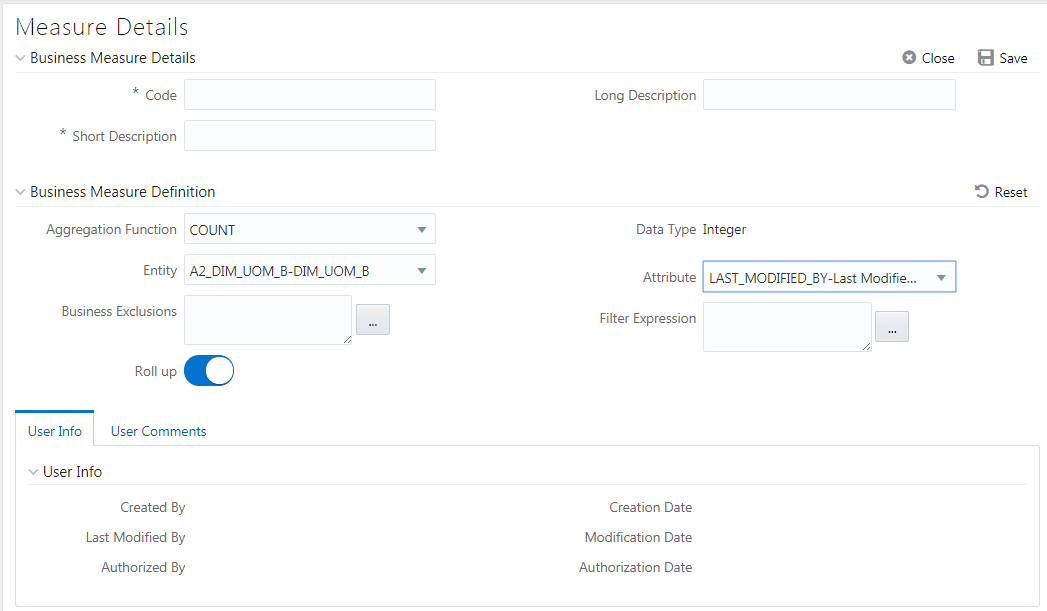
2. Enter the details in the Business Measure Details section as tabulated.
Field |
Description |
Fields marked in red asterisk (*) are mandatory. |
|
Code |
Enter a distinct code to identify the Measure. Ensure that the code is alphanumeric with a maximum of 8 characters in length and there are no special characters except underscore “_”. Note the following: The code can be indicative of the type of Measure being created. A pre-defined Code and Short Description cannot be changed. Same Code or Short Description cannot be used for Essbase installation: "$$$UNIVERSE$$$", "#MISSING”, "#MI”, "CALC”, "DIM”, "ALL”, "FIX”, "ENDFIX", "HISTORY”, "YEAR”, "SEASON", "PERIOD”, "QUARTER”, "MONTH”, "WEEK”, "DAY". In Unauthorized state, the users having Authorize Rights can view all the unauthorized Metadata. |
Short Description |
Enter a Short Description based on the defined code. Ensure that the description is of a maximum of 8 characters in length and does not contain any special characters except underscore “_”. |
Long Description |
Enter the Long Description if you are creating subject-oriented Measure to help users for whom the Measure is being created or other details about the type/subject. Ensure that the description is of a maximum of 100 characters in length. |
3. Enter the details in the Business Measure Definition section.
a. Select the required Aggregation Function from the drop-down list.
The list consists of various metrics based on which a Measure can be aggregated. The available aggregation functions are as tabulated.
Aggregator |
Description |
SUM |
Adds the actual value of attribute or data element to get the measure value. |
COUNT |
Counts the records for the data element to get the measure value or counts the number of occurrences |
MAXIMUM |
This function acquires the maximum of the data element to get the measure value. |
MINIMUM |
This function obtains the minimum of the data element to get the measure value. |
COUNT DISTINCT |
This function is different from a simple count aggregation function. The peculiarity of these measures is that they are linked to the dimensions and they vary across the hierarchies of these dimensions. In a Count Distinct aggregation function a simple roll cannot determine the values at the intermediate nodes in the hierarchies up of their leaf level values. |
Based on the selected Aggregation Function the Data Type is auto populated.
i. Select the Entity to load the data for the Measure from the drop-down list. The list displays all the entities in the information domain, to which your application is connected.
ii. Select the required Attribute from the drop-down list. The list displays all the attributes in the selected entity.
iii. Define the Business Exclusions
rules for the base Measure. You can enter the expression or click  button to define using the Expression
Builder window.
button to define using the Expression
Builder window.
iv. Define Filter Expression
to filter the aggregation process. You can enter the expression or click
button to define using the Expression
Builder window.
v. Turn on the Roll Up toggle button to calculate the measure values and to display the nodes at the total level. By default, the checkbox is selected if the Aggregation Type is Maximum, Minimum, Count, or Sum. Roll Up option, when selected with Percentage Measures results in wrong values at intermediate/total levels.
4. Click Save to save the Business Measure details or click Close to discard the changes.
You can view individual Business Measure at any given point. To view the existing Business Measure definition details in the Business Measures window: You can view the Business Measure if you are mapped with the role Measure Read Only with the user group.
1. Select the checkbox adjacent to the required Business Measure code.
2. Click  View button from the Business Measure tool bar.
The View Business Measures window displays the details of the selected Business Measure definition. The User Info grid at the bottom of the window displays the metadata information about the Business Measure created along with the option to add comments.
You can modify the Business Measure if you are mapped with the role Measure Write with the user group.
You can update the existing Business Measure definition details except for the Code and Short Description. To update the required Business Measure details in the Business Measure window:
1. Select the checkbox adjacent to the required Business Measure code.
2. Click  Edit button from the Business Measures tool bar.
The Edit Business Measure window is displayed.
Edit button from the Business Measures tool bar.
The Edit Business Measure window is displayed.
3. Update the required details. For more information, see Create Business Measure.
4. Click Save and update the changes.
You can copy the existing Business Measure details to quickly create a new Business Measure. You can later modify the Code or Short Description, add/remove Entities and Attributes, and also define the join/filter conditions. You can copy Business Measure if you are mapped with the role Measure Write with the user group.
To copy an existing Business Measure definition in the Business Measure window:
1. Select the checkbox adjacent to the required Business Measure code.
2. Click  Copy button from the Business Measures tool bar.
The Business Measure definition details are copied and a confirmation message is displayed.
You can remove the Business Measure definition(s) which are created by you and which are no longer required in the system by deleting from the Business Measures window. To delete a Business Measure, you need to be mapped with the role Measure Write. Delete function permanently removes the Business Measure details from the database. Ensure that you have verified the details as indicated below:
· A Business Measure definition marked for deletion is not accessible for other users.
· Every delete action has to be Authorized/Rejected by the authorizer.
§ On Authorization, the Business Measure details are removed.
§ On Rejection, the Business Measure details are reverted back to authorized state.
· You cannot update Business Measure details before authorizing/rejecting the deletion.
· An un-authorized Business Measure definition can be deleted.
To delete an existing Business Measure in the Business Measure window:
1. Select the checkbox adjacent to the required Business Measure code.
2. Click  Delete button from the Business Measure tool bar.
A confirmation dialog is displayed.
Delete button from the Business Measure tool bar.
A confirmation dialog is displayed.
3. Click OK. The Business Measure details are marked for delete authorization.