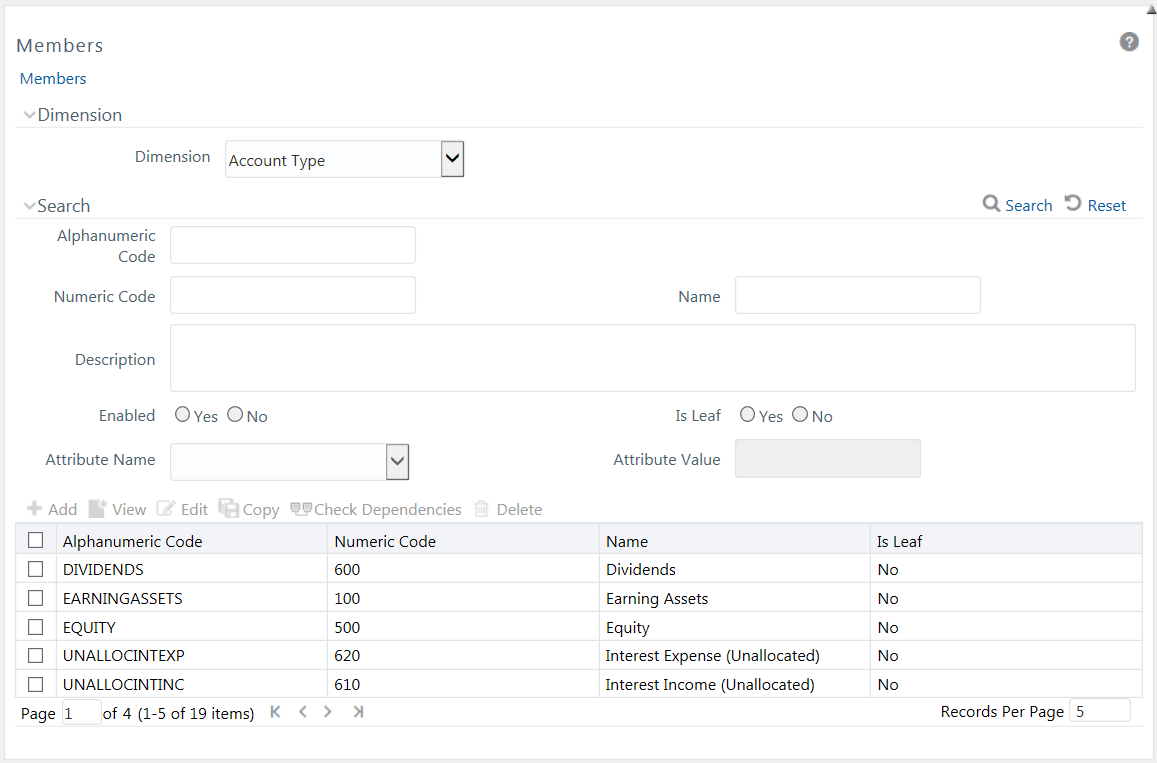
Dimension Members refer to the individual items that constitute a dimension when data is categorized into a single object. Example, Product, Organization, Time, and so on. Members are available within Dimension Management section of the Infrastructure system.
For more information on how to set up alphanumeric and numeric codes, see Configurations to use Alphanumeric and Numeric Codes for Dimension Members section in OFSAAI Administration Guide.
The Members window displays the list of pre-defined Dimension Members with the other details such as the Alphanumeric Code, Numeric Code, Name, and Is Leaf. You can also search for a specific Member based on Alphanumeric / Numeric Code (irrespective of whether dimension is configured to be numeric or alphanumeric), Name, Description, Enabled status, Is Leaf status, Attribute Name, or Attribute Value and view the list of existing definitions within the system.
This option allows you to add member definition. The Write role should be mapped to your user group.
To create an Attribute definition in the Attributes window:
1. Click  Add from the toolbar. The Member
Definition (New Mode) window is displayed.
Add from the toolbar. The Member
Definition (New Mode) window is displayed.
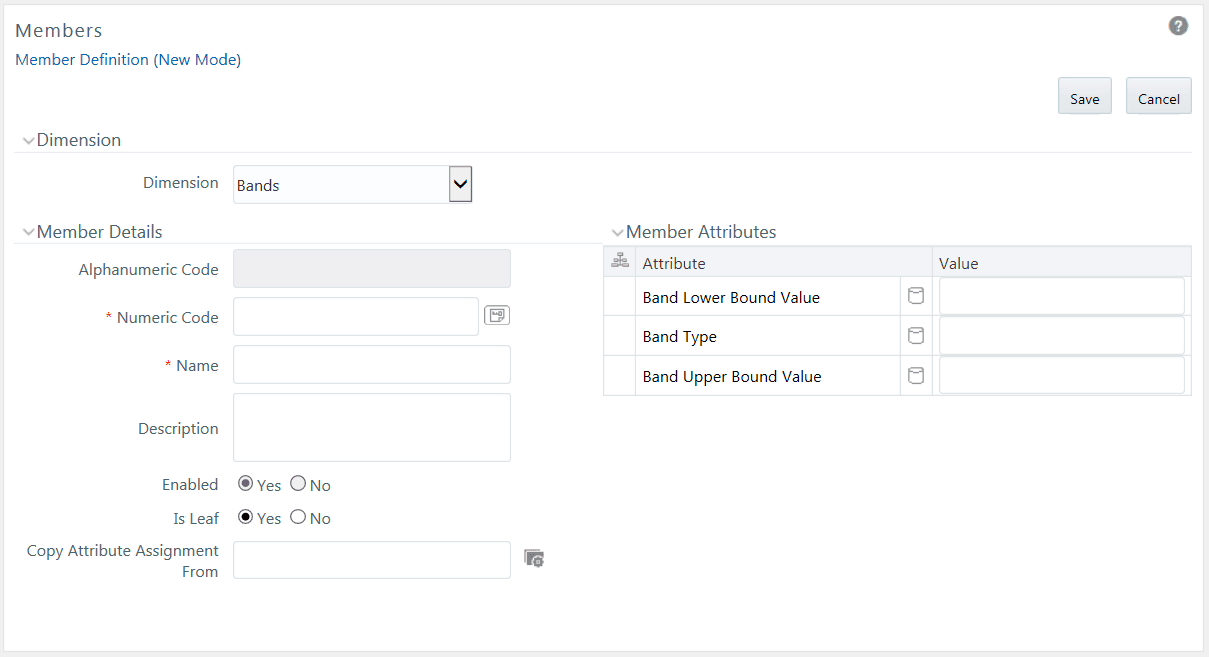
2. In the Dimensions section, select the required Dimension from the drop-down list.
3. Enter the Member Details as tabulated:
Field |
Description |
Fields marked in red asterisk (*) are mandatory. |
|
Alphanumeric Code |
The Alphanumeric Code field is editable only if the selected Dimension accepts Alphanumeric Code. For example, Billing Method Dimension. Else, the field is Read Only and the value is fetched from the Numeric Code field entered. Enter the required Alphanumeric Code. Ensure that the code has a maximum of 14 characters and there are no special characters like & ' ~ " @ + included. |
Numeric Code |
Enter the Numeric Code by doing any of the following: To auto-generate a Numeric Code, click Manually enter the required code which is auto validated for uniqueness. A maximum of 14 numeric characters can be specified. Note: if the selected Dimension accepts only Numeric Code, then the specified, the Numeric Code is auto populated to the Alphanumeric Code field also. |
Name |
Enter the Name of the Member. Note: The characters &’ ” are restricted |
Description |
Enter the required Description for the Member. Note: The characters ~&+' "@ are restricted. |
Enabled |
This field is set to Yes by default and is editable only in Edit window. Note: You can change the option to No only when the particular member is not used in any hierarchy. The disabled members will not be displayed in Hierarchy rules, or UIs which are based on Hierarchies, such as Hierarchy Filters and hierarchical assumption browsers used in applications. |
Is Leaf |
This field is set to Yes by default. If Yes, the particular member can be used as a leaf node in any hierarchy and child cannot be added to this node. If No, the node becomes a non leaf and can have child nodes. Note: A member created as Non Leaf having child nodes to it in any hierarchy cannot be made Leaf. |
NOTE |
If the Dimension is selected as “Common Chart of Accounts”, proceed further. Else, jump to step 5. |
4. Click  button
in Copy Attribute Assignment From
field. The Member Browser Properties window
is displayed. This field can be left blank so that the Member Attributes
panel can be filled in without considering the values already assigned.
button
in Copy Attribute Assignment From
field. The Member Browser Properties window
is displayed. This field can be left blank so that the Member Attributes
panel can be filled in without considering the values already assigned.
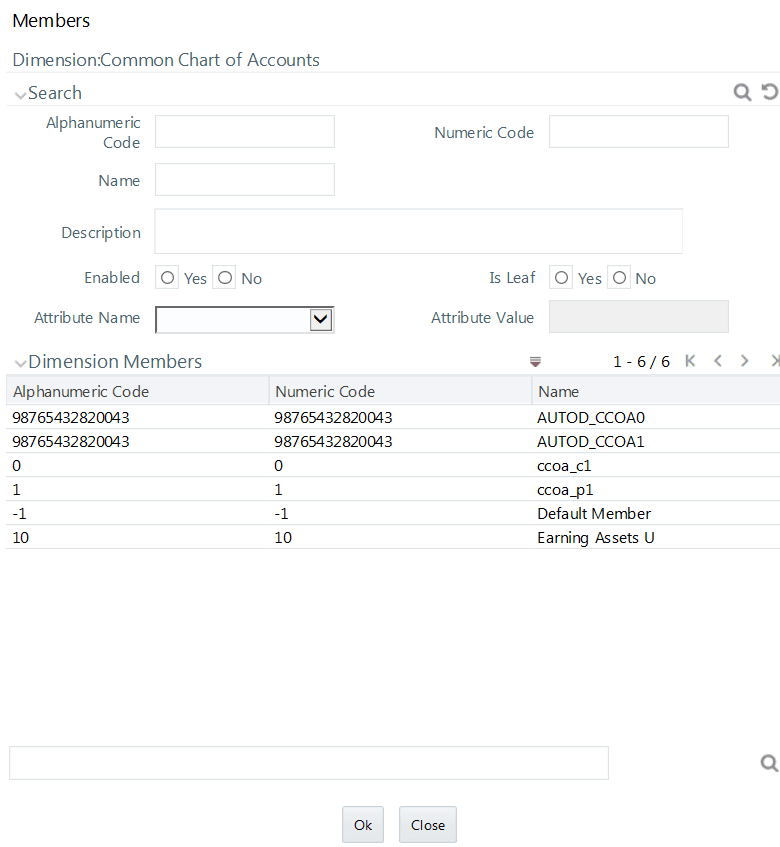
§ Select the required Member from the Dimension Members list.
Click  button
in the Search grid to search for a specific Member based on Alphanumeric
Code, Numeric Code, Name, Description, Enabled status, Is Leaf status,
Attribute Name, or Attribute Value. You can also click button
to find a member present in the Dimension Members grid using key words.
button
in the Search grid to search for a specific Member based on Alphanumeric
Code, Numeric Code, Name, Description, Enabled status, Is Leaf status,
Attribute Name, or Attribute Value. You can also click button
to find a member present in the Dimension Members grid using key words.
§ Click OK. The selected Member is displayed in the Copy Attribute Assignment From field in New – Member Details window and the details of selected Attribute are displayed in the Member Attributes section. You can edit the Attribute details as indicated:
Edit Attribute based on date by clicking the  (Calendar)
icon.
(Calendar)
icon.
Edit Attribute based on Dimension Value by selecting from the drop-down list.
Edit Attribute based on Number Value by entering the valid numerical value.
Edit Attribute based on String Value by specifying alphanumerical value.
5. Click Save and the defined Member Definition is captured after validating the entries.
You can view individual Member Definition details at any given point. To view the existing Member Definition details in the Members window:
1. Select the checkbox adjacent to the Alphanumeric Code of the Member, whose details are to be viewed.
2. Click  View button in the toolbar.
The View – Member Details window is displayed with the details such as Dimension, Member Details, and Member Attributes details.
You can Modify the Name, Description, or Enabled fields of a Member definition.
To modify an existing Member Definition in the Members window:
1. Select the checkbox adjacent to the Alphanumeric Code of the Member, whose details are to be updated.
2. Click  Edit button in the toolbar. Edit
button is disabled if you have selected multiple Members. The Edit
– Member Details window is displayed.
Edit button in the toolbar. Edit
button is disabled if you have selected multiple Members. The Edit
– Member Details window is displayed.
3. Edit the Member details as required. For more information, see Add Member Definition.
4. Click Save to save the changes.
The Copy Member Definition facilitates you to quickly create a new Member Definition based on the existing attributes or by updating the values of the required members.
To copy an existing Member Definition in the Members window:
1. Select the checkbox adjacent to the Alphanumeric Code of the Member, whose details are to be duplicated.
2. Click Copy button in the toolbar to copy a selected Member definition. Copy button is disabled if you have selected multiple Members.
3. In the Copy – Member Details window you can:
§ Create new Member with existing variables. Specify the Numeric Code and new Member Name.
§ Create new Member definition by updating the required variables. Specify the Numeric Code and new Member Name. Update the required details. For more information, see Add Member Definition. Click Save.
The new member definition details are displayed in the Members window.
You can view the dependencies of Members. To view the dependency of member in the Members window:
1. Select the checkbox adjacent to the Alphanumeric Code of the Member, whose dependency is to be viewed.
2. Click  Check Dependencies button in the toolbar. The
Check Dependencies button is disabled if you
have selected multiple members. The Members Dependency
Information window is displayed with the dependency details.
Check Dependencies button in the toolbar. The
Check Dependencies button is disabled if you
have selected multiple members. The Members Dependency
Information window is displayed with the dependency details.
You cannot delete predefined members or the members which are the Nodes for a hierarchy.
To delete a Member in the Members window.
1. Select the checkbox adjacent to the Alphanumeric Code(s) of the Members, whose details are to be removed.
2. Click  Delete button in the Dimension Members tool bar.
3. Click OK in the information dialog to confirm deletion.
 button. A system generated code is displayed.