This section of the document consists of information related to intermediate actions that needs to be performed while completing a task. The procedures are common to all the sections and are referenced where ever required. You can refer to the following sections based on your need.
The process to create a Form using the Tree View Layout differs from the procedure as explained for other layouts. You can create a Form using the Tree View Layout, by selecting either Dimensional Table Tree or Parent Child Tree.
If you want to create a Form using the Dimension table Tree, select Tree view > Dimension Table Tree option in the DEFQ - Layout window. On clicking Next, you need to provide the required details in the following windows:
1. Dimension Table Selection: Enter the Root Name and select the Table. Click Next.
2. Fields Selection: Select required Fields to Display from Available fields and click Next.
3. Dimension Node Selection: Select Field Nodes from Available fields and click Next.
4. Select Dimensional Tree Nodes for the selected fields and click Next.
5. DEFQ Field Properties window: Specify the required details. For more information, refer DEFQ Field Properties.
If you want to create a Form using the Parent Child Tree, select Tree view > Parent Child Tree option in the DEFQ - Layout window. On clicking Next, you need to provide the required details in the following windows:
6. Hierarchy Table Selection: Enter the Root Name and select the Table. Click Next.
7. Parent-Child Node Selection: Select Parent Node, Child Node, and Node Description from the drop-down list.
8. Fields Selection: Select required Fields to Display from Available fields and click Next.
9. DEFQ Field Properties window: Specify the required details. For more information, refer DEFQ Field Properties.
You can apply rules to Validate Form Data to specific fields such as Text Field, Text Area, or Protected Field. To specify rules for a field in the DEFQ - Forms Designer DEFQ Field Properties window:
10. Click Rule adjacent to the required field. The Specifying Rules and Expressions for Data Validations window is displayed.
11. Select the required Fields, Operators, and Functions from the list.
12. Enter the Rule Expression in the Expression Viewer field.
13. Depending on the data type of the selected field, the following column constraints are displayed. Select the required checkbox.
§ No Spaces
§ Characters Only
§ Alpha Numeric
§ Not Null
§ Non Negative
14. Select the Alignment type from the drop-down list.
15. Click OK and save the details.
While creating a Form, if you choose the Select List field parameter option in the In Edit/Add column in the DEFQ Field Properties window, you need to define the list of values in the Select List window. However, you do not need to define the values for foreign key fields and primary key fields.
In the Select List Window, select the required Field Type from the following options:
· Comma Separated Values: Supports only the user specified values while creating a Form.
· Dynamic List of Values: Supports fieldname from a table and stores it in the database. The same can be used during Data Entry.
If Comma Separated Values is selected:
16. Enter the List of Values to be displayed.
17. Specify Alternate Display Values to be displayed.
18. Click OK and save the specified list of values.
If Dynamic List of Values is selected:
19. Select Table Value, List Value and Display Value field.
20. Select the Field, Operator, and Functions from the list.
21. Define a filter condition for the selected values.
22. Click OK and save the specified list of values.
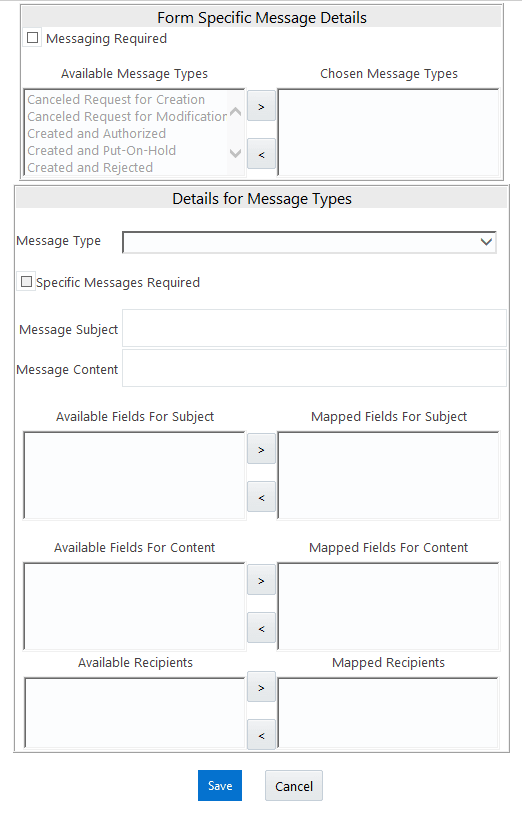
While creating a Form, you can click Message Details in the DEFQ Field Properties window to define the messaging details. You can specify an alert message which is sent to the Creator of the Form or to an Authorizer.

In the Messaging Details for a Form window:
23. Select Messaging Required checkbox to activate the Messenger feature.
|
NOTE |
If the option is not selected, a single mail is sent for the entire batch. Message details such as recipients, subject, and contents are fetched from the metadata |
24. Select the required Available Message Types from the list and click  .
.
25. Select the Message Type from the drop-down list based on specific action.
26. Select Specific Messages Required to add a specific message.
27. Select Available Fields for Subject, Content, & Recipients from the list and click  .
.
28. Click Save and save the messaging details. You also need to select Save with Authorization in the DEFQ Field Properties window for the messages to be functional.
You can perform data versioning on an authorized Form. The modifications made to the particular Form is tracked and displayed as per date versioning. In the Data Versioning for Form window, do the following:
29. Select Enable Data Versioning checkbox to ensure that the version is tracked.
30. Select the Table and Version Identifier from the drop-down list.
31. Click OK and save the versioning details.
The Save with Authorization feature in Forms Designer (Sort Fields Selection window) allows you to authorize the uploaded data. Authorization serves as a checkpoint for validation of uploaded data.

To authorize the uploaded data, you need to create a Form in DEFQ with the Save with Authorization checkbox selected.
32. Before any DEFQ Form is created to authorize the data, the underlying table in the data model needs to have below columns added to its table structure. You need to perform a data model upload to have the new structures reflected in the application.
Columns required:
V_MAKER_ID VARCHAR2(20),
V_CHECKER_ID VARCHAR2(20),
D_MAKER_DATE DATE,
D_CHECKER_DATE DATE,
F_AUTHFLAG VARCHAR2(1),
V_MAKER_REMARKS VARCHAR2(1000),
V_CHECKER_REMARKS VARCHAR2(1000)
33. Navigate to Create a New Form in the Forms Designer section and complete the design steps up to Step 6. From the DEFQ Field Properties window explained in step 7, select the appropriate values as listed below for Store Field As depending on the columns selected:
V_MAKER_ID - MakerID
V_CHECKER_ID - CheckerID
D_MAKER_DATE - Maker Date
D_CHECKER_DATE - Checker Date
F_AUTHFLAG - AuthFlag
V_MAKER_REMARKS - Maker Remarks
V_CHECKER_REMARKS - Checker Remarks
34. Click Save with Authorization. Once data is loaded into the table, you can login as 'Authorizer' and navigate to the Data Entry window. Select the Form to open and authorize the records loaded.