| Agile Product Lifecycle Management Getting Started Guide Release 9.3.4 E52154-03 |
|

 Previous |
 Next |
| Agile Product Lifecycle Management Getting Started Guide Release 9.3.4 E52154-03 |
|
Previous |
Next |
A Design object is an container object intended for use with CAD models.
Design objects are an additional type of File Folder object. The File Folder base class includes two classes of objects:
File folders
Designs
A Design object is another type of file container object intended for use with CAD models. Design objects have all the capabilities of file folder objects described in Chapter 11, "Working with File Folders."
Design objects have additional features that allow you to create a parent-child structure of related design objects, and to record and modify the version of each design object in the model structure.
Typically, Design objects are used with an Agile PLM Engineering Collaboration (EC) CAD integration. The integration application manages most of the tasks related to the creation, modification, and maintenance of CAD data model structures associated with Agile Design objects. Although you can create and modify Design object, just like any other Agile object, an Agile PLM EC CAD integration will perform many of these tasks automatically.
|
Note: Design objects are available in your Agile PLM system only if your Agile administrator has enabled them for use. Design objects are not available through the Java Client. |
Contact your Agile administrator if you have questions about how Design objects are used at your company. For additional information about Design objects, see Agile PLM Administrator Guide.
For information about the Web Client Actions menu, see "Actions Menu."
For information about Design object actions, see:
When a Design object is open, you can view information about all versions/revisions of the Design by using the Actions menu View All Versions command.
A version or revision can be selected from the version drop-down list on File Folder objects. Revisions (if set) are indicated to the right of the version.
To switch between versions of a Design object in Web Client:
From the Version drop-down list at the top of the Design object, select the version/revision you want to view.
|
Note: A version number in brackets, for example [4], indicates a version that has not yet been checked in. In this example, when version 3 was checked out, a pending version [4] was created. Selecting [4] in the version drop-down list lets you view and work with the pending version. |
To open the Versions palette:
In the Actions menu, choose View All Versions. The Versions palette opens.
|
Note: The View All Versions action is available only in Web Client. Java Client does not support Design objects. |
The Version palette displays the following information about each version:
Table 12-1 Design object Version palette information
| Versions Column | Description |
|---|---|
|
Column 1 |
Displays the approval status of the file folder version. Note: The approval status is displayed only if there are approvers on the Routing Slip. |
|
Version |
The version number. |
|
Checkin Date Checkin User |
The date the version was checked in and the user who performed the checkin. When the version is checked out, these fields are blank. |
|
Change Info |
Indicates how the version was modified before it was checked in. Files indicate that the object's files were modified; for example, files were replaced, added, or deleted. For Design objects, Structure indicates that the Design's Structure tab was modified. |
|
Label, Revision, Revision Date |
These are version-specific editable fields used primarily with Design data model objects. |
Actions you can initiate in the Versions palette:
View: Click the View drop-down menu to choose one of the options.
View: Select any version row and click View to view the file or files in AutoVue for Agile.
Compare: For single-file versions, select two version rows, and choose Compare in the View button drop-down list. AutoVue for Agile compares the selected files.
The Design object Version palette includes the following additional actions:
Comparison Report: (Design objects only) Click the Comparison Report drop-down menu to choose one of the options.
Compare: Select any two version rows and click Compare to compare the Designs in the Comparison Report drop-down menu. A Design Comparison Chart displays a comparison report.
Comparison by Search: Select a version row and click Compare by Search in the Comparison report drop-down list. A Compare by Search palette opens. In the drop-down list select either Latest Version or All Versions. Enter a search string (enter * to search for any design object) and execute a quick search. Choose from a list of Designs to compare with the original Design object. The Design Comparison Chart displays a comparison report.
Design Comparison Chart
The Design Comparison Chart displays reports of the compared Design objects.
The plus sign expands the Design object to display a list of child objects attached to it. You can collapse the object using the minus sign. Click the gray dot icon to see more details about Attributes and Files. Colors indicate the state of the Design object. For example, Blue - Added, Orange - Modified, Red - Deleted.
Purge Version: Design objects store large CAD files, which are updated regularly. The Purge Version action lets you remove unwanted Design versions and help optimize file storage. To begin the process, the Design object must be in the checked in state. Purging starts at the original version and continues down the Structure tab, and goes through all the versions, including the child objects. The process stops if you cannot purge a child object.
When you use Save As in the Design object Actions menu to create a new Design object, Save As additionally copies the Structure tab of the latest checked-in version of the Design object.
Design objects store large CAD files, which are updated regularly. The Purge Version action lets you remove unwanted Design versions and help optimize file storage. To begin the process, the Design object must be in the checked in state. Purging starts at the original version and continues down the Structure tab, and goes through all the versions, including the child objects. The process stops if you cannot purge a child object.
You cannot purge a Design object if it is checked out, redlined, or in use on an Attachment tab/Relationships tab/Content tab.
For details on how to use the Purge Version action, see "Purging Unused File Folder Versions."
The Load to CAD option on the Actions menu of the Design objects lets you load Design objects into a CAD system, when used along with Agile EC CAD connectors. The data in XML format includes the object base class, number, and specific version or revision, which will help in accessing more details using SDK or EC connection to Agile PLM. You can access data from both the Design object page and the Search results page. You can select and load single or multiple Design objects from the Search Results page. The Design object page loads the current version of the selected Design object.
To enable the Load to CAD feature in Java Client go to Admin > Server Settings > Preferences > Load to CAD.
The following objects also support Load to CAD:
File Folders
Item
Changes
Customers
Manufacturer Parts
Manufacturers
Programs
User Groups
Users
Suppliers
The Mass Update option on the Actions menu lets you update the files on a bulk scale. You can Attach Files, Replace Attached Files, Replace Attached Versions, and Remove as Attachment from the Actions menu.
To perform a Mass Update action on a Design object in Web Client:
Open the Design object that you want to remove, replace, or add.
Choose Actions > Mass Update.
Specify whether you want to add file, remove file, replace file, or replace version, and click Next.
Select the version of the Design object on which you want to perform the bulk operation.
Select the attachment files you want to include in the operation, and click Next.
Using the wizard search tools, find, and select the objects you want to be affected by this bulk operation. The wizard takes you through 3 frames: Select Files to Replace, Select Objects to Replace File and Select Replacement Files.
Click Finish.
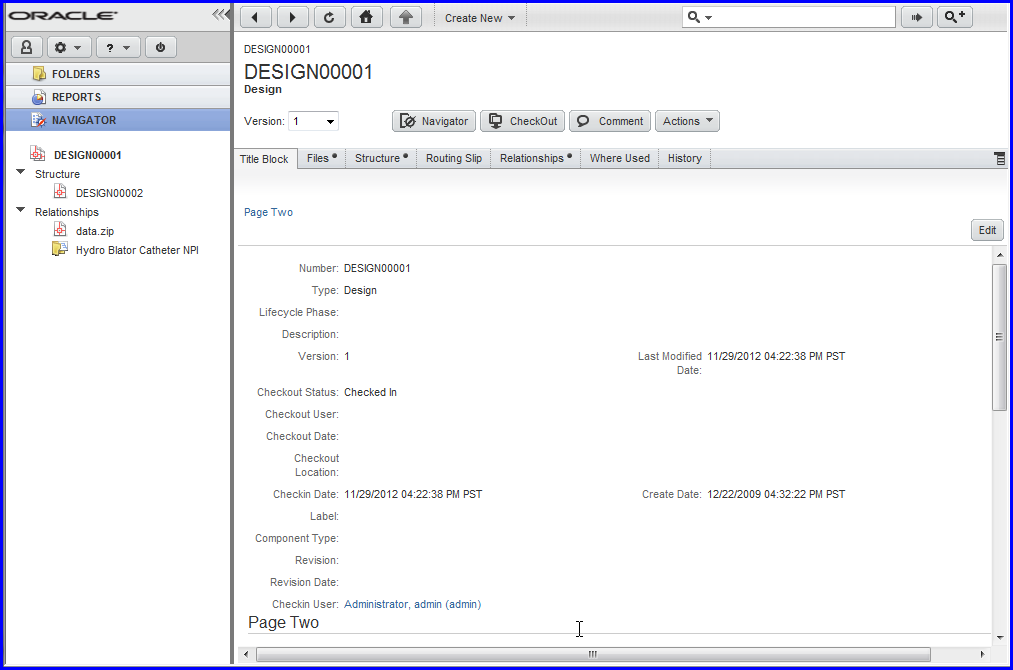
By default, the Design object Title Block tab contains the fields listed in the following table. Agile administrators determine which fields are enabled and visible on the Title Block tab.
In Web Client, the Title Block can contain two additional sections, called Page Two and Page Three by default. (Design objects are not supported in Java Client). Agile administrators can add custom class fields to Page Two section and custom subclass fields to the Page Three section. The Agile administrator determines enabling, and naming these sections.
The following table describes each Title Block tab field and how it is completed.
Table 12-2 Design object Title Block tab fields
| Field | Description |
|---|---|
|
Number |
The Design object's number, completed when the file object is created. |
|
Type |
The subclass of this Design object. Depending on Agile system settings, this field is automatically completed when the Design object is created. |
|
Lifecycle Phase |
Current lifecycle; selected from a list. For example, Concept or Maintenance. |
|
Description |
Text describing the Design object |
|
Version |
Indicates the version and the revision of the Design object. |
|
Last Modified Date |
Date the Design object was last modified. Completed automatically. |
|
Checkout Status |
Indicates whether the Design object is currently checked out or checked in. Completed automatically. |
|
Checkout User |
When the Design object is checked out, displays the user who checked out the object. Completed automatically. |
|
Checkout Date |
When the Design object is checked out, displays the checkout date. Completed automatically. |
|
Checkout Location |
In Java Client, the checkout location is automatically filled in. |
|
Checkin Date |
When the Design object is checked in, displays the checkin date. Completed automatically. |
|
Create Date |
The date the Design object was created. |
|
Label |
Version-specific text field which indicates a label identifier for the version. Users with the appropriate privileges can modify this field on any checked in or checked out version. |
|
Component Type |
List field which indicates the type of component represented by the Design object. |
|
Revision |
Version-specific text field which indicates the Revision for the Design version. |
|
Revision Date |
Version-specific date field which indicates a revision date for the Design version. |
|
Checkin User |
Indicates the user who checked in the currently selected version; completed automatically. |
|
Approval Status |
The "Approval Status" attribute gives the overall status from the Routing Slip, per version. |
|
Item Change Status |
The "Item Change Status" attribute is a non-editable version-specific text attribute that can be used instead of, or in combination with, the "Approval Status" attribute to control privileges on the Design. |
|
Note: To view Design Object in Agile PLM Web Client, the Design Object feature must be enabled in your Agile PLM system and your user profile Design Object preference must be set to On. If you have questions about your ability to view Design Objects, contact the Agile administrator. |
To open the Design Object Navigator:
Click the Navigator button in the header area of the Design Object.
A Navigator pane appear to the left of the main pane, displaying the structure and the Relationships of the Design Object.
The following table lists fields on the Files tab of Design objects.
Table 12-3 Design object Files tab fields
| Field | Description |
|---|---|
|
|
Replaces a file. Click Replace button to remove the file and add the latest version of the file or another file. Check-out the file to be replaced. Note: The checked-in files must have the same file extension as the checked-out file. |
|
|
This icon appears in the field if the file Has been redlined. The Do Redlining icon will appear here from the file folder level for any file type that is listed in the Supported File Types and Valid Model File Type settings in Agile Administrator. Both of these cases allow ad-hoc viewing and redlining. |
|
File Name |
The name of the file. In Web Client, click the file name to view the file in the Viewer. |
|
File Description |
Description of the File object. |
|
File Path |
Can be manually set. |
|
File Type |
The format of the file. |
|
File Size |
The size of the file, in bytes |
|
Last Viewed Date |
Date when the file was last viewed. (The History tab records detailed information about file viewing.) |
|
Checkout Location |
In Java Client, records where checked out files were placed during the check out procedure. |
|
File Category |
Category selected from a list. |
|
Document Text |
If needed, this field will be filled in automatically by the Agile system. |
|
Master Thumbnail |
Only visible if Thumbnails are enabled. |
You can perform the following actions using buttons on the Files tab in the Designs object.
Table 12-4 Design object Files tab buttons
| Buttons | Description |
|---|---|
|
Add |
Lets you add Files or URLs to the Design object. |
|
Remove |
Lets you remove the Files or URLs, provided they are not reflected on any other object. |
|
Get |
Lets you extract files and save it in a folder or location of your choice. In addition, if the file has a structure, the "Get" function lets you extract all files from the structured file (for example, a CAD assembly). A zip file will be created that contains all CAD files in a Design Structure. The name of the zip file is the original file name (plus zip), which helps to identify the "top level" assembly file inside the zip file. Note: All files with the same value of "File Category" as the initial file will be extracted! |
|
Open |
Opens a copy of the selected file in the native application of the file. Note: This is for single files only, not for CAD design structures! |
|
View |
Lets you select from a list of views. View: Lets you view the selected files in the Viewer. Compare: Lets you compare versions of two Design objects Compare by Search: Lets you compare the original Design object with other Design objects you obtain by Search. Overlay: Lets you lay other files over the current active file. (For more information, see Viewer Supplement.) |
|
|
Prints selected Design objects. |
|
Get Shortcut |
Opens the URL directly in a browser. |
|
More |
Displays more actions you can perform. |
The Files tab of the Design class object has the same functions as the Files tab of the File Folder class object.
For information about working on the Files tab, see "Adding Attachment Files and URLs to File Folders."
Design objects are available in Web Client only. Any instructions related to Java Client do not apply to Design objects.
Each row in the structure table includes information about the child Design object in each structure table row.
Structure rows can reference checked in or checked out versions of child objects.
You can check in a parent while using a checked out version of a child.
You cannot Cancel Checkout a version that is in use; an error message is displayed.
The following table describes the fields included in the Structure table.
Table 12-5 Design object Structure tab fields
| Structure Table Field | Description |
|---|---|
|
|
Icon indicates that the Design data model has a file attached to its Files tab. |
|
|
Icon indicates that the Design data model is linked to an Agile business object; that is, whether the Design object appears on the Attachments tab of an Agile object, for example, the Attachments tab of an item object. |
|
|
Icon indicates that the Design object is currently checked out. |
|
Design Type |
The type of the Design object |
|
Number
|
The number of the Design object.
Click the number to open the Design object. |
|
Description |
The description of the Design object. |
|
Lifecycle Phase |
List field which indicates the current phase of the Design object. |
|
Version
|
The version of the Design object included in the structure. The version included in the structure can be any version of the Design data model.
|
|
Label |
Version-specific text field which indicates a label identifier for the version. |
|
Component Type |
List field which indicates the type of component represented by the Design object. |
|
Last Modified Date |
Date the Design object was last modified. |
|
Checkout Status |
Indicates whether the Design object is currently checked out or checked in. |
|
Checkout User |
When the specified version of the Design object is checked out, displays the user who checked out the object. |
|
Checkout Date |
When the specified version of the Design object is checked out, displays the checkout date. |
|
Checkin Date |
Date the specified version was checked in. |
|
Create Date |
Date the Design object was created. |
|
Checkout Location |
In Java Client, when the Design object is checked out and, the checkout location is automatically completed. |
|
Master Thumbnail |
Only visible if Thumbnails are enabled. |
The following table explains the Structure tab buttons and the actions you can perform on the Structure tab.
You must select a checked out Design object version to Add or Remove rows, or to Edit rows. Checkout all checked in versions of the object before adding, removing, or editing Structure table rows.
Table 12-6 Design object Structure tab buttons
| Button | Description |
|---|---|
|
Edit |
Note: You must select a checked-out version to edit Structure table rows. The edit button on the right hand side of the page lets you edit Structure row details by displaying the selected rows on an Edit page. The editable fields are in the form of text boxes, list boxes, and so on. |
|
Remove |
Note: You must select a checked-out version to remove Structure table rows. Removes the selected rows from the Structure table. |
|
Add |
Note: You must select a checked-out version to add Structure table rows. Add – Adds a Design object to the Structure table. Depending on which option you choose, you can: Search for an existing Design object using the Search palette. Create a Design object using the Create to add palette. |
|
Multi-level... Expand Collapse |
Multi-level > Expand expands all the sub-structures in the Structure table. All levels of the Structure are displayed. Multi-level > Collapse collapses all expanded structure levels. Displays only the top level of the structure. |
|
Go To |
Takes you to a specific Design object based on the criteria you enter in the Go To dialog box. The Go To search can be limited to a particular Design data model column and to the specified number of levels. For example, specifying level 3 searches through levels 1, 2, and 3. |
|
More... |
Lists more actions that you can perform from the Structure tab. Copy – lets you copy an object from the Structure table and paste it in another Design object. Paste – lets you paste an object from another Design object. |
The Structure Go To feature lets you search for a specific Design object in the parent/child design structure.
To use the Go To Design in Structure feature in Web Client:
On the Structure tab, click the Go To button.
In the Go To Design in Structure dialog box, define your search:
Enter the text you want to find. The Go To search finds any Design object that includes (contains) the specified text in its attribute fields. You can use any type of character, including numerals and punctuation.
In the drop-down list, choose which Structure table column you want to search. You can choose all columns or one specific column.
Check Match Case to perform a case-sensitive search where text capitalization matters.
Choose how many Structure levels you want to search: Enter a number or check All levels.
To start the search, click Find Next. The Structure table highlights the first Design object that matches the search criteria.
Use the Find Next and Find Previous buttons to scroll up and down the Structure table, highlighting Design objects that match the search criteria.
When you have found the Design object you want, click Close in the Go To Design in Structure dialog box. The last Design object you highlighted in the Structure table remains highlighted.
The Default File Folders Workflow applies to all file folder objects that users create in the File Folders base class, which includes both the File folders class and the Designs class. This workflow has a read-only privilege along with a single Review status—a simple review-and-signoff—although the signoff can still be an approval or a rejection.
Each Design object version has its own Routing Slip. Each version can have a different set of approvers and observers.
To add Approvers or Observers:
Open the Design object.
Select the Routing Slip tab.
In the Version drop-down list, select a version.
|
Note: Ensure to check in the selected version. You cannot add Approvers to a version, which is not yet checked in. |
Click the CheckIn button. The Add Reviewers /Remove Reviewers button is active once you check in the Design object.
Click the Add Reviewers button. The Add Approvers and Observers dialog box opens.
Select the approvers and observers you want to add. Enter a comment, if desired.
If urgent, select the Send notification as urgent option.
Click OK.
Similarly, use the Remove Reviewers button to remove reviewers from a Design object.
Approving or Rejecting a Design object:
Approving or rejecting a Design object uses the same process as approving or rejecting any routable object. For detailed information, see:
|
Note: Approvals and rejections are version-specific. Your approval or rejection applies only to the selected version of the Design object. |
The Relationships tab of the Design object has the same functions as other routable objects in Agile PLM. Relationships between two Design objects are now version-specific. Storage of certain data causes circular reference and hence version-specific relationships between objects are required to support storage of data. Other relationships involved with Design objects will not be version-specific.
The table below lists the default fields on the Relationships tab.
Table 12-7 Design object, Relationships tab fields
| Field | Description |
|---|---|
|
Name |
Name of the added object. For example, C10970 |
|
Description |
The description of the object you add with the number. |
|
Current Status |
The current status of the object. For example, Pending |
|
Rule |
The Rule associated with the object. |
|
Type |
The type of the object you add. |
|
Version |
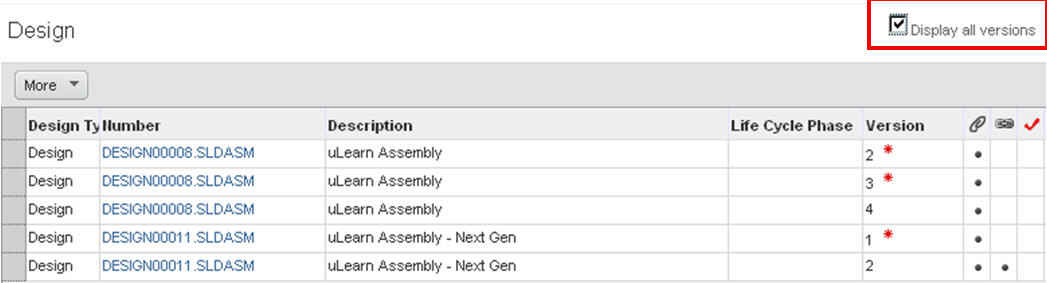
By default the latest version of the related Design object is displayed. If the check box "Display all versions" is selected, then all versions are displayed. In this case, the Not Latest icon indicates that the specified Design object version is not the latest version. |
For more information on Relationships, see "Relationships and Dependencies Between Objects."
A Display all version check box enables you to toggle on or off the display of all versions. When the check box is deselected (default), only the latest version is displayed.
When you select a different version in the Version drop-down list, then the Where Used tables display information about the selected version only.
Attachments
The Attachments table lists all the Agile business objects where the currently selected version of the Design object is attached, that is, all the Agile business objects that have the current version of the Design object listed on their Attachments tab.
Design
The Design table lists all the Design objects that are structure parent objects for the currently selected Design object version. That is, the selected version of the Design object appears on the Structure tab of the listed Design objects as a child object.
|
Note: The Design table lists only direct (on-level) parents of the current version of the Design object. |
The Where-Used query locates version-specific relationships of the Design objects. You can search, any or all checked in versions of a Design object used in another Design object in Advanced Search.
Search results for Advanced Search criteria like Where-Used in Structure One Level All Checked In versions or Where-Used in Structure One Level Latest Version Only now returns all the checked in versions or the latest checked in version of the Design object.