| Agile Product Lifecycle Management Getting Started Guide Release 9.3.4 E52154-03 |
|

 Previous |
 Next |
| Agile Product Lifecycle Management Getting Started Guide Release 9.3.4 E52154-03 |
|
Previous |
Next |
This chapter introduces Agile PLM Web Client and discusses Web Client window features and actions that apply to all Agile PLM solutions.
Agile PLM Web Client is opened using a browser. Web Client is the only client that supports the following Agile PLM solutions:
Program Portfolio Management
Product Governance & Compliance
Product Cost Management
Both Web and Java clients support the following Agile PLM solutions:
Product Collaboration
Product Quality Management.
You can access Agile Reports (Reports and Analytics), Design Objects, and utilities such as Agile Import, Export, and File Load from Web Client or Java Client. When these objects are selected they open in Web Client. For example, in Java Client, choosing Tools > Import opens the Import utility in Web Client; Java Client remains open.
Agile PLM 9.3 has been installed on your company's system, and you are ready to work in Web Client. There may be a bookmark already on your browser, or perhaps your Agile administrator has given you a URL, along with username (User ID) and password.
If a URL is specified in the documentation or release notes, copy the upper- and lower-case characters exactly, including the full domain name specified.
Also, if a popup blocker is installed on your computer, the login may halt. You must disable the popup blocker and then click the Retry button, which will display the application in a new window.
To start Web Client:
Start your browser.
Click the Web Client bookmark, if one exists, or, in the address bar of the browser, type a URL that follows this pattern:
http://<webserver>.<domainname>:<port>/Agile/PLMServlet
The Login page appears.
Enter your username. Your username is not case-sensitive.
Your username is assigned by your Agile administrator and can be an abbreviation of your full name. For example, the name Michael Jones may be abbreviated to MICHAELJ or MJONES.
|
Note: If you are an LDAP user, your password cannot be reset in the Agile PLM database, neither by you nor by the Agile administrator. LDAP user passwords must be reset through LDAP. |
Enter your password. Your password is case-sensitive.
Your password is initially assigned by your Agile administrator. If you have the appropriate privileges, you can change your password at any time. The administrator may require you to do so within a set number of sessions. See "Changing Your Password."
Click the Login button. If you type an incorrect username or password, click Clear and retype your username and password.
The login process is complete, and the user Home page appears ("Welcome, <Your Name>").
You can choose an activity from the user Home page, the navigation pane on the left, or the main toolbar at the top. For more information, see "Top Pane Main Toolbar" or "Navigation Pane."
You can select a preferred start page; see "Choosing Your Preferred Start Page."
|
Note: Although it is technically possible to log in and open multiple Web Client browser windows using the same username and password, Agile PLM does not support the use of multiple browser windows in the same session. Each Web Client browser window is a separate session and activities by the same user in different browser windows are not coordinated.Therefore, if you perform conflicting edits in multiple Web Client browser windows, then Agile PLM resolves any edit conflicts in the same way that Agile PLM resolves edit conflicts between two different users editing an object at the same time. See also Agile PLM Administrator Guide, Object Edit Conflicts SmartRule. |
When the Web Client Login page opens in your browser, you can bookmark it in your browser to create a startup shortcut in your browser Favorites list or Bookmarks list.
When the Web Client login page is open in your browser window, right-click in the login page to create a shortcut on your desktop. You can click the desktop shortcut the next time you want to open Web Client.
At any time you can change the start page that opens when you log in to Web Client. However, your administrator may restrict which user profile properties you are able to change in your user object.
To set or change your preferred start page:
Click the My Settings button in the left navigation pane.
Your "user object" appears. Your user object is the Agile database object that your administrator created to represent you.
Click the Preferences tab.
Click the Edit button. The properties on the page become editable.
Under Display Preferences, click the drop-down arrow for Preferred Start Page. Select the page you want: Workflow Routings, Notifications, My Assignments, or choose from the available Dashboard tabs.
The Preferred Start Page list includes all the dashboard tabs for which you have view privileges.
For more information about the Home page and these settings, see "Exploring the Home Page."
When you have finished, click Save (at the top of the page). Your preferences have been saved and you will see your chosen start page the next time you log in to Web Client.
For more information about changing properties in your user object, see "Changing Your User Profile."
The page that displays when you first open Web Client can be changed, as described in "Choosing Your Preferred Start Page."
If you chose a Dashboard page as your Preferred Start Page, that Dashboard page is displayed each time you click the Home button in the main menu.
To log out of Web Client:
From the courtesy controls in the left navigation pane, click the Logout button.
For information about the list of courtesy controls, see "Web Client Home Page."
You are returned to the Login page. To exit, close the browser from the upper-right corner.
When you log in, your user Home page appears (Welcome <Your Name>").
Your Preferred Start Page setting determines which tab is displayed in the content pane. The following illustration shows a typical Home page.
The Web Client window is organized into three main areas, or panes:
Top Pane
Navigation controls (Back, Forward, Refresh, Home)
Access to the File Upload Manager (Display the progress of file uploads)
Create menu
Search controls
Navigation Pane
Branding area and Navigation pane Expand and Collapse controls
Courtesy Controls
My Settings
Tools and Settings, for example, Import, Export, Address Book, and Calendar.
Help
Logout
Navigation Drawers
FOLDERS drawer: Saved Searches, My Bookmarks, and Recently Visited
REPORTS drawer: Reports and Analytics
Navigator drawer: object links from Workflow Routings, search results table, BOM tree, or Project tree
Content Pane
Business objects tabular data is displayed in the content pane.
The Home page, at login and when the user clicks the Home button.
When you first start Agile Web Client, it is a good idea to view the information collected for you on the Home page.
Your Home page includes the following components:
Quick Links, at the top of the Home page, is a list of up to ten links that you use frequently. You can define and edit your own Quick Links list. Your Quick Links list can include predefined Agile PLM system links, saved searches in your Personal Searches folder, or bookmarks in your My Bookmarks folder.
To edit your Quick Links list:
Click the Edit icon next to the Quick Links: heading at the top of the Home page. The Edit Quick Links dialog appears.
From the drop-down list choose the type of link you want to use.
The three types of available links are:
Links – predefined Agile PLM system links including My User Profile and Change Password.
Bookmarks – available values are all the bookmarks in your Bookmarks folders, listed individually.
Searches – available values are all the searches in your Personal Searches folders, listed individually.
Use the Display Selected Columns button and the Hide Selected Columns button to move links from the Hidden Links list to the Quick Links list
Or, double-click to move links from one list to the other list.
You may include more than ten links in the Quick Links list, but only the first ten links are displayed in your Quick Links list.
Reorder the list by selecting one or more links and using the move up and move down arrow buttons to move them up or down in the list.
When you are finished, click the Save button.
The specific Inbox tabs displayed on your home page are determined by your assigned roles and privileges. Agile PLM home page tabs include:
Dashboard tab – provides personalized views of selected information, such as reports, project highlights, web pages that you need to access often, and so on.
Notifications tab – informs you of some action or process that has taken place or a notification can let you know that you have a request to accept or decline ownership of an action item or activity. Delete notifications after you have read them.
Workflow Routings tab – lists routable objects that require your review or action. Click the object number in the table to open it.
My Assignments tab – lists project leaf node objects assigned to you which are not yet complete and action items assigned to you which are not yet complete.
Time Sheet tab – Agile PPM feature used to record, administer, and analyze the number of hours worked on assigned tasks. For more information see Product Portfolio Management User Guide.
Once your preferred start page is displayed, you can click a different tab. For example, click the My Assignments tab, the Notifications tab, or the Workflow Routings tab to view information about your assignments, notifications, or workflow routings.
|
Note: The page that displays when you open Web Client can be changed, as described in "Choosing Your Preferred Start Page." If you chose a Dashboard page as your Preferred Start Page, that Dashboard page is displayed each time you click the Home button in the main menu. |
The Dashboard is a highly configurable set of views that enables users to track and manage the information available in the Agile PLM system.
You can create an unlimited number of dashboard tabs to categorize and display the content you want. Access to these tabs can be restricted through roles and privileges. The data that you want to view can be retrieved from different sources, and rendered in charts, tables, and other forms.
Dashboard tabs must be created and configured in Agile Java Client by an administrator. You can view and personalize the tabs that are made visible in Agile PLM Web Client for your use.
For details on configuring Dashboard views, see the Agile PLM Administrator Guide.
The Dashboard tab appears on the Home page along with Notifications, Workflow Routings, and My Assignments tabs.
To view the Dashboard:
In the top pane of the Welcome page, click the Home button.
Click the Dashboard tab.
To make the Dashboard tab page your default start page when you log in to Web Client:
In the top pane of the Welcome page, click the My Settings button. The User Profile page appears.
Click the Preferences tab.
Click Edit.
Select the Dashboard list item in the Preferred Start Page drop-down list.
Click Save.
The Dashboard comprises:
Default Tabs that enable you to select the view: My Stuff, Optional Tab 1, and Optional Tab 2.
User-configured tabs that display customized information in tabular or chart formats, based on preferences set up by an administrator.
|
Note: To view user-configured tabs, you must have the Dashboard Tab View privilege assigned to you, and this privilege must be applied to these tabs within the Agile Java Client. |
Widgets within each tab that present information relevant to that view. For example, in the My Stuff tab, the widgets can be named and configured to display the current user's project activities: My Assignments, My Documents, My Action Items, and so on.
The Dashboard Filter icon in every table enables you to filter data within the widgets to create customized views.
For information on how to configure optional dashboard tabs, see the Agile PLM Administrator Guide.
The My Stuff tab displays the Documents, Discussions, and Action Items assigned to the logged in user. The widgets in this tab are:
My Action Items – Displays all your Action Items by Status, Creator, and Due Date. The name of the project or discussion to which the Action Item is associated appears as a link in the Belongs To column. Click the link to view the associated object. To view the Action Item, click the corresponding link in the Subject column.
My Documents – Lists all the project-related documents that you own with the name of the Root Project, Project Name, Folder Number, and the File Name. To open a file, click the folder number and then click the Files tab. Alternatively, you can click the file name to view the document.
My Discussions – Lists all the discussions you have created for the selected set of projects, showing the Subject, Most Recent Message, and the Date for each. You can click the Subject link to view and reply to a discussion.
You can configure Optional Tab1 and Optional Tab2 to display reports based on your customized queries in each table. If you have the privilege to configure these tabs, a Configure button appears in the middle of each table in the Optional Tabs page.
To configure a dashboard widget table:
Click Configure.
In the Table Name field, type a name relevant for the data you want to show in the table.
In the Chart Type field, select an option.
Click Next.
Select one of the following search options:
Saved Search – Use the search palette to select a saved search.
Advanced Search – Click Define Query to use the Agile PLM Advanced Search feature to retrieve the data you want.
Click Next.
Select the fields you want to display from the Available Fields column and move them to the Selected Fields column using the left and right arrows. You can also reorder the fields using the up and down arrows.
Specify sort order and click Finish.
The fields that are available for display are configured in Java Client by an administrator. For more information on configuring Optional tabs in Java Client, see the Agile PLM Administrator Guide.
The Dashboard widgets can be manipulated by the icons and menu entries described in the table below.
Table 2-1 Dashboard widget commands
| Button | Description |
|---|---|
|
Export |
Exports data in comma-separated value (.CSV) format for use in a spreadsheet (available in all tables). |
|
Maximize/Restore Original Size |
Expands the window to full size or reduces it to the size it was previously. |
|
Refresh |
Refreshes the table view to show latest changes to content. |
|
Remove Content From View |
Closes the window. To reopen the window, refresh your browser view. Or select the content object from the Add Content drop-down list at the bottom of the page and click Add. |
|
|
Displays the dashboard category fields which you can use to filter the widget results. Edit these fields and click Save to obtain the narrowed down search results. |
In the windows which display a widget, you can click column headings of most tables to change the sort order. If you have the necessary privileges, you can click data in most widgets to 'drill down' to a view of the individual object.
The Dashboard Filter icon at the top of each widget enables you to filter the data in the widget to show only the information that is most relevant to you.
To filter the table display within a dashboard tab widget:
Click the Dashboard Filter icon in the table. The default filter values for the dashboard category fields appear.
Click Edit.
The default selection for all the dashboard categories is All. Choose the Selected option to enable the search palette next to each field.
Launch the search palette next to the dashboard category field which you want to filter, and search for defined attributes.
Select attributes for each category field, one by one.
Click Save.
The selected fields display in the widget.
The Home page Notifications tab lists notifications that have been sent to you through the PLM notification system. Notifications inform you of some action or process that has taken place, such as the trigger of a field subscription and the generation of RFQs. A notification can also let you know that you have a request that requires your attention. Requests ask you to accept or decline ownership of an action item or activity.
|
Note: To accept or decline a request, use the My Assignments tab. |
To view a notification:
Click the Subject link.
The notification details and links to associated data are displayed in the notification palette. The palette controls include:
Back – read the previous notification in the table.
Forward – read the next notification in the table.
Delete – delete the displayed notification.
Close – close the palette.
To delete notifications from the table:
Select the table rows you want to delete.
Click the Delete button or Press the Delete key.
To filter the Notifications by time ranges:
Use the Pending age of notifications drop-down list to select the age for the notifications that you want to see in the table: All, 30 days, 90 days, 180 days, 360 days.
For example, select 90 days to see notification that moved into your Notifications list within the last 90 days. The default is 90 days, but once you make a selection in the Pending age list, then that selection is retained the next time you lot in.
The Notifications table displays the following information about each notification.
You can sort the Notifications table by clicking any of the table column headers described below.
Table 2-2 Notifications table columns
| Notification table columns | Description |
|---|---|
|
Notification icons |
Displays icons representing the type of notification and whether you have read the notification:
|
|
Subject |
A link that you can click. The title of the notification. Click this link to view and read the notification in the notification palette. |
|
object icon |
Icon for the object type related to the notification. Place your cursor over the icon to see the object name in the tool tip, for example, ECR or Audit. Click this column header to sort the notification table by object type. |
|
Regarding |
A link that you can click. The object for which the notification was sent, for example, a specific Discussion or ECR. Click this link to open the object in the content pane. Or, use the Quick View feature to view the object:
The Notifications table remains visible and accessible behind the Quick View palette. |
|
Received |
The date the notification was received. Click this column header to sort the notification table by date. |
The Home page Workflow Routings tab lists routable objects that require your review or action. For example, your Workflow Routings table may contain changes for which you are an approver. The workflow routings are a combination of base classes and actions that you need to perform, for example, approving or acknowledging a change.
|
Note: The searches selected in your User Profile Searches field also determine which workflow routings appear in your Workflow Routings tab. For example, if Change Analyst Searches is one of your assigned searches, you see Change class object workflow routings in the Workflow Routings tab. In a similar manner, if Quality Searches is one of your assigned searches, you see QCR and PSR workflow routings. For more information, see "Changing Your User Profile" and "User Properties Defined." |
To open an object in the table, click its number. The Print button prints the entire table.
The types of routable objects that appear in the Workflow Routings table are:
Change base class, which includes the object classes:
Change Orders
Change Requests
Site Change Orders
Price Change Orders
Deviations
Stop Ships
Quality Change Request (QCR) base class, which includes the object classes:
Corrective and Preventative Actions (CAPA)
Audits
Problem Service Request (PSR) base class, which includes the object classes:
Non-Conformance Requests
Problem Reports
Package base class, which includes the object class:
Packages
Program base class, which includes the object classes:
Activities
Gates
Transfer Order base class, which includes the object classes:
Content Transfer Orders (CTO)
Automated Transfer Orders (ATO)
Declaration base class, which includes the object classes:
Substance Declarations
Part Declarations
Homogeneous Material Declarations
JGPSSI Declarations
Supplier Declarations of Conformance
IPC 1752-1 Declarations
IPC 1752-2 Declarations
The Workflow Routings tab includes features that allow you to review your routing objects quickly and efficiently. The Navigator feature enables the quick and efficient review of all objects in the routings list.
Navigator – When you click the Navigator button, the routings list is displayed in the NAVIGATOR drawer in the left navigation pane.
Click the links in the NAVIGATOR on the left to display each object in the content pane. As you click through the list, the object appears in the content pane with the most recently viewed tab displayed.
For example, click a link in the NAVIGATOR and then click the Affected Items tab in the content pane. As you click each link in the NAVIGATOR, the object appears in the content pane with the Affected Items tab selected.
By using the NAVIGATOR, you can quickly review Affected Items table information for each Workflow Routings object.
|
Note: The NAVIGATOR displays a maximum of 500 object links. |
Sort the table by any table column – Click the table headers to sort the table by that attribute. You can use all the table columns to sort the table.
Pending age of routings drop-down list – Select the age for the workflow routings you want to see in the table: All, 30 days, 90 days, 180 days, 360 days. For example, select 90 days to see routings that moved into your Workflow Routings list within the last 90 days. The default is 90 days, but once you make a selection in this list, that selection is retained the next time you log in.
Print – Click the Print button to print a copy of the Workflow Routings table. Use the printed list as a reference as you work with your Workflow Routings list.
The Workflow Routings tab includes the following table attributes:
Table 2-3 Workflow Routing table columns
| Workflow Routing table columns | Description |
|---|---|
|
Object icons |
This column displays the appropriate object icon for each table row, for example, for an ECO or for an ECR. Click this column header to sort the table by object type. |
|
Number |
The object number is available as a link. Click this link to open the object in the content pane. Or, use the Quick View feature to view the object:
The Workflow Routings table remains visible and accessible behind the Quick View palette. |
|
|
Has Attachments indicator. A dot in this column indicates that the object in this row has attachments. Click this column header to sort the table by whether the objects have attachments or do not have attachments. |
|
|
Part indicator. A dot in this column indicates that the object in this row has parts on its affected items table. Click this column header to sort the table by whether objects have affected items or do not have affected items. |
|
Description |
The description of the object that appears in the Description field on the object's General Info or Cover Page tab. Click this column header to sort the table by the descriptions. |
|
Status |
The current status of the object, for example, CCB or Released. Click this column header to sort the table by workflow status. |
|
Action |
This column indicates the type of action the object requires. For example, Await Approval tells you that you need to approve the object. If you are a routing manager, this column tells you about the progress of the object through the workflow. For example, In Review tells you that the object is being reviewed by the approvers. Awaiting Release tells you that the approvers have signed off and the object is ready to release. Click this column to sort the table by the routings action. |
|
Workflow |
This column indicates the workflow assigned to each object. Click this column to sort the table by workflow. |
The Home page My Assignments tab lists Activities and Action Items for which you are responsible. The My Assignments tab provides a set of tools that allow you to efficiently work with your assignments. You can sort the assignments table rows, or select one or more assignment rows in the table, and then perform an action on the selected assignments. For example, you can accept or decline a project activity assignment, or flag an assignment for easier tracking.
The Home page My Assignments tab table includes:
Activity objects where:
The activity is In Process. The workflow status type is not Complete or Canceled.
The activity's Project State attribute is set to Active. Proposed or Template activities are not included.
You are the owner of the activity and the Delegated Owner field is blank. If you have delegated ownership, the Delegated Owner field contains the name of the delegated owner until the activity is accepted or declined.
You are the delegated owner of the activity.
You are a resource on the Team tab of the activity and your allocation is greater than 0%.
Action Items where:
The action item is assigned to you and it is not Complete or Canceled.
The action item is assigned to you and it has been accepted.
The action item is assigned to you and it has not been declined.
You are the creator of the action item and it has been declined by the assignee.
Your Agile administrator determines which columns appear in the My Assignments table. The displayed attributes can be enabled or disabled only through the Admin > System Settings > My Assignments node in Agile Java Client PLM Administrator. You can, however, rearrange or filter the defined columns as you want, using the Personalize option. If you have questions about the My Assignments tab, contact your Agile administrator.
By default, the My Assignments tab includes the following columns:
Table 2-4 My Assignments tab columns
| Column name | Description |
|---|---|
|
Flag |
Flag icon which you can set to manage your assignments. For more information, see "Flagging Assignments." |
|
Activity Status |
The current status of the activity. For example, if you have not yet accepted the assignment, a Pending Acceptance icon is displayed here. |
|
Name |
The name of the activity or action item. Click this link to open the activity or action item. |
|
Status |
Workflow status of the activity or action item. For example, an activity can be Not Started or In Process and an action item can be Not Accepted, Accepted, or In Progress. If you have the appropriate privileges, you can edit the Status column. For more information, see "Editing Assignments." |
|
Due Date |
The date the activity or action item is due. You can sort the assignment list by due dates. For more information, see "Using the View Options to Sort your Assignment List." If you have the appropriate privileges, you can edit the Due Date column. For more information, see "Editing Assignments." |
|
% Complete |
For activities, the percentage of the task that has been completed. If you have the appropriate privileges, you can edit the % Complete column. For more information, see "Editing Assignments." |
|
Related To |
For activities, the Related To column lists the parent activity and root parent activity. For action items, the Related To column lists the activity or discussion object to which the action item is associated. Click the links in this column to open the related activities or discussions. |
|
Actual Hours |
For activities, the number of hours expended on the activity. If you have the appropriate privileges, you can edit the Actual Hours column. For more information, see "Editing Assignments." |
The My Assignments tab tools include:
Table 2-5 My Assignments tab tools
| Tool | Description |
|---|---|
|
Views |
Select a view from the drop-down list. Use the list to sort your assignments by pre-defined views, for example, pending requests, flagged assignments, due dates, action items, or activities where you are a resource. For more information, see "Using the View Options to Sort your Assignment List." |
|
|
Prints the table. Lets you print the assignment table in the currently displayed sort order. For more information, see "Printing the Assignment Table." |
|
Accept |
Accept the selected activities, project activity assignments, or action items. For activities, accept the ownership when you are the designated owner. For project activity assignments, accept the assignment as a resource for the activity. For action items, accept the action item when you are the assignee and the action item has not yet been accepted. For more information, see "Accepting Assignments." |
|
Decline |
Decline the selected activities, project activity assignments, or action items. For activities, decline the ownership when you are the designated owner. For project activity assignments, decline the assignment as a resource for the activity. For action items, decline the action item when you are the assignee and the action item has not yet been accepted. For more information, see "Declining Assignments." |
|
Mark Complete |
Mark as complete the selected activities or action items. For activities, sets the Complete field to 100% and changes the workflow status to Complete. For action items, changes their status to complete and removes them from your assignment list. For more information, see "Mark Assignments Complete." |
|
More > Add to Flagged View |
Sets the flag for all the selected table rows. Lets you flag multiple rows simultaneously. To display flagged rows, in the View drop-down list, choose Flagged. For more information, see "Flagging Assignments." |
|
More > Add to Hidden Assignments View |
Lets you hide assignments. Hidden assignments do not appear in the assignments table. For more information, see "Hiding and Unhiding Assignments." |
|
More > Remove From View |
Remove assignments from the Hidden view. When displaying the hidden assignment view, this menu lets you remove (unhide) the selected assignment rows. See also "Hiding and Unhiding Assignments" and "Flagging Assignments." |
|
More > Fill-down |
Copy the value from a cell to the corresponding cells in all rows following the selection. |
|
More > Fill-down (selected cells) |
Copy the value from a cell to all the selected cells. The value of the first cell in the selection is copied into all the selected cells. |
|
More > Fill-up |
Copy the value from a cell to the corresponding cells in all rows preceding the selection. |
|
More > Fill-up (selected cells) |
Copy the value from a cell to all the selected cells. The value of the last cell in the selection is copied into all the selected cells. |
|
|
Flag icon appears in each row of the assignment table. Set or unset the flag by clicking it. The flag helps you to organize your assignments and mark the ones you want to track. For more information, see "Flagging Assignments." |
|
Quick View |
The Quick View callout bubble appears when you place the mouse cursor over the name of the activity. Click this callout bubble to open a pop-up window that displays important details about the object and lets you edit, accept, or decline the object. The content of this window is configured in Java Client Administrator. For more information, see "Using the Quick View Dialog." |
Use the Home page My Assignments tab Views drop-down list to sort your assignments and quickly find the assignments with which you want to work. For example, you can sort for pending requests or for overdue assignments.
Agile PLM provides the following pre-defined view categories.
Table 2-6 My Assignments tab predefined Views
| View | Description |
|---|---|
|
Base View* |
Displays all assignments, except hidden assignments. |
|
Pending Requests |
Displays only pending requests. |
|
Flagged |
Displays only the flagged assignment rows. You set or clear flags to manage your assignments. This Views list choice displays only the rows that you have flagged. |
|
Due Today or Overdue Due this Week Due within 2 Weeks Due within 30 Days Due within 90 Days |
These Views list choices display assignment table rows according to due dates. |
|
Hidden Assignments |
Displays only hidden assignments. You decide which assignments you want to hide on your assignments list. For more information, see "Hiding and Unhiding Assignments." |
|
Activities where I am a Resource |
Displays activities where you have been assigned as a resource on the Team tab. |
|
Action Items |
Displays action items assigned to you. Action items are generated and assigned from activities and discussions. |
You can edit the assignment attributes in the My Assignments tab table. You must have the appropriate Modify privileges for the editable fields.
For example, depending on your privileges, for an activity, you can edit the Status, Percent Complete, Actual Hours, and Due Date.
To edit My Assignment table rows:
Click the Home button to display the Home page.
Click the My Assignments tab to display your list of assignments.
Locate the row of the assignment you want to edit.
Within the row, double-click a table cell to make the field editable.
Make the desired modifications.
The editable fields are determined by which fields your Agile administrator has included in the assignments table and your modify privileges.
To duplicate an existing cell value across multiple cells:
Select the range of cells that you want to fill with the same value.
To deselect a cell within the range, press CTRL and click the cell.
From the More drop-down menu, choose Fill Up or Fill Down as appropriate.
When you are finished, click Save.
You can use the Home page My Assignments tab Accept function to accept multiple activities or action items simultaneously. The accept action applies to:
Activities where you are the delegated owner.
Project activities assigned to you.
Action items whose status is Not Accepted and you are the assignee.
To accept assignments on the My Assignment tab:
Click the Home button to display the Home page.
Click the My Assignments tab to display your list of assignments.
Select one or more rows in the table.
Click the Accept button.
The selected objects are accepted.
You can use the Home page My Assignments tab Decline function to decline multiple activities or action items simultaneously. The decline action applies to the:
Activities where you are the delegated owner.
Action items whose status is Not Accepted and you are the assignee.
|
Note: When you decline an activity, you must enter a reason. |
To decline assignments on the My Assignment tab:
Click the Home button to display the Home page.
Click the My Assignments tab to display your list of assignments.
Select one or more rows in the table.
Click the Decline button.
If one or more of the selected rows are activities, you must enter a reason why you are declining the activities. Enter your reason in the pop-up dialog and click Send.
You can use the Home page My Assignments tab Mark Complete function to mark as complete multiple activities or action items simultaneously.
|
Note: If you have not accepted an action item, you cannot mark it as complete. Accept the action item first and then mark it as complete. |
When you mark an activity as complete, the Percent Complete field is automatically set to 100%.
To mark assignments as complete on the My Assignments tab:
Click the Home button to display the Home page.
Click the My Assignments tab to display your list of assignments.
Select one or more rows in the table.
Click the Mark Complete button.
The selected assignments are marked complete.
You can use the Print function in the My Assignments tab of the Home page to print the currently displayed assignments table. Use the View drop-down list or the Filter to sort the table, and then print the displayed table rows.
To print the My Assignment table:
Click the Home button to display the Home page.
Click the My Assignments tab to display your list of assignments.
Use the Views drop-down list to sort the table to display the assignments you want.
Click the Print button.
A printable version of the table is displayed in a new browser window and the Print dialog appears.
Click Print in the Print dialog.
Close the new browser window when you are finished.
On the My Assignments tab of the Home page, the More > Add to Hidden Assignments View command lets you hide assignment rows that you do not want to see. The assignments are still part of your assignment list, but they are displayed only when you choose Hidden Assignments in the Views drop-down list.
Hiding assignments can be a useful assignment management tool. For example, suppose you are assigned as a resource for an activity, but you are not the activity owner. You have completed your portion of the task, but other resources have not yet completed their portions of the task. Therefore, the assignment still appears on your My Assignments tab because it has not been marked as Complete. You can hide this assignment so it no longer appears on your assignments list. However, it will still appear on the assignment lists of other resources.
Hiding an assignment removes it from all your My Assignments tab views except your Hidden Assignments view. Your Hidden Assignments view has no effect on the assignment lists of other users. You can hide assignments (add them to your hidden view), display your hidden assignments, and unhide hidden assignments (remove them from your hidden view).
To add assignment rows to your Hidden View:
Click the Home button to display the Home page.
Click the My Assignments tab to display your list of assignments.
If desired, use the Views drop-down list or the filter to sort which assignment rows are displayed.
Select one or more rows in the table.
Choose More > Add to Hidden Assignments View.
To view your hidden assignments:
Click the My Assignments tab to display your list of assignments.
In the Views drop-down list, choose Hidden Assignments.
To remove assignment rows from your Hidden View:
Click the My Assignments tab to display your list of assignments.
In the Views drop-down list, choose Hidden Assignments.
In the hidden assignments view, select the rows you want.
Choose More > Remove from View.
On the Home page My Assignments tab, the flag icon included in each row is a useful assignment management tool. Because you can sort assignments according to whether they are flagged, you can use the flag to indicate assignments that you want to track differently from other assignments. The flags on your assignment table appear only on your My Assignments tab, so you can decide how you want to use them.
To set or unset the flag in a single assignments table row:
Click the Home button to display the Home page.
Click the My Assignments tab to display your list of assignments.
Click the flag icon in the row you want.
If the flag is not set (white flag icon), clicking it toggles the flag to set (red flag icon).
If the flag is set (red flag icon), clicking it toggles the flag to not set (white flag icon).
To set the flags in multiple assignments table rows:
Click the My Assignments tab to display your list of assignments.
If desired, use the Views drop-down list or the filter to sort which assignment rows are displayed.
Select the rows you want to flag.
Choose More > Add to Flagged View.
To unset the flags in multiple assignments table rows in the flagged view:
Click the My Assignments tab to display your list of assignments.
In the Views drop-down list, choose Flagged.
In the flagged assignments view, select the rows you want.
Choose More > Remove from View.
On the Home page My Assignments tab, click the Quick View callout bubble (appears when you place the mouse cursor over the name of activity objects) to open a details dialog that displays additional information about the object and lets you perform some actions on that object, for example, edit and delete. In the details dialog, the attributes that you can view and the actions that you can perform are determined by the roles and privileges that are assigned to you for that object type.
In Agile PLM Web Client, toolbars appear in the top pane, left navigation pane, and content pane.
If you have the appropriate roles and privileges, you can use the toolbar buttons on the top pane to perform the tasks described in the following table. Toolbars in content pane object windows contain buttons that pertain to the object.
Table 2-7 Top Pane main toolbar buttons
| Button | Name | Description |
|---|---|---|
|
|
Back |
Takes you to the previous page you viewed in your browser. (It does not, however, undo any changes you entered in Agile PLM.) |
|
|
Forward |
Takes you to the next page forward. It is disabled if you did not use the Back button to view the page currently in your browser. |
|
|
Refresh |
You can refresh (update) objects, the Recently Visited list, My Bookmarks list, and Search Results page by clicking the Refresh button. There is a Validate button on the Cover Page of change objects in Edit mode. The Validate button saves the changes, validates the workflow, and reloads the workflow list. |
|
|
Home |
Displays your home page in Web Client as defined by Preferred Start Page in your user properties. The Agile administrator selects your user properties and you can change them if you have the appropriate roles and privileges. See "Choosing Your Preferred Start Page." Based on that setting, when you click the Home button, the main area displays your My Assignments, Workflow Routings, or Notifications. See "Exploring the Home Page." Above the main area, the standard Home page has the live links that you have defined as your Quick Links list. See "Quick Links." |
|
|
Displays the progress of file uploads |
Opens the File Upload Manager dialog. In the File Upload Manager you can pause, resume, or cancel any file upload that is in progress. During a file upload, this button is an indicator of the file upload progress. See also: "Web Client File Uploader Tools," "Web Client File Upload Manager." |
|
Create New menu |
Create New |
Lets you create objects in all the base classes and classes that your company has installed and to which you have privileges. See "Introducing Agile Objects." |
|
|
All |
Quick Search criteria text box. Use the drop-down list to limit your Quick Search to a specific base class. See "Installed Agile Classes, Base Classes, and Subclasses." Enter the search criteria you want to use in the text box. See "Web Client Quick Search." The icon for the selected object class appears in the text box. The Quick Search icon indicates All object classes will be searched. See "Full Text Search for Content in Attachment Files." |
|
|
Execute a Quick Search |
Searches for objects that match the criteria in the Quick Search text box. See "Quick Searches." |
|
|
Custom Search |
Opens the Custom Search page, which lets you run a custom search using the parameters configured by your Agile administrator. From the Custom Search page, you can choose to use an Advanced Search, which looks for objects with fields that match (multiple) conditions that you define. A Where Used search finds assemblies that contain parts that meet your search criteria; a Relationship search finds objects related to the objects that match your search criteria. |
The left pane, called the navigation pane, provides basic access to settings, searches, reports, and the Agile PLM Navigator feature:
Logo area, which includes the navigation pane Collapse and Expand controls.
Navigation Pane toolbar. See "Navigation Pane Toolbar."
Navigation pane drawers, which provide access to:
FOLDERS – Search folder, My Bookmarks folder, Recently Visited list. See "Navigation Pane Folders Drawer."
REPORTS – Analytics, Standard Reports, Global Reports, Personal Reports. See Chapter 7, "Working with Agile Reports."
NAVIGATOR – Workflow Routings, Search results, item BOM tree, or PPM Project tree. See "Navigator Drawer."
At times you may want to show the left navigation pane or view the content pane only (hide the navigation pane).
To hide the navigation pane:
In the Navigation pane toolbar, click the Collapse Left Navigation button (which points left).
To show the navigation pane:
At the upper-left margin of the Agile PLM browser window, click the Expand Left Navigation pointer (which points right).
To adjust the width of the navigation pane:
Hold the pointer on the boundary between the navigation and content panes. The pointer changes to a double-pointed arrow.
Drag until the pane is the desired width: it is limited to a maximum of about three quarters of the total screen width.
There are toolbars in the left navigation pane, the top pane, above the Web Client content pane. In the content pane, toolbars appear in object windows, and in object tabs.
If you have the appropriate roles and privileges, you can use the toolbar buttons on the navigation pane toolbar to perform the tasks described in the following table. Toolbars in object windows contain buttons that pertain to the object.
Table 2-8 Navigation pane toolbar buttons
| Button | Name | Description |
|---|---|---|
|
|
My Settings |
Displays your User Profile. Edit your user profile to modify your user settings and preferences. |
|
|
Tools and Settings |
The Tools and Settings drop-down menu includes the following commands:
|
|
|
Help |
The Help drop-down menu includes the following commands:
|
|
|
Logout |
Exits Web Client and ends your current session. |
Web Client sessions are set to time out, or disconnect, after a session is idle for a specified time period.
Session timeout messages are displayed in the following sequence:
One minute before the session expires the Session Timeout Alert message appears.
Click OK to extend the session.
Any unsaved data is preserved, allowing you to save your work.
Click Close to log out.
Agile PLM prompts you to save unsaved data (if any) before logging out.
If you do not respond to the Session Timeout Alert above, when the session has expired, the Session Timed Out message appears. This indicates that Agile PLM has logged out of your session and any unsaved data has been discarded.
Click OK.
The login screen appears in the same browser window.
Once you log in again, Agile PLM displays the page you were viewing last, if possible. For example, if you were viewing the BOM tab of an item when the session timed out, and then you log in again, using the same browser window, Agile PLM displays the same BOM tab of the same Item.
If Agile PLM cannot display the last page you viewed, then Agile PLM displays the Home page.
Additionally, if you do not explicitly log out of Agile PLM, but you close the browser window, Agile PLM closes all dialogs and saves the Recently Visited list. Any unsaved data is discarded.
For information about setting the timeout (idle time) value for Web Client, see Agile PLM Administrator Guide.
If the FOLDERS drawer is not already open in the navigation pane, click the FOLDERS drawer title in the navigation pane. The currently displayed drawer closes, and the FOLDERS drawer opens.
The FOLDERS drawer displays saved searches, bookmarks, and a list of recently visited objects.
The Searches section of the navigation pane FOLDERS drawer contains saved searches you can use whenever needed. It includes predefined system searches and searches you have created, stored in folders. Click a search to view the search results.
For more information about saved searches, see "Saved Searches."
Beneath the search folders are two shortcuts areas:
My Bookmarks – Objects you have bookmarked for quick display later. To bookmark an object, choose Actions > Bookmark on an object's page. For more information about bookmarking, see "Using and Organizing Bookmarks."
Recently Visited – The last 10 objects you have viewed (or 25, 50, or 100, depending on how the Agile administrator has defined the Agile PLM system preferences); click a link to display it in the content pane. For more information about the Recently Visited list, see "Using the Recently Visited List."
The Help drop-down menu provides access to online Agile documentation set and online help tools:
Help – Opens the Agile documentation web page, with a link to online Agile PLM manuals and a link to Oracle Agile UPK (User Productivity Kit).
The online Agile PLM documentation set contains detailed information about Oracle Agile PLM applications, concepts, procedures, and reference information.
Oracle Agile UPK is an interactive online help utility. If UPK is not installed on your company's Agile PLM system, no UPK link is displayed.
About – Displays technical information about the current release of Agile PLM.
Keyboard Controls – Opens a dialog box that lists the keyboard shortcuts available in Agile PLM. Use the Print button in the dialog to print a copy for reference.
The left navigation pane REPORTS drawer gives you access to the Reports and Analytics folders. You can access the types of reports for which you have privileges—and Analytics folders if that is part of your Agile installation. You can view, edit, and delete existing reports. You create reports from the Create New button; see "Creating Objects."
Reports are documented later in this manual. See Chapter 7, "Working with Agile Reports."
Analytics requires separate licensing. Agile PLM Analytics folder may not appear in your view. There is a separate user guide for Analytics.
When you click a Navigator button in the content pane, Agile PLM populates the NAVIGATOR drawer with a list of object links. As you click each link in the Navigator drawer, the object is displayed in the content pane. The list in the navigator drawer is not refreshed or updated as you click through the list.
Populate the navigator list by clicking the Navigator button in the following locations:
Workflow Routings tab on the Home page, to navigate your workflow tasks.
Search results table, to navigate the list of search results.
Content pane of Agile PLM objects: item, change, PSR, QCR, sourcing project, design, part group, declaration, specification.
Project object, to navigate the Agile PPM project tree.
When the Workflow Routings tab is displayed on the Home page, click the Navigator button on the Workflow Routings tab. The workflow routings list is displayed in the left navigation pane NAVIGATOR drawer.
When you click a link in the NAVIGATOR drawer, the object is displayed in the content pane. The navigator list remains visible in the NAVIGATOR drawer, allowing you to click and view any object in the navigator list.
When a search results table is displayed on the content page, click the Navigator button on the search results table. The list of search results is displayed in the left navigation pane NAVIGATOR drawer.
The Navigator button appears in Quick Search, Custom Search, and Advanced Search results tables.
|
Note: The NAVIGATOR drawer displays a maximum of 500 search results. |
When you click a link in the NAVIGATOR drawer, the object is displayed in the content pane. The navigator list is remains visible in the NAVIGATOR drawer, allowing you to click and view any object in the navigator list.
When the following objects are displayed in the content pane, click the Navigator button in the object window to display the object structure in the left navigation pane NAVIGATOR drawer.
Item
Design
Part Group
Project
Change
PSR
QCR
Sourcing Project
Declaration
Specification
Tabs that include a table are displayed in the left navigation pane NAVIGATOR drawer. The displayed tabs are the tabs that have been enabled for that object type. (For information about enabling object tabs, see Agile PLM Administrator Guide.)
The first tab is expanded to list the tab contents. To expand another tab, click the expand control (right arrow head) next to the tab name in the NAVIGATOR drawer. Click the collapse control (down arrow head) to collapse the tab in the NAVIGATOR drawer.
If you click the expand control for a tab that has no contents, then the tab is displayed in the content frame, and the tab name in the NAVIGATOR drawer is displayed without a collapse control.
For example, click the Navigator button in the content pane of a part to view the structure of the part:
Use the expand (right arrow head) and collapse (down arrow head) controls to view the contents of a tab in the NAVIGATOR drawer.
When you click a link in the NAVIGATOR drawer, the object is displayed in the content pane. The object structure remains visible in the NAVIGATOR drawer, allowing you to expand additional tabs as needed.
When a project object is displayed on the content pane, click the Navigator button in the Project window. The Project tree is displayed in the left navigation pane NAVIGATOR drawer.
Use the expand (right arrow head) and collapse (down arrow head) controls to view the Project tree structure in the NAVIGATOR drawer.
When you click a link in the NAVIGATOR drawer, the object is displayed in the content pane. The Project tree remains visible in the NAVIGATOR drawer, allowing you to click and view any object in the Project tree.
View and edit your User Profile settings by clicking the My Settings button in the left navigation pane menu; your User Profile is displayed in the content pane.
Administrators or user administrators can access the profiles of other users by choosing Tools and Settings > Address Book or other User Settings. For more information about working with User Settings (for user administrators), see Agile PLM Administrator Guide.
The Agile administrator may have set values in Agile PLM that impact what you are able to modify. Most changes made by the administrator are automatically implemented systemwide; however, if the administrator makes changes in your role assignment, or to the roles and privilege masks themselves, these take effect for a user only after the user has logged out and logged back in to Web Client or Java Client.
To make changes to a setting:
Display your user profile by clicking the My Settings button in the left navigation pane.
Your user profile object is displayed in the content pane.
Click the user profile tab you want to change.
The user profile window also includes the Change Passwords button, the Transfer Authority button, and the user profile Actions menu.
Here are the personal settings available on the User Profile object and where you can find more information about them in this manual.
Table 2-9 User settings on the My Settings page
| User Settings available on the My Settings page | Topics in this manual describing the function |
|---|---|
|
User Profile |
"Changing Your User Profile.". See also "Choosing Your Preferred Start Page." |
|
Change Passwords |
|
|
Transfer Authority |
"Signoff Authority Transfers." |
|
Actions > Specify Personal Criteria |
|
The following is a list of additional personal settings and features in Agile PLM Web Client, where to access these settings in Web Client, and the sections of this manual that explains the feature:
Table 2-10 Personal settings in Web Client
| Additional personal settings | Where to access the function and topics in this manual describing the function |
|---|---|
|
Organize Bookmarks |
Navigation pane FOLDERS drawer, in the My Bookmarks section, click the Organize Bookmarks icon. |
|
Organize Searches |
Navigation pane FOLDERS drawer, in the Searches section, click the Organize Searches icon. |
|
Organize Reports |
Navigation pane REPORTS drawer, click the Organize Reports icon. |
|
Personal Groups |
Navigation pane select Address Book in the Tools and Settings menu. |
|
Personal Supplier Groups |
Navigation pane, select Address Book in the Tools and Settings menu. |
Your User Profile is simply the settings entered by the Agile administrator when your "user object" was created. Your user profile is available for you to modify, within constraints set by the administrator. The data contained in the various tabs of your user profile is either purely information or it is data useful data to the Agile solutions:
General Information, for example, your contact information;
User Preferences, including:
System Preferences, for instance, your preferred client to receive email notifications;
Format Preferences, for instance, your Windows date and time preferences; and
Display Preferences, for instance, whether you see icons or text in the toolbar (or both).
Other tabs are for Escalations, User Groups, Share, Subscription, Attachments, and History, which you will learn about in other chapters of this manual.
To edit or add information to your user profile:
Open your user profile by clicking the My Settings button in the left navigation pane.
Click the tab on which you want to make changes. For example, click the Preferences tab.
Click the Edit button on that page. Use lists, palettes, and text boxes to enter the requested information.
When you have finished, click Save. To cancel your changes, click Cancel.
You may change settings on other tabs, but you must click Save for each page you alter the settings. If you click another tab after entering new values, you will be prompted to cancel the move operation so you can save the tab you are on.
To verify changes you make to your user profile, it is best to log out of Web Client and login again.
|
Note: If you will be working primarily in Web Client, check this setting in your user profile: Preferences tab, System Preferences section, Preferred Client setting; it should be set to Web Client. Also, Receive Email Notifications should be set to Yes. This will ensure that you receive email notifications in the same client you are working in. If there is a discrepancy and you are not able to change these properties, see your Agile administrator. |
|
Important: Product Portfolio Management, Product Governance & Compliance, and Product Cost Management solutions operate only from Web Client. If one of these solutions is to be your primary area of work, your administrator has likely already set Preferred Client to Web Client. If you change this setting to Java Client, all your email notifications will include a link that opens Java Client; yet you cannot work with PPM, PG&C or PCM objects in Java Client, therefore, consider how you will use Agile PLM before you change this setting. |
A full list of the user preferences and their descriptions are found in "User Properties Defined."
For some user interface settings, the most recently used settings are persisted across sessions for each user.
Examples include:
Resizable table columns
Resizable table column widths are persisted across sessions for each user.
Certain dialog sizes, for example, Create New dialog and Save As dialog.
Selections on the drop-down list on Workflow Routings tab on the Home page.
The last-used custom search mode. That is, if you execute an advanced search, the next time you login and click the Custom Search button in top-pane, the advanced search is automatically displayed instead of the basic search.
Table Personalization – See "Defining Table Views."
Agile PPM – Creation method selection in the Create Project from Template wizard.
Your User Profile includes the following tabs. Your assigned roles and privileges determine which tabs and settings that you are allowed to modify.
Table 2-11 User Profile tabs
| User Profile tab | Description |
|---|---|
|
General Info |
Information about you in Agile PLM. For details, see "Changing Your User Profile" and "User Properties Defined." |
|
Preferences |
Your preferences that determine how data is displayed for you in Agile PLM. For details, see "Changing Your User Settings" and "User Properties Defined." |
|
Escalations |
Your list of escalations. For more information about escalations, see "Working with Escalations in Web Client." |
|
User Groups / Functional Teams |
The user groups and functional teams of which you are a member. Your personal user groups are listed and managed in the Address Book. See "Web Client Address Book: Users, User Groups, Functional Teams, and Supplier Groups." |
|
Share |
List of objects that have been shared with you. On this tab, you can select and remove shares. For more information about sharing, see "Sharing Objects with Other Users." |
|
Subscription |
List of objects to which you have subscribed. On this tab, you can select and remove subscriptions. For more information about subscriptions, see "Subscribing to Objects." |
|
Attachments |
Files or URLs attached to your User Profile. |
|
History |
Summary of actions and modifications made to the User Profile. |
A saved "personal criteria" is a reusable database query very similar to an advanced search, in that the attributes used to create personal criteria are similar to the attributes used to create advanced searches. (For more information, see "Advanced Searches.") They may also be thought of as "filters" or "qualifying descriptions" of objects that you want to track.
You use personal criteria to define signoff authority transfers. If you have the appropriate privileges, you can temporarily transfer your signoff authority for routable objects to one or more Agile users. For more information about signoff authority transfers, see "Transferring Signoff Authority." and "Defining Personal Criteria for Authority Transfers."
Any criteria in Agile—personal or reusable—applies to one Agile class (and its children) or a particular subclass; therefore, you must create a separate criteria to apply to the objects of another class or another subclass.
To create a personal criteria:
Open your user profile by clicking the My Settings button in the left navigation pane.
Choose Actions > Specify Personal Criteria. The specify Personal Criteria window appears.
Click the Add button. The Create Criteria dialog appears.
Fill in the Name and Description fields.
In the first drop-down list, select the object base class. In the second drop-down list, select the object class or subclass (type) that your personal criteria will apply to.
The personal criteria name must be unique. If you specify a personal criteria name that is already used, a duplicate name error message is displayed.
Select the attribute you want from the Attribute drop-down list. The available values in the list change according to the Agile class or subclass you selected in the previous step.
The Operator field specifies the search operator. The values that appear depend on what you selected from the Attribute list. Select from the listed operators, which will be a subset of the following:
In the Value field, select a value for the field you selected from the Attribute list.
If you are going to add additional conditions, select a value (And, Or) in the Join field.
Alternately, you can click the plus button to add another search condition. Click the minus button to remove a search condition.
Repeat step 6 through step 8 until your personal criteria is complete.
|
Note: Changing the criteria in the Object Type field resets the entire personal criteria. A personal criteria applies to one class or subclass. You must create a separate global criteria to apply to another class or subclass. |
If you want your criteria to be case-sensitive, select the Match Case check box. This can simplify how you define personal criteria:
If you enter text in the Value field, the criteria will look for text that is an exact match, depending on the restraints of the Operator field's value.
If you define a numeric value, selecting the Match Case check box allows the Agile PLM system to utilize internal database settings to find objects more quickly.
Using case-sensitive searches improves performance of the system and is recommended when possible.
When the criteria is complete, click Save.
Click Close to close the Specify Personal Criteria dialog.
The Grouping menu lets you group search conditions in parentheses or brackets. The Add( ) grouping option places parentheses around the specified condition or conditions, which changes the order in which the search conditions are evaluated. The Add( ) grouping option follows the standard algebraic order of operations. The grouped criteria within parentheses are resolved before any others. If you do not use parentheses when defining your personal criteria search, the search is processed row by row without any precedence of Join values (And, Or). The first line is combined with the second based on the first line's Join value. The result of the first two lines is then combined with the third line based on the second line's Join value, and so on.
These instructions describe how to change your login password. The process is similar for changing your approval password using the Change Approval Password option, which is enabled only if your Use Login Password for Approval user property is set to No.
|
Note: If you are an LDAP user, your password cannot be reset in the Agile PLM database, neither by you nor by the Agile administrator. LDAP user passwords must be reset through LDAP. |
To change your login password:
Open your user profile by clicking the My Settings button in the left navigation pane.
Your user profile appears in the content pane.
Click the Change Passwords button.
The Change Passwords dialog appears.
Type your old login password in the Login Password field.
Type your new login password in the New Login Password and Confirm Login Password fields. (Passwords are case-sensitive.)
To change your approval password (and the Change Passwords dialog displays the Change Approval Password fields), fill in the fields as described above.
Click Save. If you have not followed the rules set by the Agile administrator for selecting passwords, you are prompted to correct your password.
The Agile administrator or user administrator can have signoff authority transferred from you to another user or from another user to you. This is useful when, for example, you are out of the office and unavailable to sign off on changes.
To view transfers that have been set up:
Open your user profile by clicking the My Settings button in the left navigation pane.
Your user profile appears in the content pane.
Click the Transfer Authority button.
The All Transfer Authority Details dialog appears.
If you have the appropriate privileges, you can add, remove, or edit a transfer authority. See "Routing Objects with Workflows."
If your administrator has granted you the necessary privileges, you can set up escalations for yourself. Escalations allow changes to be forwarded automatically to a designated user if you do not respond within a set amount of time. You can also create escalations for your personal user groups.
Your Agile administrator can add escalations to your user profile, and can edit existing escalations.
To manage escalations for yourself:
Display your user profile by clicking the My Settings button in the left navigation pane.
Your user profile object is displayed in the content pane.
Click the Escalations tab.
To set up a new escalation, click the Add button. The Add Escalation dialog appears.
Select an escalation criteria.
Choose one or more users to be notified for that criteria.
When you are finished, click the Add button in the dialog.
You can select a different person for each criteria, if you want.
Click the Add button and repeat the process for each criteria for which you want to create an escalation.
To edit an escalation in the table:
Double-click the cell you want to modify. For example, double-click the Criteria cell.
Select a different criteria from the drop-down list. Press the Tab key to move to the Notify Users cell.
Use the address palette to add or remove users from to Notify Users list.
Click the Save button at the top right of the table.
To delete an escalation, select its row and click the Remove button.
To manage escalations for a personal user group:
Display your personal groups:
In the left navigation pane Tools and Settings menu, choose Address Book. The Address Book appears in the content pane.
Click the User Groups tab. By default, all the user groups to which you have access are displayed, both Global groups and Personal groups.
In the Views list, choose My Personal Groups. The table is filtered to display only your personal groups.
Click the name link of the user group you want to modify. The user group appears in the content pane.
Click the Escalations tab.
To set up a new escalation, click the Add button. The Add Escalation dialog appears.
Select an escalation criteria.
Choose one or more users to be notified for that criteria.
Click the Add button in the dialog.
You can select a different person for each criteria, if you want.
Click the Add button and repeat the process for each criteria for which you want to create an escalation.
To edit an escalation in the table:
Double-click the cell you want to modify. For example, double-click the Criteria cell.
Select a different criteria from the drop-down list. Press the Tab key to move to the Notify Users cell.
Use the address palette to add or remove users from to Notify Users list.
Click the Save button at the top right of the table.
To delete an escalation, select its row and click the Remove button.
The Agile Web Client Address Book is a multi-tab display in the content pane that lets you view or manage users, user groups, functional teams, and supplier groups, depending the roles and privileges assigned to you.
To open the Address Book, choose Tools and Settings > Address Book > <Address Book tab> in the left navigation pane menu.
The Address Book includes the following tabs:
Users
User Groups
Functional Teams
Supplier Groups
User groups cannot be modified (adding or deleting users) in the Address Book, instead, you must use the Users tab of the user group object. To modify a user group or delete a user group, use the User Groups tab on the Address Book display to view your user groups.
You can access the address book by choosing Tools and Settings > Address Book and selecting a tab. You can select individual users (Users tab) or user groups (User Groups tab). The address book lists all the individuals and global user groups that have been created in Agile PLM.
Your Agile administrator can use Discovery privileges to limit the users you see in the address book.
|
Note: Your Agile administrator can use Discovery privileges to limit the users you see in the address book. |
If you are assigned a role with privileges that allow you to create or modify user objects (for example, the User Administrator role), then you can perform these actions from the Web Client Address Book Users tab.
Refer to Agile PLM Administrator Guide for detailed information about creating and managing users, and for information about roles, job functions, and passwords.
To open the Address Book:
In the left navigation pane Tools and Settings menu, choose Address Book and then choose Users.
The Add button opens the Create New User dialog, which lets you create a new user object.
To use the remaining Users tab buttons:
Select one or more rows in the Users table, and then choose the action you want to perform.
|
Note: You must have the appropriate privileges to perform these actions. If you have questions about your roles and privileges, contact the Agile administrator. |
The following table summarizes the remaining available Users tab actions:
Table 2-12 Address Book User tab actions
| Address Book Users tab action | Description |
|---|---|
|
Change Status |
Change the status (Active, Inactive) of the selected users. |
|
Add Users to Group menu: Add Users to Group |
Add the selected users to an existing user group. In the Add Users To Group dialog, enter the name of the user group or perform a search for the user group you want. |
|
Add Users to Group menu: Add Users to New Group |
Add the selected users to a new users group. Opens the Create New dialog. Enter a name for the new user group. When you click Save, the user group is created and the selected users are added as members. |
|
More menu: Assign Roles |
Assign roles to the selected users. Lets you assign one or more roles to multiple users at the same time. |
|
More menu: Assign Job Functions |
Assign job functions to the selected users. Lets you assign one or more job functions to multiple users at the same time. |
|
More menu: Change Password at Next Login |
Forces the selected users to change passwords the next time the users log in. |
With the appropriate privileges, you can create personal user groups. You create user groups from the Address Book User Groups tab.
With the appropriate privileges, you can create personal user groups. You create user groups from the Address Book User Groups tab.
To create a personal user group:
To open the Address Book, in the left navigation pane Tools and Settings menu, choose Address Book and then choose User Groups.
Click Add. The Create New User Groups dialog appears.
In the Type field, select the User Group subclass.
In the Name field, type the name of the new group.
In the Global/Personal field, choose Personal or Global.
|
Note: If you have the appropriate privileges, you can create a Global group. Global groups are available and visible to all Agile PLM users. Your personal groups are available and visible only to you. |
Click Save.
The newly created user group is displayed in the content pane with the General Info tab in edit mode.
On the General Info tab, specify general information about the user group, including description, status (Active or Inactive), and whether you want this group to be a resource pool (part of the Product Portfolio Management solution), owner, and maximum number of users.
Click Save.
To add users, click the Users tab.
Click the Add button to add users.
When you have selected all the users you want to include in the new group, press the Return key.
You may complete aspects of the user group by clicking the tabs and the Edit button. See "Editing Personal User Groups."
You can edit the groups you have created.
To edit a personal group in Web Client:
In the left navigation pane Tools and Settings menu, choose Address Book and then choose User Groups.
The Address Book appears in the content pane and displays the User Groups tab.
By default, all the user groups to which you have access are displayed, both Global groups and Personal groups.
In the Views list, choose My Personal Groups.
The table is filtered to display only your personal groups.
Click the name of the user group you want to edit.
The user group appears in the content pane.
On the General Info tab, you can click Edit to change the general information about the group.
You can click the Users tab to add or delete users.
To add users, click Add.
To remove users, select one or more user rows and click Remove.
To create or modify escalations, click the Escalations tab.
You can add or remove attachments on the Attachments tab.
For information about attachments, see Chapter 10, "Working with Attachments."
To delete a personal user group from the address book:
Choose Tools and Settings > Address Book > User Groups in the left navigation pane menu.
The Address Book appears in the content pane and displays the User Groups tab.
By default, all the user groups to which you have access are displayed, both Global groups and Personal groups.
In the Views list, choose My Personal Groups.
The table is filtered to display only your personal groups.
Click the name of the user group you want to delete.
The user group appears in the content pane.
Click Remove.
Respond to the prompt by clicking OK.
|
Note: If the personal group is involved with elements like workflow approval or escalation, you will be prompted and prevented from deleting the group. In this case, you can set the group to Inactive status, which keeps the group from being involved in new events, but does not impact events in which it is already involved. |
A personal group may be "undeleted" if, for instance, a project team (group) is no longer needed after the project is completed, then the project is reinstated later, and the same people are on the project team. Once the group is undeleted, of course, the users in the group can be changed.
To undelete a personal user group:
From the Recycle Bin searches folder, execute the Deleted Personal User Groups search.
Open a deleted personal group by clicking its name.
In the Actions menu, choose Undelete. The selected group is undeleted and now appears in the Personal Groups table.
By undeleting the deleted user group, it appears again in the Address Book.
You can also create a new personal group from a deleted personal group. Once you have opened a deleted personal group, in the Actions menu, choose Save As. You will be prompted to give the deleted group a new name and save it. You can then modify it in the usual ways.
Functional teams are a list of workplace job functions, and each job function is assigned one or more users. In the Functional Team(s) field of a routable object, one or more functional teams can be selected. Workflows are configured to assign Approvers, Acknowledgers, and Observers by job function. When the routable object enters a signoff status, Agile PLM automatically assigns users from the functional team as reviewers of the routable object according to job function. This ability to assign approvers by job function is referred to as the Approval Matrix feature.
|
Note: Functional Team objects are created in Agile PLM Web Client.To create, modify, and manage functional team objects, you must have the appropriate role. If you have questions about your roles and privileges, contact the Agile administrator. |
To create a functional team:
In the left navigation pane Tools and Settings menu, choose Address Book and then choose Functional Teams.
The Address Book opens with the Functional Teams tab displayed.
Click Add.
In the Create New dialog, select a value in the Type field, if necessary.
In the Name field, enter the name of the functional team.
Click Save.
The functional team object is displayed.
Modify the remaining fields on the General Info tab, if desired.
Description – Enter a meaningful description.
Status – Can be set to Active or Inactive.
Owner – If desired, select a different user.
Click Save.
On the Job Functions tab, you specify the job functions that will be included in this functional team, and you select the user or user group that will perform each job function on this team.
To add select job functions and add team members:
Click the Job Functions tab.
Click the Add button. The Add Job Function to Functional Team dialog appears.
In the Job Function field, click the Launch the Palette button to open the selection palette.
Double-click to select a job function.
You can select only one job function for each job function table row. Each job function can be listed only once on the job function table.
Press Escape to close the palette.
Click the Launch the Palette button to open the Users/User Groups search palette.
Search for the user or user group you want to add.
The search is limited to users or user groups that have been assigned the job function that you selected in step 4. For example, if you select Developer as the job function, the search is limited to users or user groups that where Developer is included in their Job Function(s) attribute.
Double-click the users you want to add.
If desired, you can perform additional searches to find more users or user groups to add.
You can add as many users and user groups as needed.
When you are done, click Add.
The row is added to the job functions table.
To remove a job function from the Job Function table:
Select the row you want to remove.
Click Remove.
To edit a job function row:
|
Note: You can add or remove users or user groups in the User/User Groups cell of the Job Functions table. |
In the table row you want to modify, double-click inside the User/User Groups cell. The search palette appears.
Click the small x button on each user or user group you want to remove.
Type the name of the user or user group you want to add separated by semicolons.
Or, click the Launch the Palette button to open the address book palette.
The search is limited to users or user groups that have been assigned the job function in that row.
Press Return to save your modifications to the cell.
When you are done, click Save on the job functions table.
To soft-delete a functional team:
Select and open the functional team you want to delete.
In the Actions menu, choose Delete, and respond OK to the confirmation prompt.
The object is soft-deleted.
To undelete a soft-deleted functional team:
Run the Deleted Global User Groups search from the Recycle Bin Searches folder.
Open the deleted function team that you want to restore.
In the Actions menu, choose Undelete.
To hard-delete a soft-delete functional team object (if you have the appropriate privileges):
Run the appropriate Deleted Global User Groups search from the Recycle Bin Searches folder.
Open the functional team you want to delete.
In the Actions menu, choose Delete, and respond OK to the confirmation prompt.
You can also create a new functional team from a deleted functional team. Once you have opened a deleted functional team, in the Actions menu, choose Save As. You will be prompted to give the deleted functional team a new name and save it. You can then modify it in the usual ways.
With the appropriate privileges, you can create personal supplier groups. You create personal supplier groups from the Settings page.
To create a personal supplier group:
In the left navigation pane Tools and Settings menu, choose Address Book and then choose Supplier Groups.
The Address Book appears in the content pane displaying the Supplier Groups tab.
Click Add. The Add Supplier Group dialog appears.
Type a name and a description of the new group, and select the supplier group type Personal.
In the Suppliers field, select the suppliers you want to include in the supplier group.
Click Add. The personal supplier group is created and appears on your Supplier Groups tab.
You may modify aspects of a supplier group by selecting the supplier group row and clicking the Edit button.
Web Client displays many types of information in tables. For example, search results, BOMs, and RFQ information appear in tables. Often a table is what you see when you click a tab in an object, so as BOM tab displays the BOM table.
To open and view objects in a table:
Click the Number link of the object.
Web Client displays a tooltip (in both Read and Edit modes) that displays the object ID and object Description, which identifies the data in the row that has the focus.
To open and view objects in a table:
Click the Number link of the object.
Web Client displays a tooltip (in both Read and Edit modes) that displays the object ID and object Description, which identifies the data in the row that has the focus.
To Quick View the objects in a table:
Hover the cursor over the object link until the Quick View callout bubble appears.
Click the Quick View callout bubble. The object is displayed in the Quick View palette.
There are some Agile tables on which you can perform certain actions in Web Client. For example, on the Affected Items table, you can add items to the table or remove items from the table. These tables have a "handle" column at the left, as shown in the following figure. You can select rows by using any of the following methods:
You can select all the rows with the top handle, or you can use Windows commands (Shift-click and Ctrl-click) on the row handles to select the rows on which you want to perform the action.
You can select a row by clicking in the row or you can use Windows commands (Shift-click and Ctrl-click) in the rows you want.
When you have selected the rows you want, the available actions are buttons in the menu bar above the table.
Table Views allow you to customize the way you view tables. Global table views are available to all users. Your personal table views are available only to you. Multiple table views can be defined.
A table is initially sorted according to the Default View for that table. Agile PLM provides a Base View for each table. You can define additional personal views for each table, and select any view as your default view.
You can change the sort order of any Agile table, for example, the Affected Items table. To sort a table, click the column header of the column by which you want to sort. For example, to sort the Affected Items table by item description, click the Item Description column header. On a returned-search table, all columns can be sorted, that is, clicking the column header sorts the table one way, clicking again sorts the other way (ascending or descending order).
An indicator in the column header indicates how the table is currently sorted:
Table 2-13 Column header sort order icons
| Column Sort Indicator | Sort Order |
|---|---|
|
|
Ascending. The table is sorted by the column attribute in ascending order. |
|
|
Descending. The table is sorted by the column attribute in descending order. |
Table views can include up to three sort definitions: a primary sort, a secondary, and a tertiary sort. When more than one sort definition is applied to a table, the sort indicators appear in the column headers as follows:
To define a table view:
In the Views list, select a table view. You can select the Base View.
In the Personalize list, choose Save As.
In the Table Personalization palette, on the Properties tab:
Enter a name and a description.
In the Type list, choose a table view type: Global or Personal.
In the Apply to list, choose whether to apply the table view to this object subclass or to the all objects in the class.
|
Tip: The subclass name appears in the top left corner of the object pane, under the object number. |
To choose which attributes to display on the table, click the Format tab.
On the Format tab, in the Hidden Fields table, select field names you want and then use the right and left arrows to move field names to and from the Hidden Fields and Displayed Fields lists. Double-clicking a field name also moves it from one list to the other list.
The Displayed Fields list specifies the field names that will appear in the table. Use the up and down arrows to change the order of field names in the list, which reflects the order of the columns in the table.
Lock horizontal scrolling – Use the Lock Selected Column button to lock horizontal scrolling. Select and highlight an attribute in the Displayed Fields list. The slightly thicker vertical line appears to the right of the locked column in the search results table.
Click the Lock Selected Column button. A lock icon (locked padlock icon) appears in the Displayed Fields list next to the selected attribute. The locked column and all columns to the left of the locked columns will not scroll horizontally. For example, when you lock the number column, the object number is always visible when you scroll horizontally left or right.
To lock a different column, select the attribute you want in the Displayed Fields list and click the Lock Selected Column button. The lock is moved from one attribute to the other. Only one column can be locked at a time.
To remove the lock, select the locked column in the Displayed Fields list and click the Unlock Selected Column button. The column lock is removed and no columns remain locked.
Click the Sort tab.
To sort the table, on the Sort tab, in the Attribute column, use the drop-down list to select the field name by which you want to sort first and use the Sort Order drop-down list to choose Ascending or Descending. Select attributes and sort order for up to three attributes. The results are sorted by the first attribute, then by the second attribute and then by the third attribute.
Click Apply at any time to immediately apply your format settings to the table.
When you have finished specifying output fields and sort order, click Close in the Search Personalization palette.
In Web Client, a gray dot icon appears on the tab, next to the tab name, to indicate:
The tab has contents. For example, content icon on a BOM tab indicates that the item has child items added to the BOM tab.
The tab has active contents. For example, a content icon appears on the Changes tab of an item only when the item has pending changes (active changes).
A red square icon appears on a tab to alert you that the tab has problematic content.
The red square icon is displayed on the Compliance tab if an item or manufacturer part has a specification that is non-compliant or is missing information.
A red square icon is displayed on the item Changes tab if the item has a released Deviation or Stop Ship.
Table 2-15 Tab indicator icons
| Tab | Web Client Tab Indicator | Found in these classes of business objects |
|---|---|---|
|
Attachments (and Files) |
Object has attachments |
All objects except file folders (which contain attachment content) and reports. |
|
Changes |
Item has pending changes
The Red Square icon also appears in the Pending Changes column on the Search Results, BOM, and Affected Items tables, if the items have pending and active Deviation or Stop Ship. |
Items and published prices. |
|
BOM |
|
Items. |
|
Manufacturer |
|
Items & Sourcing Projects. |
|
Affected Items (in PCOs: Affected Prices) |
|
Changes, PSRs, QCRs. |
|
Sites |
|
Items. |
|
Prices |
|
Items & Manufacturer Parts. |
|
Suppliers |
|
Items & Manufacturer Parts. |
|
Quality |
|
Items. |
|
Compliance |
|
Items, Manufacturer Parts, & Part Groups. |
|
Content |
|
Agile PPM Program objects For Program classes, relationships are included on the Content tab and relationships with rules are named deliverables. |
|
Discussions |
|
Agile PPM Program objects. |
|
Related PSR |
|
Agile PQM Product Service Request (PSR) objects. |
|
PSRs |
|
Customers |
|
First object tab "Page One" for example: Cover Page Title Block General Information General Info In Web Client, optional tabs: Page Two and Page Three |
Not applicable Tab indicator icons are not used on these tabs. |
All objects have a "Page One" that uses one of the names to the left. In Web Client, if Page Two and Page Three sections are enabled, they appear on the first object tab. Your Agile administrator may rename them. |
|
Relationships |
|
All classes (except Actions Items and Reports) (For Programs classes, relationships are included on the Content tab, which does have an indicator icon.) |
|
Where Used |
Not applicable Tab indicator icons are not used on this tab. |
Items, Manufacturer Parts, Discussions, File Folders. |
|
History |
Not applicable Tab indicator icons are not used on this tab. |
All. |
|
Workflow (routable objects only) |
|
Changes, PSRs, QCRs, Packages, Transfer Orders, Programs |
|
Escalations |
Not applicable |
Users and User Groups |
|
Shares |
Not applicable |
Users and User Groups |
|
Subscriptions |
Not applicable |
Users |
When adding rows to a table in Web Client, you can use any of the following methods to select the objects to add:
Add by typing and type-ahead search
Add by quick search
Add by custom search
Add by creating a new object
Add by Drag and Drop
Add by Copy and Paste
To add rows to a table in Web Client with the Add palette:
Click the object tab to display the table you want.
Click the Add button. The add object palette appears.
You can use any of these methods to select the objects to add to the table:
Type-ahead Search:
In the text entry field, begin typing the number or name of the object you want to add.
Agile PLM displays a list of objects that match the text typed so far.
Use the arrow up and arrow down keys to highlight the object you want.
Press the right arrow key to select the object.
Press the Enter key to add the object to the table and close the palette.
Quick Search:
Click the Search to Add button to open the Search palette.
Enter the search string text in the text field, and click the Launch Search button. The search results are displayed in the palette table.
Click, Ctrl-click or Shift-click to select the row or rows you want to add and then press Enter. The selected objects are added to the table.
When you are done adding objects to the table, press Escape key to close the palette.
Custom Search:
Click the Search to Add button to open the Search palette.
Click the Custom Search button to open the Custom Search palette. The Base Class appears by default according to the tab from which you invoke the Custom Search.
In the Custom Search palette, click Advanced to provide elaborate search criteria. Click Basic to revert to the simple search frame.
Specify the Search criteria as required.
Click Search. The search results conforming to the specific criteria appear in the Search results pane.
Click, Ctrl-click or Shift-click to select the row or rows you want to add to the table.
Use Copy/Paste or drag and drop method to add the selected results to the table.
|
Note: In the Custom Search palette, you can click the Launch Saved Searches button to view the list of Saved Searches. Double-click one of the saved searches. The results appear in the Search results pane. |
Create a New Object:
Click the Create to Add button to open the Create New dialog.
Select the object type.
Complete the required fields.
Click the Add button. The newly created object is added to the table.
If there are objects that you need to return to frequently, you can use Bookmarks and the Recently Visited list for quick access. For more information about the Recently Visited list, see "Using the Recently Visited List."
Bookmarking enables you to keep a list of objects that you return to frequently. You can click an object bookmark to quickly display that object.
You can also bookmark reports that you use frequently.
To bookmark an object in Web Client:
Open the object.
From the Actions menu, choose Bookmark.
The Add to Bookmarks dialog box appears.
Enter a name for the bookmark in the Name field.
By default, the Name field contains the object's number or name. You can edit or replace the bookmark name in this field now, or you can edit the bookmark name later.
Select a folder in which to store it.
To create a new folder, click the New Folder button. In the Add New Folder dialog, enter a folder name and click Save.
Click Save in the Add to Bookmarks dialog box to save the bookmark in the highlighted folder.
The bookmark is saved in the My Bookmarks list in the FOLDERS drawer on the left navigation pane.
To open a bookmarked object in Web Client:
Click FOLDERS drawer in the navigation pane.
Expand the My Bookmarks list.
Or, click the Expand All icon in the navigation pane to display all bookmark subfolders and their contents.
Click the object link in the list of bookmarks.
The object opens in the content pane.
You can organize bookmarks, including renaming them and organizing them into folders.
The following table lists and describes the buttons on the My Bookmarks folder in the Web Client navigation pane.
Use the features in the Organize Bookmarks dialog to create or remove folders, rename or remove bookmarks, and organize and move folders and bookmarks.
Open the Organize Bookmarks dialog by clicking the pencil icon in the left navigation pane next to My Bookmarks. The Organize Bookmarks dialog appears.
Table 2-17 Organize Bookmarks dialog actions
| Button or action | Description |
|---|---|
|
Remove |
Removes the selected bookmarks and bookmark folders. |
|
(double-click a name) |
Renames the selected bookmark or bookmark folder. |
|
Create Folder |
Adds a new bookmark folder within the current folder. |
|
Order |
Reorder the contents of the selected folder alphabetically, either A to Z or Z to A. |
|
Expand All |
Expands all the bookmark folders in the Organize Bookmark dialog to display all available bookmarks. |
|
Collapse All |
Collapses all the bookmarks folders in the Organize Bookmarks dialog. |
|
(drag and drop) |
Lets you reorder bookmarks and bookmark folders. |
|
Save |
Save the modifications you made in the Organize Bookmarks dialog. |
|
Cancel |
Discards the modifications you made in the Organize Bookmarks dialog. |
|
Close |
Closes the Organize Bookmarks dialog. |
To delete a bookmark in Web Client:
Click the pencil icon in the left navigation pane next to My Bookmarks.
The Organize Bookmarks dialog appears.
In the Organize Bookmarks dialog navigate to the bookmark you want to remove and select it.
Click the Remove button.
To save your modifications, click Save.
When you are finished, click Close.
The Organize Bookmarks dialog closes.
To rename a bookmark or a bookmark folder in Web Client:
Click the pencil icon in the left navigation pane next to My Bookmarks.
The Organize Bookmarks dialog appears.
In the Organize Bookmarks dialog navigate to the bookmark or to the bookmark folder you want.
Double-click the name of the bookmark or the bookmark folder.
An edit text box appears.
Type the name you want to use for the bookmark or folder and press the Return key.
To save your modifications, click Save.
When you are finished, click Close.
The Organize Bookmarks dialog closes.
You can organize your bookmarks in folders to make them easier to locate and manage. You can use the existing folders or create new ones.
To create a bookmark folder in Web Client:
Click the pencil icon in the left navigation pane next to My Bookmarks.
The Organize Bookmarks dialog appears.
In the Organize Bookmarks dialog, if folders already exist, click a folder row within which you want to create a new folder.
Click the Create Folder button.
In the text field, enter a new name and press the Return key.
To save your modifications, click Save.
When you are finished, click Close.
The Organize Bookmarks dialog closes.
To alphabetically reorder the contents of a bookmark folder in Web Client:
Click the pencil icon in the left navigation pane next to My Bookmarks.
The Organize Bookmarks dialog appears.
In the Organize Bookmarks window navigate to the bookmark or to the bookmark folder you want.
Select the folder you want to reorder alphabetically.
Click the Order button and select either A to Z or Z to A.
To save your modifications, click Save.
When you are finished, click Close.
The Organize Bookmarks dialog closes.
You can remove or delete a folder, even if it is not empty.
To remove a bookmark folder in Web Client:
Click the pencil icon in the left navigation pane next to My Bookmarks.
The Organize Bookmarks dialog appears.
In the Organize Bookmarks window navigate to the folder you want to remove and select it.
Click the Remove button.
To save your modifications, click Save.
When you are finished, click Close.
The Organize Bookmarks dialog closes.
To rename a bookmark or a bookmark folder in Web Client:
Click the pencil icon in the left navigation pane next to My Bookmarks.
The Organize Bookmarks dialog appears.
In the Organize Bookmarks dialog navigate to the bookmark or to the bookmark folder you want.
Double-click the name of the bookmark or the bookmark folder.
An edit text box appears.
Type the name you want to use for the bookmark or folder and press the Return key.
To save your modifications, click Save.
When you are finished, click Close.
The Organize Bookmarks dialog closes.
To move a bookmark or a bookmark folder into another folder or to a different location in the list in Web Client:
Click the pencil icon in the left navigation pane next to My Bookmarks.
The Organize Bookmarks dialog appears.
In the Organize Bookmarks window, navigate to the bookmark or folder that you want to move.
To expand a folder, click the Expand icon to the left of the closed folder icon.
To expand or collapse all the bookmark folders, use the Expand All and Collapse All buttons
Click and drag the folder or bookmark to its new location and drop it. The final location is indicated by highlight icons:
A blue arrow next to a folder indicates that the dropped bookmark will be inserted under the highlighted folder.
A green arrow next to a bookmark or folder indicates that the dragged bookmark or folder will be inserted above or below the highlighted row.
To save your modifications, click Save.
When you are finished, click Close.
The Organize Bookmarks dialog closes.
When you view an object during a Web Client session, it is listed in the Recently Visited list. The Recently Visited list includes the last 10 objects viewed (or 25, 50, or 100 if the administrator re-set the Agile PLM systemwide Preference).
To open a recently visited object in Web Client:
Click the FOLDERS drawer in the navigation pane.
Expand the Recently Visited list.
Click the object link in the list of recently visited objects.
The object opens in the content pane.
The table below lists and describes the properties common to all users in the Agile PLM system. The General Info, Preferences, Escalations, and User Groups tabs are documented here. Share, Subscription, and History tabs are all automatically populated, and do not have editable fields or properties. To modify the Attachments tab, see "Working with the Attachments Tab of Business Objects." If you are not able to set a field that you want, see the Agile administrator to go over your roles and privileges.
Preferences for users are found on the Preferences tab of any user object. There are three subcategories of user preferences: system-related, format-related, and display-related.
|
Note: For Administrator users – These user preferences should not be confused with the Admin > Server Settings > Preferences node in Agile Administrator in Java Client. |
Table 2-18 User properties, General Info tab
| Property | Notes | Description |
|---|---|---|
|
User ID (username) |
Required field |
The user's Agile PLM login user identification or username. |
|
First Name and Last Name |
Required field |
The user's public name. |
|
Status |
Required field |
Indicates whether the user is enabled (Active) or disabled (Inactive). A disabled user cannot log in. |
|
|
Required field |
The user's valid email address for change notification/routing. Example: danny.design@agile.com. Note: The user will not receive any email notifications if there is no valid address in the Email field. |
|
Status |
Optional user information |
Active or Inactive. (This is the same thing as Enabled or Disabled, respectively.) |
|
Title |
Optional user information |
The user's title, for example, Senior Engineer. |
|
Address fields |
Optional user information |
There are four address fields that are used for informational purposes only: Address (street), City, Postal/Zip Code, and Geography. The Geography field is a series of drop-down lists. |
|
Phone number fields |
Optional user information |
The user's Business Phone, Home Phone, and Mobile Phone numbers (for informational purposes only). |
|
Fax |
Optional user information |
The user's fax number (for informational purposes only). |
|
Pager |
Optional user information |
The user's pager number (for informational purposes only). |
|
Secondary Email |
Optional user information |
The Secondary Email is optional, but when the field is filled in, the user receives notifications at both email addresses. |
|
Role(s) |
Profile field |
The user's role assignments. This property determines a user's access to the objects in Agile PLM from the point of discovery forward. |
|
Job Function(s) |
Profile field |
The user's assigned job functions. This property determines which job functions the user can be associated with in a functional team. |
|
Lists |
Profile field |
These lists link certain roles, like Change Analyst, to routable objects and their workflows, such as Changes. |
|
Searches |
Profile field |
These lists control roles, searches folders, and queries. For example, Change Analyst Searches controls whether a user has, in Web Client, a Change Analyst Searches folder and, in Java Client, Change Analyst queries in the My Inbox Workflow Routings list. |
|
User Category |
Profile field |
Named, Concurrent, or Restricted. |
|
Use Login Password for Approval |
Profile field |
Each user has a login password and approval password (used to approve changes). |
|
Allow Escalation Designation Approval |
Profile field |
If the user has identified one or more Designated Escalation Persons (DEPs), this setting determines when the DEPs can approve or reject a routable object. |
|
Home Organization |
Profile field |
The name of the company profile (organization name) for all users created from the Java Client Users node or the Web Client Address Book Users tab. For supplier users, the supplier name and supplier number for all users added to the Contact Users tab of the supplier object. |
|
Site(s) and Default Site |
Profile field |
Sites are used for distributed manufacturing, and indicate all of the company's locations where the user is involved; selecting from the drop-down list for this property populates the drop-down list for Default Site. Default Site is the user's main base of work. |
|
Ship-To address fields |
Profile field |
Authorized Ship-To (called "Site" in earlier versions of PCM), used only by PCM, indicates all company locations where the user can initiate sourcing activity; selecting from the drop-down list for this property populates the drop-down list for Home Ship-To. Home Ship-To is the primary location where the user is responsible for sourcing activities. |
|
Program Manager for Partners |
Profile field |
The partners for which this user is program manager (which is the change analyst for Package objects). |
|
Rate fields |
Profile field |
There are three Rates fields: Labor Rate, Overhead Rate, and Bill Rate. The drop-down lists in these fields show all currencies entered in the Currency Exchange Rates node. You can select a currency different from the user's Preferred Currency (see Preferences tab). Used by Agile PPM. |
|
Comment |
Profile field |
The Agile PLM administrator may enter a comment regarding the user. |
|
Project Type |
Profile field |
Types of Agile PPM projects the user can participate in. |
|
Region |
Profile field |
Regions the user belongs to. |
|
Division |
Profile field |
Divisions the user belongs to. |
|
Product Line |
Profile field |
Product lines the user has access to. |
|
Customer |
Profile field |
Customers the user is associated with. |
|
Launch Year |
Profile field |
Product launch years the user is associated with. |
|
Category 7 to Category 24 |
Profile field |
Optional Product Portfolio Management Dashboard fields. |
|
Project Type |
Profile field |
The Project types to which the user has access. For more information, see Product Portfolio Management User Guide. |
|
Calendar |
Profile field |
The user's preferred calendar which defines work days and non-work days. For more information, see Product Portfolio Management User Guide. |
Table 2-19 User Properties, Preferences Tab, System Preferences
| System Preference Property | Description |
|---|---|
|
Preferred Client |
This field controls the type of link provided in system notifications to the user. Select Web Client or Java Client. Agile's PCM, PG&C, and PPM solutions operate only in Web Client. Users who work primarily in those areas should have their Preferred Client set to Web Client. |
|
Preferred File Manager |
Select from the list of file servers. For best performance, select a file server that is a local server for the user. |
|
Receive Email Notification |
Controls whether the user can receive automatically generated email notifications from the system.Settings = Yes or No |
Table 2-20 User Properties, Preferences Tab, Format Preferences
| Format Preference Property | Description |
|---|---|
|
Language |
English is available with all Agile PLM licenses. Agile PLM includes Italian, Korean, Portuguese, Russian, Spanish, Japanese, Traditional Chinese, Simplified Chinese, French, or German, per your license. |
|
Workweek Settings |
This setting is for future use only, and is not referenced in any Agile PLM solution. Note: This property is not applicable to any Agile PLM module including Product Portfolio Management and Microsoft Project schedules. |
|
Preferred Date Format |
The format in which dates are displayed to the user. |
|
Time Zone |
The time zone where the user is located. |
|
Preferred Time Format |
The format in which times are displayed to the user. |
|
Preferred Currency |
The currency in which prices/costs are displayed to the user. |
|
Number Format |
The format in which numbers are displayed to the user. An example of each format is displayed in the drop-down list. |
Table 2-21 User Profile, Preferences Tab, Display Preferences
| Display Preferences Property | Description |
|---|---|
|
Preferred Start Page |
Select between My Assignments, Notifications, and Workflow Routings. If the user has privileges that allow him to view any dashboards, one of those dashboards can be selected as the Preferred Start Page. |
|
Response Edit Mode |
The default response mode for RFQ Responses in Agile PCM. Choose between Basic, Advanced Table Edit, and Advanced Wizard Edit. The Basic setting brings the user—generally a "supplier" who does not work at the "buyer" company—to a simplified Web Client user interface. The two Advanced settings bring the user to the familiar Web Client UI. |
|
Encode Type |
Select from: Western European (ISO), Japanese (Shift JIS), Traditional Chinese (Big 5), Japanese (EUC), Simplified Chinese (GB2312), Korean (MS949), Russian (cp1251), and Unicode (UTF-8) |
|
Thumbnails |
Turns thumbnail display Off or On. Requires the Agile PLM system preference Thumbnail Support to be enabled. |
|
Table Display Mode |
Determines whether Web Client tables will display Thumbnails in a separate column. Set to Standard or With Thumbnails |
|
Search Display Mode |
The three settings of this mode determine whether Web Client search results tables display Thumbnails. Set to Thumbnails, Standard, or Standard with Thumbnails |
|
Show Time Sheet |
Set to Yes to display Timesheet tab in your Agile PLM Home page. Requires the SmartRule Detailed Timesheet Entry to be enabled. |
Table 2-22 User Profile, Escalation Tab
| Escalation Tab Property | Description |
|---|---|
|
Criteria and Notify Users |
Set Criteria and Notify Users, which is an individual user or user group (personal or global) to be notified when a workflow status exceeds its escalation time period without a signoff by the user. |
Table 2-23 User Profile, User Groups/Functional Teams Tab
| Property | Description |
|---|---|
|
Name and Status |
The user's user group assignments. The user is a member of the listed groups. |
|
Name, Job Function(s), Status |
The user's functional team assignments. The user is a member of the listed functional teams. Job Function(s) indicates which job functions the user performs on that team. |
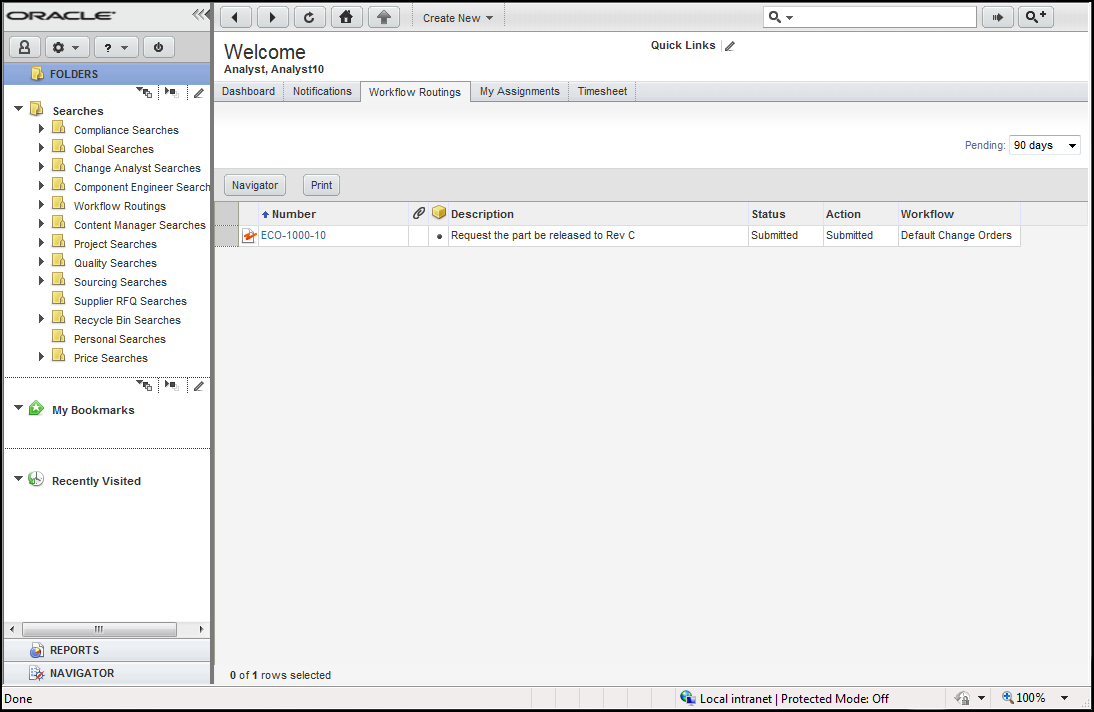
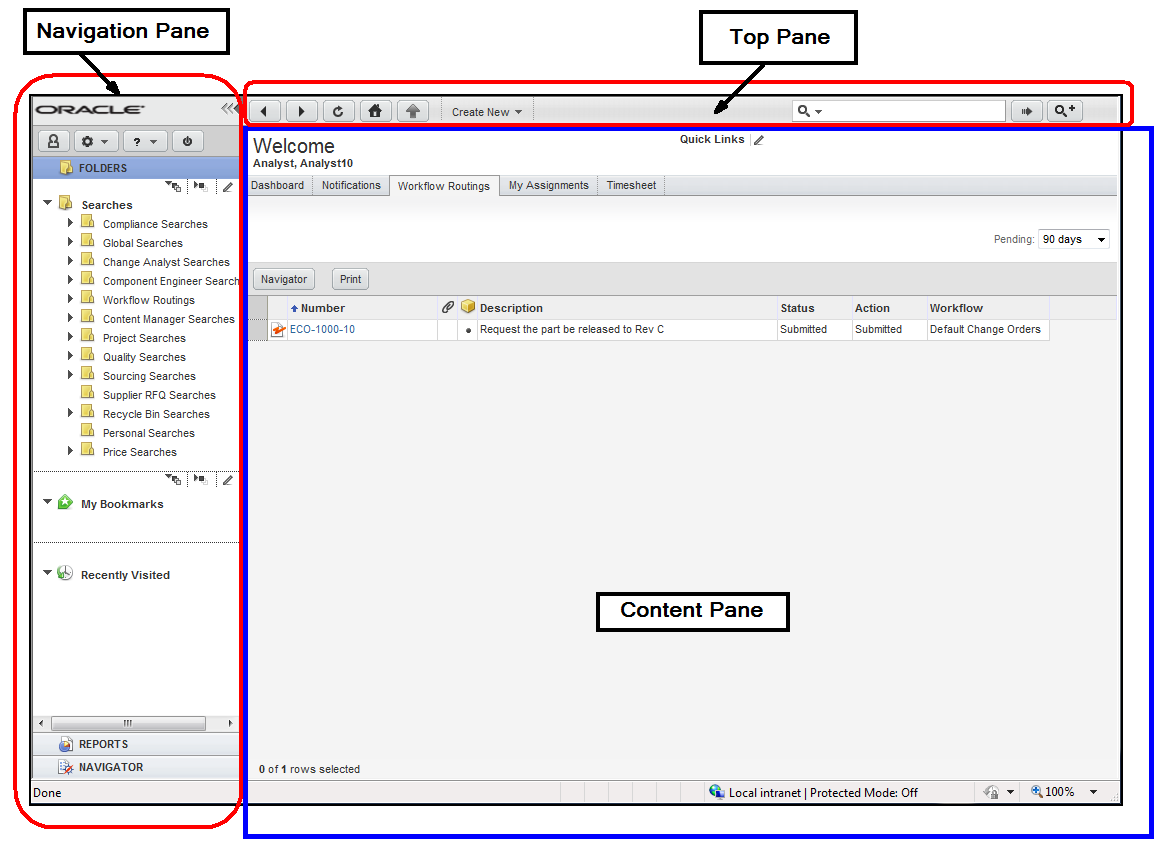

 Unread notification
 High importance unread notification
 Low importance unread notification.
 Read notification
 High importance read notification
 Low importance read notification


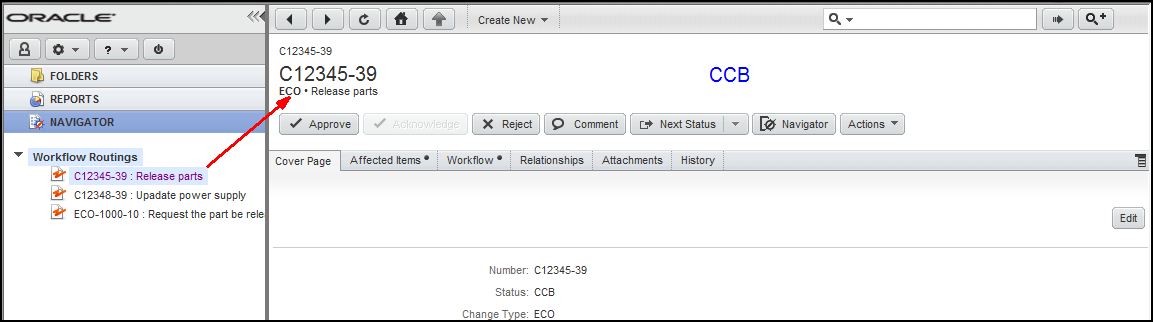


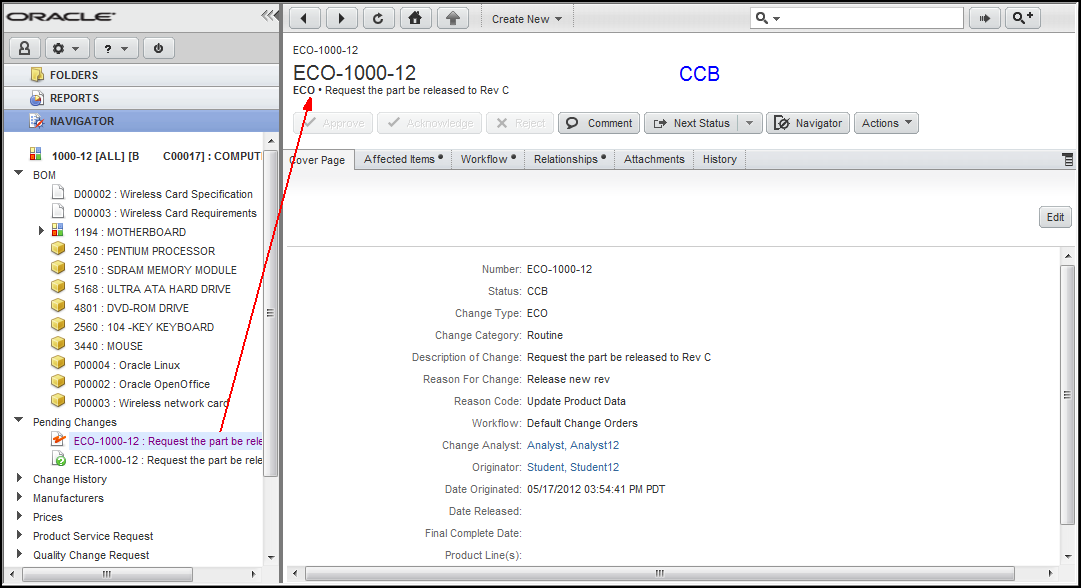


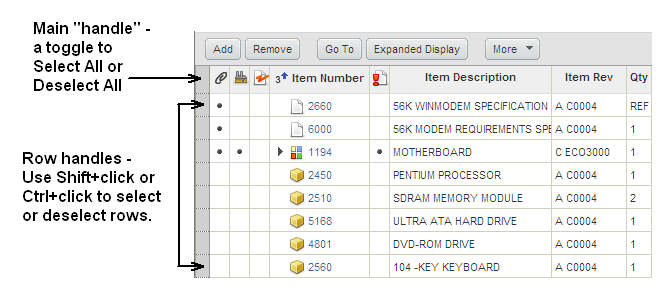


 (Gray Dot icon) =
 (Red Square icon) = Item has released Deviation or Stop Ship


