| Agile Product Lifecycle Management Document Publishing Solution Release 9.3.4 E52164-02 |
|

 Previous |
| Agile Product Lifecycle Management Document Publishing Solution Release 9.3.4 E52164-02 |
|
Previous |
Document Publishing Solution
Release 9.3.4
E52164-02
March 2015
During the life of a product, Agile PLM acquires, processes, and maintains a wide range of data related to the product. This data is used in many ways and for different requirements to expedite, manage, and control product development activities.
Dynamic Publishing of product information enables publishing documents such as product data sheets, Parts List, or service manuals with embedded PLM data. To support this solution, Agile PLM provides two Web services APIs for XML publishing. The Dynamic Document Publishing of product information can be used by Industrial, Retail, Life Sciences, Pharmaceutical, and High Tech industries to:
Create new structured document templates (Product Data sheets, Parts List, Service Manual)
Create documents in the native document publishing tool such as MS Word or Adobe Framemaker
Browse and insert PLM metadata and file contents into documents
Create formatted reports from PLM objects, search results, and push selected rows to reporting tools (compliance report, pricing model, quality report)
Push a selected object ID, or all search results to a report for formatting purposes
Modify the content that is shared by other documents already stored in PLM
Update documents that reference content that was modified
This White Paper provides background and procedural information to install and configure the necessary components to update, format, and publish product documents using Agile PLM-based data about the given product. This includes procedures to create, and publish a sample document using the Oracle-supplied Process Extensions.
This White Paper is a supplement to the release Readme and other Agile manuals. For example, the Capacity Planning Guide, the PLM Administrator Guide, or the SDK Developer Guides. The purpose of this document is to introduce Oracle's Dynamic Document Publishing solution and is not intended as a User or Developer Guide.
New features in Release 9.3.4 are:
Configuring the Large Text Field attribute field. See "Defining Agile Content Services Filters for XML and HTML Data Files."
Updating Oracle BI Publisher Desktop 11.1.1.6. to Oracle BI Publisher Desktop 11.1.1.17.0. See "Setting Up BI Publisher 11g for PLM Release 9.3.2 and Earlier Releases."
|
Note: The update to BI Publisher Desktop 11.1.1.17.0, enables operation with. BI report. |
Limitations of Oracle BI Publisher Report for Large Text field. See "Font Mapping Constraints for Large Text Content and BI Publisher Reports."
Configuring SSL Reporting requirements. These steps are documented in Agile PLM Webservices User Guide.
This revision of Release 9.3.3 provides information for installations that want to run BI publisher 11g with earlier releases of PLM, such as Release 9.3.2, or 9.3.1.
|
Note: For information to run BI publisher 11g with earlier releases of Oracle Agile PLM, see "Setting Up BI Publisher 11g for PLM Release 9.3.2 and Earlier Releases." |
The Document Publishing solution Release 9.3.3 uses the BI publisher 11g instead of BI publisher 10g for template construction and formatting purposes. In addition, this release supports Oracle BI Publisher 11.1.1.6.0 to create and configure Document Publishing Templates and Web Service Reports in a Windows 7 environment. For the URL and steps to install and verify BI Publisher availability, see "To install BI Publisher Desktop:", and to log in to BI Server, see "Accessing the BI Server."
#username to log in to BI Server#BI_SERVER_LOGIN_USERNAME =AdministratorBI_SERVER_LOGIN_USERNAME =weblogic#password to log in to BI Server#BI_SERVER_LOGIN_PASSWORD =AdministratorBI_SERVER_LOGIN_PASSWORD =agile123#Report absolute path#REPORT_ABSOLUTE_PATH =Boilerplates/A932/A932/xdo# use 11GREPORT_ABSOLUTE_PATH =/agile933wspx/agile933wspx.xdo#BI SERVER URL#BI_SERVER_URL =http://dineshp.agile.agilesoft.com:9704/ xmlpserver/services/PublicReportService# 11GBI_SERVER_URL =http://scl34059.us.oracle.com:7001/ xmlpserver/services/PublicReportService
For Release 9.3.2, the Document Publishing solution operates in a Web Logic Server (WLS) environment. Other enhancements and changes are:
Resolution of reported issues to extract the sample files on WLS and broken PXs
Setting BI Publisher option to read Agile XML files. See "Installing and Setting Up BI Publisher Desktop 11.1.1.7.0."
Information provided in this document is organized as follows:
Introduction - This section describes the solution, the required environment, and applicable processes.
Installing BI Publisher and Defining the Template files - This section provides information to install and set up the BI Publisher and ancillary tools and define templates and publish reports
Configuring the PLM Client and PLM Server - This section provides information to configure the PLM client and PLM server, and develop the Event Management process extensions (PXs) that enable the Dynamic Document Generation capability.
Generating a sample report - This section provides several examples that vary the Event Trigger and objects to publish documents with data extracted from Agile PLM as input. It also includes information to configure the Agile PLM for specific reports and generate and store Templates.
|
Note: See "The Document Publishing Blog" for background information and steps to generate printouts for a single object sample. |
The primary users of the Dynamic Document Publishing solution are document authors who use it to prepare and maintain documents with embedded PLM data. That is, documents such as product data sheets, parts lists, or service manuals. In performing these tasks, they are supported by Agile PLM administrators, and where applicable, SDK developers who create and manage the necessary templates and Event subscriptions that automate document updating and document generation.
The following Oracle Agile PLM and BI Publisher publications provide useful information to install and configure the Dynamic Document Publishing components and to publish the documents.
This site provides background information and a script that enables generating automatic printouts of a supplied sample. You can access this site at: https://blogs.oracle.com/PLM/entry/update_on_document_publishing_sample.
|
Note: Oracle recommends reviewing and printing the sample in the Blog before continuing with the Whitepaper to configure the PLM and print other documents. |
Agile PLM Readme
Agile PLM SDK Developer Guide - Developing PLM Extensions
Agile PLM AIS Developer Guide
Installing Agile PLM for WebLogic Server/Installing Agile PLM for Oracle Application Server
Agile PLM Administrator Guide
Agile PLM Web Services User Guide
For information about Oracle's commitment to accessibility, visit the Oracle Accessibility Program website at http://www.oracle.com/pls/topic/lookup?ctx=acc&id=docacc
Oracle customers have access to electronic support through My Oracle Support. For information, visit http://www.oracle.com/pls/topic/lookup?ctx=acc&id=info and http://www.oracle.com/pls/topic/lookup?ctx=acc&id=trs for hearing impaired.
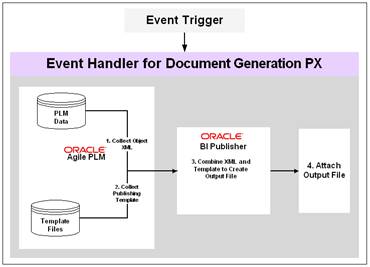
To support the Document Publishing Solution, Agile PLM provides two new Web services APIs to enable XML publishing. These APIs return an XML package containing the object's schema and the actual data. These XML packages are used with a publishing tool such as Oracle's BI Publisher to generate any type of document using Agile PLM metadata.
Although the flexible architecture of this solution can support other authoring tools such as Adobe Framemaker, this Whitepaper uses Word and Oracle BI Publisher to generate these reports.
Figure 1 summarizes the document and template formatting tasks by integrating Oracle Agile PLM and Oracle BI Publisher. BI Publisher is a reporting and document management solution. BI Publisher report formats are designed using MS Word and published in PDF, HTML, RTF, and Excel formats. The flow of data from Agile PLM supported output formats, and potential destinations are summarized in the following illustration.
Oracle's Dynamic Document Publishing is the integration of Oracle BI Publisher and Oracle Agile PLM. PLM is Oracle's product lifecycle management solution and BI Publisher is a reporting and document generation and management solution from Oracle. The operating environment includes:
Oracle Agile PLM
Oracle BI Publisher
Microsoft Word
Agile PLM Release 9.3.3 (Server and databases)
Agile PLM Release 9.3.3 File Manager
Agile PLM Release 9.3.3 SDK (Template Management Java and Script PXs)
Agile PLM Release 9.3.3 Web Services APIs - The following APIs support DynamicFoot 3
loadXMLSchema - This Web Service API returns an XML package that fully describes the attributes of the object. This Web Service is used to create XML schema files that are used by BI Publisher to create the Templates. For example, if you use this Web Service against a subclass like Engineering Change Order (ECO), it will tell BI Publisher all of the possible attributes for ECOs. This is useful to enable using all potential attributes of an object when creating a Template.
loadXMLData - This Web Service API returns the actual data that is stored for an object in an XML package. This Web service is used to retrieve the object data that is combined with the Template to create the output file. You can also use the saved output from this Web Service to test a Template in BI Publisher
The figure below is a streamlined view of the Document Publishing process. In this process, a ”trigger” invokes a ”handler” and that causes steps 1, 2, 3, and 4 to execute automatically.
To describe what actually occurs, consider Figure 3. It provides information about an assembly part that is not yet a PLM object. When this object is loaded into the PLM, applicable information about this object is maintained in the object's attributes. You can see some of these attributes in The Datasheet Configuration in Agile PLM.
Because of recent business activities, there is a need to update some of these attributes. For example, the Name and Address attributes, and then publish the updated Datasheet. The next few paragraphs summarize the Dynamic Document Publishing process that updates and publishes this Datasheet
The Datasheet attributes are shown in the following illustration. As a PLM object, anytime the Datasheet is updated, its attributes such as date, product title, and descriptions are subject to change. Dynamic Document Publishing enables publication of the Datasheet with the latest information. However, because BI Publisher generates the final document, it is necessary is to convert these attributes to a Data XML file for BI Publisher processing.
When the Web Service loadXMLData is invoked, the resulting XML output looks like the figure below. The samples in this document describe how to generate an attachment in Agile PLM of the XML file. Download the XML file from Agile to your computer. Using the BI Publisher menus in Word, select to load Sample XML and open this file. The next step is to combine the Data XML and Schema XML (Template) files for BI Publisher to generate the Datasheet.
Template is an RTF file created and formatted using Word, BI Publisher, and object's attributes in Agile PLM. For procedures, see "Building BI Publisher Templates" and "References." The following XSD file assumes you have generated the Schema file using the Sample, and then downloaded and loaded it with BI Publisher.
Now, you can view the Template and make sure it is properly formatted and the specified PLM attributes are selected. Figure 7 shows the output in RTF format. Upon completion of the testing process, you must load the completed template into Agile PLM template location for use in the Even trigger.
When the appropriate Event subscription, which is set up in advance, is triggered, XML Data is combined with the Template and the document is generated in the specified format. In this case, in PDF format. For information to set up the various Event subscriptions, see Getting Started with Publishing the Sample.
Setting up the environment requires installing and the following installations and BI Publisher and Agile PLM configurations. The setup documented below, supports the shipped samples. If the samples are altered to use different classes and attributes, then these configurations are not necessary.
These steps include installing BI Publisher to enable:
Inserting data fields into RTF templates
Inserting data driven tables and crosstabs
Inserting data driven charts
Previewing and Validating RTF templates with sample XML data
Browsing and updating the data in the selected fields
These configurations include:
Creating the Template Subclass
Configuring Attributes and Agile Content Services (ACS) Filter
Server configuration involves creating and setting up the following Process Extensions (PXs)Foot 4 :
Template Management Structure Creation PX
SchemaGeneration PX
DataGeneration PX
DocumentGeneration PX
The BI Publisher extension to Microsoft Word simplifies the development of RTF templates.
|
Note: If you are running Agile PLM Release 9.3.2 or earlier releases, and plan to install BI Publisher 11g (revision11.1.1.7.0), see "Setting Up BI Publisher 11g for PLM Release 9.3.2 and Earlier Releases" to prepare the environment . |
To install BI Publisher Desktop:
Download and install BI Publisher Desktop 11.1.1.7.0 from the OTN at: http://www.oracle.com/technetwork/middleware/bi-publisher/downloads/index.html
|
Note: In this document, BI Publisher 11g implies BI Publisher Desktop 11.1.1.7.0 and conversely. |
Depending on the version of Windows and Word that you are using, verify either Add-Ins or, BI Publisher are available in MS Word's banner.
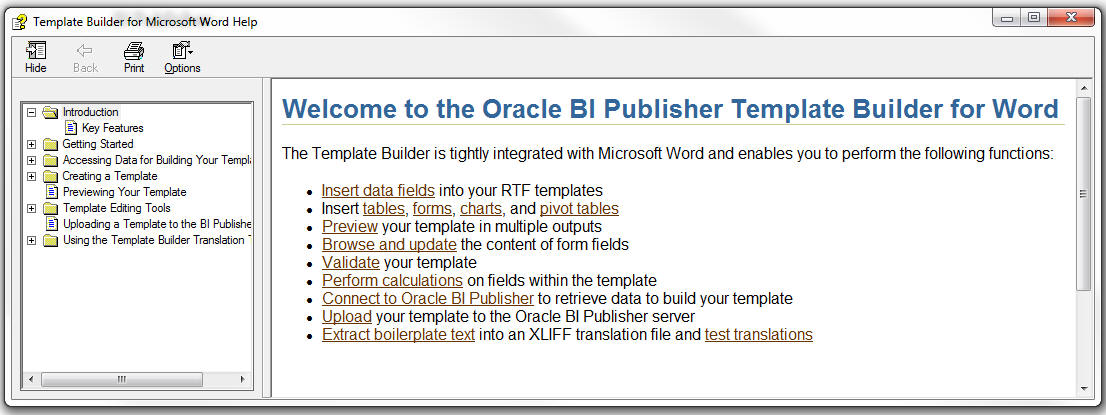
To view the tutorial documenting the Creation of RTF Templates and Updating the Data Fields, in MS Word's banner, click BI Publisher, and click the Help. to display Template Builder for Microsoft Word's Help dialog.
Navigate the Template Builder Help to information you need to create the required templates. For other options, see"Creating RTF Templates and Updating Data Fields."
If you need to run BI Publisher 11g Desktop to develop templates for Agile PLM Releases 9.3.2 and earlier releases, do as follows:
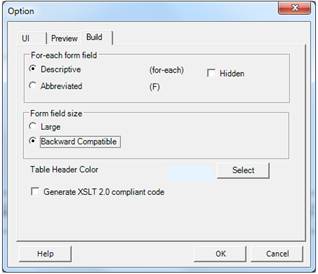
Open a Word document and depending on your version of Word, select Add-Ins > Tools > Option or BI Publisher > Option. The Option dialog appears.
In Option dialog, select the Build tab and then select the Backward Compatible radio button in the Form field size box and then click OK.
Insert new tags throughout your template before using them, because all existing tags are incorrectly set.
Change the class path statements as shown below to run the script for Agile PLM Release 9.3.2 and lower and Release 9.3.3 and higher. This step is necessary because BI Publisher10g and 11g use different class paths and the Oracle-supplied script calls BI Publisher10g directly.
Import statements for BI Publisher 10G embedded in Agile PLM 9.3.2 and lower.
Uncomment these lines for Agile PLM 9.3.2 and lower.
// import oracle.apps.xdo.template.FOProcessor;
// import oracle.apps.xdo.template.RTFProcessor;
// import oracle.apps.xdo.XDOException;
Import statements for BI Publisher 11G embedded in Agile PLM 9.3.3 and higher.
Comment out these lines for Agile PLM 9.3.3 and lower.
import oracle.xdo.template.FOProcessor;
import oracle.xdo.template.RTFProcessor;
import oracle.xdo.XDOException;
If necessary, complete the steps in "To set up BI Publisher Desktop to read aXML files in the Design mode:." Otherwise, complete configuring the PLM Administrator and Server steps.
To set up BI Publisher Desktop to read aXML files in the Design mode:
Open a Word document and select Add-Ins > Tools > Option or BI Publisher > Option. The Option dialog appears.
In Option dialog, select the Build tab.
In the Form field size box, select the Backward Compatible radio button and then Click OK.
|
Note: Configuring or not configuring this setting does not prevent BI Publisher from reading aXML files in the Design mode. It only produces an error when the embedded BI Publisher attempts to access a document from within Agile. |
The Agile PLM Administrator configurations include:
One time configurations
Add a Subclass called DocumentTemplate
Object-level configurations
Add Page 2 fields
Define ACS Filters
Create Event Subscriptions consisting of Event Masks, Handler Masks, and Subscriber Masks for Script PX or Java PXFoot 5
This is a new Document Subclass for the XML schema (Templates) files and is used in Script PX and Java PX configurations. The PX that creates the object schema XML automatically creates an object of this subclass for every object in the system and attaches the schema XML to this object.
|
Note: This is a onetime configuration that creates a subclass which serves as a place holder for all Template files organized by Base Class, Class, and Subclass. This is typically used in a Test or QA system, and is not required in a production environment. |
Log in to Java Client as an administrator. For information on Event Management framework, refer to the Agile PLM Administrator Guide.
Select Admin > Classes > Items > Documents to open the Class:Documents dialog.
Point to the Class:Documents dialog, select the Subclasses tab and click New Subclass to open the New Subclass dialog.
Create a new Documents Subclass called DocumentTemplate for the Item in Figure 12.
Make sure you are selecting Document Number for a New Autonumber. For details, see TemplateManagement.properties file in Template Management Process Extensions. You can find a copy in the Doc-Publishing folder described in SDK Samples Folder and Document Publishing Examples.
Click OK. The DocumentTemplate subclass opens in the General Information page.
Complete the following steps to set these fields.
In Agile PLM Java client select the Admin tab.
Select Classes> Items > Documents> User Interface Tabs > TitleBlock > Attributes:Title Block > Number. The Attributes:Number page appears.
Set the MaxLength field 75 and set the Include Characters field to All.
Click Save to complete this task.
|
Note: You can rename this subclass if you modify the configuration of the PX. For example, if you changeTEMPLATE_SUBCLASS_API_NAME=DocumentTemplate in ManagementStructure.properties file. |
These samples expect to read three pieces of information from the attributes of the Object. These information are the:
Location of the BI Publisher Template
ACS filter API name for the object
Output format
Document publishing Web Services rely on Agile Content Services (ACS) filters to determine the data that is returned for the object in the XML file.
You can customize these filters to return the minimum information to improve performance and minimize performance degradation during data transfer. An ACS filter is referred to by its API Name. As indicated earlier, these are object-level configurations.
The required fields for the Sample are a Heading field, two Text fields, and one List fieldFoot 7 . The Base IDs are for later use.
Heading field - This is for BI Publisher to display the Doc Publishing attributes in a Heading area.
Output Type -List field - This Alpha Type filed determines the Output Type (EXCEL, RTF, PDF, and HTML). The sample PXs assume this field is stored as List11 with Base ID 1271.
ACS Filter -Text field - This is for the Filter which assumes Text 12 and Base ID 1302. PXs read this attribute to correctly call the Web Service with a Filter for Exporting the object information. An empty filter will cause an error when running the PXs.
Template Holder -Text field - This is for the Object identifier of the BI Publisher Template and assumes Text11 and Base ID 1301. PXs will retrieve the BI Publisher template from the Attachments Tab of the object in this attribute.
Complete the following steps to define these fields:
Log in to Java Client and select Admin > Classes > Documents > User Interface Tabs > Page 2 > Attributes:Page Two > List11.
Click Save.
In Java client, select Admin > Data Settings > Classes > Documents Class > User Interface Tabs > Page 2, and configure the remaining Text and Header fields as shown in the following figure.
|
Note: The Base ID values are used in the Java PX Properties files and the Script PX text files. If different fields are used, you must change the Java or Script PXs to reflect the new Base ID values. |
Document Publishing PXs use ACS filters to determine how to build the XML files. Agile PLM provides a set of Agile PLM filters and you can use these filters or define your own. Fields selected for the filter provide flexibility for the sample and you can alter them for a production environmentFoot 8 . In this Whitepaper, the Default Item Filter is selected for this purpose.
To access and set the Default ACS Item Filter:
Log in to Agile PLM Java Client with administrator privileges.
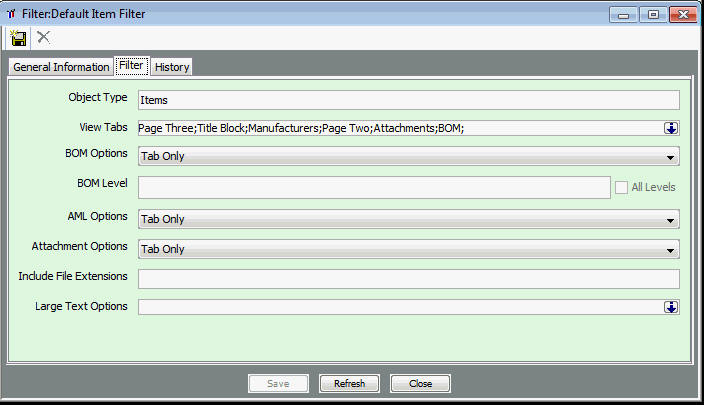
Select Admin > System Settings > Agile Content Service > Filters > Default Item Filter. The following dialog appears.
|
Note: Dynamic Document Generation does not support the Files option feature. Therefore, avoid using the Tabs and Files option, and use the Tabs Only option instead. |
Make sure the Tab Only option is selected for BOM Options, AML Options, and Attachments Options. In View Tabs, as a minimum, select Page Three, Page Two, Title Block, Attachments, BOM, and Manufactures options.
If at this time, you need to set the Large Text Options, you must invoke the steps in "To access and setup the HTML Item Filter:." Otherwise, click Save to save the new settings.
To access and setup the HTML Item Filter:
Repeat steps 1 through 3 in "To access and set the Default ACS Item Filter:."
In Figure 21, above, point to the down arrow in the Large Text Options box. The following selection box appears.
Based on your requirements, select either Page Two or Page Three options, as well as page Two and Page three options. Select the page or pages that you want to use for Large Text attribute fields and then, click OK.
BI Publisher reports do not directly support HTML data fields. Data entered in a rich text enabled long edit field are stored in HTML format. To transform this HTML data, you must incorporate a special style-sheet into your RTF template to perform this conversion. You can find more information about this topic, including procedures, at:
http://docs.oracle.com/cd/E38689_01/pt853pbr0/eng/pt/txml/concept_UnderstandingRichTextEditorDatainBIReporting-177f04.html
BI Publisher's Font Mapping enables mapping base fonts in RTF or PDF templates for use in the published document. Font mapping is only performed for PDF PowerPoint output. You can find more information about font mapping types, required templates, and available and user defined fonts at:
https://docs.oracle.com/cd/E10415_01/doc/bi.1013/e12187/T518230T522345.htm#fontmaps
Dynamic Document Publishing involves configuring and deploying the following Agile PLM Event Management components:
Event Node - These masks are configured around Event types. For example, Create Object, Delete Object, Audit for Workflow. Agile PLM provides a list of pre-defined Events for which an event can occur.
Event Handler - These masks configure a custom action that is called when the Event is raised. They extend the function of an action taken by a user, interface, or the system when the Event subscription is triggered.
Event Subscriber - These masks link a Handler mask to an Event mask.
Deploying these components enables creating the Templates, and generating the schema and document files. These configurations make use of PXs described in. For information on Event components, refer to Agile PLM Administrator Guide and Agile PLM SDK Developer Guide - Developing PLM Extensions.
Process Extensions (PX) is a framework for extending the functionality of the Agile PLM system. The functionality can be server-side extensions, or extensions to client-side functionalities, such as external reports or new commands added to the Actions menu or Tools menu. Regardless of the type of functionality a PX provides, all custom actions are invoked on the Agile Application Server rather than the local client.
In Agile SDK environment, Event Management framework extends the PX framework to enable developing and deploying event-driven applications. Events act as trigger points for generating an automation action within the PLM application. Every Event is generated from a source within Agile PLM applications. The source can be a business action triggered by a user, a UI action, or a system initiated action. Agile PLM's Event framework supports developing extensions using the Java programming language and Groovy Script.
For information to develop Java PXs/Script PXs and Events, refer to the latest release of the Agile PLM SDK Developer Guide - Developing PLM Extensions and Agile PLM Administrator Guide. You can find referential and procedural information about PXs, Events, and Event triggers in these documents.
Java and Script PXs described in this chapter, namely, TemplateManagementStructureCreationPX, SchemaGenerationPX, DataGenerationPX, and DocumentGenerationPX make use of settings defined in Agile PLM Server Configurations.
Oracle provides Document Publishing configuration examples for PLM server and PLM Administrator. Server examples include PXs and related Java and properties files. Configurations described in setting up the PLM server use the following Oracle-supplied Java and Script PXs (Event Handlers):
TemplateManagementStructureCreation – Generates objects in DocumentTemplate subclass in a tree representing every base class, class, and subclass
SchemaGeneration - Generates an XML Schema Attachment for the current object's subclass and adds it to the DocumentTemplate object for the current subclass
DataGeneration - Creates an XML Data attachment and adds to a new object in DocumentTemplate subclass called DocumentTemplate
DocumentGeneration – Publishes the document when the Event is triggered
You can find these folders in <release#>Doc-Publishing_samples.zip which is maintained on the Oracle Agile PLM Event and Web Services Samples Web site at: http://www.oracle.com/technetwork/indexes/samplecode/agileplm-sample-520945.html
You can use these PXs to create the Event Handler and the Event Subscriber that trigger the Event. For details, see "Configuring the TemplateManagementStructureCreationPX," "Configuring the SchemaGenerationPX," and "Configuring the DataGenerationPX." Alternatively, you can use the information to develop your own Java Client and server configuration. For more information and procedures to access its contents, contact your system administrator, or refer to your Agile PLM Installation Guide.
This is one of the files in the DocumenGenerationJavaOpen folder. You can find this file in the Doc-Publishing folder.
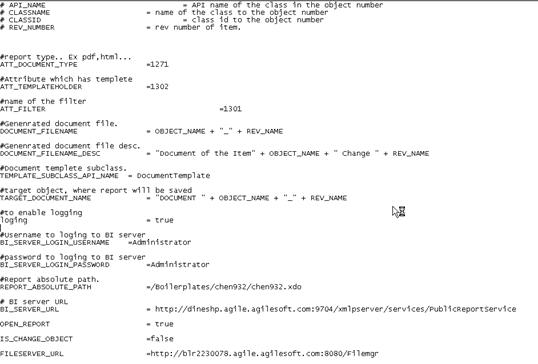
Customizing this file to enable the PX to run in your environment requires modifying the URL, USERNAME, and PASSWORD parameters. Set USERNAME to admin, PASSWORD to agile1, and the URL parameter as shown below.
<?xml version="1.0" encoding="ISO-8859-1" ?><web-app xmlns="http://java.sun.com/xml/ns/j2ee" xmlns:xsi="http://www.w3.org/2001/XMLSchema-instance" xsi:schemaLocation="http://java.sun.com/xml/ns/j2ee http://java.sun.com/xml/ns/j2ee/web-app_2_4.xsd" version="2.4"><display-name>Agile933 Doc-Publishing URL PX</display-name><description>URLPX Servlet</description><servlet><servlet-name>PX</servlet-name><servlet-class>samples.DocumentGeneration.DocumentGenerationJavaPxOpen.DocumentGenerationJavaPxOpen</servlet-class><init-param><param-name>URL</param-name><param-value> http://<your-server>.us.oracle.com:7001/Agile</param-value></init-param><init-param><param-name>USERNAME</param-name><param-value>admin</param-value></init-param><init-param><param-name>PASSWORD</param-name><param-value>agile1</param-value></init-param></servlet><servlet-mapping><servlet-name>PX</servlet-name><url-pattern>/PX</url-pattern></servlet-mapping></web-app>
The required Agile Application file is application.earwhich is a .ZIP file and is located in the 9.3.3 Install folder. The path to this file is agileDomain > applications > application.ear. You must extract this file into Applicationfolder and specify the path shown in Figure 20.
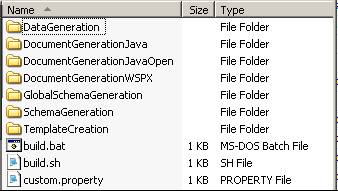
Doc-Publishing folder contains both the Java PX and Script PX handlers. The Java Handlers provide the Java, Properties, and Resources files that you need to deploy the sample Java PX and Script PX handlers. To deploy the Script PXs, refer to Agile PLM Administrator Guide. To deploy the Oracle-Supplied Java PXs, you must first create the JAR files by completing the following steps.
In Doc-Publishing folder, open the custom.property file and using the information in Figure 20, specify the name and path for the Agile PLM server wls.deploy the name and path for the Application server in wls.home and the location that the PXs will reside in your environment, in px.deploy.
Make sure you are running apache-ant-1.7.1 and specify the path for ANT_HOME.
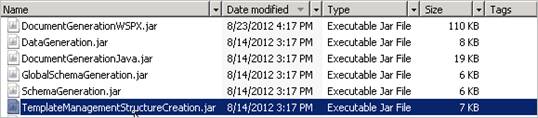
Make sure the JAR files are in: ”<AgileHomeDir>\integration\sdk\extensions”directory and wls.home is set to Weblogic Server 12 installation folder, and then run buid.bat to create the JAR files for Windows environment, or buid.sh to create them for the UNIX environment.
|
Note: After running the build files, the.JAR files are loaded in the Doc-Publishing folder. |
You can use these PXs to implement the Dynamic Document Publishing capabilities and create the Event Handler and Event Subscribers that trigger these Events.
For procedures, see: "Configuring the TemplateManagementStructureCreationPX," and "Configuring the SchemaGenerationPX," and "Configuring the DataGenerationPX." Alternatively, you can use the information to develop your own Java Client and server configurations.
Steps in publishing the sample are illustrated in "Publishing the Sample." For more information to complete these steps, see "The Task Sequence."
Publishing a document requires completing of the following tasks:
Configure and run the TemplateManagementStructureCreationPX.
Configure and run the SchemaGenerationPX.
Configure and run the DataGenerationPX.
Download the schema (XSD) and data (XML) files to the local drive.
Load the schema file.
Load the data file.
Lay out the BI Publisher Template and saving the Word file in RTF format.
Upload the Template into Agile PLM.
Trigger the Event to create the output file
The TemplateManagementStructureCreationPX creates a 3 level Bill of Material (BOM) for Base Classes, Classes, and Subclasses defined in Creating the DocumentTemplate Subclass. This is a placeholder for all future .RTF template filesFoot 9 .
You can find this Script or the Java PX in SDK Samples Folder and Document Publishing Examples. The paths to the Script PX and Java PX with its .JAR and Properties files are:
Script PX for WLS - 932_wls_sdk\ samples\Doc-Publishing\TemplateCreation\TemplateCreationScript.groovy
Java PX for WLS - 932_wls_sdk\samples\Doc-Publishing\TemplateCreation\samples\TemplateManagement StructureCreation\TemplateManagementStructureCreationPX.jaava
This procedure creates the necessary Event masks, Handler masks, and Subscriber masks for the PX.
To create Event mask and set Event Type:
Log in to Java Client with Admin privileges.
In Java Client, select Admin > System Settings > Event Management > Events.
In Events page, select the New button to open the Create Event dialog and define an Event mask called CreateBomTemplate for Object Type Parts with the settings shown in "The Create Event mask for TemplateManagementStructureCreationPX," and then Click OK.
In Java Client with Admin privileges, select Admin > System Settings > Event Management > Event Handlers
In Event Handlers pane, select the New button to open the Create Event Handler dialog.
Create a new Event Handler mask called CreateBomTemplate.
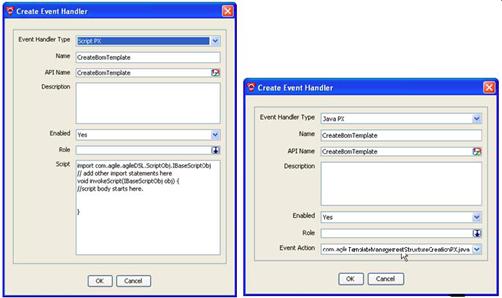
Set Enabled to Yes and for Role, select the applicable roles. For example, Quality Administrator, Quality Analyst, or Quality Analytics User. For Event Handler Type you have the option to select the Script or Java PX option. You can find the Oracle-Supplied Script and Java PXs in "Using Oracle-Supplied Document Publishing PXs."
1
In Create Event Handler, paste the contents of TemplateCreationScript.groovy file in the dialog's Script box.
Click OK. For more information, refer to Agile PLM Events and Event Framework chapter in Agile PLM SDK Developer Guide - Developing PLM Extensions. You can also find information on configuring Script PXs in Agile PLM Administrator Guide.
In Java client with Admin privileges, select Admin > System Settings > Event Management > Event Subscribers.
In Event Subscribers pane, select the New button to open the Create Event Subscriber dialog.
Create a new Event Subscriber mask called CreateBomTemplate with the following settings:
Enabled to Yes
Trigger Type to post
Error Handling Rule to Stop
Click the drop-down arrow to select the Event and Event Handler you created earlier.
Click OK.
Values set in the Oracle-Supplied Properties file are shown in the shaded region of Figure 27 below. Make sure these values conform to Java Client Admin settings for this PX.
If there are no changes to the PX, you can use the JAR files described in "Creating JAR Files and Deploying Script and Java PX Handlers" (Event Handlers). If you need to modify the Java or Script PXs, do as follows:
For Java PX:
Copy "TemplateManagementStructreCreation.jar" to "<AgileHomeDir>\integration\sdk\extensions".
Unpack "TemplateManagementStructreCreation.jar" to gain access to ”ResourceTemplateManagement.properties”file.
Update as needed.
Repack and recopy to PLM server.
For Script PX:
Open the Handler in PLM client.
Configuration is at the beginning of the Script. Modify the Script as needed.
Save the modified Handler.
The Script PX and Java PXs are invoked from the Tools menu and when triggered will do as follows:
Configure the Template Subclass and create a new Documents Subclass called CreateBomTemplate for Item - Document.
Create a 3-level BOM with Level 1 for all Agile Base classes in the system.
The purpose of SchemaGenerationPX is to programmatically generate XML schema files using the Agile Java API for a given object.
It is necessary to run this PX for each Subclass to generate the Schema XSD file. Alternately, you can run the GlobalSchemaGeneration.jar Java PX from the Tools menu to generate a schema for ALL subclasses in the system. The Schema XSD will be attached to the applicable object in the Template (Schema) Management Structure'
The paths to the Script PX and Java PX with its .JAR and Properties files are:
Script PX - 933_wls_sdk\samples\Doc-Publishing\SchemaGenerationScript.groovy
Java PX - 933_wls_sdk\samples\Doc-Publishing\SchemaGeneration\samples\SchemaGenerationPX.java
Similar to TemplateManagementStructureCreationPX, these configurations require creating the Event and setting the Event Type, Event Handler (Java or Script PX), and Event Subscriber.
Follow the steps in "Configuring the TemplateManagementStructureCreationPX" to define an Event mask called for Object Type Items with setting in Figure 29 and then click OK.
Use the information in Configuring Event Masks for TemplateManagementStructureCreationPX and create a new Event Handler (Script PX, or Java PX) called CreateSchema.
Set Enabled to Yes, and for Role, select the applicable roles. For example, Quality Administrator, Quality Analyst, Quality Analytics User. For Event Handler Type, you have the option to select Script PX, or Java PX and use the Oracle supplied PXs. To access these PXs, see "Accessing the Oracle Supplied PXs.".
To configure your Script or Java PX Handler Type do as follows.
For Script PX Event Handlers - In Create Event Handler, paste the contents of Schema Generation Groovy script file in the dialog's Script box and click OK. For more information, see Agile PLM Events and Event Framework chapter in Agile PLM SDK Developer Guide - Developing PLM Extensions. You can also find information on configuring Script PXs in Agile PLM Administrator Guide.
For Java PX Event Handler - Make sure the Event Action for this Java PX is deployed. See "Creating JAR Files and Deploying Script and Java PX Handlers." Check values in the SchemaGeneration.properties file and make sure they conform to settings defined in Java Client Admin in "Properties File Settings for SchemaGenerationPX."
Click OK.
In Java Client with Admin privileges, select Admin > System Settings > Event Management > Event Subscribers.
Event Subscribers pane, select the New button to open the Create Event Subscriber dialog.
Create a new Event Subscriber called CreateSchema with settings shown in "Create Event Subscriber dialog", and then Click OK.
Values set in the Oracle-Supplied Properties file are shown in the shaded region of the following illustration. Make sure these values conform to Java Client Admin settings for this PX.
If there are no changes to the PX, you can use the JAR files described in Creating JAR Files and Deploying PXs (Event Handlers). If you need to modify the Java or Script PX, then do as follows:
When the Event is triggered from the Actions menu or Tools menu, a Schema for the sub class is created and added to the Template BOM created by TemplateManagementStructureCreationPX. It is necessary to run this PX for each Subclass you defined in Performing Agile PLM Administrator Configurations to generate the required Schema XSD file. Alternatively, you can run the GlobalSchemaGenerationPX from Tools menu and generate a Schema for all subclasses in the system. The Schema XSD file is attached to the applicable object in created in TemplateManagementStructureCreationPX.
The Schema Naming Convention is <ObjectClassName>:<ObjectSubClassName>:<SchemaSuffix>.
These attributes are:
ObjectClassName - This is the name of the class. For example, Document.
ObjectSubClassName - This is the name of the subclass. For example, Documents.
SchemaSuffix - The SchemaSuffix is set in the properties file.
In the output of SchemaGenerationPX shown in Figure 33, Document is the Class name and Documents is the name of the Subclass of Document.
This requires triggering the first three Document Publishing Events. When they are triggered, the PXs will perform the following tasks in the listed order:
TemplateManagementStructureCreationPX - This PX will create a 3 level BOM for all Base Classes/Classes/Sub Classes in the system.
SchemaGenerationPX - This PX generates the Schema file (.XSD) for the referenced objects.
DataGenerationPX - This PX creates the Data.XML file and attaches it to the object. As prerequisite, it requires creating Item - Part/Document and setting the Page Two attributes, in this case, DocType, Filter and TemplateHolder. These prerequisites for this PX were defined in "Performing Agile PLM Administrator Configurations" and "Configuring the DataGenerationPX."
For your convenience and to facilitate search, names used for PX Events and Event Handlers start with letters DP for ”Document Publishing” in Figure 34 and Figure 35.
In Java Client (Admin client), select Tools > DP Generate Schema Structure to create the schema for the desired object.
In Java Client, select Part - Action > Generate SchemaFoot 10 .
Trigger the Event that runs the Generate Data Handler.
Make sure to update the Title Block of a Part in the Oracle-Supplied sample to trigger the PX to run.
Make sure all Document Publishing attributes are correct before triggering this PX
|
Note: When triggered, this Event generates attachments for the Schema XSD and Data XML for use in Word with BI Publisher. Schema XSD is attached to aDocumentTemplate object, for example, ”Assembly_2467572”where Assembly is the Item Type and 2467572 is the internal ID of the subclass. |
The purpose of the DataGenerationPX is to programmatically generate sample data using the Agile Java API Get XML Schema for document authors to preview the generated outputs in the format of the selected authoring tool. When invoked, the PX creates and loads the XML file into the authoring tool (in this case, MS Word) to test the Template with BI PublisherFoot 11 . As indicated in Creating JAR Files and Deploying PXs (Event Handlers), this PX requires creating the Item - Part/Document and setting values for Page Two attributes DocType, Filter, and TemplateHolder.
These configurations are similar to the two preceding PXs. The Script PX or Java PX Event Handlers call the SDK Agile API to load Data for the object and add it as an attachment to the object.
Follow the steps in Configuring Event Masks for TemplateManagementStructureCreationPX and define an Event called Create Object for Object Type Part and the following settings.
Click OK.
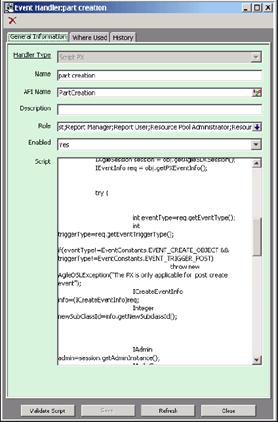
Use the information in Configuring Event Masks for TemplateManagementStructureCreationPX and create a new Event Handler mask (Script PX, or Java PX) called part creation.
Set Enabled to Yes, and for Role, select the applicable roles. For example, Quality Administrator, Quality Analyst, Quality Analytics User. For Event Handler Type, you have the option to select Script PX, or Java PX. You can find the Oracle-supplied Script and Java PXs in "Accessing the Oracle Supplied PXs.."
Click OK.
For Script PX Event Handler mask:, in Create Event Handler, paste the contents of Data Generation Groovy Script file in the dialog's Script box and then click OK. For more information, see Agile PLM Events and Event Framework chapter in Agile PLM SDK Developer Guide - Developing PLM Extensions. You can also find information on configuring Script PXs in Agile PLM Administrator Guide. Figure 37 is an example of a Script PX Handle.
For Java PX Event Handler mask, make sure the Event Action for this Java PX is deployed, for procedures, see Creating JAR Files and Deploying PXs (Event Handlers) and check the values in DataGeneration.properties file and make sure they conform to Java Client Admin settings shown in "Properties File Settings for DataGenerationPX."
In Java Client with Admin privileges, select Admin > System Settings > Event Management > Event Subscribers.
In Event Subscribers pane, select the New button to open the Create Event Subscriber dialog.
Create a new Event Subscriber called item creation with settings shown in Figure 39.
Click the drop-down arrow to select the Event mask and Event Handler mask you created earlier.
Click OK.
Values set in the Oracle-Supplied Properties file are shown in the shaded region of the following illustration. Make sure these values conform to Java Client Admin settings for this PX.
For Java PX:
Copy DataGenerationPX.jar to <AgileHomeDir>\integration\sdk\extensions.
Unpack DataGenerationPX.jar to gain access to DataGeneration.properties file.
Update as needed.
Repack and redeploy to PLM server.
For Script PX:
Open the Handler in PLM client.
Configuration is at the beginning of the Script. Modify the Script as needed.
Save the modified Handler.
The Sample creates a Document and then attaches the XML file to the new document. A better behavior is to simply attach the XML file to the source object, especially when dealing with processes such as Problem Reports.
To change this behavior, modify the script as shown in the bold font blow.
try {String TEMPLATE_SUBCLASS_API_NAME="DocumentTemplate";
String DATA_OBJECT_NUMBER="OBJECT_NUMBER";String DATA_FILE_NAME=" \"AgileData\" + \"_\" +API_NAME+\".xml\"";int ACS_FILTER_ATTRIBUTE=1302;String DATA_FILE_DESCRIPTION=" \"AgileData for \"+OBJECT_NUMBER";ITable attachmentTable =null;IAgileObject agileObject=null;String msg="";
When triggered from the Actions menu, the PX will perform the following:
Gets the current object data using the Agile SDK.
Gets the Template BOM ID, filter ID, and output format using Page 3 attributes in the property file.
Creates a Document and attaches the XML file to the new document.
The output of the PX is an XML file. The naming convention for the Data XML file is <ObjectSubclassName>:<ObjectName>:<Rev>:<DataSuffix>.<XML>.
These attributes are defined as follows:
ObjectSubClassName - This is the name of the Subclass. For example, Documents.
ObjectName - This is the instance of the Object. For example, D000001.
Rev - This is the Revision name/number.
DataSuffix - This is set by the user in the Properties file.
If you need to run BI Publisher 11g Desktop to develop templates for Agile PLM Release 9.3.2 or lower, you must select Options > Options > Build and then select the Backward Compatible radio button in the Form field size section. Because existing tags are no longer setup incorrectly, you must insert new tags throughout your template before using the template. If your template is built incorrectly, you will get errors creating the final document.
BI Publisher10g and 11g also use different class paths. Because the Oracle-supplied script calls BI Publisher10g directly, you must change the class path statements to run the script on 9.3.2 and lower. Both statements are added to the script, so make sure to uncommon the 10g statements and comment out the 11g statements for the older version. If the wrong class path is used, errors will appear in the log file.
For more information, refer to "The Document Publishing Blog."
To build a template, you need the Schema XML and Data XML files. For Doc-Publishing purposes, these are the files that are generated by invoking Web ServicesloadXMLSchema and loadXMLData APIs.
In the BI Publisher menu, select Insert > Field.
This opens a BI Publisher screen that lists all available fields from the Agile PLM Schema previously loaded using their API Names.
In the Field selection dialog, point to the field of interest and using Insert, add them in the order that you want them to appear in the resulting document.
Scroll through the list, or use Find Next to select fields, for example, CreateUser.
Using Word features, customize fonts and other formats for the inserted tags.
When you complete the layout, save your Template as an RTF file in the local drive.
From the BI Publisher menus, select Preview Template > PDF (or any format) to see the Data formatted in your Template.
In Agile PLM Web client, search by document name and the click the Attachments tab.
The following procedure assumes that you have already:
Installed BI Publisher Desktop on your system
Ran the SchemaGenerationPX and DataGenerationPX and created the Schema XML and Data XML files.
Ran FileManagementSetup.msi (The Word Plug in Installer)
Open the document that you want to generate. For example, a data sheet containing text that it describes and is not subject to change and variable (data) such as Part Number, Date, and so on that you want to update with Agile PLM data for publication purposes.
Open Microsoft Word and select Add-Ins > Data.
Select Load XML Data... and then Load XML Schema...to load the files. Word will display ”Data loaded successfully” after each completed action.
Loading the files enables BI Publisher to access Agile PLM fields in the XML file that were defined earlier for the Subclass. For example, for ”Documents” subclass defined in Creating a Placeholder for Template Files, you can use all features of Word with BI Publisher to create a template for the data sheet.
BI Publisher facilitates selecting Agile PLM data fields and provides extensive facilities to format the data and output document.
In the BI Publisher menu, select Insert > Field.
This opens a BI Publisher screen that lists all available fields from the Agile PLM Schema previously loaded using their API Names.
In the Field selection dialog, point to the field of interest and using Insert, add them in the order that you want them to appear in the resulting document.
Scroll through the list, or use Find Next to select fields, for example, CreateUser.
Using Word features, customize the fonts and other formats of the inserted tags.
After completing the layout, save your Template as an RTF file.
From the BI Publisher menus, select Preview Template > PDF (or any format) to preview the Data formatted in your Template. See Figure 46.
Using BI Publisher, you can insert and represent Agile PLM fields in a tabular form. BI Publisher's Table formatting combined with Word, provide rich formatting capabilities, for example, generating totals for numeric fields in columns or rows. For more information, see BI Publisher publication in "References."
In Word with BI Publisher Desktop, select Add-Ins > Insert > Table Wizard. The Wizard prompts you to select the grouping fields that you want to report on.
Select the applicable group, for example, AgileDocumentTitleBlock.
Select the required fields and then format the table.
BI Publisher supports several options for adding images in a published document. These options require including the image files in the document Template.
These options are:
Direct insertion
Using a URL Reference
Referencing Elements in XML Files
To directly insert an image or chart:
Similar to inserting images or charts in Word documents, you can simply insert or paste JPG, GIF, or PNG images directly in the RTF Template.
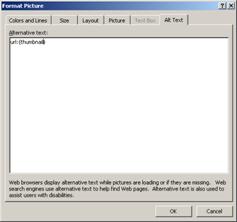
To insert an image using a URL reference:
Insert/paste an image in the Template file. This is used to access MS Word's Picture Format dialog box.
Depending on the version of Word that you are using do as follows to open the Alternative text box:
In Word 2007, right click the image and select Format Picture > Alt Text.
For earlier versions of Word, right click the image and select Format Picture in the drop-down list and then select the Web tab.
In Alternative text box, type the URL that is pointing to the location of the image that is using this syntax: url:{'http://<location_of_the_image>'}. For example, url:{'http://www.oracle.com/images/ora_log.gif"}
To reference an element in an XML File:
Similar to inserting an image using a URL reference, insert/paste an image in the Template file.
Open the Alternative text box as you did in "To insert an image using a URL reference:."
In the Alternative text box, type the path to the image, using this syntax url: {IMAG_LOCATION}. IMAGE_LOCATION is an element in the XML file that holds the full URL to the image.
By using the concat function to build the URL string, you can build a URL based on multiple elements at runtime. For example, url:{concat(SERVER,'/',IMAGE_DIR,'/',IMAGE_FILE)}, where SERVER, IMAGE_DIR, and IMAGE_FILE are element names in the XML file that holds the values to construct the URL
Similar to images, you must also furnish information about Thumbnails in the document Template as shown in Figure 50.
This is done using Web client's Add function as shown below.
Log in to Agile PLM and select the folder you want to load the file into. In this case, DOCUMENT_TEMPLATE that you defined earlier.
Select Attachments > Add. The Add Files dialog opens.
In Add Files dialog, use Browse to locate the file on the local drive and then click the Add.
Repeat the process to load other files.
Document Generation provides the following options to publish a document:
DocumentGenerationJavaPX - This PX generates a file based on a Template and using BI Publisher
DocumentGenerationJavaPXOpen - This PX opens the document instead of saving it as an attachment
DocumentGenerationWS PX - The purpose of this Document generation PX is to programmatically generate documents using the Document Publication engines such as BI Publisher.
The purpose of the Oracle-Supplied Document Generation PX is to programmatically generate a file based on a Template and a PLM object and use BI Publisher as the Document Publication engine to publish the file/document.
As prerequisite, this PX requires an object number for the TemplateHolder attribute, for example, P00001, or P00021.
Similar to the preceding PXs, you must create an Event and set Event Type, Event Handler, and Event Subscriber for the Java or Script PX. Upon the release of an ECO, the PX loads all items from the BOM tab and will Generate Document from each BOM item using the Agile embedded BI Publisher.
Follow the steps in Configuring Event Masks for "Configuring Event Masks for TemplateManagementStructureCreationPX,", and define an Event called CreateDocument for Object Type Change Requests with settings in Figure 52.
2. Click OK.
Use the information in Configuring Event Masks for TemplateManagementStructureCreationPX and create a new Event Handler mask (Script PX, or Java PX) called GenerateDocument.
Set Enabled to Yes, and for Role, select the applicable roles. For example, Quality Administrator, Quality Analyst, Quality Analytics User. For Event Handler Type, you have the option to select Script PX, or Java PX. You can find the Oracle-Supplied Script and Java PX in Doc-Publishing folder in SDK_samples.zip.
Click OK.
·
For Script PX Event Handler mask, in Create Event Handler, paste the contents of Document Generation Groovy Script file in the dialog's Script box and click OK. For more information, see Agile PLM Events and Event Framework chapter in Agile PLM SDK Developer Guide - Developing PLM Extensions. You can also find information on configuring Script PXs in Agile PLM Administrator Guide. Following is an example of a Script PX Handler and then click OK.
For Java PX Event Handler mask, make sure the Event Action for this Java PX is deployed. See Deploying PXs (Event Handler masks) and then check the values in DocumentGeneration.properties file and make sure they conform to Java Client Admin settings shown in Properties File Settings for DocumentGenerationJavaPX. And then click OK.
In Java Client with Admin privileges, select Admin > System Settings > Event Management > Event Subscribers.
In Event Subscribers pane, select the New button to open the Create Event Subscriber dialog.
Create a new Event Subscriber called GenerateDocument with settings shown in the following figure.
Click OK.
When the PX is triggered upon the release of an ECO, it will:
Load the Affected Items Tab of the change and calls the SDK to get the data for the Affected Item
Use the settings in the Properties file for the following P2 Item attributes:
TemplateID
ACS filter name
Document Type
Load the template using the P2 Document Number attribute for the Item.
Call the SDK to load the data for BOM items.
Call BI publisher and pass the data Template to generate the document.
Save the document along the naming convention for the generated file in the Attachments Tab.
The PX creates a separate document object and attaches the output file to this object.
The naming convention for the generated file is <ObjectSubclassName> :<ObjectName> :<Rev>:<templateID><documentSuffix>.<documentType>.
These attributes are defined as follows:
ObjectSubClassName - This is the name of the Subclass. For example, Documents.
ObjectName - This is the instance of the Object. For example, D000001.
Rev - This is the Revision name/number.
TemplateID - This is the template name.
DataSuffix - This is set by the user in the Properties file.
DocumentType - This is the format of the output file. Options are PDF, EXCEL, HTML, RTF and PowerPoint.
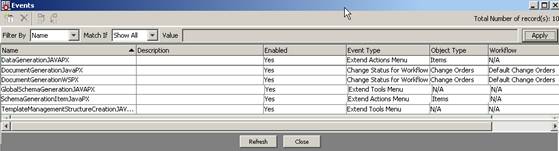
When creating Events, Event handlers and Event subscribers, you must enable the Event by clicking the enable button in Java Client to see the Events in their respective actions. If Events are disabled, you cannot see the Events under their respective actions.
The DocumentGenerationJavaPxOpen or URL PX, instead of saving the document as an attachment, displays the output generated by the DocumentGenerationJavaPX in the URL that you specified in Java PX's Properties file, or in Script PX's Groovy script. For procedures, see "To setup the URL PX:" below.
|
Note: To run the DocumentGenerationJavaPxOpen or URL PX in a Web Services configured environment, you must import the following certificates to the Agile934Home\jdk\jre\lib\security folder:fm-ssl-cert.ceragile-ssl-cert.cera9-democa-cert.cer |
Unzip URLPX.zip to tomcat directory at tomcat\webapps.
After unzipping, you will see the URLPX directory in tomcat\webapps.
Edit the tomcat\webapps\URLPX\WEB-INF\ web.xml by changing the http://shahdesk-dgx520.agile.agilesoft.com:8888/web to your application server's hostname.
Type the correct value for FILESERVER_URL in Tomcat\webapps\URLPX\WEB-INF\classes\samples\DocumentGeneration\DocumentGenerationJavaPxOpen\ DocumentGeneration.properties.
In Java Client, with Admin privileges, select Admin > Data Settings > Process Extensions.
The Process Extension Library panel opens.
In Process Extension Library, select the New button to open and configure the Add Process Extension dialog as shown in the following figure.
The Address field should point to the Filemanager. For example, http://<filemgerHost>:<FilemgerPort>/URLPX/PX.
Click OK.
Navigate to the respective object, for example, Items > Documents class.
Navigate to Process Extensions tab of that Document class and add this URL PX which is already created.
Use these steps for other objects of interest.
When the PX is invoked from the Actions Menu, it will open the document in the specified URL in HTML format.
On releasing the trigger (for example, a change), this PX generates a report with the file extension defined in DocType and attaches it to the object specified in TemplateHolder. Because it is a prerequisite, it requires assigning an existing object number for the TemplateHolder attribute. The required settings are defined in "Performing Agile PLM Administrator Configurations"”and "Configuring the DocumentGeneration WebService PX".
The Sample creates a Document object and then attaches the output file to the new document. Oracle recommends attaching the output file to the source object, especially with processes such as Problem Reports. Be sure to specify the correct location of the Template because getting the Template retrieves the first file from the specified object.
To modify the PX, for example, to change the name of the document from Document name, to Document and Object name, you must modify the PX's Properties file as shown below.
Public ITem getTargetObject(IAgileSession session, Item object)throws Exception{private static final String TEMPLATE_SUBCLASS_API_NAME = "documentTemplate";private static final String TARGET_DOCUMENT_NAME = "DOCUMENT + OBJECT_NAME";
To trigger the Event and generate the sample document do as follows:
Make sure the object that you want to process has the correct configuration for the Template, Filter, and output file type in Script PX Code, or Java PX Properties file. For the example, the settings are as shown below.
Output Type = PDF
ACS Filter = Itemstabs
Template Holder = D-00004
Trigger the Event (release the ECR).
Open the generated document to view the output file.
The purpose of this Document generation PX is to programmatically generate documents using Document Publication engines such as BI Publisher. This PX gets the necessary data from Agile PLM and generates the document in Agile Java PX using the Agile bundled BI Publisher (engine).
Settings for this PX appear in Figure 61 below.
The BI Template Builder is an extension of Microsoft Word that simplifies the development of RTF templates. While the Template Builder is not required to create RTF templates, it provides many functions that greatly increase your productivity.The Template Builder is fully integrated with Microsoft Word and enables you to perform the following functions:
Insert data fields into your RTF templates
Insert data driven tables and crosstabs
Insert data driven charts
Review and Validate RTF templates with sample XML data
Browse and update the content of form fields
Extract boilerplate text into an XLIFF translation file and test translations
To create your RTF Templates:
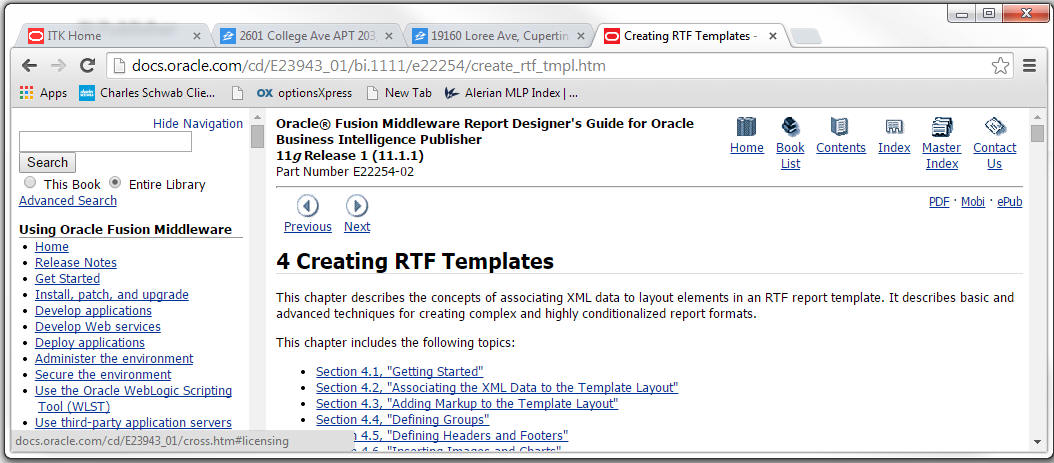
Point to http://docs.oracle.com/cd/E23943_01/bi.1111/e22254/create_rtf_tmpl.htm for information and procedures to create RTF templates.
Create your RTF template(s) use supplied procedures.
The Oracle® Fusion Middleware Report Designer's Guide opens in Creating RTF Templates shown in Figure 62 below.
Navigate the Creating RTF Templates panel to view basic and advanced techniques to create complex report formats, including those that are subject to predefined conditions.
Copyright Page
E52164-02
Copyright © 2013-2015 Oracle and/or its affiliates. All rights reserved.
This software and related documentation are provided under a license agreement containing restrictions on use and disclosure and are protected by intellectual property laws. Except as expressly permitted in your license agreement or allowed by law, you may not use, copy, reproduce, translate, broadcast, modify, license, transmit, distribute, exhibit, perform, publish, or display any part, in any form, or by any means. Reverse engineering, disassembly, or decompilation of this software, unless required by law for interoperability, is prohibited.
The information contained herein is subject to change without notice and is not warranted to be error-free. If you find any errors, please report them to us in writing.
If this is software or related documentation that is delivered to the U.S. Government or anyone licensing it on behalf of the U.S. Government, then the following notice is applicable:
U.S. GOVERNMENT END USERS: Oracle programs, including any operating system, integrated software, any programs installed on the hardware, and/or documentation, delivered to U.S. Government end users are "commercial computer software" pursuant to the applicable Federal Acquisition Regulation and agency-specific supplemental regulations. As such, use, duplication, disclosure, modification, and adaptation of the programs, including any operating system, integrated software, any programs installed on the hardware, and/or documentation, shall be subject to license terms and license restrictions applicable to the programs. No other rights are granted to the U.S. Government.
This software or hardware is developed for general use in a variety of information management applications. It is not developed or intended for use in any inherently dangerous applications, including applications that may create a risk of personal injury. If you use this software or hardware in dangerous applications, then you shall be responsible to take all appropriate fail-safe, backup, redundancy, and other measures to ensure its safe use. Oracle Corporation and its affiliates disclaim any liability for any damages caused by use of this software or hardware in dangerous applications.
Oracle and Java are registered trademarks of Oracle and/or its affiliates. Other names may be trademarks of their respective owners.
Intel and Intel Xeon are trademarks or registered trademarks of Intel Corporation. All SPARC trademarks are used under license and are trademarks or registered trademarks of SPARC International, Inc. AMD, Opteron, the AMD logo, and the AMD Opteron logo are trademarks or registered trademarks of Advanced Micro Devices. UNIX is a registered trademark of The Open Group.
This software or hardware and documentation may provide access to or information about content, products, and services from third parties. Oracle Corporation and its affiliates are not responsible for and expressly disclaim all warranties of any kind with respect to third-party content, products, and services unless otherwise set forth in an applicable agreement between you and Oracle. Oracle Corporation and its affiliates will not be responsible for any loss, costs, or damages incurred due to your access to or use of third-party content, products, or services, except as set forth in an applicable agreement between you and Oracle.
Footnote Legend
Footnote 1: These Oracle Agile PLM documents are available at Oracle Technology Network (OTN) Web site: http://www.oracle.com/technetwork/documentation/agile-085940.html