7Importing Users from a File
This chapter contains the following:
About Importing Users
Now that you have created several users in the user interface to test your setup, you are ready to import the rest of the users from a file. When you import, you create users and the resource organizations that you must assign to managers.
To import your user data, you must:
-
Create a text file with your user data.
-
Create a mapping of the attributes in the file to the attributes in the application.
-
Create an import activity where you upload the data file and specify the mapping you will use for the import.
To help you with the import, you will download a template from the application which contains most of the attributes you will need for your import. The template comes with a predefined mapping which you will copy and modify.
Setup Overview
-
Use the Manage File Import Mappings task in the Setup and Maintenance work area to download the template for the Employee Resource object. The template includes all the required and many of the common attributes you will need to import.
For detailed steps, see Downloading a Template for Importing Your Data from a File.
-
Replace the sample data in the template with your data, preserving the order of the columns.
You must add some values the application expects. For example, you must include the names of the business unit and the legal entity and you must include the codes for the resource roles you are using.
For details on the values that the template expects and how to obtain them, see Understanding the User Import Template topic in this chapter.
-
As described in a previous chapter, the application is set up to immediately send all users that you create an e-mail with their sign-in credentials. Because you don't want users signing into your test environment as you are setting it up, you will want to prevent the bulk of the e-mails from being sent. For the few users you want to use for testing, you will redirect the e-mails to a single user on the setup team. This way you can sign in as different users in the sales organization for testing.
To do this, you:
-
Designate one of the setup users as the person to receive the e-mails as described in the Designating a Single User to Receive All Credential E-Mails topic in the Getting Ready to Create Sales Users chapter.
-
Append to your import file the WorkerProfile_SendCredentialsEmail attribute. Using this optional attribute, you specify which user records generate the credentials e-mail.
For details, see Appending Additional Attributes to Your User Import File topic in this chapter.
-
-
Save the file with your user data as a text (
.csv) file. -
Create a new mapping file for your import by copying the predefined mapping and adding the extra attributes. A mapping tells the application which column in your file corresponds to which attribute in the application.
For details, see Copying and Modifying the Import Mapping topic in this chapter.
-
Import the file by using the Manage File Import Activity task available from the Setup and Maintenance work area. Use the mapping you copied and modified.
See Importing Your User Data File topic in this chapter for details.
-
Enable searching of the imported users.
For details, see Enabling the Search for Imported Users topic in this chapter.
Downloading a Template for Importing Your Data from a File
You can download templates to help you import data with the file-based import tool. The templates include all the common and required fields.
Downloading the Import Template
-
Sign in as a setup or a sales administrator user.
-
Navigate to the Setup and Maintenance work area and search for the Manage File Import Mappings task.
-
Click Go to Task.
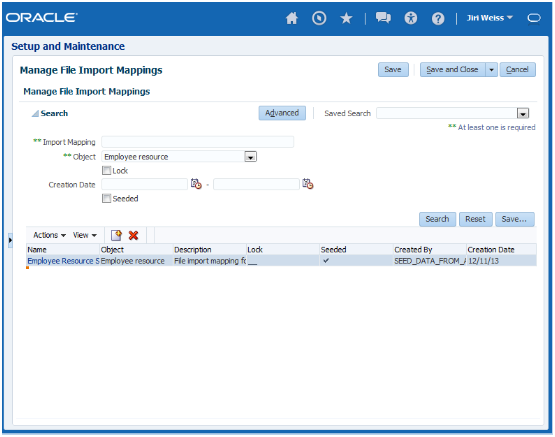
The Manage File Import Mappings page appears.
-
In the Search region, select Employee resource from the Object list.
-
Click Search.
-
Select the Employee Resource Seeded Mapping name link.
The Edit Import Mapping page appears.
-
Click Download Template.

-
Save the template to your desktop.
Understanding the User Import Template
Here is a description of the fields contained in the employee resource import template and the values they expect.
The template file includes a header row with the key attributes for your import, including all the required fields. The attribute name in each column consists of two parts separated by a period. These correspond to selections you make for mapping the import file to the attributes in the application.
The file attributes are arranged in the same order as a mapping Oracle provides for you. So, if you arrange the columns in your import file in exactly the same way as the template, then you can copy and modify this mapping. If you do want to add additional attributes, you can append them to the last column.
The following table lists the attributes in the order they are included in the template. The Value to Import provides instructions for the values each attribute expects.
| Template Header Column Name | Value to Import |
|---|---|
|
WorkerProfile_BusinessUnit |
Enter the name of the business unit created for you when you signed up for the service. You can obtain this value from the Business Unit field in the Employee Information region of Create User page, as described in this topic. |
|
WorkerProfile_LegalEntity |
Enter the legal entity created for you. You can obtain this value from the Legal Employer field in the Employee Information region of Create User page, as described in this topic. |
|
WorkerProfile_FirstName |
Enter the first name as you want it to appear in the sales application. |
|
WorkerProfile_LastName |
Enter the last name as you want it to appear in the sales application. |
|
WorkerProfile_EmailAddress |
You must enter a unique e-mail address. The application sends the initial sign-in credentials to this address unless you:
These options are described in related topics. |
|
WorkerProfile_ManagerEmail |
Enter the manager's e-mail address. The application uses this address to build the management hierarchy, so it must match the e-mail address you entered for the manager. |
|
ResourceProfile_RoleCode |
You must include the internal code rather than the name. For sales, resource role codes provided by Oracle include:
Follow the procedure in this topic to obtain additional codes. |
|
ResourceProfile_RoleTypeCode |
Always enter |
|
ResourceProfile_CreateUserAccount |
Enter a |
|
ResourceOrganizationMembership_TreeCode |
Enter |
|
ResourceOrganizationMembership_ParentTreeCode |
Enter the organization code you entered when you created the top of the resource organization hierarchy. |
|
ResourceOrganizationMembership_OrganizationUsage |
Enter |
|
ResourceOrganizationMembership_OrganizationName |
For each manager, you must enter the name of the resource organization you want to create. This is the name that will appear in the resource directory and elsewhere in the UI. Leave this field blank for each resource role that's not a manager, such as a salesperson. |
|
ResourceOrganizationMembership_ParentOrganizationName |
You must enter the name of the resource organization assigned to the manger of each user. Entry is required for both managers and employees. The application uses these organization names to build the hierarchy of your organization, so the names must match exactly. |
Obtaining the Names of the Business Unit and Legal Entity
-
Sign in as a setup user.
-
In the Navigator, select Manage Users under the Manage Resources heading.
-
Click Create.
The Create User page appears.
-
In the Employment Information region, select Employee as the Person Type.
-
You can obtain the business unit and legal entity values for your file from the Business Unit and Legal Entity lists.

Obtaining the Resource Role Codes
-
Sign in as a setup user.
-
Search for the Manage Resource Roles task in the Setup and Maintenance Work area.
-
Click Go to Task.
-
To obtain a list of resource roles for sales, select Sales from the Role Type list and click Search.

-
Click Edit for each resource role that you want to import. The value in the Role Code field is the value you must include in your file.

Appending Additional Attributes to Your User Import File
You may want to add additional attributes to your file to alter the application's default behavior or import additional user data. Here are a couple of examples.
Specifying Your Own User Names
By default, the application creates user names from the e-mails you enter. If you want to create user names of your own choosing, then append a column to your file with the header WorkerProfile_Username and enter the user names.
Selecting Which Users Generate Credentials E-Mails
By default, the application sends an e-mail for every user you create. You can specify which users will generate the e-mail, by appending a column to your file with the header WorkerProfile_SendCredentialsEmail.
For users you want to generate the credentials e-mail,
enter Y. For all the others,
enter N.
Researching Additional Attributes for Inclusion
You can review other user attributes you may want to append to your file by reviewing the documentation in the Oracle Enterprise Repository:
-
Using your browser, navigate to
fusionappsoer.oracle.com -
Sign in as Guest.
-
Search for
Employee Resource Import. -
On the Details tab, select the HZ_IMP_GROUP_MEMBERS_Reference link and save the file.

Copying and Modifying the Import Mapping
Because we added attributes that are not in the supplied template, we cannot use the original template mapping during import. Follow the steps in this procedure to create a new mapping. You copy the template mapping, add the additional attributes to that copy, and use the new mapping for your import.
Copying the Predefined Mapping to Create Your Own
-
Navigate to the Setup and Maintenance work area and search for the Manage File Import Mappings task.
-
Click Go to Task.
-
In the Manage File Import Mappings page Search region, select Employee resource from the Object list.
-
Select Seeded to restrict the search to templates provided with the application.
-
Click Search.
-
Select the Employee Resource Seeded Mapping name link.
-
In the Edit Import Mapping page, click Copy Mapping.

-
Edit the Import Mapping name to change it to something more meaningful.
-
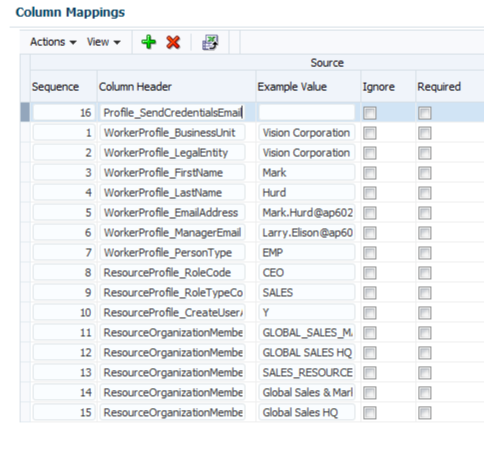
In the Column Mapping region, add the additional attributes.
For each attribute:
-
Click Add.
-
Enter a sequence number corresponding to the sequence of the attribute you added to your file.
-
Enter the column header for the attribute, for example WorkerProfile_SendCredentialsEmail.
-
Optionally, enter sample value in Example Value, for example,
Y. -
In the Target section, select the Object, for example, WorkerProfile.
-
Select the target Attribute, for example, SendCredentialsEmail.
-
-
Click Save and Close.
Importing Your User Data File
When your import file is saved as a text
(.csv) file and you have created your
import mapping, you are ready to run the import process by creating
an import activity.
Importing Users from a File
-
Sign in as a setup or a sales administrator user.
-
In the Setup and Maintenance work area, search for the Manage File Import Activities task.
-
Click Go to Task.
The Manage Import Activities page appears.

-
Click the Create icon.
The Create Import Activity: Enter Import Options page appears.
-
In the Name field, enter a name to identify your import activity in the application.
-
From the Object list, select Employee resource to import users.
-
In the Source File region, select the Desktop option. This is the only option that you can use for Oracle Sales Cloud.

-
Keep the File Type as Text file and File Selection as Specific file.
-
Click Browse and select your data file.
-
If your file does not use a comma to separate values, then select the correct delimiter in the Data Type field.
-
Select the Header row included option because the file includes a header.
-
Click Next.
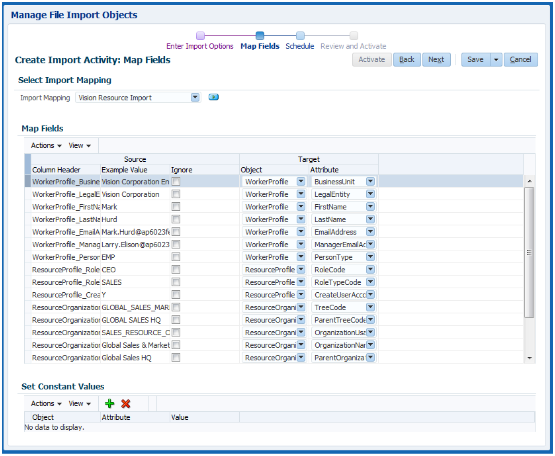
The Create Import Activity: Map Fields page appears.
-
From the Import Mapping list in the Select Import Mapping region, select the mapping you created.
The Map Fields region displays your mapping.
-
Click Next.
The Create Import Activity: Schedule page appears.
-
Click Next.
The Create Import Activity: Review and Activate page appears.
-
Click Activate.
-
You return to the Manage Import Activities page to view the status of your import. You may have to scroll to the right to see the status and periodically refresh the page. An import activity with a status of Completed or Completed with Errors indicates that the import activity completed. To obtain error details, click the import status to see the logs.
Enabling Search for Imported Users
Use this procedure to set a parameter that enables application search for users you imported. The setting makes it possible to search for the imported users in the Manage Users work area and elsewhere in the application.
Setting the Search Parameter
-
Sign in as a setup user.
-
From the Setup and Maintenance work area, search for the Manage HCM Configuration for Coexistence task.
-
Scroll down to the Enable Keyword Crawler parameter.

-
Change the Enable Keyword Crawler parameter value from
NtoY. -
Click Submit.
The application runs a process to enable to you to search for the users you imported.