5Getting Ready to Create Sales Users
This chapter contains the following:
-
Designating a Resource Organization as the Top of the Sales Hierarchy
-
Creating Rules to Automatically Provision Roles to Sales Users
What You Must Do Before Creating Sales Users
Creating sales application users requires a bit more preparation than creating setup users. When you create sales application users either in the UI or by importing them from a file, you not only provision the permissions the users need to do their jobs, but you also build the organization chart for your sales organization. This means that you must set up not only the provisioning rules, but also the elements that the application will use to create the organization chart. These include the root of the organization chart and the names of the roles the resources play in the organization.
You are getting ready to create two types of application users. There are members of the sales team without any system administration duties. These are the salespersons, the sales managers, and the sales vice presidents. And there must be at least one sales administrator user who will set up and administer the sales territories and sales processes.
Setup Overview
-
You must assign a resource role, a name describing the role each resource plays in the organization, to each sales user you create. The resource roles display right underneath user names in the resource directory and elsewhere in the UI.
You also use the resource roles as conditions in your provisioning rules. For example, you assign the Sales Manager job role to a user with the Sales Manager resource role.
Oracle provides standard resource roles, which correspond to the available job roles. For sales, these resource roles include:
-
Sales Administrator
-
Sales Manager
-
Sales Vice President
-
Salesperson
If you want other job titles to display for your users, or if you want to provision some users with special privileges, then you must create additional resource roles using the Manage Resource Roles task from the Setup and Maintenance work area.
For example, you must create a CEO resource role if you want to include the CEO title in your organization chart. It's not one of the resource roles created for you.
You must also create additional resource roles, if you want to provide a small subset of resources with additional privileges. For example, if one of the sales managers in the organization is also in charge of maintaining territories and sales processes, you want to create a new resource role that you can provision with both the sales manager and the sales administrator job roles.
In our case study, Vision Corp. creates just two additional resource roles: CEO and Sales Operations Manager. The sales operations manager is provisioned with the Sales Administrator job role so that he can set up and administer territories and sales processes.
For details, see Creating Additional Resource Roles in this chapter.
-
-
Create a resource organization for the top manager in your hierarchy using the Manage Internal Resource Organizations task from the Setup and Maintenance work area.
You must assign resource organizations to all the manager users you create. All direct reports who are not managers inherit the organization.
While you must use the Manage Internal Resource Organizations task to create the resource organization for the manager at the top of the hierarchy, you can create the rest of the resource organizations while creating users in the UI or while importing them.
As you create users, the application creates an organization hierarchy that you can use to browse through the sales organization's resource directory.
For details, see Creating a Resource Organization in this chapter.
-
Next, you must designate the resource organization you just created as the top of your organization hierarchy, by using the Manage Resource Organization Hierarchies task in the Setup and Maintenance work area.
For details, see Designating a Resource Organization as the Top of the Sales Hierarchy in this chapter.
-
Decide what job roles you want to assign to your users.
Remember that you are not restricted to assigning one job role to a user. For example, you will want to provision the sales manager in charge of determining sales territories and sales processes with the Sales Administrator job role in addition to the Sales Manager job role. This will enable this resource to perform the required sales setups.
You must create at least one user with the Sales Administrator job role to perform these setups.
-
Using the Manage HCM Role Provisioning Rules task, set up the provisioning rules to automatically provision the appropriate job roles and the Resource abstract role to your users based on their resource role. You must create a provisioning rule for every resource role. This includes the resource roles Oracle provides and those you created.
For details, see Creating Rules to Automatically Provision Enterprise Roles to Sales Users in this chapter.
-
When you create users, the application automatically sends e-mails with the sign-in credentials. Because you do not want members of the sales organization signing into your environment while you are setting it up, you will redirect these e-mails to one of the setup users. This is accomplished by entering the alternate e-mail address in the Edit Enterprise page, which you can access by using the Manage Enterprise HCM Information task from the Setup and Maintenance work area.
For details, see Designating a Single User to Receive All Credential E-Mails in this chapter.
Creating Additional Resource Roles
This topic describes how to create additional resource roles.
After you create a resource role, you must create the appropriate provisioning rules to provision the user with the required job and abstract roles. The resource role by itself is only a title.
Creating a Resource Role
-
Sign in as a setup user and search for the Manage Resource Roles task in the Setup and Maintenance work area.
-
Click Go to Task.
The Manage Resource Roles page appears.
-
If you want to review all the existing resource roles to verify that it is necessary to create a new role, then click Search without entering search criteria.
All the available resource roles are listed. Roles that are predefined by Oracle are labeled System.
-
Click Create to create a new resource role.
The Create Role page appears.

-
In the Role Name field, enter the name of the resource role as it will appear in the application UI, for example,
CEO. -
In the Role Code field, enter a unique internal name. No spaces are permitted. If you are importing users from a file, then you must include this code in your file rather than the name.
-
Select the Manager option, if the resource role belongs to a manager, or the Member option, if the resource role belongs to an individual contributor.
-
From the Role Type list, select Sales to classify the role that you are creating.
-
Click Save and Close.
Creating a Resource Organization
Use this procedure to create the resource organization for the top manager in your sales organization, usually the CEO.
You must create a resource organization for every manager in your sales organization, but you can save time by creating the resource organizations while you creating users in the UI or by importing them. When you import users from a file, you can create the resource organizations automatically from the information you include in the file itself.
Creating a Resource Organization
-
While signed in as a setup user, search for the Manage Internal Resource Organizations task in the Setup and Maintenance work area.
-
Click Go to Task.
The Manage Internal Resource Organizations page appears.
-
Click Create.
The Create Organization: Select Creation Method page appears.
-
Select Option 2: Create New Organization.
-
Click Next.
-
Enter the name of the resource organization in the Name field. This is the name that will be visible in the resource directory.
Note that:
-
Each resource organization name you enter must be unique.
-
The names do not have to correspond to any formal organization in your enterprise. They are there solely to create a resource directory.
-
Do not use managers' names, as you may want to reassign the organizations to others later.
-
-
In the Organization Usages region, click Add Row and select Sales Organization.
-
Click Finish.
Designating a Resource Organization as the Top of the Sales Hierarchy
After you have created the resource organization for the top person in the sales organization hierarchy, designate that resource organization as the top of the sales hierarchy in the application.
Designating the Organization You Created as the Top of the Sales Hierarchy
-
Sign in as a setup user and search for the Manage Resource Organization Hierarchies task in the Setup and Maintenance work area.
-
Click Go to Task.
The Manage Resource Organization Hierarchies page appears.
-
Click Search.
-
In the search results, select the Internal Resource Organization Hierarchy link. This value is supplied by Oracle.
The View Organization Hierarchy: Internal Resource Organization Hierarchy page appears.
-
From the Action menu at the top right-hand corner of the page, select Edit This Hierarchy Version.
The Edit Organization Hierarchy Version page appears.
-
Click Add in the Internal Resource Organization Hierarchy region.
The Add Tree Node window appears.
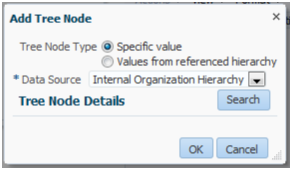
-
Click Search.
The Search Node window appears.
-
Click Search again in the Search Node window.
-
In the Search Results list, select the resource organization that you created for the top person in the hierarchy.
-
Click OK.
The application returns you to the Edit Organization Hierarchy Version page.
-
Click Save and Close.
-
When a warning appears, click Yes.
Creating Rules to Automatically Provision Roles to Sales Users
You must create rules to automatically provision Oracle Sales Cloud application users with the job and abstract roles they require to perform their jobs before you create users. The provisioning is based on the resource role that you assign to a user, so you must create a rule for every resource role you use in your organization. You must create rules to provision all of the resource roles provided by Oracle as well as all the additional resource roles you created, such as the CEO.
Creating a Provisioning Rule
-
Sign in as a setup user.
-
Navigate to the Setup and Maintenance work area and search for the Manage HCM Role Provisioning Rules task.
-
Click Go to Task.
The Manage Role Mappings page appears.
-
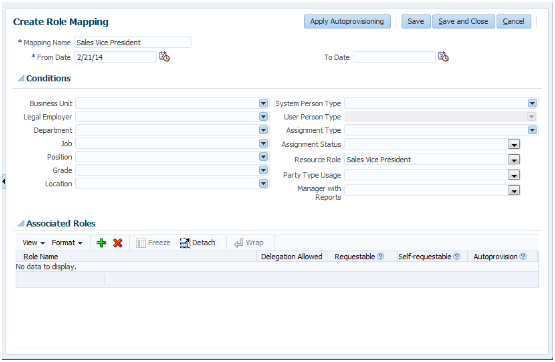
Click Create.
The Create Role Mapping page appears.
-
In the Mapping Name field, enter a name that will help you identify the mapping, for example,
Sales Vice President. -
In the Conditions region, select the resource role you want to provision from the Resource Role list. For example, Sales Vice President.
-
If you have implemented Oracle Global Human Resources Cloud Service, then enter Active for Assignment Status.
This additional condition ensures that the provisioned roles are automatically removed if the user is terminated in Global Human Resources.
-
In the Associated Roles region, click Add to add the roles you want to provision. For the sales vice president, you add the following:
-
Sales Vice President
-
Resource
Note
Each sales resource must be provisioned with both the Resource and Employee abstract roles. You already created a rule to provision the Employee abstract role when you created setup users.
-
-
Make sure the Autoprovision option is selected for all the roles.
-
Click Save and Close.
Designating a Single User to Receive All Credential E-Mails
You can redirect the e-mails with user credentials and temporary passwords to a single user. For example, you may want to send all of the credential e-mails to one of the setup users, so that you can sign in as different sales users and test your setups.
Note
The application sends the e-mails with initial passwords only once, so, if you choose to send the initial e-mail to a setup user, you will have to forward the credentials to the real user yourself.
Designating a Single User to Receive the Credential E-Mails
-
While signed in as a setup user, navigate to the Setup and Maintenance work area and search for the task Manage Enterprise HCM Information.
-
Click Go to Task.
-
Click Edit in the top right hand corner of the Enterprise page, and select Correct.

The Edit Enterprise page appears.
-
In the User and Role Provisioning Information region, enter the e-mail address of the user to receive the credential e-mails in the Alternate Contact E-Mail Address field.

-
Make sure the Send User Name and Password option is set to Yes.
-
Click Submit.
-
Click Done.
-
Dismiss the warning by clicking Yes.
The user e-mail you specified will continue to receive all credentials e-mails until you clear the Alternate Contact E-Mail Address field.