13Importing Accounts and Contacts
This chapter contains the following:
About Importing Accounts and Contacts
You can import your accounts and contacts into Oracle Sale Cloud using a text file. Alternatively, you can also create accounts and contacts in Customer Center. However, if you want to move a large number of accounts or contacts from other systems into Oracle Sales Cloud then it is recommended you import them into Oracle Sales Cloud.
Oracle Sales Cloud refers to sales account and sales prospects collectively as an Account. Sales accounts are accounts with a sell-to address, and this allows you to assign territories to the sales account. In this scenario, Vision Corporation wants to import accounts and assign territories to them. We will import accounts, with sell-to address, and then import contacts for related to the accounts.
Oracle Sales Cloud provides templates for importing accounts and contacts. These templates are:
-
Account Create and Update Seeded Mapping: To import accounts with basic and additional entity information, such as relationship, job information, and sales profile information.
-
Contact Create and Update Seeded Mapping: To import contact with basic and additional entity information, such as relationship, job information, and comprehensive contact information.
Before importing contacts, you must ensure that the accounts related to the contacts exist in Oracle Sales Cloud by importing accounts before importing the related contacts.
Oracle Sales Cloud includes a reference attribute, for all import objects, that is used to store the source of a record. You can use this reference attribute to update an existing record in Oracle Sales Cloud with updated records from a source. For example, you must provide the reference attribute of an account when import contacts for the account.
Setup Overview
To import accounts and contacts:
-
Use the Manage File Import Mappings task in the Setup and Maintenance work area to download the templates for the Account and Contact objects. The templates include the most common attributes you use to import an account or a contact. For more information, see Downloading Templates You Can Use for Import.
-
Register the source system in Oracle Sales Cloud. This helps you identify the source system of a record, and is helpful when you are importing from multiple sources. For more information, see Registering the Source System of Your Customer Data Import.
-
Create import files for accounts and contacts using their templates and save them as CSV files. For more information, see Understanding the Import Templates.
-
Optionally, add additional attributes to the import file. For more information, see the Appending Additional Attributes for Import topic in the respective section.
-
Import the file by creating an import activity using the Manage File Import Activity task available from the Setup and Maintenance work area. For more information, see Importing Accounts from a File or Importing Contacts from a File.
Downloading Templates You Can Use for Import
Oracle Sales Cloud provides templates to help you import data with the file-based import tool. The templates include the commonly used fields, in addition to the required fields.
Downloading an Import Template
To download your import template:
-
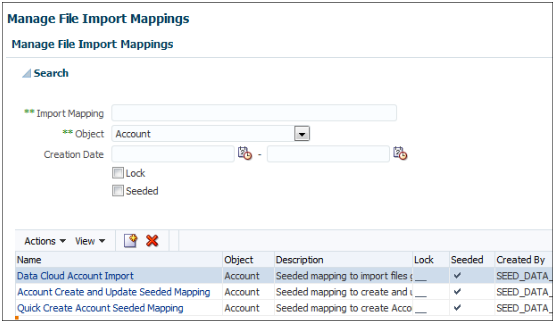
Navigate to the Setup and Maintenance work area and search for the Manage File Import Mappings task.
-
Click the Go to Task icon.
-
In the Manage File Import Mappings page, select Account to download the account template, or Contact to download the contact template.
-
Click Search.
-
Vision Corp. would like to import complete information for accounts and contacts, so we would select the template that supports comprehensive account and contact information. Select Account Create and Update Seeded Mapping to download the account template, or select Contact Create and Update Seeded Mapping to download the contact template. The Edit Import Mapping page is displayed.
-
In the Edit Import Mapping page, click Download Template.
Registering the Source System of Your Customer Data Import
You can set up source systems to identify the source of the data you are importing. You can specify whether the source system is a spoke system, such as a legacy system, or a purchased system, such as data from a third party provider. The import process uses the combination of source system and source system reference value to identify the existing record. The source system reference value is a unique identifier of the record in that source system.
You can either import source systems or configure them in the Manage Trading Community Source Systems page. In this topic, we will create a source system to identify data you are importing from a legacy application in the in the Manage Trading Community Source Systems page.
To add a source system:
-
Navigate to the Setup and Maintenance work area and search for the Manage Trading Community Source Systems task.
-
Click the Go to Task icon.
-
In the Manage Trading Community Source Systems page, click Add from Actions menu. The Create Source System is displayed.
-
In the Code field, enter VISION.
-
In the Name field, enter Vision Applications.
-
In the Description field, enter a description for the spoke system such as Maintains cross reference between Oracle Sales Cloud database and Vision records.
-
Select Spoke from the Type list.
-
Select Enable for Trading Community Members.
-
Click Save and Close.
Importing Accounts
Understanding the Account Import Template
You must understand the columns in the account import template to populate the templates with the correct data.
The template file includes a header row with columns that map to the attributes for the account object. The columns are arranged in the same order as the mapping in Oracle Sales Cloud. You can add additional attributes to the file by appending them after the last column. In case you add additional attributes, you must copy and modify the seeded mapping to create a custom mapping that includes these additional attributes.
You must provide a unique identifier for an account when you use file-based data import to update the record or to associate another record with it. For example, to associate a contact with an account you must uniquely identify the account record. You can identify an account record by providing the Party ID or by providing the record's original system and its original system reference. If an account includes its original system and original system reference when it is imported, then they can uniquely identify the record when it is updated or when other records are associated with it.
Account Import Template
The following table lists the commonly used and required attributes of the account import template in the order they are included in the template. In this scenario, we import a sell-to address for each of the account, so that we can assign territories to accounts.
| Column | Description | Sample Value |
|---|---|---|
|
Organization_Origin_System |
Enter the unique identifier representing the source system for the account. You can manage source systems in the Setup and Maintenance, Manage Trading Community Source Systems task. |
VISION |
|
Organization_Origin_System_Reference |
Enter the unique identifier of the account within the source system. For example, you can either use the account ID from the source system, or generate a unique ID for the party in Excel. |
Vision_Account1 |
|
Organization_Name |
Enter an organization name. Organization names within an import batch must be unique. You must provide an organization name when importing accounts. |
PCM Tech Computer Maintenance Global HQ |
|
Party_Usage_Code |
Enter usage code for the account such as organization or partner. |
SALES_ACCOUNT |
|
Classification_Category |
Enter the classification category for the account from the list of available categories. You can manage classification categories in the Setup and Maintenance, Manage Classification Categories task. |
1987 SIC |
|
Classification_Code |
You must enter one of the classification codes for the classification category you specified. You can obtain a list of the codes using the Manage Classification Categories, Setup and Maintenance task. |
2752 |
|
Named_Account_Flag |
Enter Y if the account is a named account. |
Y |
|
Account_Owner_Party_Id |
Enter the party ID of the account owner. You can identify the party ID of the account owner by exporting the party object by using the Manage Bulk Data Export, Schedule Export Processes Setup and Maintenance task. If you do not enter an account owner, the current user is assigned as the account owner. |
|
|
Address_Purpose |
Enter the purpose of the address. You can have multiple addresses with different purposes for an account. An account record must include at least one sell-to address to be a customer. You can assign only customer accounts to territories. |
SELL_TO |
|
Address_Line_1 |
Enter the first line of the address. |
600 4th Ave |
|
City |
Enter the city for the account's address. |
IRVINE |
|
State |
Enter the state for the account's address. |
CA |
|
Postal_Code |
Enter the postal code for the account's address. |
19102 |
|
Address_Country_Code |
Enter the country code for the account's address. The country code should exist in Oracle Sales Cloud. You can manage the list of countries using the Define Geographies, Setup and Maintenance task. |
US |
You can import additional attributes to an account by appending attributes to the import file. For more information about appending additional attributes for import, see the topic Appending Additional Attributes for Import in this chapter.
You can identify the party ID of the account owner by exporting the party object by using the Manage Bulk Data Export, Schedule Export Processes Setup and Maintenance task.
Appending Additional Account Attributes for Import
You may want to add additional attributes to your files to import additional information for your accounts.
Appending Additional Attributes for Account Import
All available attributes for an import object are included in a reference file located in Oracle Enterprise Repository. Review the reference file to explore other account attributes that are available for import and the possible prerequisite steps for those attributes. You must copy and modify the seeded mapping to create a custom mapping that includes these additional attributes.
The reference file includes the following information:
-
All organization profile attributes available for account import.
-
The attribute descriptions, including the user interface display name for the attribute if the attribute is displayed on the user interface.
-
The data type, length, and validation logic, including the task or work area where you can view or define valid values before importing data.
-
The logic for default values, if values are not provided in your source file.
To access the reference file for accounts, follow these steps.
-
Using your browser, enter http://fusionappsoer.oracle.com. Sign in as a user or a guest to Oracle Enterprise Repository.
-
Search for assets, using the following value for your Search String: HZ_IMP_PARTIES_T.
The results include a set of assets. The assets that apply to file-based import are typically titled <Object> Name Import, such as Contact Import.
-
Within the asset, click the link to the reference file in the Details tab. The file opens in Excel or in another application of your choice. Select the HZ_IMP_PARTIES_T_Reference file to view the attributes for the account object.
Importing Accounts from a File
After creating the import file and creating your import mapping, you create an import activity to import the account.
Importing accounts from a file
To import accounts from a file:
-
In the Navigator menu, select the Setup and Maintenance link under the Tools heading.
-
Search for the Manage File Import Activities task.
-
Click Go to Task. The Manage Import Activities page appears.
-
Click Create. The Create Import Activity: Enter Import Options page appears.
-
In the Name field, enter a name for your import activity.
-
In the Objects list, select Account .
-
In the Source File region, select Desktop. This is the only option available for Oracle Sales Cloud.
-
Click Browse and select your import file.
-
Select the correct delimiter for your import file in the Data Type list. The default is Comma separated.
-
Select the Header row included option because the file includes a header.
-
In the Import Mapping list, select Account Create and Update Seeded Mapping .
If you have added additional attributes into your file and created a custom mapping, select the custom mapping that includes these additional attributes.
-
Click Next. The Create Import Activity: Map Fields page appears.
The Map Fields region of the page displays the attribute mapping based on the import mapping you select.
Optionally, you can ignore blank columns from the import process by selecting the Ignore option for the column.
-
Click Next. The Create Import Activity: Schedule page appears.
-
Click Next. The Create Import Activity: Review and Activate page appears.
-
Click Activate.
You can monitor the progress of the import activity processing, and view completion reports for both successful records and errors. To view the status of an import activity, select the import activity in the Manage File Import Activities page.
Importing Contacts
Understanding the Contact Import Template
You must understand the columns in the contact import template to populate the templates with the correct data.
The template file includes a header row with columns that map to the attributes for the objects. The columns are arranged in the same order as the mapping in Oracle Sales Cloud. You can add additional attributes to the file by appending them after the last column. In case you add additional attributes, you must copy and modify the seeded mapping to create a custom mapping that includes these additional attributes.
You must provide a unique identifier for a record when you use file-based data import to update the record or to associate another record with it. If a record includes its original system and original system reference when it is imported, then that pair of attributes can uniquely identify the record when it is updated or when other records are associated with it. For example, to associate a contact with the existing account you must uniquely identify the account record.
Contact Import Template
You must provide the first name and last name of the contact, as well as parent account information when importing a contact.
To import contacts, you must identify the existing account that you want to associate the contact with. You can identify an existing account record either by providing the Party Id or by providing the origin system and origin system reference. You can get Party Id of an account by exporting the Party object using the Setup and Maintenance, Manage Bulk Data Export, Schedule Export Processes task.
When importing contacts or contact information for an account, you must provide relationship reference information in addition to the parent reference. This information is required because a contact can have multiple relationships with an organization, such as an employee or board member. When importing information about a contact you must refer to the specific relationship that you want to import information for. For example, you might want to import information for John Smith the employee or John Smith the board member. If you do not include the reference information for an account-contact relationship, then the import process creates a relationship. Vision Corporation does not have multiple account-contact relationships, so we are not going to provide a specific contact relationship.
The following table lists the commonly used attributes of the contact import template in the order they are included in the template.
| Column | Description | Sample Value |
|---|---|---|
|
Person_Origin_System |
Enter the unique identifier representing the source system for the contact. You can manage source systems in the Setup and Maintenance, Manage Trading Community Source Systems task. |
VISION |
|
Person_Origin_System_Reference |
Enter the unique identifier of the contact within the source system. For example, you can either use the party Id of the account from the source system, or generate unique Id for the party in Excel. |
Vision_Contact1 |
|
First_Name |
Enter the first name of the contact. |
Dennis |
|
Last_Name |
Enter the last name of the contact. |
Peattie |
|
Gender |
Enter the gender of the contact. |
MALE |
|
Job_Title |
Enter the job title of the contact. |
President |
|
Address_Line_1 |
Enter the first line of the contact's address. |
212 Herrington Boulevard |
|
Address_Line_2 |
Enter the second line of the contact's address. |
Suite 10 |
|
City |
Enter the city of the contact's address. |
Foster City |
|
State |
Enter the state of the contact's address. |
CA |
|
Postal_Code |
Enter the postal code of the contact's address. |
94356 |
|
Address_Country_Code |
Enter the country code of the contact's country. |
US |
|
|
Enter the e-mail of the contact. |
Dennis.Peattie@usvisioncorp.com |
|
Existing_Account_Party_Id |
Enter the party ID of the account associated with the contact. |
|
|
Existing_Account_Origin_System |
Enter the code representing the source system for the account associated with the contact. |
VISION |
|
Existing_Account_Origin_System_Reference |
Enter the reference number or text representing the source system unique ID for the account associated with the contact. |
Vision_Account1 |
You can import additional attributes to a contact by appending attributes to the import file. For more information about appending additional attributes for import, see the topic Appending Additional Attributes for Import in this chapter.
Appending Additional Contact Attributes for Import
You may want to add additional attributes to your files to import additional information for your contacts.
Appending Additional Attributes for Contact Import
All available attributes for an import object are included in a reference file located in Oracle Enterprise Repository. Review the reference file to explore other contact attributes that are available for import and the possible prerequisite steps for those attributes.
The reference file includes the following information:
-
All organization profile attributes available for contact import.
-
The attribute descriptions, including the user interface display name for the attribute if the attribute is displayed on the user interface.
-
The data type, length, and validation logic, including the task or work area where you can view or define valid values before importing data.
-
The logic for default values, if values are not provided in your source file.
To access the reference file for contacts, follow these steps.
-
Using your browser, enter http://fusionappsoer.oracle.com. Sign in as a user or a guest to Oracle Enterprise Repository.
-
Search for assets, use HZ_IMP_CONTACTS_T value for your Search String to view the contact-related spreadsheet.
The results include a set of assets. The assets that apply to file-based import are typically titled <Object> Name Import, such as Contact Import.
-
Within the asset, click the link to the HZ_IMP_CONTACTS_T_Reference file in the Details tab. The file opens in Excel or in another application of your choice.
Importing Contacts from a File
After creating the import file and creating your import mapping, you create an import activity to import the contact. Before importing contacts, you must ensure that the accounts related to the contacts exist in Oracle Sales Cloud by importing accounts before importing the related contacts.
Importing contacts from a file
To import contacts from a file:
-
In the Navigator menu, select the Setup and Maintenance link under the Tools heading.
-
Search for the Manage File Import Activities task.
-
Click Go to Task. The Manage Import Activities page appears.
-
Click Create. The Create Import Activity: Enter Import Options page appears.
-
In the Name field, enter a name for your import activity.
-
In the Objects list, select Contact .
-
In the Source File region, select Desktop. This is the only option available for Oracle Sales Cloud.
-
Click Browse and select your import file.
-
Select the correct delimiter for your import file in the Data Type list. The default is Comma separated.
-
Select the Header row included option because the file includes a header.
-
In the Import Mapping list, select Contact Create and Update Seeded Mapping .
If you have added additional attributes into your file and created a custom mapping, select the custom mapping that includes these additional attributes.
-
Click Next. The Create Import Activity: Map Fields page appears.
The Map Fields region of the page displays the attribute mapping based on the import mapping you select.
Optionally, you can ignore blank columns from the import process by selecting the Ignore option for the column.
-
Click Next. The Create Import Activity: Schedule page appears.
-
Click Next. The Create Import Activity: Review and Activate page appears.
-
Click Activate.
Verifying Your Imported Data
You can view the list of import activities from the Manage Import Activities page. You can verify your imported data by clicking the Status column for your import activity. After the import is complete, you can verify the imported contacts in the Customer Center. You can search for the account you have associated with the contact, and view the contacts for the account.