16Setting Up Forecasting
This chapter contains the following:
About Setting Up Forecasting
Set forecast options to enable forecasts for all users. You must define the forecast periods and due dates for your organization. Forecast criteria determine the opportunity line items that get automatically added to a territory forecast.
Prerequisites
Before you can set up the forecasting periods and due dates, you must complete the following steps:
-
Your selected calendar and the period definition for that calendar determine the adjustment period for the forecast. For Vision, it is a calendar month. See Creating the Accounting Calendar in the Setting Up Calendar and Currencies chapter.
-
You created your territory hierarchy as described in the Defining Sales Territories chapter. Forecasts are generated by territory and roll up the territory hierarchy. The owner of a territory submits a forecast to the owner of the parent territory.
Setup Overview
Perform the following tasks to set up forecasting:
-
Select forecast period parameters. See Creating a Forecast in this chapter.
-
Review the scheduled forecast dates and modify as needed.
-
Set the criteria for automatically adding opportunity line items to the forecast. See Creating a Forecast.
-
Schedule forecast processes to run daily. See Generating Your Forecasts in this chapter.
Creating a Forecast
Start the forecasting process by creating your forecast for the year and defining forecasting periods.
Prerequisites
Before you can begin forecasting, you must have a territory hierarchy. Forecasts accumulate by territory and then roll up the established territory hierarchy.
Your accounting calendar must be set up, and you need to be familiar with the period frequency defined in the calendar. The period frequency is called Fiscal period in forecasting options. For a discussion of how time period frequency settings and time period dates affect your forecast time periods, see Creating the Accounting Calendar in the Setting Up Calendar and Currencies chapter.
Selecting Options to Create the Forecast
Perform the following steps to select sales forecasting options:
-
Sign in as a setup user or sales administrator.
-
In Setup and Maintenance, search for Select Forecasting Options.
-
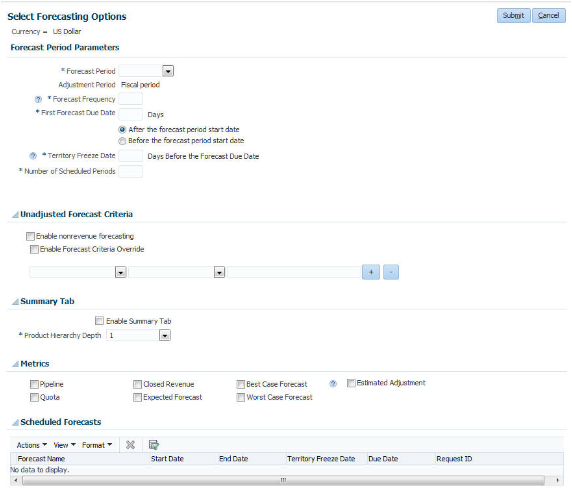
Click Go to Task. The Select Forecasting Options page appears.
-
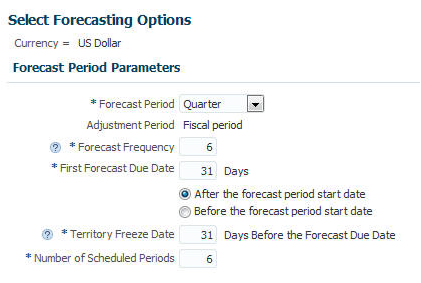
Set the options to generate your forecast. Following are the settings for Vision Corporation, which sets quarterly forecasts that salespeople update monthly:
-
Forecast Period: Quarter
-
Adjustment Period is always the fiscal period. This is the time period you set in the Period Frequency field when you created your calendar. Vision Corporation is set to month. Therefore Vision salespeople can make adjustments to each of their monthly forecast amounts.
-
Forecast Frequency: 6
To allow salespeople to forecast both the current quarter and next quarter every month, the frequency is set to 6 instead of three.
-
First Forecast Due Date: 31 Days after the period start date
-
Territory Freeze Date: 31 Days before the forecast due date
-
Number of Scheduled Periods: 6
The number of scheduled periods determines how far in advance the forecast schedule will extend measured in terms of the forecast period. If a period is quarterly, and the number of scheduled periods is four, then the system will generate forecasts for the year.
-
-
Click Submit.
-
Select Delete current and future scheduled forecasts.
-
If you see a warning message about deleting current and future forecasts, then click Yes.
-
Click Yes to continue after you review the sample dates.
-
Click Yes on the confirmation message that the process was submitted. You will return to Setup and Maintenance.
-
Click Go to Task for Select Forecasting Options.
-
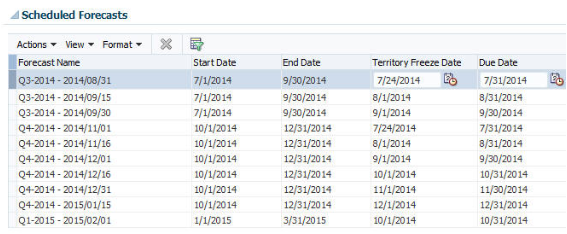
When the process is completed, the generated forecasts appear in the Scheduled Forecasts table in the Select Forecasting Options page.

Note
When you schedule forecasts, the forecast quarter you are in will not have all six forecasts generated. The first quarter will have a prorated number of forecasts scheduled, depending on where you are in that quarter.
-
Because with the forecast frequency of 6 salespeople can change the forecast for a quarter (for example quarter 4) three times during quarter 3 and three times during quarter 4, you must manually change the generated territory freeze dates and due dates. The first date for July can't be July 1 because this example forecast was generated in July. Today is therefore the territory freeze date for July in quarter 3 and quarter 4, as shown in this image.
-
Make sure the due dates are the same as the dates that the VP of Sales typically requires all forecasts to be submitted. For Vision Corporation, this is the first of each month. You can manually change dates whenever needed.
-
Also make sure the freeze date for the next forecast is at least one day after the due date of the current forecast. This allows time for processes to run that generate the next forecast before salespeople start making changes to it.
Setting Forecast Criteria
Opportunity revenue lines are automatically added to the forecast when they fit the unadjusted forecast criteria, and have a close date within a forecasting period. Perform the following steps to set the criteria for this forecast:
-
In the Unadjusted Forecast Criteria region of the Select Forecasting Options page, select one criterion you want to use. Vision Corporation selects Probability.
-
Select the operator. Vision uses Greater Than.
-
Enter the value for the criteria. Vision Corporation wants to include all revenue items that have a win probability greater than 70 percent. Enter
70.
-
Deselect Enable Forecast Criteria Override. If it is selected, then salespeople can manually add items to the forecast that do not fit the unadjusted forecast criteria.
-
Click Submit.
For more information about forecasting options, see the Define Sales Forecasting Configuration chapter of the Oracle Sales Cloud Implementing Sales guide.
Enable Forecasting by Product
Enable the Summary tab if salespeople want to forecast by product.
Enable Metrics
Enable the Pipeline and Quota metrics.
Generating Your Forecasts
After you submit forecasting options, you need to schedule the following processes to run periodically: Run processes to generate the dates for each forecast time period. Set processes to run periodically to add the latest opportunity line item amounts to the correct forecast time period for the correct territory.
-
Refresh Forecast process
This process updates current and future forecasts using the latest opportunity data. It also updates the forecast territory hierarchy from the latest active territories. Between the territory freeze date and the forecast due date, the forecast territory hierarchy remains frozen. Run this process once prior to the territory freeze date for each forecast period.
-
Refresh Forecast Items process
Opportunities constantly change. This process quickly refreshes forecast items for current and future forecasts. It should be run every night after midnight.
-
Due Date Check process
This short process archives forecasts that are now past their due dates. It should be run every night after midnight.
-
Refresh Forecast Metrics process
This process calculates the enabled metrics from the latest source data. It should be run every night after midnight.
Scheduling Forecasting Processes
Perform the following steps to schedule and run forecasting processes:
-
Sign in as a setup user or sales administrator.
-
In Setup and Maintenance, search for the task list Manage Sales Forecasting Schedulable Processes and expand the task list to see all schedulable processes.
-
Find the Run Refresh Forecast Process task and click Go to Task.

-
To run the process immediately, click Submit.
If opportunities were bulk loaded into the database, it may take some time to refresh the forecast with the new data.
-
Schedule the Refresh Forecast process. The recommendation is to schedule the Refresh Forecast process to be run a day before the territory freeze date. Click Advanced in the Run Refresh Forecast Process page.
-
Select Run Using a Schedule.
-
For Frequency, select Monthly.
-
Select start and end dates and times.

-
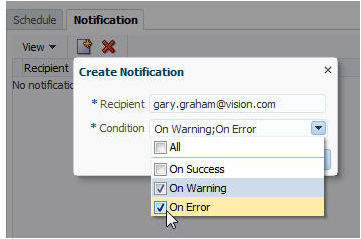
Go to the Notification tab.
-
Click Create Notification.
-
Enter the e-mail address for the person who should receive notifications.
-
In the Condition field, you should select On Warning and On Error as a minimum.
-
Find the Run Due Date Check Process task and click Go to Task.
-
Repeat the steps to schedule this process to run after midnight each day. Create a notification for this process as well.
-
Click Submit.
See the Define Sales Forecasting chapter of the Oracle Sales Cloud Implementing Sales guide for information about other forecasting processes.
Timing for Forecast Processes
At the end of a scheduled forecast (the due date), you want to give the processes time to run before the territory freeze date of the next forecast, which is the start of forecast activities. Salespeople will then have accurate information to work with when they update and submit their forecasts.
The recommendation in the Creating a Forecast topic is to provide a one day gap to run both the Refresh Forecast and the Due Date Check processes. The Refresh Forecast process should be scheduled to be run the night before the freeze date The Due Date Check process should be scheduled to be run daily after midnight, for example, at 12:05 a.m.