11Creating Your Sales Catalog
This chapter contains the following:
About Creating the Sales Catalog
You'll need to create the sales catalog so you can:
-
Use product as a territory dimension.
-
Let salespeople add product groups to leads.
-
Let salespeople add product groups to opportunities, where they can also enter revenue amounts.
-
Have product revenue available in forecasting.
In the setup area, you create the catalog as a hierarchy of product groups. You can create the product group hierarchy manually in the application, or you can import product groups using file-based import. If your product group hierarchy is small, such as 50 groups, it's easier to create the catalog manually in the application. If you have a large number of product groups, Oracle recommends that you import them. Even if you are importing, you still have to create a root catalog in the UI before you can import any product groups.
Note
While you can include individual products (versus product groups) in your catalog, stock keeping units (SKUs) are not desirable for sales forecasting and not required unless you are integrating with an order management system, such as Oracle Configure, Price and Quote (CPQ) Cloud. In this guide, we'll start by creating the catalog with only product groups. You can always add individual products later, if required.
Use Case
In our use case, Vision Corporation is selling a new line of green servers, the ElitePro Series. They will create the first four high-level product groups in the application and import the rest.
The following figure shows the product group hierarchy to be created.

Setup Overview
Following are the high-level setup steps, which are different depending on whether you are importing product subgroups (grandchildren of the root group) or creating them in the UI.
If you are not importing product groups:
-
Create the root product group in the Manage Product Groups area available from the Setup and Maintenance work area.
-
In the product group setup pages, create the high-level subgroups under this root product group.
-
In the product group setup pages, create the subgroups (grandchildren of the root group) for your catalog.
-
Publish your sales catalog and validate.
For more information on creating product groups in the UI, see the topic Creating Product Groups in this chapter.
If you are importing product groups:
-
Create the root product group in the Manage Product Groups area available from the Setup and Maintenance work area.
-
In the product group setup pages, create the high-level subgroups under this root product group.
-
Download the product group import reference spreadsheets.
-
Download the supplied import template for the Product Group object.
-
Use the downloaded template and enter the product group information.
-
Run the import process.
-
View and verify the imported product groups in the UI.
-
Publish your sales catalog and validate.
For more information on importing product groups, see the topic Importing Product Groups in this chapter.
Additional Setups for Products
While our use case covers setting up a simple product hierarchy, you can set up additional product functionality, including:
-
Product group descriptions and images: When you create product groups, you can include descriptions and images. Whether you should include this detail depends on your intended use. Different interfaces are optimized for different uses:
-
The simplified UI is optimized for quick entry. Salespeople pick the product group from a list in the opportunity products table. They do not browse a catalog, so no descriptions or images are required.
-
The desktop UI includes the ability to browse through the catalog, in addition to directly picking the product group. If you are planning to use this interface, you may want to include more detail.
-
-
Products: You may want to set up individual products, depending on your business requirements.
For more information on creating sales catalogs, see the rest of this chapter and the Oracle Sales Cloud Implementing Sales guide. For more information on the setup of individual products, search the online help using keywords "production information management".
Creating Product Groups
There are no prerequisites to creating your product groups. To begin, create your root product group and then create the nested subgroups to form your product hierarchy.
Creating the Root Product Group
Use this procedure to create the root product group for your sales catalog. In this example, we create a product group for a new product line of green servers that Vision Corporation has introduced.
-
In the Navigator, select Setup and Maintenance under the Tools heading.
-
Search for the Manage Product Groups task.
-
Click the Go to Task icon for the task. The Manage Product Groups page appears.
-
Click Create from the Manage Product Groups region. The Create Product Group page appears.

-
Enter an internal name without spaces in the Name field, for example VisionServers. This is not displayed in the catalog.
-
Enter a name that you want displayed in the catalog in the Display field, for example Servers.
-
Enter an optional description in the Description field.
-
Optionally, enter start and end dates.
-
Make sure the Active check box is checked.
-
Deselect the Allow Duplicate Children check box. This ensures that product groups do not appear multiple times in the hierarchy.
-
Select the Root Catalog check box.
-
Do not use the Revenue Role drop down list.
-
Optionally, if you are using revenue categories, select a Revenue Category.
-
Click Save and Close.
Creating Product Subgroups
Use the following procedure to create subgroups under the root product group:
-
In the Manage Product Groups page, select the root group in the product groups list.
-
Click the Subgroups tab.
-
Click the Lock button.
-
Click Create. The Create Subgroup page appears.
-
In the Create Subgroup page, enter the details for the subgroup. Do not select the Root Catalog check box.
-
Click Save and Close.
-
Repeat the steps to create additional levels in your sales catalog hierarchy.
Importing Product Groups
If you don't want to create product groups individually in the application, you can import them using file-based import. Product Group is one of the import objects recognized by Oracle Sales Cloud.
Overview of Importing Product Groups
Following is the high-level process for importing product groups:
-
Download the product group import reference spreadsheets.
-
Download the supplied product group import template.
-
Review the product group import template and understand what values the import process expects. In tandem, review the reference spreadsheets to determine which attributes are required, optional, or conditionally required.
-
Populate your import spreadsheet and save it as a .csv file.
-
Perform the import, during which you pick a mapping that maps attributes to UI fields.
-
Validate that the import was successful.
The sections that follow go through each of these steps in detail.
Downloading Reference Spreadsheets
Reference spreadsheets list the product group import attributes and information about each attribute, such as when it's required or not for import, any default value, and any validation performed on the attribute during import.
Use the following procedure to download the spreadsheets:
-
Navigate to the Oracle Enterprise Repository at http://fusionappsoer.oracle.com.
-
In the Enter Search String box, enter
QSC_IMP_PROD_GROUP. -
For Type, pick File Based Data Import.
-
Click Search.

-
In the list that's returned, click the release value for your cloud service. For example, pick 11.1.8.0.0 for Release 8 of Oracle Sales Cloud.
-
Click the Details tab.

-
Download and save to your hard drive the following spreadsheets:
-
QSC_IMP_PROD_GROUPS_Reference.xls: Contains reference information for fields relevant to product groups.
-
QSC_IMP_PROD_GROUP_REL_Reference.xls: Contains reference information for fields relevant to set the hierarchical relationship of product groups.
Note
Another reference spreadsheet exists for item import, named QSC_IMP_PROD_GROUP_ITEMS_Reference.xls. It's available for download by selecting the Release 7 version option and then selecting the Details tab.
-
Downloading the Product Group Import Template
Download the product group import template using the file-based import tool.
-
Sign in as a setup or sales administrator user and click Setup and Maintenance in the Navigator.
-
Search for the Manage File Import Mappings task.
-
Click the Go to Task icon on the task. The Manage File Import Mappings page appears.
-
In the Manage File Import Mappings page Search region, select Product group from the Object list.
-
Click Search.
-
In the search results, click the Product Group Predefined Mapping - Product Group Header and Child Entities mapping name link.
The Edit Import Mapping page appears.
-
Click Download Template.
-
Save the template to your hard drive.
Template Headers and Import Attributes
The product group import template spreadsheet includes a header row with import attributes. It includes all of the required fields, plus several that are optional. The header row names correspond to attribute names for the Product Group file-based import object. These attributes are listed in the reference spreadsheets that you downloaded from the enterprise repository.
The following table lists the column headings in the template; the corresponding, actual import attributes from the reference spreadsheets; and the value that the import process expects.
Note
Optional or unnecessary attributes from the import template are not described in the table. For more information on these other attributes, consult the reference spreadsheets.
-
Column Header in Import Template column: Lists the import template column headers. The column headers are arranged in the same order as the predefined import mapping that Oracle provides for you. So, be sure to keep the order of the columns in your import file in exactly the same order as the template. If you need additional attributes, add them after the last column.
-
Attribute Name in Reference Spreadsheet column: Lists the attributes that the template column headers map to in the reference spreadsheets.
-
Purpose and Expected Value column: Lists the purpose of the attribute and whether the attribute is required.
Note
This document provides a brief summary of the value the import process expects. It does not list all of the details that you can find in the reference spreadsheets. You'll want to consult the reference spreadsheets in addition to this document.
Product group import has the concept of a product group ID (PROD_GROUP_ID), also known as the Oracle Fusion ID. This is the unique ID assigned in the Oracle Fusion (Oracle Sales Cloud) database tables for the product group.
| Column Header in Import Template | Attribute Name in Reference Spreadsheet | Purpose and Expected Value |
|---|---|---|
|
PGHeader Reference Number |
PgRefNumber |
Reference number of the parent product group, used to derive the product group ID. Required if creating a new product group or updating an existing product group record and you are not providing the product group's internal name (PgInternalName). Limited to 50 characters. No default value. |
|
PGHeader Internal Name |
PgInternalName |
Unique internal name of the product group. Required if you are creating a new product group or updating an existing product group record and you are not providing the product group's reference number (PgRefNumber). Limited to 150 characters. No default value. |
|
PGHeader Language |
Language |
Code representing the language for the translatable columns PROD_GROUP_NAME and PROD_GROUP_DESC_TEXT. Required if you are creating a new product group or updating an existing product group's name (ProdGroupName) or description (ProdGroupDescText). No default value. You can view valid language codes from the Setup and Maintenance, Manage ISO Languages task. |
|
PGHeader Source Language Flag |
SourceLangFlag |
Y or N. Indicates whether the language for the record is the primary language for the product group name and product group description. Required if you are creating a new product group or updating an existing product group's name (ProdGroupName) or description (ProdGroupDescText). No default value. |
|
PGHeader Product Group Display Name |
ProdGroupName |
Product group name that you want displayed in the catalog. Limited to 250 characters. Required if you are creating a new product group. No default value. |
|
PGHeader Product Group Description |
ProdGroupDescText |
Text that describes the product group. Optional. Limited to 1,000 characters. No default value. |
|
PGItem PG Reference Number |
PgRefNumber |
Reference number of the parent product group. Required if you are creating a new product group or updating an existing product group record and you are not providing the product group's internal name (PgInternalName). Limited to 50 characters. No default value. |
|
PGItem PG Internal Name |
PgInternalName |
Unique internal name of the parent product group. Required if you are creating a new product group or updating an existing product group record and you are not providing the product group's reference number (PgRefNumber). |
|
PGRel Parent PG Reference Number |
PgRefNumber |
Unique number of the parent product group ID. Limited to 50 characters. Required if you are adding, updating, or deleting a product group's subgroup (child of a group) and you are not providing the parent group's internal name (PgInternalName). No default value. |
|
PGRel Parent PG Internal Name |
PgInternalName |
Unique internal name of the parent product group. Limited to 50 characters. Required if you are adding, updating, or deleting a product group's subgroup and you are not providing the parent group's reference number (PgRefNumber). No default value. |
|
PGRel Child PG Reference Number |
PgRelChildRefNumber |
Unique internal number of the subgroup, used to derive the product group ID. Limited to 50 characters. Required if you are adding, updating, or deleting a product group's subgroup and you are not providing the subgroup's internal name (PgRelChildInternalName). No default value. |
|
PGRel Child PG Internal Name |
PgRelChildInternalName |
Unique internal name of the subgroup, used to derive the product group ID. Limited to 50 characters. Required if you are adding, updating, or deleting a product group's subgroup and you are not providing the subgroup's reference number (PgRelChildRefNumber). No default value. |
|
PGRel Relation Type Code |
RelationTypeCode |
Lookup code that represents the relationship type between product groups:
Required if you are adding a product group's subgroup. No default value. |
Adding Data to the Product Group Import Template
Next, add sample data to the import template, using the following procedure.
-
Open the import template spreadsheet you downloaded earlier. Create your own version of the spreadsheet. For example, save it as Product_Catalog_Import.xls to your hard drive.
-
In rows 2 through 12, enter the sample data shown in the following table.
Note
Since either Reference Number or Internal Name is required, but not both, you can omit one of them if you want to.
The following table shows the required column headings in the import template spreadsheet for rows 2 through 12. The second row of the table shows which column each heading aligns with.
PGHeader Reference Number PGHeader Internal Name PGHeader Language PGHeader Source Language Flag PGHeader Product Group Display PGHeader Product Group Description Column A
Column B
Column C
Column D
Column E
Column F
PGVC1
DG 150 Green Servers
US
Y
DG 150 Green Servers
DG 150 line of Green Servers
PGVC2
DG150-20 Green Rack Server
US
Y
DG150-20 Green Rack Server
DG 150 series 16 core, 128-thread general purpose system
PGVC3
DG150-50 Green Rack Server
US
Y
DG150-50 Green Rack Server
DG 150 series 16 core, 128-thread general purpose system
PGVC4
DG150-30 Green Rack Server
US
Y
DG150-30 Green Rack Server
DG 150 series 16 core, 128-thread general purpose system
PGVC5
DG950 Green Servers
US
Y
DG950 Green Servers
DG950 line of Green Servers
PGVC6
DG950-10 Green Rack Server
US
Y
DG950-10 Green Rack Server
DG 950 series high performing database and enterprise workload server
PGVC7
DG950-20 Green Rack Server
US
Y
DG950-20 Green Rack Server
DG 950 series high performing database and enterprise workload server
PGVC8
DG950-30 Green Rack Server
US
Y
DG950-30 Green Rack Server
DG 950 series high performing database and enterprise workload server
PGVC9
DG750 Green Servers
US
Y
DG750 Green Servers
DG750 line of Green Servers
PGVC10
DG750-20 Green Rack Server
US
Y
DG750-20 Green Rack Server
Green rack server backed by the Solaris 10 OS
PGVC11
DG750-10 Green Rack Server
US
Y
DG750-10 Green Rack Server
Green rack server backed by the Solaris 10 OS
Your spreadsheet should now look like the following images.
The following image shows the spreadsheet with rows 1-12 and columns A through E populated with the sample data.

The following image shows the spreadsheet with rows 1-12, column F populated. Columns G-V are not required attributes, so they are not included here.

-
In the remaining rows, 13 through 23, use the sample data to enter Reference Number values that establish hierarchical relationships between the product groups in your import file and the product groups that you created in the UI.
For our use case, we have provided the sample data (see the following table) that will establish these relationships. However, in a scenario where you don't yet have the reference numbers needed to establish these relationships, you would need to find the reference number for the parent product group using the Setup and Maintenance work area.
Here is the procedure you would use if you needed to find and copy the reference numbers:
-
In Setup and Maintenance, navigate to the Manage Product Groups task.
-
In the Manage Product Groups page, find the parent product group and select it. For example click on the Sentinel Series.
-
The reference number is shown in the Reference Number column. You may have to add the column to the view by clicking View and selecting Reference Number under Columns.
-
Copy this reference number under the PGRel Parent PG Reference Number column in your spreadsheet.
The following image shows an example of how the product groups and the reference numbers might look.

Using the sample data, enter the values from the following table in rows 13 through 23, columns W, Y, and AA. Again, attributes for the headings in columns G through V are not required and are not mentioned here.
PGRel Parent PG Reference Number PGRel Child PG Reference Number PGRel Relation Type Code Column W
Column Y
Column AA
300100062437404
PGVC1
PRODUCT_GROUP_HIERARCHY
PGVC1
PGVC2
PRODUCT_GROUP_HIERARCHY
PGVC1
PGVC3
PRODUCT_GROUP_HIERARCHY
PGVC1
PGVC4
PRODUCT_GROUP_HIERARCHY
300100062437407
PGVC5
PRODUCT_GROUP_HIERARCHY
PGVC5
PGVC6
PRODUCT_GROUP_HIERARCHY
PGVC5
PGVC7
PRODUCT_GROUP_HIERARCHY
PGVC5
PGVC8
PRODUCT_GROUP_HIERARCHY
300100062437410
PGVC9
PRODUCT_GROUP_HIERARCHY
PGVC9
PGVC10
PRODUCT_GROUP_HIERARCHY
PGVC9
PGVC11
PRODUCT_GROUP_HIERARCHY
Your completed spreadsheet should look similar to the following images.
The following image shows columns W and Y, with parent product group and child product group reference numbers.

The following image shows column AA.

-
-
When you've finished populating the spreadsheet, save it as a .csv file. For example, save it as Product_Catalog_Import.csv.
Performing the Import
After your import spreadsheet is ready for importing, perform the import. Use the following procedure.
-
Navigate to Setup and Maintenance and search for the Manage File Import Activities task.
-
Click the Go to Task icon for the task.
The Manage Import Activities page appears.
-
Click Create. The Create Import Activity: Enter Import Options page appears.
-
In the Name field, enter a name for your import. For example, enter Vision Green Server Catalog Import.
-
From the Object list, select Product group.
-
In the Source File region, select the Desktop option. This is the only option available for Oracle Sales Cloud.
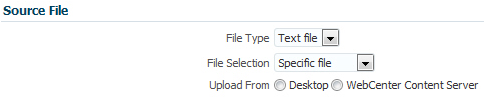
-
Click Browse and select the file.
-
Select the Header row included option because the file includes a header.
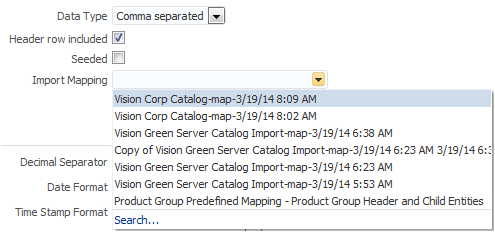
-
From the Import Mapping list, select the predefined mapping, since in this procedure you did not append any attributes.
Click Next. The Create Import Activity: Map Fields page appears. The Map Fields region displays your mapping.
-
Click Next. The Create Import Activity: Schedule page appears.
-
Click Next. The Create Import Activity: Review and Activate page appears.
-
Click Activate.
-
You return to the Manage Import Activities page to view the status of your import. You may have to scroll to the right to see the status and periodically refresh the page. An import activity with a status of Completed or Completed with Errors indicates that the import activity completed. Click the status link to see detailed information about the import, including any errors.
Viewing the Imported Product Groups
After you complete the import, verify that the imported product groups were imported correctly. Use the following procedure:
-
From the Navigator, select Setup and Maintenance under the Tools heading.
-
Search for the Manage Product Groups task.
-
Click the Go to Task icon for the task.
-
In the Manage Product Groups region, search for Servers.
-
Select the Servers product group and click the tree icon to view the product groups you imported as a hierarchy. Verify that the hierarchical relationships that you defined have been imported correctly.

For additional information on importing product groups, see the Importing Product Groups chapter of the Oracle Sales Cloud File-Based Data Import Guide (Doc ID: 1564536.1).
Publishing and Validating the Sales Catalog
After you have created your product groups, either directly in the UI or through file-based import (or a combination of the two), you need to publish and enable your sales catalog, and then validate it in the opportunities UI.
Publishing the Sales Catalog
Now that you have verified your imported product groups and their hierarchy, use the following steps to publish your sales catalog.
-
Sign in as a setup user or as the sales administrator user.
-
From the Navigator, select Setup and Maintenance, under the Tools menu.
-
Search for the Manage Product Groups task.
-
Click the Go to Task icon for the task.
-
In the Product Group page, select the top product group you want to publish, for example EliteProSeries. Most likely, you will not want to publish the root product group because it is too general.
-
Click Lock.
-
Click Publish.
-
Click Yes in the Confirm Publish dialog box.
-
Click OK on the confirmation message that is displayed.
-
Click Save and Close.
Enabling the Catalog for Use in Sales Cloud
For sales catalogs to be visible in opportunities and leads, you must enable them by associating the root catalog you created with the Base usage. Use the following procedure:
-
Sign in as a setup user or as the sales administrator user.
-
From the Navigator, select Setup and Maintenance, under the Tools menu.
-
Search for the Manage Product Group Usage task.
-
Click the Go to Task icon for the task.
-
In the Manage Product Group Usage page, in the upper portion of the page, select the record named Base.
-
In the Details region in the lower portion of the screen, if a product group is already associated with the Base usage, then remove the product group by selecting it and clicking the clicking Delete icon.
-
In the Details section, click the Select and Add icon.
-
In the dialog box that appears, search for the root catalog that you created. For example, search for
Serversas the Display name. -
Select the record and click OK.
-
On the Manage Product Group Usage page, click Save and Close.
Validating the Sales Catalog
Use the following steps to validate the sales catalog:
-
Sign in as a sales manager or salesperson.
-
From the Navigator, select Opportunities.
-
In the Opportunities overview page, click Create Opportunity.
-
Enter a name for the opportunity, and click Save and Close.
-
Search for the opportunity you just created and edit it.
-
In the Revenue Items region, click Add.
-
For Type, pick Group.
-
Under Product, from the drop down list, click the product group or one of the product subgroups you have created. For example, select ElitePro Series.
-
Click Save and Close.