14Setting Up Sales Territories and Assignment
This chapter contains the following:
About Setting Up Sales Territories and Assignment
In Oracle Sales Cloud, you assign salespeople to both accounts and individual opportunities to ensure everyone focuses on the most important tasks and shares the information they need to be efficient and effective in dealing with customers.
While all salespeople in your organization have access to basic account information, including customer names, contacts, and addresses, salespeople who are assigned to an account or an opportunity gain additional access:
-
Accounts
Assignees get to share all the details they need to collaborate including, customer interactions, to-do lists, and appointments. Assignees participate in social discussions, share collateral, and collaborate on presentations.
-
Opportunities
You must be assigned to an opportunity (or be in the management chain for someone who is), to view and update opportunities and their revenue lines, and to submit forecasts.
While salespeople can always assign others manually while editing an account or opportunity, Vision Corporation decides to take advantage of automatic assignment. In Oracle Sales Cloud, there are two methods of automatically assigning sales people:
-
By setting up sales territories
The primary method for assigning salespeople to both accounts and opportunities is using sales territories. You can set up the sales territory boundaries based on a wide variety of factors, called dimensions. The most common dimensions include geography, products, customer size, customer type, and industry.
One set of sales territories takes care of assigning both accounts and opportunities. Sales territories also form the basis for forecasting setup described in a later chapter.
When you assign salespeople using territories, the territories themselves become associated with the account and opportunity. If you later realign your sales territories or there's turnover in your sales organization, the assignments reflect those changes automatically after you run the assignment process.
Note
If you implement Outlook, only the accounts that are part of a salesperson's territory are downloaded when synchronizing.
-
By creating assignment rules
For opportunities, you can assign additional salespeople based on factors that are not covered by territories, such as deal size or product knowledge, by creating rules to supplement territory assignment. But because you cannot use rules for account assignment and because rules are of secondary importance for opportunities, rule-based assignment is not covered in this guide.
Managers in a salesperson's management hierarchy get automatic visibility to their team's set of accounts and contacts. They do not have to be explicitly assigned to each territory or sales team.
Vision Corporation Use Case
For simplicity, we assume that Vision Corporation sells only to the United States and divides the country into three geographic regions: west, central, and east. Each territory is owned by one sales representative (although you can assign multiple sales people, if required).
Recently, Vision Corporation introduced a new line of servers, called ElitePro. The company is assigning an additional salesperson to handle the new severs in each region. The additional salesperson will work closely with the prime salesperson on managing the accounts.
Here is the organization chart:
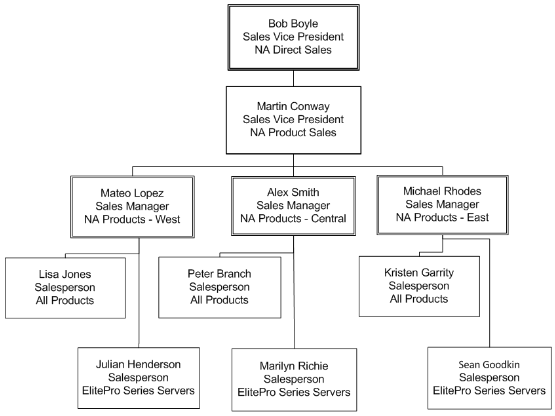
Whenever a new account or opportunity is created or updated, Vision Corporation will have the application automatically check the territories to see who needs to be assigned. Here's how the assignment will work:
-
Based on the state the account is located in, the application assigns the territories of both the prime salesperson and the additional salesperson to each account.
Assigning both salespeople ensures they can access all the account details they need for close collaboration.
-
When an opportunity includes a line item for any of the company's products, including an ElitePro server, the application assigns the prime salesperson's territory to the opportunity.
-
When an opportunity line item includes ElitePro servers, the application assigns both the prime salesperson's territory and the additional salesperson's territory to the opportunity.
The following diagram show the sales territory setup. Because Vision Corporation is using territories for forecasting as well, it makes sure that the territory hierarchy mirrors the management hierarchy.

Vision Corporation sets up the sales territories from the top down as described in this chapter. The following table lists the key values for the Vision Corporation territories, which are based on U.S. states and the products in the sales catalog.
Note that:
-
The default value Any means that any value matches the territory.
-
Vision is breaking up the 50 states in the U.S. into three geographical regions.
-
The entries in the Product dimension are the product groups in the sales catalog. Selecting a product group includes all the product groups nested within the product group.
| Territory Name | Territory Owner | Geography | Product |
|---|---|---|---|
|
NA Direct Sales |
Bob Boyle |
Any |
Any |
|
NA Product Sales |
Martin Conway |
Any |
Any |
|
East USA Products |
Michael Rhodes |
Arkansas and all the other states in the eastern U.S. |
Any |
|
ElitePro East |
Seam Goodkin |
Arkansas and all the other states in the eastern U.S. |
ElitePro Series |
|
All Products Central |
Kristen Garrity |
Arkansas and all the other states in the eastern U.S. |
Any |
|
Central USA Products |
Alex Smith |
Illinois and all the other states in the central U.S. |
Any |
|
ElitePro Central |
Marilyn Richie |
Illinois and all the other states in the central U.S. |
ElitePro Series |
|
All Products Central |
Peter Branch |
Illinois and all the other states in the central U.S. |
Any |
|
West USA Products |
Mateo Lopez |
Alaska and all the other states in the western U.S. |
Any |
|
ElitePro West |
Julian Henderson |
Alaska and all the other states in the western U.S. |
ElitePro Series |
|
All Products West |
Lisa Jones |
Alaska and all the other states in the western U.S. |
Any |
The application matches territories to accounts and opportunities from the bottom of the hierarchy up. For example:
-
An account in Illinois gets assigned the ElitePro Central and All Products Central territories
-
An opportunity for the Illinois account with an ElitePro server line item gets assigned the ElitePro Central territory.
-
An account from Mexico gets assigned the NA Product Sales territory.
-
An opportunity for a Mexican account with an ElitePro server line item gets assigned the NA Product Sales territory.
Setup Overview
-
You configure the application for the types of sales territories you plan to create.
-
If you are setting up territories based on geography, like Vision Corporation, you must enable the geographical elements you plan to use during territory setup for the countries for which you imported geography reference information. Optionally, you can organize the geography elements into zones.
See Specifying Geography Elements for Territory Setup in this chapter for details.
-
You must enable the territory dimensions you plan to use in your territories.
See Enabling Territory Dimensions for details.
-
-
You set up the sales territories themselves. This involves:
-
Creating a territory proposal.
A proposal is a sandbox that permits you to update territories without affecting any existing territory setup, so it becomes useful when you want to readjust your territories in the future.
See Creating a Territory Proposal for details.
-
Create the hierarchy of sales territories in the proposal starting with the top territory and working your way down.
See Creating the Sales Territory Hierarchy
-
Activate the proposal.
See Activating the Territory Proposal.
-
-
You set assignment options.
Assignment behavior is controlled by a set of system profiles. By default, the application
-
Automatically assigns sales territories to accounts whenever an account is created or updated.
-
Assignment of opportunities is manual: salespeople can either trigger the assignment process while editing an individual opportunity or the opportunities are assigned by the Sales Account Assignment Process which you set up to run periodically.
Oracle sets manual assignment for opportunities as the default behavior to prevent performance issues for companies with large number of opportunities (100,000 and up).
If your organization, like Vision Corporation, does not have such a large volume, you can have the application assign the opportunity automatically by setting the profile Assignment Submission at Save Enabled to Yes.
See Making Opportunity Assignment Automatic for details.
-
-
Turn off deal protection for quoting and incentive compensation to permit immediate opportunity sales team reassignment when you are configuring territories.
When a territory is assigned to an opportunity, the application copies over the territory owners to the opportunity sales team. When you realign territories, the application automatically implements your territory changes but waits 15 days to remove sales people from the opportunity sales teams. This delay permits the original salespeople to receive credit for the deals they are working on.
If you are not implementing quotas and incentive compensation or if you are in the process of setting up territories, you should turn off deal protection by setting the system profile Opportunity Resource Deal Protection Period to 0. By default this profile is set to 15 days. Making this change does not impact forecasting because the salesperson's territory has been removed from the opportunity and no longer is a forecast territory for any revenue line.
See Disabling Deal Protection for details.
-
Run assignment processes:
-
Request
                                    Sales Account Assignments
-
Revenue Territory Territory Batch Assignment
You should run these processes immediately after you activate your territories and then set them to run on a regular basis, perhaps once a day in off-peak periods, to handle ongoing assignments. Just how frequently you need to run these processes depends on your business needs.
See Running the Account Assignment Process and Running the Opportunity Assignment Process topics for details.
-
Preparing to Create Territories
Specifying Geography Elements for Territory Setup
This step is required only if you are creating territories with geography as one of the dimensions. For example, if you are creating territories based on states, you must enable the states for selection during territory creation.
In an earlier step, you imported the reference geography for the countries where you do business. Now you must specify which of those geography elements you want to use in your sales territories. Vision Corporation is creating territories by states, so it will enable states.
Optionally, you can organize the geographies into zones to simplify territory creation. Vision Corporation, in our example, has imported just one country, the US, and plans just three geographical territories: West, Central, and East.
Vision has two options:
-
Enable states
List the states in each territory
-
Enable the states and create zones to organize them
Organize the states in zones, and then select the zone in each territory rather than entering the individual states.
Vision Corporation decides to forego zones and enables states only. When building the territory hierarchy, you copy the existing territories and modify them. The individual states you entered are copied as well.
Specifying Geography Elements for Selection During Territory Setup
-
Navigate to the Setup and Maintenance work area and search for the Manage Territory Geographies task.
-
Click Go to Task.
-
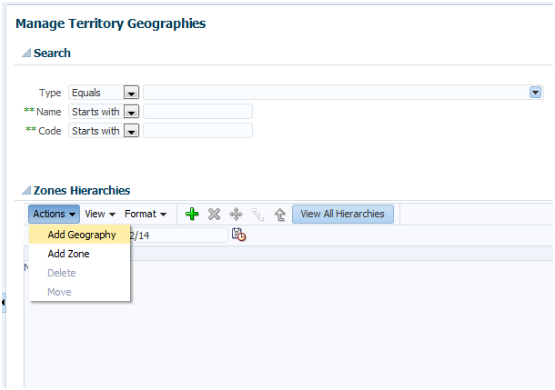
In the Manage Territory Geographies page, Zones Hierarchies region, select Add Geography from the Actions menu.
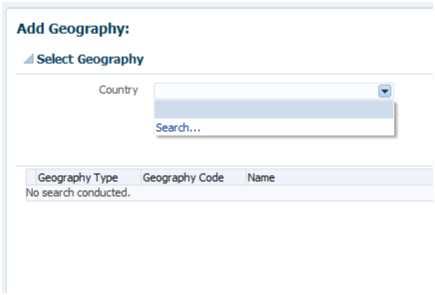
The Add Geography page appears.
-
From the Country list, select Search.
-
In the Search and Select Country window, search for the country, select it, and click OK.
-
Click Search. The geographies belonging to the country appear in the Add Geography page.

-
Select the country and click Submit.
-
In the confirmation box, select Add geography and include selected children.
-
Select the geography elements you want to use in territories. For Vision Corporations, this is State.

-
Click OK.
-
Click OK again in the batch process confirmation box.
-
Click OK.
Enabling Sales Territory Dimensions
You must enable the territory dimensions that you will use to create your sales territories.
Make sure you have all the source data available before you start. Vision Corporation plans to enable the Product and Geography dimensions, so it has completed sales catalog and territory geography setup.
Enabling Sales Territory Dimensions
-
Sign in as a setup user or sales administrator.
-
Navigate to Territories and Quotas.
-
In the Tasks list, select Enable Dimensions and Metrics.

The Enable Dimensions and Metrics page appears.
-
Click Edit.
The Edit: Enable Dimensions and Metrics page appears.

-
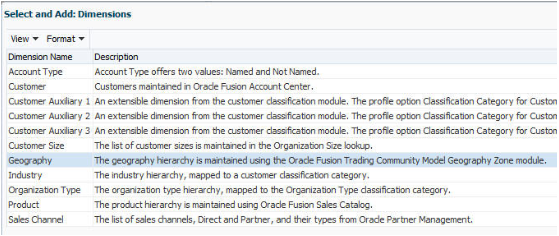
In the Dimensions table, click Select and Add.
The Select and Add: Dimensions window appears.
-
Select the dimensions that you want to use and click OK. Vision Corporation adds Geography and Product.
-
Click Save and Close.

-
From the Actions menu, select Load and Activate .

When the process completes successfully, you can start defining territories in the application.
For more information about enabling dimensions, see the Define Territory Management Configuration chapter in the Oracle Sales Cloud Implementing Sales guide.
Creating the Sales Territory Hierarchy
Creating a Territory Proposal
Use this procedure to create a territory proposal. A territory proposal is the sandbox where you will create the sales territory hierarchy.
Creating the Territory Proposal
-
Sign in as a setup user or sales administrator.
-
Navigate to Territories and Quotas.
-
In the Tasks region, select the Manage Territory Proposals link.
The Manage Territory Proposals page appears.
-
In the Current Territory Proposals region, click Create.
The Create Territory Proposal window appears.

-
Enter a name for the proposal.
-
Leave the Activation Datefield blank. This will cause the proposal to be activated immediately after you build your territories and activate it.
Note
Entering an activation date requires you to run the Run Territory Proposal Activation process, not covered here.
-
Click Save and View.
Your territory proposal opens and you can start building your territory hierarchy.

Creating the Sales Territory Hierarchy
Create the sales territory hierarchy starting with the top territory in the hierarchy.
For each territory you create, you enter the name of the salesperson or manager who owns the territory and the values for the dimensions that form the territory boundaries. When you create the territories, the application automatically copies all the dimension values from the parent territories to the child territories to speed up entry.
Creating the Top of the Hierarchy
-
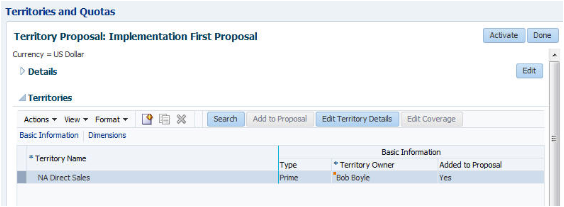
In the Territories region of your territory proposal, click Create.
The Create Territory page appears.

-
Enter the territory name, for example,
NA Direct Sales. -
Select an owner for the top territory, most likely the VP of Sales:
-
From the Owner list, select Search
-
Search for the resource name using any of the criteria.

-
Select the name and click OK.
The owner appears on the Territory Team tab. You can add additional members to the team, and the owner himself can add members later.

-
-
From the Forecast Participation list, select Revenue and nonrevenue. This setting enables the territory to be used for forecasting.
-
Click Save and Close.
Your new territory appears in the Territories table of your proposal.
-
Select the Coverages tab in the Details region at the bottom of the page.
Note
If the Coverages tab is blank, then your territory configuration is incomplete. Navigate to Scheduled Processes and check to see if the Synchronize Stage Environment process completed successfully. See Enabling Territory Dimensions topic for more information.
-
In the Dimensional Coverage table, click Add.
The enabled dimensions appear. Every enabled dimension is represented by a column, and each column shows
Any. For the Vision Corporation example, this entry means that sales accounts in any location and for any product are assigned to this territory. This is the setting you want for your top territory.
Adding the Rest of the Hierarchy
-
In Manage Territory Proposals page, select the name of your proposal.
The territory proposal opens for editing.
-
If you are creating a subordinate territory, then:
-
Select the parent territory.
-
From the Actions menu, select Create Child.
-
-
If you are creating a territory at the same level as an existing territory, then:
-
Select the territory you want to duplicate.
-
From the Actions menu, select Duplicate.
The application creates a new territory and copies all of the existing coverage values.
-
-
Enter the territory name.
-
Select the owner for the territory.
-
Click Save and Close.
-
Click Edit Coverage.
-
Select the members for each dimension that you want to change. For details, see Defining the Territory Coverage in this chapter.
-
If you need to make changes to an existing territory that was not added to the proposal, then select it and click Add to Proposal and make your changes.
-
Click Save and Close.

Defining the Territory Coverage
Perform the following steps to change the territory coverage of a territory. Any new territory defaults to the coverage of the parent territory.
-
In Manage Territory Proposals page, select the name of your proposal.
The proposal opens for viewing.
-
In the Territories table, select the territory you want to change.
-
Click Edit Coverage.
The Edit Coverage window appears.
-
For every dimension you want to change:
-
Select the dimension from the Dimensions list.
-
Add or remove dimension members from the Selected Dimension Members box.

For example, to specify the states in Vision Corp.'s West USA Products territory, you would move the following states to the Selected Dimension Members box:
-
Alaska
-
Arizona
-
California
-
Colorado
-
Idaho
-
Montana
-
Nevada
-
New Mexico
-
Oregon
-
Utah
-
Washington
-
Wyoming
-
-
Click Save and Close.
-
Activating the Territory Proposal
When you have completed building your territory hierarchy, use this procedure to activate the territory proposal and start using the new territories for assignment.
Activating the Territory Proposal
-
Sign in as a setup user or sales administrator.
-
Navigate to Territories and Quotas.
-
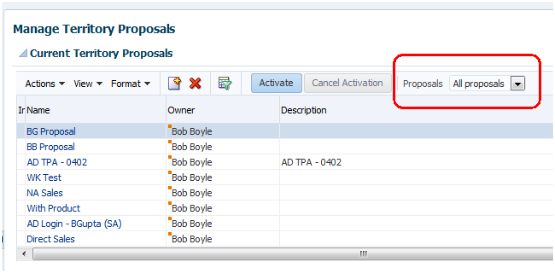
In the Tasks region, click Manage Territory Proposals.
The Manage Territory Proposals page appears.

-
If the proposal you want to activate doesn't appear in the Current Territory Proposals table, select All Proposals from the Proposals list.
-
Select the proposal and click Activate.
The application displays the new territories in the View Active Territories page.
Setting Assignment Options
Making Opportunity Assignment Automatic
By default, sales users must assign opportunities manually when they edit each opportunity. You can make the assignment of opportunities automatic by setting the system profile Assignment Submission at Save Enabled.
Making Opportunity Assignment Automatic
-
Sign in as a sales administrator or setup user.
-
Navigate to Setup and Maintenance and search for the Manage Opportunity Profile Options task.
-
Click the Go to Task.
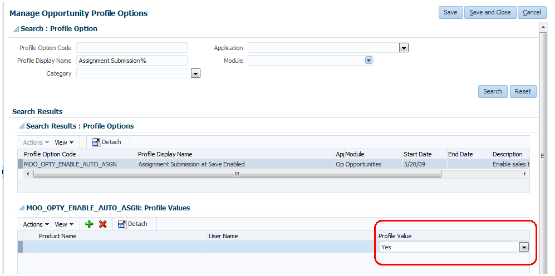
The Manage Opportunity Profile Options page appears.
-
In the Search region, enter
Assignment Submission at Save Enabledin the Profile Display Name field. -
In the MOO-OPTY_ENABLE_AUTO_ASSIGN: Profile Values region, select Yes from the Profile Value list.
-
Click Save and Close.
Disabling Deal Protection on Opportunities
When a sales territory is assigned to an opportunity, the application copies over the territory resources to the opportunity sales team. By default, the application retains the salespeople on the opportunity sales team for a period of 15 days after territory realignment. Use this procedure to disable this feature by setting the system profile Opportunity Resource Deal Protection Period to 0.
Disabling Deal Protection
-
Sign in as a sales administrator or setup user.
-
Navigate to Setup and Maintenance and search for the Manage Opportunity Profile Options task.
-
Click the Go to Task icon.
The Manage Opportunity Profile Options page appears.
-
In the Search region, enter
Opportunity Resourcein the Profile Display Name field. -
In the MOO_DEAL_PROTECTION_PERIOD: Profile Values region, enter
0in the Profile Value field.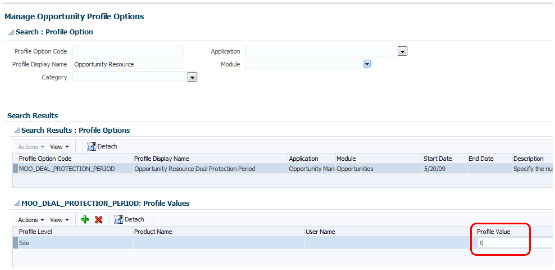
-
Click Save and Close.
Running Assignment Processes
Running the Account Assignment Process
You must run the Request Sales Account Assignments process to assign territories to accounts after you activate a territory proposal and then set it run on a regular basis to ensure that all territories are assigned properly.
Running the Request Sales Account Assignment Process
-
Navigate to the Scheduled Processes work area.
-
On the Overview page, click Schedule New Process.
The Schedule New Process window appears.

-
Click the down arrow to the right of the Name field and select the Search... link.
The Search and Select: Name window appears.

-
Enter
Request Sales Account Assignmentsin the Name field and click Search. -
Select the name below and click OK.
You are returned to the Schedule New Process window.
-
Click OK.
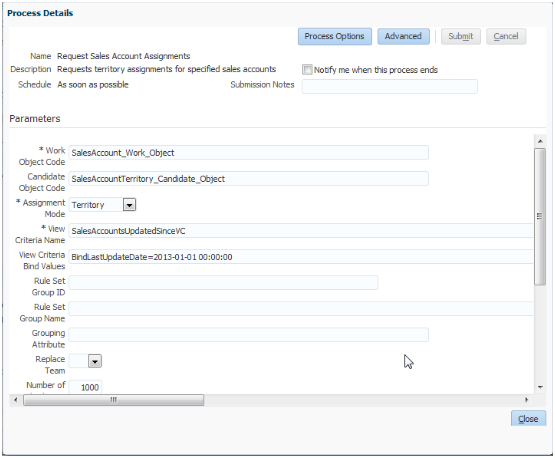
The Process Details page appears.
-
Make the following entries:
Field Entry Work Object Code
Enter
SalesAccount_Work_Object.Candidate Object Code
Enter
SalesAccountTerritory_Candidate_Object.Assignment Mode
Select Territory from the list.
View Criteria Name
Enter
SalesAccountsUpdatedSinceVC.View Criteria Bind Values
Enter the date you started implementing the application to ensure you are assigning all the records, in the format: BindLastUpdateDate= YYYY-MM-DD HH:MM:SS. For example:
BindLastUpdateDate=2012-01-01
                                             00:00:00
Note
You can find additional information on the available process parameters in the Sales Account Assignment Process Parameters (1507365.1) document on support.oracle.com.
-
If you want to run this process on a regular basis, then:
-
Click Advanced.
-
Select the Schedule tab.
-
Select the Using a schedule option.
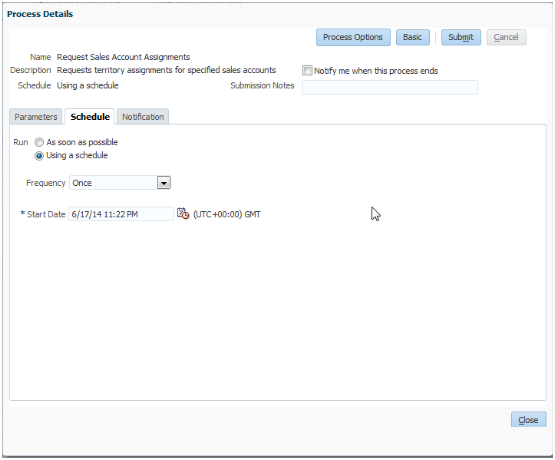
-
Select the frequency and start date.
-
-
Click Submit.
-
Unless you specified a schedule, your process runs immediately. You can monitor its progress by searching for the process by name on the Overview page.
Note
For information on troubleshooting see the CRM Assignment Troubleshooting Guide (1389342.1) on my.oracle.support.com.
Running the Assignment Process for Opportunities
You must run the Revenue Territory Territory Based Assignment process to assign territories to opportunities after you activate a territory proposal and then set it run on a regular basis to ensure that all territories are assigned properly.
Just how frequently and when you need to run this process depends on such factors as your opportunity volume and the sales cycle.
Running the Assignment Process
-
While signed in as a sales administrator, select Scheduled Processes in the Tools group in the Navigator.
-
In the Scheduled Processes page, click Schedule New Process.
-
In the Schedule New Process dialog, select the Name list and then select the Search link.
-
In the Search and Select dialog, enter the process name
Revenue Territory Based
                                    Assignment
, and click Search. You can search by a partial name, but note that the search is case sensitive.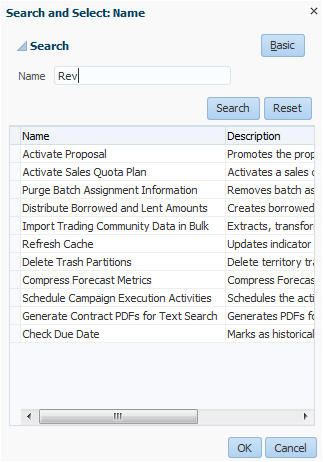
-
Select the process name in the results and click OK.
-
Click OK again if needed to dismiss the dialog.
-
The Process Details window appears, where you enter parameters using the steps in the following section, Entering Process Parameters.

-
Make the following entries:
Field Entry View Criteria Name
Enter
OpenOpportunitiesByCreationDate.View Criteria Bind Values
You can have the option of assigning territories to those open opportunities created since a certain date or those created for a range of dates:
-
For a specific date, enter
BindOptyCreationDateFrom=YYYY-MM-DDwhere YYYY-MM-DD is the date you started implementing the application. For example,BindOptyCreationDateFrom=2014-01-01assigns all open opportunities created since January 1, 2014. -
To use a date range, enter
BindOptyCreationDateFrom=<date>, BindOptyCreationDateTo=<date>. Note that the From and To values are separated by a comma.
Note
You can find more information on the process parameters in application help, by searching on
Revenue
                                       Territory Territory Based Assignment Process
. Or, you can view article Opportunity Assignment Process Parameters (1507365.1) available on support.oracle.com. -
-
To run this process on a regular basis, then:
-
Click Advanced.
-
Select the Schedule tab.
-
Select the Using a schedule option.
-
Select the frequency and start date.
-
-
Click Submit.
-
Unless you specified a schedule, your process runs immediately. You can monitor its progress by searching for the process by name on the Overview page.