12Enabling and Configuring Search
This chapter contains the following:
-
Activating and Configuring Application Objects for Global Search
-
Enabling the Objects You Activated as Filters in the Global Search UI
-
Changing the Behavior of Global Search Automatic Suggestions
About Enabling and Configuring Search
This chapter describes how to enable and configure the two principal ways of searching in Oracle Sales Cloud.
-
Global Search
The global search, located at the top of the application page, makes it possible to search across different objects in the application. When searching for a contact, for example, you retrieve not only information about the contact herself, but also all of the accounts, opportunities, activities, and other information that involve the contact.

-
Work Area Search and Lists
The Find field available in the different work areas makes it possible to search for the record by name.

You can also search for records using other search criteria by creating a saved search. The results of your search are displayed as a list in the work area landing page. For example, you can search for and display a list of all of the active accounts in Canada.
For more information how to use these two types of search, see Using Sales guide (https://docs.oracle.com/cloud/latest/salescs_gs/docs.htm).
The two searches use different technology. This means that the setups you perform for one do not impact the other.
Setup Overview
Here is an overview of the setup steps.
-
Enable work area search by setting up the Synchronize Database Search Indexes for CRM Objects process to run periodically. Oracle recommends that you set the process to run every five minutes.
You can run the process by signing in as a setup user (or another user with the CRM Application Administrator Duty role) and navigating to the Scheduled Processes work area.
See Running the Work Area Search Index Process in this chapter for details.
-
Enable global search by setting the system profile option FUSION_APPS_SEARCH_ENABLED to Y at the Site level. This setup is accomplished using the Manage Profile Options task.
See Enabling the Global Search Profile Option in this chapter for details.
-
Configure global search using the tasks in the Define Global Search Configuration task group. You can search for this task group from the All Tasks tab in the Setup and Maintenance work area.
-
Using the Manage Search View Objects task, activate the objects you want to search and set the indexing frequency. Until a record is indexed, it does not appear in search results. Optionally, you can change what information gets displayed in the search results and which fields are indexed for searching (adding custom fields, for example).
See Activating and Configuring Application Objects for Global Search in this chapter for details.
-
Using the Manage User Interface task, select the objects you activated to display as filters in the global search UI. Users can use the filters to specify which objects they want to search and to filter results.
See Enabling the Objects You Activated as Filters in the Global Search UI in this chapter for details.
-
Optionally, you can modify the default configuration of the automatic suggestions users receive as they enter their search terms. For example, the application displays suggestions based on searches performed within the last 30 days by default, but you may want to extend or shorten this interval. These setups are accomplished using the Manage Auto Suggest task.
See Changing the Behavior of Global Search Automatic Suggestions in this chapter for details.
-
Running the Work Area Search Index Process
To enable searches in Oracle Sales Cloud work areas, you must set up the Synchronize Database Search Indexes for CRM Objects process to run periodically. Oracle recommends that you set the process to run every five minutes. Until a new record is indexed, it remains unavailable for searching.
Setting Up the Indexing Process to Run Periodically
-
Sign in as a user with the CRM Application Administrator Duty role.
-
From the Navigator, select Scheduled Processes under the Tools heading.
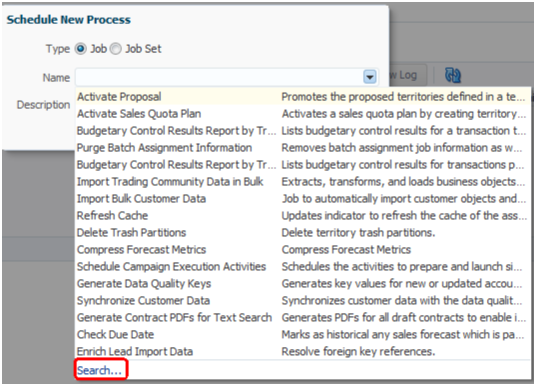
The Schedule New Process window appears.
-
Click on the down arrow to the right of the Name field and select Search.
The Search and Select Name window appears.
-
Enter
Synchronize
                                 database search indexes
in the Name field. Capitalization is important. -
Click Search.
-
Select the process name below and click OK.
-
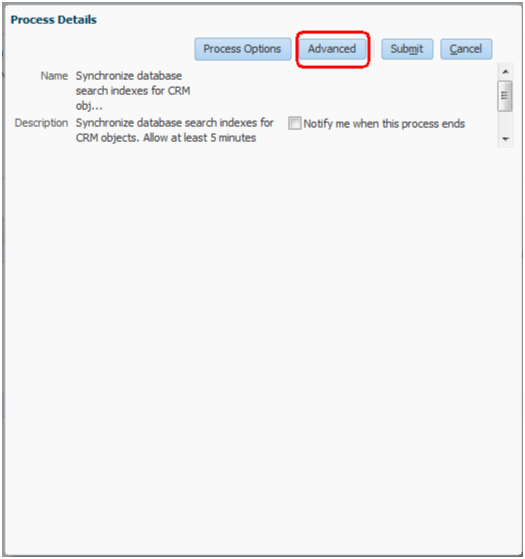
On the Schedule New Processes window, click OK.
The Process Details window appears.
-
Click Advanced.
-
On the Schedule tab, select the Using a schedule option.

-
Select Hourly/Minute from the Frequency list.
-
Specify the index to run every five minutes and enter an end-date far in the future.
-
Click Submit.
Enabling the Global Search Profile Option
Use this procedure to enable global search by setting the FUSION_APPS_SEARCH_ENABLED profile option.
Setting the Profile Option
-
Sign in as a setup user and navigate to the Setup and Maintenance work area.
-
Search for the Manage Profile Options task.
-
Click Go to Task.
The Manage Profile Options page appears.

-
In the Search region, Profile Option Code field, enter
FUSION_APPS_SEARCH_ENABLED. -
Click Search.
-
Select the Site option.
-
Click Save and Close.
Activating and Configuring Application Objects for Global Search
Use this procedure to activate and configure each of the objects you want to enable for searching using global search.
For each object:
-
Activate the object.
-
Specify the frequency with which the object will be indexed.
-
Optionally, you can modify the list and order of fields indexed in the search and displayed in the search results.
Activating an Object for Search
-
While signed in as a setup user or a sales administrator, navigate to the Setup and Maintenance work area.
-
In the All Tasks tab, search for the Manage Search View Objects task.
-
Click Go to Task.
The Manage Search View Objects page appears.

-
Select the object you want to enable for search.
-
Click Activate.
The status for the object changes to Active.
Setting the Indexing Frequency and Schedule
After you have activated the object, you must specify how frequently you want the object records indexed.
Oracle recommends that you index objects daily during off-hours. You can stagger the indexing times for the different objects to minimize performance impacts.
Specifying the fields to be indexed and displayed in the search results is optional because these are already set up for you.
-
Select the Display Name link of the object.
The Edit Search View Object page appears.

-
In the Index Schedule region, select the Frequency Type and enter the number of days between index runs and the time, if appropriate.
-
You can change which fields the application indexes and which fields display in search results as described in the following section.
-
When you are done, click Save and Close
The application returns you to the Manage Search View Objects page where you can monitor the status of the index generation for each object.
The first time your scheduled indexing process runs or any time you modify the list of fields in the object, the application generates a complete index of all the existing records. Subsequently, the process indexes only records that have changed.
If you end up with many inactive records in your system over time, you can improve the efficiency of your searches by periodically regenerating the full index. This can be accomplished by selecting the object and clicking Full Reindex.
Modifying the List of Fields Used for Indexing and Displayed in Search Results
In the Edit Search View Object page, you can also change which fields the application indexes and which fields display in search results. You will want to add any custom fields you want to enable for searching, for example.
-
The Title and Fixed Content fields let you specify which fields are displayed in search results and in what order.
-
Title is the linked heading of each search result.
-
Fixed Content is the text which appears under the heading.
In the following example, the titles starting with the word Opportunity: are links which permit users to drill down to the record. The rest of the fields are the fixed content.

-
-
The Body field lists the fields that are indexed by the application. The most relevant fields are displayed in the search results, space permitting. While the Body field includes all of the standard fields for indexing, you must add any custom fields to the list if you want them available for searches.
To make changes, click Edit (the pencil icon) and make your changes in the Edit Search View Object window.
Enabling the Objects You Activated as Filters in the Global Search UI
After you have activated the different objects for global search and set up their indexing, you will want to display these objects as filters in the global search UI.
Enabling the Objects as Filters
-
While signed in as a setup user, navigate to the Setup and Maintenance work area.
-
Search for the Manage User Interface task.
-
Click Go to Task.
The Manage User Interface page appears.

-
Use the arrows in the Search Categories region, to move each object to the Selected Categories list.
-
Optionally, select the Show Clear button option to display the Clear button on the search results page. This button permits users to clear all of the filter options they have previously selected in the search.
-
Click Save and Close.
Changing the Behavior of Global Search Automatic Suggestions
Use this procedure to change the behavior of the automatic suggestions users receive for global search.
Changing the Automatic Suggestions Options
-
While signed in as a setup user, navigate to the Setup and Maintenance work area.
-
Search for the Manage Auto Suggest task.
-
Click Go to Task .
The Manage Auto Suggest page appears.

-
On this page, you can:
-
Select the type of suggestions users receive in the Suggestion Groups region. By default, only Recent Items and Recent Searches display.
-
Last Search
Shows the very last search for the signed-in user, including any applied filters.
-
Recent Items
Recent items the user accessed from the search results.
-
Recent Searches
Recent searches by the user, including any applied filters.
-
Saved Searches
Any saved searches, if this functionality has been implemented.
-
-
Show or hide the headers for the suggestion groups by setting the Show Suggestion Group Headers option. The headers are displayed by default.
-
Specify the minimum number of search characters users must enter before the suggestions appear, by selecting a value from the Minimum Characters for New Suggestions list.
The default is three characters.
-
Specify the maximum number of suggestions users receive, by selecting a value from the Maximum Number of Suggestions list.
The default is 15 suggestions.
-
Specify the number of days the recent items are retained, by selecting a value from the Number of Days Recent Items Retained list.
The default is 30 days.
-
-
Click Save and Close when you are done.