7 Manage Your Devices
When you install your mobile client software, the mobile device manager client software is automatically installed and, in most cases, bootstrapped. Within the Mobile Manager, the administrator can send commands to remote devices. The next time that the device is available—either through wireless connection or synchronization—the command that you send will execute.
The following sections describe how to manage your devices:
-
Section 7.1, "Customize the Mobile Client Software Installation for Your Mobile Device"
-
Section 7.2, "Configuring Mobile Clients Before Installation"
-
Section 7.4, "Configuring and Customizing Your Mobile Device Platform"
-
Section 7.7, "Using the Device Manager Agent (dmagent) on the Client"
-
Section 7.8, "Managing the Network Protocol Between the Device and the Mobile Client Software"
-
Section 7.10, "Defining Device Manager Commands With the Device Manager OTL Tag Language"
7.1 Customize the Mobile Client Software Installation for Your Mobile Device
The mobile device software for your language and platform is installed when you install the mobile client on your device.
You can customize the installation for your mobile clients by customizing the platform and the setup configuration files for the platform, as follows:
-
Certain modifications can be made to the mobile client configuration files before installation. See Section 7.2, "Configuring Mobile Clients Before Installation" for more information.
-
Customize the platform to install additional binaries, applications, and other environment modifications. See Section 7.4, "Configuring and Customizing Your Mobile Device Platform" for more information.
Once installed, you can locally or remotely manage the client using the Device Manager tool. See Section 7.7, "Using the Device Manager Agent (dmagent) on the Client" for more information.
7.2 Configuring Mobile Clients Before Installation
When you install the mobile client on the device, a few configuration files are installed, such as the ose.ini, devmgr.ini and odbc.ini files. However, you can pre-configure some of the parameters destined for the client ose.ini, devmgr.ini and odbc.ini files using either of the following:
-
Using the Mobile Manager: Navigate to the Mobile Devices->Administration->Configuration Management page, which enables you to modify the parameters, located in the INF file, corresponding to the mobile client platform that is to be downloaded to the client.
-
Edit the
<ini>section of the INF file: To edit the INF file directly, see Section 7.9, "Installation Configuration (INF) File".
Note:
Theose.ini, devmgr.ini and odbc.ini files are available in under $MOBILE_CLIENT_HOME/bin. You must have write permissions on the directory where these are located to be able to modify them.-
Navigate to the "Mobile Device" screen.
-
Click "Administration".
-
Click "Configuration Management".
-
The parameters destined for the client configuration files are initially set up in different INF files. You can modify some of the parameters in these files. However, this is a very sensitive configuration and should only be done if you fully understand the function of each parameter. Normally, the only time you modify these parameters is when directed by Oracle Support.
Select the INF file from the File Name pull down and click Show. This enables you to modify the INI section in this particular INF file. All of the current assignments are displayed.
For each INF file, the parameters in each INI section is displayed. You can only add name value pairs to existing sections.
-
To add name/value pairs to the existing sections, click "Add". To modify a parameter, modify it and click "Apply". To delete, select the configuration pair and click "Delete".
-
To add more sections, you must modify the INF file directly. To modify or add items to the existing sections, you can click "Add".
-
A screen is displayed asking for two strings: a name and a value. Enter these items and click "OK".
The following sections describe each INF file:
7.2.1 Modifying Device Management Parameters for Client Device
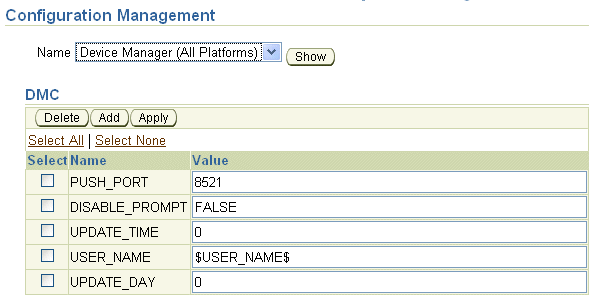
When you select Device Management from the File Name pull down, you can modify the dmc.inf file. The following example shows the INI section directly from the dmc.inf file:
<ini>
 <item name="DEVMGR" section="DMC">
 <item name='PUSH_PORT'>8521</item>
 <item name='DISABLE_PROMPT'>FALSE</item>
 <item name='UPDATE_DAY'>0</item>
 <item name='UPDATE_TIME'>0</item>
 </item>
</ini>
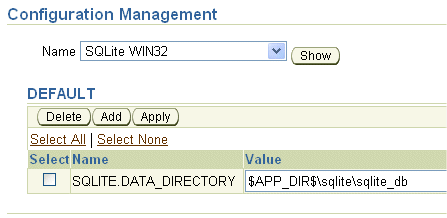
When you select Device Management->Administration->Configuration Management, you can modify the device management parameters as follows:
-
Modify generic platform parameters, as shown in Figure 7-1.
-
Modify platform-specific parameters, as shown in Figure 7-2. These parameters exist only for certain platform types.
To add a name/value pair, click "Add". To modify a parameter, modify it and click "Apply". To delete, select the configuration pair and click "Delete".
Figure 7-1 Adding Name/Value Pairs to Device Management INF File
Description of "Figure 7-1 Adding Name/Value Pairs to Device Management INF File"
Where the parameters are as follows:
Table 7-1 Device Management Parameters in DEVMGR.INF File
Note:
You can also modify theUPDATE_DAY and UPDATE_TIME parameters on the client through the dmagent UI. See Section 7.7, "Using the Device Manager Agent (dmagent) on the Client" for details.7.3 Managing Devices
From the Mobile Devices screen, as shown in Figure 7-3, you can perform the following:
-
Add—Click Add to add a new device.
-
View—Select the device to view information about this device.
-
Delete—Select the checkbox next to the desired device and click Delete.
Note:
If you want to delete a device, use thedelete method from the Device class. To retrieve the Device object, use either the getDevice or getDeviceByName methods, as demonstrated below.
If the device id is available, the following can be directly used:
if (oracle.lite.resource.ResourceManager.getInstance() == NULL)
oracle.lite.resource.ResourceManager.initialize(JDBC_URL, USER, PASSWORD);

oracle.lite.resource.Device d =
oracle.lite.resource.ResourceManager.getInstance().getDevice(deviceId);

d.delete();
If the device id is not available, then you can provide the device name, which is shown on the Mobile Manager UI in the oracle.lite.resource.User.getDeviceByName (deviceName) method. Once retrieved, use the delete method of the Device object as demonstrated above.
Once you select the intended device, several tabs at the top provides information about the device. Use this information to determine what sort of administration each one needs in order to continue to operate smoothly. You can use this information to tell what needs to be upgraded on each device. The following sections cover each of these tabs.
7.3.1 Configuring the Mobile Device through Properties
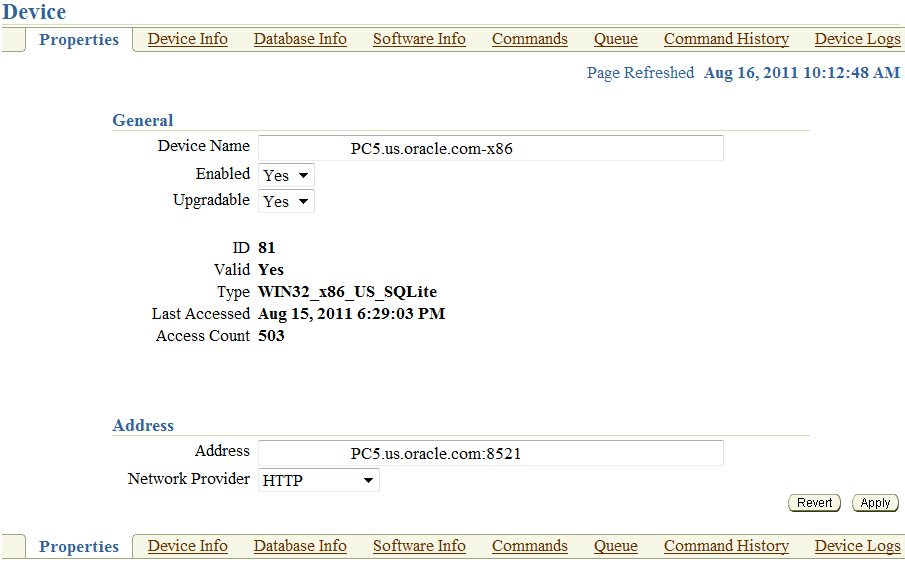
To modify the configuration of a specific device, select the device. Figure 7-4 is displayed:
Figure 7-4 Mobile Device Properties and Information
Description of "Figure 7-4 Mobile Device Properties and Information"
To modify the configuration of a specific device, do the following:
-
The device name is displayed on the first line. You can modify the name of the device to anything that you want. For example, if you have a naming convention for all devices in your organization, modify this field to reflect this convention. The name defaults to the mobile device platform.
-
Enable the device by selecting "Yes"; disable the device by selecting "No." See Section 7.4.2, "Enabling or Disabling All Mobile Devices in a Platform" or Section 7.3.1.1, "Enabling or Disabling a Mobile Device" for more information.
-
"Set Upgradable" to "Yes" to retrieve all software updates for the device. If you want the device to continue to receive automatic software updates for the device, choose Yes. If you want the device to stay with the current software versions, choose No. See Section 7.6, "Managing Device Software Updates" for more information.
-
Valid: If the Device Manager software is installed and correct. If de-installed, Valid displays "No".
-
The installed address is displayed in the "Address" field. If the address is an IP address or a phone number, these may change at some point. You can enter the new addresses in this field.
-
Choose the Network Provider type. You can choose a different network provider than that with which you chose to install. The default list includes HTTP, SMS, or RAPI. For Android client, the only supported network provider is SMS. If you have added another network provider, these custom network providers will also be included in the list. For iOS client, there is no need to choose the network provider type.
Note:
To create a network provider, see Section 7.8, "Managing the Network Protocol Between the Device and the Mobile Client Software".
7.3.1.1 Enabling or Disabling a Mobile Device
You can enable or disable a mobile device. By default, the device is enabled, which means that the user can log in, perform updates, synchronize, and perform other duties. If you disable the device, then it can no longer perform work for the user. See Section 7.3.1, "Configuring the Mobile Device through Properties" for where you enable or disable the device.
Why would you want to disable the device? If the mobile device was lost or the user is no longer with the company, but did not return the device, then you might choose to send a deinstall command (see Section 7.5, "Sending Commands to Your Mobile Devices") and then disable the device. This way, the software is no longer on the device and even if the user had another copy of the software to reinstall the application, they could no longer log in and retrieve any information from your company.
7.3.2 Viewing Device Information
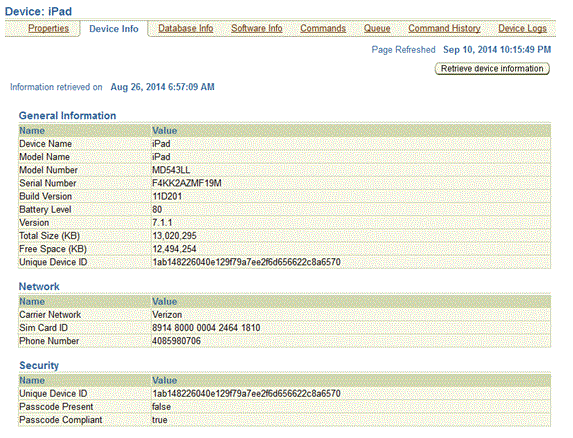
The Mobile Manager displays general and database information for a chosen device. To view device information, click "Device Info". If no information is displayed, click "Retrieve Device Information". This sends a command to the device, which is then posted back to this page. Click reload until the information is posted.
In the first section, all of the details about the operating system is provided. You no longer have to go to the machine and type in a command to determine the operating system, its version and the latest service pack applied. This section will provide you with all of this information. In addition, you can see what the host name and IP address is.
The second section details how much memory you have on the device. This includes how much virtual or physical memory is on the device, and how much of that memory is still available.
The third section details the type of processor that is installed on the machine. For example, it describes the type of Intel processor that is installed on your Windows machine. You know exactly when your users must be upgraded to the next version of processor for the capability that they need.
For Windows-based devices only, the fourth section details the version of the JDK that you have installed and where it is installed. You no longer have to ask your users to check which version of JDK that they have installed. You can view this information for each device and know if the mobile client software must be upgraded or not. In addition, this section describes the CLASSPATH for the mobile client environment.
The last section details the amount of storage space that exists and is currently available on each drive.
7.3.3 Viewing Database Information
When you select the Database Info tab, you see all of the information about any databases installed on the mobile client.
The first section provides the ODBC driver name, so that you can know which version that is installed on your client. In addition, you can see what DLL is used for the database and the directory.
The third section displays the configuration in raw form in the DEVMGR.INI files on the client. Each section in the DEVMGR.INI file is displayed. The purpose of this section is for you to view the sections and parameters in the INI files.
7.3.4 Viewing Software Information
You can view all of the software that is installed on the mobile device by clicking "Applications", which lists each application, its version, setup time, and location details. If no information is available, click "Retrieve Software Information", which sends a command to the device.
Once the information becomes available, which is dependent on when the device reconnects, the platform is listed for the device. Select the platform to see the software information.
7.3.5 Commands
You can send commands to each device by itself or to all devices in a platform to gather information or execute some function. This is described fully in Section 7.5, "Sending Commands to Your Mobile Devices".
7.3.6 Queue
The queue shows any commands that are currently in process. That is, if the device is not currently connected, then the command is placed into the queue until the device becomes available. Viewing this queue shows you all of the commands that are queued up waiting for devices.
7.4 Configuring and Customizing Your Mobile Device Platform
Oracle Database Mobile Server ships with a number of predefined platforms that you can download and install on your mobile client device. However, there are some devices that the CAB file is provided within the installation, but which are not registered and available for download within the Mobile Manager. You can register these devices—if necessary—for any needed device platform. After registration, the platform appears on the Mobile Manager setup screen for your mobile client installations.
A mobile client platform consists of a CAB file and an Installation Configuration File (INF file) that describes how to install the files.
As described in Section 4.3.5, "Mobile Client Install" in the Oracle Database Mobile Server Installation Guide, you normally install the mobile client software by selecting the type of mobile device and the language in the setup UI. However, you can extend any of these platforms to not only install the mobile client software for the platform, but also install any of your binaries or applications. The following sections describe how to configure your platform or create and customize a new platform.
-
Section 7.4.1, "Modifying Platform Properties for Installation"
-
Section 7.4.2, "Enabling or Disabling All Mobile Devices in a Platform"
7.4.1 Modifying Platform Properties for Installation
Before you install a platform on your system, you should ensure that all of the configuration details for the mobile device setup are what you want. A setup file is used to detail installation details, such as directories, binaries to install, path and CLASSPATH additions, and so on. You can modify the setup INF file that is defaulted for each platform, or you can create your own and point the platform to the new setup INF file.
Generally, you do not want to modify the generic platforms provided for you, in case you need to go back to basics. Thus, you should create your own unique platform by extending one of the provided platforms. This copies the existing platform into a separate platform with a user-provided name. Once extended, modify this platform with your own characteristics. For instructions on how to extend one of the provided platforms, see Section 7.4.3, "Extend or Create a Custom Platform".
To modify how the platform is installed, perform the following:
-
Designate the name and path of the setup INF file for your platform by navigating to the Mobile Devices page.
-
Click "Platforms".
-
Click on the platform for which you are currently modifying the INF file.
-
Make sure that the correct setup INF file is listed in the Setup INF field.
Note:
If you want to modify this INF file or provide a different INF file, then on the mobile server, navigate on the file system to$MOBILE_HOME/Mobile/Server/admin/repository/setup/dmc/to where the setup INF files are located. Open the file that you want to modify or create a new INF file. Add the changes you want for this platform. See Section 7.9, "Installation Configuration (INF) File" for the configuration syntax. -
-
Choose a Bootstrap group command from the list displayed. After the device bootstrap is complete, you can choose a group command to execute when it is completed. For example, choosing the device information command retrieves all of the device information to the Mobile Manager for viewing.
-
Enable or disable all devices in the platform. If you enable these devices by choosing Yes, then each user can log in, perform updates, synchronize, and perform other duties. If you disable these devices by selecting No, then they can no longer perform work for the user. See Section 7.4.2, "Enabling or Disabling All Mobile Devices in a Platform" for more information.
-
"Set Upgradable" to "Yes" to retrieve all software updates for all devices in the platform. If you want these devices to continue to receive automatic software updates, choose "Yes". If you want these devices to stay with the current software versions, choose "No". See Section 7.6, "Managing Device Software Updates" for more information on updating software on your device.
7.4.2 Enabling or Disabling All Mobile Devices in a Platform
You can enable or disable all mobile devices in a platform. By default, each device in the platform is enabled, which means that the user can synchronize to the database and perform software updates. If you disable the device, then it can no longer perform work for the user. If you wanted to disable a single device—because a user has lost the device or left the company—then you follow the instructions in Section 7.3.1.1, "Enabling or Disabling a Mobile Device". However, if you want to enable or disable all devices for a platform, then see Section 7.4.1, "Modifying Platform Properties for Installation".
When disabling all devices for a platform, you could send a deinstall command (see Section 7.5, "Sending Commands to Your Mobile Devices") and then disable all of the analog mobile devices.
7.4.3 Extend or Create a Custom Platform
You can create custom device platforms either by using an existing platform as the template or by enabling a platform.
-
Only a few of the available platforms are displayed in the mobile client setup screen. To add a platform that you need, enable the desired platform. See Section 7.4.3.1, "Enable a Platform for Your Mobile Client" for more information.
-
You can extend an existing platform to customize that platform to install additional binaries, applications, or with specific instructions to modify the client machine. See Section 7.4.3.2, "Create a Custom Platform By Extending an Existing Platform" for more information.
7.4.3.1 Enable a Platform for Your Mobile Client
Not all of the possible platforms are enabled for the mobile client setup screen. To enable a platform for your client device, do the following:
-
On the Mobile Devices screen, click "Platforms".
-
On the Platforms screen in the Search pulldowns, select the language and either Disabled or All and click "Go".
-
Select the platform name that you want to enable.
-
Enable the device by selecting "Yes" in the Enable pulldown.
-
Click "OK". The device is now enabled and will be visible in the client setup screen.
7.4.3.2 Create a Custom Platform By Extending an Existing Platform
You may wish to install additional binaries, applications, or provide specific instructions to modify the client machine when the client platform is installed on the device. The INF file contains the "directions" to the client on how the platform is installed.
To create a custom platform from an existing platform, do the following:
-
Create a new INF file for your extended platform—On the mobile server, navigate on the file system to
$MOBILE_HOME/Mobile/Server/admin/repository/setup/dmc/to where the setup INF files are located. Create an empty INF file for your new platform. As discussed in Section 7.9, "Installation Configuration (INF) File", when you extend a platform, the INF files that are used for the installation is a concatenation of your platform and every platform that it was extended from—just like how objects extend methods, properties and attributes from each other in an object-oriented language. -
On the Mobile Devices screen, click "Platforms".
-
On the Platforms screen, select the platform name and click "Extend".
-
Enter the custom platform name, path, and file name of the blank setup INF file you created in step 1. The setup INF file determines what is installed and how the client machine environment is modified. See Section 7.9, "Installation Configuration (INF) File" for instructions on how to modify the setup INF file after you have completed extending the platform.
-
Choose a Bootstrap group command from the list displayed. After the device bootstrap is complete, you can choose a group command to execute when it is completed. For example, choosing the device information command retrieves all of the device information to the Mobile Manager for viewing.
-
Enable or disable the device. If you enable the device by choosing Yes, then the user can log in, perform updates, synchronize, and perform other duties. If you disable the device by selecting No, then it can no longer perform work for the user.
-
Set Upgradable to Yes to retrieve all software updates for the device. If you want the device to continue to receive automatic software updates for the device, choose Yes. If you want the device to stay with the current software versions, choose No.
-
Click "OK".
-
After you have extended your platform and given it a unique name, you should modify the setup INF file for this platform.
The client can now install your customized platform from the setup UI.
7.5 Sending Commands to Your Mobile Devices
As an administrator, you can create and send commands to any mobile device. The following sections describe how to send existing commands to devices and create new commands for your own purposes:
7.5.1 Scheduling or Sending Commands
You can send or schedule a command to be sent from the Mobile Manager.
7.5.1.1 Sending Commands
You can send commands to devices that are installed and registered with the Mobile Manager. You can send these commands from several places.
-
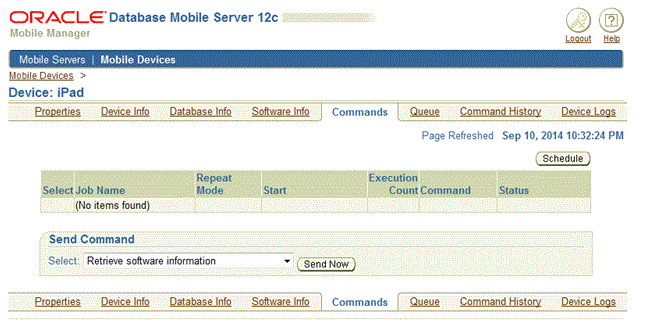
Sending a command to a single device—To send a command to a single device, select the device from the list displayed on the Mobile Devices page. Select "Commands". Under the "Send Commands" section, choose the command—as designated by the description—and click "Send Now". The Mobile Manager seeks your confirmation and then displays a confirmation message.
If the command requires arguments, then the Mobile Manager displays an argument collection page. For example, the Upload File command requires a file name as an argument. To send the command to the device, click "Yes".
-
Sending a command to all devices of the same platform type—To send a command to all devices of a certain platform, click "Platform" off of the Mobile Devices page. Click the "Select" button next to the desired platform, select the command from the command pull-down list, and click "Send Command".
Note:
If a Windows Mobile device is not physically connected to the mobile server, then the device manager commands are not sent immediately. Instead, all commands are queued up. The client device receives these commands when connected to the mobile server and polls the command queue.The default frequency to pull commands is 1800 seconds, which can be configured through the options section of the Device Manager Agent (dmagent.exe) located on the client.
For information on how to create a command, see Section 7.5.3, "Creating New Commands".
7.5.1.1.1 Description of Existing Commands
The following are the commands that you can use to control your device:
-
Retrieve Device Information—retrieves hardware and software information from the device. The retrieved information may be viewed by clicking on 'Device Info' and 'Database Info' pages.
-
Install Application—Send this command to force the device to install an application. In order for this command to work, the following conditions must be met:
-
The application must be published correctly to the mobile server.
-
The application platform must match the device platform.
-
The user must have access to the application.
If the application already is installed on the client and an update is available, this command forces an update for the client.
-
-
Retrieve Software Information—Retrieves information regarding Oracle Database Mobile Server and its applications. Retrieved information is displayed on 'Software Info' page.
-
Stop Device Manager Client—Sends a stop signal to the device manager client. Once the client is stopped, it will not receive any more commands from the server. User must either start the Device Manager agent explicitly (
dmagent.exe) or invoke "Check For Update" program in order to restart the device manager client. -
Retrieve synchronization log—Retrieves the data synchronization log from the client. The retrieved information is displayed in "Device Log->Synchronization" page.
-
Synchronize databases—Synchronize all the databases that are 'synchronizable'. This command does not retrieve the synchronization log.
-
Retrieve a file from the device—Force the device to upload a file. By default, this command will retrieve the file from mobile client HOME directory. If you want to retrieve an arbitrary file, you must provide the full path name of the file. The retrieved file is stored in the mobile server repository and may be viewed by clicking on the hyper-link on the "Command History" status column. The physical location of the file in the server is MOBILE_HOME\Mobile\Server\admin\repository\devmgr\<USER_NAME>\<DEVICE_ID>,where MOBILE_HOME is the installation directory of Oracle Mobile Server.
-
Modify Configuration—Modify configuration settings in
DEVMGR.INIfiles. -
Update Device Manager Client—Force the device manager client to update the OTL script files. The common use of this command is to propagate the OTL script files copied to the mobile server script directory.
-
De-install Oracle Database Mobile Server—Remotely de-install Oracle Database Mobile Server on the client device.
-
Reset Password—Reset the client side password to match the new password on the server side. This command DOES NOT change the password. In order to use the command, the administrator must change the user's password in mobile server and later send the command to the device to reset its stored password. Also, the device must be immediately reachable from the Server.
7.5.1.2 Scheduling Commands
You can schedule a command to execute at a later time or at certain intervals. Select the device to which you want this command to be directed. Select "Commands". Perform the following:
-
Click "Schedule". The Schedule Command page appears.
-
As shown in Figure 7-5, configure the following:
-
The name and descriptor are unique identifiers. You can modify them to your own unique identifiers.
-
Choose the command that you want to schedule from the "Parameter Command" pull-down list.
-
Check the "Enabled" box to enable or disable the command. If disabled, the command cannot be executed.
-
Check "Save to History" if you want to keep a log of when this is executed and the results, which are printed to the "Command History" screen.
-
Choose from the Priority pull-down list if this is to be high, medium, or low priority. This determines in what order the scheduled commands are executed.
Note:
You can only use fast refresh with a high priority restricting predicate. If you use any other type of refresh, the high priority restricting predicate is ignored. -
Enter any expected parameter values, separated by semi-colons, in the Extra Parameter field. For example, if you chose the Synchronize databases command and you wanted a fast refresh, you would enter 'fast' in the "Extra" parameter field.
Note:
If you use complete refresh, it erases all of the data on the client and brings down the snapshot from the server. This is only a problem if you have not specified the publication as updateable. An updateable publication enables all new data entered in the client to be uploaded to the back-end Oracle server.
Figure 7-5 The General Section of the Command Scheduler

Description of "Figure 7-5 The General Section of the Command Scheduler"
-
-
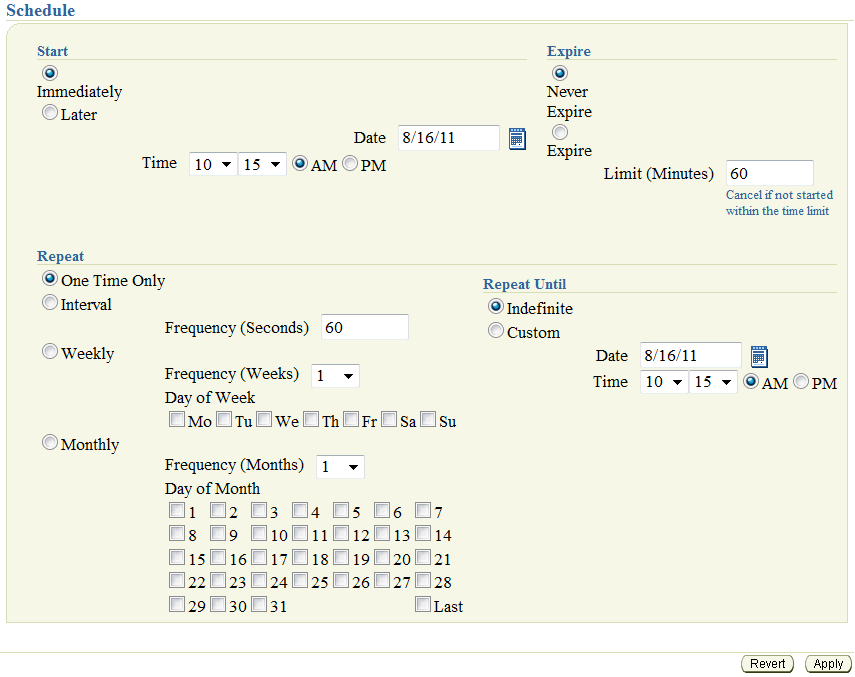
As Figure 7-6 shows, enter the timing that the command is to execute. Choose when it is to start, when it will expire (if it does not execute within a certain time frame), how often it will repeat, and a date and time that it will repeat until.
Figure 7-6 Timing Section of the Command Scheduler
Description of "Figure 7-6 Timing Section of the Command Scheduler"
-
Click "Apply". The Mobile Manager displays a confirmation message.
7.5.2 Modifying Existing Commands
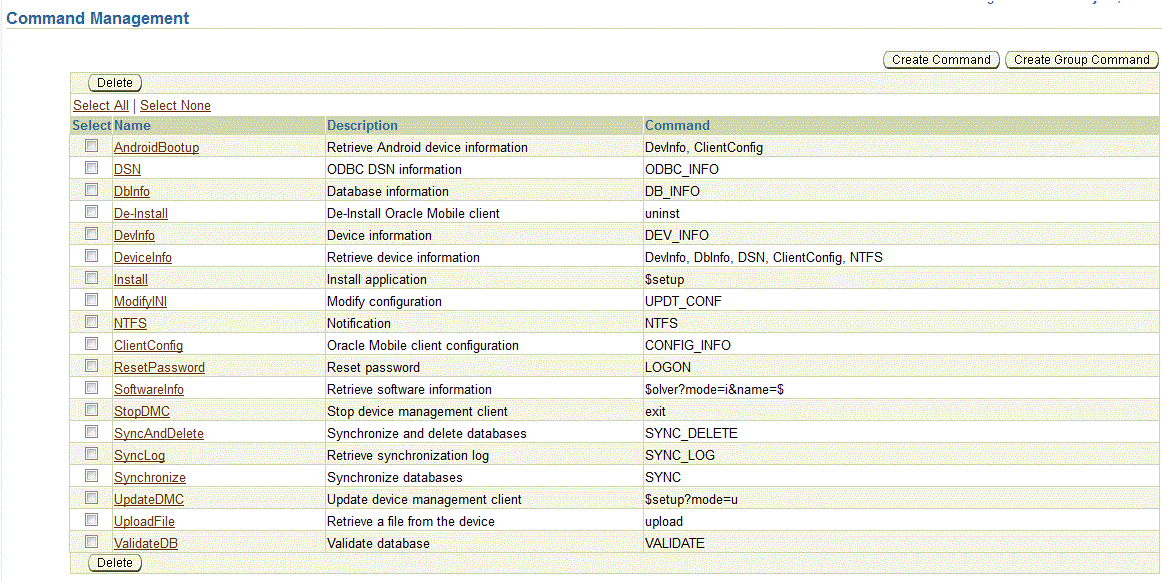
To view the available commands, select the "Mobile Devices" tab on the Mobile Manager. Navigate to the "Administration" page and click the "Command Management" link. As Figure 7-7 displays, the "Command Management" page appears.
Using the Command Management page, you can modify existing device commands and create new device commands. To modify existing commands, do the following:
-
Click the required "Command Name" link. The "Properties" page for this command appears.
-
Enter the command name, description, and syntax in the corresponding fields. For more information on modifying these fields, see Section 7.5.3, "Creating New Commands".
-
To check the accuracy of the command syntax, click "Syntax Check" button. If no errors are found, the Mobile Manager displays a confirmation message.
-
Click "Apply". The Mobile Manager displays a confirmation message.
7.5.2.1 Adding Parameters to Mobile Device Commands
You must configure the command to prompt for expected input parameters. For example, the Synchronize command requires that you define what type of refresh you want: fast, force, or push.
You can specify any parameters by modifying the command, as follows:
-
Click the required "Command Name" link. The "Properties" page for this command appears.
-
Add the parameter name and values, as follows:
-
The parameter name—This is the name specified in the OTL script.
-
A short description—The description is what is displayed when the user is prompted for the value of the parameter.
-
The display name—This is the description for each value. For example, the Synchronize databases command has three possible values: fast, force or push. However, the display values to describe each of these actual values is Fast Refresh, Force Refresh, and Push Only. These values are separated by a semi-colon, as follows:
Fast Refresh;Force Refresh;Push Only.Note:
If you use complete refresh, it erases all of the data on the client and brings down the snapshot from the server. This is only a problem if you have not specified the publication as updateable. An updateable publication enables all new data entered in the client to be uploaded to the back-end Oracle server.You can only use fast refresh with a high priority restricting predicate. If you use any other type of refresh, the high priority restricting predicate is ignored.
-
The default values for this parameter—Enter one or more potential values for this parameter, if applicable. For example, the Synchronize databases command values would be
fast;force;push. These values are separated by semi-colons and in the same order as the display name. If you do not have definitive values, leave blank and the user will enter their own value.
-
7.5.3 Creating New Commands
You can create commands using the OTL scripting language, as described in Section 7.10, "Defining Device Manager Commands With the Device Manager OTL Tag Language". These commands are then used to perform activity on the mobile devices, but controlled by the administrator within the Mobile Manager.
You can create a command with a single or multiple OTL script commands. Each is created in a different manner, as described in the following sections:
To create new commands, click "Create Command". Enter a unique Command ID, Command String, and Description in the corresponding fields. Click the Create button. The Mobile Manager displays a confirmation message.
To create a command that has several lines, you must perform the following:
-
Create a file with an
.otlextension with the OTL commands in it. Place this file in theMOBILE_HOME\Mobile\Server\admin\repository\setup\dmc\otldirectory. -
With any editor, add all OTL commands that you want executed within the file. See Section 7.10, "Defining Device Manager Commands With the Device Manager OTL Tag Language" for a full description of the OTL scripting language.
-
Within Mobile Manager, navigate to the "Command Management" page.
-
Click "Create Command".
-
In the "Name" field, pick a short name to identify the command within Mobile Manager.
-
In the "Command" field, put the name of the OTL file, without the
.otlextension. -
In the "Description" field, type in a sentence describing accurately the purpose of the command.
-
Click "OK".
-
Back on the "Command Management" screen, select the command that you just created.
-
If you ask the user to enter parameters, then add the parameter definitions. See Section 7.5.2.1, "Adding Parameters to Mobile Device Commands" for a full description.
-
Click "Apply".
-
You have now successfully created a new command. After you send the command to the device, you can execute this command against your mobile device. See Section 7.5.1, "Scheduling or Sending Commands" for information on how to send the command to the device.
7.5.4 Creating Group Commands
To create group commands, do the following:
-
Click "Create Group". The "Create Group Command" page appears.
-
Enter a unique Command Name, which will be used to identify the grouping.
-
Enter a description.
-
Select the set of existing commands that you want to execute together. The Command Weight feature controls the order in which the commands are executed. For example, a command with Weight 1 is executed first and a command with Weight 2 is executed next. Users must specify a weight for all the commands for the chosen group command.
Note:
If you provide similar weights to more than one command, the commands with the same weight are executed in the sequence in which they are listed on the GUI, which is alphabetical. -
Click "Add". The Mobile Manager displays a confirmation message.
7.5.5 Enabling or Disabling Mobile Device Commands
By default, all commands are enabled, which means that you can execute the command. If you want to disable a command, so that it can no longer be executed, do the following:
-
From the Mobile Devices page, click "Administration".
-
Choose "Command Management".
-
Select the command that you want to enable or disable.
-
Select either "Yes" for enable or "No" for disable on the Enabled pull-down.
-
Click "Apply".
7.5.6 Viewing the Mobile Device Command History
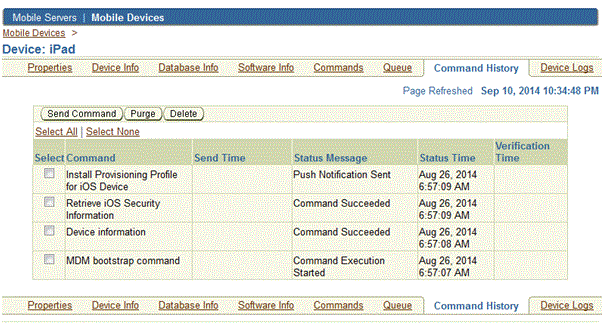
To view the Device Command History, click the Command History link from the single mobile device screen. The Command History page lists a history of commands that were implemented for the chosen device. You can delete a single historical message by clicking the select box next to the message and clicking "Delete". To delete all messages, click "Purge".
7.6 Managing Device Software Updates
This section describes how to enable and initiate software updates and patches for your devices.
-
Section 7.6.1, "Configuring the Device to Receive Required Software Updates"
-
Section 7.6.2, "Configuring Application Software for Automatic Update"
-
Section 7.6.3, "Initiate Updates of Oracle Database Mobile Server Software from the Client"
7.6.1 Configuring the Device to Receive Required Software Updates
If you configure for automatic software updates, then when a new software update comes available—either for the mobile client software or for any applications installed on the client—the mobile device will receive these updates. However, if you want a device to stay with the level of software that is currently installed, disallow automatic updates.
There are two types of software updates that you can control, as detailed in the following sections:
7.6.1.1 Allowing Automatic Software Updates for the Oracle Database Mobile Server Platform
You can configure to automatically allow software updates for the devices through one of two methods:
-
Set
UpgradabletoYes/No—TheUpgradablefield enables you to configure for automatic software updates, so that when a new software update comes available—either for the mobile client software or for any applications installed on the client—then the mobile device will receive these updates. However, if you want a device to stay with the level of software that is currently installed, set Upgradable to No.See Section 7.3.1, "Configuring the Mobile Device through Properties" for details on how to modify the Upgradable field within the Mobile Manager GUI.
Note:
Do not set your device to No until after the first synchronization. The device must be configured as upgradable for the first synchronization.Change the value of
Upgradablein the Mobile Manager GUI to Yes to enable and No to disable, as follows:-
Select the Mobile Devices tab in Mobile Manager.
-
Select the Platform tab to display all platforms.
-
Click the appropriate client "WIN32" platform to display its properties.
-
Change the value of
UpgradabletoYes/No. Click "OK".
-
-
Set the
UPDATE_SOFTWAREattribute in the Resource Manager totrue/false. This has to be set programmatically on the Resource Manager object, as follows:rs.setAttribute (ResourceConst.UPDATE_SOFTWARE, "false");
If you want to enable/disable any application updates, but continue to allow platform updates, then set the UPDATE_SOFTWARE_APPS attribute to true/false.
For example, to set the UPDATE_SOFTWARE_APPS attribute to false, do the following:
rs.setAttribute (ResourceConst.UPDATE_SOFTWARE_APPS, "false");
7.6.1.2 Updating Application Software On Each Client
You can control whether a new version of an application software is downloaded on each client and which users receive the latest update. The default configuration is for all devices attached to a user to receive current updates.
For example, you have two users: John and Tom. You want John's devices to stay at the current version, which is SQLite Win32 version 11.2.0.0.0; however, you want Tom's devices to upgrade to the new version, which is SQLite Win32 version 11.3.0.0.0. Configure each user's devices, as follows:
-
For John, configure the
update.software.appsattribute toMinor. -
For Tom, configure the
update.software.appsattribute toMajor.
Modify the update policy attribute of the user in one of the following ways:
-
On the user page in the Mobile Manager, set the Software Update pulldown to the appropriate update that you want, as follows:
-
All updates—Include major and minor updates.
-
Major—The devices attached to this user receives only major software updates, which is denoted by the version number. Any modification of the version in the first or second position is a major update. For example, any version that changes from 10.0.0 to 10.1.0 or 11.0 is a major update. This is the default.
-
Minor—The devices attached to this user receives only minor software updates. This includes only patch releases. For example, if the client software is version 11.0.0, then modifications only apply to the third position or later constitutes a patch update. This would include the version numbers 11.0.1 or 11.0.0.1. It would not include the 11.1.0 which would be a major update.
-
Disable updates—The devices attached to this user does not receive any software updates.
In addition, you can specify the date that the update occurs.
-
-
Set the
UPDATE_SOFTWARE_APPSpolicy attribute of theUserobject to one of the following values to specify what type of update that the client can receive:-
Major—The devices attached to this user receives only major software updates. For example, if the version shows a major release, then this device receives the update. This is the default. -
Minor—The devices attached to this user receives only minor software updates. For example, if the version shows only a minor patch release, then this device receives the update. However, if the software released is a major version upgrade, then this is not applied. -
False—The devices attached to this user does not receive any software updates.
user.setPolicy (ResourceConst.UPDATE_SOFTWARE_APPS, "Minor");
-
7.6.1.3 Rolling Out Updates With Controlled Upgrade
If you want to roll out software updates in a staggered fashion to a subset of your users at a time, you can use the controlled update. A controlled update enables the following:
-
You can deploy the latest software or patches to a set of users to limit the impact of your IT team handling multiple responses from affected users.
-
You can deploy the latest software or patches to a set of users for testing purposes, while keeping the majority of the users on an older version of the software.
To perform a controlled update, perform the following within Mobile Manager:
-
Create a group with all of the users that you want to receive the update.
-
Edit the group and set the update policy for the group to All, Major, Minor or Disable.
Alternatively, you can use the APIs and perform the following:
-
Create a group with the
MobileResourceManager.createGroupmethod. -
Set the group update policy with the following method, where the value can be ”
major,” ”minor,” or ”false.”group.setPolicy(ResourceConst.UPDATE_SOFTWARE, ”major”);
-
Add all users to be within the group with the
MobileResourceManager.addUsersToGroupmethod.
7.6.2 Configuring Application Software for Automatic Update
In order for the mobile server and the device to know if an application software is to be updated, you need to configure the INF file to detail the current version. This version is checked against what is currently installed on the client, which then enables the mobile server and the device management to decide whether an automatic software update is necessary.
The following sections describe how to configure your application software for automatic update:
-
Section 7.6.2.1, "Configuring Major Software Updates for Download"
-
Section 7.6.2.2, "Configuring Patches or Minor Updates for Download"
7.6.2.1 Configuring Major Software Updates for Download
In order to facilitate a major software update, the corresponding INF file must be modified to reflect the new version number. mobile server relies on the application version number to determine if the client software is out-of-sync.
To update your software, perform the following:
-
In the software
INFfile, the administrator modifies the version number for the application to the current version, as follows.<setup name="Application Name" version="1.2.3">
-
Initiate a synchronization. When the client user synchronizes, mobile server compares the client application software version number against the version number in the
INFfile. If the version numbers are different, mobile server compares the 'Last Modified Time' of all of the client application files against the server application files to determine the changes and then sends the modified files to the client device.Alternatively, the client user can invoke
update.exeto check for the latest version of the software. See Section 7.6.3, "Initiate Updates of Oracle Database Mobile Server Software from the Client" for more details on the update tool.
7.6.2.2 Configuring Patches or Minor Updates for Download
In order to apply specific patches to an existing installation for your application, the application developer creates an INF file with the patch attribute and copies it to the correct platform patch directory, each of which is located in the ORACLE_HOME\Mobile\Server\admin\repository\setup\dmc directory in the mobile server.
The following application INF file defines the patch element as myFirstApp for applying a patch to "Application Name" software:
<setup name="Application Name" version="1.2.3">
     <property>
        ...
        <patch>myFirstApp</patch>
    </property>
    ...
</setup>
The value in the patch element is a user-defined name. This will be the name of the directory into which the updates for the application are copied. In this example, the updates for "Application Name" are copied into the myFirstApp directory.
Note:
Be careful to have a unique patch directory name for each application. If you have the same directory name in thepatch element, then all applications with that patch directory name receive the updates placed there.In order to update a patch with the olobj40.dll, update the patch INF file as follows:
<setup name="Application Name" version="1.2.3" id='1001'>
   <install>
     <action msg_i='$FILE_I$' msg_u='$FILE_U$'>file</action>
       <file>
         <item>
           <src>/common/win32/olobj40.dll</src>
           <des>$APP_DIR$\bin\olobj40.dll</des>
         </item>
       </file>
   </install>
</setup>
Note:
For a full description of INF files and the elements within them, see Section 7.9, "Installation Configuration (INF) File".There are two mandatory attributes in a patch INF file, as follows:
-
The
INFfile contains a version number, which is the same as the application version number. In the above example, the version number (1.2.3) tells DMS that the patch is meant for the application version 1.2.3. -
The
INFfile must have an ID, which is used for determining patch dependencies. This ID can be any number you choose.
If you have dependencies among patches, use the dependency element to indicate these dependencies. For example, the previous patch for olobj40.dll was configured with the ID of 1001. The following INF file configures another patch with ID of 1002. This patch defines a dependency on the patch for olobj40.dll by configuring the ID number of 1001 in the dependency element.
<setup name="SQLite WIN32" version="10.0.0.0.0" id='1002'>
  <property>
    <dependency>1001</dependency>
  </property>
</setup>
Update the patch, as follows:
-
The administrator copies the patch
INFfiles to the patch directory. -
The administrator copies the new application files to the application directory.
-
The client user synchronizes with mobile server. Alternatively, the client user can invoke
update.exeto check for the latest version of the software.
The mobile server checks for patches and sends all new patches to the client device.
7.6.3 Initiate Updates of Oracle Database Mobile Server Software from the Client
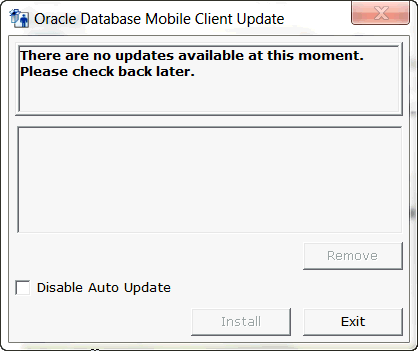
You can initiate a request for software updates from the mobile server by executing the Update tool, as shown in Figure 7-8. To execute, choose "Update" from the Oracle Database Mobile Server Programs list or enter update on the command line.
The mSync tool automatically launches this tool if and only if a software update is available.
Figure 7-8 Updating Mobile Client Software
Description of "Figure 7-8 Updating Mobile Client Software"
When updates are located, you can select items that you do not want to update and click "Remove". When all updates are satisfactory, click "Install". When you are finished, click "Exit".
If you check the Disable Auto Update checkbox, then the next time you execute mSync, this tool is not automatically executed. You can also disable automatic updates from the Mobile Manager. See Section 7.6.1.1, "Allowing Automatic Software Updates for the Oracle Database Mobile Server Platform" for more information.
Note:
In Windows Vista, Windows 7, and Windows 8 if the user has run update.exe with administrator privilege before, the dmagent.exe will also run as admin, then the next update with normal privilege will fail.To run update.exe with normal privilege successfully, the user must stop dmagent before running update.exe.
Alternatively, you can initiate a request for software updates from the Mobile Server with the command line:
update /qs <Mobile Server URL> <user name> <password> [http proxy]
*/qs: checks available software updates from Mobile Server and installs all the updates quietly.
With this option, the software update prompt in Figure 7-8 is skipped.
For example:
* update /qs http://mobile_server_host:7001/mobile JOHN welcome1
7.7 Using the Device Manager Agent (dmagent) on the Client
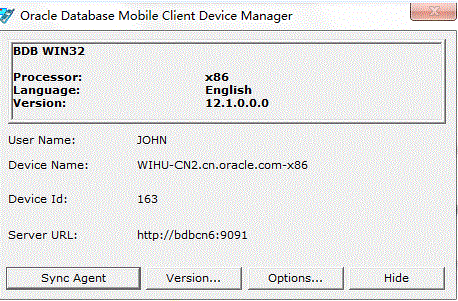
On any client, you can manage the mobile device client software and commands sent to the device from the mobile server, as shown in Figure 7-9.
To bring up the Device Manager Agent GUI, choose "Oracle Database Mobile Server Device Manager"from the Oracle Database Mobile Server Programs list or execute dmagent. The main screen provides information about the following: platform with type of platform, language, and version, the owner/user of this device, the name of the device, and the URL of where the device is installed.
-
Click "Sync Agent" to bring up the Sync Agent UI, which is described in Section 5.5.2, "Start, Stop, or Get Status for Automatic Synchronization".
-
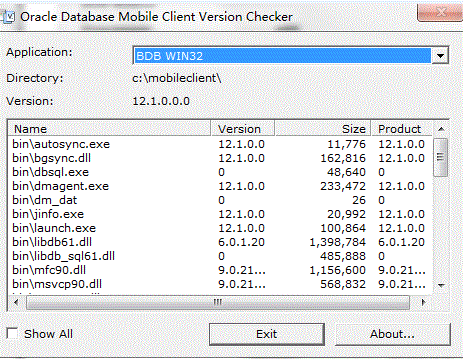
Click "Version" to see the version number of all mobile client software executables and DLLs, as shown in Figure 7-10.
-
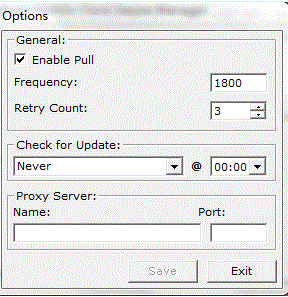
Click "Options", which brings up Figure 7-11, to configure the following:
-
Enable Pull: If the server cannot connect to the client, any commands sent to the client are placed into the Device Manager command queue. These commands are sent to the client when one of two things occurs:
-
The client synchronizes.
-
A "Pull" is initiated from the client. When you check the "Enable Pull" checkbox, the device manager client automatically polls the Device command queue for any commands for this user. The frequency is the number of seconds to wait between each pull.
-
-
Retry Count: If you have created your own Device Command, this count specifies the number of times that the command is executed, if it fails to execute. If it still fails after retrying, the command is deleted. This count also applies to failed synchronization attempts. The commands are retried with the same frequency interval that is set for the Enable Pull command. A command can fail to execute if there is an error within the command or if there is no connection between the client and the server.
-
Check for Update: Select the day and time that you want the device manager client to automatically poll for updates. This also occurs anytime you start a synchronization. So, this is useful if you never synchronize with the mobile server.
This specifies around the time of day to initiate the update tool, which checks for software updates for the client. The actual time depends on when the device manager checks for queued commands. See Section 7.6.3, "Initiate Updates of Oracle Database Mobile Server Software from the Client" for more details on the update tool.
-
Proxy Server: If you have a proxy server between the mobile client and mobile server, enter the address and port here.
Figure 7-11 Device Client Manager Options
Description of "Figure 7-11 Device Client Manager Options"
-
-
Click "Hide" to place the Oracle Database Mobile Server Device Manager in the Windows System Tray.
7.8 Managing the Network Protocol Between the Device and the Mobile Client Software
The Network Management page is where the administrator defines the properties of an installed network provider or register new network providers. A network provider is the protocol that the mobile client uses to communicate between itself and the mobile device. The mobile client software, which is often installed on a Windows system, sends commands to the mobile device over this protocol. Often, you have a device, such as Windows Mobile, that interacts with the mobile client installed on a Windows system.
This network provider definition describes what you have already installed as the protocol between the mobile client and the device. The frequently-used network providers are as follows:
-
HTTP—If you use HTTP, you will provide an HTTP URL in the Address field. You cannot use HTTPS between the Device Manager and the mobile device.
Note:
HTTP may not work if the device does not have a direct IP conection to the mobile server. -
RAPI—Remote API used by the ActiveSync API, which only supports Windows Mobile class devices. These devices connect directly to the computer that is executing the mobile server.
-
RAPI does not work on LINUX or UNIX-based systems.
-
When using RAPI on a Windows machine, install and configure ActiveSync 4.5 or Windows Mobile Device Center 6.1 depending on the Windows Operating System version.
-
Ensure CEUTIL.DLL and RAPI.DLL are in the %WINDIR%\System32 directory.
-
Android client only supports SMS as the network provider.
To modify or create a new network provider, navigate to the Devices page, click "Administration", and click "Network Management". The Network Management page lists existing network providers. Select any of these providers to see their properties, which consists of the following:
-
Java classname: The name of the Java class that implements the Network protocol, such as HTTP, SMS, EMAIL, and so on.Metadata: Any user defined string that is required as input by the Java class during the initialization. See Section 9.8.1.5.3, "Proxy Configuration for the Mobile Server" for an example of how to configure the metadata for the HTTP protocol.
To define a new network protocol, do the following:
-
Create a
NetworkProviderclass using Java. This class must implement theoracle.lite.provider.NetworkProviderinterface. -
Register the network provider through the Mobile Manager on the Network Management page, as follows:
-
Click "Create" on the Network Management page.
-
Input the network provider name, Java class name, and metadata.
-
Click "OK".
-
7.9 Installation Configuration (INF) File
The Installation Configuration file contains all the instructions required to install or de-install client software and its format is based on XML. The INF file contains a set of actions and each action may have multiple items.
When you extend a platform, the INF files that are used for the installation is a concatenation of your platform and every platform that it was extended from—just like how objects extend methods, properties and attributes from each other in an object-oriented language. When you view the configuration information on Mobile Manager, the type field describes all of the platforms from which this INF file extends.
Note:
The server-side INF files that you can modify for the client platform are located in the<MOBILE_HOME>\Mobile\Server\admin\repository\setup\dmc directory.As Table 7-2 describes, the supported Software Management Client (SMC) keywords start with a '$' character and ends with a '$' symbol.
Table 7-2 Software Management Client Keyword Description
| Keyword | Description |
|---|---|
|
|
Application directory of the application |
|
|
Application name |
|
|
Operating system directory |
|
|
Operating system type, which can be one of the following: WIN32, WinCE, LINUX. |
|
|
Language or Location name, which can be US for English or JA for Japanese. |
|
|
Folder name of the Windows desktop. |
|
|
Device processor type, which can be one of the following: X86, ARMV4 or ARMV4I. |
|
|
Host name of the client device. |
|
|
Mobile Server User Name |
|
|
HTTP Proxy Server URL, if any. |
|
|
mobile server URL. |
|
|
Home directory of the login user, which is determined by the value of %UserProfile% and $HOME environment variable on Windows and Linux, respectively. |
The following sections describe the INF file:
7.9.1 Setup Information
All Software Management actions are enclosed within the SETUP XML tag. The SETUP consists of a set of PROPERTIES, INITIALIZATION, INCLUSION of other INF files and INSTALLATION actions. All the four items must be child elements of the SETUP element. A sample INF file is given below.
<setup name="SQLite" version="1.0.0.0">
<property>…. </property>
        <init>…</init>
        <include>…</include>
        <install> …..</install>
</setup>
Setup may have the following attributes specified as XML tag attributes.
-
NAME - Application name (Mandatory).
-
VERSION - Application version number (Mandatory).
-
PACKAGE - Package Type, which can only be
cabto specify a Windows CAB format.
7.9.2 Properties
All of the SETUP properties must be the child element of the PROPERTY tag. Setup may have following properties.
-
STORAGE—Estimated disk (storage) space (in MB) required for an application.<storage>5</storage> -
MEMORY—Minimum amount of system memory in MB. Required.<memory>5</memory> -
USERS—Optional setting that defines under what privileges to install the mobile client. Also, if not configured in the INF file, then a prompt will appear in the installation to ask under what privileges to install the client.The
promptattribute describes if the screen prompt for asking under what privileges to install the mobile client should be displayed. Thepromptattribute defaults to true. Setting thepromptattribute to false eliminates this screen from displaying during client installation.The two options for user install privilege are as follows:
-
Install for all users: This requires an administrator to install as it provides access to the main user on the device. The following is an example of how to set this privilege:
<users prompt='false'>All</users>
-
Install for single user: This requires only the user privilege as only a single user is using the application and device. The following is an example of how to set this privilege:
<users prompt='false'>Current</users>
Note:
If any other word is provided for the<USERS>setting, then it will default toprompt='true'and the user will be prompted for the user privilege.
The presence of the
<users>section will not have any effect if the user is installed on Windows Mobile or Linux installation, which automatically requires the administration privilege. -
-
LOCATION—Location or directory name of the application. You can specify the location for the application in one of the following ways:-
Default directory. If you do not specify anything or specify
<location></location>, then the directory defaults tomobileclient, which is created on the drive with the largest available free space. The user is always prompted to either accept the default or enter the directory that they wish. -
Absolute directory. Define the absolute path where the application is to be installed. The following installs the application in the
c:\abcdirectory:<location>c:\abc</location>
-
Specify a default directory name. The directory will be created on the drive with the largest available free space. In addition, the user is always prompted to be able to alter the directory into which the application is installed. The following example defines the default directory as
abc:<location default='abc'></location>
-
Define a default directory and an absolute directory. You can specify an absolute directory, where the drive may not exist. If the drive does not exist, then a prompt appears with the default directory, where the user can accept the default or provide another. The following defines the absolute directory of
e:\abc, which if the E drive does not exist, then the default directory ofabcis created on the drive with the most available free space:<location default='abc'>e:\abc</location>
-
Specify the platforms that this application is installed upon. You can define, with the type attribute, what platforms this application is to be installed on or not installed on. The platforms that you can specify are WIN32, LINUX, and WinCE.
-
To install only on WIN32, do the following:
<location default='abc' type='WIN32'></location>
-
To install on all platforms, except WIN32, do the following:
<location default='abc' type=!'WIN32'></location>
-
To install on either WIN32 or WinCE, do the following:
<location default='abc' type='WIN32|WINCE'></location>
-
-
-
PROMPT—You can have a window pop-up with a prompt if one of the files that you need to install is currently being used. If the user inputs Yes, then the other instances using that file are terminated. For example, if other executables are using thesqlite3.dllwhen you are installing the client, the prompt "Would you like to terminate the application?" is provided to the user.<prompt><item type='WINCE' file='sqlite3.dll'/>Would you like to terminate the application?</prompt>
The following is an example of the
setupsection in the INF file:<setup name="SQLite" version="1.0.0.0"> <property> <storage>4</storage> <memory>12</memory> <location>d:\tmp\a</location> <users prompt='false'>Current</users> <prompt> <item>Would you like to install App1?</item> <item file='sqlite3.dll'>Would you like to close the applications?></item> </prompt> </property>
7.9.3 Initialization
Initialization includes setting keywords that you can use when installing your application; the Oracle Database Mobile Server installation keywords are described in Table 7-2. Specify a keyword for your application installation in the type parameter and its value in the name parameter. The following defines a WIN32 keyword with a value of $APP_DIR$/bin.
<init> <item type='WIN32' name='DMC_DIR'>$APP_DIR$/bin</item> </init>
7.9.4 Including Other INF Files
The following syntax allows an INF file to include other INF files:
<include>/dmc/common/devmgr.inf</include>
The value of this tag can be an application name or a fully qualified INF file name. If the value is an application name, the DMS includes the INF file of the application.
7.9.5 INSTALL Element
This section lists all the installation steps necessary to perform software installation. Each of the steps (actions) must correspond to another child entry or tag. Each action element has a set of ITEMS and two optional caption strings. The caption string is displayed on the SMC user interface. For example,
<action msg_i='Creating directories' msg_u='Removing
directories'>directory</action>
Where msg_i is the message to be shown during install when an action is executed and msg_u is the message to be shown during uninstall when an action is executed.
When the SMC interprets the above tag, it looks for a child element by the name directory and processes all the child items of this element. At this stage, the Device Manager UI indicates that directories are being created. If you have a child element without a corresponding action element, it will not be executed. The action elements force the invocation of the child elements.
Table 7-3 describes INSTALL actions that are supported by the SMC.
Table 7-3 INSTALL Actions Supported by the SMC
| Action | Description |
|---|---|
|
|
Lists all directories to be created. |
|
|
Lists all the files to be copied. |
|
|
Lists all the environment variables to be added to the Operating System. |
|
|
Registry keys and values to be added to the Windows Registry. |
|
|
ODBC driver and DSN to be created. |
|
|
JDK to be installed in the computer. |
|
|
Folder links to be created. For example, desktop, menu, and so on. |
|
|
INI (configuration files) to be updated. |
|
|
DLLs to be registered with Windows. |
|
|
Executable files to be launched during the installation process. |
|
|
Installation completion messages. |
7.9.5.1 DIRECTORY Section
The directory element contains names of all the directories to be created during the installation process. Entries in this section are fully qualified directory names. For example,
<directory>
    <item>$APP_DIR$\sqlite_db</item>
    <item>$APP_DIR$\crm</item>
</directory>
The SMC creates sqlite_db and CRM directories in the ROOT of the application directory.
7.9.5.2 FILE Section
The file element lists all the files to be copied during the software installation process. Each item contains a target file name and source file name. The source file name must be unique. We do not support copying the same source file to multiple destination files.
<file>
   <item>
        <src> win32/crm/crm.dll </src>
        <des>$APP_DIR$\crm\crm.dll </des>
   </item>
</file>
If you want to copy a source file multiple times, you cannot just define the source file and then configure for it to be copied to multiple destinations. Instead, you must manually copy the source file to another filename and then configure it as follows:
<file>
  <item>
        <src> win32/crm/crm.dll </src>
        <des>$APP_DIR$\crm\crm1.dll </des>
   </item>
   <item>
        <src> win32/crm/crm2.dll </src>
        <des>$APP_DIR$\crm\crm2.dll </des>
   </item>
</file>
Where crm.dll and crm2.dll are the same source file.
The file element also supports inflation of JAR and ZIP files. To inflate a file, use the inflate='true' attribute along with the item tag. In the following example, the inflate tag copies the client.jar. Once copied, the abc.jar file is inflated into the $APP_DIR$/bin directory.
<file>
    <item inflate='true'>
        <src>/common/win32/client.jar</src>
        <des>$APP_DIR$\bin\abc.jar</des>
    </item>
</file>
7.9.5.3 ENV Section
The env element contains all environment variables to be added to a Windows NT registry. This modifies only the User environment in Windows NT systems.
<env>
   <item name='PATH'>$APP_DIR$\MYAPP</item>
</env >
The above example appends the application_root\myapp directory to the PATH environment variable.
7.9.5.4 REGISTRY Section
The registry element modifies or removes Windows Registry values. All the entries in this section must be a fully qualified registry key name. Sub key names and values must be specified as a sub section. For example,
<registry>
  <item>
     <key>HKEY_CURRENT_USER\Software\Oracle\Test</key>
     <item name="Count" type="DWORD">400</item>
     <item name="Test" type="STRING">ABCDE</item>
  </item>
</registry>
The SMC adds the Windows Registry key named Test in the directory named HKEY_CURRENT_USER\Software\Oracle and creates a String value named Test and a DWORD value named Count inside the key. If the same script is used in UNINSTALL mode, the SMC removes the key from the Registry.
7.9.5.5 ODBC Section
This section creates/registers the ODBC driver and DSNs for the mobile client device.
The following example registers and ODBC driver for the Berkeley DB Mobile Client:
<odbc>
 <item name="driver:BDB ODBC Driver" dll='$APP_DIR$\bin\sqlite3odbc.dll'>
   <version>00.86</version>
   <admin>$APP_DIR$\bin\sqlite3odbc.dll</admin>
  </item>
  <item name="dsn:MY_APP" driver='BDB ODBC Driver'
          dll='$APP_DIR$\bin\sqlite3odbc.dll'>
   <Data_Directory>$APP_DIR$\..\bdb\data\$USER_NAME$\my_app.db</Data_Directory>
  </item>
</odbc>
The following example registers and ODBC driver for the SQLite Mobile Client:
<odbc>
 <item name="driver:SQLite ODBC Driver" dll='$APP_DIR$\bin\sqlite3odbc.dll'>
   <version>00.86</version>
   <admin>$APP_DIR$\bin\sqlite3odbc.dll</admin>
  </item>
  <item name="dsn:MY_APP" driver='SQLite ODBC Driver'
          dll='$APP_DIR$\bin\sqlite3odbc.dll'>
   <Data_Directory>$APP_DIR$\..\sqlite\sqlite_db\$USER_NAME$\my_app.db
   </Data_Directory>
  </item>
</odbc>
7.9.5.6 LINK Section
The LINK element creates a symbolic link on the client system, such as a UNIX soft link or a Windows program link (or Program menu item). Each entry must have a name, a program file name and a folder name, which describe where you want to put the symbolic link and the file path.
The following example creates a symbolic link of libdb_sql.so on a UNIX platform in $APP_DIR/bin directory, which points to $APP_DIR$/bin/libdb_sql61.so.
<link>
   <item name='libdb_sql.so'>
     <folder>$ADD_DIR/bin</folder>
     <file>$APP_DIR$/bin/libdb_sql61.so/file>
   </item>
</link>
For Windows platforms, you can also optionally set the current working directory with the <directory> tag and the default arguments can be set using the <arg> tag. The following example creates a Windows program link to My application.lnk, where the .lnk is automatically appended, in the Startup folder for the MyApp.exe file, which is located in the $APP_DIR\bin directory.
<link>
   <item name='My application'>
       <folder>Startup</folder>
       <file>$APP_DIR$\my_dir\MyApp.exe</file>
       <directory>$APP_DIR\bin</directory>
   </item>
</link>
7.9.5.7 INI Section
The INI section creates entries in the INI (configuration) files. Each item must have an INI file name and a set of values to be added to a section. For example, the following adds the RESUME parameter and modifies the DATA_DIRECTORY parameter in the mobile client OSE.INI file:
<ini>
   <item name="OSE.INI" section="OSE">
       <item name="RESUME">YES</item>
   </item>
   <item name='OSE.INI' section='SQLITE'>
       <item name="DATA_DIRECTORY">$APP_DIR$\sqlite</item>
   </item>
</ini>
If you want to replace an existing item in the INI file, just provide the name and value, such as follows:
<item name="DATA_DIRECTORY">c:\mobileclient</item>
The replace attribute defaults to true; thus DataDirectory is modified—whether it already exists or not in the INI file—to be c:\mobileclient. However, if you do not want to overwrite any existing value, but want only to add DataDirectory if it does not exist, then set the replace attribute to false. The following example only adds DataDirectory with c:\mobileclient if DataDirectory is not currently configured in the INI file. If it is configured, the value is not replaced.
<item name="DATA_DIRECTORY' replace="false">c:\mobileclient</item>
The default value for the replace attribute is true; thus, if you want to replace the value, then set the replace attribute to false.
7.9.5.8 EXECUTE Section
The EXECUTE element lists all the programs to be executed during the installation process. Each item must have a program name, wait period, and program arguments. The wait value defines how long the installer waits until it moves on to the next action. The wait value can be either an event name, multiple event names, or time specified in seconds. If the value is seconds, then the installer waits that many seconds and then moves on to the next action. However, if the wait value is an event names, then the installer waits for the executable (in this case, the MyApp.exe) to post that event, before the installer moves on to the next action. For example,
<execute>
  <item>
     <file>$APP_DIR$\my_dir\MyApp.exe</file>
     <args>-h</args>
     <wait>MySetupExit/MySetupStop</wait>
  </item>
</execute>
7.9.5.9 REGISTER Section
The REGISTER element lists all DLLs to be registered with the Windows Operating System. For example,
<register >
   <item>$APP_DIR$\my_dir\MyApp.dll</item>
</register>
7.9.5.10 FINISH Section
The FINISH element controls what can happen during the last stage of processing an INF file. It controls whether or not to restart the computer after the client install, whether or not to show a completion message in the UI, or whether or not to open a specific URL in a browser.
The FINISH section must be added to the main platform .inf file, located in the MOBILE_HOME\mobile\server\admin\repository\setup\dmc\ directory. The FINISH element contains two parameters, namely, "restart" and "show". By default, "restart"='false' and "show"=false'. These can be set to true or false depending on what behavior is desired. The item contains the URL to open in a browser.
The following is a complete example of MOBILE_HOME\mobile\server\admin\repository\setup\dmc\bdb_win32.inf with the FINISH section added.
BDB Win32 client will show the installation completion message 'Completed software installation' in UI and open http://localhost:80/mobile in default browser but will not restart the computer.
For win32 client, the browser used is defined by the windows system.
For linux client, the browser used is /usr/bin/firefox. If firefox is not installed, then you need to install it.
For Windows Mobile client, opening a specific URL is not supported.
<setup name="BDB WIN32" version="12.1.0.0.0"> <property> <storage>25</storage> <memory>20</memory> <location/> <prompt/> <patch>patches\bdb\win32</patch> </property> . <include>common/bdb_win32.inf</include> <install> <action msg_i='$FINISH_I$' msg_u='$FINISH_U$'>finish</action> <finish restart='false' show='true'> <item>http://localhost:80/mobile</item> </finish> </install> </setup> .
FINISH element is supported for Windows Mobile, Win32 and Linux mobile client, but is not supported for Android mobile client.
7.10 Defining Device Manager Commands With the Device Manager OTL Tag Language
You can send a command from the mobile server to any device. To create these commands, use the Device Manager Tag Language, which is described in the following sections:
-
Section 7.10.2, "Operators That You Can Use With the Device Manager Tag Language"
-
Section 7.10.3, "Syntax for the Device Manager Tag Language"
-
Section 7.10.10, "Sample Device Manager Commands Using the Tag Language"
7.10.1 Device Manager Tag Language Data Types
The allowed data types for the device manager are as follows:
7.10.1.1 Character
The Character object represents a UNICODE character. It is a primitive data type with no public methods. However, this data type supports implicit conversion methods, such as toString().
7.10.1.2 Number
The Number data type represents either an integer, a double (float), or a large number.
7.10.1.3 Integer
The Integer object represents a four byte signed value. It is a primitive data type with no public methods.
7.10.1.4 Long
The Long object represents an eight byte signed value. It is a primitive data type with no public methods.
7.10.1.5 Double
The Double object represents a signed double (float) value. It is a primitive data type with no public methods.
7.10.1.6 Boolean
The Boolean object has only two possible values of true or false. It is a primitive data type with no public methods.
7.10.1.7 String
The String object represents a series of NULL terminated characters. The String data type represents all of the literal strings in OTL. They are immutable and has the following public methods:
Returns the number of characters in the string.
SubString (Integer start, Integer end)
Creates a sub-string from a String object. Provide the start and the end of the index and it returns the sub-string—beginning at the start value and stopping at the end value.
Trim a string to remove white spaces from both ends of the string.
IndexOf (Character ch) or IndexOf (String str)
Find the index of a character or a substring within the string. Provide the character or substring inside the string to search for and the index of the first occurrence of the character or substring is returned.
LastIndexOf (Character ch) or LastIndexOf (String str)
Find the index of the last occurrence of a character or a substring within the string. Provide the character or substring inside the string to search for and the index of the last occurrence of the character or substring is returned.
Compares two strings, without comparing the case of the characters within the string. On one string, execute this method and provide the string to compare it to within the input parameter. True or false is returned.
Check if the string starts with the provided sub-string. True or false is returned.
Check if the string ends with the provided sub-string. True or false is returned.
Parse the string and create a number. This method succeeds only if the string represents a valid number. A number object is either an Integer, Double, or Long. For example, if the content of the String is '12', then this method returns an Integer of 12.
Replace (String in, String repl)
Replace a substring with another, as follows:
<c:set var='str' value='${str.Replace ("123,"345")}'/>
Converts characters in the string to upper case.
Converts characters in the string to lower case.
Tokenize the string into sub-strings, each separated by a character separator. The input parameter is the character that is to be used as the character separator. The output is an Enumeration object. For example, the following OTL script separates numbers by separating a string everytime it encounters a semi-colon:
<c:set var="str" value="1;2;3;4"/>
<c:foreach var="tok" items="${str.Tokenize (';')}">
 Token = <c:out value="${tok}"/>
</c:foreach>
7.10.1.8 Array
The OTL Array object can hold a set of other objects. An array can hold dissimilar objects and can grow automatically as more objects are added. All of the array objects have a global scope.
Sort the content of the array using a Quick Sort algorithm. The array must be single dimensional. Returns the Sort order.
Returns the size of the array.
Removes all of the NULL objects from the array.
Copy (Integer from, Integer count)
Copy a number of elements within the array to another array. Give the place in the index to start the copy in the from parameter and the number of elements to copy in the count parameter. An array containing these copied elements is returned.
Insert (Integer index, Object o)
Insert the element provided in Object o into the spot designated by the index parameter.
Remove the element in the array at the location of the index parameter.
7.10.1.9 Date Methods
Use System.Date to create a Date object, which contains the date and time. The following are other methods that pertain to dates.
Retrieve the year out of the Date object.
Retrieve the month represented by an integer from 1 to 12 out of the Date object.
Retrieve the day of the week where Sunday is 0 to Saturday, which is 6, out of the Date object.
Format the date as described by the format string, which can be either dd/mm/yyyy or mm/dd/yyyy.
Check if the year of the date is a leap year or not. Returns true if it is a leap year; false if not.
7.10.1.10 Time Methods
A Time object represents Time value. A Date object always contains a Time object. You can also create a Time object using the System.Time function. In addition, the following methods pertain to time:
Retrieve the hour out of the Time object.
Retrieve the minute out of the Time object.
Retrieve the second out of the Time object.
Format the Time object using the provided format string. The format string should either be hh:mm:ss or hh:mm.
Convert the Time object to a 12 hour format instead of a 24 hour format.
7.10.1.11 Enumeration
Contains a list of objects. Some of the object types that can be contained in the Enumeration object is a SQL result set, a String Tokenizer, or Request Parameter names.
Counts the number of elements in the Enumeration object. Returns the number of elements.
Accesses the next element in the Enumeration object.
7.10.1.12 File
An object of this type can be used to access contents of a file in the file system. You must use the OpenFile function to open an existing file (a System function). OTL does not allow creation of new files or modification of existing files.
True is returned if the file exists in the file system.
Open the file for reading. Throws an exception if the file does not exist.
Returns a string from the open file. It reads a line from the file that is terminated by a \r\n.
7.10.2 Operators That You Can Use With the Device Manager Tag Language
You can use operators for calculations on certain objects, as
Table 7-4 Device Manager Tag Language Operators
| Operator | Description |
|---|---|
|
|
Add numbers within Integer, Long, or Double objects. If applied to a String, the strings are concatenated. |
|
|
Subtract numbers contained in Integer, Long, or Double objects. Subtract dates or time. |
|
|
Multiply numbers contained in Integer, Long, or Double objects. |
|
|
Divide numbers contained in Integer, Long, Double, or Character objects. |
|
|
A mod operator applied against Integer, Long, Double, or Character objects. |
7.10.3 Syntax for the Device Manager Tag Language
OTL supports all regular scripting language syntax rules, such as Assignment, Conditional Constructs, and Sub Routines.
7.10.3.1 Initialization Statements
You can define primitive data types or arrays using the following:
-
Defining primitive data types: Use the
SETsyntax to define a new variable in OTL.SETcan also be used as an Assignment statement.<c:set var="a" value="1"/> <c:set var="b" value="String variable"/> <c:set var="c" value="${a}"/> -
Defining an array: Use the
SETsyntax to define the array, which can hold any type of object, including mixed types.<c:set var="arr1" value="${{"aa", "bb", "cc"}}"/> <c:set var="arr2" index="0" value="10"/> <c:set var="arr3" value="${{}}"/>The first array,
arr1, is initialized with the values provided. The second array,arr2, is initialized with the number 10 at index 0. The third array,arr3, creates an empty array. When values are assigned to an existing array, the array is expanded, as necessary.The following example expands the array,
arr1, to size 11. All of the values from index 3 to 9 is set to NULL.<c:set var="arr1" index="10" value="dd"/>
If there already was an object at location 10, then the object is replaced with the new object, "
dd". To insert a new object at index 10 and keep existing data, use theInsertmethod, as follows:<c:set value="${arr1.insert(10, "dd")}"/>
7.10.3.2 Assignment Statements
SET and SQL are two distinct assignment syntax statements.
-
SETsupports normal operations, such as arithmetic operations. Normal arithmetic operations can be used on most of the primitive data types, as well as other objects. OTL converts data types appropriately when arithmetic operations are applied to objects. -
SQLexecutes SQL statements on a database connection, which results in aSQLRESULTSETobject.
<c:set var="a" value="1"/>
<c:set var="a" value="${a + 2}"/>
<c:set var="b" value="${"1" + 2}"/>
<c:set var="dt" value="${System.Date ("01-01-2004")}"/>
<c:set var="dt" value="${dt + 1}"/>
In this example, a is first assigned the value of 1. Then, two is added to a, which brings the value to three. The value of b is initialized to 12 and dt is initialized to the date of Jan. 1, 2004. Lastly, a 1 is added to dt, bringing the date value to 01-02-2004.
7.10.4 Conditional Statements
OTL supports the following four types of conditional statements:
-
If-Else
-
While
-
Foreach
-
Choose
Each statement must end with the appropriate end tags. Conditional operators, such as &&, ||, ==, >, >=, <, <=, and != are supported by OTL. However, implicit boolean conditions are not allowed, such as if (value).
7.10.4.1 If-Else Conditional Statement
The if-else conditional statement enables you to execute a block of statements depending upon a condition. ELSEIF statements are not supported.
<c:if test="${a == 1 && b == 2}">
 ...
<c:else/>
 ...
</c:if>
7.10.4.2 While Conditional Statement
The while statement enables you to execute a block of statements repeatedly until the condition check fails.
<c:while test="${a == 1}">
 ...
</c:while>
7.10.4.3 Foreach Conditional Statement
The foreach conditional statement enables to you enumerate built-in enumeration objects, such as SQL Result Set and Vectors.
<c:foreach var="row" items="${rs}">
 <c:out value="${row[0]}"/>
</c:foreach>

Also, this statement is used to execute a block of statements repeatedly by stepping through a STEP value.

<c:set var=”count” value=”100”/><c:foreach var="row" begin="1" end="${count}" step="3">   <c:out value=”${row}”/></c:foreach>
7.10.4.4 Break Statement
Break from a loop with the break statement.
<c:foreach var="row" items="${rs}">
 <c:if test="${row[0] == "1"}">
   <c:break/>
   </c:if>
</c:foreach>
7.10.4.5 Choose Statement
The choose statement supports a mutually exclusive conditional execution, where only one of a number of possible actions is executed. The following example executes one of the when blocks depending on value:
<c:choose>
  <c:when test="${value < 20}">
    <c:out value="Greater than 20"/>
  </c:when>

  <c:when test="${value == 20}">
    <c:out value="Equal to 20"/>
  </c:when>

  <c:otherwise>
    <c:out value="Less than 20"/>
  </c:otherwise>
</c:choose>
7.10.5 Define Custom Functions
You can define custom functions. These functions have a global scope from the point of definition, which means that they can access all global variables within the same OTL page. All variables defined within a function have local scope, except for the Array data type.
In the following example, the par1, par2, par3, and local variables have local scope. Any modifications to these variables are not reflected in other parts of the script. If you want to return more than one object from a function, use the System.SetAttribute and System.GetAttribute methods.
<c:func var="PrintData" params="par1, par2, par3">
  <c:out value="${par1}"/>
  <c:set var="local" value="${par1}"/>
  <c:return value="${par2 + par1}"/>
</c:func>

<c:set var="a" value="${PrintData ("Function Call", 1, 2)}"/>
<c:out value="${a}"/>
7.10.6 Manage the Database Connection
You can use database to specify the database connection information used to establish a connection for the application or to disconnect from the database. Only one connection for each application is allowed in the OTL engine.
7.10.7 Global Classes
The device manager OTL engine contains two predefined global classes, which are available to any script that access operating system and device manager information.
-
Section 7.10.7.1, "Methods of the System Class": Use to access operating system information.
-
Section 7.10.7.2, "Methods of the DeviceManager Class": Use to access device manager information.
7.10.7.1 Methods of the System Class
You can use the following system functions in your device manager command:
-
Section 7.10.7.1.1, "Retrieve HTTP Request Parameters and Session Values"
-
Section 7.10.7.1.4, "Get, Set, or Remove Session Attributes"
7.10.7.1.1 Retrieve HTTP Request Parameters and Session Values
You can retrieve the existing HTTP request parameters and HTTP Session values, as follows:
Retrieve HTTP Request Parameters
You can retrieve all of the HTTP request parameters, such as the URL and Form parameters. To retrieve a specific parameter value, prefix the parameter name with a colon—such as :param_name—or use the GetParameterValue function. All of the parameter values are preprocessed and the URLs are decoded by the tag language for you.
For example, if a URL is c://my_app/index.html?my-Par=abcde, then you can retrieve the parameter value in either of the following ways:
<c:out value="${:my_par} />
or you can use the GetParameterNames function to retrieve all of the input parameters and then use GetParameterValue function to retrieve the value of each individual parameter, as follows:
<c:set var="rs" value="${System.GetParameterNames()}" />
<c:foreach var="r" items="${rs}">
 <BR>Parameter Name = <c:out value="${r} />
 Parameter Value = <c:out value="$System.GetParmaeterValue (r)}" />
</c:foreach>
For more information on GetParameterNames and GetParameterValue, see Section 7.10.7.1.5, "Retrieving Parameter Name or Value".
Retrieve HTTP Session Attributes
You can retrieve and store session attributes by prefixing the parameter name with a colon (:name) or through the Session get and set functions.
<c:set var="dummy" value="${System.SetAttribute ("NAME", "VALUE")}"/>
<c:set var="val1 value="${System.GetAttribute ("NAME")}"/>
<c:set var="val2 value="$(:NAME}"/>
As you can see, val1 demonstrates how to retrieve the value using the GetAttribute function and val2 demonstrates how to retrieve the value using :NAME. Substitute the actual HTTP session parameter name for NAME.
For more information on get and set attribute functions, see Section 7.10.7.1.4, "Get, Set, or Remove Session Attributes".
7.10.7.1.2 Create a Date Object
Create a Date object with the current time using System.Date(). Create a Date object with a predefined date value using System.Date(String date), where date is a date string.
7.10.7.1.3 Create a Time Object
Create a Time object with the current time using System.Time(). Create a Time object with a predefined time value using System.Time(String time), where time is a time string.
7.10.7.1.4 Get, Set, or Remove Session Attributes
You can get, set, or remove Session attributes. To set an attribute in the application session, use System.SetAttribute (String name, Object value). Each attribute has a unique name and value. To get the attribute value, use System.GetAttribute (String name). To remove the attribute, use System.RemoveAttribute (String name).
7.10.7.1.5 Retrieving Parameter Name or Value
You can retrieve all of the parameters that are provided through the GetParameterNames method, which returns all parameters in an Enumeration object. Given a parameter name, you can retrieve the value through the System.GetParameterValue(String name) method.
Retrieve all parameters into the params variable, as follows:
<c:set var="params" value="${System.GetParameterNames()}" />
Then, once you have retrieved the parameters, you can parse through them using a for loop, as follows:
<c:foreach var="parm" items="${params}">
 <BR>Parameter Name = <c:out value="${parm} />
 Parameter Value = <c:out value="$System.GetParameterValue (parm)}" />
</c:foreach>
Each parameter is read into the parm variable and the name is retrieved using value="${parm}. The value is retrieved with the System.GetParameterValue method.
7.10.7.1.6 Retrieving the Request URL
Use the System.GetURL() method for retrieving the request URL.
7.10.7.1.7 Retrieving the Last Error Message
Use the System.GetError method for retrieving the last error message. If any of the command statements resulted in an error, such as a database error while executing a SQL statement, retrieve the error using this method.
7.10.7.1.8 Retrieving System Memory Information
Use GetMemoryInfo method to retrieve the device memory information. The following parameters are supported by this function:
-
0 - Retrieve free memory (virtual)
-
1 - Retrieve total memory (virtual)
-
2 - Retrieve free memory (physical)
-
3 - Retrieve total memory (physical)
System.GetMemoryInfo (Integer type)—Given a value between 0 and 3, returns a Long value containing the requested memory information.
7.10.7.1.9 Retrieving Storage Information
Use System.GetStorageInfo to retrieve device storage information. The return value sent back is in KB.
-
0 - Retrieve free storage
-
1 - Retrieve total storage
The second parameter must be a drive name or a directory name. If the function is invoked without parameters, then the function retrieves the free storage space in the root directory.
System.GetStorageInfo(Integer type, String drive)—returns a Long value containing storage information.
7.10.7.1.10 URL Encoding a String
Encodes the provided string.
System.URLEncode (String value)
Returns the given string as a URL encoded string.
7.10.7.1.11 Opening a File
Use System.OpenFile (String name) to open the file provided in the method parameter. Returns the File object.
7.10.7.1.12 Synchronizing Databases
Use the System.CreateSyncClient method to create a Synchronization client object. Call the Synchronization.Synchronize method to synchronize. Retrieve any error messages using the System.GetError method.
<c:set var="sync " value="${System.CreateSyncClient()}"/>
<c:set value="${sync.SetUserName ("S11U1")}"/>
<c:set value="${sync.SetPassword ("manager")}"/>
<c:set value="${sync.SetServerURL ("http://localhost")}"/>
<c:set value="${sync.SetProxyInfo ("www-proxy:80")}"/>
<c:set var='ret' value="${sync.Synchronize()}"/>
<c:if test="${ret != 0}">
   <BR>Synchronization error = <c:out value="${System.GetError()}"/>
</c:if>
7.10.7.2 Methods of the DeviceManager Class
The device manager methods are accessed using DeviceManager.FunctionName syntax. These functions can only be used by trusted OTL scripts.
-
DeviceManager.SetRegistry (String key, String name, String value)
-
DeviceManager.LogMessage (String handler, String name, String message)
DeviceManager.UploadFile (File file, String URL)
Use UploadFile method to upload a file to the mobile server, which contains the device manager server. In order to use this method, you must first successfully use System.OpenFile on the file in question.
Given a File object and a URL, returns true if the upload is successful.
DeviceManager.GetServerURL ( )
Returns the URL of the mobile server.
<c:set var='url' value='${DeviceManager.GetServerURL()}'/>
DeviceManager.GetBinaryDir ( )
Returns the full path of the binary directory of mobile client.
<c:set var='dir' value='${DeviceManager.GetBinaryDir()}'/>
Returns the Oracle Database Mobile Server user name
<c:set var='user' value='${DeviceManager.GetUserName()}'/>
DeviceManager.CreateRequest (String cmd)
Create a Device Manager request (or command) and notify Device Manager Agent to process it. Command string must have corresponding OTL script file in the client device.
The following example demonstrates notifying the DM Agent to process an OTL script of the name: sync.otl.
<c:set value='${DeviceManager.CreateCommand ("sync")}'/>
DeviceManager.GetRegistry (String key, String name)
Retrieve a value from the configuration file (OSE.INI). All the values are retrieved as String. The following example retrieves the value for DATA_DIRECTORY configured in the OSE.INI file.
<c:set var='val' value='${DeviceManager.GetRegistry ("SQLITE", "DATA_DIRECTORY")}'/>
DeviceManager.SetRegistry (String key, String name, String value)
Set a new configuration value in the configuration file (OSE.INI). The following example sets a new value for RESUME.
<c:set value='${DeviceManager.SetRegistry ("OSE", "RESUME", "YES")}'/>
DeviceManager.LogMessage (String handler, String name, String message)
Log a message in the Device Manager logging system. The Device Manager client uploads all logged messages to the mobile server.
<c:set value='${DeviceManager.LogMessage (0, "My Log", "Log message..."}'/>
Applications may use this method to send data to the server. In order to accomplish this, you must create a handler on the server to process the client message. Once created, you must register this handler in the mobile server. If your application is written in C/C++, or Visual Basic, you may use corresponding native APIs to log any message. For a C/C++ application, use the following:
dmLogMessage (const TCHAR* handler, const TCHAR* name, const TCHAR* message);
In order to use the above API, you must dynamically load the OMCAPI.DLL library and extract the function pointers. The following sample code demonstrates how to log a message:
typedef void (*dm_Initialize)();
typedef void (*dm_Destroy)();
typedef void (*dm_LogMessage) (LPCTSTR, LPCTSTR, LPCTSTR);
HMODULE hMod = ::LoadLibrary (TEXT ("omcapi.dll"));
if (hMod)
{
  dm_Initialize init =
         (dm_Initialize)::GetProcAddress (hMod, TEXT ("dmInitialize"));
  dm_Destroy    dest = (dm_Destroy)::GetProcAddress (hMod, TEXT ("dmDestroy"));
  dm_LogMessage log  =
         (dm_LogMessage)::GetProcAddress (hMod, TEXT ("dmLogMessage"));
  if (init && dest && log)
  {
    (*init)();
    (*log) (TEXT ("MY_HANDLER"), TEXT ("MY LOG"), TEXT ("My Message"));
    (*dest) ();
   }
   ::FreeLibrary (hMod);
}
Once the message handler is implemented and compiled, copy the JAR file to <ORACLE_HOME>\Mobile\class directory. Then, execute the following SQL script to register your message handler implementation:
sqlplus <mobile server schema>/<password>
insert into dm$all_providers values ('MY_HANDLER', 'MESSAGE', 'MyMessage', NULL);
7.10.8 Importing Another OTL Page
Use the import statement to include a page into the current page. All URL parameters are available to scripts in the imported page, as well as in the current page below the point of inclusion.
<c:import url="url_of_the_include_page"/>
Specify URL parameters using the HTTP format with the ? or the <c:param> tag, as shown below:
<c:import url="URL?abc=def">
  <c:param name="name1" value="value1"/>
  <c:param name="name2"> value2 </c:param>
</c:import>
7.10.9 Error Handling
You can throw and catch exceptions within any OTL script. The only restriction is that you can only have at most one catch block. The throw script terminates the current script processing and jumps to the catch block. If a page contains a single throw tag and no catch tag, then the script stops upon reaching the throw tag.
<c:throw value='1'/>
...
<c:catch var='ex'>
...
</c:catch>
7.10.10 Sample Device Manager Commands Using the Tag Language
Retrieve current date and time:
<c:set var="d" value="${System.Date()}"/>
<c:out value="Date = ${d}"/>
<br><c:out value="Time = ${d.Time()}"/>
Perform Date arithmetic by first retrieving the date, then adding or subtracting 2 days from it. The last two lines changes the date to either be 2 days from now or 2 days ago.
<c:set var="d"  value="${System.Date()}"/>
<c:set var="d2" value="${d + 2}"/>
<c:set var="d3" value="${d - 2}"/>
Date + 2 = <c:out value="${d2}"/>
<br>Date - 2 = <c:out value="${d3}"/>
Formatting date and time by retrieving the time using the Date or Time methods, and then applying a format. For the date, apply either day/month/year or month/day/year with the Format method. For time, you can choose the format of hours:minutes.
<c:set var="d"  value="${System.Date()}"/>
Date (dd/mm/yyyy) = <c:out value="${d.Format ("dd/mm/yyyy")}"/>
Date (mm/dd/yyyy) = <c:out value="${d.Format ("mm/dd/yyyy")}"/>
<c:set var="t" value="${System.Time()}"/>
Time (hh:mm) = <c:out value="${t.Format ('hh:mm')}"/>
You can apply the names of the month or day to a date by using GetMonth and GetDay, as follows:
<c:set var="month" value="${{"Jan", "Feb", "Mar", "Apr", "May", "Jun",
            "Jul", "Aug", "Sep", "Oct", "Nov", "Dec"}}"/>
<c:set var="day" value="${{"Sunday", "Monday", "Tuesday", "Wednessday",
            "Thursday", "Friday", "Saturday"}}"/>
<c:out value="${month[d.GetMonth() - 1]}"/>
<c:out value="${day[d.GetDay()]}"/>
Retrieve the day and add two days to it:
<c:set var="d" value="${d + 2}"/>
Set the date to 02-20-2002.
<c:set var="d" value="${date ("02-20-2002")}"/>
7.11 Using Mobile Manager to Manage iOS Devices
iOS Mobile Device Management (MDM) functionality is supported for iOS 7 devices. To manage an iOS device from mobile manager, the device must first be enrolled. After it is enrolled, mobile manager administrator can view the device information, send commands to the device, and view the command history from history list.This section describes the following:
-
How to enroll iOS device, see, Section 7.11.1, "iOS Device Enrollment"
-
How to view iOS device information on mobile manager, see, Section 7.11.2, "View iOS Device Information"
-
iOS MDM command management, see, Section 7.11.3, "iOS MDM Command Management"
-
iOS device profile management, see, Section 7.11.4, "iOS Profile Management on Mobile Manager"
Note:
Device enrollment is available for all iOS device users but the other functionalities are available only for mobile manager administrators.7.11.1 iOS Device Enrollment
To enroll an iOS device in MDM server, follow the steps below on the iOS device:
-
Go to the setup page:
https://server_ip:server_https_port/mobile/console/setup/setuppage.uix -
Choose Language and Platform for the device type you need to enroll as shown in Figure 7-12. Click "BDB iOS" or "SQLite iOS" to start your enrollment. It will go to iOS MDM enrollment page:
https://server_ip:server_https_port/mobile/console/setup/MdmRegisterLogin.uixSee Figure 7-13.
You can access the iOS MDM enrollment page by clicking "BDB iOS" or "SQLite iOS" on the setup page. You cannot directly access the page.
-
Click "Get CA Certificate" on the iOS MDM enrollment page, to get Certificate Authority (CA) certificate downloaded on the iOS device. The following steps describe the procedure on the device.
-
Click "Install" as shown in Figure 7-14.
-
Click "Install Now" as shown in Figure 7-15.
-
Enter "Passcode" as shown in Figure 7-16.
-
Click "Done" as shown in Figure 7-17. The CA certificate is downloaded and installed successfully.
-
Enter the username and password on iOS MDM enrollment page (after the CA certificate is installed) as show in Figure 7-13 and click "Enroll".
The enrollment process will install all published configuration and provisioning profiles with MDM payload and will also install all applications granted to this user for the given platform. The following steps illustrate this:
-
Click button "Install" as shown in Figure 7-18.
-
Click "Install Now" as shown in Figure 7-19.
-
"Enter Passcode" as shown in Figure 7-20.
-
Click "Install" as shown in Figure 7-21.
-
Click "Done" as shown in Figure 7-22. The configuration profile is installed and the enrollment is done successfully.
After the enrollment is finished on the device, all profiles that are installed during enrollment can be found on the device in iOS settings "General" Profiles as shown in Figure 7-23. The device is listed in Devices page on the mobile manager.
-
-
7.11.2 View iOS Device Information
Once an iOS device is enrolled, see Section 7.11.1, "iOS Device Enrollment", mobile manager administrators can view the device information on mobile manager.
Go to tab "Device Info" for that device as shown in Figure 7-24. To refresh device and security information with update-to-date values, use the "Retrieve Device Information" button.
You can view application information and status on tab "Software Info" as shown in Figure 7-25. To retrieve update-to-date information for all applications on the device, use the "Retrieve Software Information" button.
7.11.3 iOS MDM Command Management
iOS MDM command management is available for mobile manager administrator. For iOS devices, the following command management is supported:
7.11.3.1 All Commands
You can retrieve commands from tab Mobile Devices -> Administration -> Command Management.
7.11.3.2 Send Command from Mobile Manager
The following commands can be sent from mobile manager:
-
Device Information
Retrieve device information from iOS device. Once the command is executed, the device information can be retrieved on the device information page as shown in Figure 7-24.
-
Retrieve iOS Security Information
Retrieve iOS security information. Once the command is executed, the security information can be viewed on the device information page as shown in Figure 7-24.
-
Install Application
Install an application on iOS device. The application must be published correctly to mobile server, its platform must match the device platform and the user must have access to the application.
-
Retrieve iOS Application Status
Retrieve application status for applications which are installed on the device. It can retrieve status on a specific application or retrieve status on all applications. Once the command is executed, the application status can be viewed on software information page as shown in the "Status" column of Figure 7-25.
-
Retrieve Software Information
Retrieve application information for applications which are installed on the device. Once the command is executed, the application status can be viewed on software information page as shown in all other columns of Figure 7-25.
-
Remove iOS Application
Remove an application which is installed on the device.
-
Update iOS Application
Update an application which is installed on the device.
-
Update all iOS Applications
Update all applications which are installed on the device.
-
Install Config Profile for iOS Device
Install a configuration profile on the device. The profile needs to be uploaded in the repository before the command is sent to devices. See Section 7.11.4.1, "Create or Update Profiles," for information on how to create or update profiles.
-
Install Provisioning Profile for iOS device
Install a provisioning profile on the device. The profile needs to be uploaded in the repository before the command is sent to devices. See Section 7.11.4.1, "Create or Update Profiles," for information on how to create or update profiles.
-
Remove Config Profile for iOS Device
Remove a configuration profile from the device.
-
Remove a Provisioning Profile for iOS Device
Remove a provisioning profile from the device.
-
Lock iOS Device
Lock the device. If a message is entered when the command is sent, the message will be displayed on the device when the device is locked. Otherwise, the default message "Device Locked by MDM" will be displayed when the device is locked.
-
Erase iOS Device
-
Clear Passcode for iOS device.
-
Unenroll iOS Device from MDM
Unenorll the device from mobile server. Once the command is executed, the record of this device is deleted from the mobile repository.
Commands listed above can be viewed in the drop down list in tab "Commands". The following are examples for sending MDM commands from the mobile manager.
Example 1: Send "Install Config Profile for iOS Device"
-
Go to the tab "Commands" for the device that will receive the command. Choose "Install Config Profile for iOS Device" as shown in Figure 7-26. Click "Send Now".
-
All available configuration file names in the mobile repository are listed in the drop down list. Choose the one to be installed and click "Next" as shown in Figure 7-27. If no configuration files are available in the repository, refer to Section 7.11.3.1, "All Commands"to upload a new profile.
-
The command and parameter will be displayed for confirmation as shown in Figure 7-28. Click "OK" to send the command. The command is then sent to the device.
Example 2: Send "Retrieve Software Infomation"
-
Go to the tab "Commands" for the device that will receive the command. Choose "Retrieve Software Information" as shown in Figure 7-29. Click "Send Now".
-
The drop down list shows all application names that the users have access to and the application's platform matches the device's platform. If no such application exists in the repository, a warning message will be displayed. Applications must be published using packaging wizard and is assigned to the user.
Choose the application name that you want to retrieve information from the drop down list to retrieve the specific application information. You can also choose "All Applications" to retrieve all applications that are installed on the device as shown in Figure 7-30. Click "Next" to continue.
-
Click "Yes" to send the command as shown in Figure 7-31.
Once the command is executed successfully, updated application information can be retrieved as described in Section 7.11.2, "View iOS Device Information".
7.11.3.3 View Command History
Click tab "Command History". The page lists all commands which have been sent to the device as shown in Figure 7-32.
7.11.3.4 Differences between iOS Device Management and Non-iOS Device Management
See the sections below:
7.11.3.4.1 Device Management on Devices
A device manager agent is not needed for iOS devices. For non-iOS devices, a device manager agent (dmagent) runs on native clients.
7.11.3.4.2 Device Management on Mobile Manager
The following functionalities on mobile manager are not supported for iOS devices:
-
Section 7.1, "Customize the Mobile Client Software Installation for Your Mobile Device"
-
Section 7.2, "Configuring Mobile Clients Before Installation"
-
Section 7.4, "Configuring and Customizing Your Mobile Device Platform"
-
Section 7.5.1.1.1, "Description of Existing Commands".However, the commands described in Section 7.11.3.2, "Send Command from Mobile Manager" are supported for iOS devices.
-
Section 7.6.1.2, "Updating Application Software On Each Client"
-
Section 7.6.2, "Configuring Application Software for Automatic Update"
-
Section 7.6.3, "Initiate Updates of Oracle Database Mobile Server Software from the Client"
-
Section 7.7, "Using the Device Manager Agent (dmagent) on the Client"
-
Section 7.8, "Managing the Network Protocol Between the Device and the Mobile Client Software"
-
Section 7.10, "Defining Device Manager Commands With the Device Manager OTL Tag Language"
-
View device logs in Tab "Device Logs".
7.11.4 iOS Profile Management on Mobile Manager
You can manage iOS profiles in mobile manager by going to tab Mobile Devices -> Administration -> iOS Device Profile Management. iOS profile management includes creating or updating profiles in mobile repository, deleting profiles from mobile repository, and retrieving profile information. The functionalities are supported for both configuration profiles and provisioning profiles.
The configuration profile management page is:
https://server_ip:server_https_port/mobile/console/DMAdmin-Profile.uix
Provisioning profile management page is:
https://server_ip:server_https_port/mobile/console/DMAdmin-ProvisProfile.uix
The following sections describe the iOS profile management functionalities:
7.11.4.1 Create or Update Profiles
To create or update a configuration/provisioning profile, follow the steps below on configuration/provisioning profile management page:
-
Click "Create or Update Profile" on the page as shown in Figure 7-33.
-
Click "Browse" to retrieve a configuration/provisioning profile on the local computer for uploading.
-
Click button "OK" to upload it.
If the configuration profile does not exist in the mobile repository, it creates a new profile in the repository according to the uploaded profile and the new profile is listed in configuration profile page.
If the configuration profile exists in the mobile repository, it displays a warning message "Do you want to overwrite the profile" as shown in Figure 7-34. Click "OK" to overwrite the existing profile in the repository with the uploaded profile. Otherwise, no change is done in the repository.
Mobile manager checks the configuration profile id to decide whether a configuration profile exists in the repository or not while it checks the provisioning profile uuid to decide whether a provisioning profile exists in the repository or not.
The profiles are validated during uploading and invalid profiles are not be allowed to be stored in the repository. Configuration profiles are signed before getting stored in the repository. Provisioning profiles are downloaded from Apple Development Portal and should already be signed by Apple.
7.11.4.2 Delete Profiles
To delete configuration/provisioning profiles from the mobile repository, select the profiles on configuration/provisioning profile management page and click button "Delete". A warning message "Do you want to delete the selected profile(s)" with profile id or profile UUID will be displayed as shown in Figure 7-36. If "Yes" is clicked, the selected profiles will be deleted from the mobile repository. Otherwise, no change is done in the repository.
7.11.4.3 Retrieve Profile Information
To retrieve profile information, go to Configuration/Provisioning Profile Management page, and click the "Profile ID" in the Profile Table as shown in Figure 7-37.
