Importing a Batch of User Accounts
Identity domain administrator can import a batch of users accounts by using a comma-separated values (CSV) file that lists the information required to set up each user account. Make sure the user logins match the Fusion user name.
Task 1: Create a Comma-Separated Values File
The CSV file is a simple text file in a tabular format (rows and columns). The first row in the file, which defines the columns (fields) in your table, must have these exact column headings:
-
First Name
-
Last Name
-
Email
-
User Login
For each user account, you create a new row (line) and enter data into each column (field). Each row equals one record.
To create a CSV file, you can use a standard spreadsheet application, such as Microsoft Excel or Google Spreadsheet, or you can use a text editor, such as Notepad or TextPad. You must be sure to save the file in a valid CSV format.
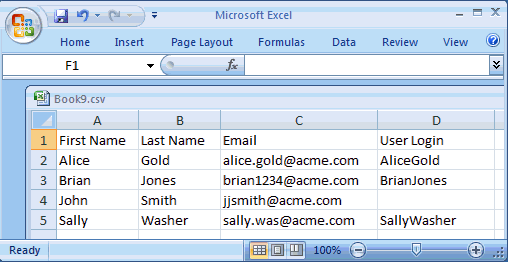
Spreadsheet applications make it easy to create, edit, and save CSV files. You can use standard features to add and delete rows of data, edit individual fields, search for records, or sort the list. The illustration shows an example of user account data defined in a Microsoft Excel file. The layout lets you easily review the data.
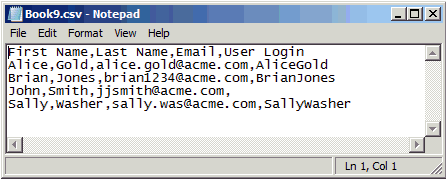
When you save your spreadsheet as type CVS (Comma delimited) (*.csv), a comma separates the values in each row. For example, the illustration shows the data from the Microsoft Excel spreadsheet, saved as a CSV file, and opened in Notepad:
-
Must be ANSI or UTF-8 encoded.
-
Must not be larger than 256 KB (maximum file size).
-
Must use a comma as the delimiter between the values.
-
Must include three columns with these exact headings: First Name, Last Name, and Email.
-
May include an optional fourth column with this exact heading: User Login. The User Login should be the same as the FUSION user name, as it will in some cases affect the data security applied to the user. For example, for My Territories in sales the username is used to enforce data security.
Note:
In the CSV file, the column heading is User Login. However, the value you enter in the User Login column maps to the User Name on the Users page in My Services. This value, also called the user name, is the name the user enters on the Sign In page.
The user name (that is, the value in the User Login column), along with the password and the name of the identity domain, define a user's sign-in credentials.
If you do not include a value in the User Login column, the system makes the user name the same as the email address unless the user name is currently in use or had previously been in use within the current domain. For these cases, the system adds a number to the email address to create a unique value for the user name.
The maximum length of the user name is 80 characters.
Task 2: Import the Comma-Separated Values File
-
Sign in to My Services. Be sure to specify the appropriate identity domain.
-
Click Users.
-
Click the Users tab.
-
Click Import.
-
Enter the name of the CSV file to import. Alternatively, you can click Browse to locate and select the CSV file to use.
-
Click Import. A message confirms that the import is in progress.
The system begins the process of creating the user accounts. The time required to create the user accounts depends on several factors such as system load, import requests in progress, and number of user entries in the CSV file.
When the processing of the CSV file is finished, you receive an email with the following subject line:
User Loading completed
The email provides the following information:
-
The total number of user records processed in the CSV file
-
The number of user records successfully uploaded
-
The number of user records that failed
-
Details about failure and errors, if any
-
Task 3: Review and Fix Any Reported Errors
In the User Loading completed email that you receive from Oracle Transactional Business Intelligence Enterprise, review the list of errors, if any. Some of the reasons the system could not create a user account include:
-
Invalid email format
-
Missing information
-
User account already exists
-
Invalid CSV file
If there are only a few invalid accounts, you may want to create these user accounts manually. See Creating One User Account at a Time for details.
If there are many invalid accounts, you may want to create a new CSV file and import the file again.
Task 4: Assign Roles and Provide Access Details to Users
After the user accounts are created, you must explicitly assign one or more roles to the users. Roles control access to applications, resources, and services. For more information, see .
When you use the Import function in My Services to add user accounts, the system automatically generates a temporary password for each user. After the processing of the CSV file is finished and the user accounts are created, Oracle Transactional Business Intelligence Enterprise automatically sends your users an email with details about the account created for them.
-
The user's sign-in name (also referred to as the user login).
-
A temporary password. Users are forced to change their temporary password when they sign in the first time.
If users forget their password, identity domain administrators can reset it.
-
The name of the identity domain.
-
Provide the URL for the My Services application to the user.
-
Provide the Oracle Transactional Business Intelligence Enterprise URL to the user.

